reset Acura RDX 2016 Owner's Guide
[x] Cancel search | Manufacturer: ACURA, Model Year: 2016, Model line: RDX, Model: Acura RDX 2016Pages: 81, PDF Size: 17.94 MB
Page 4 of 81
| 1
VISUAL INDEX
INDEX
VOICE COMMAND
INDEX
CLIENT
INFORMATION
SPECIFICATIONS
MAINTENANCE
HANDLING THE UNEXPECTED
DRIVING
NAVIGATION
TABLE OF
CONTENTS
VISUAL INDEX
SAFETY
INFORMATION
INSTRUMENT PANEL
VEHICLE
CONTROLS
AUDIO AND
CONNECTIVITY
BLUETOOTH®
HANDSFREELINK®
ACURALINK®
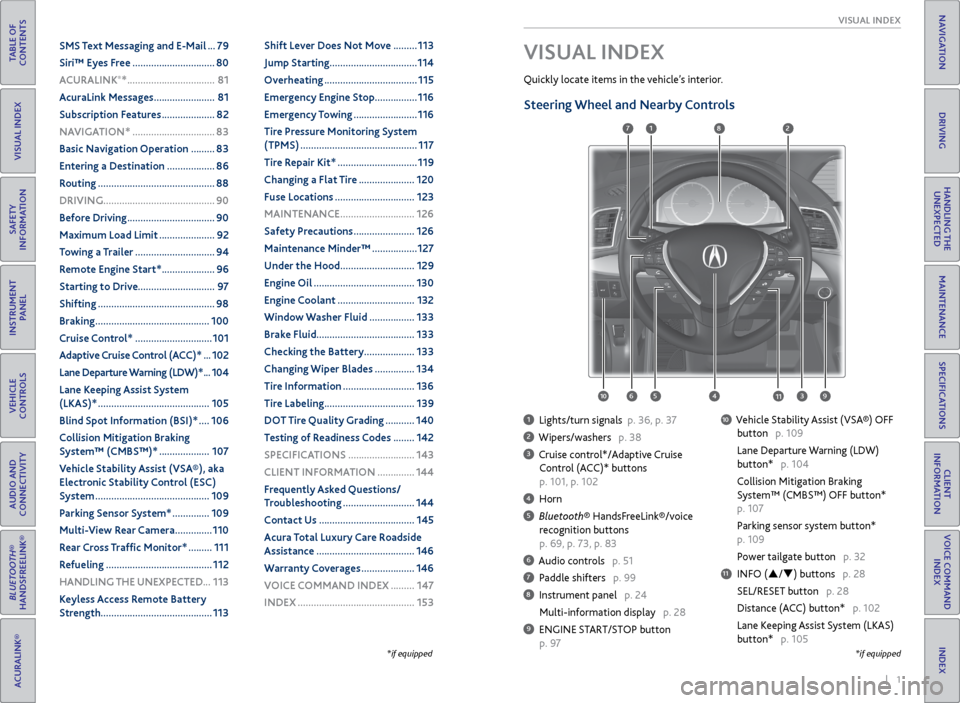
1 Lights/turn signals p. 36, p. 37
2 Wipers/washers p. 38
3 Cruise control*/Adaptive Cruise
Control (ACC)* buttons
p. 101, p. 102
4 Horn
5 Bluetooth® HandsFreeLink®/voice
recognition buttons
p. 69, p. 73, p. 83
6 Audio controls p. 51
7 Paddle shifters p. 99
8 Instrument panel p. 24
Multi-information display p. 28
9 ENGINE START/STOP button
p. 97
10 Vehicle Stability Assist (VSA®) OFF
button p. 109
Lane Departure Warning (LDW)
button* p. 104
Collision Mitigation Braking
System™ (CMBS™) OFF button*
p. 107
Parking sensor system button*
p. 109
Power tailgate button p. 32
11 INFO (p/q) buttons p. 28
SEL/RESET button p. 28
Distance (ACC) button* p. 102
Lane Keeping Assist System (LKAS)
button* p. 105
VISUAL INDEX
Quickly locate items in the vehicle’s interior.
*if equipped
Steering Wheel and Nearby Controls
*if equipped
1
3495
782
11106
SMS Text Messaging and E-Mail ... 79
Siri™ Eyes Free ............................... 80
A CURALINK
®* ................................. 81
AcuraLink Messages ....................... 81
Subscription Features .................... 82
NAVIGATION* ............................... 83
Basic Navigation Operation ......... 83
Entering a Destination .................. 86
Routing ............................................ 88
DRIVING .......................................... 90
Before Driving ................................. 90
Maximum Load Limit ..................... 92
Towing a Trailer .............................. 94
Remote Engine Start* .................... 96
Starting to Drive ............................. 97
Shifting ............................................ 98
Braking ........................................... 100
Cruise Control* ............................. 101
Adaptive Cruise Control (ACC)* ... 102
Lane Departure Warning (LDW)* ... 104
Lane Keeping Assist System
(LKAS)* .......................................... 105
Blind Spot Information (BSI)* .... 106
Collision Mitigation Braking
System™ (CMBS™)* ................... 107
Vehicle Stability Assist (VSA®), aka
Electronic Stability Control (ESC)
System ........................................... 109
Parking Sensor System* .............. 109
Multi-View Rear Camera .............. 110
Rear Cross Traffic Monitor* ......... 111
Refueling ........................................ 112
HANDLING THE UNEXPECTED ...113
Keyless Access Remote Battery
Strength .......................................... 113Shift Lever Does Not Move .........
113
Jump Starting ................................. 114
Overheating ................................... 115
Emergency Engine Stop ................ 116
Emergency Towing ........................ 116
Tire Pressure Monitoring System
(TPMS) ............................................ 117
Tire Repair Kit* .............................. 119
Changing a Flat Tire ..................... 120
Fuse Locations .............................. 123
MAINTENANCE ............................ 126
Safety Precautions ....................... 126
Maintenance Minder™ ................. 127
Under the Hood ............................ 129
Engine Oil ...................................... 130
Engine Coolant ............................. 132
Window Washer Fluid ................. 133
Brake Fluid ..................................... 133
Checking the Battery ................... 133
Changing Wiper Blades ............... 134
Tire Information ........................... 136
Tire Labeling .................................. 139
DOT Tire Quality Grading ........... 140
Testing of Readiness Codes ........ 142
SPECIFICATIONS ......................... 143
CLIENT INFORMATION .............. 144
Frequently Asked Questions/
Troubleshooting ........................... 144
Contact Us .................................... 145
Acura Total Luxury Care Roadside
Assistance ..................................... 146
Warranty Coverages .................... 146
V OICE COMMAND INDEX ......... 147
INDEX ............................................ 153
Page 18 of 81

28 || 29
INSTRUMENT P
ANEL
INSTRUMENT P ANEL
TABLE OF
CONTENTS
INDEX
VISUAL INDEX
VOICE COMMAND INDEX
SAFETY
INFORMATION
CLIENT
INFORMATION
INSTRUMENT PANEL
SPECIFICATIONS
VEHICLE
CONTROLS
MAINTENANCE
AUDIO AND
CONNECTIVITY
HANDLING THE UNEXPECTED
BLUETOOTH®
HANDSFREELINK®
DRIVING
ACURALINK®
NAVIGATION
Multi-Information Display
Consists of several displays that provide you with useful information.
Main Displays
Odometer,
Outside temperature Trip A,
Outside temperature Trip B,
Outside temperature
Lower Displays
Models with black-and-white display
Main Displays
Odometer,
Outside temperature Trip A,
Outside temperature Trip B,
Outside temperature
Lower Displays
Models with color display
Main display
Vehicle settings Average/instant
fuel economy
Tire pressure for each tire Range
Engine oil lifeElapsed time Turn-by-turn directions*Average speed
Compass*
Main display
Vehicle settings Average/instant
fuel economy
Engine oil life Range
Tire pressure for each tire Elapsed time
Average speed
SEL/RESET button: Scroll
through lower displays. Info (p/q) buttons:
Scroll through upper
displays.
Vehicle Settings
Use the MID to customize certain vehicle features when the vehicle is in Park (P).
You can also use the SETTINGS button* (see page 48).
An example of how to change the Trip A reset timing setting is below. Use the
Info and SEL/RESET buttons to make and enter selections.
1. Scroll to the Vehicle Settings menu and select it.
2. Scroll to Meter Setup and select it.
3. Scroll to “Trip A” Reset Timing and select it.
4. Scroll through the options, and select the one you want.
5. Scroll to Exit, and select it to exit the menus.
*if equipped
Page 25 of 81
42 || 43
VEHICLE CONTROLS
VEHICLE CONTROLS
TABLE OF
CONTENTS
INDEX
VISUAL INDEX
VOICE COMMAND INDEX
SAFETY
INFORMATION
CLIENT
INFORMATION
INSTRUMENT PANEL
SPECIFICATIONS
VEHICLE
CONTROLS
MAINTENANCE
AUDIO AND
CONNECTIVITY
HANDLING THE UNEXPECTED
BLUETOOTH®
HANDSFREELINK®
DRIVING
ACURALINK®
NAVIGATION
Failure to reinstall, or correctly reinstall, the head restraints can result in
severe injury during a crash.
Always replace the head restraints before driving.
WARNING
Pull
Lever
Unlock
Lock
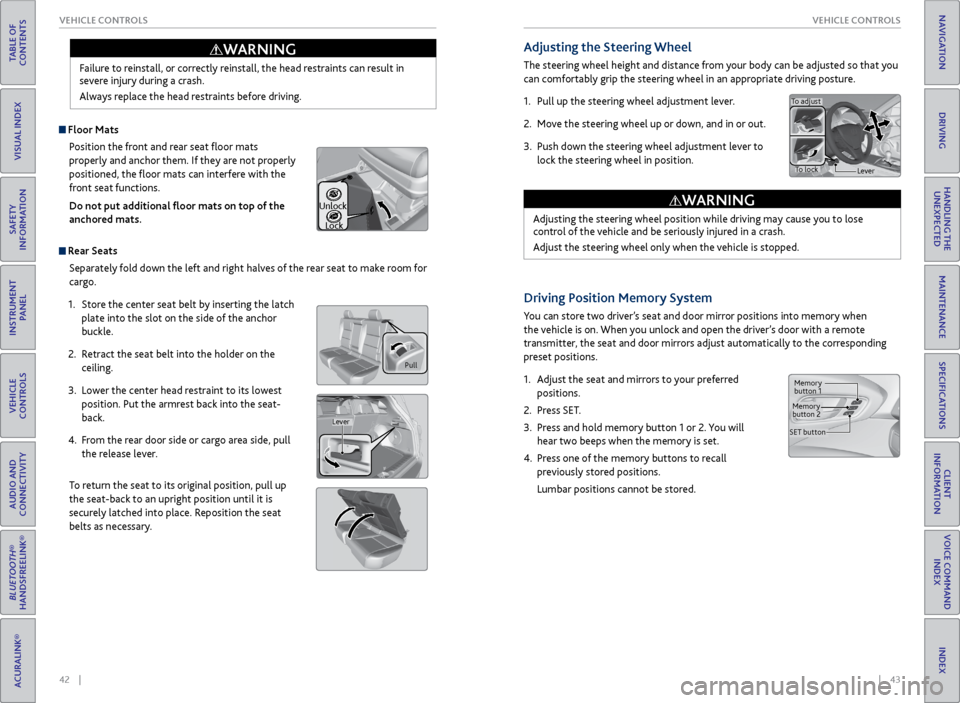
Adjusting the Steering Wheel
The steering wheel height and distance from your body can be adjusted so that you
can comfortably grip the steering wheel in an appropriate driving posture.
1. Pull up the steering wheel adjustment lever.
2. Move the steering wheel up or down, and in or out.
3. Push down the steering wheel adjustment lever to
lock the steering wheel in position.
Adjusting the steering wheel position while driving may cause you to lose
control of the vehicle and be seriously injured in a crash.
Adjust the steering wheel only when the vehicle is stopped.
WARNING
To adjust
To lock Lever
Driving Position Memory System
You can store two driver’s seat and door mirror positions into memory when
the vehicle is on. When you unlock and open the driver’s door with a remote
transmitter, the seat and door mirrors adjust automatically to the corresponding
preset positions.
1. Adjust the seat and mirrors to your preferred
positions.
2. Press SET.
3. Press and hold memory button 1 or 2. You will
hear two beeps when the memory is set.
4. Press one of the memory buttons to recall
previously stored positions.
Lumbar positions cannot be stored.
Memory
button 1
Memory
button 2
SET button
Floor Mats Position the front and rear seat floor mats
properly and anchor them. If they are not properly
positioned, the floor mats can interfere with the
front seat functions.
Do not put additional floor mats on top of the
anchored mats.
Rear Seats
Separately fold down the left and right halves of the rear seat to make room for
cargo.
1. Store the center seat belt by inserting the latch
plate into the slot on the side of the anchor
buckle.
2. Retract the seat belt into the holder on the
ceiling.
3. Lower the center head restraint to its lowest
position. Put the armrest back into the seat-
back.
4. From the rear door side or cargo area side, pull
the release lever.
To return the seat to its original position, pull up
the seat-back to an upright position until it is
securely latched into place. Reposition the seat
belts as necessary.
Page 29 of 81
50 || 51
AUDIO AND CONNECTIVITY
AUDIO AND CONNECTIVITY
TABLE OF
CONTENTS
INDEX
VISUAL INDEX
VOICE COMMAND INDEX
SAFETY
INFORMATION
CLIENT
INFORMATION
INSTRUMENT PANEL
SPECIFICATIONS
VEHICLE
CONTROLS
MAINTENANCE
AUDIO AND
CONNECTIVITY
HANDLING THE UNEXPECTED
BLUETOOTH®
HANDSFREELINK®
DRIVING
ACURALINK®
NAVIGATION
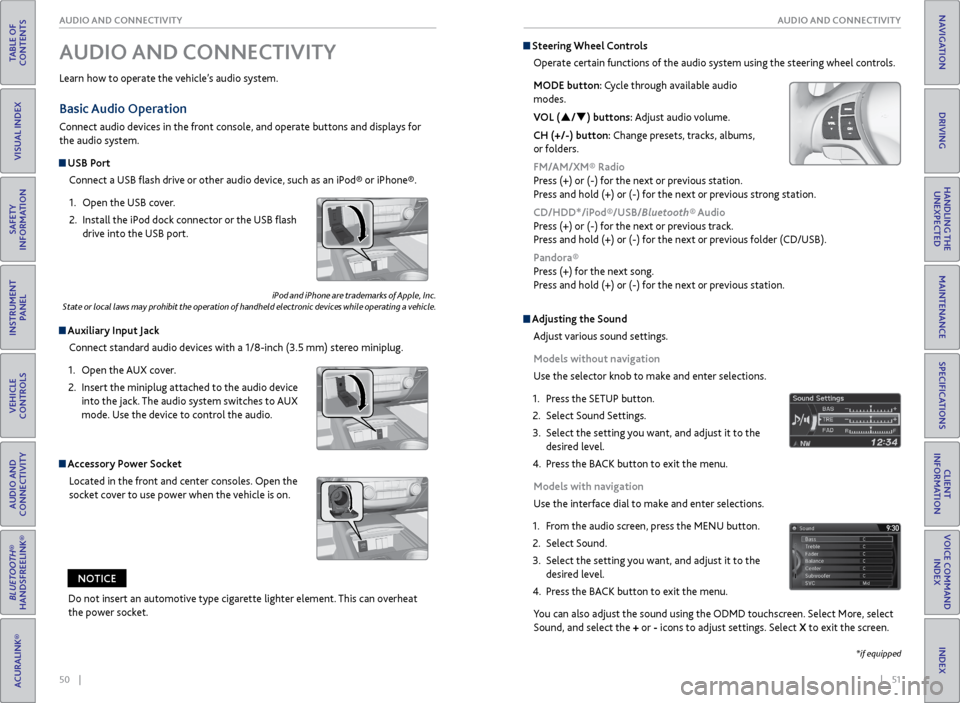
Basic Audio Operation
Connect audio devices in the front console, and operate buttons and displays for
the audio system.
USB Port
Connect a USB flash drive or other audio device, such as an iPod® or iPhone®.
1. Open the USB cover.
2. Install the iPod dock connector or the USB flash
drive into the USB port.
Auxiliary Input Jack
Connect standard audio devices with a 1/8-inch (3.5 mm) stereo miniplug.
1. Open the AUX cover.
2. Insert the miniplug attached to the audio device
into the jack. The audio system switches to AUX
mode. Use the device to control the audio.
iPod and iPhone are trademarks of Apple, Inc.
State or local laws may prohibit the operation of handheld electronic devices while operating a vehicle.
AUDIO AND CONNECTIVITY
Learn how to operate the vehicle’s audio system.
Accessory Power Socket
Located in the front and center consoles. Open the
socket cover to use power when the vehicle is on.
Do not insert an automotive type cigarette lighter element. This can overheat
the power socket.
NOTICE
Adjusting the Sound
Adjust various sound settings.
Models without navigation
Use the selector knob to make and enter selections.
1. Press the SETUP button.
2. Select Sound Settings.
3. Select the setting you want, and adjust it to the
desired level.
4. Press the BACK button to exit the menu.
Models with navigation
Use the interface dial to make and enter selections.
1. From the audio screen, press the MENU button.
2. Select Sound.
3. Select the setting you want, and adjust it to the
desired level.
4. Press the BACK button to exit the menu.
You can also adjust the sound using the ODMD touchscreen. Select More, select
Sound, and select the + or - icons to adjust settings. Select X to exit the screen.
Steering Wheel Controls
Operate certain functions of the audio system using the steering wheel controls.
MODE button: Cycle through available audio
modes.
VOL (p/q) buttons: Adjust audio volume.
CH (+/-) button: Change presets, tracks, albums,
or folders.
FM/AM/XM® Radio
Press (+) or (-) for the next or previous station.
Press and hold (+) or (-) for the next or previous strong station.
CD/HDD*/iPod®/USB/Bluetooth® Audio
Press (+) or (-) for the next or previous track.
Press and hold (+) or (-) for the next or previous folder (CD/USB).
Pandora®
Press (+) for the next song.
Press and hold (+) or (-) for the next or previous station.
*if equipped
Page 30 of 81
52 || 53
AUDIO AND CONNECTIVITY
AUDIO AND CONNECTIVITY
TABLE OF
CONTENTS
INDEX
VISUAL INDEX
VOICE COMMAND INDEX
SAFETY
INFORMATION
CLIENT
INFORMATION
INSTRUMENT PANEL
SPECIFICATIONS
VEHICLE
CONTROLS
MAINTENANCE
AUDIO AND
CONNECTIVITY
HANDLING THE UNEXPECTED
BLUETOOTH®
HANDSFREELINK®
DRIVING
ACURALINK®
NAVIGATION
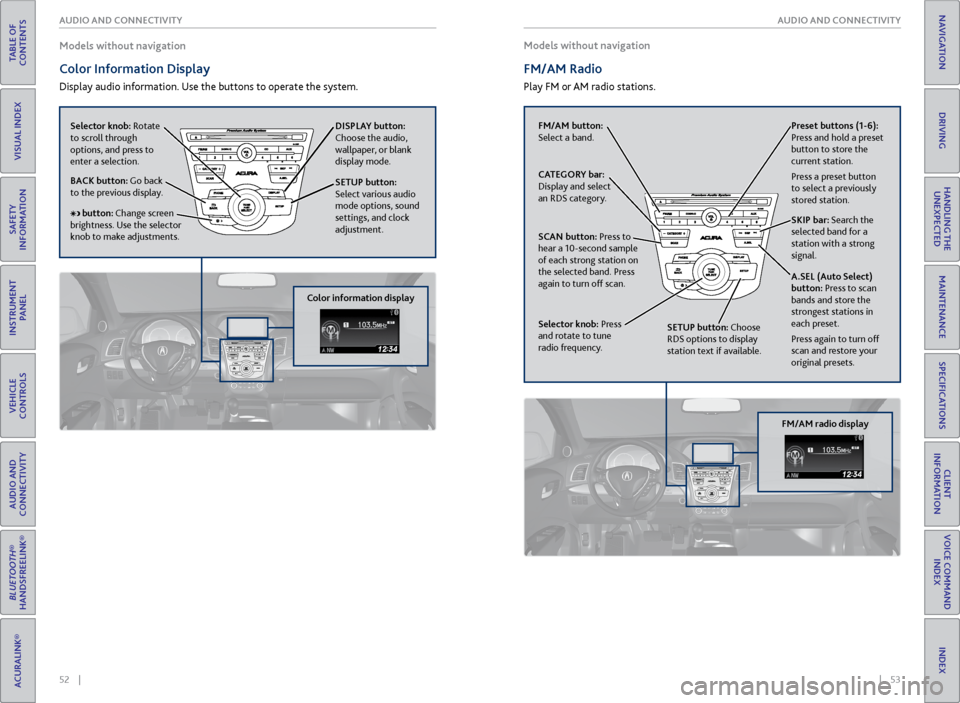
Models without navigation
Color Information Display
Display audio information. Use the buttons to operate the system. Models without navigation
FM/AM Radio
Play FM or AM radio stations.
Selector knob: Rotate
to scroll through
options, and press to
enter a selection.
DISPLAY button:
Choose the audio,
wallpaper, or blank
display mode.
SETUP button:
Select various audio
mode options, sound
settings, and clock
adjustment.
BACK button: Go back
to the previous display.
button: Change screen
brightness. Use the selector
knob to make adjustments.
Color information display
FM/AM button:
Select a band. Preset
buttons (1-6):
Press and hold a preset
button to store the
current station.
Press a preset button
to select a previously
stored station.
SKIP bar: Search the
selected band for a
station with a strong
signal.
A.SEL (Auto Select)
button: Press to scan
bands and store the
strongest stations in
each preset.
Press again to turn off
scan and restore your
original presets.
CATEGORY bar:
Display and select
an RDS category.
SCAN button: Press to
hear a 10-second sample
of each strong station on
the selected band. Press
again to turn off scan.
Selector knob: Press
and rotate to tune
radio frequency.
SETUP button: Choose
RDS options to display
station text if available.
FM/AM radio display
Page 31 of 81
54 || 55
AUDIO AND CONNECTIVITY
AUDIO AND CONNECTIVITY
TABLE OF
CONTENTS
INDEX
VISUAL INDEX
VOICE COMMAND INDEX
SAFETY
INFORMATION
CLIENT
INFORMATION
INSTRUMENT PANEL
SPECIFICATIONS
VEHICLE
CONTROLS
MAINTENANCE
AUDIO AND
CONNECTIVITY
HANDLING THE UNEXPECTED
BLUETOOTH®
HANDSFREELINK®
DRIVING
ACURALINK®
NAVIGATION
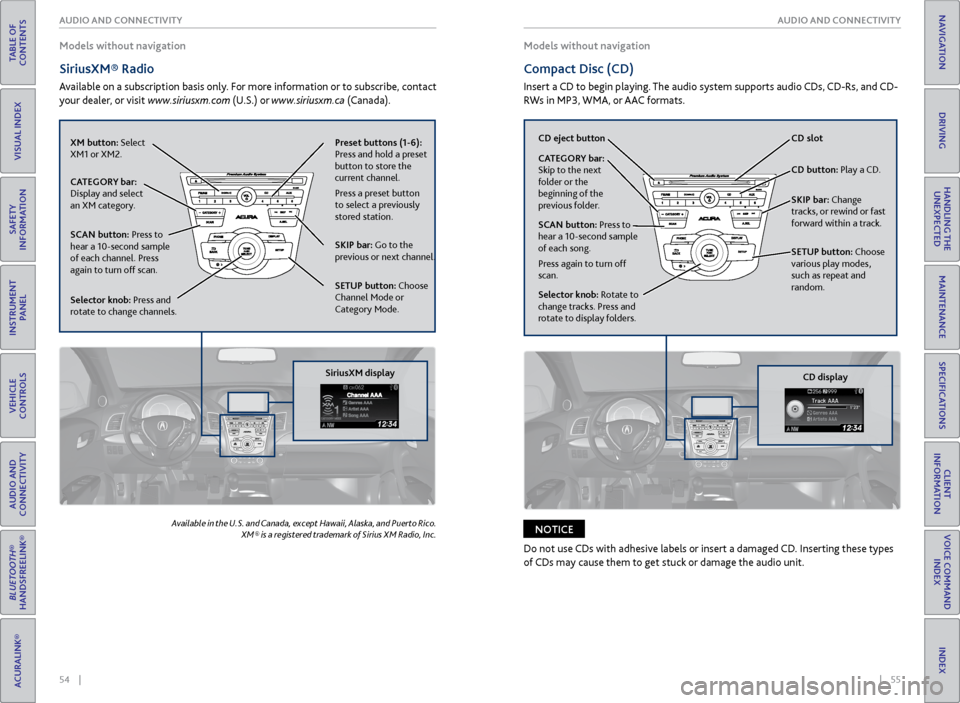
Models without navigation
SiriusXM® Radio
Available on a subscription basis only. For more information or to subscribe, contact
your dealer, or visit www.siriusxm.com (U.S.) or www.siriusxm.ca (Canada).
Available in the U.S. and Canada, except Hawaii, Alaska, and Puerto Rico.
XM® is a registered trademark of Sirius XM Radio, Inc.
Models without navigation
Compact Disc (CD)
Insert a CD to begin playing. The audio system supports audio CDs, CD-Rs, and CD-
RWs in MP3, WMA, or AAC formats.
Do not use CDs with adhesive labels or insert a damaged CD. Inserting these types
of CDs may cause them to get stuck or damage the audio unit.
NOTICE
XM button: Select
XM1 or XM2. Preset
buttons (1-6):
Press and hold a preset
button to store the
current channel.
Press a preset button
to select a previously
stored station.
SKIP bar: Go to the
previous or next channel.
SETUP button: Choose
Channel Mode or
Category Mode.
CATEGORY bar:
Display and select
an XM category.
SCAN button: Press to
hear a 10-second sample
of each channel. Press
again to turn off scan.
Selector knob: Press and
rotate to change channels.
SiriusXM display
CD
eject button CD slot
CD button: Play a CD.
SKIP bar: Change
tracks, or rewind or fast
forward within a track.
SETUP button: Choose
various play modes,
such as repeat and
random.
CATEGORY bar:
Skip to the next
folder or the
beginning of the
previous folder.
SCAN button:
Press to
hear a 10-second sample
of each song.
Press again to turn off
scan.
Selector knob: Rotate to
change tracks. Press and
rotate to display folders.
CD display
Page 33 of 81
58 || 59
AUDIO AND CONNECTIVITY
AUDIO AND CONNECTIVITY
TABLE OF
CONTENTS
INDEX
VISUAL INDEX
VOICE COMMAND INDEX
SAFETY
INFORMATION
CLIENT
INFORMATION
INSTRUMENT PANEL
SPECIFICATIONS
VEHICLE
CONTROLS
MAINTENANCE
AUDIO AND
CONNECTIVITY
HANDLING THE UNEXPECTED
BLUETOOTH®
HANDSFREELINK®
DRIVING
ACURALINK®
NAVIGATION
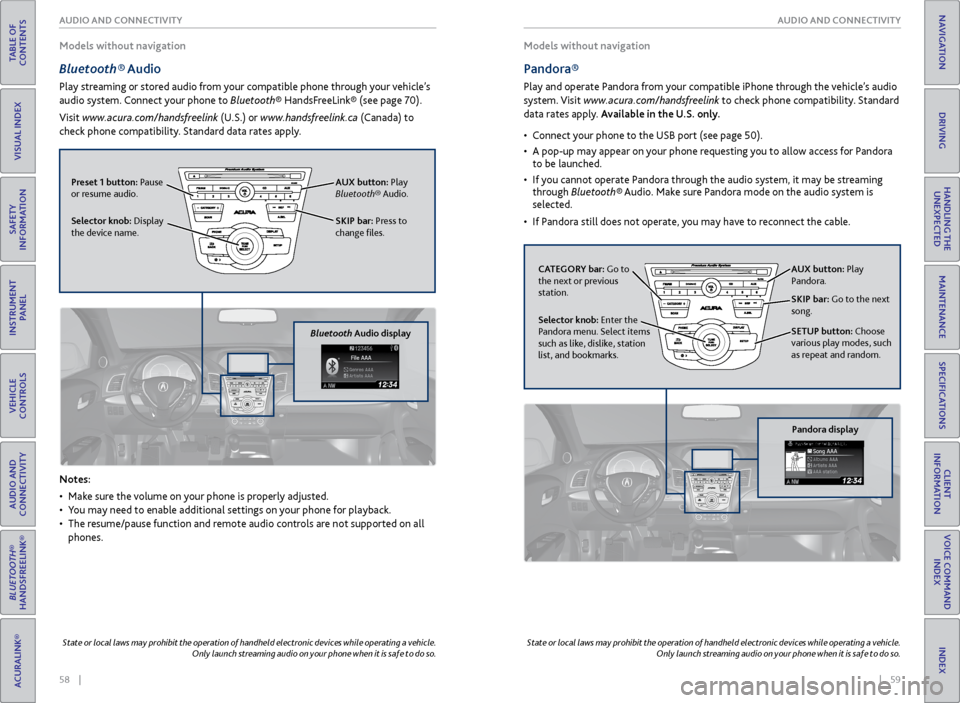
Models without navigation
Bluetooth® Audio
Play streaming or stored audio from your compatible phone through your vehicle’s
audio system. Connect your phone to Bluetooth® HandsFreeLink® (see page 70).
Visit www.acura.com/handsfreelink (U.S.) or www.handsfreelink.ca (Canada) to
check phone compatibility. Standard data rates apply.
Notes:
• Make sure the volume on your phone is properly adjusted.
• You may need to enable additional settings on your phone for playback.
• The resume/pause function and remote audio controls are not supported on all
phones.
State or local laws may prohibit the operation of handheld electronic devices while operating a vehicle.
Only launch streaming audio on your phone when it is safe to do so.
Models without navigation
Pandora®
Play and operate Pandora from your compatible iPhone through the vehicle’s audio
system. Visit www.acura.com/handsfreelink to check phone compatibility. Standard
data rates apply. Available in the U.S. only.
• Connect your phone to the USB port (see page 50).
• A pop-up may appear on your phone requesting you to allow access for Pandora
to be launched.
• If you cannot operate Pandora through the audio system, it may be streaming
through Bluetooth® Audio. Make sure Pandora mode on the audio system is
selected.
• If Pandora still does not operate, you may have to reconnect the cable.
State or local laws may prohibit the operation of handheld electronic devices while operating a vehicle.
Only launch streaming audio on your phone when it is safe to do so.
SKIP bar: Press to
change files.
Selector knob: Display
the device name. AUX button:
Play
Bluetooth® Audio.
Preset 1 button: Pause
or resume audio.
Bluetooth Audio display
CATEGORY bar: Go to
the next or previous
station.
SKIP bar: Go to the next
song.
SETUP button: Choose
various play modes, such
as repeat and random. AUX button: Play
Pandora.
Selector knob: Enter the
Pandora menu. Select items
such as like, dislike, station
list, and bookmarks.
Pandora display
Page 34 of 81
60 || 61
AUDIO AND CONNECTIVITY
AUDIO AND CONNECTIVITY
TABLE OF
CONTENTS
INDEX
VISUAL INDEX
VOICE COMMAND INDEX
SAFETY
INFORMATION
CLIENT
INFORMATION
INSTRUMENT PANEL
SPECIFICATIONS
VEHICLE
CONTROLS
MAINTENANCE
AUDIO AND
CONNECTIVITY
HANDLING THE UNEXPECTED
BLUETOOTH®
HANDSFREELINK®
DRIVING
ACURALINK®
NAVIGATION
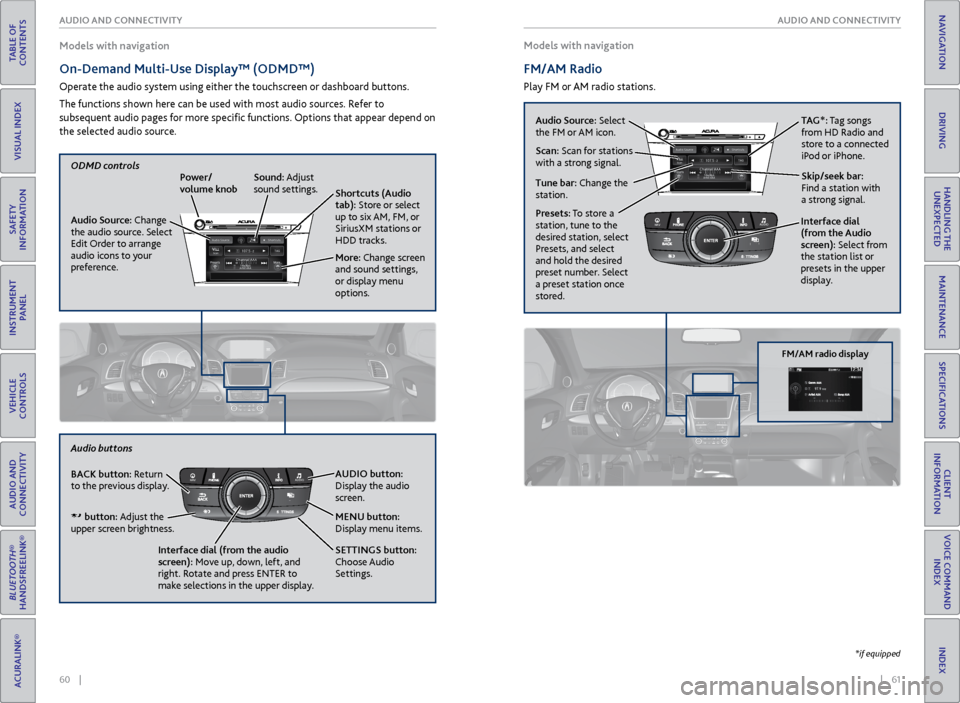
Models with navigation
On-Demand Multi-Use Display™ (ODMD™)
Operate the audio system using either the touchscreen or dashboard buttons.
The functions shown here can be used with most audio sources. Refer to
subsequent audio pages for more specific functions. Options that appear depend on
the selected audio source. Models with navigation
FM/AM Radio
Play FM or AM radio stations.
*if equipped
Power/
volume knob
More: Change screen
and sound settings,
or display menu
options. Shortcuts (Audio
tab): Store or select
up to six AM, FM, or
SiriusXM stations or
HDD tracks.
Audio Source:
Change
the audio source. Select
Edit Order to arrange
audio icons to your
preference.ODMD controls Sound: Adjust
sound settings.
NAVAUDIOAUDIONAV
MENU button:
Display menu items. AUDIO button:
Display the audio
screen.
BACK button: Return
to the previous display.
Audio buttons
Interface dial (from the audio
screen): Move up, down, left, and
right. Rotate and press ENTER to
make selections in the upper display. SETTINGS button:
Choose Audio
Settings.
button: Adjust the
upper screen brightness.
Presets: To store a
station, tune to the
desired station, select
Presets, and select
and hold the desired
preset number. Select
a preset station once
stored.NAVAUDIOAUDIONAVInterface dial
(from the Audio
screen): Select from
the station list or
presets in the upper
display.
Audio Source:
Select
the FM or AM icon.
Skip/seek bar:
Find a station with
a strong signal. TAG*: Tag songs
from HD Radio and
store to a connected
iPod or iPhone.
Tune bar: Change the
station. Scan: Scan for stations
with a strong signal.
FM/AM radio display
Page 35 of 81
62 || 63
AUDIO AND CONNECTIVITY
AUDIO AND CONNECTIVITY
TABLE OF
CONTENTS
INDEX
VISUAL INDEX
VOICE COMMAND INDEX
SAFETY
INFORMATION
CLIENT
INFORMATION
INSTRUMENT PANEL
SPECIFICATIONS
VEHICLE
CONTROLS
MAINTENANCE
AUDIO AND
CONNECTIVITY
HANDLING THE UNEXPECTED
BLUETOOTH®
HANDSFREELINK®
DRIVING
ACURALINK®
NAVIGATION
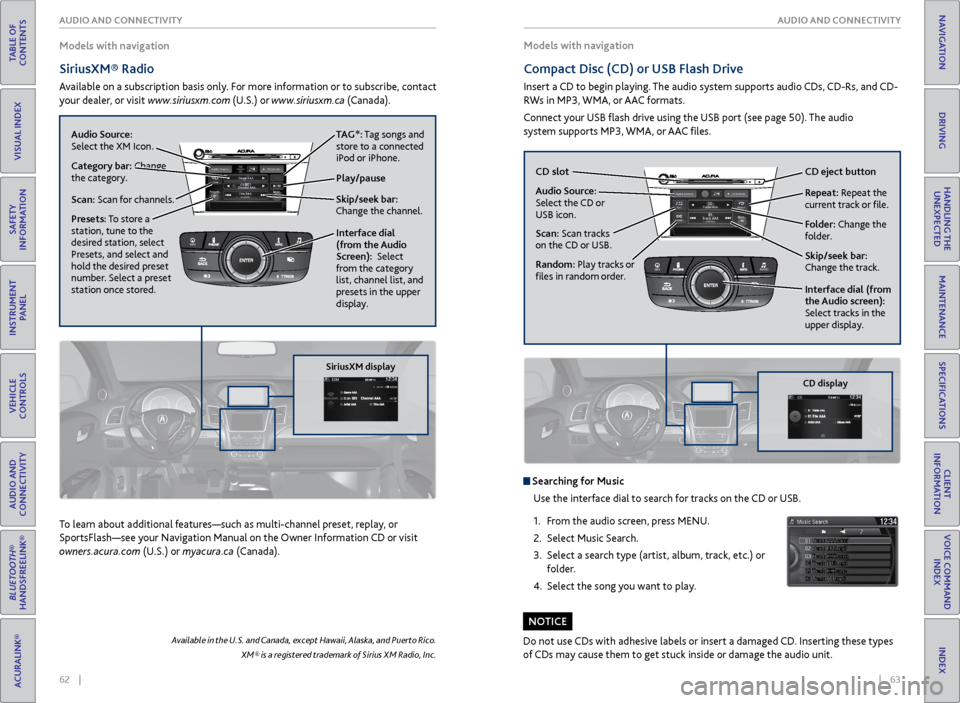
Models with navigation
SiriusXM® Radio
Available on a subscription basis only. For more information or to subscribe, contact
your dealer, or visit www.siriusxm.com (U.S.) or www.siriusxm.ca (Canada). Models with navigation
Compact Disc (CD) or
USB Flash Drive
Insert a CD to begin playing. The audio system supports audio CDs, CD-Rs, and CD-
RWs in MP3, WMA, or AAC formats.
Connect your USB flash drive using the USB port (see page 50). The audio
system supports MP3, WMA, or AAC files.
Available in the U.S. and Canada, except Hawaii, Alaska, and Puerto Rico.
XM® is a registered trademark of Sirius XM Radio, Inc.
To learn about additional features—such as multi-channel preset, replay, or
SportsFlash—see your Navigation Manual on the Owner Information CD or visit
owners.acura.com (U.S.) or myacura.ca (Canada).
Do not use CDs with adhesive labels or insert a damaged CD. Inserting these types
of CDs may cause them to get stuck inside or damage the audio unit.
NOTICE
Searching for MusicUse the interface dial to search for tracks on the CD or USB.
1. From the audio screen, press MENU.
2. Select Music Search.
3. Select a search type (artist, album, track, etc.) or
folder.
4. Select the song you want to play.
Interface dial
(from the Audio
Screen): Select
from the category
list, channel list, and
presets in the upper
display.
Presets: To store a
station, tune to the
desired station, select
Presets, and select and
hold the desired preset
number. Select a preset
station once stored.
NAVAUDIOAUDIONAV
Skip/seek bar:
Change the channel.
Audio Source:
Select the XM Icon.
Category bar: Change
the category.
Scan: Scan for channels.
Play/pause TAG*: Tag songs and
store to a connected
iPod or iPhone.
SiriusXM display
Audio Source:
Select the CD or
USB icon. CD slot
CD eject button
Skip/seek bar:
Change the track. Repeat: Repeat the
current track or file.
Scan: Scan tracks
on the CD or USB.
Random: Play tracks or
files in random order. Interface dial (from
the Audio screen):
Select tracks in the
upper display.
Folder: Change the
folder.
NAVAUDIOAUDIONAV
CD display
Page 68 of 81
128 || 129
MAINTENANCE
MAINTENANCE
TABLE OF
CONTENTS
INDEX
VISUAL INDEX
VOICE COMMAND INDEX
SAFETY
INFORMATION
CLIENT
INFORMATION
INSTRUMENT PANEL
SPECIFICATIONS
VEHICLE
CONTROLS
MAINTENANCE
AUDIO AND
CONNECTIVITY
HANDLING THE UNEXPECTED
BLUETOOTH®
HANDSFREELINK®
DRIVING
ACURALINK®
NAVIGATION
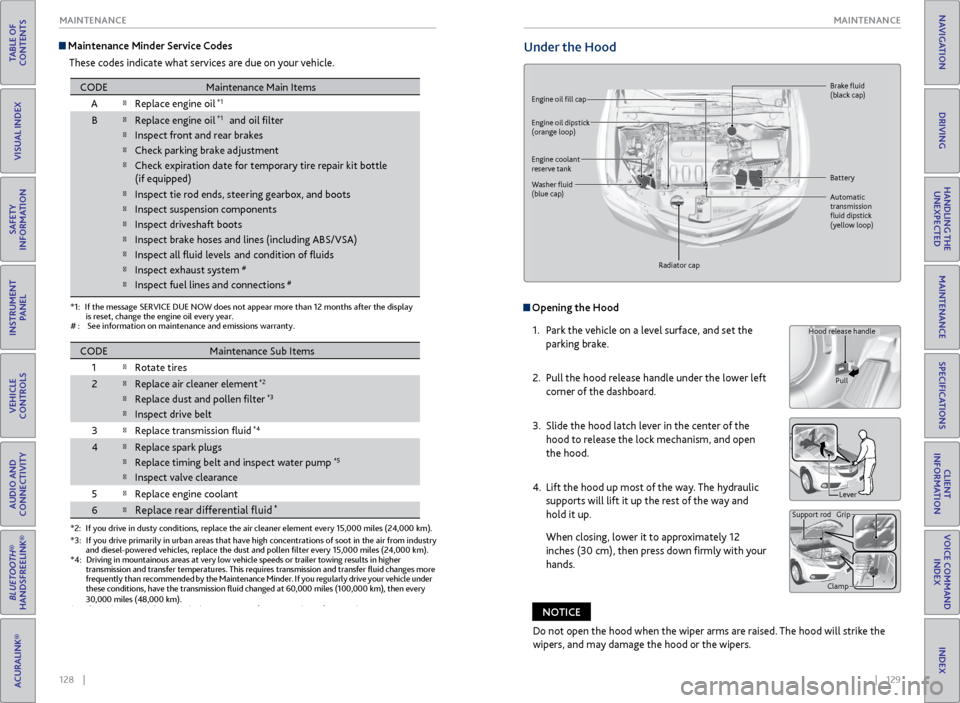
Maintenance Minder Service Codes
These codes indicate what services are due on your vehicle.
*1:If the message SERVICE DUE NOW does not appear more than 12 months after the display
is reset, change the engine oil every year.
#:See information on maintenance and emissions warranty.
*2:If you drive in dusty conditions, replace the air cleaner element every \
15,000 miles (24,000 km).
COD EMaintenance Main Items
A
�Replace engine oil*1
B�Replace engine oil*1 and oil �lter
�Inspect front and rear brakes
�Check parking brake ad justment
�Check expiration date for temporary tire repair kit bottle
�Inspect tie rod ends, steering gearbox, and boots
�Inspect suspension component s
�Inspect driveshaft boots
�Inspect brake hoses and lines (including ABS/VSA)
�Inspect all �uid levels and condition of �uids
�Inspect exhaust system#
�Inspect fuel lines and connections#
*3:If you drive primarily in urban areas that have high concentrations of s\
oot in the air from industryand diesel-powered vehicles, replace the dust and pollen �lter every \
15,000 miles (24,000 km).*4:Driving in mountainous areas at very low vehicle speeds or trailer towin\
g results in higher
transmission and transfer temperatures. This requires transmission and t\
ransfer �uid changes more
frequently than recommended by the Maintenance Minder. If you regularly drive your vehicle under
these conditions, have the transmission �uid changed at 60,000 miles \
(100,000 km), then ever y
30,000 miles (48,000 km).
*5: If you drive regularly in very high temperatures (over 110 °F/43 °C), in very low temperatures
(under -20 °F/-29 °C), or tow a trailer, replace every 60,000 mi\
les (100,000 km).
CODEMaintenance Sub Item s
1
�Rotate tire s
2�Replace air cleaner elemen t*2
�Replace dust and pollen �lte r*3
�Inspect drive belt
3
�Replace transmission �uid*4
4�Replace spark plugs
�Replace timing belt and inspect water pump*5
�Inspect valve clearance
5
�Replace engine coolant
6�Replace rear differential �uid*
(if equipped )
Under the Hood
Opening the Hood
1. Park the vehicle on a level surface, and set the
parking brake.
2. Pull the hood release handle under the lower left
corner of the dashboard.
3. Slide the hood latch lever in the center of the
hood to release the lock mechanism, and open
the hood.
4. Lift the hood up most of the way. The hydraulic
supports will lift it up the rest of the way and
hold it up.
When closing, lower it to approximately 12
inches (30 cm), then press down firmly with your
hands.
Hood release handle
Pull
Lever
Support rod Grip
Clamp
Engine oil fill cap Brake
fluid
(black cap)
Automatic
transmission
fluid dipstick
(yellow loop)
Washer
fluid
(blue cap) Battery
Engine coolant
reserve tank
Radiator cap
Engine oil dipstick
(orange loop)
Do not open the hood when the wiper arms are raised. The hood will strike the
wipers, and may damage the hood or the wipers.
NOTICE