set reset button Acura RDX 2016 User Guide
[x] Cancel search | Manufacturer: ACURA, Model Year: 2016, Model line: RDX, Model: Acura RDX 2016Pages: 445, PDF Size: 15.25 MB
Page 107 of 445
uuGauges and Multi-Information Display uMulti-Information Display
106
Instrument Panel
Use the multi-information display to customize certain features.
■How to customize
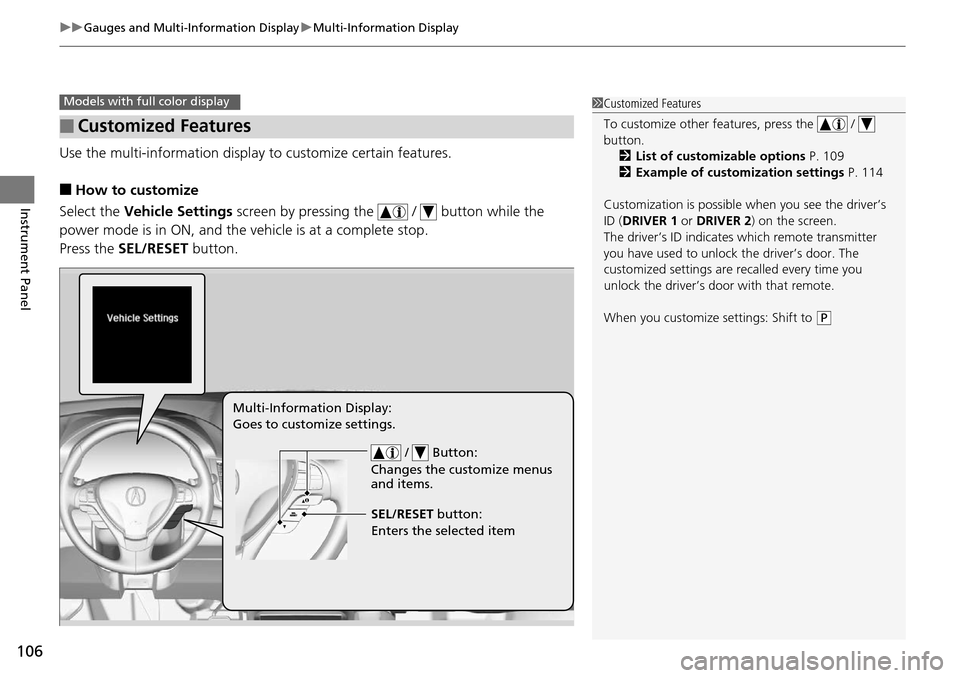
Select the Vehicle Settings screen by pressing the / button while the
power mode is in ON, and the vehicle is at a complete stop.
Press the SEL/RESET button.
■Customized Features
Models with full color display1Customized Features
To customize other features, press the /
button.
2 List of customizable options P. 109
2 Example of customization settings P. 114
Customization is possible when you see the driver’s
ID ( DRIVER 1 or DRIVER 2) on the screen.
The driver’s ID indicates which remote transmitter
you have used to unlock the driver’s door. The
customized settings are recalled every time you
unlock the driver’s door with that remote.
When you customize settings: Shift to
( P
/ Button:
Changes the customize menus
and items.
Multi-Information Display:
Goes to customize settings.
SEL/RESET button:
Enters the selected item
Page 108 of 445
107
uuGauges and Multi-Information Display uMulti-Information Display
Continued
Instrument Panel
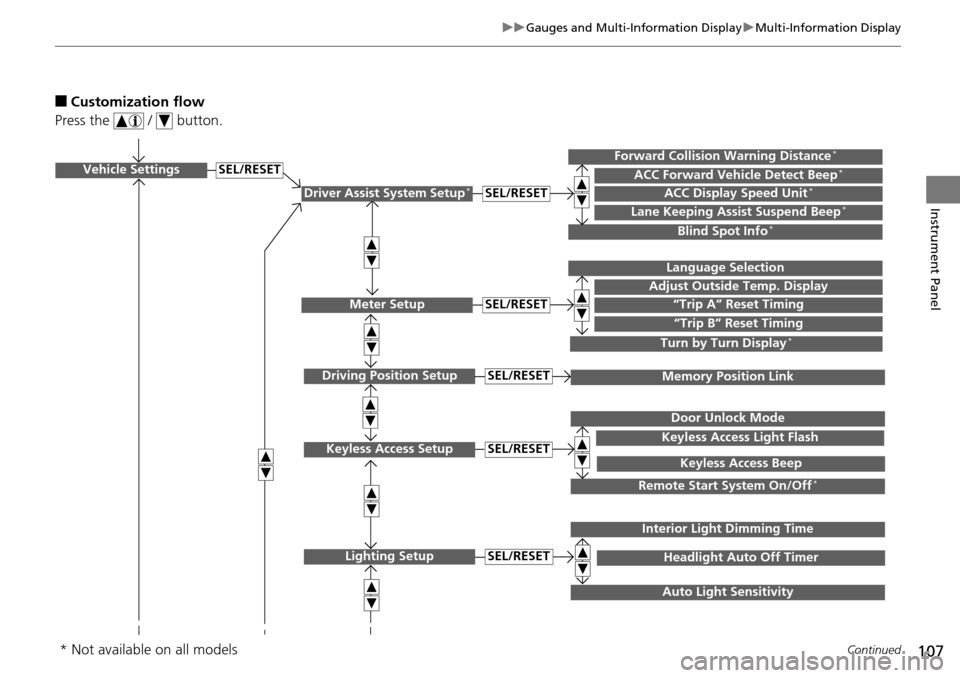
■Customization flow
Press the / button.
Vehicle Settings
Meter Setup
Keyless Access Setup
Lighting Setup
“Trip A” Reset Timing
Adjust Outside Temp. Display
Language Selection
“Trip B” Reset Timing
Keyless Access Light Flash
Door Unlock Mode
Keyless Access Beep
Headlight Auto Off Timer
Interior Light Dimming Time
Auto Light Sensitivity
SEL/RESET
SEL/RESET
SEL/RESET
SEL/RESET
Remote Start System On/Off*
Driver Assist System Setup*ACC Display Speed Unit*ACC Forward Vehicle Detect Beep*Forward Collision Warning Distance*
Lane Keeping Assist Suspend Beep*
Blind Spot Info*
SEL/RESET
Turn by Turn Display*
Driving Position SetupMemory Position LinkSEL/RESET
* Not available on all models
Page 115 of 445
114
uuGauges and Multi-Information Display uMulti-Information Display
Instrument Panel
■Example of customization settings
The steps for changing the “TRIP A” RESET TIMING /”Trip A” Reset Timing setting
to WITH REFUEL /When Refueled are shown below. The default setting for “TRIP
A” RESET TIMING/ ”Trip A” Reset Timing is MANUALLY RESET/Manually
Reset .
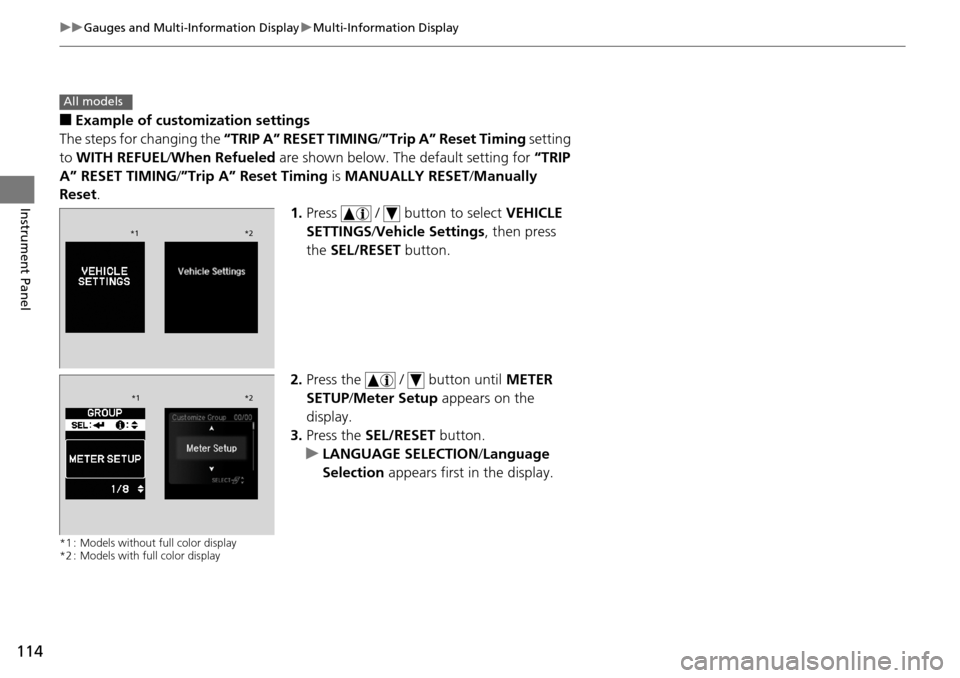
1.Press / button to select VEHICLE
SETTINGS /Vehicle Settings , then press
the SEL/RESET button.
2. Press the / button until METER
SETUP/ Meter Setup appears on the
display.
3. Press the SEL/RESET button.
u LANGUAGE SELECTION /Language
Selection appears first in the display.
*1 : Models without full color display
*2 : Models with full color display
All models
*1 *2
*1*2
Page 116 of 445
115
uuGauges and Multi-Information Display uMulti-Information Display
Instrument Panel
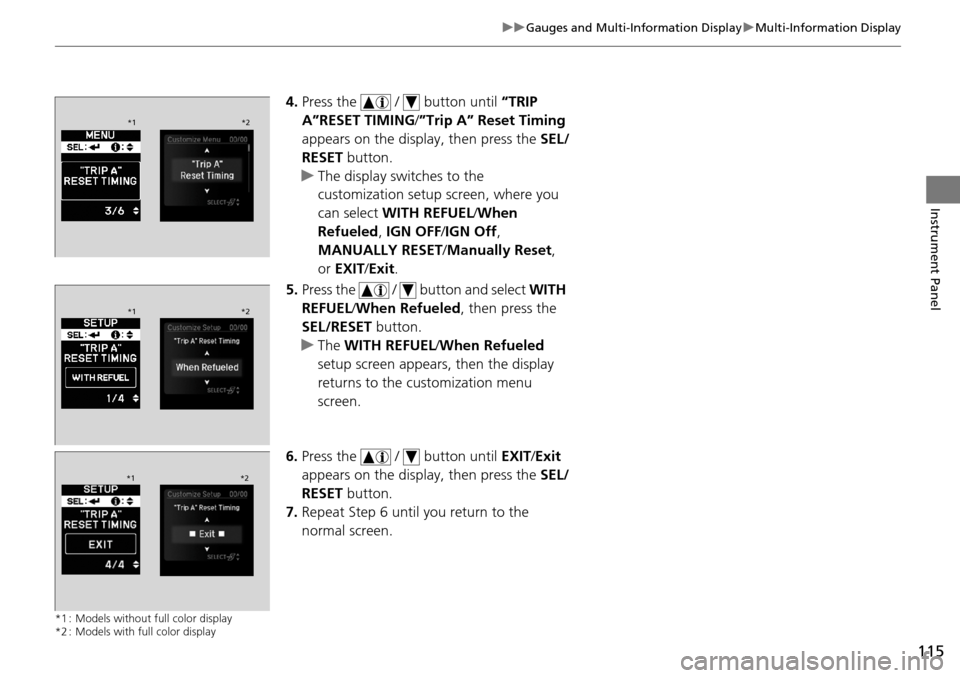
4. Press the / button until “TRIP
A”RESET TIMING /”Trip A” Reset Timing
appears on the display, then press the SEL/
RESET button.
u The display swit ches to the
customization setup screen, where you
can select WITH REFUEL /When
Refueled, IGN OFF/IGN Off ,
MANUALLY RESET/ Manually Reset,
or EXIT /Exit .
5. Press the / button and select WITH
REFUEL /When Refueled , then press the
SEL/RESET button.
u The WITH REFUEL /When Refueled
setup screen appears, then the display
returns to the customization menu
screen.
6. Press the / button until EXIT/Exit
appears on the display, then press the SEL/
RESET button.
7. Repeat Step 6 until you return to the
normal screen.
*1 : Models without full color display
*2 : Models with full color display
*1 *2
*1*2
*1*2
Page 119 of 445
118
Controls
Setting the Clock
Clock
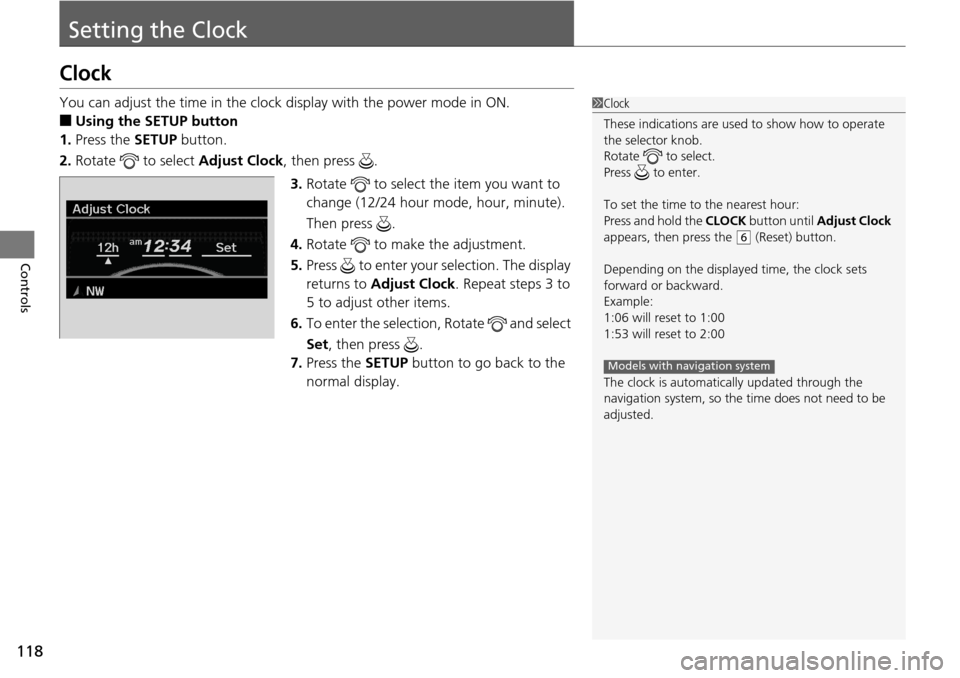
You can adjust the time in the clock display with the power mode in ON.
■Using the SETUP button
1. Press the SETUP button.
2. Rotate to select Adjust Clock, then press .
3. Rotate to select the item you want to
change (12/24 hour mode, hour, minute).
Then press .
4. Rotate to make the adjustment.
5. Press to enter your selection. The display
returns to Adjust Clock . Repeat steps 3 to
5 to adjust other items.
6. To enter the selection, Rotate and select
Set , then press .
7. Press the SETUP button to go back to the
normal display.
1 Clock
These indications are used to show how to operate
the selector knob.
Rotate to select.
Press to enter.
To set the time to the nearest hour:
Press and hold the CLOCK button until Adjust Clock
appears, then press the
( 6 (Reset) button.
Depending on the displayed time, the clock sets
forward or backward.
Example:
1:06 will reset to 1:00
1:53 will reset to 2:00
The clock is automatica lly updated through the
navigation system, so the ti me does not need to be
adjusted.
Models with navigation system
Page 157 of 445
156
uuOperating the Switches Around the Steering Wheel uDriving Position Memory System
Controls
Driving Position Memory System
You can store two driver’s seat and door mirror positions with the driving position
memory system.
When you unlock and open the driver’s door with a remote transmitter, the seat and
door mirrors adjust automatically to one of the two preset positions.
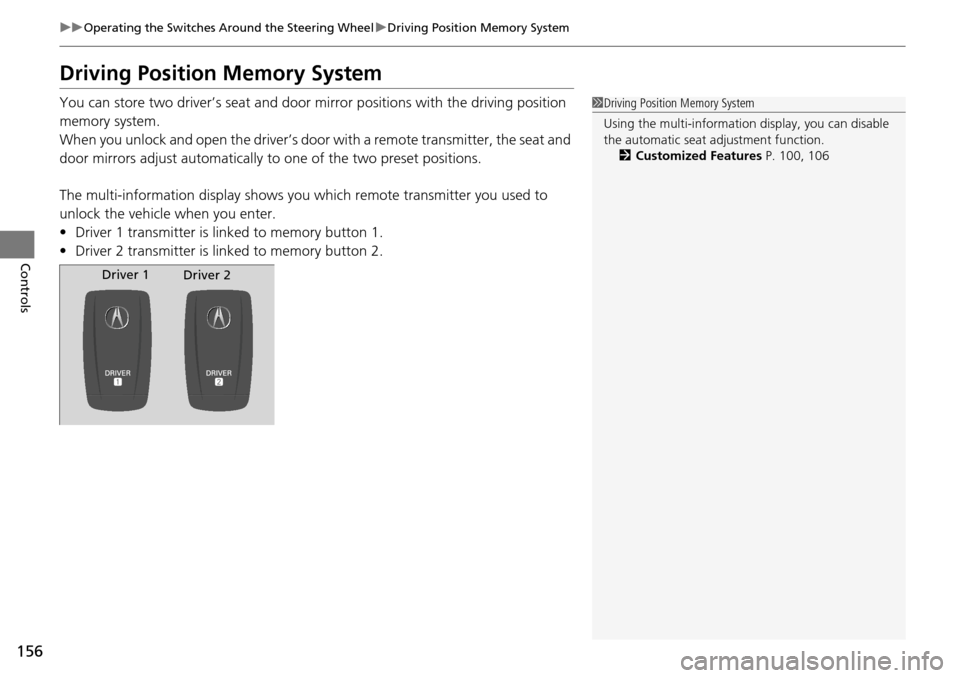
The multi-information display shows you which remote transmitter you used to
unlock the vehicle when you enter.
• Driver 1 transmitter is linked to memory button 1.
• Driver 2 transmitter is linked to memory button 2.1Driving Position Memory System
Using the multi-information display, you can disable
the automatic seat adjustment function. 2 Customized Features P. 100, 106
Driver 1
Driver 2
Page 189 of 445
188
uuAudio System*uAudio System Theft Protection
Features
Audio System Theft Protection
The audio system is disabled when it is di sconnected from the power source, such as
when the battery is disconnected or goes dead.
■Reactivating th e audio system
1. Set the power mode to ON, and turn on the audio system.
u If you set the power mode to ACCESSORY, you will be requested to enter the
audio security code. See step 3.
2. Press and hold the power button ag ain for more than two seconds.
u The audio system is reactivated when the system’s control unit recognizes that
the system is in your vehicle.
If the control unit fails to recognize, ENTER CODE appears on the audio/
information screen.
3. Enter the audio security code using the pr eset buttons. If you enter an incorrect
digit, continue to the last digit, then try again. If you do not enter the code
correctly after 10 tries, leave the system for one hour before trying again, or visit
a dealer to have the system reset.
1 Audio System Theft Protection
Find the audio system’s se curity code and serial
number label in your owner’s manual kit.
We recommend that you write down the serial
number in this owner’s manual.
Do not store the label in your vehicle. If you lose the
label, you must first retrie ve the serial number, and
then obtain the code.
You can find out about your serial number and
security code from a dealer.
You can register the securi ty code at Acura Owners
(owners.acura.com.), and find information on how to
retrieve the serial numbe r and obtain the code at
radio-navicode.acura.com.
U.S. models
Page 190 of 445
189
uuAudio System*uAudio Remote Controls
Features
Audio Remote Controls
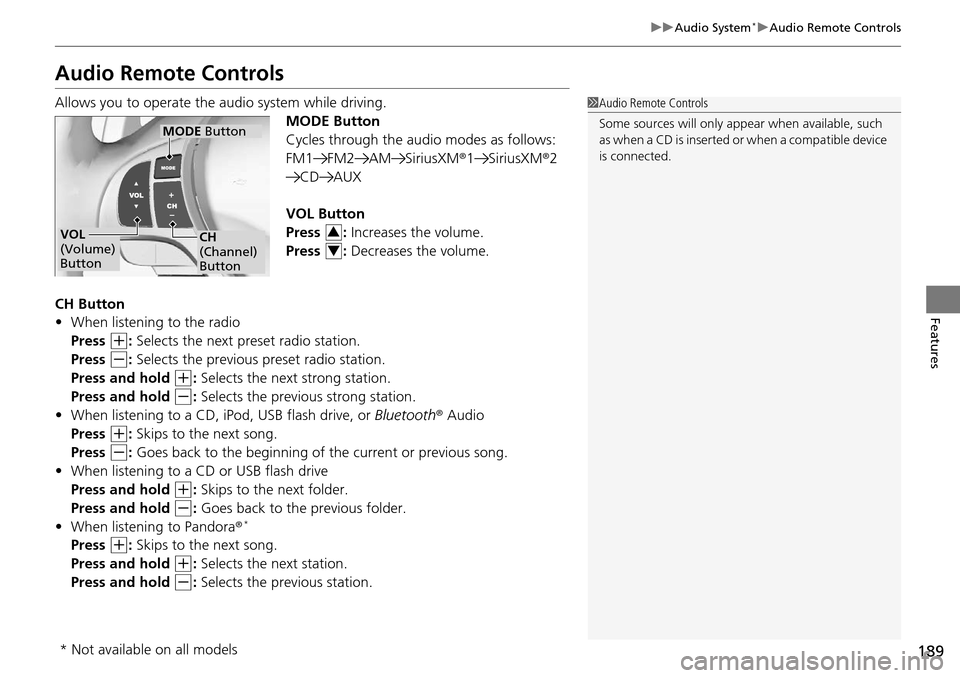
Allows you to operate the audio system while driving.
MODE Button
Cycles through the audio modes as follows:
FM1 FM2 AM SiriusXM®1 SiriusXM®2
CD AUX
VOL Button
Press : Increases the volume.
Press : Decreases the volume.
CH Button
• When listening to the radio
Press
(+: Selects the next preset radio station.
Press
(-: Selects the previous preset radio station.
Press and hold
(+: Selects the next strong station.
Press and hold
(-: Selects the previous strong station.
• When listening to a CD, iPod, USB flash drive, or Bluetooth® Audio
Press
(+: Skips to the next song.
Press
(-: Goes back to the beginning of the current or previous song.
• When listening to a CD or USB flash drive
Press and hold
(+: Skips to the next folder.
Press and hold
(-: Goes back to the previous folder.
• When listening to Pandora ®*
Press (+: Skips to the next song.
Press and hold
(+: Selects the next station.
Press and hold
(-: Selects the previous station.
1 Audio Remote Controls
Some sources will only appe ar when available, such
as when a CD is inserted or when a compatible device
is connected.
VOL
(Volume)
Button
MODE Button
CH
(Channel)
Button3
4
* Not available on all models
Page 199 of 445

198
uuAudio System Basic Operation*uPlaying the AM/FM Radio
Features
Playing the AM/FM Radio
BACK Buttons
Press to go back to the previous
display. SCAN Button
Press to sample each of the strongest
stations on the selected band for 10
seconds. To turn off scan, press the
button again. VOL/ (Power/volume) Knob
Press to turn the audio system on and off.
Turn to adjust the volume.
Preset Buttons (1-6)
To store a station:
1. Tune to the selected station.
2. Pick a preset button and hold it
until you hear a beep.
To listen to a stored station, select a
band, then press the preset button. SKIP Bar
Press to search up and down the
selected band for a station with a
strong signal.
SETUP Button
Press to display menu items.
Selector Knob
Press and turn to tune the radio
frequency. FM/AM Button
Press to select a band. CATEGORY Bar
Press either side to display and
select an RDS category.
A.SEL (Auto Select) Button
Press to scan both bands and store
the strongest station in each
preset.To turn off auto select, press
the button again. This restores the
presets you originally set.
Page 200 of 445
199
uuAudio System Basic Operation*uPlaying the AM/FM Radio
Features
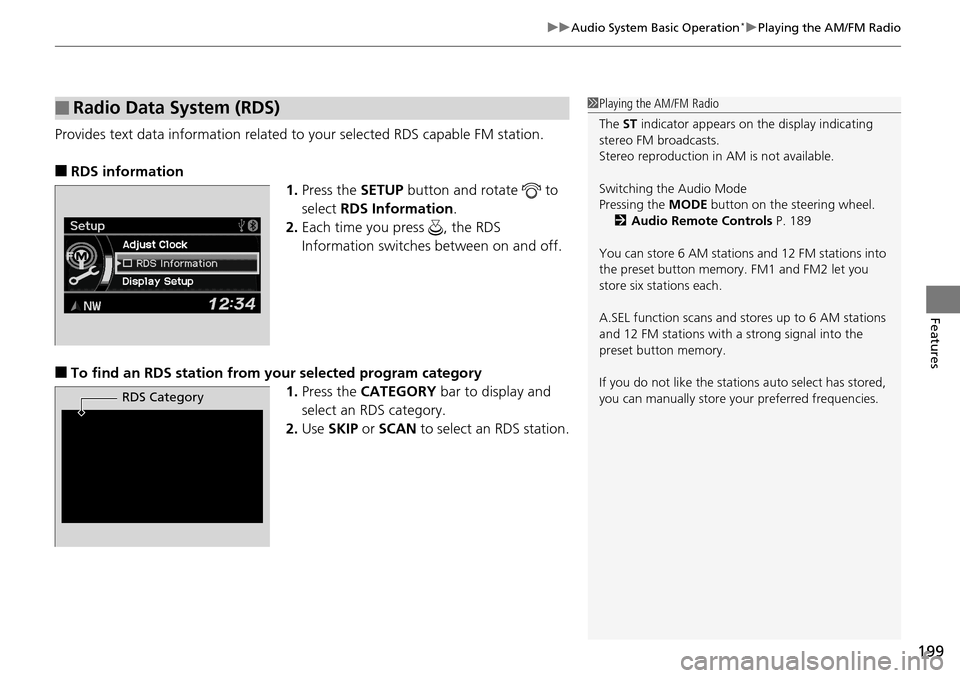
Provides text data information related to your selected RDS capable FM station.
■RDS information
1.Press the SETUP button and rotate to
select RDS Information .
2. Each time you press , the RDS
Information switches between on and off.
■To find an RDS station from your selected program category
1.Press the CATEGORY bar to display and
select an RDS category.
2. Use SKIP or SCAN to select an RDS station.
■Radio Data System (RDS)1Playing the AM/FM Radio
The ST indicator appears on the display indicating
stereo FM broadcasts.
Stereo reproduction in AM is not available.
Switching the Audio Mode
Pressing the MODE button on the steering wheel.
2 Audio Remote Controls P. 189
You can store 6 AM stations and 12 FM stations into
the preset button memory. FM1 and FM2 let you
store six stations each.
A.SEL function scans and stores up to 6 AM stations
and 12 FM stations with a strong signal into the
preset button memory.
If you do not like the stati ons auto select has stored,
you can manually store your preferred frequencies.
RDS Category