display Acura RDX 2017 Owner's Manual
[x] Cancel search | Manufacturer: ACURA, Model Year: 2017, Model line: RDX, Model: Acura RDX 2017Pages: 449, PDF Size: 10.88 MB
Page 254 of 449
253
Features
Compass*
When you set the power mode to ON, the compass self-calibrates, and the compass
display appears.
Compass Calibration
If the compass indicates the wrong direction, or the CAL. indicator blinks, you need
to manually calibrate the system.
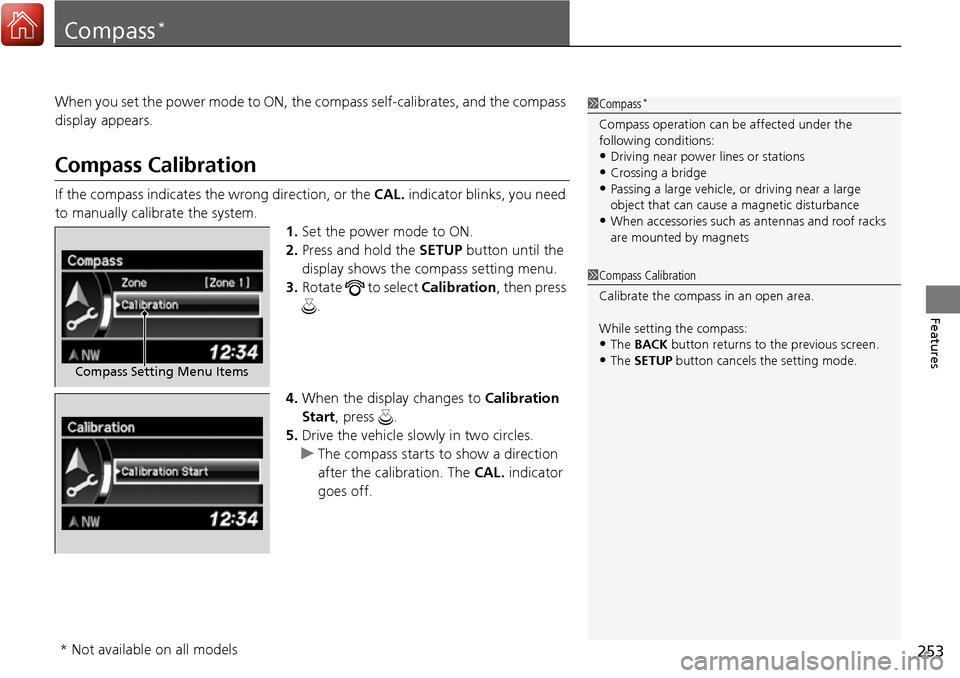
1.Set the power mode to ON.
2. Press and hold the SETUP button until the
display shows the compass setting menu.
3. Rotate to select Calibration, then press
.
4. When the display changes to Calibration
Start, press .
5. Drive the vehicle slow ly in two circles.
u The compass starts to show a direction
after the calibration. The CAL. indicator
goes off.
1 Compass*
Compass operation can be affected under the
following conditions:
•Driving near power lines or stations•Crossing a bridge
•Passing a large vehicle, or driving near a large
object that can cause a magnetic disturbance
•When accessories such as antennas and roof racks
are mounted by magnets
Compass Setting Menu Items
1 Compass Calibration
Calibrate the compass in an open area.
While setting the compass:
•The BACK button returns to the previous screen.•The SETUP button cancels the setting mode.
* Not available on all models
Page 255 of 449

254
uuCompass*uCompass Zone Selection
Features
Compass Zone Selection
1. Set the power mode to ON.
2. Press and hold the SETUP button until the
display shows the compass setting menu.
3. Rotate to select Zone, then press .
The display shows the current zone
number.
4. Rotate to select the zone number of
your area (See Zone Map), then press .
Zone Number
2
3
4 5678910
111213
14
15Zone Map
Guam Island: Zone 8
Puerto Rico: Zone 11
1 Compass Zone Selection
The zone selection is done to compensate the
variation between magneti c north and true north.
If the calibration starts while the audio system is in
use, the display returns to normal after the calibration
is completed.
Page 271 of 449
uuWhen Driving uStarting the Engine
270
Driving
You can remotely start the engine using the two-way keyless access remote from
extended distances.
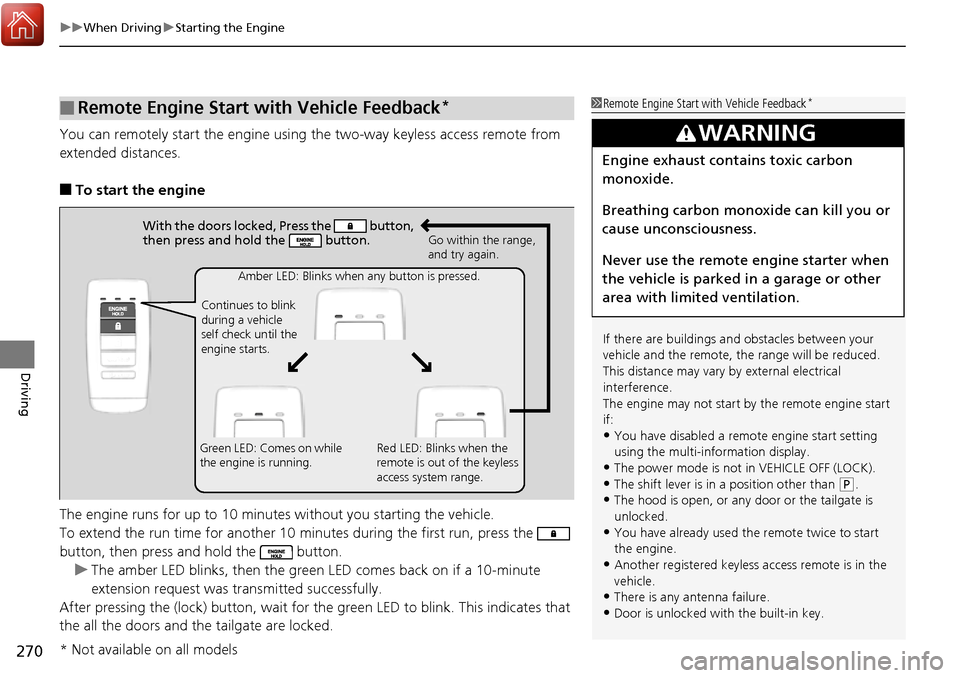
■To start the engine
The engine runs for up to 10 minutes without you starting the vehicle.
To extend the run time for another 10 minutes during the first run, press the
button, then press and hold the button. u The amber LED blinks, then the green LED comes back on if a 10-minute
extension request was transmitted successfully.
After pressing the (lock) button, wait for th e green LED to blink. This indicates that
the all the doors and the tailgate are locked.
■Remote Engine Start with Vehicle Feedback*1 Remote Engine Start with Vehicle Feedback*
If there are buildings an d obstacles between your
vehicle and the remote, th e range will be reduced.
This distance may vary by external electrical
interference.
The engine may not start by the remote engine start
if:
•You have disabled a remo te engine start setting
using the multi-information display.
•The power mode is not in VEHICLE OFF (LOCK).
•The shift lever is in a position other than ( P.
•The hood is open, or any door or the tailgate is
unlocked.
•You have already used the remote twice to start
the engine.
•Another registered keyless access remote is in the
vehicle.
•There is any antenna failure.•Door is unlocked with the built-in key.
3WARNING
Engine exhaust contains toxic carbon
monoxide.
Breathing carbon monoxide can kill you or
cause unconsciousness.
Never use the remote engine starter when
the vehicle is parked in a garage or other
area with limited ventilation.
With the doors locked, Press the button,
then press and hold the button.
Amber LED: Blinks when any button is pressed.
Continues to blink
during a vehicle
self check until the
engine starts. Go within the range,
and try again.
Green LED: Comes on while
the engine is running. Red LED: Blinks when the
remote is out of the keyless
access system range.
* Not available on all models
Page 276 of 449

275
uuWhen Driving uShifting
Continued
Driving
Shifting
Change the shift position in accordance with your driving needs.
■Shift lever positions
1Shifting
You cannot change the pow er mode from ON to
VEHICLE OFF (LOCK) unless the shift lever is in
( P.
The vehicle may move forward very slightly even in
(N while the engine is cold.
Depress the brake pe dal firmly and, when necessary,
apply the parking brake.
When shifting gears in extremely low temperatures (-
22°F/-30°C), there may be a short delay before the
shift indicated in the display. Always confirm you are
in the correct gear before driving.
Park
Used when parking or starting the
engine
Reverse
Used when reversing
Neutral
Used when idling
Drive
Used:
●For normal driving (gear change
between 1st and 6th automatically)
●When temporally driving in the
sequential mode
Drive (S)
Used:
●For automatically changing gears
between 1st and 6th (6th gear is used
only at high speed)
●When driving in the sequential mode
Release Button
Page 277 of 449
uuWhen Driving uShifting
276
Driving
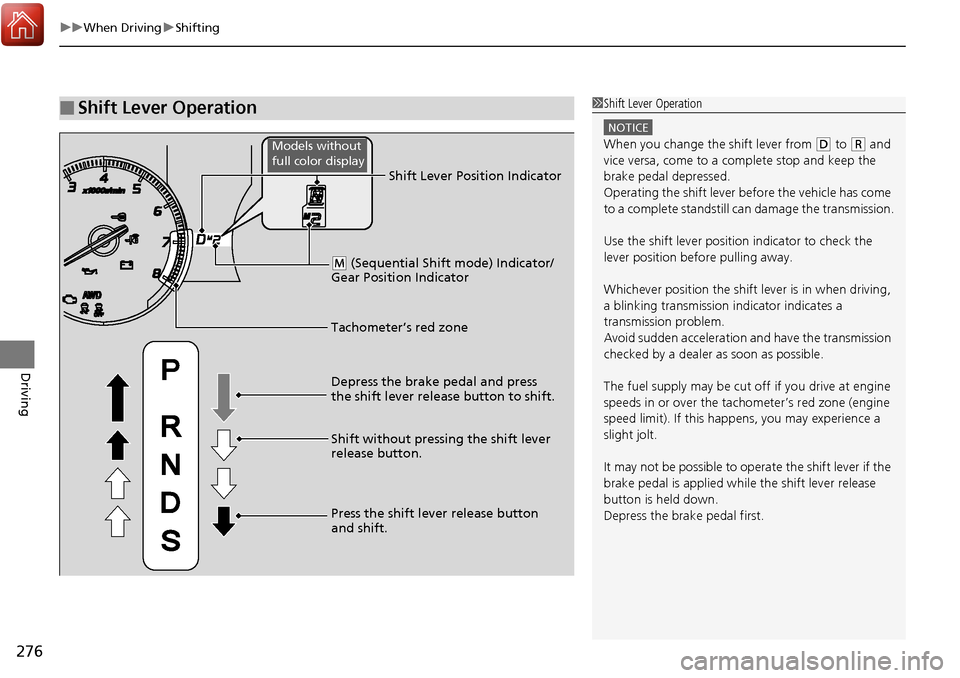
■Shift Lever Operation1Shift Lever Operation
NOTICE
When you change the shift lever from (D to (R and
vice versa, come to a complete stop and keep the
brake pedal depressed.
Operating the shift lever be fore the vehicle has come
to a complete standstill can damage the transmission.
Use the shift lever position indicator to check the
lever position befo re pulling away.
Whichever position the shift lever is in when driving,
a blinking transmission indicator indicates a
transmission problem.
Avoid sudden acceleration and have the transmission
checked by a dealer as soon as possible.
The fuel supply may be cut of f if you drive at engine
speeds in or over the tachometer’s red zone (engine
speed limit). If this happe ns, you may experience a
slight jolt.
It may not be possible to operate the shift lever if the
brake pedal is applied while the shift lever release
button is held down.
Depress the brake pedal first.
Tachometer’s red zone Shift Lever Position Indicator
Depress the brake pedal and press
the shift lever release button to shift.
Shift without pressing the shift lever
release button.
Press the shift lever release button
and shift.
( M (Sequential Shift mode) Indicator/
Gear Position Indicator
Models without
full color display
Page 280 of 449
279
uuWhen Driving uCruise Control*
Continued
Driving
Cruise Control*
Maintains a constant vehicle speed without having to keep your foot on the
accelerator. Use cruise control on freeways or open road s where you can travel at a
constant speed with little ac celeration or deceleration.1Cruise Control*
It may not be possible to maintain a constant speed
when driving uphill or downhill.
When not using cruise control:
Turn off cruise control by pressing the CRUISE
button.
3WARNING
Improper use of the cruise control can lead
to a crash.
Use the cruise control only when traveling
on open highways in good weather.
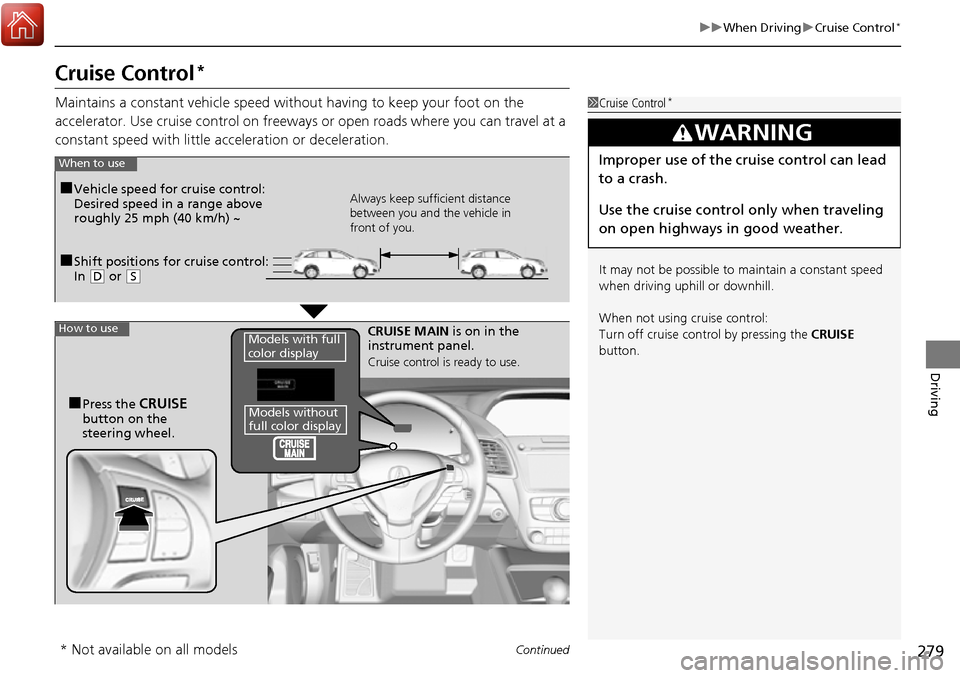
■Shift positions for cruise control:
In ( D or (S
When to use
Always keep sufficient distance
between you and the vehicle in
front of you.■Vehicle speed for cruise control:
Desired speed in a range above
roughly 25 mph (40 km/h) ~
How to useCRUISE MAIN is on in the
instrument panel.
Cruise control is ready to use.
■Press the CRUISE
button on the
steering wheel.
Models with full
color display
Models without
full color display
* Not available on all models
Page 281 of 449

280
uuWhen Driving uCruise Control*
Driving
Take your foot off the pedal and press the DECEL/SET button when you reach the
desired speed.
The moment you release the DECEL/SET button, the set speed is fixed, and cruise
control begins. The CRUISE CONTROL indicator comes on.
■To Set the Vehicle Speed
DECEL/SET Button
On when cruise control beginsPress and release
Models without
full color display
Models with full
color display
Models without
full color display
Models with full
color display
Page 287 of 449
uuWhen Driving uAdaptive Cruise Control (ACC)*
286
Driving
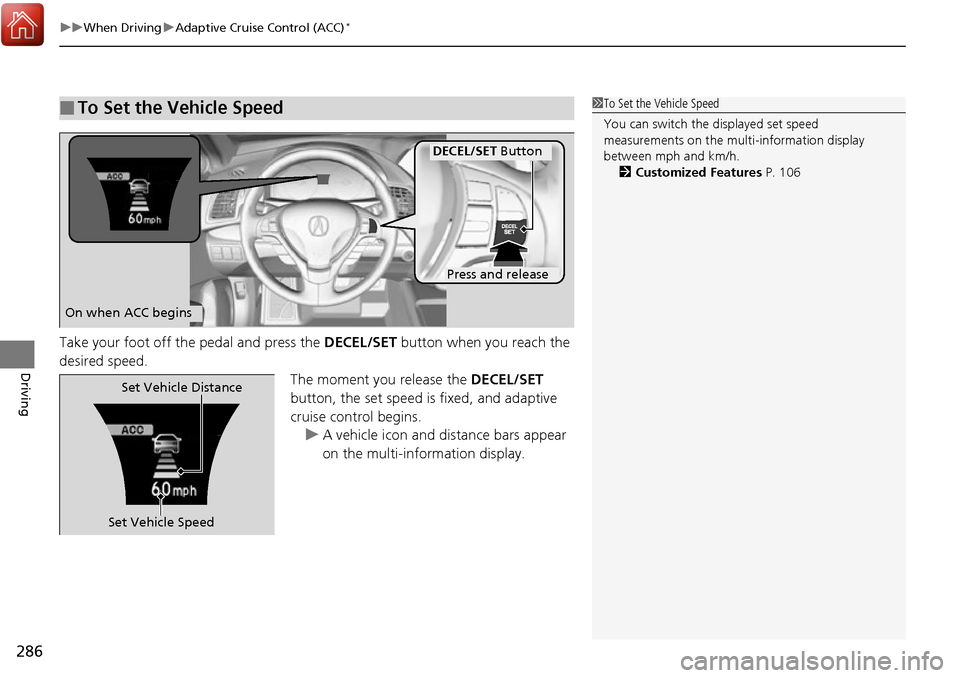
Take your foot off the pedal and press the DECEL/SET button when you reach the
desired speed. The moment you release the DECEL/SET
button, the set speed is fixed, and adaptive
cruise control begins. u A vehicle icon and distance bars appear
on the multi-information display.
■To Set the Vehicle Speed1To Set the Vehicle Speed
You can switch the displayed set speed
measurements on the mult i-information display
between mph and km/h. 2 Customized Features P. 106
On when ACC begins
Press and release
DECEL/SET Button
Set Vehicle SpeedSet Vehicle Distance
Page 288 of 449

Continued287
uuWhen Driving uAdaptive Cruise Control (ACC)*
Driving
■There is a vehicle ahead
ACC monitors if a vehicle ahead of you enters the ACC range. If a vehicle is detected
doing so, the ACC system maintains or decele rates your vehicle’s set speed in order
to keep the vehicle’s set followi ng-distance from the vehicle ahead.
2To Change Vehicle Distance P. 292
■When in Operation1When in Operation
If the vehicle detected ahead of you slows down
abruptly, or if a nother vehicle is de tected cutting in
front of you, the beep er sounds and a message
appears on the multi-informat ion display to alert you
to brake.
Depress the brake pedal, and keep an appropriate
distance from the vehicle ahead.
Even if the distance betw een your vehicle and the
vehicle detected ahead is short, ACC may start
accelerating your vehi cle under the following
circumstances:
•The vehicle ahead of you is going at almost the
same speed as, or fast er than your vehicle.
•A vehicle that cuts in front of you is going faster
than your vehicle, gradua lly distancing itself from
you.
Beep
ACC Range: 394 ft. (120 m)
Page 295 of 449
uuWhen Driving uAdaptive Cruise Control (ACC)*
294
Driving
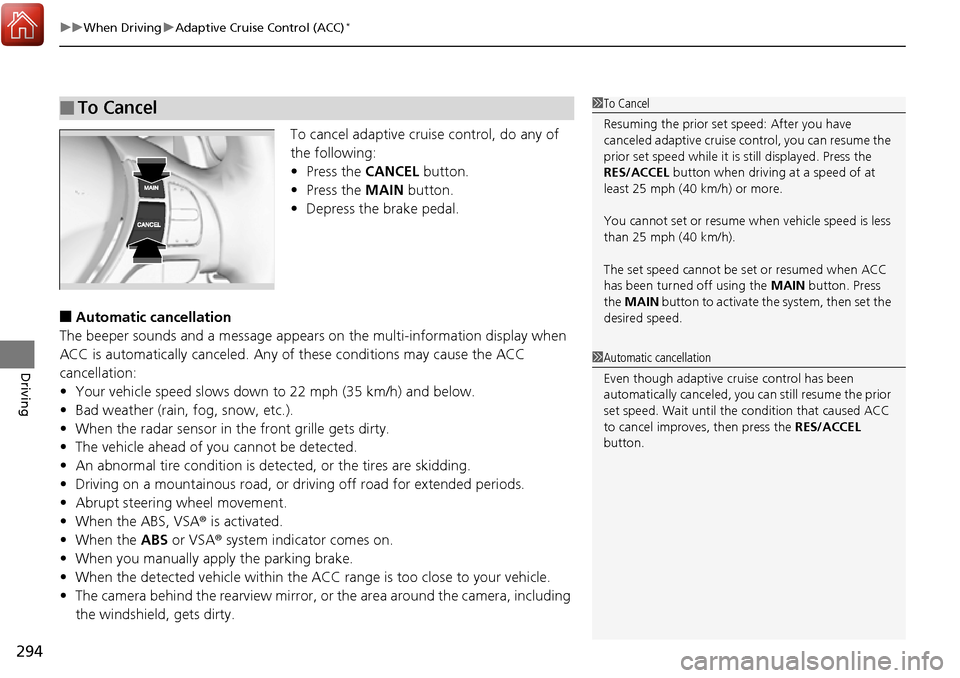
To cancel adaptive cruise control, do any of
the following:
• Press the CANCEL button.
• Press the MAIN button.
• Depress the brake pedal.
■Automatic cancellation
The beeper sounds and a me ssage appears on the multi-information display when
ACC is automatically canceled. Any of these conditions may cause the ACC
cancellation:
• Your vehicle speed slows down to 22 mph (35 km/h) and below.
• Bad weather (rain, fog, snow, etc.).
• When the radar sensor in the front grille gets dirty.
• The vehicle ahead of you cannot be detected.
• An abnormal tire condition is dete cted, or the tires are skidding.
• Driving on a mountainous road, or driving off road for extended periods.
• Abrupt steering wheel movement.
• When the ABS, VSA ® is activated.
• When the ABS or VSA ® system indicator comes on.
• When you manually apply the parking brake.
• When the detected vehicle within the ACC range is too close to your vehicle.
• The camera behind the rearview mirror, or the area around the camera, including
the windshield, gets dirty.
■To Cancel1 To Cancel
Resuming the prior set speed: After you have
canceled adaptive cruise c ontrol, you can resume the
prior set speed while it is still displayed. Press the
RES/ACCEL button when driving at a speed of at
least 25 mph (40 km/h) or more.
You cannot set or resume wh en vehicle speed is less
than 25 mph (40 km/h).
The set speed cannot be set or resumed when ACC
has been turned off using the MAIN button. Press
the MAIN button to activate the system, then set the
desired speed.
1 Automatic cancellation
Even though adaptive crui se control has been
automatically canceled, you can still resume the prior
set speed. Wait until the condition that caused ACC
to cancel improves, then press the RES/ACCEL
button.