display Acura RDX 2017 Manual PDF
[x] Cancel search | Manufacturer: ACURA, Model Year: 2017, Model line: RDX, Model: Acura RDX 2017Pages: 449, PDF Size: 10.88 MB
Page 195 of 449
194
uuAudio System Basic Operation*uWallpaper Setup
Features
Wallpaper Setup
You can change, store, and delete the wa llpaper on the audio/information screen.
See the navigation system manual for how to change the wallpaper.
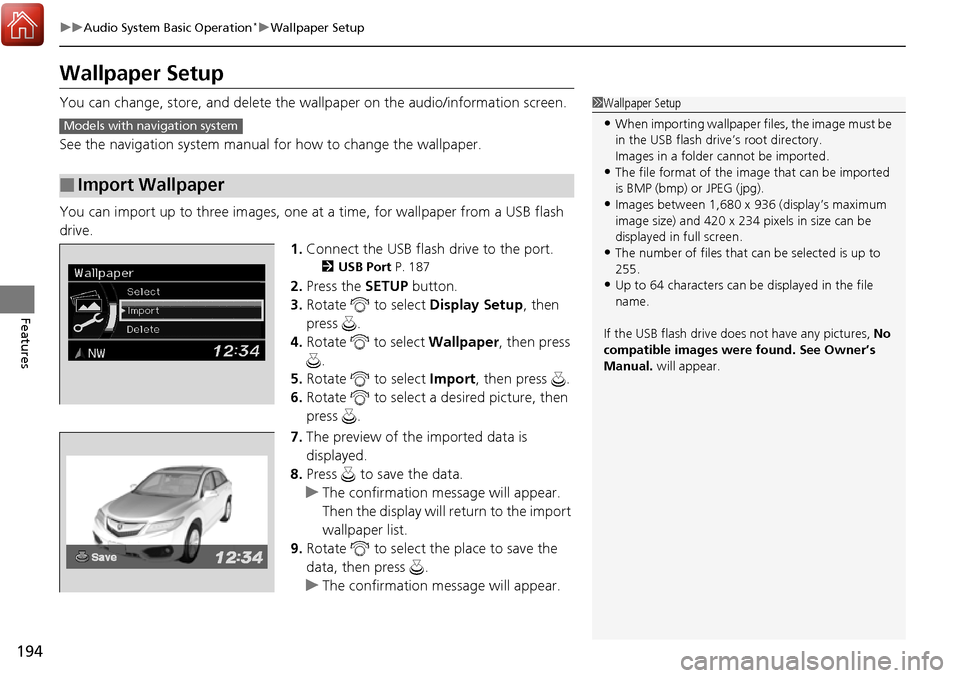
You can import up to three images, one at a time, for wallpaper from a USB flash
drive. 1.Connect the USB flash drive to the port.
2 USB Port P. 187
2.Press the SETUP button.
3. Rotate to select Display Setup, then
press .
4. Rotate to select Wallpaper, then press
.
5. Rotate to select Import, then press .
6. Rotate to select a desired picture, then
press .
7. The preview of the imported data is
displayed.
8. Press to save the data.
u The confirmation message will appear.
Then the display will return to the import
wallpaper list.
9. Rotate to select the place to save the
data, then press .
u The confirmation message will appear.
■Import Wallpaper
1Wallpaper Setup
•When importing wallpaper files, the image must be
in the USB flash drive’s root directory.
Images in a folder cannot be imported.
•The file format of the im age that can be imported
is BMP (bmp) or JPEG (jpg).
•Images between 1,680 x 936 (display’s maximum
image size) and 420 x 234 pixels in size can be
displayed in full screen.
•The number of files that can be selected is up to
255.
•Up to 64 characters can be displayed in the file
name.
If the USB flash drive doe s not have any pictures, No
compatible images were found. See Owner’s
Manual. will appear.
Models with navigation system
Page 196 of 449
195
uuAudio System Basic Operation*uWallpaper Setup
Features
1. Rotate to select Select on the wallpaper setup menu, then press .
u The screen will change to the wallpaper list.
2. Rotate to select desired wallpaper and press .
u The confirmation message will appear. Then the display will return to the
wallpaper setup menu.
1. Rotate to select Delete on the wallpaper setup menu, then press .
u The screen will change to the delete wallpaper list.
2. Rotate to select wallpaper that you want to delete and press .
u The confirmation me ssage will appear.
3. Rotate to select OK, then press to delete completely.
u The confirmation me ssage will appear.
■Select Wallpaper
■Delete Wallpaper
Page 197 of 449
196
uuAudio System Basic Operation*uDisplay Setup
Features
Display Setup
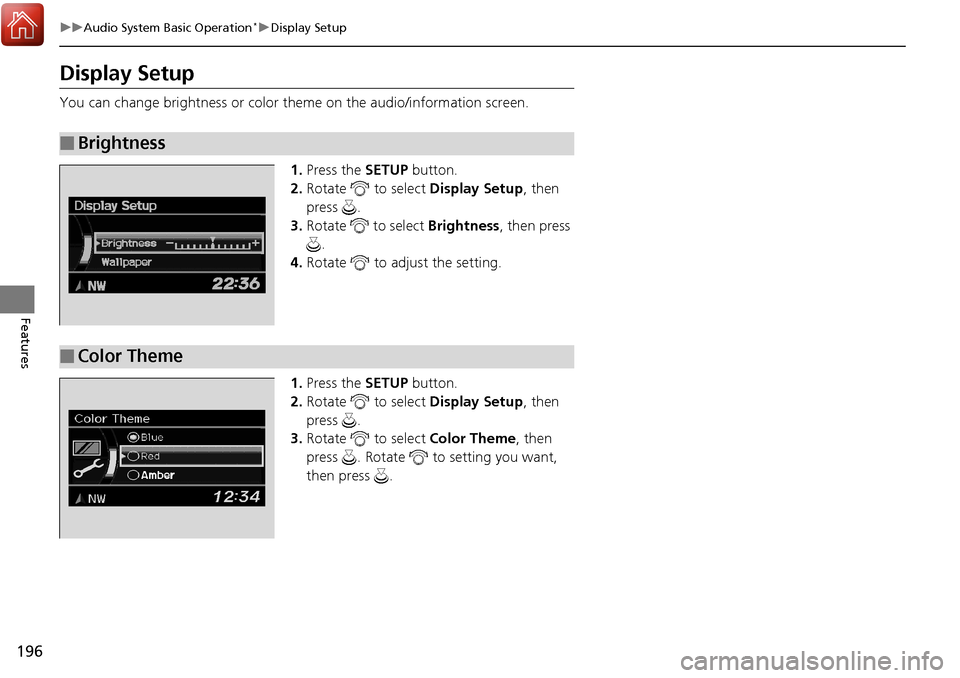
You can change brightness or color th eme on the audio/information screen.
1. Press the SETUP button.
2. Rotate to select Display Setup, then
press .
3. Rotate to select Brightness, then press
.
4. Rotate to adjust the setting.
1. Press the SETUP button.
2. Rotate to select Display Setup, then
press .
3. Rotate to select Color Theme, then
press . Rotate to setting you want,
then press .
■Brightness
■Color Theme
Page 199 of 449
198
uuAudio System Basic Operation*uPlaying the AM/FM Radio
Features
Playing the AM/FM Radio
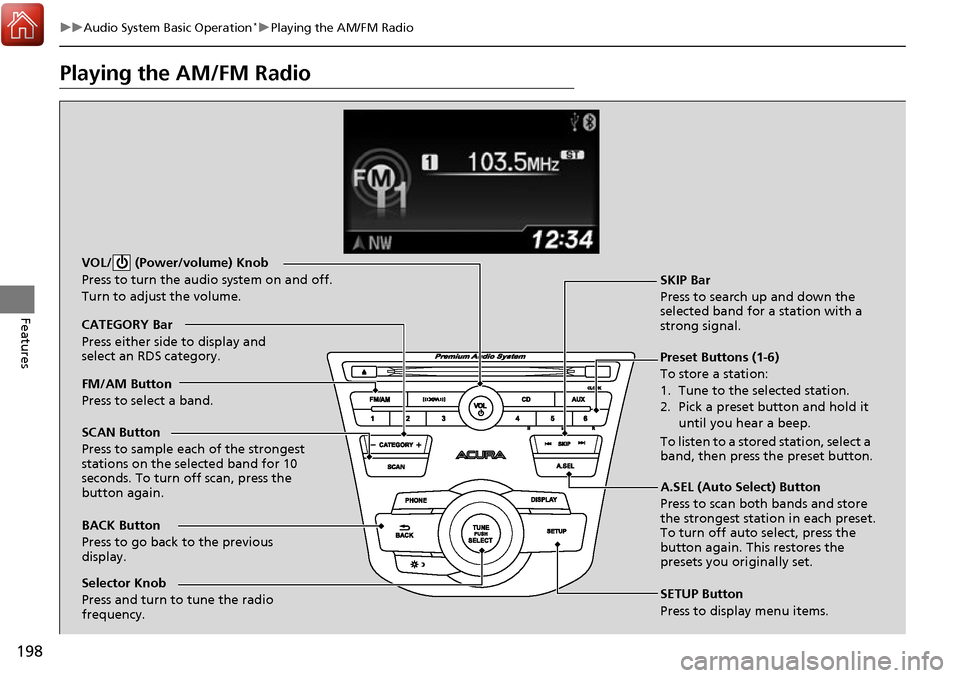
BACK Button
Press to go back to the previous
display. SCAN Button
Press to sample each of the strongest
stations on the selected band for 10
seconds. To turn off scan, press the
button again. VOL/ (Power/volume) Knob
Press to turn the audio system on and off.
Turn to adjust the volume.
Preset Buttons (1-6)
To store a station:
1. Tune to the selected station.
2. Pick a preset button and hold it
until you hear a beep.
To listen to a stored station, select a
band, then press the preset button. SKIP Bar
Press to search up and down the
selected band for a station with a
strong signal.
SETUP Button
Press to display menu items.
Selector Knob
Press and turn to tune the radio
frequency. FM/AM Button
Press to select a band. CATEGORY Bar
Press either side to display and
select an RDS category.
A.SEL (Auto Select) Button
Press to scan both bands and store
the strongest station in each preset.
To turn off auto select, press the
button again. This restores the
presets you originally set.
Page 200 of 449
199
uuAudio System Basic Operation*uPlaying the AM/FM Radio
Features
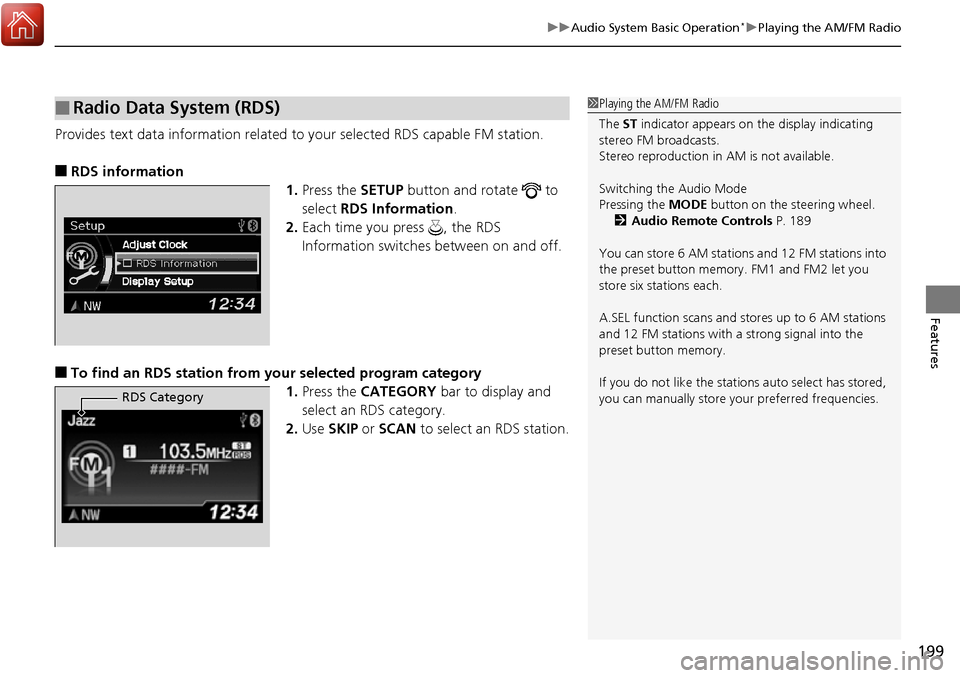
Provides text data information related to your selected RDS capable FM station.
■RDS information
1.Press the SETUP button and rotate to
select RDS Information .
2. Each time you press , the RDS
Information switches between on and off.
■To find an RDS station from your selected program category
1.Press the CATEGORY bar to display and
select an RDS category.
2. Use SKIP or SCAN to select an RDS station.
■Radio Data System (RDS)1Playing the AM/FM Radio
The ST indicator appears on the display indicating
stereo FM broadcasts.
Stereo reproduction in AM is not available.
Switching the Audio Mode
Pressing the MODE button on the steering wheel.
2 Audio Remote Controls P. 189
You can store 6 AM stations and 12 FM stations into
the preset button memory. FM1 and FM2 let you
store six stations each.
A.SEL function scans and stores up to 6 AM stations
and 12 FM stations with a strong signal into the
preset button memory.
If you do not like the stati ons auto select has stored,
you can manually store your preferred frequencies.
RDS Category
Page 201 of 449
200
uuAudio System Basic Operation*uPlaying the SiriusXM ® Radio
Features
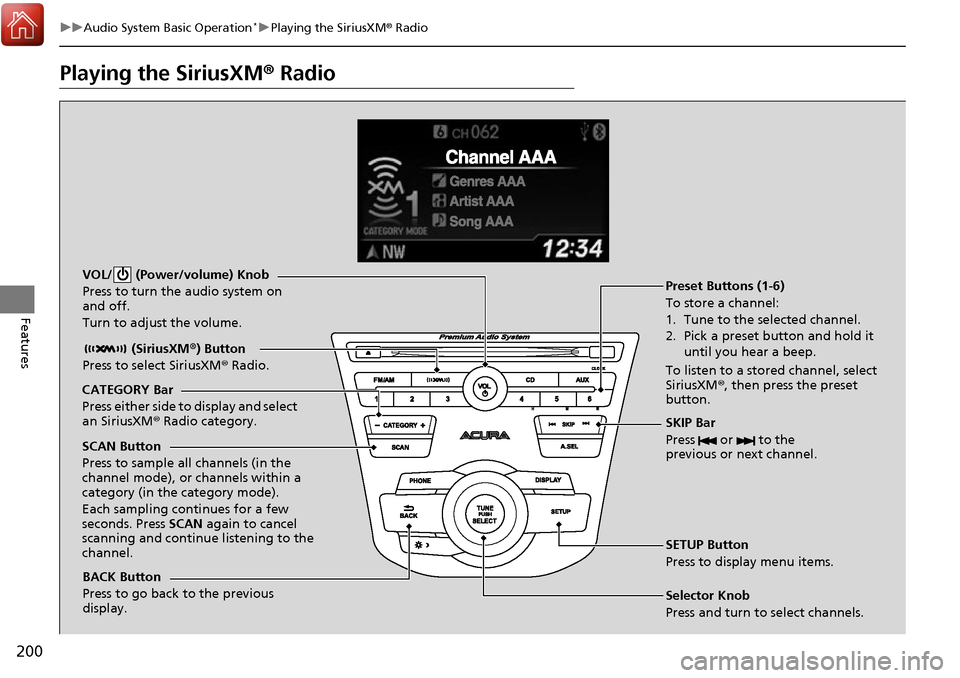
Playing the SiriusXM ® Radio
BACK Button
Press to go back to the previous
display. (SiriusXM
®) Button
Press to select SiriusXM ® Radio.
VOL/ (Power/volume) Knob
Press to turn the audio system on
and off.
Turn to adjust the volume.
SKIP Bar
Press or to the
previous or next channel.
SETUP Button
Press to display menu items.
Selector Knob
Press and turn to select channels. Preset Buttons (1-6)
To store a channel:
1. Tune to the selected channel.
2. Pick a preset button and hold it
until you hear a beep.
To listen to a stored channel, select
SiriusXM® , then press the preset
button.
SCAN Button
Press to sample all channels (in the
channel mode), or channels within a
category (in the category mode).
Each sampling continues for a few
seconds. Press SCAN again to cancel
scanning and continue listening to the
channel. CATEGORY Bar
Press either side to display and select
an SiriusXM ® Radio category.
Page 202 of 449
201
uuAudio System Basic Operation*uPlaying the SiriusXM ® Radio
Features
1. Press the button to select the SiriusXM ® radio band ( SiriusXM®1 or
SiriusXM ®2).
2. Press the SETUP button, rotate to select SiriusXM® Mode , and press .
Rotate to select Channel Mode or Category Mode , then press .
3. Select a channel using the TUNE (), SKIP , CATEGORY , SCAN, or Preset
buttons.
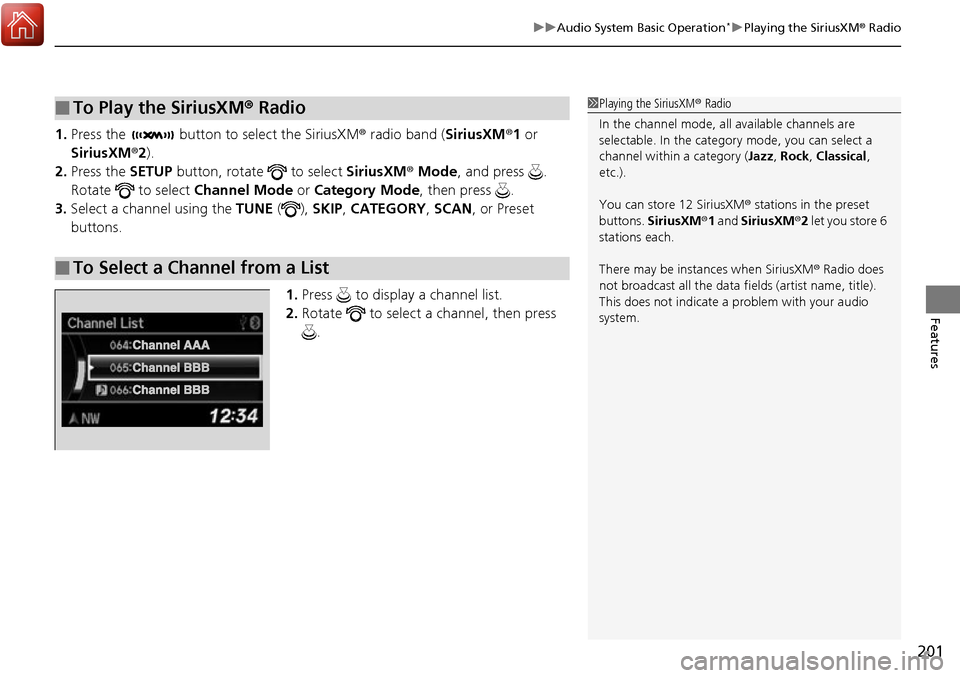
1.Press to display a channel list.
2. Rotate to select a channel, then press
.
■To Play the SiriusXM ® Radio
■To Select a Channel from a List
1 Playing the SiriusXM ® Radio
In the channel mode, all available channels are
selectable. In the categor y mode, you can select a
channel within a category ( Jazz, Rock , Classical,
etc.).
You can store 12 SiriusXM ® stations in the preset
buttons. SiriusXM ®1 and SiriusXM ®2 let you store 6
stations each.
There may be instances when SiriusXM ® Radio does
not broadcast all the data fi elds (artist name, title).
This does not indicate a problem with your audio
system.
Page 203 of 449
202
uuAudio System Basic Operation*uPlaying a CD
Features
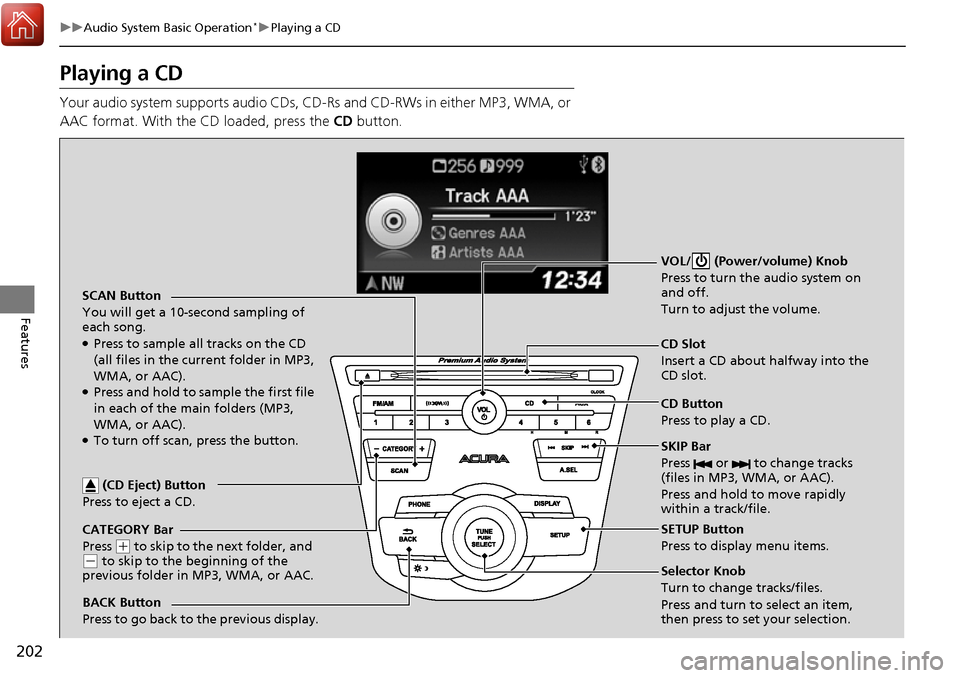
Playing a CD
Your audio system supports audio CDs, CD-Rs and CD-RWs in either MP3, WMA, or
AAC format. With the CD loaded, press the CD button.
CATEGORY Bar
Press
(+ to skip to the next folder, and (- to skip to the beginning of the
previous folder in MP3, WMA, or AAC. SCAN Button
You will get a 10-second sampling of
each song.
●Press to sample all tracks on the CD
(all files in the current folder in MP3,
WMA, or AAC).
●Press and hold to sample the first file
in each of the main folders (MP3,
WMA, or AAC).
●To turn off scan, press the button. VOL/ (Power/volume) Knob
Press to turn the
audio system on
and off.
Turn to adjust the volume.
CD Slot
Insert a CD about halfway into the
CD slot.
SKIP Bar
Press or to change tracks
(files in MP3, WMA, or AAC).
Press and hold to move rapidly
within a track/file.
SETUP Button
Press to display menu items.
Selector Knob
Turn to change tracks/files.
Press and turn to select an item,
then press to set your selection. CD Button
Press to play a CD.
(CD Eject) Button
Press to eject a CD.
BACK Button
Press to go back to the previous display.
Page 204 of 449
Continued203
uuAudio System Basic Operation*uPlaying a CD
Features
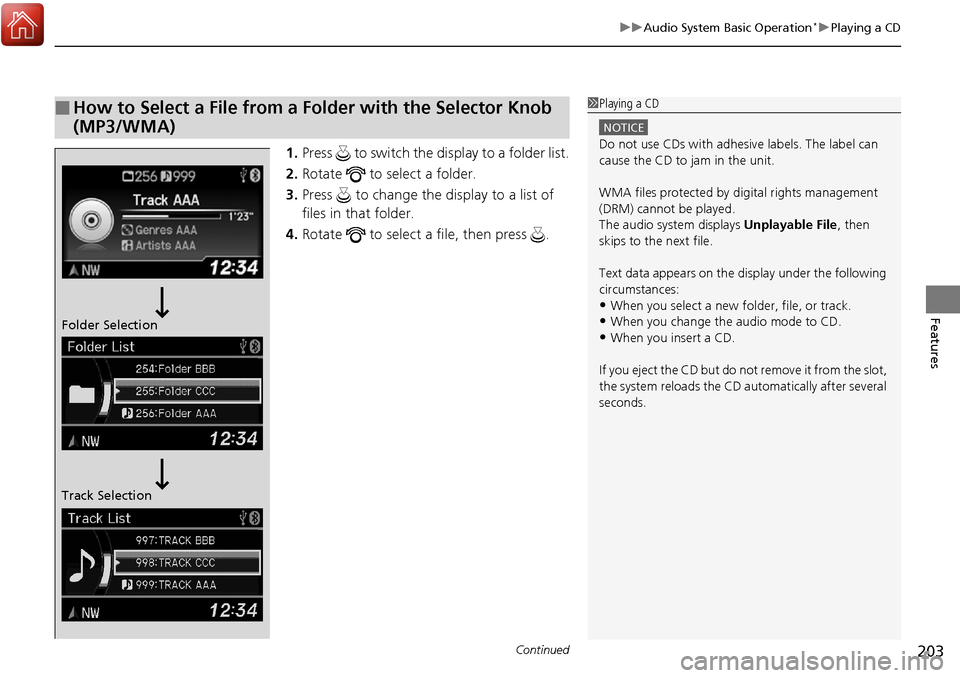
1. Press to switch the display to a folder list.
2. Rotate to select a folder.
3. Press to change the display to a list of
files in that folder.
4. Rotate to select a file, then press .
■How to Select a File from a Folder with the Selector Knob
(MP3/WMA)1Playing a CD
NOTICE
Do not use CDs with adhesive labels. The label can
cause the CD to jam in the unit.
WMA files protected by di gital rights management
(DRM) cannot be played.
The audio system displays Unplayable File, then
skips to the next file.
Text data appears on the di splay under the following
circumstances:
•When you select a new folder, file, or track.
•When you change the audio mode to CD.
•When you insert a CD.
If you eject the CD but do not remove it from the slot,
the system reloads the CD automatically after several
seconds.Folder Selection
Track Selection
Page 205 of 449
uuAudio System Basic Operation*uPlaying a CD
204
Features
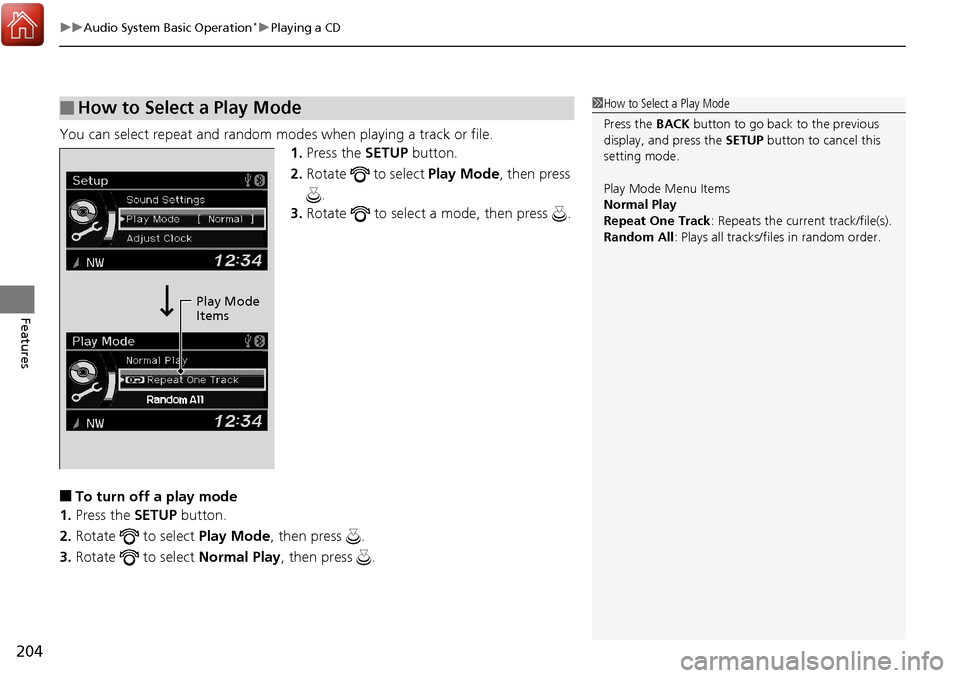
You can select repeat and random modes when playing a track or file.
1.Press the SETUP button.
2. Rotate to select Play Mode, then press
.
3. Rotate to select a mode, then press .
■To turn off a play mode
1. Press the SETUP button.
2. Rotate to select Play Mode, then press .
3. Rotate to select Normal Play, then press .
■How to Select a Play Mode1How to Select a Play Mode
Press the BACK button to go back to the previous
display, and press the SETUP button to cancel this
setting mode.
Play Mode Menu Items
Normal Play
Repeat One Track : Repeats the current track/file(s).
Random All : Plays all tracks/files in random order.
Play Mode
Items