warning multi information display Acura RDX 2017 User Guide
[x] Cancel search | Manufacturer: ACURA, Model Year: 2017, Model line: RDX, Model: Acura RDX 2017Pages: 449, PDF Size: 10.88 MB
Page 95 of 449
94
uuGauges and Multi-Information Display uMulti-Information Display
Instrument Panel
Multi-Information Display
The multi-information display shows the od ometer, trip meter, outside temperature
indicator, and other gauges. It also disp lays important messages such as warnings
and other helpful information.
■Main displays
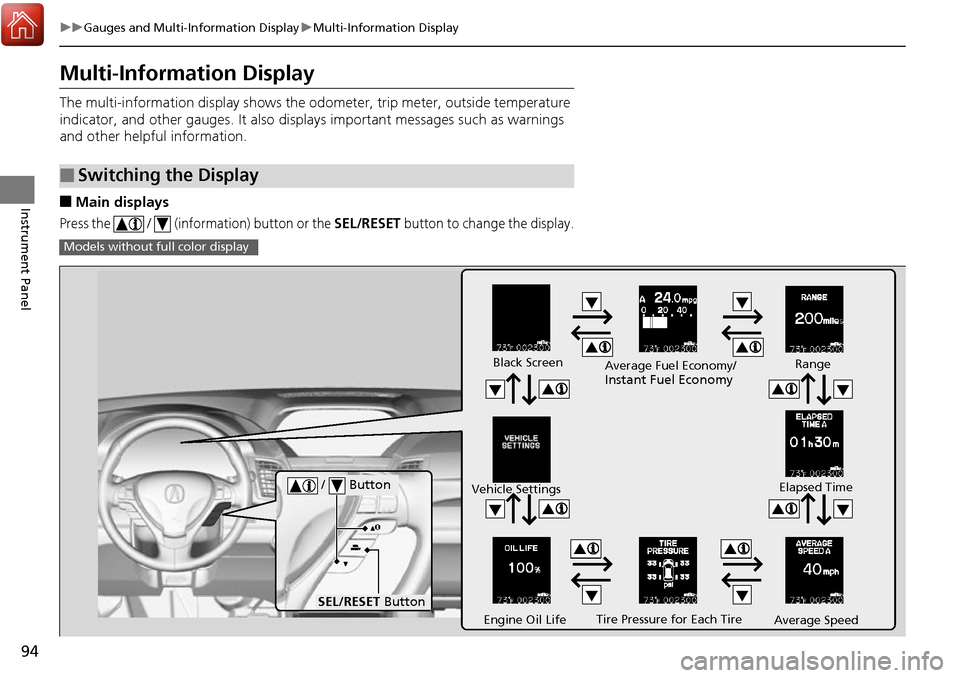
Press the / (information) button or the SEL/RESET button to change the display.
■Switching the Display
Models without fu ll color display
Tire Pressure for Each Tire
Black Screen
Engine Oil Life
Vehicle Settings
Average SpeedRange
Elapsed Time
Average Fuel Economy/
Instant Fuel Economy
/ Button
SEL/RESET
Button
Page 108 of 449
107
uuGauges and Multi-Information Display uMulti-Information Display
Continued
Instrument Panel
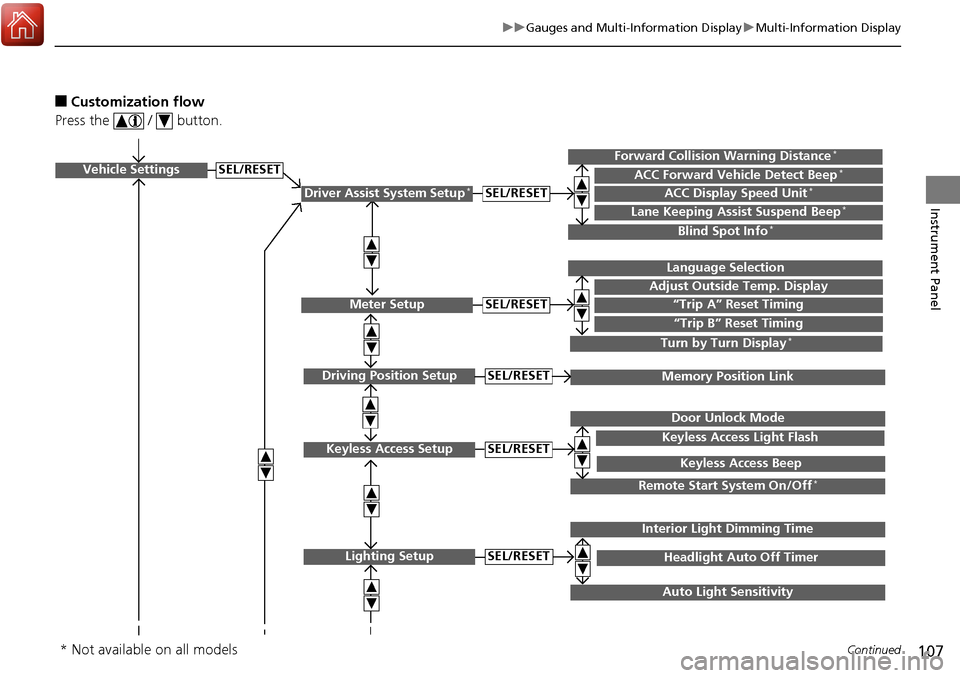
■Customization flow
Press the / button.
Vehicle Settings
Meter Setup
Keyless Access Setup
Lighting Setup
“Trip A” Reset Timing
Adjust Outside Temp. Display
Language Selection
“Trip B” Reset Timing
Keyless Access Light Flash
Door Unlock Mode
Keyless Access Beep
Headlight Auto Off Timer
Interior Light Dimming Time
Auto Light Sensitivity
SEL/RESET
SEL/RESET
SEL/RESET
SEL/RESET
Remote Start System On/Off*
Driver Assist System Setup*ACC Display Speed Unit*ACC Forward Vehicle Detect Beep*Forward Collision Warning Distance*
Lane Keeping Assist Suspend Beep*
Blind Spot Info*
SEL/RESET
Turn by Turn Display*
Driving Position SetupMemory Position LinkSEL/RESET
* Not available on all models
Page 110 of 449

109
uuGauges and Multi-Information Display uMulti-Information Display
Continued
Instrument Panel
■List of customizable options
*1:Default Setting Setup Group Customizable Features
Description Selectable Settings
Driver Assist
System
Setup
*
Forward Collision
Warning Distance*Changes at which distance CMBSTM alerts.Long/Normal*1/Short
ACC Forward Vehicle
Detect Beep*Causes the system to beep when the system detects a
vehicle, or when the vehicl e goes out of the ACC range.On/Off*1
ACC Display Speed Unit*Changes the speed unit for ACC on the multi-
information display.mph*1/km/h (U.S.)
mph /km/h*1 (Canada)
Lane Keeping Assist
Suspend Beep*Causes the system to beep when the LKAS is suspended.On/Off*1
Blind Spot Info*Changes the setting for th e blind spot information.Audible And Visual
Alert*1/Visual Alert /Off
* Not available on all models
Page 147 of 449
uuOperating the Switches Around the Steering Wheel uENGINE START/STOP Button
146
Controls
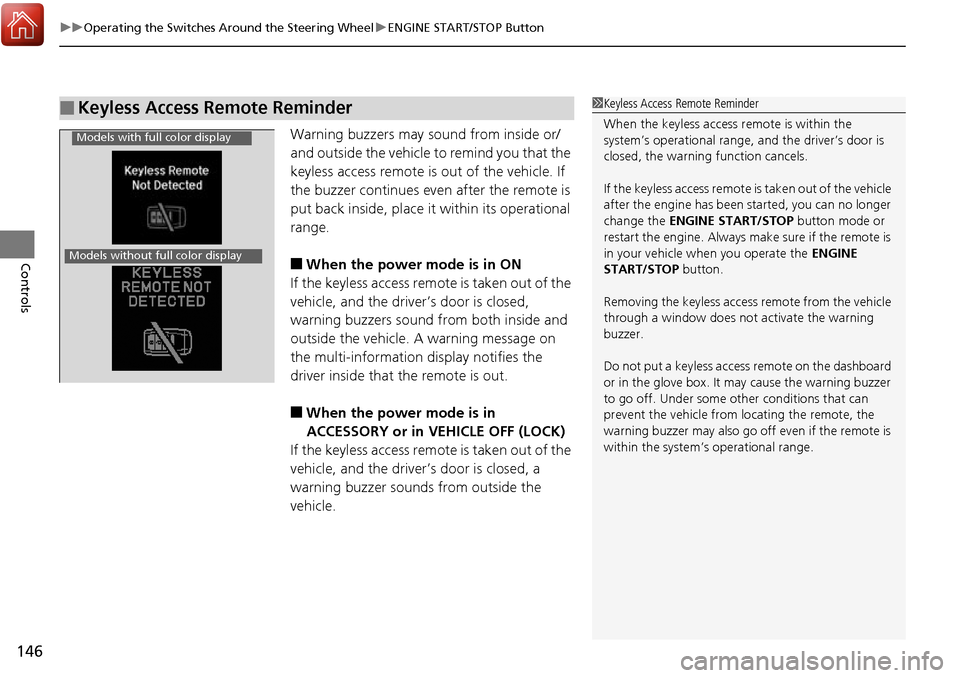
Warning buzzers may sound from inside or/
and outside the vehicle to remind you that the
keyless access remote is out of the vehicle. If
the buzzer continues even after the remote is
put back inside, place it within its operational
range.
■When the power mode is in ON
If the keyless access remote is taken out of the
vehicle, and the driver’s door is closed,
warning buzzers sound from both inside and
outside the vehicle. A warning message on
the multi-information display notifies the
driver inside that the remote is out.
■When the power mode is in
ACCESSORY or in VEHICLE OFF (LOCK)
If the keyless access remote is taken out of the
vehicle, and the driver’s door is closed, a
warning buzzer sounds from outside the
vehicle.
■Keyless Access Remote Reminder1 Keyless Access Remote Reminder
When the keyless access remote is within the
system’s operational range, and the driver’s door is
closed, the warni ng function cancels.
If the keyless access remote is taken out of the vehicle
after the engine has been started, you can no longer
change the ENGINE START/STOP button mode or
restart the engine. Always make sure if the remote is
in your vehicle when you operate the ENGINE
START/STOP button.
Removing the keyless access remote from the vehicle
through a window does not activate the warning
buzzer.
Do not put a keyless access remote on the dashboard
or in the glove box. It may cause the warning buzzer
to go off. Under some other conditions that can
prevent the vehicle from locating the remote, the
warning buzzer may al so go off even if the remote is
within the system’s operational range.
Models with full color display
Models without full color display
Page 271 of 449
uuWhen Driving uStarting the Engine
270
Driving
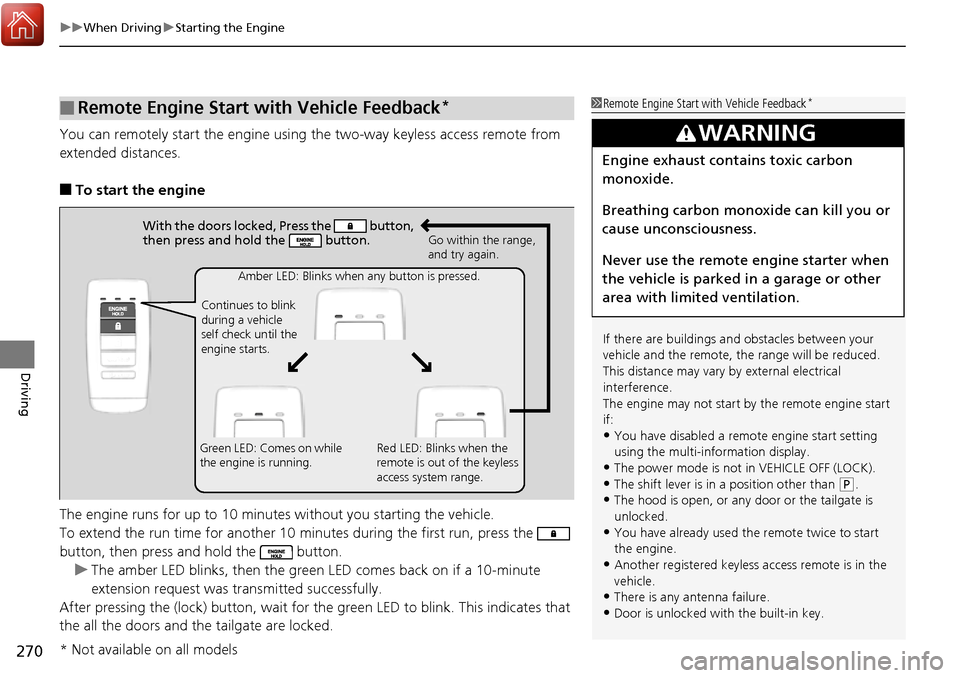
You can remotely start the engine using the two-way keyless access remote from
extended distances.
■To start the engine
The engine runs for up to 10 minutes without you starting the vehicle.
To extend the run time for another 10 minutes during the first run, press the
button, then press and hold the button. u The amber LED blinks, then the green LED comes back on if a 10-minute
extension request was transmitted successfully.
After pressing the (lock) button, wait for th e green LED to blink. This indicates that
the all the doors and the tailgate are locked.
■Remote Engine Start with Vehicle Feedback*1 Remote Engine Start with Vehicle Feedback*
If there are buildings an d obstacles between your
vehicle and the remote, th e range will be reduced.
This distance may vary by external electrical
interference.
The engine may not start by the remote engine start
if:
•You have disabled a remo te engine start setting
using the multi-information display.
•The power mode is not in VEHICLE OFF (LOCK).
•The shift lever is in a position other than ( P.
•The hood is open, or any door or the tailgate is
unlocked.
•You have already used the remote twice to start
the engine.
•Another registered keyless access remote is in the
vehicle.
•There is any antenna failure.•Door is unlocked with the built-in key.
3WARNING
Engine exhaust contains toxic carbon
monoxide.
Breathing carbon monoxide can kill you or
cause unconsciousness.
Never use the remote engine starter when
the vehicle is parked in a garage or other
area with limited ventilation.
With the doors locked, Press the button,
then press and hold the button.
Amber LED: Blinks when any button is pressed.
Continues to blink
during a vehicle
self check until the
engine starts. Go within the range,
and try again.
Green LED: Comes on while
the engine is running. Red LED: Blinks when the
remote is out of the keyless
access system range.
* Not available on all models
Page 298 of 449
297
uuWhen Driving uLane Departure Warning (LDW)*
Continued
Driving
Lane Departure Warning (LDW)*
Alerts you when the system determines a possibility of your vehicle unintentionally
crossing over detected lane markings.
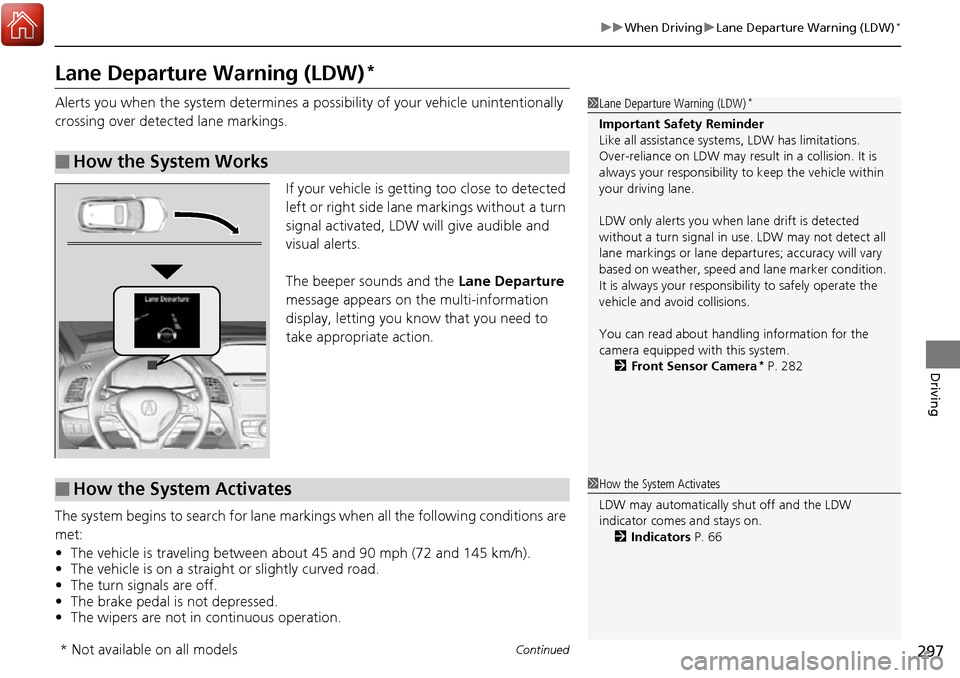
If your vehicle is getting too close to detected
left or right side lane markings without a turn
signal activated, LDW will give audible and
visual alerts.
The beeper sounds and the Lane Departure
message appears on the multi-information
display, letting you know that you need to
take appropriate action.
The system begins to search for lane mark ings when all the following conditions are
met:
• The vehicle is traveling between about 45 and 90 mph (72 and 145 km/h).
• The vehicle is on a straight or slightly curved road.
• The turn signals are off.
• The brake pedal is not depressed.
• The wipers are not in continuous operation.
■How the System Works
1Lane Departure Warning (LDW)*
Important Safety Reminder
Like all assistance systems, LDW has limitations.
Over-reliance on LDW may result in a collision. It is
always your respons ibility to keep the vehicle within
your driving lane.
LDW only alerts you when lane drift is detected
without a turn signal in us e. LDW may not detect all
lane markings or lane departures; a ccuracy will vary
based on weather, speed and lane marker condition.
It is always your responsibility to safely operate the
vehicle and avoid collisions.
You can read about handling information for the
camera equipped with this system. 2 Front Sensor Camera
* P. 282
■How the System Activates1How the System Activates
LDW may automatically shut off and the LDW
indicator comes and stays on.
2 Indicators P. 66
* Not available on all models
Page 302 of 449
301
uuWhen Driving uLane Keeping Assist System (LKAS)*
Continued
Driving
Lane Keeping Assist System (LKAS)*
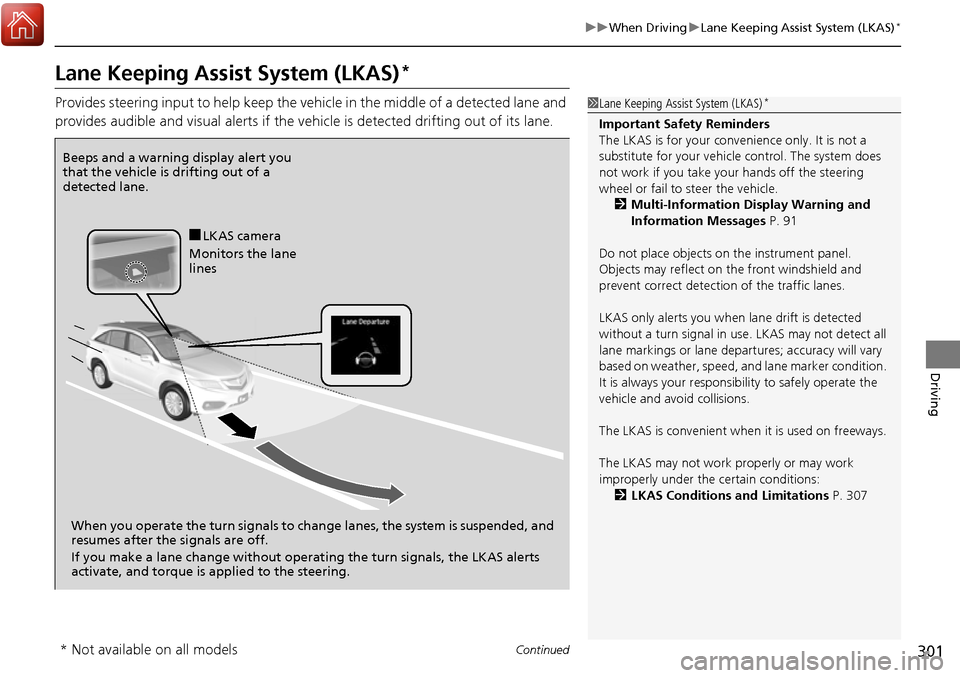
Provides steering input to help keep the vehicle in the middle of a detected lane and
provides audible and visual alerts if the vehicle is detected drifting out of its lane.1Lane Keeping Assist System (LKAS)*
Important Safety Reminders
The LKAS is for your convenience only. It is not a
substitute for your vehicl e control. The system does
not work if you take y our hands off the steering
wheel or fail to steer the vehicle.
2 Multi-Information Display Warning and
Information Messages P. 91
Do not place objects on the instrument panel.
Objects may reflect on th e front windshield and
prevent correct detectio n of the traffic lanes.
LKAS only alerts you when lane drift is detected
without a turn signal in use. LKAS may not detect all
lane markings or lane departures; a ccuracy will vary
based on weather, speed, an d lane marker condition.
It is always your responsibility to safely operate the
vehicle and avoid collisions.
The LKAS is convenient when it is used on freeways.
The LKAS may not work properly or may work
improperly under the certain conditions: 2 LKAS Conditions and Limitations P. 307
Beeps and a warning display alert you
that the vehicle is drifting out of a
detected lane.
When you operate the turn signals to chan ge lanes, the system is suspended, and
resumes after the signals are off.
If you make a lane change without operat ing the turn signals, the LKAS alerts
activate, and torque is applied to the steering.
■LKAS camera
Monitors the lane
lines
* Not available on all models
Page 312 of 449
311
uuWhen Driving uBlind spot information (BSI) System*
Continued
Driving
Blind spot informa tion (BSI) System*
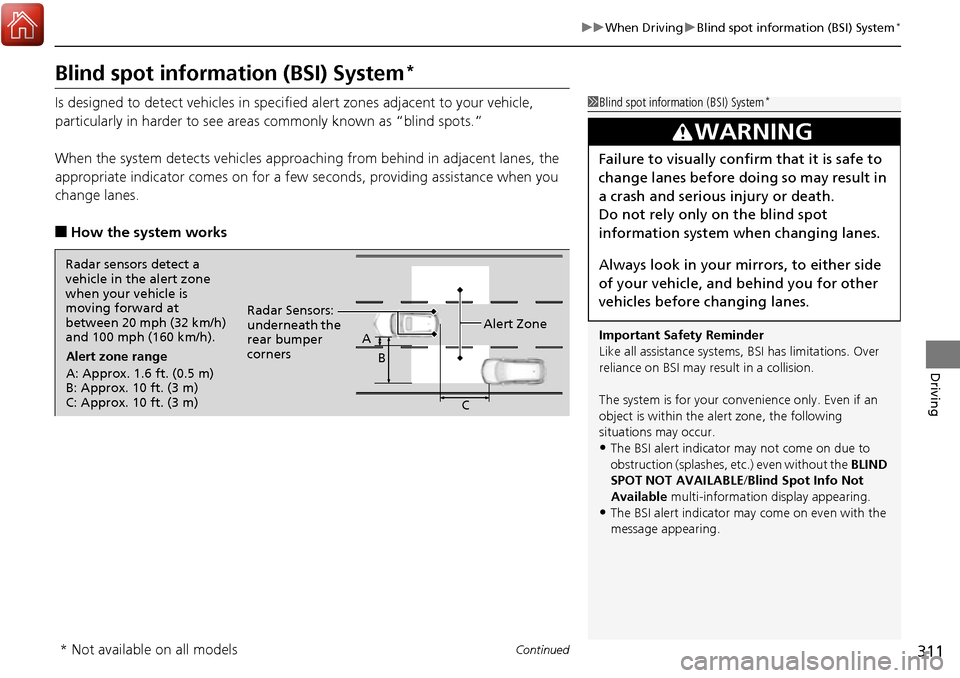
Is designed to detect vehicles in specified alert zones adjacent to your vehicle,
particularly in harder to see areas commonly known as “blind spots.”
When the system detects vehicles approach ing from behind in adjacent lanes, the
appropriate indicator comes on for a few se conds, providing assistance when you
change lanes.
■How the system works
1 Blind spot inform ation (BSI) System*
Important Safety Reminder
Like all assistance systems, BSI has limitations. Over
reliance on BSI may re sult in a collision.
The system is for your convenience only. Even if an
object is within the alert zone, the following
situations may occur.
•The BSI alert indicator may not come on due to
obstruction (splashes, et c.) even without the BLIND
SPOT NOT AVAILABLE/Blind Spot Info Not
Available multi-information display appearing.
•The BSI alert indicator may come on even with the
message appearing.
3WARNING
Failure to visually confirm that it is safe to
change lanes before doing so may result in
a crash and serious injury or death.
Do not rely only on the blind spot
information system wh en changing lanes.
Always look in your mirrors, to either side
of your vehicle, and behind you for other
vehicles before changing lanes.
Radar sensors detect a
vehicle in the alert zone
when your vehicle is
moving forward at
between 20 mph (32 km/h)
and 100 mph (160 km/h). Alert zone range
A: Approx. 1.6 ft. (0.5 m)
B: Approx. 10 ft. (3 m)
C: Approx. 10 ft. (3 m) Radar Sensors:
underneath the
rear bumper
corners
Alert Zone
A
B
C
* Not available on all models
Page 319 of 449

318
Driving
Braking
Brake System
Use the parking brake to keep the vehicle stationary when parking.
To apply:
Depress the parking brake pedal down with
your foot.
To release:
1. Depress the brake pedal.
2. Depress the parking brake.
■Parking Brake1Parking Brake
NOTICE
Release the parking brake fu lly before driving. The
rear brakes and axle can be damaged if you drive
with the parki ng brake applied.
If you start driving without fully releasing the parking
brake, a buzzer sounds as a warning, and RELEASE
PARKING BRAKE /Release Parking Brake appears
on the multi-information display.
Always apply the parking brake when parking.
Page 401 of 449
uuIf a Tire Goes Flat uChanging a Flat Tire*
400
Handling the Unexpected
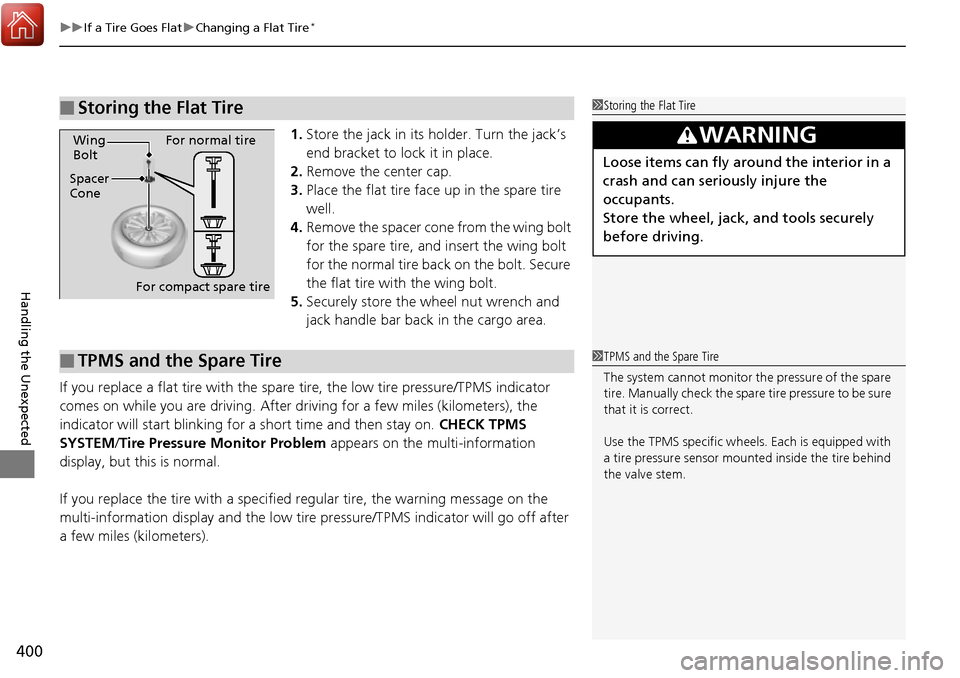
1. Store the jack in its holder. Turn the jack’s
end bracket to lock it in place.
2. Remove the center cap.
3. Place the flat tire face up in the spare tire
well.
4. Remove the spacer cone from the wing bolt
for the spare tire, and insert the wing bolt
for the normal tire back on the bolt. Secure
the flat tire with the wing bolt.
5. Securely store the wheel nut wrench and
jack handle bar back in the cargo area.
If you replace a flat tire with the spare tire, the low tire pressure/TPMS indicator
comes on while you are driving. After driving for a few miles (kilometers), the
indicator will start blinking for a short time and then stay on. CHECK TPMS
SYSTEM/ Tire Pressure Monitor Problem appears on the multi-information
display, but this is normal.
If you replace the tire with a specified regular tire, the warning message on the
multi-information display and the low tire pressure/TPMS indicator will go off after
a few miles (kilometers).
■Storing the Flat Tire1 Storing the Flat Tire
3WARNING
Loose items can fly around the interior in a
crash and can seriously injure the
occupants.
Store the wheel, jack, and tools securely
before driving.Spacer
ConeWing
Bolt
For compact spare tireFor normal tire
■TPMS and the Spare Tire1
TPMS and the Spare Tire
The system cannot monitor th e pressure of the spare
tire. Manually check the spare tire pressure to be sure
that it is correct.
Use the TPMS specific wheels. Each is equipped with
a tire pressure sensor mount ed inside the tire behind
the valve stem.