Link Acura RDX 2017 Manual PDF
[x] Cancel search | Manufacturer: ACURA, Model Year: 2017, Model line: RDX, Model: Acura RDX 2017Pages: 449, PDF Size: 10.88 MB
Page 272 of 449
Continued271
uuWhen Driving uStarting the Engine
Driving
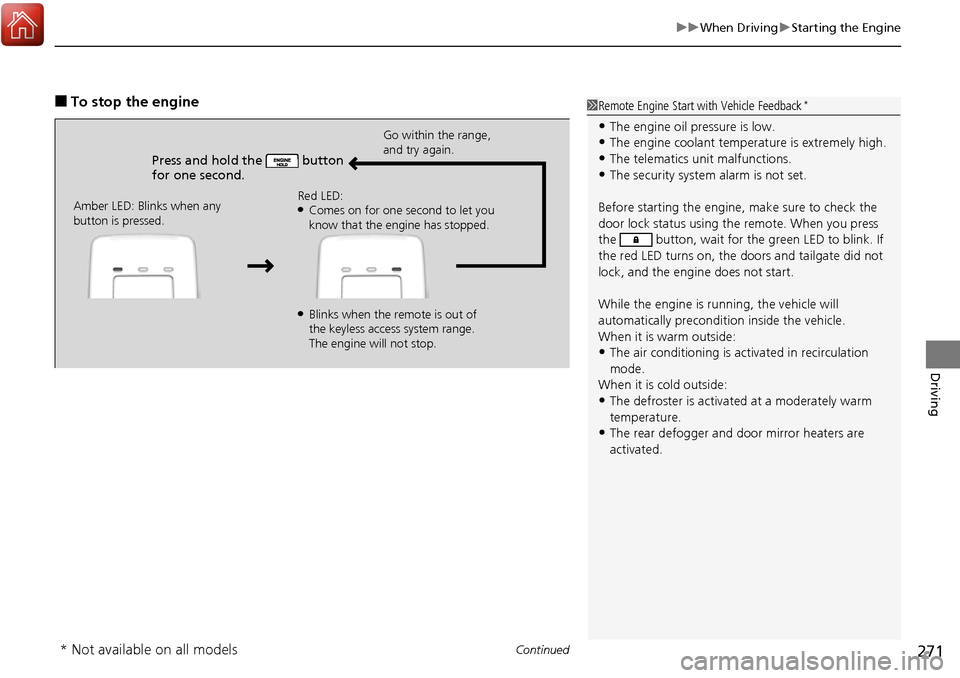
■To stop the engine
Press and hold the button
for one second.
Go within the range,
and try again.
Amber LED: Blinks when any
button is pressed. Red LED:
●Comes on for one second to let you
know that the engine has stopped.
●Blinks when the remote is out of
the keyless access system range.
The engine will not stop.
1
Remote Engine Start with Vehicle Feedback*
•The engine oil pressure is low.•The engine coolant temper ature is extremely high.
•The telematics unit malfunctions.
•The security system alarm is not set.
Before starting the engine, make sure to check the
door lock status using the remote. When you press
the button, wait for the green LED to blink. If
the red LED turns on, the doors and tailgate did not
lock, and the engine does not start.
While the engine is running, the vehicle will
automatically preconditi on inside the vehicle.
When it is warm outside:
•The air conditioning is acti vated in recirculation
mode.
When it is cold outside:
•The defroster is activated at a moderately warm
temperature.
•The rear defogger and door mirror heaters are
activated.
* Not available on all models
Page 277 of 449
uuWhen Driving uShifting
276
Driving
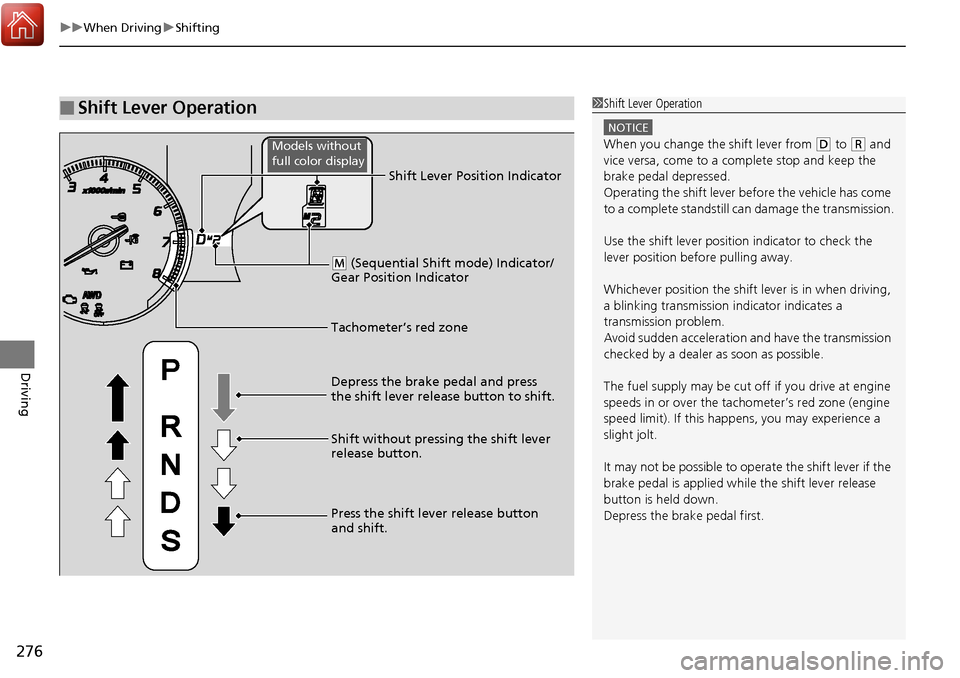
■Shift Lever Operation1Shift Lever Operation
NOTICE
When you change the shift lever from (D to (R and
vice versa, come to a complete stop and keep the
brake pedal depressed.
Operating the shift lever be fore the vehicle has come
to a complete standstill can damage the transmission.
Use the shift lever position indicator to check the
lever position befo re pulling away.
Whichever position the shift lever is in when driving,
a blinking transmission indicator indicates a
transmission problem.
Avoid sudden acceleration and have the transmission
checked by a dealer as soon as possible.
The fuel supply may be cut of f if you drive at engine
speeds in or over the tachometer’s red zone (engine
speed limit). If this happe ns, you may experience a
slight jolt.
It may not be possible to operate the shift lever if the
brake pedal is applied while the shift lever release
button is held down.
Depress the brake pedal first.
Tachometer’s red zone Shift Lever Position Indicator
Depress the brake pedal and press
the shift lever release button to shift.
Shift without pressing the shift lever
release button.
Press the shift lever release button
and shift.
( M (Sequential Shift mode) Indicator/
Gear Position Indicator
Models without
full color display
Page 279 of 449
uuWhen Driving uShifting
278
Driving
■Second gear lock mode
If you pull the
(+ paddle shifter while stopped or dr iving at 6 mph (10 km/h) or less,
the gear position will be lock ed in 2nd gear. This makes it easier to pull away on
slippery surfaces such as snow covered roads.
To cancel the 2nd gear lock mode, pull the
(- paddle shifter, or move the shift lever
from
(S to (D.
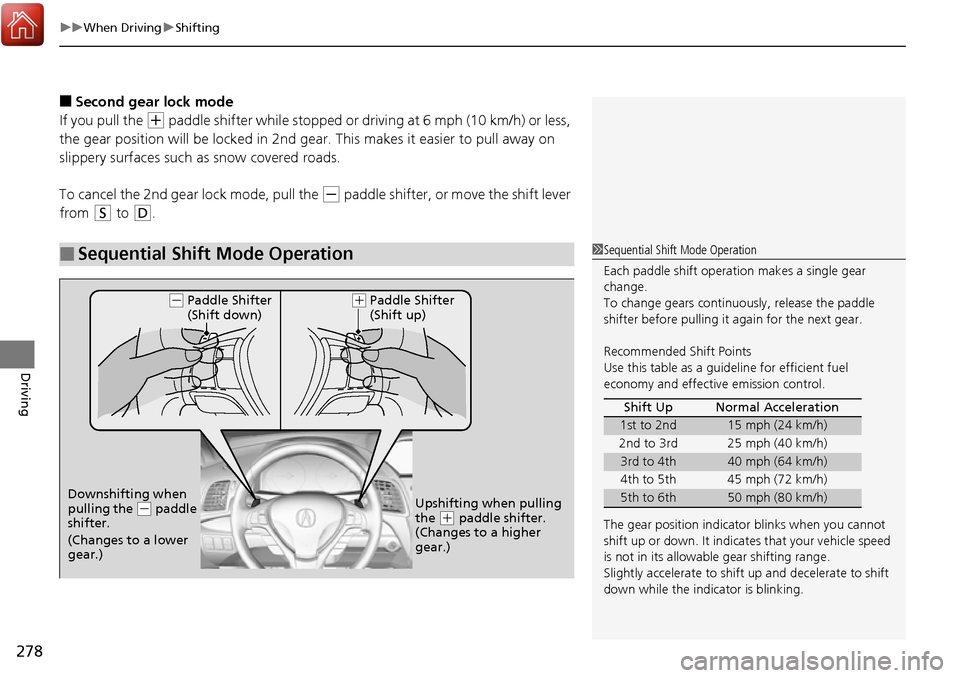
■Sequential Shift Mode Operation1 Sequential Shift Mode Operation
Each paddle shift operation makes a single gear
change.
To change gears continuously, release the paddle
shifter before pulling it again for the next gear.
Recommended Shift Points
Use this table as a guideline for efficient fuel
economy and effectiv e emission control.
The gear position indicato r blinks when you cannot
shift up or down. It indicate s that your vehicle speed
is not in its allowabl e gear shifting range.
Slightly accelerate to shift up and decelerate to shift
down while the indi cator is blinking.
Shift Up Normal Acceleration
1st to 2nd15 mph (24 km/h)
2nd to 3rd 25 mph (40 km/h)
3rd to 4th40 mph (64 km/h)
4th to 5th 45 mph (72 km/h)
5th to 6th50 mph (80 km/h)
Paddle Shifter
(Shift down)
Downshifting when
pulling the
( - paddle
shifter.
(Changes to a lower
gear.) Upshifting when pulling
the (
+ paddle shifter.
(Changes to a higher
gear.)
( -
(+Paddle Shifter
(Shift up)
Page 310 of 449
309
uuWhen Driving uVehicle Stability Assist (VSA ®), aka Electronic Stability Control (ESC), System
Continued
Driving
Vehicle Stability Assist (VSA ®), aka Electronic
Stability Control (ESC), System
VSA ® helps to stabilize the vehicle during corn ering if the vehicle turns more or less
than what was intended. It also assists in maintaining traction on slippery surfaces.
It does so by regulating engine ou tput and selectively applying the brakes.
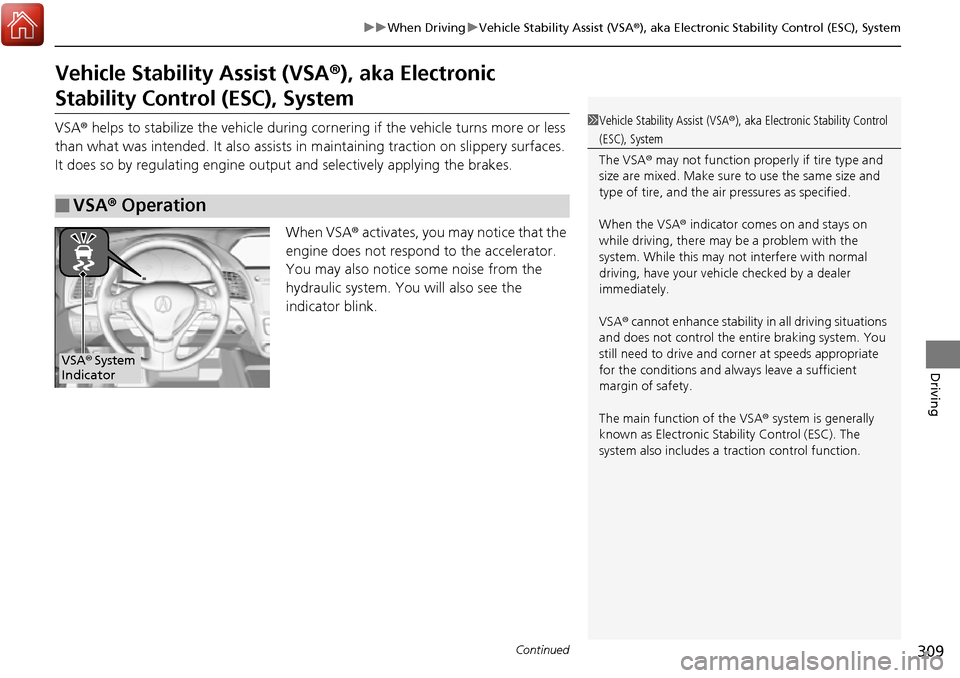
When VSA ® activates, you may notice that the
engine does not respond to the accelerator.
You may also notice some noise from the
hydraulic system. You will also see the
indicator blink.
■VSA ® Operation
1 Vehicle Stability Assist (VSA ®), aka Electronic Stability Control
(ESC), System
The VSA ® may not function properl y if tire type and
size are mixed. Make sure to use the same size and
type of tire, and the air pressures as specified.
When the VSA ® indicator comes on and stays on
while driving, there may be a problem with the
system. While this may not interfere with normal
driving, have your vehi cle checked by a dealer
immediately.
VSA ® cannot enhance stability in all driving situations
and does not control the entire braking system. You
still need to drive and corner at speeds appropriate
for the conditions and alwa ys leave a sufficient
margin of safety.
The main function of the VSA ® system is generally
known as Electronic Stability Control (ESC). The
system also includes a traction control function.
VSA® System
Indicator
Page 313 of 449

uuWhen Driving uBlind spot information (BSI) System*
312
Driving
■When the system detects a vehicle1Blind spot inform ation (BSI) System*
The BSI alert indicator may not come on under the
following conditions:
•A vehicle does not stay in the alert zone for more
than two seconds.
•A vehicle is parked in a side lane.
•The speed difference betw een your vehicle and the
vehicle you are passing is greater than 6 mph (10
km/h).
•An object not detected by the radar sensors
approaches or passes your vehicle.
•A vehicle running in the adjacent lane is a
motorcycle or other small vehicle.
The system does not operate when in
( R.
You can change the setting for BSI. 2 Customized Features P. 100, 106
Turn the system off when towing a trailer.
The system may not work properly for the following
reasons:
•The added mass tilts the vehicle and changes the
radar coverage.
•The trailer itself can be detected by the radar
sensors, causing the BSI al ert indicators to come on.
Comes on when:●A vehicle enters the ale rt zone from behind
to overtake you with a speed difference of
no more than 31 mph (50 km/h) from your
vehicle.
●You pass a vehicle with a speed difference
of no more than 12 mph (20 km/h).
Blinks and a beeper sounds when:
You move the turn signal lever in the direction
of the detected vehicle. The beeper sounds
three times. Comes On
Blinks
BSI Alert Indicator
* Not available on all models
Page 315 of 449
314
uuWhen Driving uAll-Wheel Drive (AWD) with Intelligent Control System*
Driving
All-Wheel Drive (AWD) with Intelligent Control System*
Your vehicle is equipped with the AWD wi th intelligent control system. When the
system senses a loss of front wheel tracti on, it automatically transfers some power
to the rear wheels. This allows you to ut ilize all available traction and may increase
mobility.
You still need to exercise the same care when accelerating, steering, and braking
that you would in a two wheel drive vehicle.
If you excessively spin all four wheels and overheat the AWD with intelligent control
system, only the front wheels receive power. Stop until the system cools down.
Tire Pressure Monitoring System (TPMS)
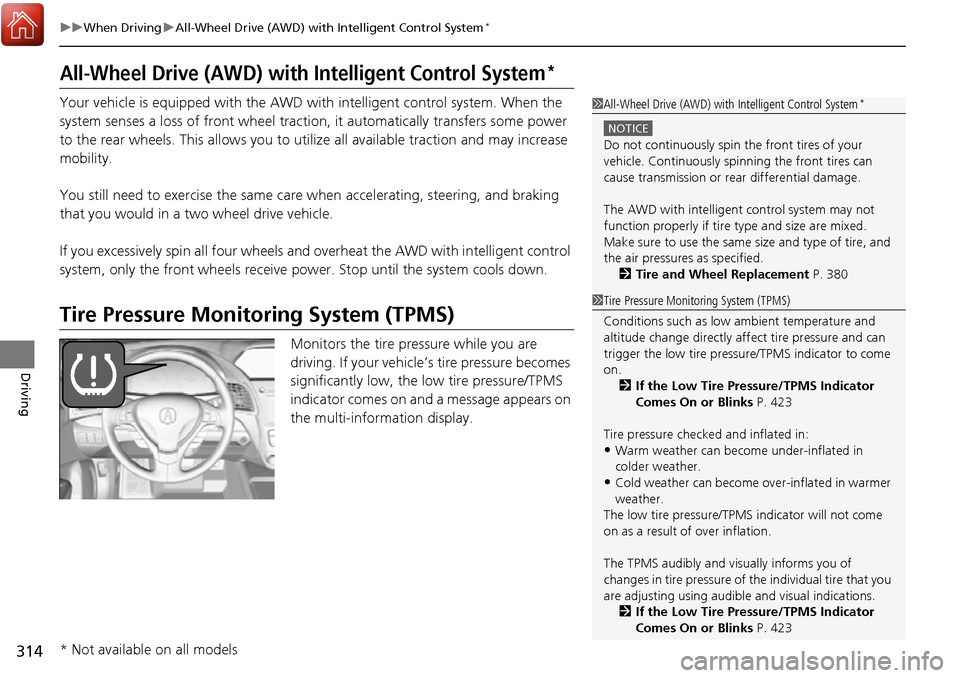
Monitors the tire pressure while you are
driving. If your vehicle’s tire pressure becomes
significantly low, the low tire pressure/TPMS
indicator comes on and a message appears on
the multi-information display.
1 All-Wheel Drive (AWD) with Intelligent Control System*
NOTICE
Do not continuously spin the front tires of your
vehicle. Continuously spinning the front tires can
cause transmission or re ar differential damage.
The AWD with intelligent control system may not
function properly if tire ty pe and size are mixed.
Make sure to use the same size and type of tire, and
the air pressures as specified.
2 Tire and Wheel Replacement P. 380
1Tire Pressure Monitoring System (TPMS)
Conditions such as low ambient temperature and
altitude change directly affect tire pressure and can
trigger the low tire pressure/TPMS indicator to come
on.
2 If the Low Tire Pressure/TPMS Indicator
Comes On or Blinks P. 423
Tire pressure checked and inflated in:
•Warm weather can beco me under-inflated in
colder weather.
•Cold weather can become over-inflated in warmer
weather.
The low tire pressure/TPMS indicator will not come
on as a result of over inflation.
The TPMS audibly and visually informs you of
changes in tire pressure of the individual ti re that you
are adjusting using audibl e and visual indications.
2 If the Low Tire Pressure/TPMS Indicator
Comes On or Blinks P. 423
* Not available on all models
Page 334 of 449
333
uuParking Your Vehicle uParking Sensor System*
Continued
Driving
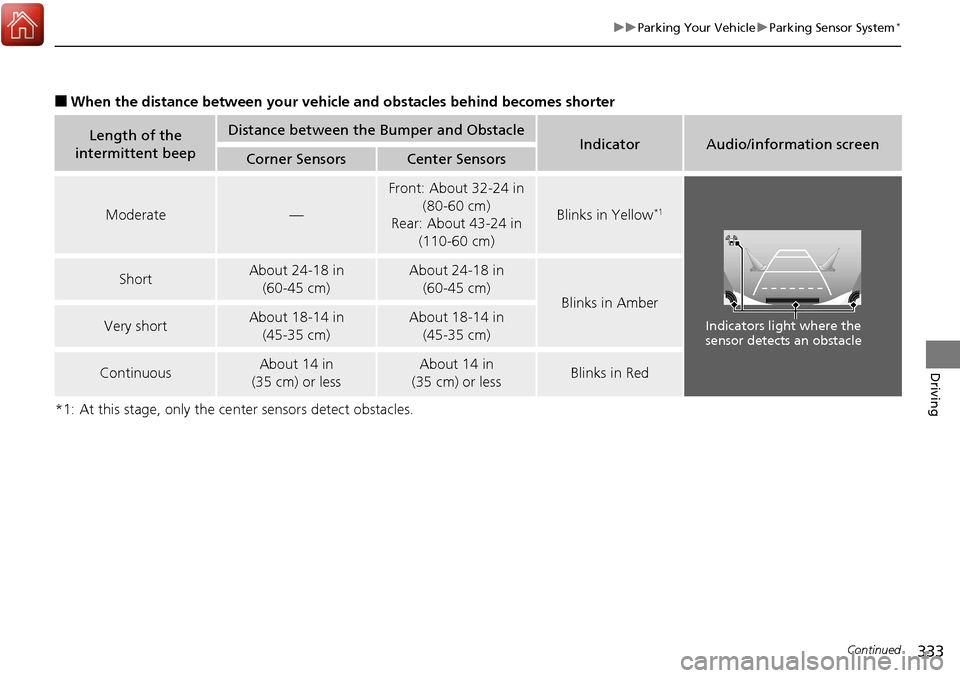
■When the distance between your vehicle and obstacles behind becomes shorter
*1: At this stage, only the ce nter sensors detect obstacles.
Length of the
intermittent beepDistance between the Bumper and ObstacleIndicatorAudio/information screenCorner SensorsCenter Sensors
Moderate—
Front: About 32-24 in
(80-60 cm)
Rear: About 43-24 in
(110-60 cm)
Blinks in Yellow*1
ShortAbout 24-18 in (60-45 cm) About 24-18 in (60-45 cm)
Blinks in Amber
Very shortAbout 18-14 in (45-35 cm) About 18-14 in (45-35 cm)
ContinuousAbout 14 in
(35 cm) or lessAbout 14 in
(35 cm) or lessBlinks in Red
Indicators light where the
sensor detects an obstacle
Page 335 of 449
uuParking Your Vehicle uParking Sensor System*
334
Driving
1. Make sure that the parking sensor system is not activated. Set the power mode to
VEHICLE OFF (LOCK).
2. Press and hold the parking sensor system button, and set the power mode to ON.
3. Keep pressing the button for 10 seconds. Release the button when the indicator
in the button flashes.
4. Press the button again. The indi cator in the button goes off.
u The beeper sounds twice. The re ar sensors are now turned off.
To turn the rear sensors on again, follo w the above procedure. The beeper sounds
three times when the rear sensors come back on.
■Turning off All Rear Sensors1 Turning off All Rear Sensors
When you shift to
(R, the indicator in the parking
sensor system button blinks as a reminder that the
rear sensors have been turned off.
Page 394 of 449
393
Handling the Unexpected
This chapter explains how to handle unexpected troubles.
ToolsTypes of Tools .................................. 394
If a Tire Goes Flat Changing a Flat Tire
*....................... 395
Temporarily Repair ing a Flat Tire*..... 401
Engine Does Not Start Checking the Engine ........................ 412
If the Keyless Access Remote Battery is Weak ............................................. 413
Emergency Engine Stop ................... 414
Jump Starting .................................... 415
Shift Lever Does Not Move .............. 417Overheating
How to Handle Overheating............. 418
Indicator, Coming On/Blinking
If the Low Oil Pressure Indicator Comes On ............................................. 420
If the Charging System Indicator Comes
On ................................................. 420
If the Malfunction Indicator Lamp Comes On or Blinks ................................... 421
If the Brake System Indicator (Red) Comes On .................................................... 422
If the Electric Power Steering (EPS) System
Indicator Comes On............................ 422
If the Low Tire Pressure/TPMS Indicator Comes On or Blinks ....................... 423
Fuses Fuse Locations ................................. 424
Inspecting and Changing Fuses ........ 426
Emergency Towing ........................... 427
When You Cannot Open the Tailgate..... 428
* Not available on all models
Page 401 of 449
uuIf a Tire Goes Flat uChanging a Flat Tire*
400
Handling the Unexpected
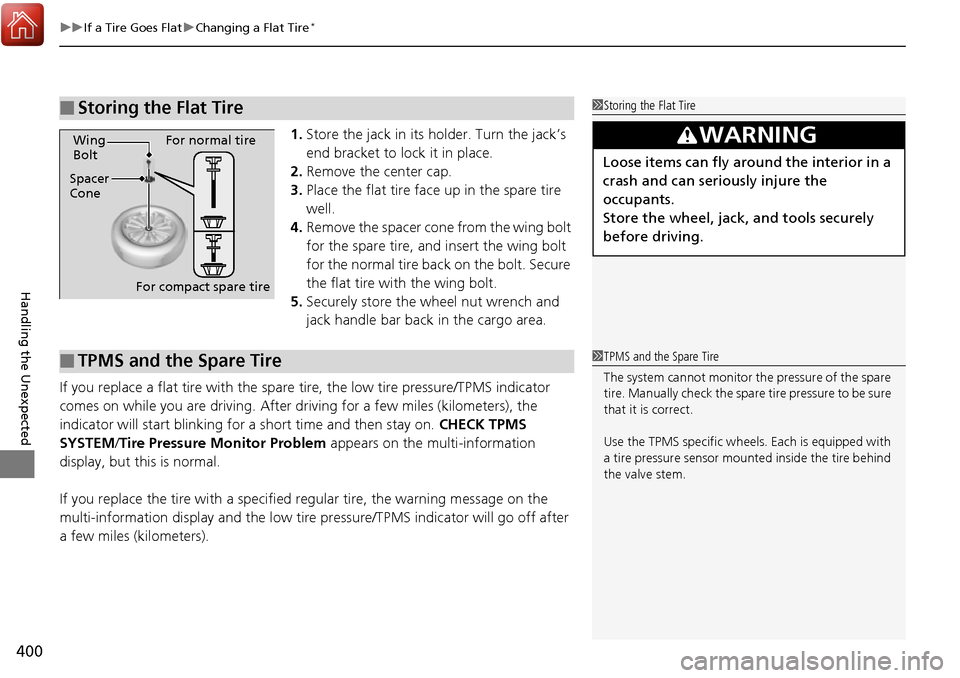
1. Store the jack in its holder. Turn the jack’s
end bracket to lock it in place.
2. Remove the center cap.
3. Place the flat tire face up in the spare tire
well.
4. Remove the spacer cone from the wing bolt
for the spare tire, and insert the wing bolt
for the normal tire back on the bolt. Secure
the flat tire with the wing bolt.
5. Securely store the wheel nut wrench and
jack handle bar back in the cargo area.
If you replace a flat tire with the spare tire, the low tire pressure/TPMS indicator
comes on while you are driving. After driving for a few miles (kilometers), the
indicator will start blinking for a short time and then stay on. CHECK TPMS
SYSTEM/ Tire Pressure Monitor Problem appears on the multi-information
display, but this is normal.
If you replace the tire with a specified regular tire, the warning message on the
multi-information display and the low tire pressure/TPMS indicator will go off after
a few miles (kilometers).
■Storing the Flat Tire1 Storing the Flat Tire
3WARNING
Loose items can fly around the interior in a
crash and can seriously injure the
occupants.
Store the wheel, jack, and tools securely
before driving.Spacer
ConeWing
Bolt
For compact spare tireFor normal tire
■TPMS and the Spare Tire1
TPMS and the Spare Tire
The system cannot monitor th e pressure of the spare
tire. Manually check the spare tire pressure to be sure
that it is correct.
Use the TPMS specific wheels. Each is equipped with
a tire pressure sensor mount ed inside the tire behind
the valve stem.