Link Acura RDX 2017 Owner's Guide
[x] Cancel search | Manufacturer: ACURA, Model Year: 2017, Model line: RDX, Model: Acura RDX 2017Pages: 449, PDF Size: 10.88 MB
Page 148 of 449
147
uuOperating the Switches Around the Steering Wheel uTurn Signals
Continued
Controls
Turn Signals
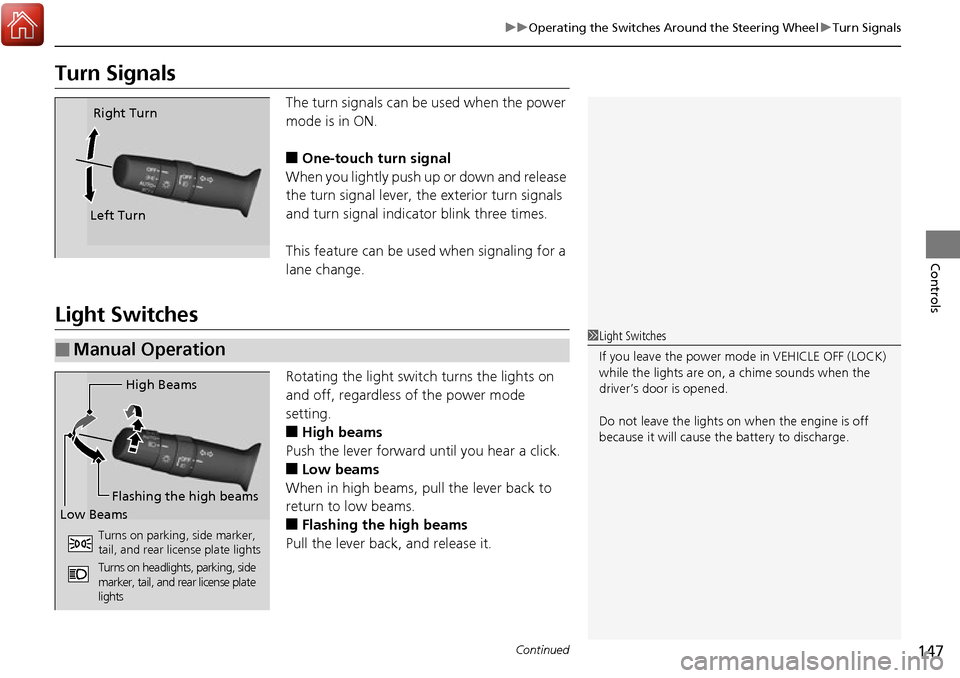
The turn signals can be used when the power
mode is in ON.
■One-touch turn signal
When you lightly push up or down and release
the turn signal lever, th e exterior turn signals
and turn signal indicator blink three times.
This feature can be used when signaling for a
lane change.
Light Switches
Rotating the light switch turns the lights on
and off, regardless of the power mode
setting.
■High beams
Push the lever forward until you hear a click.
■Low beams
When in high beams, pull the lever back to
return to low beams.
■Flashing the high beams
Pull the lever back, and release it.
Right Turn
Left Turn
■Manual Operation1 Light Switches
If you leave the power mode in VEHICLE OFF (LOCK)
while the lights are on, a chime sounds when the
driver’s door is opened.
Do not leave the lights on when the engine is off
because it will cause the battery to discharge.
High Beams
Flashing the high beams
Low Beams
Turns on parking, side marker,
tail, and rear license plate lights
Turns on headlights, parking, side
marker, tail, and rear license plate
lights
Page 157 of 449
156
uuOperating the Switches Around the Steering Wheel uDriving Position Memory System
Controls
Driving Position Memory System
You can store two driver’s seat and door mirror positions with the driving position
memory system.
When you unlock and open the driver’s door with a remote transmitter, the seat and
door mirrors adjust automatically to one of the two preset positions.
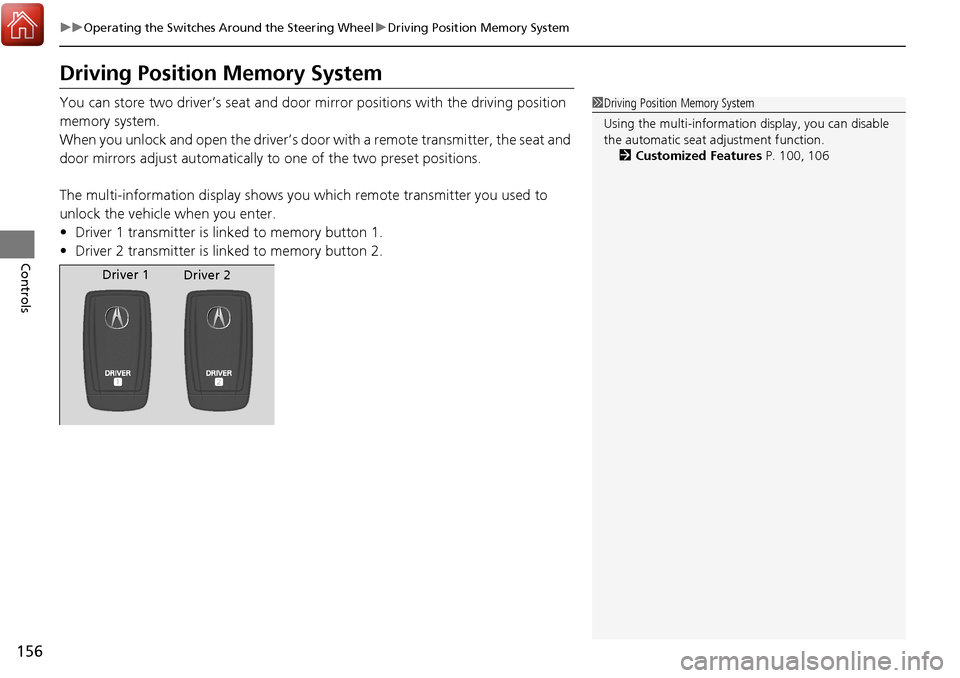
The multi-information display shows you which remote transmitter you used to
unlock the vehicle when you enter.
• Driver 1 transmitter is linked to memory button 1.
• Driver 2 transmitter is linked to memory button 2.1Driving Position Memory System
Using the multi-information display, you can disable
the automatic seat adjustment function. 2 Customized Features P. 100, 106
Driver 1
Driver 2
Page 158 of 449
157
uuOperating the Switches Around the Steering Wheel uDriving Position Memory System
Controls
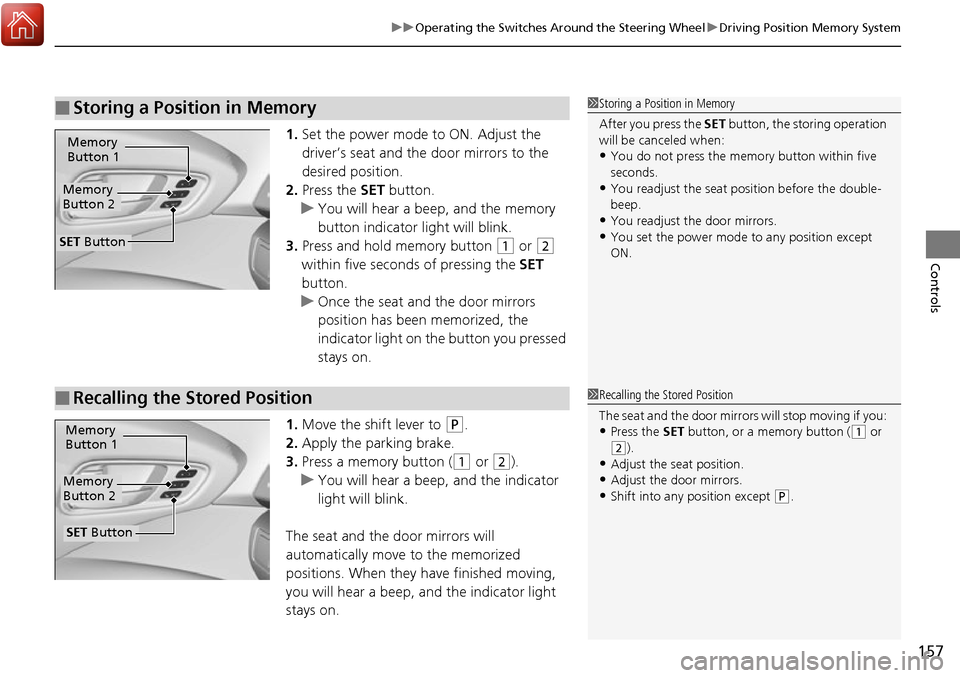
1. Set the power mode to ON. Adjust the
driver’s seat and the door mirrors to the
desired position.
2. Press the SET button.
u You will hear a beep, and the memory
button indicator light will blink.
3. Press and hold memory button
(1 or (2
within five seconds of pressing the SET
button.
u Once the seat and the door mirrors
position has been memorized, the
indicator light on the button you pressed
stays on.
1. Move the shift lever to
(P.
2. Apply the parking brake.
3. Press a memory button (
(1 or (2).
u You will hear a beep, and the indicator
light will blink.
The seat and the door mirrors will
automatically move to the memorized
positions. When they have finished moving,
you will hear a beep, and the indicator light
stays on.
■Storing a Position in Memory1 Storing a Position in Memory
After you press the SET button, the storing operation
will be canceled when:
•You do not press the memory button within five
seconds.
•You readjust the seat position before the double-
beep.
•You readjust the door mirrors.•You set the power mode to any position except
ON.
Memory
Button 1
Memory
Button 2
SET Button
■Recalling the Stored Position1 Recalling the Stored Position
The seat and the door mirror s will stop moving if you:
•Press the SET button, or a memory button ((1 or (2).
•Adjust the seat position.
•Adjust the door mirrors.•Shift into any position except (P.
Memory
Button 1
Memory
Button 2
SET Button
Page 186 of 449
185
Features
This chapter describes how to operate technology features.
Audio System*
About Your Audio System ................ 186
USB Port .......................................... 187
Auxiliary Input Jack .......................... 187
Audio System Theft Protection ......... 188
Audio Remote Controls .................... 189
Audio System Basic Operation
*....... 190
Audio/Information Screen ................ 191
Wallpaper Setup .............................. 194
Display Setup ................................... 196
Adjusting the Sound ........................ 197
Playing the AM/FM Radio ................. 198
Playing the SiriusXM ® Radio ............. 200 Playing a CD .................................... 202
Playing an iPod ................................ 205
Playing Pandora
®............................. 208
Playing a USB Flash Drive ................. 210
Playing Bluetooth ® Audio................. 213
Audio Error Messages
*..................... 215
General Information on the Audio System
*............................................ 218
HomeLink ® Universal Transceiver
Training HomeLink ........................... 222
Bluetooth® HandsFreeLink®
Using HFL ........................................ 224
HFL Menus....................................... 226 Compass
*.......................................... 253
* Not available on all models
Page 187 of 449
186
Features
Audio System*
About Your Audio System
On models with navigation system, see Navigation System Manual for operation of
the audio system, AcuraLink, Bluetooth ® HandsFreeLink ®, and voice commands for
these features.
The audio system features AM/FM radio and the SiriusXM ® Radio service. It can also
play audio CDs, WMA/MP3/AAC files, iPod, iPhone, USB flash drives, and
Bluetooth ® devices.
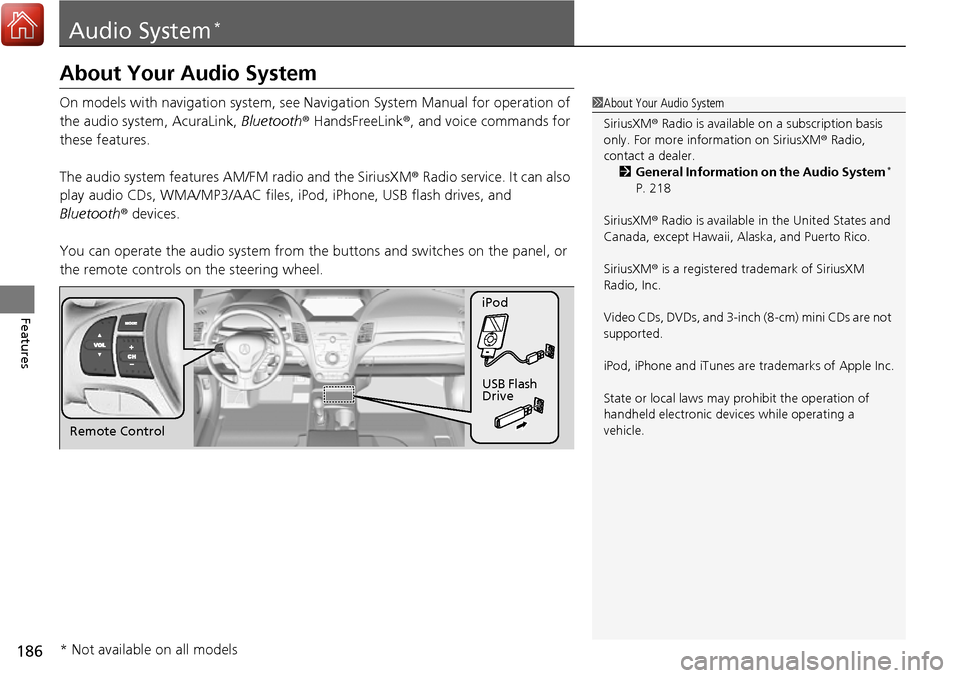
You can operate the audio sy stem from the buttons and sw itches on the panel, or
the remote controls on the steering wheel.1About Your Audio System
SiriusXM ® Radio is available on a subscription basis
only. For more information on SiriusXM ® Radio,
contact a dealer.
2 General Information on the Audio System
*
P. 218
SiriusXM ® Radio is available in the United States and
Canada, except Ha waii, Alaska, and Puerto Rico.
SiriusXM ® is a registered trademark of SiriusXM
Radio, Inc.
Video CDs, DVDs, and 3-inch (8-cm) mini CDs are not
supported.
iPod, iPhone and iTunes are trademarks of Apple Inc.
State or local laws may pr ohibit the operation of
handheld electronic devi ces while operating a
vehicle.
Remote Control iPod
USB Flash
Drive
* Not available on all models
Page 214 of 449
213
uuAudio System Basic Operation*uPlaying Bluetooth ® Audio
Continued
Features
Playing Bluetooth ® Audio
Your audio system allows you to listen to music from your Bluetooth-compatible
phone.
This function is available when the phone is paired and linked to the vehicle’s
Bluetooth ® HandsFreeLink ® (HFL) system.
2Phone Setup P. 231
1Playing Bluetooth ® Audio
Not all Bluetooth -enabled phones with streaming
audio capabilities are compatible with the system.
For a list of compatible phones:
•U.S.: Visit www.acura.com/handsfreelink , or call 1-
888-528-7876.
•Canada: Visit www.handsfreelink.ca , or call 1-888-
528-7876.
In some states, it may be il legal to perform some data
device functions while driving.
If more than one phone is paired to the HFL system,
there will be a delay before the system begins to play.
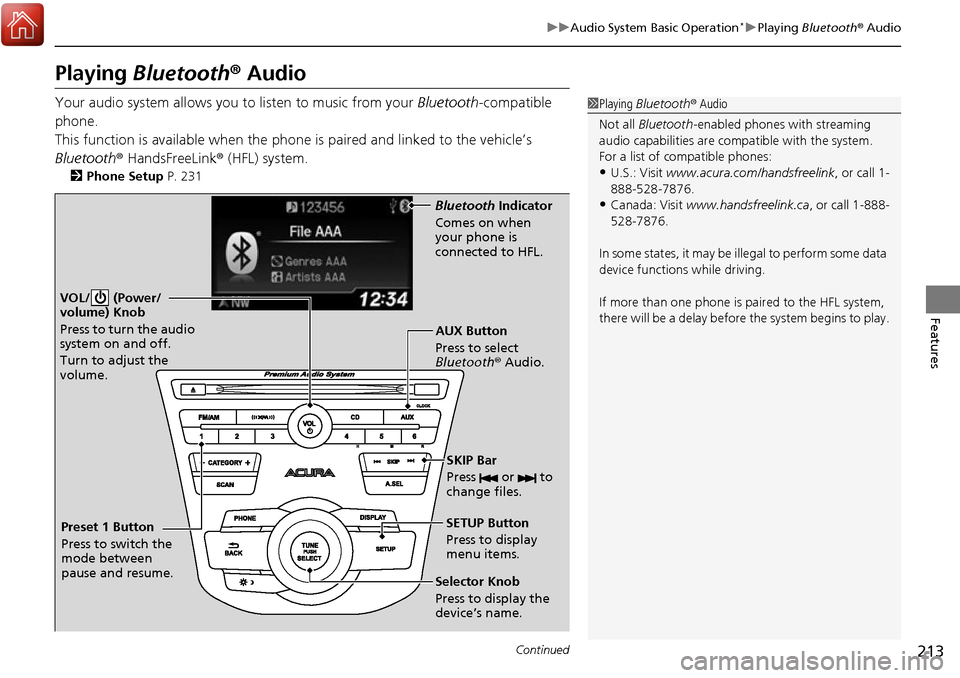
VOL/ (Power/
volume) Knob
Press to turn the audio
system on and off.
Turn to adjust the
volume.
SETUP Button
Press to display
menu items.
Selector Knob
Press to display the
device’s name. AUX Button
Press to select
Bluetooth® Audio.
SKIP Bar
Press or to
change files.
Bluetooth Indicator
Comes on when
your phone is
connected to HFL.
Preset 1 Button
Press to switch the
mode between
pause and resume.
Page 215 of 449
uuAudio System Basic Operation*uPlaying Bluetooth ® Audio
214
Features
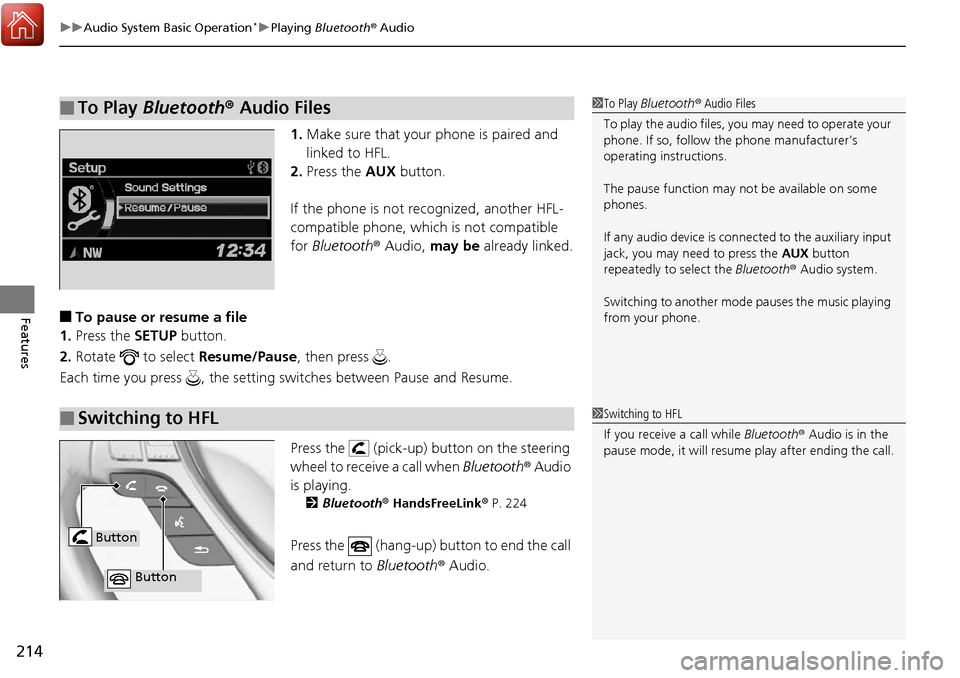
1. Make sure that your phone is paired and
linked to HFL.
2. Press the AUX button.
If the phone is not re cognized, another HFL-
compatible phone, which is not compatible
for Bluetooth ® Audio, may be already linked.
■To pause or resume a file
1. Press the SETUP button.
2. Rotate to select Resume/Pause, then press .
Each time you press , the setting sw itches between Pause and Resume.
Press the (pick-up) button on the steering
wheel to receive a call when Bluetooth® Audio
is playing.
2 Bluetooth® HandsFreeLink ® P. 224
Press the (hang-up) bu tton to end the call
and return to Bluetooth® Audio.
■To Play Bluetooth® Audio Files1To Play Bluetooth ® Audio Files
To play the audio files, y ou may need to operate your
phone. If so, follow the phone manufacturer’s
operating instructions.
The pause function may no t be available on some
phones.
If any audio device is conne cted to the auxiliary input
jack, you may need to press the AUX button
repeatedly to select the Bluetooth® Audio system.
Switching to another mode pauses the music playing
from your phone.
■Switching to HFL1 Switching to HFL
If you receive a call while Bluetooth® Audio is in the
pause mode, it will resume play after ending the call.
Button
Button
Page 223 of 449
222
Features
HomeLink® Universal Transceiver
The HomeLink ® Universal Transceiver can be pr ogrammed to operate up to three
remote controlled devices around your home, such as garage doors, lighting, or
home security systems.
Refer to the safety information that came wi th your garage door opener to test that
the safety features are functioning properly. If you do not have the safety
information, contact the manufacturer.
Before programming HomeLink, make sure that people and objects are out of the
way of the garage or gate to prevent potential injury or damage.
When programming a garage door opener, park just outside the garage door’s
path.
Training HomeLink
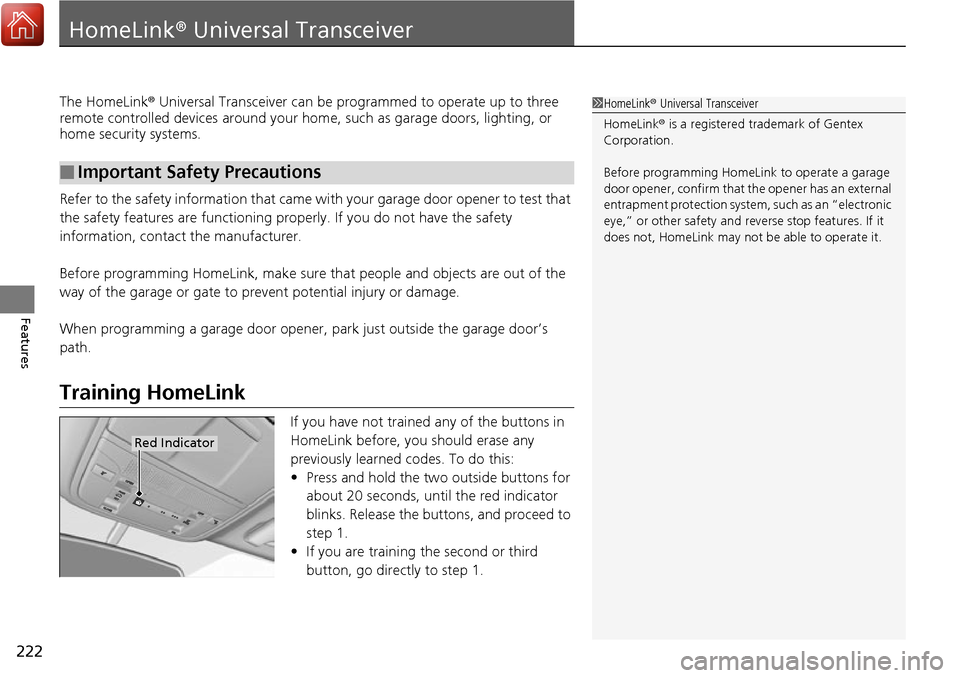
If you have not trained any of the buttons in
HomeLink before, you should erase any
previously learned codes. To do this:
• Press and hold the two outside buttons for
about 20 seconds, until the red indicator
blinks. Release the bu ttons, and proceed to
step 1.
• If you are training the second or third
button, go directly to step 1.
■Important Safety Precautions
1HomeLink ® Universal Transceiver
HomeLink® is a registered tra demark of Gentex
Corporation.
Before programming HomeLi nk to operate a garage
door opener, confirm that the opener has an external
entrapment protection system, such as an “electronic
eye,” or other safety and reverse stop features. If it
does not, HomeLink may not be able to operate it.
Red Indicator
Page 224 of 449
223
uuHomeLink ® Universal Transceiver uTraining HomeLink
Features
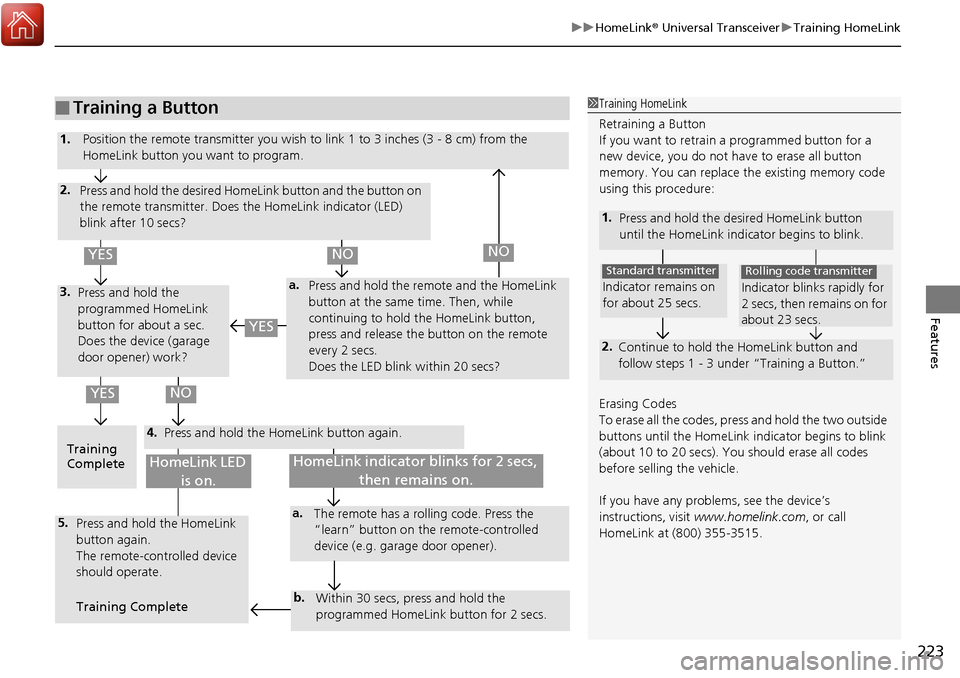
■Training a Button1Training HomeLink
Retraining a Button
If you want to retrain a programmed button for a
new device, you do not ha ve to erase all button
memory. You can replace the existing memory code
using this procedure:
1. Press and hold the desired HomeLink button
until the HomeLink indi cator begins to blink.
2.
Continue to hold the HomeLink button and
follow steps 1 - 3 unde r “Training a Button.”
Indicator remains on
for about 25 secs.
Standard transmitter
Indicator blinks rapidly for
2 secs, then remains on for
about 23 secs.
Rolling code transmitter
Erasing Codes
To erase all the codes, press and hold the two outside
buttons until the HomeLink i ndicator begins to blink
(about 10 to 20 secs). You should erase all codes
before selling the vehicle.
If you have any problems, see the device’s
instructions, visit www.homelink.com , or call
HomeLink at (800) 355-3515.
4.
a.3.
2.
5.a.
b.
1. Position the remote transmitter you wish to link 1 to 3 inches (3 - 8 cm) from the
HomeLink button you want to program.
Press and hold the desired HomeLink button and the button on
the remote transmitter. Does the HomeLink indicator (LED)
blink after 10 secs?
Press and hold the
programmed HomeLink
button for about a sec.
Does the device (garage
door opener) work? Press and hold the remote and the HomeLink
button at the same time. Then, while
continuing to hold the HomeLink button,
press and release the button on the remote
every 2 secs.
Does the LED blink within 20 secs?
Training
Complete Press and hold the HomeLink button again.
Press and hold the HomeLink
button again.
The remote-controlled device
should operate.
Training Complete The remote has a ro
lling code. Press the
“learn” button on the remote-controlled
device (e.g. garage door opener).
Within 30 secs, press and hold the
programmed HomeLink button for 2 secs.
HomeLink indicator blinks for 2 secs, then remains on.HomeLink LED is on.
YESNO
YES
YESNONO
Page 225 of 449
224
Features
Bluetooth® HandsFreeLink ®
For models with navigation system, see Navigation System Manual for how to
operate Bluetooth ® HandsFreeLink ®.
Bluetooth ® HandsFreeLink ® (HFL) allows you to place and receive phone calls using
your vehicle’s audio system, without handling your cell phone.
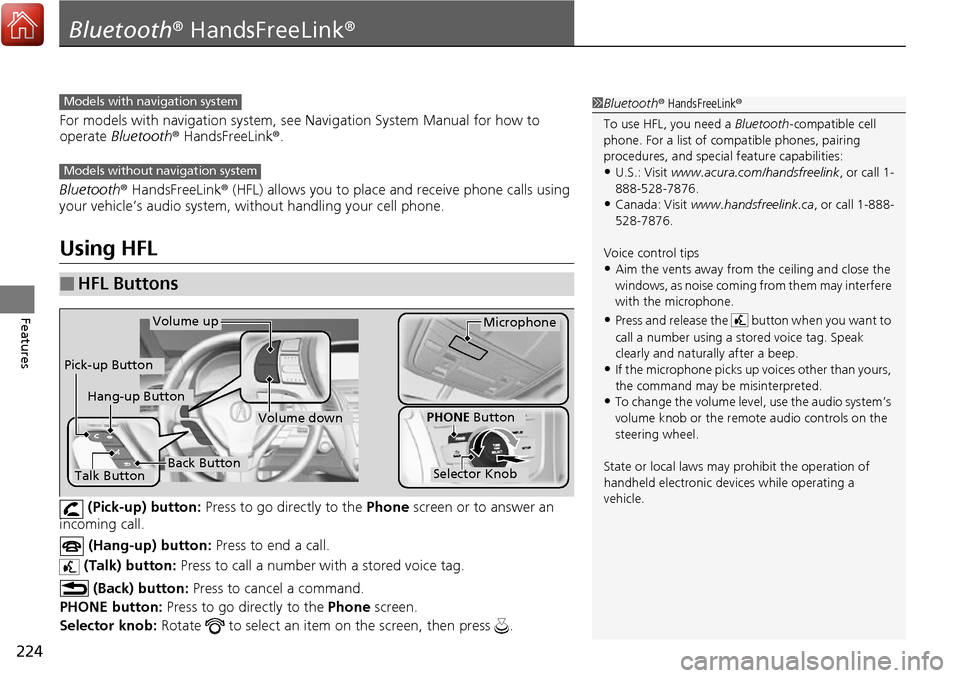
Using HFL
(Pick-up) button: Press to go directly to the Phone screen or to answer an
incoming call.
(Hang-up) button: Press to end a call.
(Talk) button: Press to call a number with a stored voice tag.
(Back) button: Press to cancel a command.
PHONE button: Press to go directly to the Phone screen.
Selector knob: Rotate to select an item on the screen, then press .
■HFL Buttons
1Bluetooth ® HandsFreeLink ®
To use HFL, you need a Bluetooth-compatible cell
phone. For a list of compatible phones, pairing
procedures, and special feature capabilities:
•U.S.: Visit www.acura.com/handsfreelink , or call 1-
888-528-7876.
•Canada: Visit www.handsfreelink.ca , or call 1-888-
528-7876.
Voice control tips
•Aim the vents away from the ceiling and close the
windows, as noise coming fr om them may interfere
with the microphone.
•Press and release the button when you want to
call a number using a st ored voice tag. Speak
clearly and naturally after a beep.
•If the microphone picks up vo ices other than yours,
the command may be misinterpreted.
•To change the volume level, use the audio system’s
volume knob or the remote audio controls on the
steering wheel.
State or local laws may pr ohibit the operation of
handheld electronic devi ces while operating a
vehicle.
Models with navigation system
Models without navigation system
Talk Button
Volume upMicrophone
Hang-up Button
Pick-up Button
Volume down
Selector Knob
PHONE Button
Back Button