buttons Acura RDX 2017 Owner's Manual
[x] Cancel search | Manufacturer: ACURA, Model Year: 2017, Model line: RDX, Model: Acura RDX 2017Pages: 449, PDF Size: 10.88 MB
Page 6 of 449
5
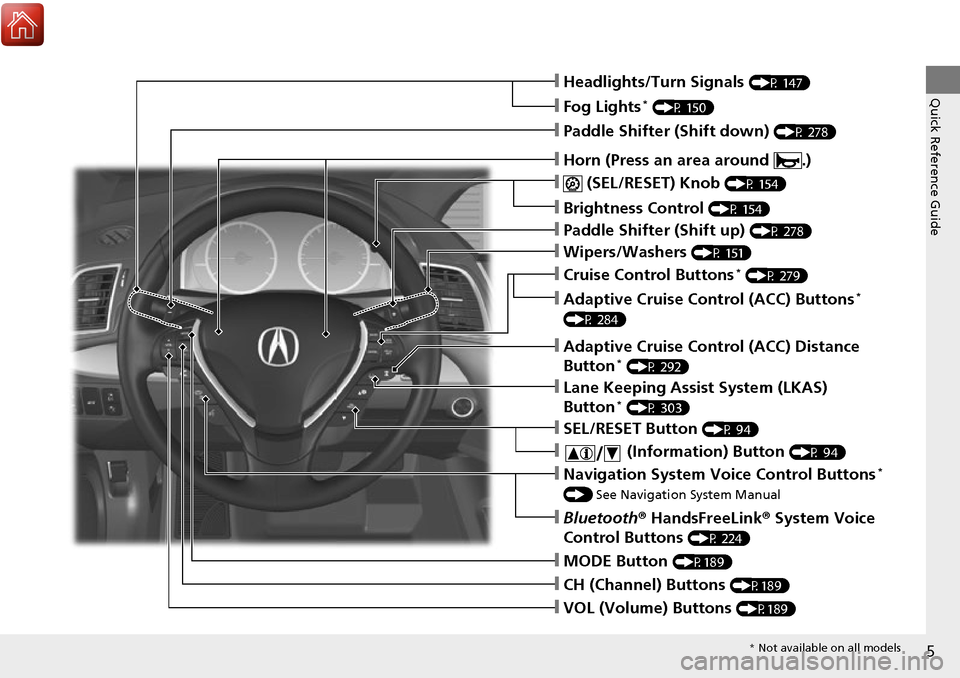
Quick Reference Guide❙Headlights/Turn Signals (P 147)
❙Fog Lights* (P 150)
❙ (SEL/RESET) Knob (P 154)
❙Brightness Control (P 154)
❙MODE Button (P189)
❙CH (Channel) Buttons (P189)
❙VOL (Volume) Buttons (P189)
❙SEL/RESET Button (P 94)
❙Paddle Shifter (Shift down) (P 278)
❙Paddle Shifter (Shift up) (P 278)
❙Wipers/Washers (P 151)
❙Bluetooth® HandsFreeLink ® System Voice
Control Buttons
(P 224)
❙Navigation System Voice Control Buttons*
() See Navigation System Manual
❙ (Information) Button (P 94)
❙Lane Keeping Assist System (LKAS)
Button* (P 303)
❙Adaptive Cruise Control (ACC) Distance
Button* (P 292)
❙Cruise Control Buttons* (P 279)
❙Adaptive Cruise Control (ACC) Buttons*
(P 284)
❙Horn (Press an area around .)
* Not available on all models
Page 7 of 449
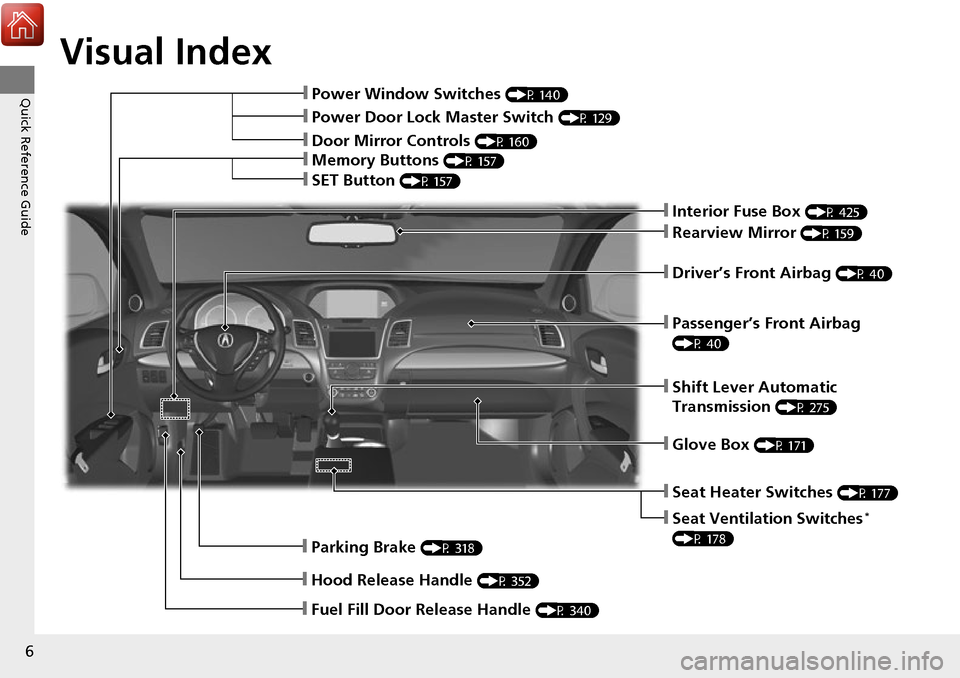
Visual Index
6
Quick Reference Guide❙Power Window Switches (P 140)
❙Rearview Mirror (P 159)
❙Parking Brake (P 318)
❙Hood Release Handle (P 352)
❙Shift Lever Automatic
Transmission
(P 275)
❙Driver’s Front Airbag (P 40)
❙Fuel Fill Door Release Handle (P 340)
❙Interior Fuse Box (P 425)
❙Glove Box (P 171)
❙Passenger’s Front Airbag
(P 40)
❙Memory Buttons (P 157)
❙SET Button (P 157)
❙Power Door Lock Master Switch (P 129)
❙Door Mirror Controls (P 160)
❙Seat Heater Switches (P 177)
❙Seat Ventilation Switches*
(P 178)
Page 15 of 449
14
Quick Reference Guide
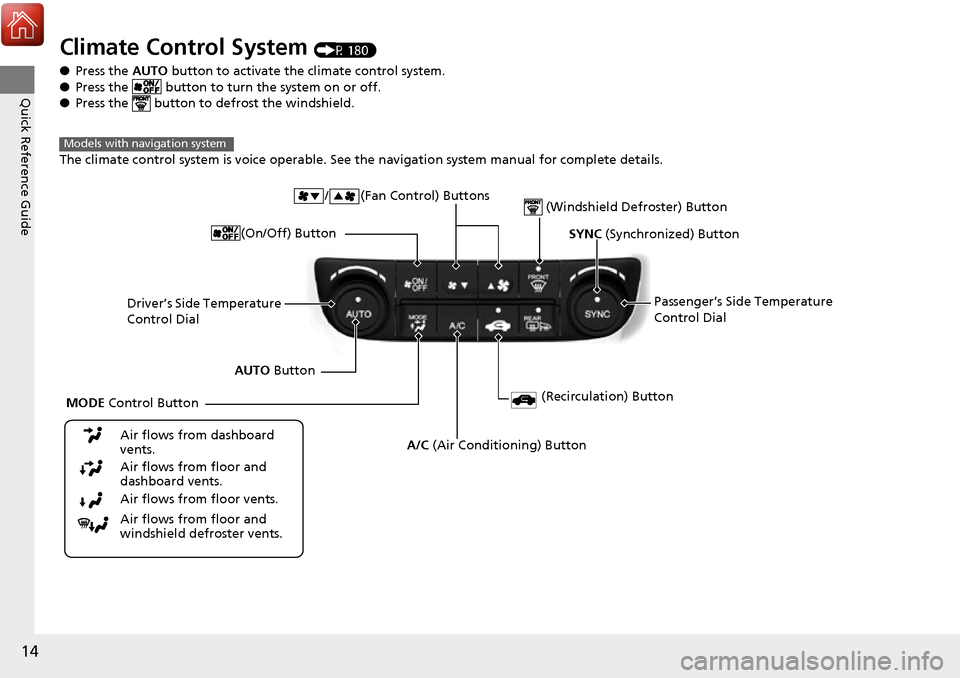
Climate Control System (P 180)
● Press the AUTO button to activate the climate control system.
● Press the button to turn the system on or off.
● Press the button to de frost the windshield.
The climate control system is voice operable. See the navigation system manual for complete details.
Models with navigation system
Driver’s Side Temperature
Control Dial / (Fan Control) Buttons
(Windshield Defroster) Button
A/C
(Air Conditioning) Button
Air flows from floor and
windshield defroster vents. Air flows from floor vents. Air flows from floor and
dashboard vents. Air flows from dashboard
vents.
SYNC (Synchronized) Button
(Recirculation) Button
AUTO Button Passenger’s Side Temperature
Control Dial
MODE Control Button (On/Off) Button
Page 16 of 449
15
Quick Reference Guide
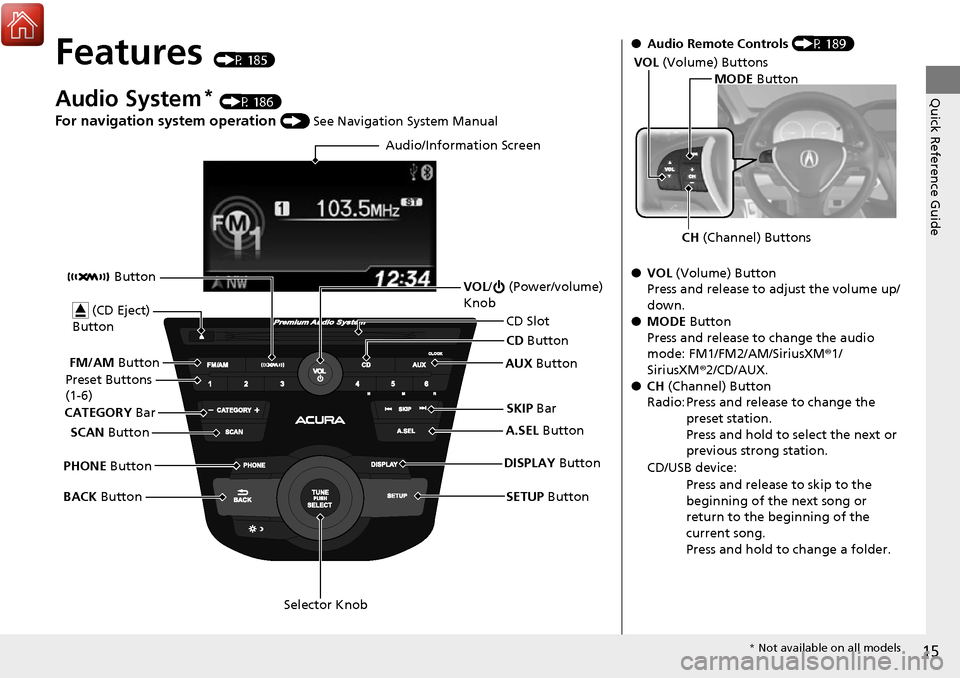
Features (P 185)
Audio System* (P 186)
For navigation system operation () See Navigation System Manual
Audio/Information Screen
SCAN Button
CATEGORY
Bar
Selector Knob
BACK
Button VOL
/ (Power/volume)
Knob
CD Button
AUX Button
CD Slot
(CD Eject)
Button
Preset Buttons
(1-6)
SETUP Button
SKIP
Bar
PHONE Button Button
FM/AM
Button
A.SEL Button
DISPLAY Button
●Audio Remote Controls (P 189)
● VOL (Volume) Button
Press and release to adjust the volume up/
down.
● MODE Button
Press and release to change the audio
mode: FM1/FM2/AM/SiriusXM ®1/
SiriusXM ®2/CD/AUX.
● CH (Channel) Button
Radio: Press and release to change the preset station.
Press and hold to select the next or
previous strong station.
CD/USB device: Press and release to skip to the
beginning of the next song or
return to the beginning of the
current song.
Press and hold to change a folder.
MODE Button
CH (Channel) Buttons
VOL
(Volume) Buttons
* Not available on all models
Page 17 of 449
16
Quick Reference Guide
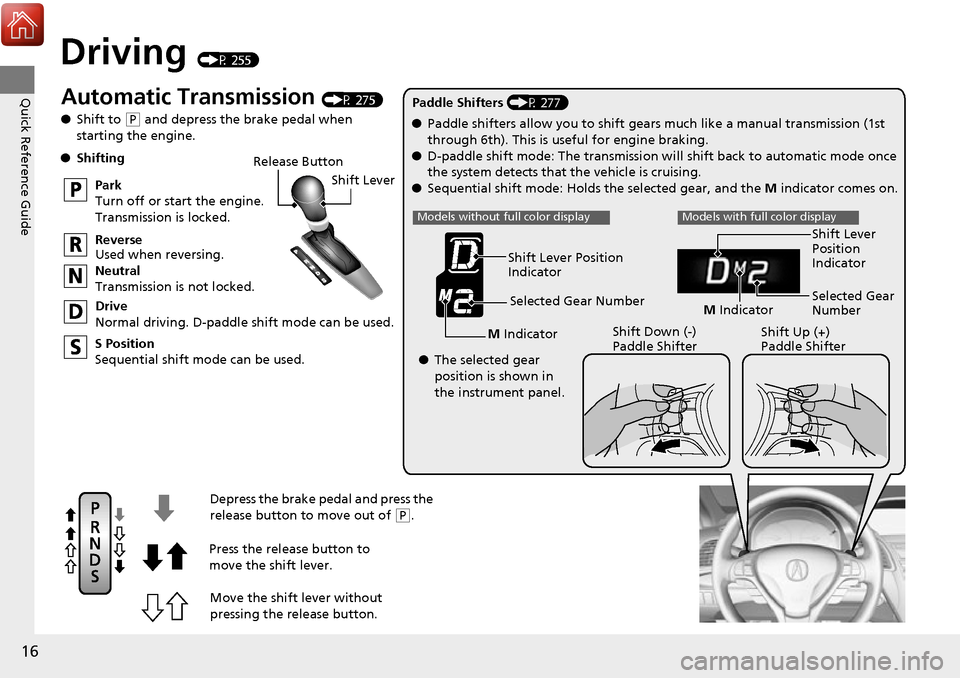
Driving (P 255)
Release ButtonShift Lever
Depress the brake pedal and press the
release button to move out of
( P.
Move the shift lever without
pressing the release button.
Press the release button to
move the shift lever.
●
Shifting
Park
Turn off or start the engine.
Transmission is locked.
Reverse
Used when reversing.
Neutral
Transmission is not locked.
Drive
Normal driving. D-paddle shift mode can be used.
S Position
Sequential shift mode can be used. Paddle Shifters (P 277)
M Indicator Shift Down (-)
Paddle Shifter Shift Up (+)
Paddle Shifter
●
Paddle shifters allow you to shift gears much like a manual transmission (1st
through 6th). This is useful for engine braking.
● D-paddle shift mode: The transmission will shift back to automatic mode once
the system detects that the vehicle is cruising.
● Sequential shift mode: Holds the selected gear, and the M indicator comes on.
Selected Gear Number
Automatic Transmission (P 275)
● Shift to
(P and depress the brake pedal when
starting the engine.
Shift Lever Position
Indicator
● The selected gear
position is shown in
the instrument panel.
Models without full color displayModels with full color display
M Indicator Selected Gear
Number Shift Lever
Position
Indicator
Page 66 of 449
65
Instrument Panel
This chapter describes the buttons, indicators, and gauges that are used while driving.
Indicators............................................ 66
Multi-Information Display Warning and Information Messages ...................... 82
Gauges and Multi-Information Display Gauges .............................................. 93
Multi-Information Display .................. 94
Page 181 of 449
180
Controls
Climate Control System
Using Automatic Climate Control
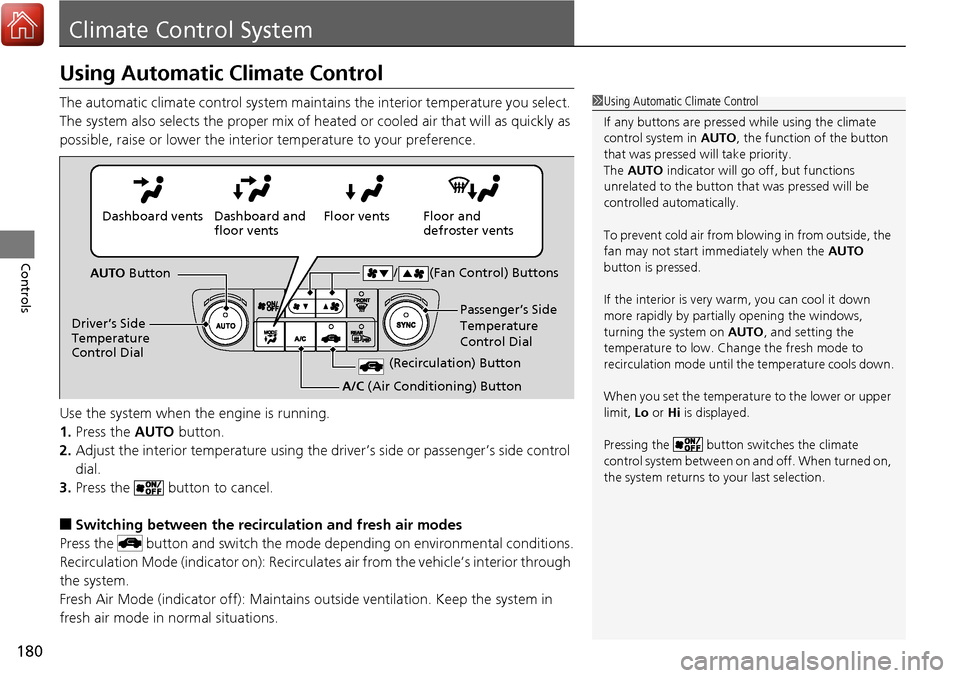
The automatic climate control system maintains the interior temperature you select.
The system also selects the proper mix of heated or cooled air that will as quickly as
possible, raise or lower the interior temperature to your preference.
Use the system when the engine is running.
1. Press the AUTO button.
2. Adjust the interior temperature using the dr iver’s side or passenger’s side control
dial.
3. Press the button to cancel.
■Switching between the recirculation and fresh air modes
Press the button and switch the mode depending on environmental conditions.
Recirculation Mode (indicator on): Recirculates air from the vehicle’s interior through
the system.
Fresh Air Mode (indicator off): Maintains outside ventilation. Keep the system in
fresh air mode in normal situations.
1 Using Automatic Climate Control
If any buttons are presse d while using the climate
control system in AUTO, the function of the button
that was pressed will take priority.
The AUTO indicator will go off, but functions
unrelated to the button th at was pressed will be
controlled automatically.
To prevent cold air from bl owing in from outside, the
fan may not start i mmediately when the AUTO
button is pressed.
If the interior is very warm, you can cool it down
more rapidly by partial ly opening the windows,
turning the system on AUTO, and setting the
temperature to low. Change the fresh mode to
recirculation mode until the temperature cools down.
When you set the temperature to the lower or upper
limit, Lo or Hi is displayed.
Pressing the button switches the climate
control system between on and off. When turned on,
the system returns to your last selection.
Floor and
defroster vents
Floor vents
Dashboard and
floor vents
Dashboard vents
AUTO Button
Driver’s Side
Temperature
Control Dial Passenger’s Side
Temperature
Control Dial
/ (Fan Control) Buttons
(Recirculation) Button
A/C
(Air Conditioning) Button
Page 187 of 449
186
Features
Audio System*
About Your Audio System
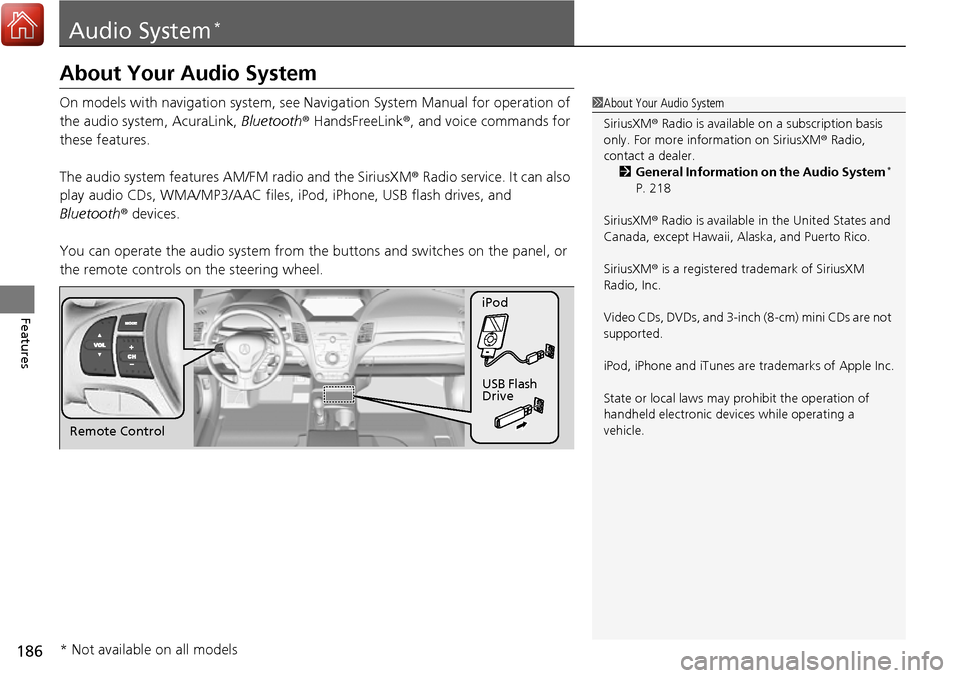
On models with navigation system, see Navigation System Manual for operation of
the audio system, AcuraLink, Bluetooth ® HandsFreeLink ®, and voice commands for
these features.
The audio system features AM/FM radio and the SiriusXM ® Radio service. It can also
play audio CDs, WMA/MP3/AAC files, iPod, iPhone, USB flash drives, and
Bluetooth ® devices.
You can operate the audio sy stem from the buttons and sw itches on the panel, or
the remote controls on the steering wheel.1About Your Audio System
SiriusXM ® Radio is available on a subscription basis
only. For more information on SiriusXM ® Radio,
contact a dealer.
2 General Information on the Audio System
*
P. 218
SiriusXM ® Radio is available in the United States and
Canada, except Ha waii, Alaska, and Puerto Rico.
SiriusXM ® is a registered trademark of SiriusXM
Radio, Inc.
Video CDs, DVDs, and 3-inch (8-cm) mini CDs are not
supported.
iPod, iPhone and iTunes are trademarks of Apple Inc.
State or local laws may pr ohibit the operation of
handheld electronic devi ces while operating a
vehicle.
Remote Control iPod
USB Flash
Drive
* Not available on all models
Page 188 of 449
187
uuAudio System*uUSB Port
Features
USB Port
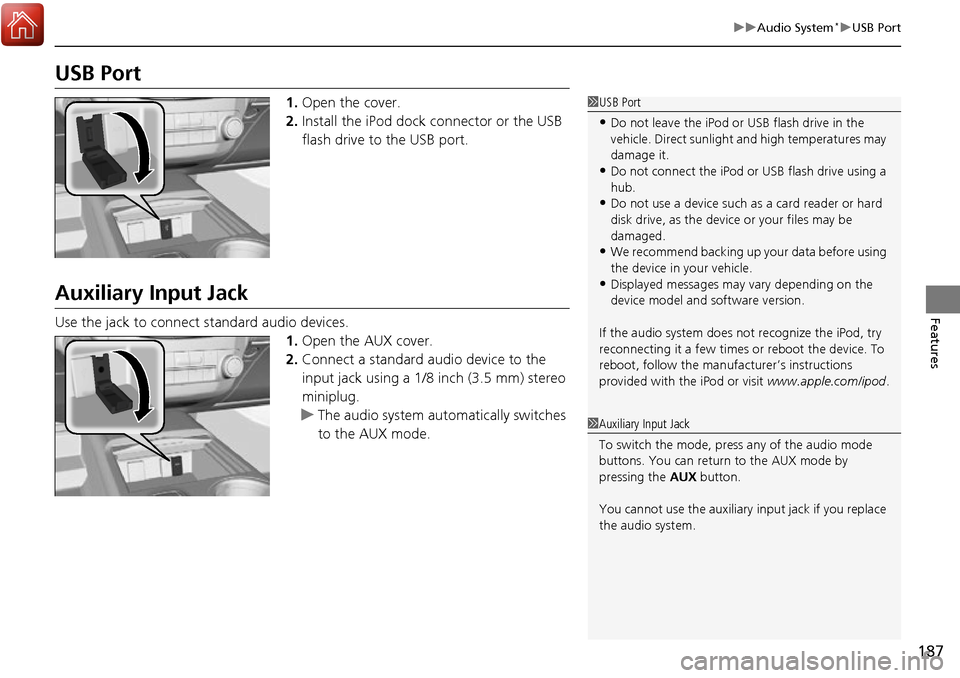
1. Open the cover.
2. Install the iPod dock connector or the USB
flash drive to the USB port.
Auxiliary Input Jack
Use the jack to connect standard audio devices.
1.Open the AUX cover.
2. Connect a standard audio device to the
input jack using a 1/8 inch (3.5 mm) stereo
miniplug.
u The audio system auto matically switches
to the AUX mode.
1 USB Port
•Do not leave the iPod or USB flash drive in the
vehicle. Direct sunlight and high temperatures may
damage it.
•Do not connect the iPod or USB flash drive using a
hub.
•Do not use a device such as a card reader or hard
disk drive, as the device or your files may be
damaged.
•We recommend backing up yo ur data before using
the device in your vehicle.
•Displayed messages may vary depending on the
device model and software version.
If the audio system does not recognize the iPod, try
reconnecting it a few times or reboot the device. To
reboot, follow the manufac turer’s instructions
provided with the iPod or visit www.apple.com/ipod.
1Auxiliary Input Jack
To switch the mode, pres s any of the audio mode
buttons. You can return to the AUX mode by
pressing the AUX button.
You cannot use the auxiliary input jack if you replace
the audio system.
Page 189 of 449
188
uuAudio System*uAudio System Theft Protection
Features
Audio System Theft Protection
The audio system is disabled when it is disconnected from the power source, such as
when the battery is disconnected or goes dead.
■Reactivating th e audio system
1. Set the power mode to ON, and turn on the audio system.
u If you set the power mode to ACCESSORY, you will be requested to enter the
audio security code. See step 3.
2. Press and hold the power button ag ain for more than two seconds.
u The audio system is reactivated when the system’s control unit recognizes that
the system is in your vehicle.
If the control unit fails to recognize, ENTER CODE appears on the audio/
information screen.
3. Enter the audio security code using the pr eset buttons. If you enter an incorrect
digit, continue to the last digit, then try again. If you do not enter the code
correctly after 10 tries, leave the system for one hour before trying again, or visit
a dealer to have the system reset.
1 Audio System Theft Protection
Find the audio system’s se curity code and serial
number label in your owner’s manual kit.
We recommend that you write down the serial
number in this owner’s manual.
Do not store the label in your vehicle. If you lose the
label, you must first retrie ve the serial number, and
then obtain the code.
You can find out about your serial number and
security code from a dealer.
You can register the securi ty code at Acura Owners
(owners.acura.com.), and find information on how to
retrieve the serial numbe r and obtain the code at
radio-navicode.acura.com.
U.S. models