park assist Acura RDX 2020 Owner's Manual
[x] Cancel search | Manufacturer: ACURA, Model Year: 2020, Model line: RDX, Model: Acura RDX 2020Pages: 657, PDF Size: 33.2 MB
Page 5 of 657
4
Quick Reference Guide
Quick Reference Guide
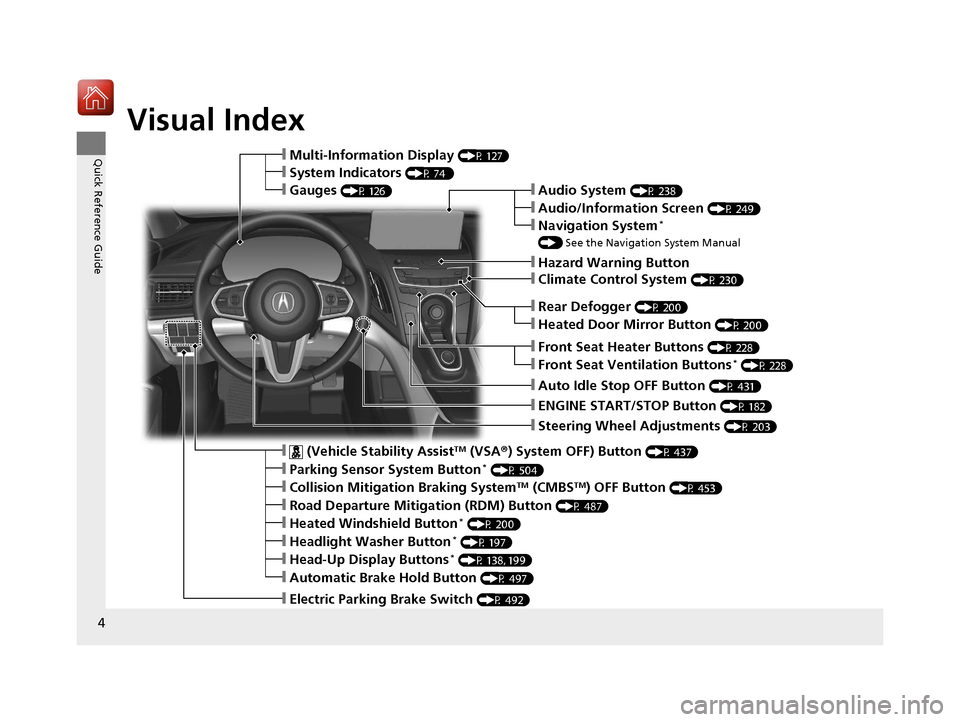
Visual Index
ŌØÖSteering Wheel Adjustments (P 203)
ŌØÖENGINE START/STOP Button (P 182)
ŌØÖRear Defogger (P 200)
ŌØÖHeated Door Mirror Button (P 200)
ŌØÖClimate Control System (P 230)
ŌØÖAudio System (P 238)
ŌØÖHazard Warning Button
ŌØÖAudio/Information Screen (P 249)
ŌØÖNavigation System*
() See the Navigation System Manual
ŌØÖFront Seat Heater Buttons (P 228)
ŌØÖFront Seat Ventilation Buttons* (P 228)
ŌØÖAuto Idle Stop OFF Button (P 431)
ŌØÖ (Vehicle Stability AssistTM (VSA ┬«) System OFF) Button (P 437)
ŌØÖParking Sensor System Button* (P 504)
ŌØÖCollision Mitigation Braking SystemTM (CMBSTM) OFF Button (P 453)
ŌØÖRoad Departure Mitigation (RDM) Button (P 487)
ŌØÖHeated Windshield Button* (P 200)
ŌØÖHeadlight Washer Button* (P 197)
ŌØÖHead-Up Display Buttons* (P 138, 199)
ŌØÖAutomatic Brake Hold Button (P 497)
ŌØÖElectric Parking Brake Switch (P 492)
ŌØÖMulti-Information Display (P 127)
ŌØÖSystem Indicators (P 74 )
ŌØÖGauges (P 126)
20 ACURA RDX-31TJB6111.book 4 ŃāÜŃā╝ŃéĖ ’╝Æ’╝É’╝Æ’╝ÉÕ╣┤’╝Ƶ£ł’╝æ’╝æµŚźŃĆĆńü½µø£µŚźŃĆĆÕŹłÕŠī’╝ƵÖé’╝¢Õłå
Page 75 of 657
74
Instrument Panel
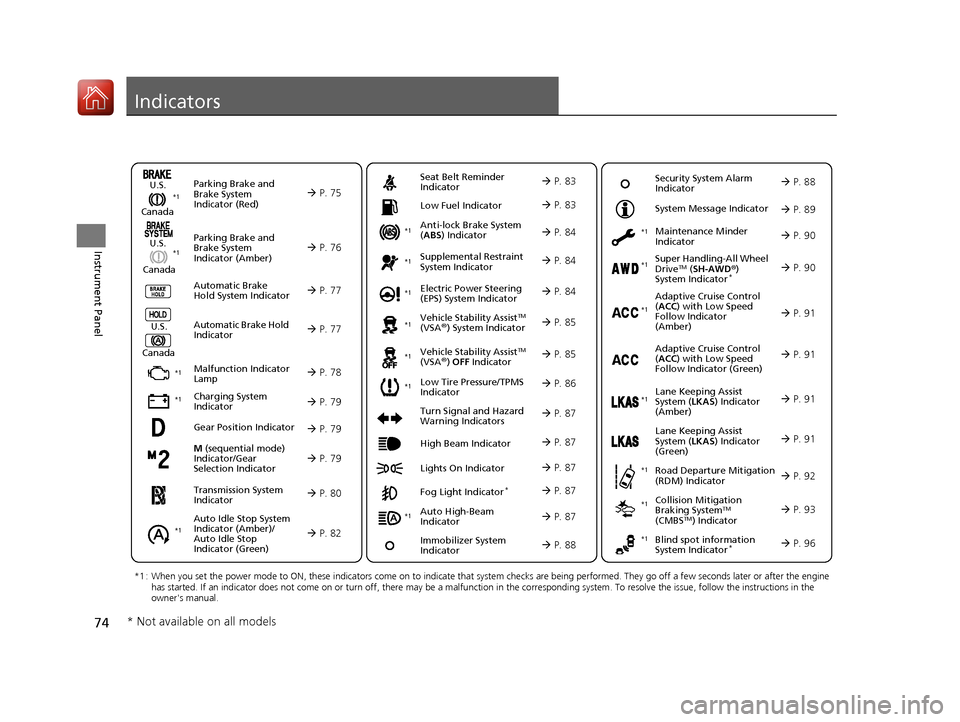
Indicators
M (sequential mode)
Indicator/Gear
Selection Indicator’āĀ P. 79
Parking Brake and
Brake System
Indicator (Red)
Parking Brake and
Brake System
Indicator (Amber)
U.S.
Canada
U.S.
Canada Automatic Brake
Hold System Indicator
Automatic Brake Hold
IndicatorU.S.
Canada
*1 : When you set the power mode to ON, these indicators come on to indicate that system checks are being performed. They go off a few seconds later or after the engine
has started. If an indicator does not come on or turn off, ther e may be a malfunction in the corresponding system. To resolve the issue, follow the instructions in the
owner's manual.
’āĀ P. 75*1
Malfunction Indicator
Lamp
Charging System
Indicator
Anti-lock Brake System
(ABS ) Indicator
Seat Belt Reminder
Indicator
Low Fuel Indicator
Vehicle Stability AssistTM
(VSA®) System Indicator
Vehicle Stability Assist
TM
(VSA®) OFF Indicator
Supplemental Restraint
System Indicator
Auto High-Beam
Indicator
Low Tire Pressure/TPMS
Indicator Electric Power Steering
(EPS) System Indicator
Turn Signal and Hazard
Warning Indicators
Lights On Indicator High Beam Indicator
Fog Light Indicator*
Maintenance Minder
Indicator
System Message Indicator
Super Handling-All Wheel
DriveTM (
SH-AWD ®)
System Indicator*
Adaptive Cruise Control
( ACC ) with Low Speed
Follow Indicator
(Amber)
Lane Keeping Assist
System ( LKAS) Indicator
(Amber)
Road Departure Mitigation
(RDM) Indicator
Blind spot information
System Indicator*
’āĀ P. 76
’āĀ P. 77
’āĀ P. 77
’āĀ P. 78
’āĀ P. 79*1
*1
’āĀ P. 86*1
*1
Gear Position Indicator’āĀ P. 79
Transmission System
Indicator’āĀ P. 80
Auto Idle Stop System
Indicator (Amber)/
Auto Idle Stop
Indicator (Green)
’āĀ P. 82
’āĀ P. 83
’āĀ P. 83
’āĀ P. 84
’āĀ P. 84
’āĀ P. 87
’āĀ
P. 85
*1
*1
*1
’āĀ P. 85
*1’āĀ P. 84
’āĀ P. 87 ’āĀ
P. 91
*1
’āĀ P. 87
’āĀ P. 87 ’āĀ
P. 90
’āĀ P. 87
Immobilizer System
Indicator’āĀ P. 88
Security System Alarm
Indicator ’āĀ P. 88
’āĀ P. 89
’āĀ P. 90
’āĀ P. 91
’āĀ P. 92
’āĀ P. 96
*1
Adaptive Cruise Control
(ACC ) with Low Speed
Follow Indicator (Green)’āĀ P. 91
*1
Lane Keeping Assist
System ( LKAS) Indicator
(Green)’āĀ P. 91
*1
*1 *1 *1
*1
Collision Mitigation
Braking SystemTM
(CMBSTM) Indicator
*1’āĀ P. 93*1
* Not available on all models
20 ACURA RDX-31TJB6111.book 74 ŃāÜŃā╝ŃéĖ ’╝Æ’╝É’╝Æ’╝ÉÕ╣┤’╝Ƶ£ł’╝æ’╝æµŚźŃĆĆńü½µø£µŚźŃĆĆÕŹłÕŠī’╝ƵÖé’╝¢Õłå
Page 194 of 657
193
uuOperating the Switches Around the Steering Wheel uAuto High-Beam
Controls
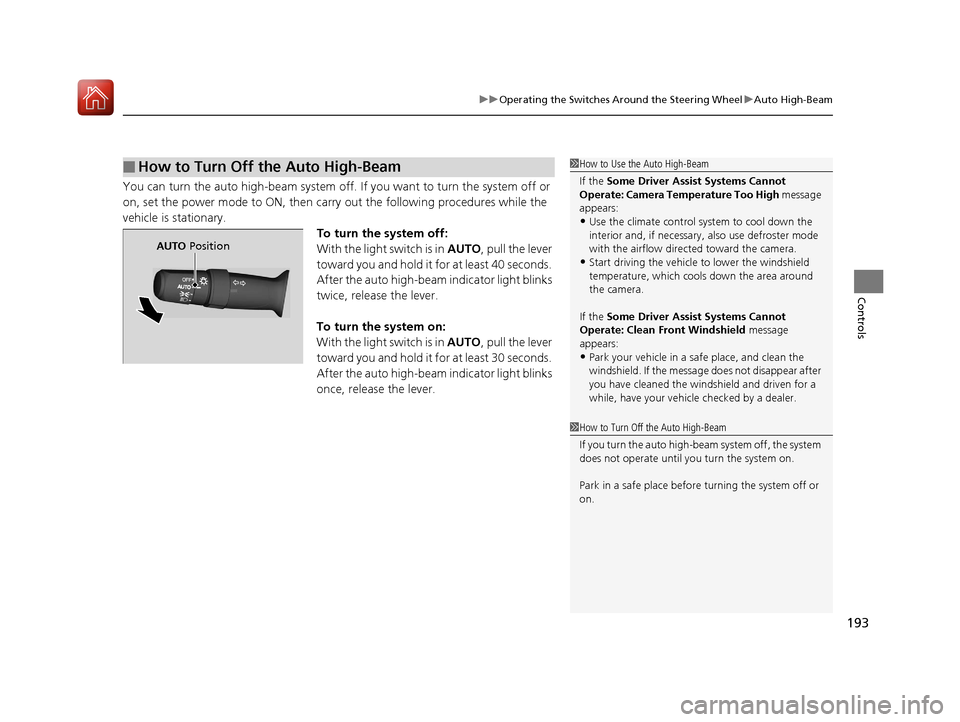
You can turn the auto high-beam system off. If you want to turn the system off or
on, set the power mode to ON, then carry out the following procedures while the
vehicle is stationary. To turn the system off:
With the light switch is in AUTO, pull the lever
toward you and hold it for at least 40 seconds.
After the auto high-beam indicator light blinks
twice, release the lever.
To turn the system on:
With the light switch is in AUTO, pull the lever
toward you and hold it for at least 30 seconds.
After the auto high-beam indicator light blinks
once, release the lever.
Ō¢ĀHow to Turn Off the Auto High-Beam1 How to Use the Auto High-Beam
If the Some Driver Assist Systems Cannot
Operate: Camera Temperature Too High message
appears:
ŌĆóUse the climate control system to cool down the
interior and, if necessary, also use defroster mode
with the airflow directed toward the camera.
ŌĆóStart driving the vehicle to lower the windshield
temperature, which cool s down the area around
the camera.
If the Some Driver Assist Systems Cannot
Operate: Clean Front Windshield message
appears:
ŌĆóPark your vehicle in a sa fe place, and clean the
windshield. If the message does not disappear after
you have cleaned the windshield and driven for a
while, have your vehicle checked by a dealer.
1 How to Turn Off the Auto High-Beam
If you turn the auto high-beam system off, the system
does not operate until you turn the system on.
Park in a safe place before turning the system off or
on.
AUTO Position
20 ACURA RDX-31TJB6111.book 193 ŃāÜŃā╝ŃéĖ ’╝Æ’╝É’╝Æ’╝ÉÕ╣┤’╝Ƶ£ł’╝æ’╝æµŚźŃĆĆńü½µø£µŚźŃĆĆÕŹłÕŠī’╝ƵÖé’╝¢Õłå
Page 396 of 657
Continued395
uuAcuraLink ®u
Features
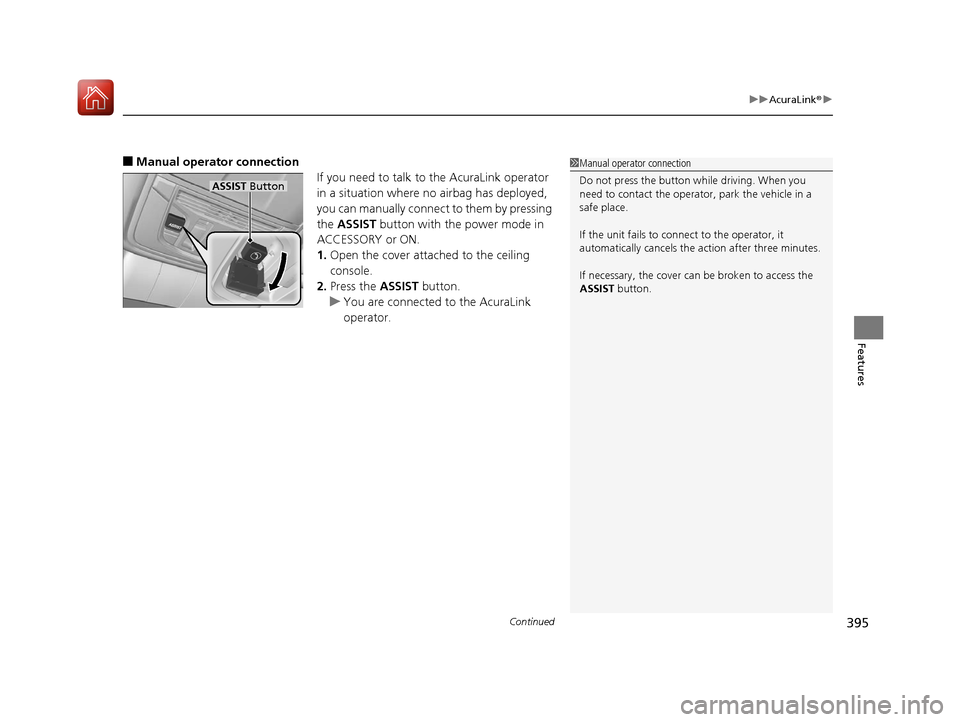
Ō¢ĀManual operator connection
If you need to talk to the AcuraLink operator
in a situation where no airbag has deployed,
you can manually connect to them by pressing
the ASSIST button with the power mode in
ACCESSORY or ON.
1. Open the cover attached to the ceiling
console.
2. Press the ASSIST button.
u You are connected to the AcuraLink
operator.1Manual operator connection
Do not press the button while driving. When you
need to contact the operato r, park the vehicle in a
safe place.
If the unit fails to connect to the operator, it
automatically cancels the action after three minutes.
If necessary, the cover can be broken to access the
ASSIST button.
ASSIST Button
20 ACURA RDX-31TJB6111.book 395 ŃāÜŃā╝ŃéĖ ’╝Æ’╝É’╝Æ’╝ÉÕ╣┤’╝Ƶ£ł’╝æ’╝æµŚźŃĆĆńü½µø£µŚźŃĆĆÕŹłÕŠī’╝ƵÖé’╝¢Õłå
Page 400 of 657
399
Driving
This chapter discusses driving and refueling.
Before Driving................................... 400
Towing a Trailer ................................ 405
Off-Highway Driving Guidelines ..... 411
When Driving Starting the Engine .......................... 413
Precautions While Driving................. 418
Automatic Transmission ................... 419
Shifting ............................................ 420
Integrated Dynamics System............. 428
Auto Idle Stop .................................. 430
Vehicle Stability AssistTM (VSA®), aka Electronic
Stability Control (ESC), System ................. 436
Agile Handling Assist ....................... 438
Super Handling-All Wheel DriveTM (SH-AWD®)*.. 439
Tire Pressure Monitoring System (TPMS) with Tire Fill Assist .......................... 440
Tire Pressure Monitoring System (TPMS) - Required Federal Explanation ......... 442
Blind spot information System
*........ 444
AcuraWatchTM................................... 447
Collision Mitigati on Braking SystemTM
(CMBSTM) ....................................... 450
Adaptive Cruise Control (ACC) with Low Speed Follow ................................. 460 Lane Keeping Assist System (LKAS) .. 477
Road Departure Mi
tigation (RDM)
System ........................................ 485
Front Sensor Camera ....................... 489
Radar Sensor ................................... 491
Braking .............................................. 492
Parking Your Vehicle ........................ 501
Multi-View Rear Camera .................. 511
Surround View Camera System
*..... 513
Refueling ........................................... 521
Fuel Economy and CO
2 Emissions .... 524
Turbo Engine Vehicle ....................... 525
* Not available on all models
20 ACURA RDX-31TJB6111.book 399 ŃāÜŃā╝ŃéĖ ’╝Æ’╝É’╝Æ’╝ÉÕ╣┤’╝Ƶ£ł’╝æ’╝æµŚźŃĆĆńü½µø£µŚźŃĆĆÕŹłÕŠī’╝ƵÖé’╝¢Õłå
Page 418 of 657

417
uuWhen Driving uStarting the Engine
Driving
1. Depress the brake pedal and press the ENGINE START/STOP button
simultaneously.
2. Keeping your right foot on the br ake pedal, put the transmission into
(D. Select
(R when reversing.
3. With the parking brake applied, release the brake pedal and gently depress the
accelerator pedal.
u Make sure the Parking Brake and Brake System indicator (red) goes off.
2Parking Brake P. 492
2 If the Transmission System Indicator Blinks along with the Warning
Message P. 620
Ō¢ĀHill start assist system
Hill start assist keeps the brake engaged br iefly to help prevent the vehicle from
rolling on inclines as you move your foot from the brake pedal to the accelerator.
Put the transmission into
(D or (S when facing uphill, or (R when facing downhill,
then release the brake pedal.
Ō¢ĀStarting to Drive1 Starting to Drive
You can also release the parking brake by pulling the
electric parking brake sw itch while depressing the
brake pedal. When facing downhill, you can start
your vehicle more smoothly by manually releasing it
with the electric parki ng brake switch than by
releasing it with th e accelerator pedal.
The engine stops when th e transmission position is
changed from
( P before the ENGINE START/STOP
button is pressed. Follow step 1 when starting to
drive.
When the engine was started using the keyless access
remote*
When the engine was started using the keyless access remote*
When the engine was started in any case
1 Hill start assist system
Hill start assist may not prevent the vehicle from
rolling downhill on a very st eep or slippery slope, and
will not operate on small inclines.
Hill start assist is not a replacement for the parking
brake.
Hill start assist will operate even when VSA ® is
switched off.
* Not available on all models
20 ACURA RDX-31TJB6111.book 417 ŃāÜŃā╝ŃéĖ ’╝Æ’╝É’╝Æ’╝ÉÕ╣┤’╝Ƶ£ł’╝æ’╝æµŚźŃĆĆńü½µø£µŚźŃĆĆÕŹłÕŠī’╝ƵÖé’╝¢Õłå
Page 445 of 657

444
uuWhen Driving uBlind spot information System*
Driving
Blind spot information System*
Is designed to detect vehicles in specified alert zones adjacent to your vehicle,
particularly in harder to see areas commonly known as ŌĆ£blind spots.ŌĆØ
When the system detects vehi cles approaching from behind in adjacent lanes, the
appropriate indicator comes on for a few se conds, providing assistance when you
change lanes.
Ō¢ĀHow the system works
1 Blind spot information System*
Important Safety Reminder
Like all assistance systems, blind spot information
system has limitations. Over reliance on blind spot
information system may result in a collision.
The blind spot information system alert indicator may
not come on under the following conditions:
ŌĆóA vehicle does not stay in the alert zone for more
than two seconds.
ŌĆóA vehicle is parked in a side lane.
ŌĆóThe speed difference betw een your vehicle and the
vehicle you are passing is greater than 6 mph (10
km/h).
ŌĆóAn object not detected by the radar sensors
approaches or passes your vehicle.
ŌĆóA vehicle running in the adjacent lane is a
motorcycle or other small vehicle.
3WARNING
Failure to visually confirm that it is safe to
change lanes before doing so may result in
a crash and serious injury or death.
Do not rely only on the blind spot
information system wh en changing lanes.
Always look in your mi rrors, to either side
of your vehicle, and behind you for other
vehicles before changing lanes.
ŌŚÅThe transmission is in
( D or (S.ŌŚÅYour vehicle speed is
between 20 mph (32
km/h) and 100 mph
(160 km/h)
Alert zone range
A: Approx. 1.6 ft. (0.5 m)
B: Approx. 10 ft. (3 m)
C: Approx. 10 ft. (3 m) Radar Sensors:
underneath the
rear bumper
corners
Alert Zone
A
B
C
* Not available on all models
20 ACURA RDX-31TJB6111.book 444 ŃāÜŃā╝ŃéĖ ’╝Æ’╝É’╝Æ’╝ÉÕ╣┤’╝Ƶ£ł’╝æ’╝æµŚźŃĆĆńü½µø£µŚźŃĆĆÕŹłÕŠī’╝ƵÖé’╝¢Õłå
Page 491 of 657

uuAcuraWatchTMuFront Sensor Camera
490
Driving
1Front Sensor Camera
If the Some Driver Assist Systems Cannot
Operate: Camera Temperature Too High message
appears:
ŌĆóUse the climate control system to cool down the
interior and, if necessary, also use defroster mode
with the airflow directed towards the camera.
ŌĆóStart driving the vehicle to lower the windshield
temperature, which cool s down the area around
the camera.
If the Some Driver Assist Systems Cannot
Operate: Clean Front Windshield message
appears:
ŌĆóPark your vehicle in a sa fe place, and clean the
windshield. If the message does not disappear after
you have cleaned the windshield and driven for a
while, have your vehicle checked by a dealer.
20 ACURA RDX-31TJB6111.book 490 ŃāÜŃā╝ŃéĖ ’╝Æ’╝É’╝Æ’╝ÉÕ╣┤’╝Ƶ£ł’╝æ’╝æµŚźŃĆĆńü½µø£µŚźŃĆĆÕŹłÕŠī’╝ƵÖé’╝¢Õłå
Page 594 of 657
593
uuIf a Tire Goes Flat uTemporarily Repairing a Flat Tire
Continued
Handling the Unexpected
Temporarily Repairing a Flat Tire
If the tire has a large cut or is otherwise severely damaged, you will need to have the
vehicle towed. If the tire only has a small puncture, from a nail for instance, you can
use the temporary tire repair kit so that you can drive to the nearest service station
for a more permanent repair.
If a tire goes flat while driving, grasp the steering wheel firmly, and brake gradually
to reduce speed. Then stop in a safe place.
1. Park the vehicle on a firm, level, and n on-slippery surface and apply the parking
brake.
2. Change the gear position to
(P.
3. Turn on the hazard warning lights an d set the power mode to VEHICLE OFF
(LOCK).
Vehicles with temporary tire repair kit
1 Temporarily Repairing a Flat Tire
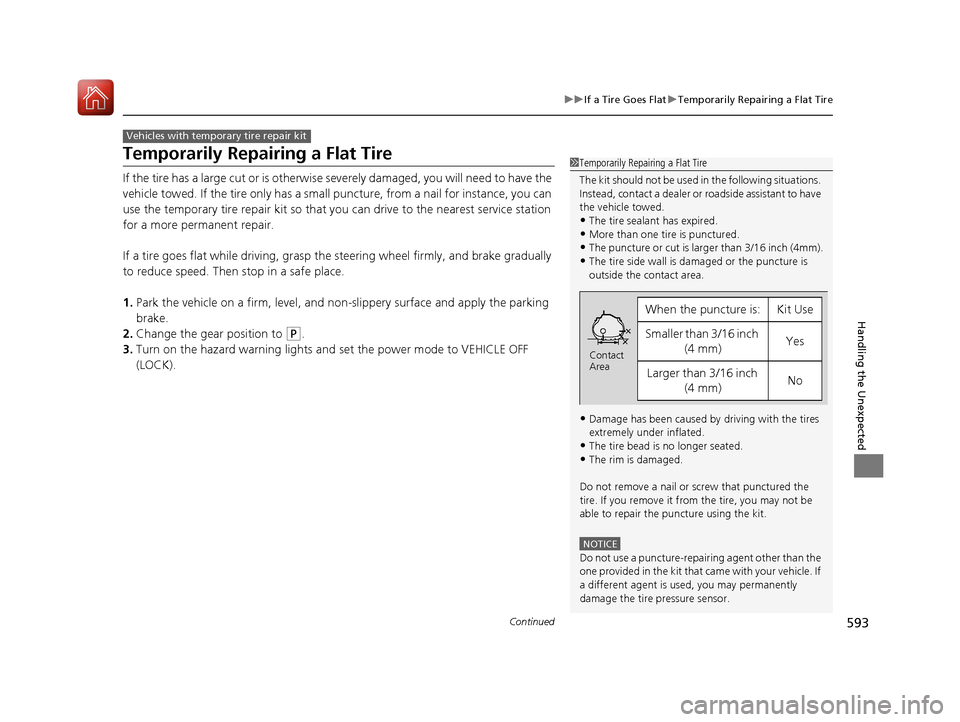
The kit should not be used in the following situations.
Instead, contact a dealer or roadside assistant to have
the vehicle towed.
ŌĆóThe tire sealant has expired.
ŌĆóMore than one tire is punctured.ŌĆóThe puncture or cut is larger than 3/16 inch (4mm).
ŌĆóThe tire side wall is da maged or the puncture is
outside the contact area.
ŌĆóDamage has been caused by driving with the tires
extremely under inflated.
ŌĆóThe tire bead is no longer seated.
ŌĆóThe rim is damaged.
Do not remove a nail or screw that punctured the
tire. If you remove it from the tire, you may not be
able to repair the puncture using the kit.
NOTICE
Do not use a puncture-repairing agent other than the
one provided in the kit that came with your vehicle. If
a different agent is used, you may permanently
damage the tire pressure sensor.
When the puncture is:Kit Use
Smaller than 3/16 inch (4 mm)Yes
Larger than 3/16 inch (4 mm)No
Contact
Area
20 ACURA RDX-31TJB6111.book 593 ŃāÜŃā╝ŃéĖ ’╝Æ’╝É’╝Æ’╝ÉÕ╣┤’╝Ƶ£ł’╝æ’╝æµŚźŃĆĆńü½µø£µŚźŃĆĆÕŹłÕŠī’╝ƵÖé’╝¢Õłå
Page 611 of 657
610
Handling the Unexpected
Jump Starting
Turn off the power to electric devices, such as audio and lights. Turn off the engine,
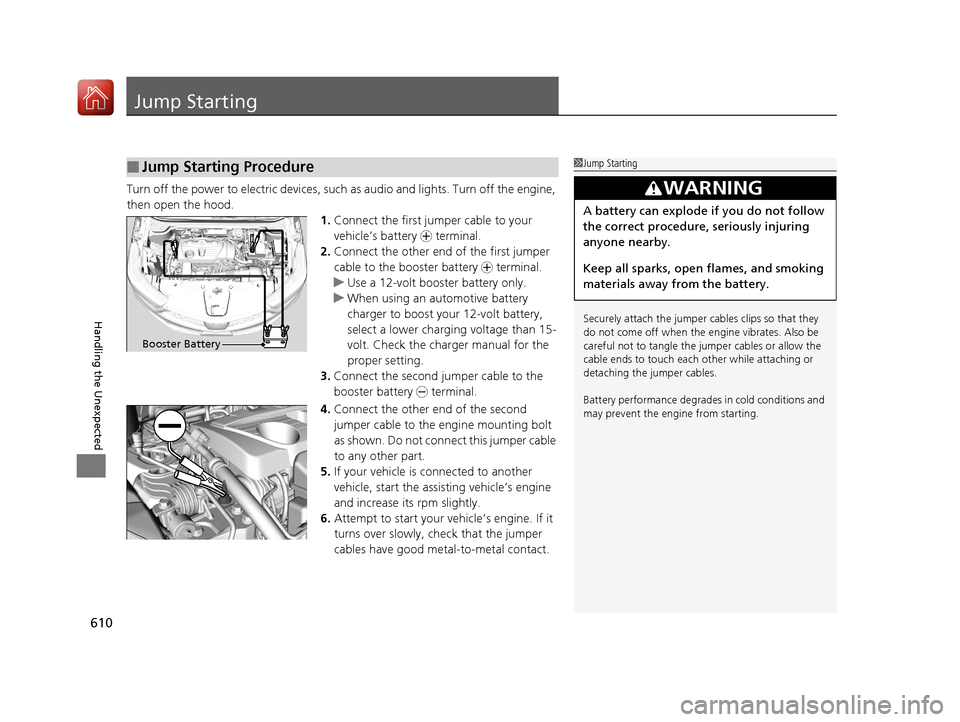
then open the hood. 1.Connect the first jump er cable to your
vehicleŌĆÖs battery + terminal.
2. Connect the other end of the first jumper
cable to the booster battery + terminal.
u Use a 12-volt booster battery only.
u When using an automotive battery
charger to boost your 12-volt battery,
select a lower charging voltage than 15-
volt. Check the charger manual for the
proper setting.
3. Connect the second jumper cable to the
booster battery - terminal.
4. Connect the other end of the second
jumper cable to the engine mounting bolt
as shown. Do not connect this jumper cable
to any other part.
5. If your vehicle is connected to another
vehicle, start the assisting vehicleŌĆÖs engine
and increase its rpm slightly.
6. Attempt to start your vehicleŌĆÖs engine. If it
turns over slowly, check that the jumper
cables have good metal-to-metal contact.
Ō¢ĀJump Starting Procedure1Jump Starting
Securely attach the jumper cables clips so that they
do not come off when the e ngine vibrates. Also be
careful not to tangle the ju mper cables or allow the
cable ends to touch each other while attaching or
detaching the jumper cables.
Battery performance degrades in cold conditions and
may prevent the engi ne from starting.
3WARNING
A battery can explode if you do not follow
the correct procedure, seriously injuring
anyone nearby.
Keep all sparks, open flames, and smoking
materials away from the battery.
Booster Battery
20 ACURA RDX-31TJB6111.book 610 ŃāÜŃā╝ŃéĖ ’╝Æ’╝É’╝Æ’╝ÉÕ╣┤’╝Ƶ£ł’╝æ’╝æµŚźŃĆĆńü½µø£µŚźŃĆĆÕŹłÕŠī’╝ƵÖé’╝¢Õłå