key Acura RL 2000 3.5 Owner's Guide
[x] Cancel search | Manufacturer: ACURA, Model Year: 2000, Model line: RL, Model: Acura RL 2000Pages: 330, PDF Size: 4.53 MB
Page 121 of 330
Courtes
y Light s
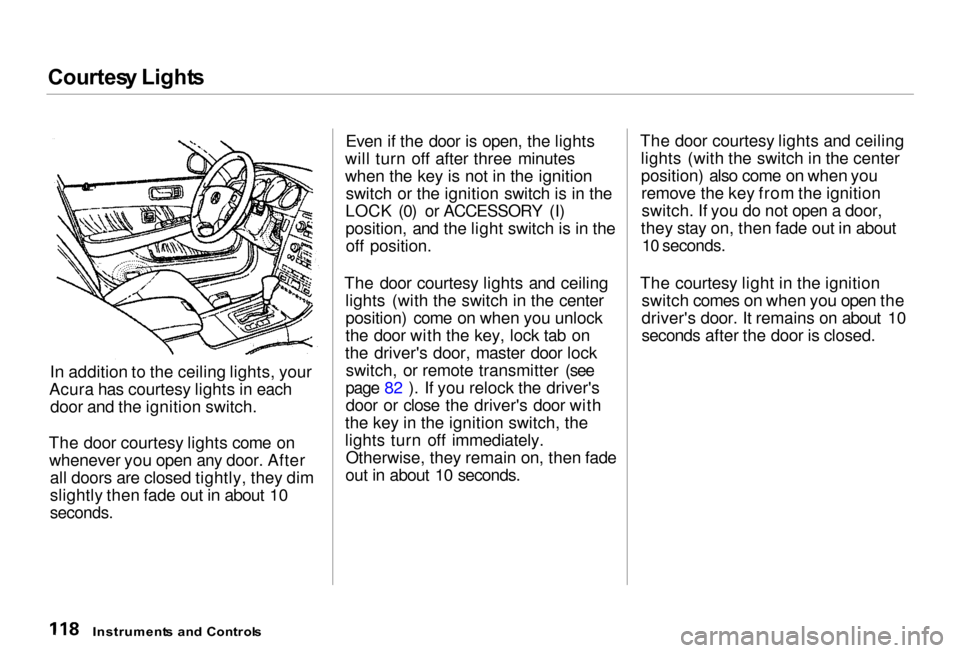
In addition to the ceiling lights, your
Acura has courtesy lights in each door and the ignition switch.
The door courtesy lights come on whenever you open any door. After all doors are closed tightly, they dim
slightly then fade out in about 10
seconds.
Even if the door is open, the lights
will turn off after three minutes
when the key is not in the ignition switch or the ignition switch is in the
LOCK (0) or ACCESSORY (I)
position, and the light switch is in the off position.
The door courtesy lights and ceiling lights (with the switch in the center
position) come on when you unlock
the door with the key, lock tab on
the driver's door, master door lock switch, or remote transmitter (see
page 82 ). If you relock the driver's door or close the driver's door with
the key in the ignition switch, the
lights turn off immediately. Otherwise, they remain on, then fade
out in about 10 seconds. The door courtesy lights and ceiling
lights (with the switch in the center
position) also come on when youremove the key from the ignitionswitch. If you do not open a door,
they stay on, then fade out in about
10 seconds.
The courtesy light in the ignition switch comes on when you open the
driver's door. It remains on about 10
seconds after the door is closed.
Instrument s an d Control s
Page 166 of 330
Securit
y Syste m
The security system helps to protect your car and valuables from theft.
The horn sounds and a combination of headlights, parking lights, side
marker lights and taillights flashes if
someone attempts to break into your
car or remove the radio. This alarm continues for two minutes, then the
system resets. To reset an alarming
system before the two minutes have
elapsed, unlock either front door
with the key or the remote
transmitter.
The security system sets auto- matically fifteen seconds after you
lock the doors, hood, and trunk. For
the system to activate, you must lock
the doors from the outside with the key, lock tab, door lock switch, or
remote transmitter. The security
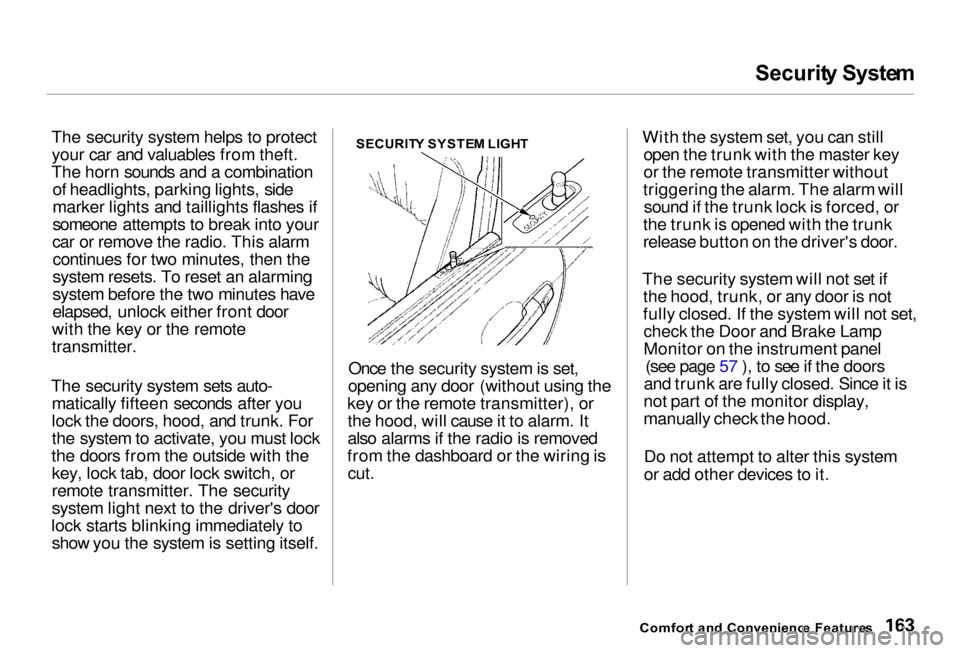
system light next to the driver's door
lock starts blinking immediately to show you the system is setting itself. SECURIT
Y SYSTE M LIGH T
Once the security system is set,
opening any door (without using the
key or the remote transmitter), or the hood, will cause it to alarm. It
also alarms if the radio is removed
from the dashboard or the wiring is
cut.
With the system set, you can still
open the trunk with the master key
or the remote transmitter without
triggering the alarm. The alarm will sound if the trunk lock is forced, or
the trunk is opened with the trunk
release button on the driver's door.
The security system will not set if the hood, trunk, or any door is not
fully closed. If the system will not set,check the Door and Brake Lamp
Monitor on the instrument panel (see page 57 ), to see if the doors
and trunk are fully closed. Since it is
not part of the monitor display,
manually check the hood.
Do not attempt to alter this system
or add other devices to it.
Comfor t an d Convenienc e Feature s
Page 182 of 330

Startin
g th e Engin e
1. Apply the parking brake.
2. In cold weather, turn off all electrical accessories to reduce
the drain on the battery.
3. Make sure the shift lever is in
Park. Press on the brake pedal.
4. Without touching the accelerator
pedal, turn the ignition key to theSTART (III) position. If the enginedoes not start right away, do not
hold the key in START (III) for
more than 15 seconds at a time.
Pause for at least 10 seconds
before trying again.
5. If the engine does not start within
15 seconds, or starts but stalls
right away, repeat step 4 with the
accelerator pedal pressed half-way
down. If the engine starts, release
pressure on the accelerator pedal so the engine does not race.
6. If the engine still does not start,
press the accelerator pedal all the
way down and hold it there whilestarting in order to clear flooding.
As before, keep the ignition key in the START (III) position for nomore than 15 seconds. Return tostep 5 if the engine does not start.
If it starts, lift your foot off the
accelerator pedal so the engine
does not race.
Startin g in Col d Weathe r a t Hig h
Altitud e (Abov e 8,000 feet/
2,400 meters )
An engine is harder to start in cold weather. The thinner air found athigh altitude above 8,000 feet (2,400meters) adds to the problem.
Use the following procedure:
1. Turn off all electrical accessories
to reduce the drain on the battery.
2. Push the accelerator pedal half-
way to the floor and hold it there
while starting the engine. Do nothold the ignition key in START (III) for more than 15 seconds.
When the engine starts, release the accelerator pedal gradually as
the engine speeds up and smoothsout.
3. If the engine fails to start in step 2,
push the accelerator pedal to the
floor and hold it there while youtry to start the engine for no more
than 15 seconds. If the engine does not start, return to step 2.
Drivin g
Page 184 of 330
Automati
c Transmissio n
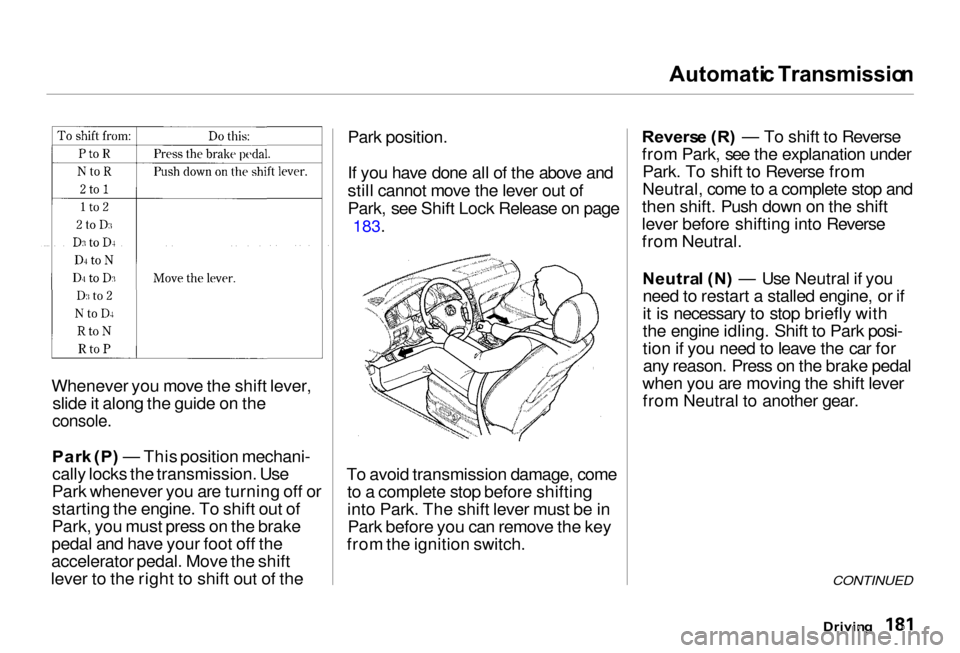
Whenever you move the shift lever, slide it along the guide on the
console.
Par k (P ) — This position mechani-
cally locks the transmission. Use
Park whenever you are turning off or starting the engine. To shift out of
Park, you must press on the brake
pedal and have your foot off the
accelerator pedal. Move the shift
lever to the right to shift out of the Park position.
If you have done all of the above and
still cannot move the lever out of
Park, see Shift Lock Release on page
183.
To avoid transmission damage, come to a complete stop before shifting
into Park. The shift lever must be inPark before you can remove the key
from the ignition switch. Revers
e (R ) — To shift to Reverse
from Park, see the explanation under Park. To shift to Reverse from
Neutral, come to a complete stop and
then shift. Push down on the shift
lever before shifting into Reverse
from Neutral.
Neutra l (N ) — Use Neutral if you
need to restart a stalled engine, or if
it is necessary to stop briefly with
the engine idling. Shift to Park posi-
tion if you need to leave the car for any reason. Press on the brake pedal
when you are moving the shift lever from Neutral to another gear.
CONTINUED
Drivin g
Page 186 of 330
Automati
c Transmissio n
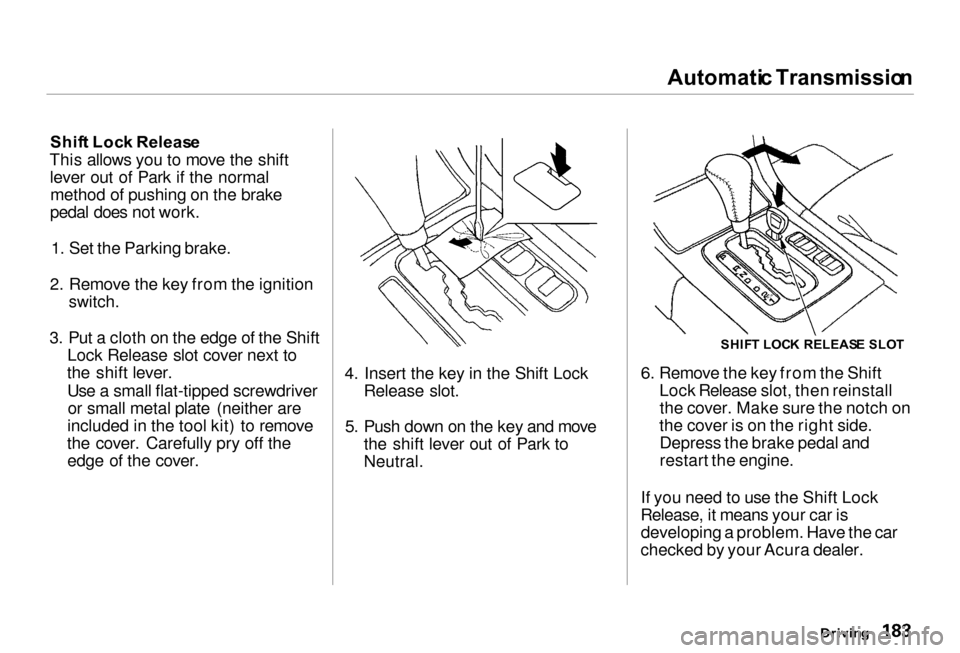
Shif t Loc k Releas e
This allows you to move the shift lever out of Park if the normalmethod of pushing on the brake
pedal does not work.
1. Set the Parking brake.
2. Remove the key from the ignition
switch.
3. Put a cloth on the edge of the Shift
Lock Release slot cover next to
the shift lever.
Use a small flat-tipped screwdriveror small metal plate (neither are
included in the tool kit) to remove
the cover. Carefully pry off the edge of the cover.
4. Insert the key in the Shift Lock
Release slot.
5. Push down on the key and move
the shift lever out of Park to
Neutral.
6. Remove the key from the Shift
Lock Release slot, then reinstallthe cover. Make sure the notch on
the cover is on the right side. Depress the brake pedal and
restart the engine.
If you need to use the Shift Lock
Release, it means your car is developing a problem. Have the car
checked by your Acura dealer.
Driving
SHIF
T LOC K RELEAS E SLO T
Page 187 of 330

Parkin
g
Always use the parking brake when
you park your car. The indicator on the instrument panel shows that the
parking brake is not fully released; it does not indicate that the parking
brake is firmly set. Make sure the
parking brake is set firmly or your
car may roll if it is parked on an
incline.
Set the parking brake before you put
the transmission in Park. This keeps
the car from moving and putting
pressure on the parking mechanism
in the transmission — making it
easier to move the shift lever out of
Park when you want to drive away. If the car is facing uphill, turn the
front wheels away from the curb.
If the car is facing downhill, turn the
front wheels toward the curb.
Make sure the parking brake is fully
released before driving away. Driving with the parking brake
partially set can overheat or damage
the rear brakes. Parkin
g Tip s
Make sure the moonroof and the
windows are closed. Turn off the lights.
Place any packages, valuables, etc.,
in the trunk or take them with you.
Lock the doors with the key or the
remote transmitter. Check the
indicator on the driver's door to
verify that the security system is set. Never park over dry leaves, tall
grass, or other flammable materials. The three way catalytic
converter gets very hot, and could
cause these materials to catch on
fire.
Drivin g
Page 253 of 330
Replacin
g a Hig h Bea m Headligh t
Bul b
The low beam headlight bulbs are a type of high voltage discharge tube.
High voltage can remain in the
circuit even with the light switch off
and the key removed. Because of
this, you should not attempt to
examine or change a low beam
headlight bulb yourself. If a low
beam headlight bulb fails, take the car to your dealer to have it replaced. Halogen bulbs are used for the high
beam headlight bulbs. When replacing a high beam headlight bulb,
handle it by its base and protect the
glass from contact with your skin or
hard objects. If you touch the glass, clean it with denatured alcohol and a
clean cloth.
Halogen bulbs get very hot when lit. Oil,
perspiration, or a scratch on the glass
can cause the bulb to overheat and
shatter.
1. Open the hood.
2. Remove the electrical connector from the bulb by pulling theconnector straight back.
3. Remove the rubber weather seal by pulling on the tab.
Maintenanc e
NOTIC
E
Page 279 of 330
Changin
g a Fla t Tire , I f You r Engin e Won' t Star t
19. Slip the hole at the top of the jack over the bracket in the trunk well.
Turn the jack's end bracket to lock
it in place. Store the tool kit back
in its place.
20. Unclip the hook from the trunk lid and lower the trunk floor.
21. Store the center cap and spacer
basket i
n the trunk. Make sure the
center cap will
not get scratched
or damaged.
22. Close th
e trunk lid. I
f You r
Engin
e Won' t Star t
Diagnosing why your engine won't start falls into two areas, depending
on what you hear when you turn the
key to START (III): You hear nothing, or almost
nothing. The engine's starter
motor does not operate at all, or
operates very slowly. You can hear the starter motor
operating normally, or the starter
motor sounds like it is spinning
faster than normal, but the engine does not start up
and run. Nothin
g Happen s
o
r th e Starte r
Moto r Operate s Ver y Slowl y
When you turn the ignition switch to START (III), you do not hear the
normal noise of the engine trying to
start. You may hear a clicking sound
or series of clicks, or nothing at all.Check these things:
Your car has the ImmobilizerSystem. You should use a
properly-coded master or valet key
to start the engine (see page 78).
A key that is not properly coded will cause the immobilizer systemindicator in the dash panel to blinkrapidly. Check the transmission interlock.
The transmission must be in Park or Neutral or the starter will not
operate.
Takin g Car e o f th e Unexpecte d
Loose items can fly around the
interior in a crash and could
seriously injure the occupants.
Store the wheel, jack and tools
securely before driving.
Page 320 of 330
Inde
x
Accessories and Modifications.... 174 Accessories................................. 174
Additional Safety Precautions.. 175Modifications............................. 175
ACCESSORY (Ignition Key Position)........................................ 80
Accessory Power Socket.............. 114
Adding Automatic Transmission
Fluid........................................ 226
Brake Fluid................................. 227
Differential Oil........................... 227
Engine Coolant........................... 219
Engine Oil................................... 215
Power Steering Fluid................. 228
Windshield Washer Fluid......... 225
Additional Information About Your Airbags............................ 48
Additional Safety Precautions.... 48
Airbag Service.............................. 48
Additional Information About Your Front Airbags................. 43
How the SRS Indicator Works... 45
How Your Front Airbags
Work.......................................... 43
SRS Components......................... 43
Additional Information About Your Seat Belts........................ 40
Automatic Seat Belt Tensioners................................ 41
Lap/Shoulder Belt....................... 40
Seat Belt Maintenance................ 42
Seat Belt System Components... 40
Additional Information About
Your Side Airbags.................... 46
How The Side Airbag Indicator Light Works............................. 47
How Your Side Airbags Work.... 46
Additives, Engine Oil..................... 216
Adjustments Head Restraints........................... 95
Mirrors.......................................... 98
Seats.............................................. 93
Steering Wheel............................ 71
Airbag (SRS).......................... 9, 43, 46
Air Cleaner Element...................... 229
Air Conditioning Filter.................. 240
Air Conditioning System............... 120
Maintenance............................... 239
Usage.................................. 122, 127
Air Outlet
s (Vents)........................ 120
Air Pressure, Tires........................ 242
Alarm, Anti-theft............................ 162
Alcohol in Gasoline........................ 303
Aluminum Wheels, Cleaning........ 263
Antifreeze....................................... 219
Anti-lock Brakes (ABS)
Indicator Light..................... 56, 187
Operation.................................... 18
6
Anti-theft, Audio System............... 162
Anti-theft Steering Column
Lock............................................... 80
Anti-theft System........................... 163
Appearance Care........................... 261
Armrest............................................. 96
Ashtrays.......................................... 116 Audio Controls, Remote................ 161
Audio System................................. 134
Automatic Climate Control System......................................... 120
Automatic Lighting.......................... 64
Automatic Seat Belt Tensioners.................................... 41
CONTINUED
Page 324 of 330
Inde
x
Reserve Indicator......................... 57
Tank, Filling the......................... 167
Fuel Mileage, Improving............... 171
Fuses, Checking the...................... 288
Gasohol........................................... 303
Gasoline.......................................... 166
Fuel Reserv
e Indicator................ 57
Gauge............................................
60
Octane Requirement................
. 166
Tank, Fillin
g the......................... 167
Gas Statio
n Procedures................. 167
Gauges..............................................
58
Engine Coolan
t Temperature .... 60
Fuel................................................
60
Maintenance Require
d
Indicator.................................... 61
GAWR (Gross Axle Weight
Rating) ........................................ 195
Gearshift Lever Positions .............180
Glass Cleaning............................... 265
Glove Box......................................... 87
GVWR (Gross Vehicle Weight
Rating) ........................................ 195
Halogen Headlight Bulbs.............. 250
Hazard Warning Flashers............... 70
Headlights
Automatic Lighting..................... 64
Daytime Running Lights............. 65
High Beam Indicator................... 57
High Beams, Turning on............ 63
Lights On Indicator..................... 55
Low Beams, Turning on............. 63
Reminder Chime.......................... 63
Replacing Halogen Bulbs ......... 250
Turning on.................................... 63
Head Restraints............................... 95
Heating and Cooling...................... 120
High Altitude, Starting at.............. 179
High-Low Beam Switch .................. 63
High-mount Brake Light............... 255
HomeLink Universal
Transmitter.................................. 88
Hood Latch..................................... 229
Hood, Opening the ........................ 168
Horn................................................... 62
Hot Coolant, Warning about........ 219
Hydroplaning.................................. 193 Identification Number, Vehicle.... 296
If Your Car Has to be Towed....... 292
Ignition
Keys............................................... 77
Switch............................................ 80
Timing Control System............. 306
Immobilizer System......................... 78
Important Safety Precautions .......... 6
Indicator Lights, Instrument Panel.............................................. 53
Inflation, Proper Tire .................... 241
Inside Mirror.................................... 98
Inspection, Tire.............................. 243
Instrument Panel............................. 53
Instrument Panel Brightness......... 66
Interior Cleaning............................ 264
Introduction......................................... i
CONTINUED