fuse Acura RL 2000 3.5 Owner's Manual
[x] Cancel search | Manufacturer: ACURA, Model Year: 2000, Model line: RL, Model: Acura RL 2000Pages: 330, PDF Size: 4.53 MB
Page 139 of 330
Audi
o Syste m
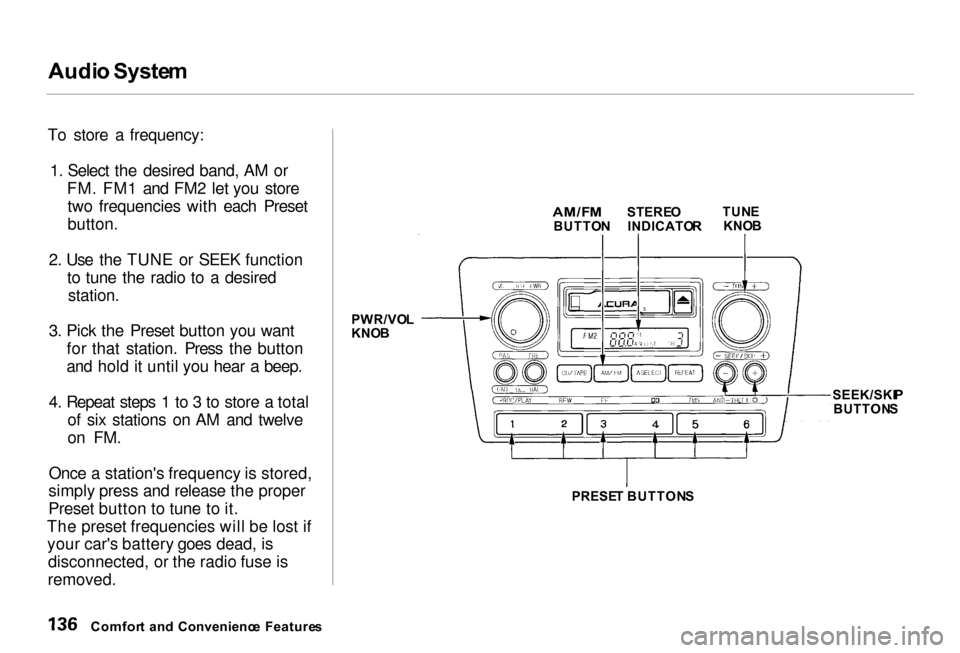
To store a frequency: 1. Select the desired band, AM or
FM. FM1 and FM2 let you storetwo frequencies with each Preset
button.
2. Use the TUNE or SEEK function
to tune the radio to a desired station.
3. Pick the Preset button you want
for that station. Press the button
and hold it until you hear a beep.
4. Repeat steps 1 to 3 to store a total
of six stations on AM and twelve
on FM.
Once a station's frequency is stored,
simply press and release the proper
Preset button to tune to it.
The preset frequencies will be lost if your car's battery goes dead, is
disconnected, or the radio fuse is
removed. PWR/VO
L
KNO B
SEEK/SKIP
BUTTON S
PRESE T BUTTON S
Comfor t an d Convenienc e Feature s
AM/F
M
BUTTO NSTERE
O
INDICATO RTUN
E
KNO B
Page 149 of 330
Audi
o Syste m
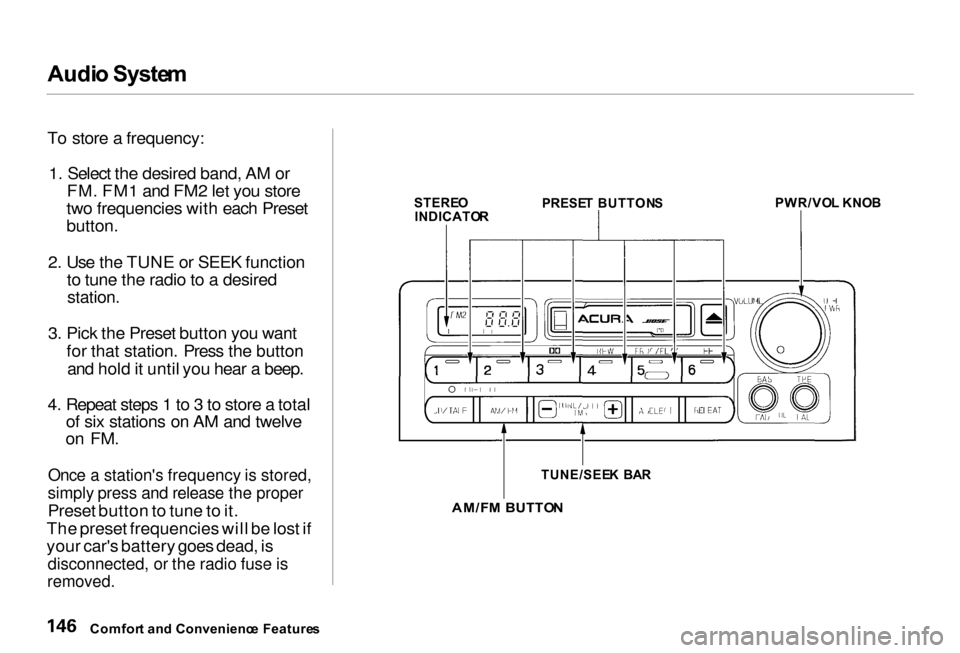
To store a frequency: 1. Select the desired band, AM or
FM. FM1 and FM2 let you store
two frequencies with each Preset
button.
2. Use the TUNE or SEEK function
to tune the radio to a desired
station.
3. Pick the Preset button you want
for that station. Press the button
and hold it until you hear a beep.
4. Repeat steps 1 to 3 to store a total
of six stations on AM and twelve
on FM.
Once a station's frequency is stored,
simply press and release the proper
Preset button to tune to it.
The preset frequencies will be lost if
your car's battery goes dead, is
disconnected, or the radio fuse is
removed.
Comfor t an d Convenienc e Feature s
STERE
O
INDICATO R
PRESE
T BUTTON S
PWR/VO
L KNO B
TUNE/SEE K BA R
AM/F M BUTTO N
Page 165 of 330
Audi
o Syste m
Thef t Protectio n
Your car's audio system will disable itself if it is disconnected fromelectrical power for any reason. To
make it work again, the user must
enter a specific five-digit code in the
Preset buttons. Because there are
hundreds of number combinations possible from five digits, making thesystem work without knowing the
exact code is nearly impossible.
You should have received a card that lists your audio system's code
number and serial number. It is bestto store this card in a safe place at
home. In addition, you should write
the audio system's serial number in this Owner's Manual. If you should
happen to lose the card, you must obtain the code number from your
Acura dealer. To do this, you will need the system's serial number. If your car's battery is disconnected
or goes dead, or the radio fuse is
removed, the audio system will disable itself. If this happens, you
will see "Code" in the frequency display the next time you turn on the
system. Use the Preset buttons to
enter the five-digit code. If it is
entered correctly, the radio will start
playing.
If you make a mistake entering the
code, do not start over or try to correct your mistake. Complete the
five-digit sequence, then enter the correct code. You have three tries to
enter the correct code. If you are
unsuccessful in three attempts, you
must then leave the system on for one hour before trying again. You will have to store your favorite
stations in the Preset buttons after
the system begins working. Your original settings were lost when
power was disconnected.
Comfor t an d Convenienc e Feature s
Page 188 of 330

Th
e Brakin g Syste m
Your Acura is equipped with disc brakes at all four wheels. A powerassist helps reduce the effort needed
on the brake pedal. The ABS helps
you retain steering control when braking very hard.
Put your foot on the brake pedal only
when you intend to brake. Resting
your foot on the pedal keeps the brakes applied lightly, causing them
to build up heat. Heat build-up can
reduce how well your brakes work. Italso keeps your brake lights on all
the time, confusing drivers behind
you.
Constant application of the brakes
when going down a long hill builds up heat and reduces their effective-
ness. Use the engine to assist the
brakes by downshifting to a lower
gear and taking your foot off the accelerator pedal.
Check your brakes after driving
through deep water. Apply the
brakes moderately to see if they feel normal. If not, apply them gently and
frequently until they do. Since a
longer distance is needed to stop
with wet brakes, be extra cautious and alert in your driving. Brak
e Wea r Indicator s
All four brakes have audible brake wear indicators.
When the brake pads need replacing, you will hear a distinctive metallic "screeching" sound when you apply
the brakes. If you do not have the
brake pads replaced, they will begin screeching all the time.
Your brakes may sometimes squeal or squeak when you apply them
lightly. Do not confuse this with the
brake wear indicators. They make a
very audible "screeching."
Driving
Page 272 of 330
Takin
g Car e o f th e Unexpecte d
This section covers the more- common problems that motorists
experience with their vehicles. It
gives you information about how to safely evaluate the problem and what
to do to correct it. If the problem has stranded you on the side of the road,
you may be able to get going again. If not, you will also find instructions
on getting your car towed.
Compact Spare Tire....................... 270
Changing a Flat Tire..................... 271
If Your Engine Won't Start........... 276 Nothing Happens or theStarter Motor OperatesVery Slowly......................... 276
The Starter Operates Normally................................. 277
Jump Starting................................. 278
If Your Engine Overheats............. 280
Low Oil Pressure Indicator.......... 282
Charging System Indicator........... 283
Malfunction Indicator Lamp ........ 284
Brake System Indicator................ 285
Closing the Moonroof................... 286
Fuses............................................... 287
Checking and Replacing........... 288
Emergency Towing....................... 292
Takin g Car e o f th e Unexpecte d
Page 280 of 330
I
f You r Engin e Won' t Star t
Turn the ignition switch to ON (II).
Turn on the headlights and check their brightness. If the headlightsare very dim or don't light at all,
the battery is discharged. See
Jum p Startin g on page 278.
Turn the ignition switch to START
(III). If the headlights do not dim,
check the condition of the fuses. If
the fuses are OK, there is proba-
bly something wrong with the
electrical circuit for the ignition switch or starter motor. You will
need a qualified technician to determine the problem. (See
Emergenc y Towin g on page 292.)
If the headlights dim noticeably or
go out when you try to start the engine, either the battery is dis-
charged or the connections are
corroded. Check the condition of
the battery and terminal connec-
tions (see page 234). You can
then try jump starting the car froma booster battery (see page 278 ).
Th e Starte r
Operate
s Normall y
In this case, the starter motor's
speed sounds normal, or even faster
than normal, when you turn the
ignition switch to START (III), but
the engine does not run. Are you using the proper starting
procedure? Refer to Startin g th e
Engin e on page 179 . Do you have fuel? Turn the
ignition switch to ON (II) for a
minute and watch the fuel gauge.
The low fuel level warning light may not be working, so you werenot reminded to fill the tank. There may be an electrical
problem, such as no power to the
fuel pump. Check all the fuses
(see page 287).
If you find nothing wrong, you will need a qualified technician to find
the problem. See Emergenc y
Towin g on page 292.
Takin g Car e o f th e Unexpecte d
Page 289 of 330
Closin
g th e Moonroo f
If the electric motor will not close
the moonroof, do the following:
1.
Check the
fuse for the moonroof
motor (see page
287). If the fuse
is blown,
replace it with one of the
same or lower rating.
2. Try closing the moonroof. If the new fuse blows immediately or the
moonroof motor still does not
operate,
you can close the
moonroof manually.
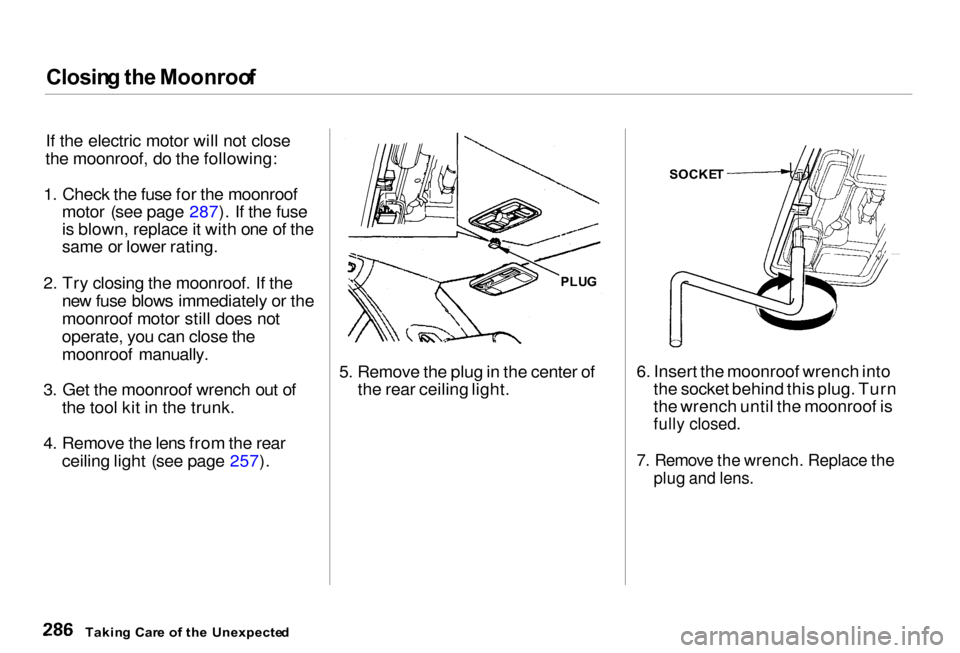
3. Get the
moonroof wrench out of
the tool kit in the trunk.
4. Remove the
lens from the rear
ceiling light (see page
257). 5. Remove the
plug in the center of
the rear ceiling light. 6. Insert the moonroof wrench into
the socket behind this plug. Turn
the wrench until the moonroof is
fully closed.
7. Remove the wrench. Replace the
plu
g and lens.
Takin g Car e
o
f th e Unexpecte d
PLU
G SOCKE
T
Page 290 of 330
Fuse
s
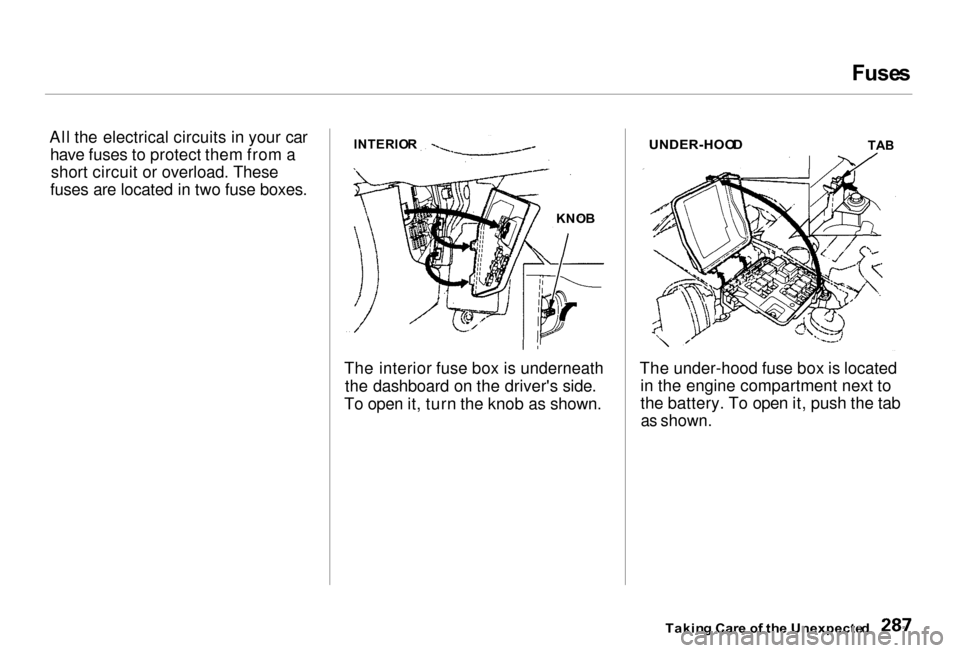
All the electrical circuits in your car have fuses to protect them from ashort circuit or overload. These
fuses are located in two fuse boxes.
The interior fuse box is underneaththe dashboard on the driver's side.
To open it, turn the knob as shown. The under-hood fuse box is located
in the engine compartment next to
the battery. To open it, push the tab
as shown.
Takin g Car e o f th e Unexpecte d
INTERIO
R
KNOB
UNDER-HOO
D
TAB
Page 291 of 330
Fuse
s
Checkin g an d Replacin g Fuse s
If something electrical in your car stops working, the first thing you
should check for is a blown fuse.
Determine from the chart on pages 290 and 291, or the diagram on the
fuse box lid, which fuse or fuses
control that component. Check those
fuses first, but check all the fuses
before deciding that a blown fuse is
not the cause. Replace any blown
fuses and check the component's
operation.
1. Turn the ignition switch to LOCK (0). Make sure the headlights and
all other accessories are off.
2. Remove the
cover from the fuse
box.
FUS
E
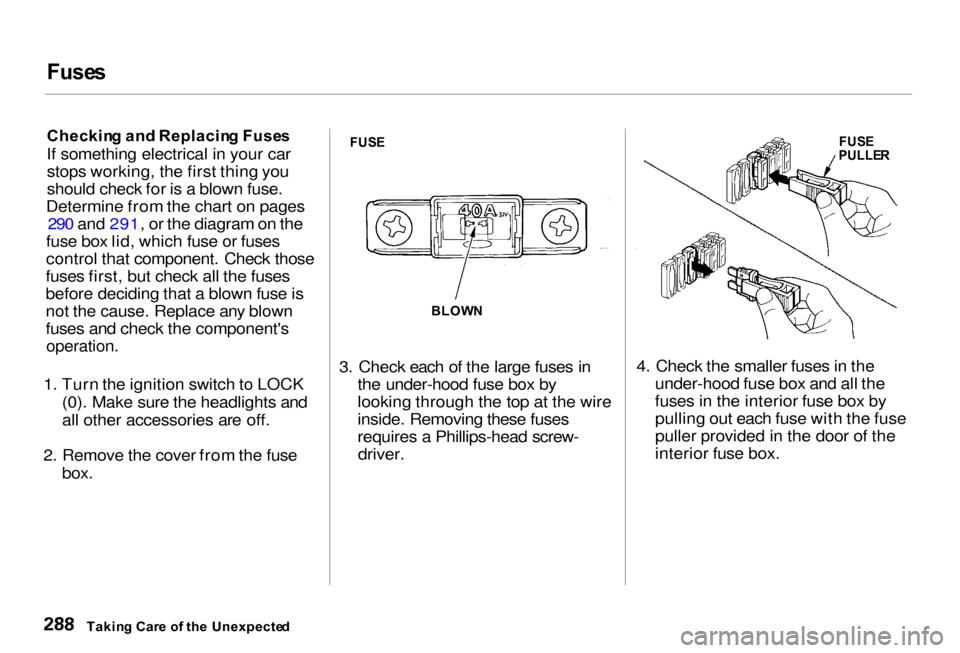
3.
Check each
of the large fuses in
the under-hoo
d fuse box by
looking through the top at the wire
inside. Removing these fuses
requires a Phillips-head screw- driver. 4. Check the
smaller fuses in the
under-hood fuse box and all the
fuses in the interior fuse box by
pulling out each fuse with the fuse
puller provided in the door of
the
interior fuse box.
Takin g Car e
o
f th e Unexpecte d
BLOW
N
FUS
E
PULLE R
Page 292 of 330
Fuse
s
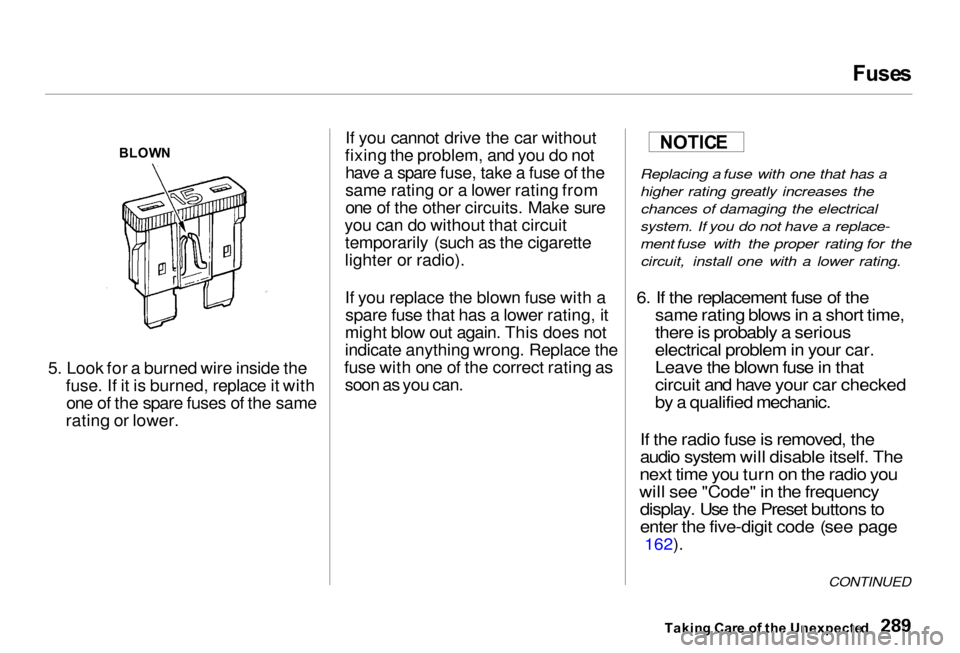
5. Look for a burned wire inside the fuse. If it is burned, replace it withone of the spare fuses of the same
rating or lower. If you cannot drive the car without
fixing the problem, and you do not have a spare fuse, take a fuse of the
same rating or a lower rating from
one of the other circuits. Make sure
you can do without that circuit temporarily (such as the cigarette
lighter or radio).
If you replace the blown fuse with aspare fuse that has a lowe r rating, it
might blo
w out again. This does not
indicate anything wrong. Replace the
fuse with one of the correct rating as soon as you can.
Replacing a fuse with one that has a
higher rating greatly increases the
chances of damaging the electrical
system. If you do not have a replace-
ment fuse with the proper rating for the circuit, install one with a lower rating.
6. If the replacement fuse of the same rating blows in a short time,
there is probably a serious
electrical proble
m in your car.
Leave the
blown fuse in that
circuit and have your car checked
b
y a
qualified mechanic.
If th
e radio fuse is removed, the
audio system will disable itself. The
next time you turn on the radio you
will see "Code" i
n the frequency
display. Us
e the Preset buttons to
enter the five-digit code (see page
162).
Takin g Car e o f th e Unexpecte d
BLOW
N
CONTINUED
NOTIC
E