bulb Acura RL 2000 3.5 Owner's Manual
[x] Cancel search | Manufacturer: ACURA, Model Year: 2000, Model line: RL, Model: Acura RL 2000Pages: 330, PDF Size: 4.53 MB
Page 60 of 330
Indicato
r Light s
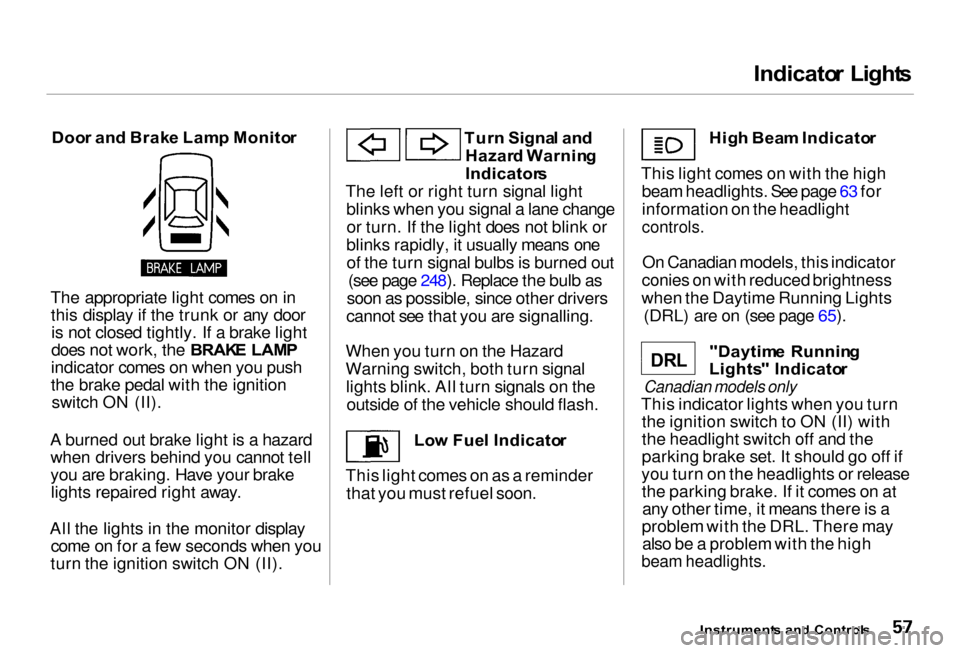
Doo r an d Brak e Lam p Monito r
The appropriate light comes on in this display if the trunk or any dooris not closed tightly. If a brake light
does not work, the BRAK E LAM P
indicator comes on when you push
the brake pedal with the ignition switch ON (II).
A burned out brake light is a hazard when drivers behind you cannot tell
you are braking. Have your brakelights repaired right away.
All the lights in the monitor display come on for a few seconds when you
turn the ignition switch ON (II). Tur
n Signa l an d
Hazar d Warnin g
Indicator s
The left or right turn signal light blinks when you signal a lane changeor turn. If the light does not blink or
blinks rapidly, it usually means one of the turn signal bulbs is burned out (see page 248). Replace the bulb as
soon as possible, since other drivers
cannot see that you are signalling.
When you turn on the Hazard
Warning switch, both turn signal lights blink. All turn signals on the outside of the vehicle should flash.
Low Fue l Indicato r
This light comes on as a reminder that you must refuel soon. Hig
h Bea m Indicato r
This light comes on with the high beam headlights. See page 63 for
information on the headlight
controls.
On Canadian models, this indicator
conies on with reduced brightness
when the Daytime Running Lights (DRL) are on (see page 65).
"Daytim e Runnin g
Lights " Indicato r
Canadian models only
This indicator lights when you turn the ignition switch to ON (II) with
the headlight switch off and the
parking brake set. It should go off if
you turn on the headlights or release the parking brake. If it comes on atany other time, it means there is a
problem with the DRL. There may also be a problem with the high
beam headlights.
Instrument s an d Control s
D R L
Page 204 of 330
Maintenanc
e
This section explains why it is important to keep your car well
maintained and to follow basic
maintenance safety precautions.
This section also includes Maintenance Schedules for normal
driving and severe driving conditions,
a Maintenance Record, and instruc-
tions for simple maintenance tasks
you may want to take care of
yourself.
If you have the skills and tools to per-
form more complex maintenance tasks on your Acura, you may want
to purchase the Service Manual. See
page 315 for information on how to obtain a copy, or see your Acura
dealer.
Maintenance Safety....................... 202
Important Safety Precautions.. 203
Maintenance Schedule.................. 204
Required Maintenance Record.... 211
Owner Maintenance Checks........ 213
Fluid Locations............................... 214
Engine Oil....................................... 215 Adding Oil................................... 215
Recommended Oil..................... 215
Synthetic Oil............................... 216
Additives..................................... 216 Changing the Oil and Filter...... 217
Cooling System.............................. 219 Adding Engine Coolant............. 219Replacing Engine Coolant........ 221
Windshield Washers..................... 225
Automatic Transmission Fluid..... 226
Differential Oil............................... 227
Brake Fluid..................................... 227
Brake System............................. 228
Power Steering............................... 228
Hood Latch..................................... 229
Air Cleaner Element...................... 229 Spark Plugs..................................... 231 Replacement............................... 231
Specifications............................. 234 Battery............................................ 234
Wiper Blades.................................. 237
Air Conditioning System............... 239
Air Conditioning Filter.................. 240
Drive Belts...................................... 240
Timing Belt..................................... 241 Tires................................................ 241 Inflation....................................... 241
Inspection................................... 243
Maintenance............................... 244
Tire Rotation.............................. 244
Replacing Tires and Wheels.... 245
Wheels and Tires....................... 246
Winter Driving........................... 246
Snow Tires.............................. 247
Tire Chains............................. 247
Lights.............................................. 248 Replacing Bulbs......................... 250
Storing Your Car............................ 259
Maintenance
Page 251 of 330
Light
s
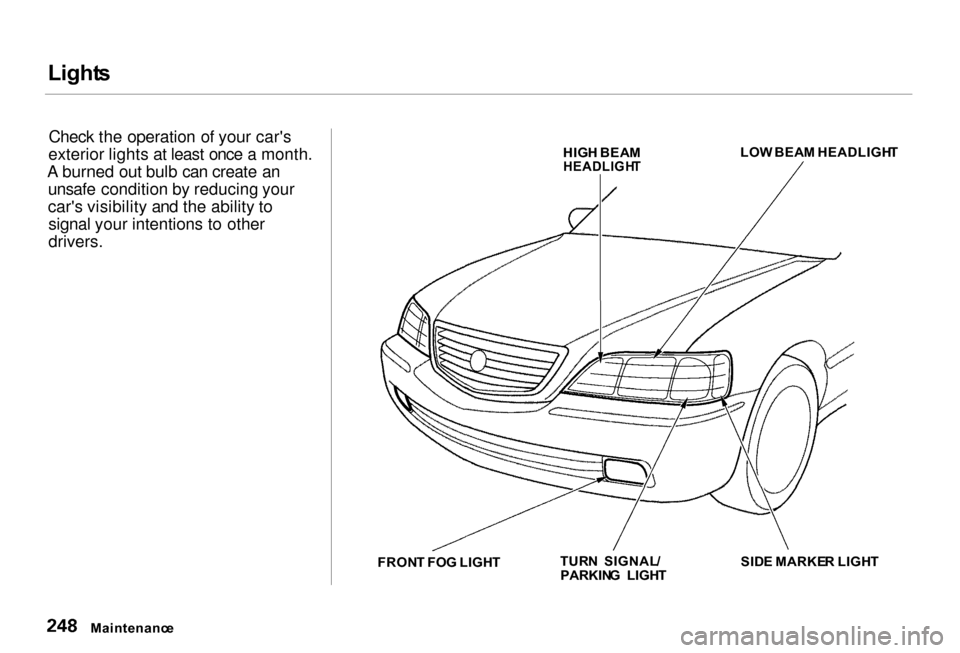
Check the operation of your car's
exterior lights at least once a month.
A burned out bulb can create an unsafe condition by reducing your
car's visibility and the ability tosignal your intentions to other
drivers.
Maintenanc e HIG
H BEA M
HEADLIGH T
LO
W BEA M HEADLIGH T
FRON T FO G LIGH T TUR
N SIGNAL /
PARKIN G LIGH T SID
E MARKE R LIGH T
Page 252 of 330
Light
s
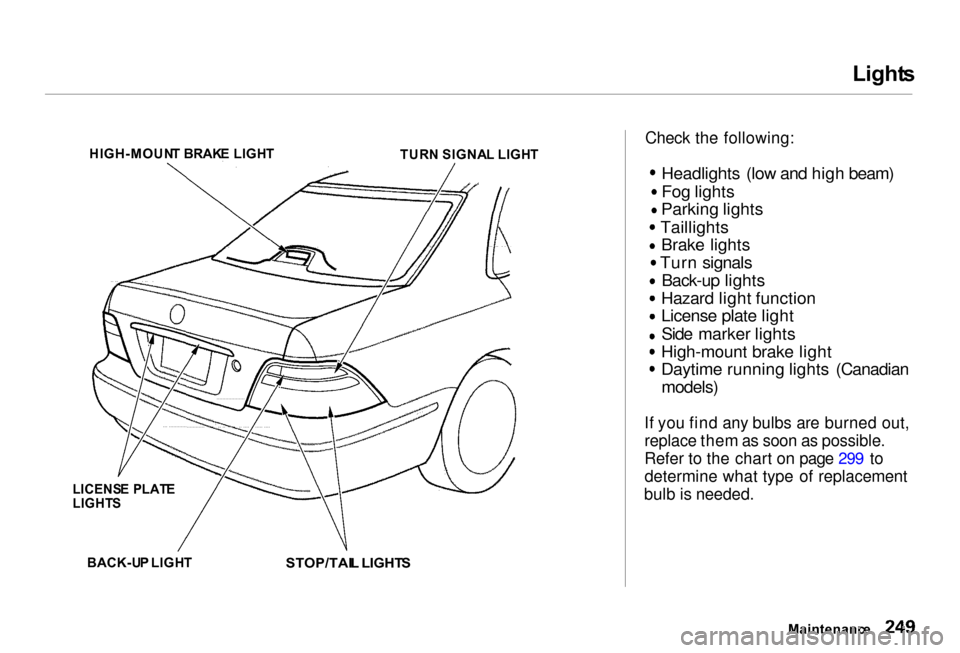
Check the following:
Headlights (low and high beam)
Fog lights
Parking lights Taillights
Brake lights Turn signals
Back-up lights
Hazard light function
License plate light
Side marker lights
High-mount brake light
Daytime running lights (Canadian
models)
If you find any bulbs are burned out,
replace them as soon as possible.
Refer to the chart on page 299 to
determine what type of replacement
bulb is needed.
Maintenance
HIGH-MOUN
T BRAK E LIGH T
TURN SIGNA L LIGH T
LICENS E PLAT E
LIGHT S
BACK-U P LIGH T
STOP/TAIL LIGHT S
Page 253 of 330
Replacin
g a Hig h Bea m Headligh t
Bul b
The low beam headlight bulbs are a type of high voltage discharge tube.
High voltage can remain in the
circuit even with the light switch off
and the key removed. Because of
this, you should not attempt to
examine or change a low beam
headlight bulb yourself. If a low
beam headlight bulb fails, take the car to your dealer to have it replaced. Halogen bulbs are used for the high
beam headlight bulbs. When replacing a high beam headlight bulb,
handle it by its base and protect the
glass from contact with your skin or
hard objects. If you touch the glass, clean it with denatured alcohol and a
clean cloth.
Halogen bulbs get very hot when lit. Oil,
perspiration, or a scratch on the glass
can cause the bulb to overheat and
shatter.
1. Open the hood.
2. Remove the electrical connector from the bulb by pulling theconnector straight back.
3. Remove the rubber weather seal by pulling on the tab.
Maintenanc e
NOTIC
E
Page 254 of 330

Light
s
4. Unclip the end of the hold-down wire from its slot. Pivot it out of
the way and remove the bulb.
5. Insert the new bulb into the hole, making sure the bulb is right side
up and the nubs on the bulb base
fit in the indentations in the
headlight assembly. Pivot the hold- down wire back in place and clip
the end into the slot. 6. Install the rubber seal over the
back of the headlight assembly.Make sure it is right side up; it is marked
7. Push the electrical connector onto the new bulb.
Turn on the headlights to test the
new bulb. Replacin
g a Fo g Ligh t Bul b
Your car uses halogen fog light bulbs. See page 250 for informationon replacing a halogen bulb.
CONTINUED
Maintenanc e
WEATHE
R SEA L
BULB
CONNECTO R
HOLD-DOW
N WIR E
Page 255 of 330

Light
s
1. Use a wrench to loosen the light
assembly's mounting bolt.
2. Remove the light assembly from
the bumper.
3. Remove the electrical connector
from the bulb by pulling the
connector straight back.
4. Remove the rubber weather seal
by pulling on the tab.
5. Unclip the end of the hold-down wire from its slot. Pivot the wireout of the way and remove the
bulb.
6. Insert the new bulb into the hole,
making sure the bulb is right side
up and the nubs on the bulb base
fit in the indentations in the fog
light assembly. Pivot the hold- down wire back in place and clip
the end into the slot.
7. Install the rubber seal over the back of the fog light assembly.Make sure it is right side up; it is
marked
8. Push the electrical connector onto the new bulb. Turn on the front
fog lights to test the new bulb.
9. Put the light assembly into the bumper. Tighten the mounting
bolt.
Maintenanc e
WEATHE
R SEA L
BUL B
HOLD-DOW
N
WIR E
CONNECTO
R
BOL T
Page 256 of 330
Light
s
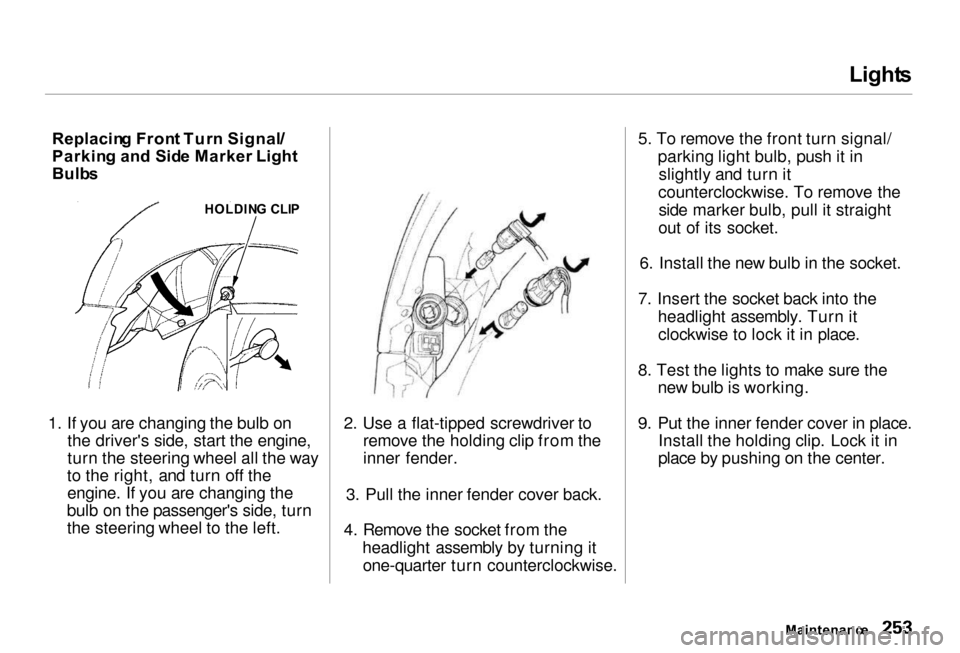
Replacin g Fron t Tur n Signal/
Parkin g an d Sid e Marker Light
Bulb s
1. If you are changing the bulb on the driver's side, start the engine,
turn the steering wheel all the way
to the right, and turn off the engine. If you are changing the
bulb on the passenger's side, turn
the steering wheel to the left. 2. Use a flat-tipped screwdriver to
remove the holding clip from the
inner fender.
3. Pull the inner fender cover back.
4. Remove the socket from the headlight assembly by turning itone-quarter turn counterclockwise. 5. To remove the front turn signal/
parking light bulb, push it inslightly and turn it
counterclockwise. To remove the side marker bulb, pull it straight
out of its socket.
6. Install the new bulb in the socket.
7. Insert the socket back into the headlight assembly. Turn itclockwise to lock it in place.
8. Test the lights to make sure the new bulb is working.
9. Put the inner fender cover in place. Install the holding clip. Lock it in
place by pushing on the center.
Maintenance
HOLDIN
G CLI P
Page 257 of 330
Light
s
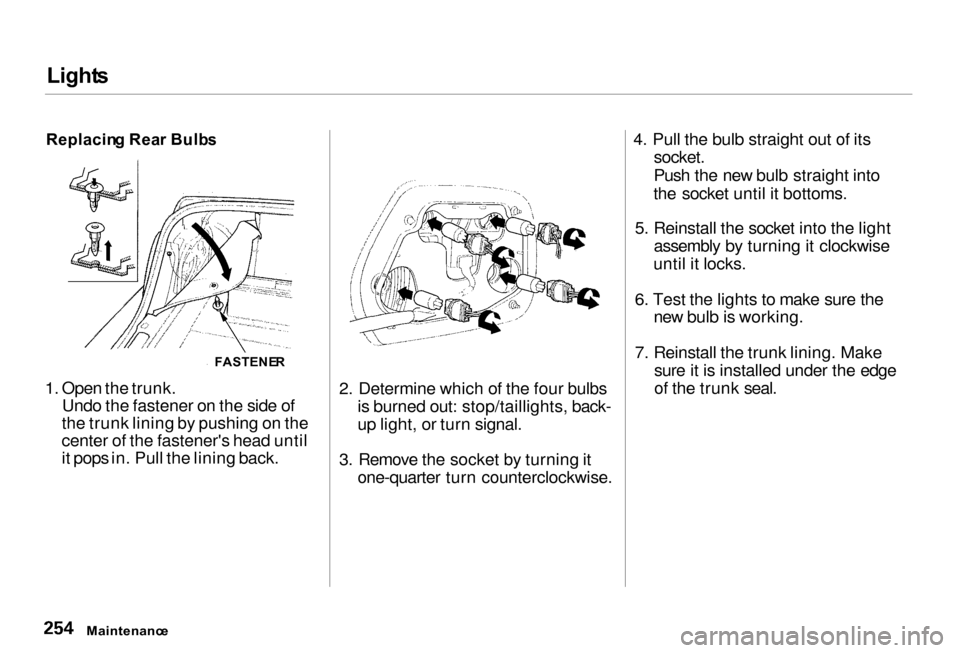
Replacin g Rea r Bulb s
1. Open the trunk. Undo the fastener on the side of
the trunk lining by pushing on the
center of the fastener's head until
it pops in. Pull the lining back. 2. Determine which of the four bulbs
is burned out: stop/taillights, back-
up light, or turn signal.
3. Remove the socket by turning it one-quarter turn counterclockwise. 4. Pull the bulb straight out of its
socket.
Push the new bulb straight into
the socket until it bottoms.
5. Reinstall the socket into the light assembly by turning it clockwise
until it locks.
6. Test the lights to make sure the new bulb is working.
7. Reinstall the trunk lining. Make sure it is installed under the edge
of the trunk seal.
Maintenanc e
FASTENE
R
Page 258 of 330
Light
s
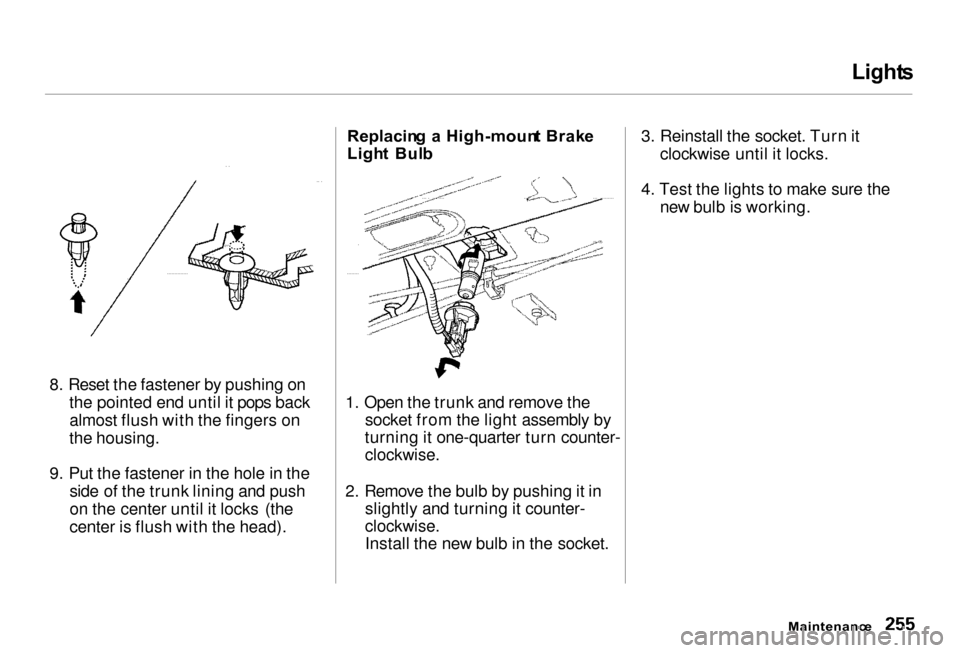
8. Reset the fastener by pushing on the pointed end until it pops backalmost flush with the fingers on
the housing.
9. Put the fastener in the hole in the side of the trunk lining and push
on the center until it locks (the
center is flush with the head). Replacin
g a High-moun t Brak e
Ligh t Bul b
1. Open the trunk and remove the socket from the light assembly by
turning it one-quarter turn counter-
clockwise.
2. Remove the bulb by pushing it in slightly and turning it counter-
clockwise.
Install the new bulb in the socket. 3. Reinstall the socket. Turn it
clockwise until it locks.
4. Test the lights to make sure the new bulb is working.
Maintenance