buttons Acura RL 2000 3.5 Owner's Manual
[x] Cancel search | Manufacturer: ACURA, Model Year: 2000, Model line: RL, Model: Acura RL 2000Pages: 330, PDF Size: 4.53 MB
Page 64 of 330
Gauge
s
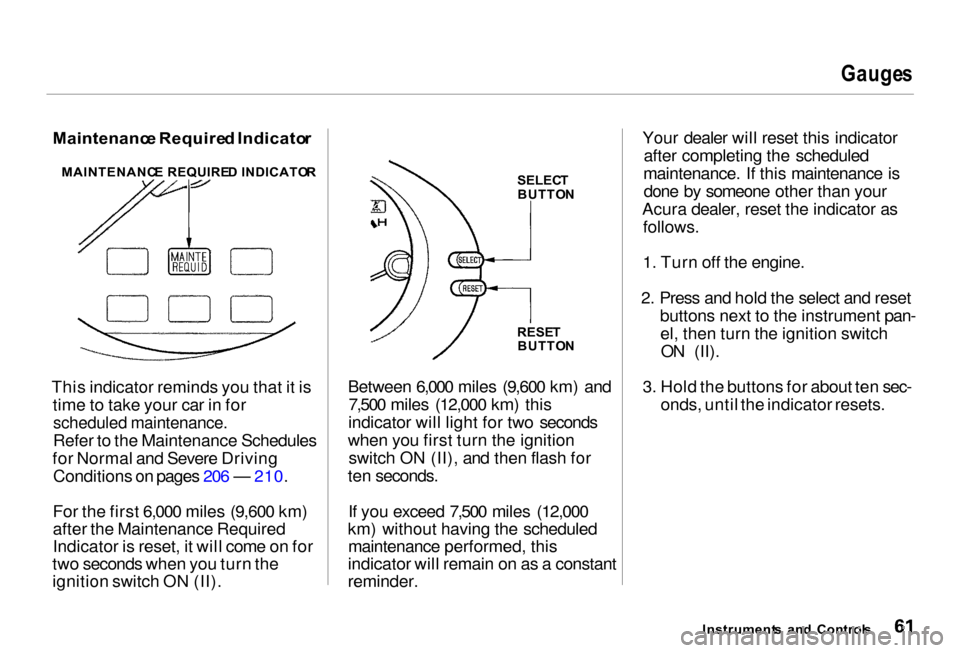
Maintenanc e Require d Indicato r
This indicator reminds you that it is time to take your car in for
scheduled maintenance.
Refer to the Maintenance Schedules
for Normal and Severe Driving Conditions on pages 206 — 210.
For the first 6,000 miles (9,600 km)
after the Maintenance Required
Indicator is reset, it will come on for
two seconds when you turn the
ignition switch ON (II). Between 6,000 miles (9,600 km) and
7,500 miles (12,000 km) this
indicator will light for two seconds
when you first turn the ignition switch ON (II), and then flash for
ten seconds.
If you exceed 7,500 miles (12,000
km) without having the scheduled maintenance performed, this
indicator will remain on as a constant
reminder. Your dealer will reset this indicator
after completing the scheduled
maintenance. If this maintenance is done by someone other than your
Acura dealer, reset the indicator as follows.
1. Turn off the engine.
2. Press and hold the select and reset buttons next to the instrument pan-el, then turn the ignition switchON (II).
3. Hold the buttons for about ten sec- onds, until the indicator resets.
Instrument s an d Control s
MAINTENANC
E REQUIRE D INDICATO R
SELECT
BUTTO N
RESE T
BUTTO N
Page 79 of 330
Steerin
g Whee l Control s
When you push the CANCEL button, or tap the brake pedal, the CRUISE
CONTROL light on the instrument
panel will go out and the car will
begin to slow down. You can use the accelerator pedal in the normal way.
The system remembers the previously-set cruising speed. To
return to that speed, accelerate toabove 25 mph (40 km/h) and then
press and release the RESUME/ accel button. The CRUISE
CONTROL light comes on. The car
will accelerate to the same cruising speed as before. Pressing the Cruise Control Master
Switch turns the system completely
off and erases the previous cruising
speed from memory. To use the
system again, refer to Using the
Cruise Control.
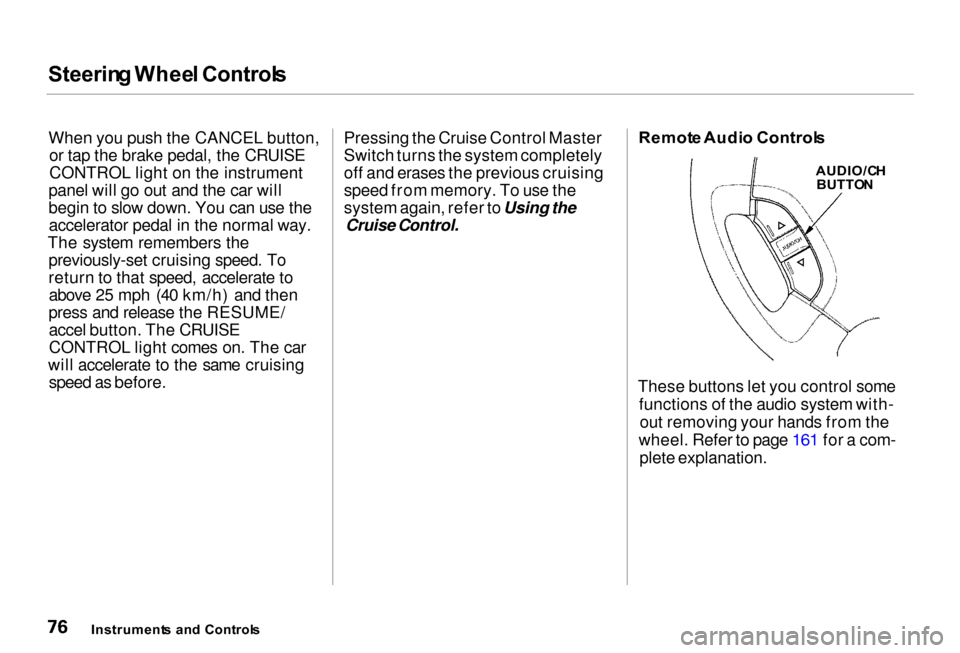
Remot
e Audi o Control s
AUDIO/C H
BUTTO N
These buttons let you control some functions of the audio system with-out removing your hands from the
wheel. Refer to page 161 for a com- plete explanation.
Instrument s an d Control s
Page 86 of 330

Key
s an d Lock s
If you unlock the doors with the
remote transmitter, but do not open
any of the doors within 30 seconds,
the doors automatically relock and
the security system sets.
You cannot lock any of the doors with the remote transmitter if any door is not fully closed or the key is
in the ignition switch. You cannot
unlock any of the doors with the key
in the ignition switch.
To open the trunk, push the Trunk Release button for approximately
one second.
You can open the trunk with the remote transmitter regardless of the
position of the main switch in the
glove box. The trunk will not open if
the key is in the ignition switch.
Turning the Beep Off and On
You can program the keyless entry system so it does not beep when you
lock and unlock the doors. This
procedure only turns off the beep;
the exterior lights will still flash.
To turn this feature off, stand near the car with the remote transmitter.Press and hold the Trunk Release
button, then press the Lock button
within one second. You should see the LED on the remote transmittercome on for one second. Release the
buttons after the LED goes out.
To turn this feature on, repeat the above procedure. You should see the
LED blink twice.
After you program the remote transmitter, make sure the trunk lidis closed.
Panic Mode
Panic mode allows you to remotely activate your car's security system to
attract attention. When activated, the
horn will sound, and the exterior
lights will flash, for about 30 seconds.
To activate panic mode, press and hold the PANIC button for about two
seconds.
To cancel Panic mode before 30 seconds, press any button on the
remote transmitter. You can also
turn the ignition switch to ON (II).
Panic mode will not activate if the
ignition switch is in ON (II).
CONTINUED
Instrument s an d Control s
Page 92 of 330
HomeLin
k Universa l Transmitte r
Trainin g th e Transmitte r
Before you can use the HomeLink
Universal Transmitter to operate
devices around your home, it must
"learn" the proper codes. For
example, to train the transmitter to
open and close the garage door:
1. This step erases all previously learned
codes. Perform this step before
training the transmitter for the very
first time. Press and hold the two
outside buttons until the red light
in the transmitter flashes (approximately 20 seconds).
Release the buttons.
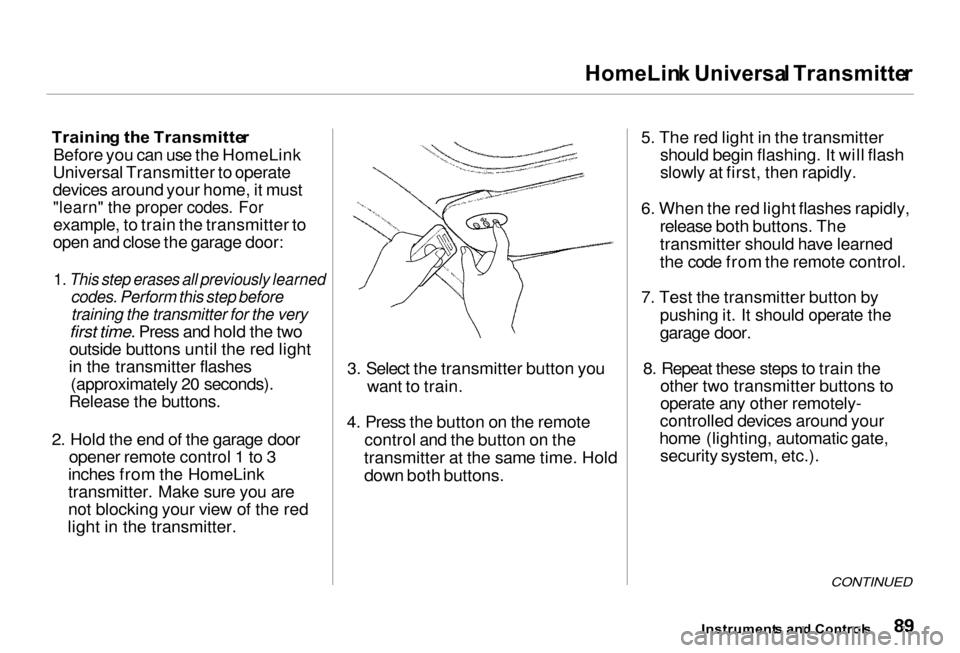
2. Hold the end of the garage door opener remote control 1 to 3
inches from the HomeLink
transmitter. Make sure you are
not blocking your view of the red
light in the transmitter. 3. Select the transmitter button you
want to train.
4. Press the button on the remote control and the button on the
transmitter at the same time. Hold down both buttons. 5. The red light in the transmitter
should begin flashing. It will flash
slowly at first, then rapidly.
6. When the red light flashes rapidly, release both buttons. The
transmitter should have learned
the code from the remote control.
7. Test the transmitter button by pushing it. It should operate the
garage door.
8. Repeat these steps to train the other two transmitter buttons to
operate any other remotely-
controlled devices around your
home (lighting, automatic gate, security system, etc.).
CONTINUED
Instrument s an d Control s
Page 93 of 330

HomeLin
k Universa l Transmitte r
Canadian Owners:
The remote control you are training from may stop transmitting after twoseconds. This is not long enough for
the HomeLink transmitter to learn
the code. Release and press the
button on the remote control every
two seconds until the transmitter has
learned the code.
If you are programming the
transmitter to operate a garage door or gate, it is recommended that you
unplug the motor for that device during programming. Repeatedly
pressing the remote control button
could burn out the motor. The HomeLink transmitter stores
the code in a permanent memory.
There should be no need to retrain the transmitter if your car's battery
goes dead or is disconnected.
Retraining a Button
To train an already programmed transmitter button to operate a new
device:
1. Select the transmitter button you want to train.
2. Press and hold the transmitter button until the red light begins to
flash slowly (approximately 20
seconds).
3. While continuing to hold the
transmitter button, place the
remote control for the device 1 to
3 inches from the HomeLink
transmitter.
4. Press and hold the button on the remote control. Hold both buttons
until the red light begins to flash
rapidly.
5. Release both buttons. The transmitter should now be trained
to operate the device.
Instrument s an d Control s
Page 95 of 330

HomeLin
k Universa l Transmitte r
Erasin g Code s
To erase the codes stored in all three buttons, press and hold the two outside buttons until the red light
begins to flash, then release the
buttons.
You should erase all three codes before selling the car.
As required by the FCC:
This device complies with Part 15 of the
FCC rules. Operation is subject to the
following two conditions: (1) This device
may not cause harmful interference, and (2) this device must accept any
interference received, including
interference that may cause undesired
operation.
Changes or modifications not expressly
approved by the party responsible for compliance could void the user's
authority to operate the equipment.
This device complies with Industry
Canada Standard RSS-210.
Operation is subject to the following two
conditions: (1) this device may not cause
interference, and (2) this device must accept any interference that may cause undesired operation of the device.
Instrument s an d Control s
Page 103 of 330
Drivin
g Positio n Memor y Syste m
Your Acura has a memory feature for the steering wheel, driver's seatand outside mirror positions.
Two seat, steering wheel, and outside mirror positions, for
different drivers or driving
conditions, can be stored in separate
memories. You select a memorized
position by pushing the appropriate
button.
Storing a Driving Position in Memory
Store a driving position as explained
in this section only when the car is
parked.
1. Turn the ignition switch ON (II). You cannot add a new drivingposition in the memory unless the
ignition switch is ON (II). You can
recall a memorized position with
the ignition switch in any position.
2. Adjust the seat to a comfortable position (see page 93). Adjust
the steering wheel to acomfortable position (see page 71).
Adjust the outside mirrors for best
visibility (see page 98).
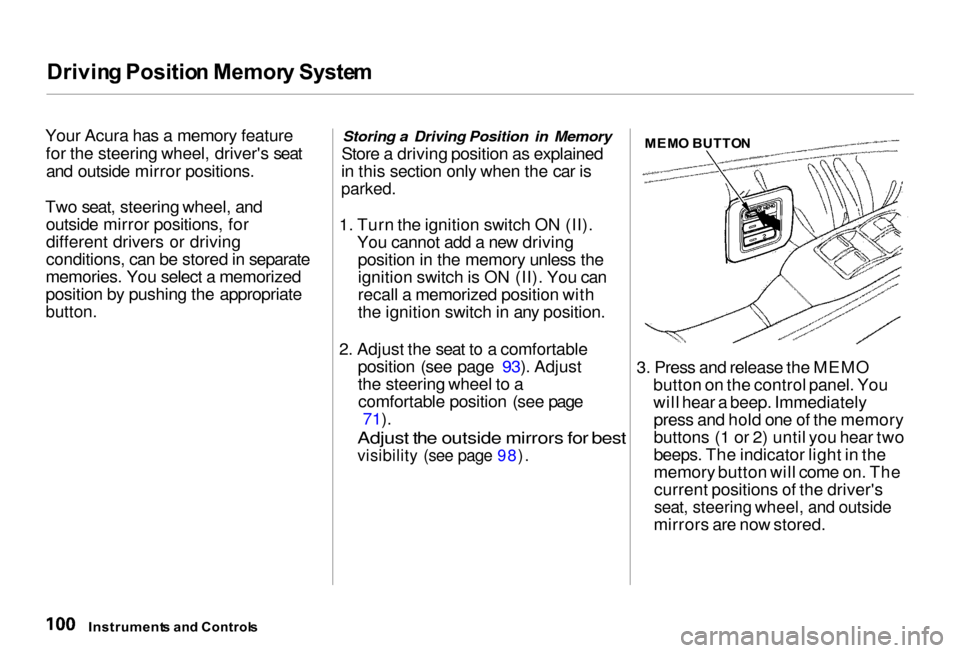
MEM
O BUTTO N
3. Press and release the MEMO button on the control panel. You
will hear a beep. Immediatelypress and hold one of the memory
buttons (1 or 2) until you hear two
beeps. The indicator light in the
memory button will come on. Thecurrent positions of the driver's
seat, steering wheel, and outside
mirrors are now stored.
Instrument s an d Control s
Page 112 of 330
Digita
l Cloc k
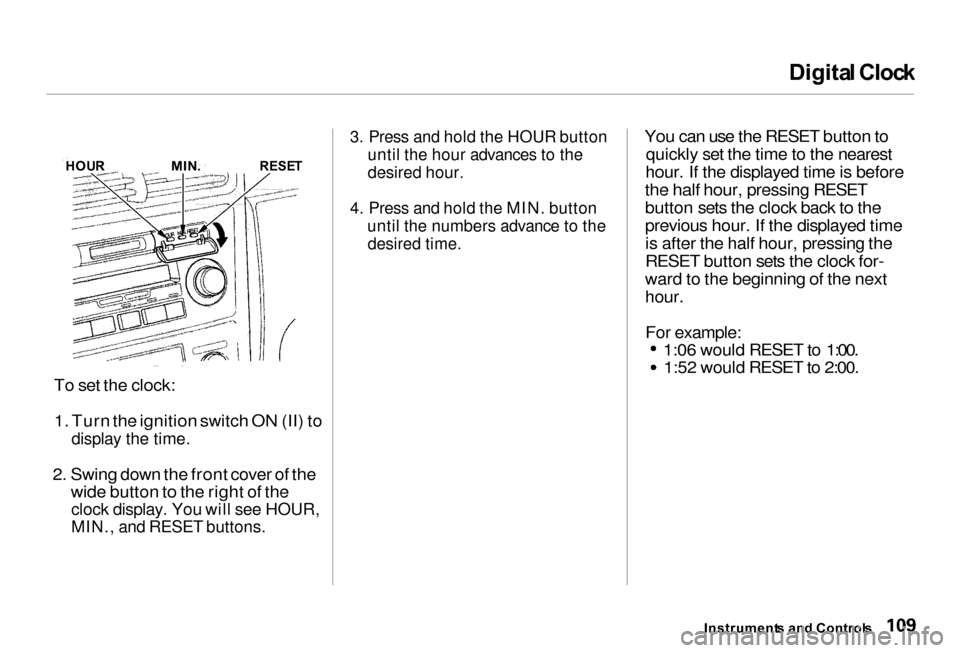
To set the clock: 1. Turn the ignition switch ON (II) to
display the time.
2. Swing down the front cover of the wide button to the right of the
clock display. You will see HOUR,
MIN., and RESET buttons.
3. Press and hold the HOUR button
until the hour advances to the
desired hour.
4. Press and hold the MIN. button until the numbers advance to the
desired time.
You can use the RESET button to
quickly set the time to the nearest
hour. If the displayed time is before
the half hour, pressing RESET
button sets the clock back to the
previous hour. If the displayed time is after the half hour, pressing the
RESET button sets the clock for-
ward to the beginning of the next
hour.
For example: 1:06 would RESET to 1:00.
1:52 would RESET to 2:00.
Instrument s an d Control s
HOU
R
MIN.
RESET
Page 127 of 330
Climat
e Control System
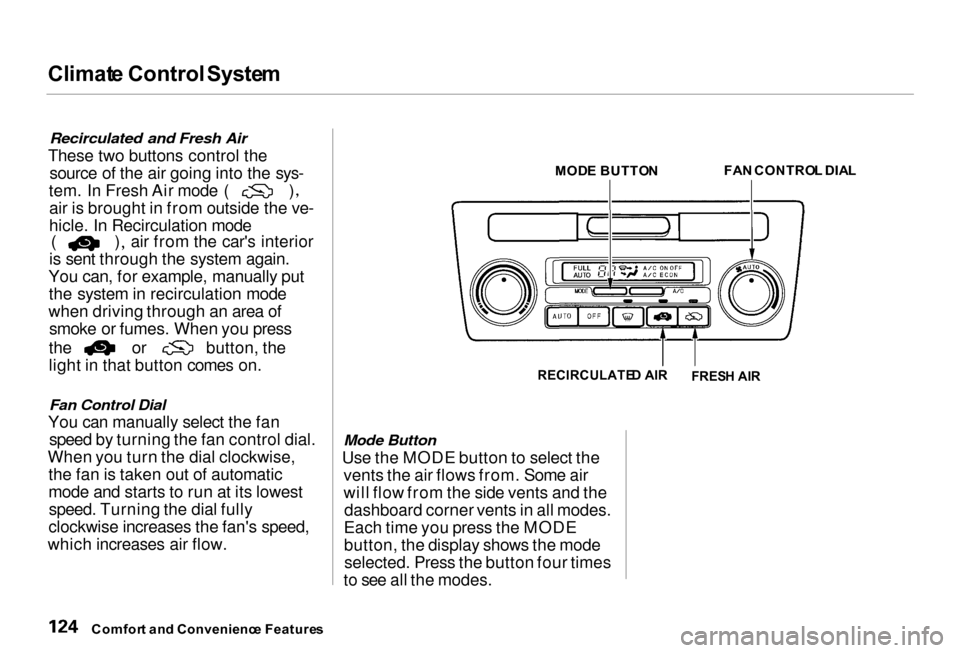
Recirculated and Fresh Air
These two buttons control the source of the air going into the sys- tem. In Fresh Air mode ( )
air is brought in from outside the ve-
hicle. In Recirculation mode ( ) air from the car's interior
is sent through the system again.
You can, for example, manually put the system in recirculation mode
when driving through an area of smoke or fumes. When you press the or button, the
light in that button comes on.
Fan Control Dial
You can manually select the fan speed by turning the fan control dial.
When you turn the dial clockwise, the fan is taken out of automatic
mode and starts to run at its lowestspeed. Turning the dial fully
clockwise increases the fan's speed,
which increases air flow. MOD
E BUTTO N
FA
N CONTRO L DIA L
RECIRCULATE D AI R
Mode Button
Use the MODE button to select the vents the air flows from. Some air
will flow from the side vents and thedashboard corner vents in all modes.
Each time you press the MODE
button, the display shows the mode selected. Press the button four times
to see all the modes.
Comfor t an d Convenienc e Feature s
FRES
H AI R
Page 137 of 330
Audi
o Syste m
AM/FM/Cassett e Stere o Audi o
Syste m
Your Acura's audio system provides clear reception on both AM and FM
bands, while the preset buttons allow
you to easily select your favorite stations.
The cassette system features Dolby B* noise reduction, automatic
sensing of chromium-dioxide (CrO2)
tape, and autoreverse for continuous
play.
* Dolby noise reduction manufactured under
license from Dolby Laboratories Licensing Corpo-
ration. "DOLBY" and the double-D symbol are trademarks of Dolby Laboratories
Licensing Corporation.
The anti-theft feature will disable the system if it is disconnected from the
car's battery. To get the system
working again, you must enter a code number (see page 162 ).
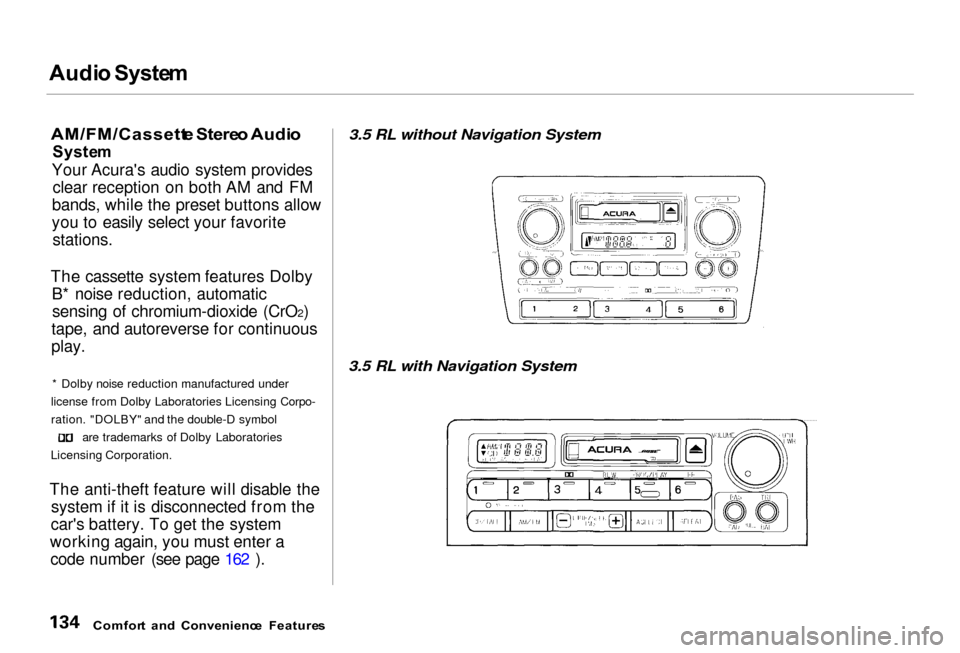
3.5 RL without Navigation System
3.5 RL with Navigation System
Comfor t an d Convenienc e Feature s