clock Acura RL 2004 3.5 Owner's Manual
[x] Cancel search | Manufacturer: ACURA, Model Year: 2004, Model line: RL, Model: Acura RL 2004Pages: 370, PDF Size: 4.33 MB
Page 58 of 370

This section gives inf ormation about
the controls and displays that
contribute to the daily operation of
your Acura. All the essential controls
are within easy reach............................
Control Locations .56
...............................
Indicator Lights .57
.............................................
Gauges .63
...............................
Speedometer .63
.................................
Tachometer .63
.....................................
Odometer .64
...................................
Trip Meter .64
Outside Temperature ...................................
Indicator .65
...................
Temperature Gauge . 65
..................................
Fuel Gauge .65
Maintenance Required ...................................
Indicator .66 Controls Near the Steering
.......................................
Wheel .67
...................................
Headlights .68
....................
Automatic Lighting .69
............
Daytime Running Lights . 70
....
Instrument Panel Brightness . 71
................................
Turn Signals .71
...................................
Fog Lights .72
.....................
Windshield Wipers .73
..................
Windshield Washers . 75
..........................
Hazard Warning .75
.............
Rear Window Def ogger . 76
....
Steering Wheel Adjustments . 76
...............................
Keys and Locks .79
..............................................
Keys .79
....................
Immobilizer System . 80
............................
Ignition Switch .82
......................
Power Door Locks .83
...................
Remote Transmitter . 84
..............
Childproof Door Locks . 87
...........................................
Trunk .88
........
Emergency Trunk Opener . 89
....................................
Glove Box .90
............................
Seat Adjustments .91
.........
Driver’s Seat Adjustments . 91
...........
Driver’s Lumbar Support . 93Front Passenger’s Seat
............................
Adjustments .93
..........................
Head Restraints .94
......................
Rear Seat Armrest .95
.............................................
Mirrors .96
....
Adjusting the Power Mirrors . 96
Driving Position Memory ..........................................
System .98
..................................
Seat Heaters .100
.......................................
Ski Sleeve .101
............................
Power Windows .103
.......................................
Moonroof .105
...............................
Parking Brake .107
..................................
Digital Clock .108
........................
Sunglasses Holder .109
...........................
Beverage Holder .110
.................
Console Compartment . 111
........................................
Coin Box .111
........................................
Sun Visor .112
................................
Vanity Mirror .112
.............
Accessory Power Socket . 113
..........................
Cigarette Lighter .114
.........................................
Ashtrays .115
................................
Ceiling Lights .116
............................
Courtesy Lights .117
Instruments and Controls
Inst rument s and Cont rols55
Page 98 of 370

Make sure all items in the trunk and
those extending through the pass-
through are secured.
For security, this cover can be
locked and unlocked only with the
master key. To lock the cover, insert
thekeyandturnitclockwise.
Never drive with this cover open and
the trunk lid open.
Seeon
page .
The rear seat armrest is located at
the center of the rear seat. Pivot it
down to use it. The trunk pass-through cover can be
opened f rom either side; it f olds
f orward onto the center armrest.
Open the cover by sliding the knob
downward and pushing or pulling on
the cover. To close the cover, swing
it up and push f irmly on the top.
Make sure it latches properly. 53
Carbon Monoxide Hazard
Rear Seat ArmrestT runk Pass-through Cover
Inst rument s and Cont rols
Seat A djustments
95
KNOB
LID
Page 111 of 370

1:06 would RESET to 1:00.
1:52 would RESET to 2:00.
For example: You can use the RESET button to
quickly set the time to the nearest
hour. If the displayed time is bef ore
the half hour, pressing the RESET
buttonsetstheclockbacktothe
previous hour. If the displayed time
is af ter the half hour, pressing the
RESET button sets the clock f or-
ward to the beginning of the next
hour. Press and hold the MIN. button
until the numbers advance to the
desired time. Press and hold the HOUR button
until the hour advances to the
desired hour.
The digital clock displays the time
with the ignition switch ON (II). To
see the time with the ignition off,
press and hold the wide button to the
right of the clock. To set the clock:
Turn the ignition switch ON (II) to
display the time.
Swing down the f ront cover of the
wide button to the right of the
clock display. You will see HOUR,
MIN., and RESET buttons.
2. 3.
4.
1.
Cars without Navigation System
Digital Clock
Inst rument s and Cont rols108
HOUR MIN. RESET
Page 122 of 370

...............
Climate Control System . 120
.......
Fully-automatic Operation . 122
.......
Semi-automatic Operation . 123
.......
Fully-automatic Operation . 127
.......
Semi-automatic Operation . 128
........................
Rear Ventilation .132
Sunlight Sensor/ ............
Temperature Sensor . 133
................................
Audio System .134
AM/FM/Cassette/CD Changer ........................
Audio System .134
.................
Operating the Radio . 135
.................
Adjusting the Sound . 138
............
Audio System Lighting . 138
Operating the Cassette .....................................
Player .139
............
Tape Search Functions . 140
.....
Operating the CD Changer . 143
CD Changer Error .............................
Indications .150 AM/FM/Cassette/CD Changer/
Satellite Digital Radio Audio ................................
System .151
.................
Operating the Radio . 152
.................
Adjusting the Sound . 155
............
Audio System Lighting . 155
....................
Radio Frequencies . 156
........................
Radio Reception .156
..............................
Digital Clock .158
Operating the Cassette .....................................
Player .159
............
Tape Search Functions . 160
Caring f or the Cassette .....................................
Player .163
.....
Operating the CD Changer . 164
.......
Protecting Compact Discs . 171
CD Changer Error .............................
Indications .172
...............
Satellite Digital Radio . 173
.........
Operating Satellite Radio . 174
Receiving Satellite Radio ....................................
Service .177
...........
Remote Audio Controls . 178
.......................
Thef t Protection .180
............................
Security System .181 ...............................
Cruise Control .182
HomeLink Universal ...........................
Transceiver .186
...............
Customer Assistance . 186
.
Important Safety Precautions . 186
..................
Training HomeLink . 187
Training with a Rolling Code ....................................
System .189
...........................
Erasing Codes .191
............................................
OnStar .192
3.5 RL without Navigation System
U.S. 3.5 RL with Navigation System
3.5 RL without Navigation System U.S. 3.5 RL with Navigation System
Comf ort and Convenience Features
Comf ort and Convenience Feat ures119
Page 127 of 370

You can manually select the f an
speedbyturningthefancontroldial.
When you turn the dial clockwise,
the fan is taken out of automatic
mode and starts to run at its lowest
speed. Turning the dial f ully
clockwise increases the f an’s speed,
which increases air flow.Use the MODE button to select the
vents the air flows from. Some air
will f low f rom the side vents and the
dashboard corner vents in all modes.
Each time you press the MODE
button, the display shows the mode
selected. Press the button four times
to see all the modes.
These two buttons control the
source of the air going into the sys-
tem. In Fresh Air mode ( ),
air is brought in f rom outside the ve-
hicle. In Recirculation mode
( ), air f rom the vehicle’s inte-
rior is sent through the system again.
You can, f or example, manually put
the system in recirculation mode
when driving through an area of
smoke or f umes. When you press
the or button, the
light in that button comes on.
Climat e Cont rol Syst em
Comf ort and Convenience Feat ures
Mode Button
Recirculat ed and Fresh A ir
Fan Cont rol Dial
124
MODE BUTTON FAN CONTROL DIAL
RECIRCULATED AIR FRESH AIR
Page 161 of 370

You can use R to quickly set the time
to the nearest hour. If the displayed
time is before the half hour, pressing
Rsetstheclockbacktotheprevious
hour. If the displayed time is af ter
the half hour, pressing R sets the
clock f orward to the beginning of the
next hour.For example:
1:06 would RESET to 1:00
1:52 would RESET to 2:00
The audio system display usually
shows the time when the ignition
switch is in ACCESSORY (I) or ON
(II).
To set the clock, press and hold the
CLOCK (CD/TAPE) button until the
number f lash. Change the hours by
pressing the H button until the
numbers advance to the desired time.
Change the minutes by pressing the
M button until the numbers advance
to the desired time.
Audio System
Comf ort and Convenience Feat ures
Digital Clock
158
CLOCK BUTTON
H BUTTON M BUTTONR BUTTON
Page 260 of 370

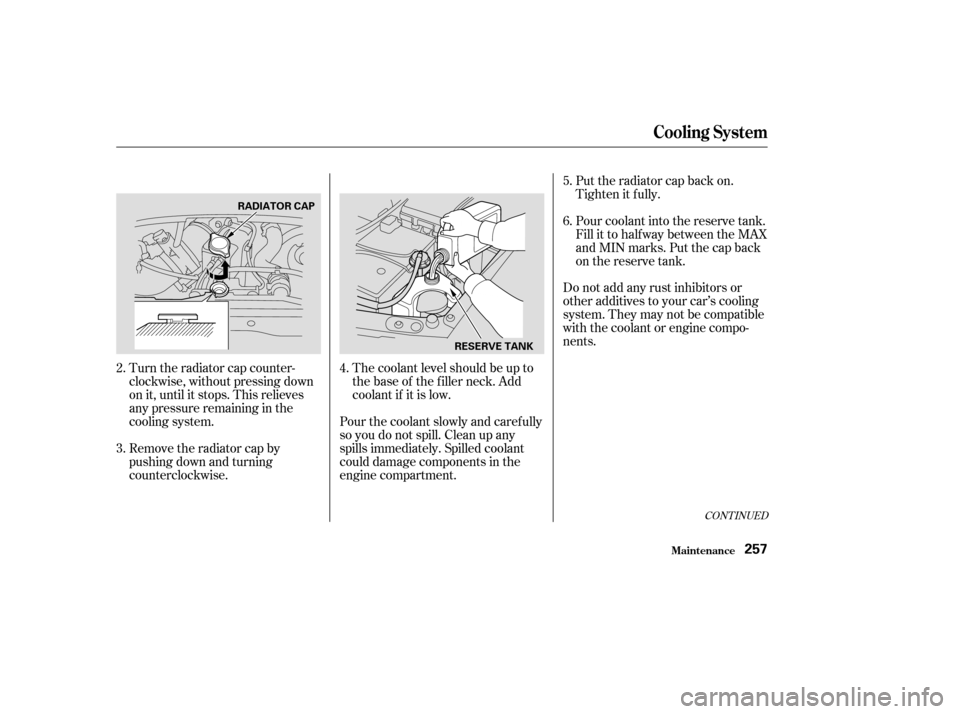
The coolant level should be up to
the base of the f iller neck. Add
coolant if it is low.
Remove the radiator cap by
pushing down and turning
counterclockwise. Turn the radiator cap counter-
clockwise, without pressing down
on it, until it stops. This relieves
any pressure remaining in the
cooling system. Put the radiator cap back on.
Tighten it f ully.
Pour coolant into the reserve tank.
Fill it to half way between the MAX
and MIN marks. Put the cap back
on the reserve tank.
Do not add any rust inhibitors or
other additives to your car’s cooling
system. They may not be compatible
with the coolant or engine compo-
nents.
Pour the coolant slowly and caref ully
so you do not spill. Clean up any
spills immediately. Spilled coolant
could damage components in the
engine compartment.
2.
3.
4.5.
6.
CONT INUED
Cooling Syst em
Maint enance257
RADIATOR CAP
RESERVE TANK
Page 294 of 370

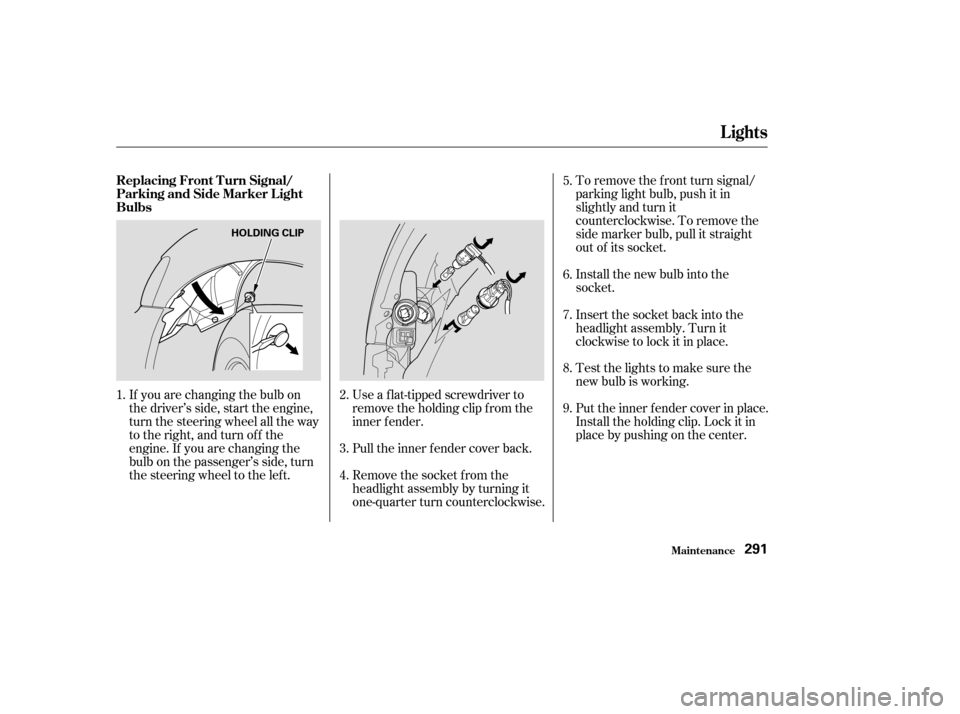
To remove the f ront turn signal/
parking light bulb, push it in
slightly and turn it
counterclockwise. To remove the
side marker bulb, pull it straight
out of its socket.
Install the new bulb into the
socket.
Remove the socket from the
headlight assembly by turning it
one-quarter turn counterclockwise. Pull the inner f ender cover back.
Use a f lat-tipped screwdriver to
remove the holding clip f rom the
inner f ender.
If you are changing the bulb on
the driver’s side, start the engine,
turn the steering wheel all the way
to the right, and turn off the
engine. If you are changing the
bulb on the passenger’s side, turn
the steering wheel to the left. Put the inner f ender cover in place.
Install the holding clip. Lock it in
place by pushing on the center. Testthelightstomakesurethe
new bulb is working. Insert the socket back into the
headlight assembly. Turn it
clockwise to lock it in place.
1. 2.
3.
4.5.
6.
7.
8.
9.
Lights
Maint enance
Replacing Front Turn Signal/
Parking and Side Marker Light
Bulbs
291
HOLDING CLIP
Page 295 of 370

Open the trunk.Pull the bulb straight out of its
socket.
Push the new bulb straight into
the socket until it bottoms.
Reinstall the socket into the light
assembly by turning it clockwise
until it locks.
Testthelightstomakesurethe
new bulb is working.
Undo the f astener on the side of
the trunk lining by pushing on the
center of the f astener’s head until
it pops in. Pull the lining back. Remove the socket by turning it one-quarter turn counterclockwise.Reinstall the trunk lining. Make
sure it is installed under the edge
of the trunk seal.
Determine which of the f our bulbs
is burned out: brake/taillights,
back-up light, or turn signal.
1.
3. 2.4.
5.
6.
7.
Replacing Rear Bulbs
Lights
Maint enance292
FASTENER
Page 296 of 370

Open the trunk and remove the
socket f rom the light assembly by
turning it one-quarter turn counter-
clockwise.
Reset the f astener by pushing on
the pointed end until it pops back
almost f lush with the f ingers on
the housing.
Put the f astener in the hole in the
side of the trunk lining and push
on the center until it locks (the
center is f lush with the head). Reinstall the socket. Turn it
clockwise until it locks.
Install the new bulb in the socket. Remove the bulb by pushing it in
slightly and turning it counter-
clockwise. Testthelightstomakesurethe
new bulb is working.
1.
2.
8.
9. 3.
4.
Replacing a High-mount Brake
Light Bulb
Lights
Maint enance293