sensor ACURA RL KA9 1996 Service Owner's Guide
[x] Cancel search | Manufacturer: ACURA, Model Year: 1996, Model line: RL KA9, Model: ACURA RL KA9 1996Pages: 1954, PDF Size: 61.44 MB
Page 272 of 1954
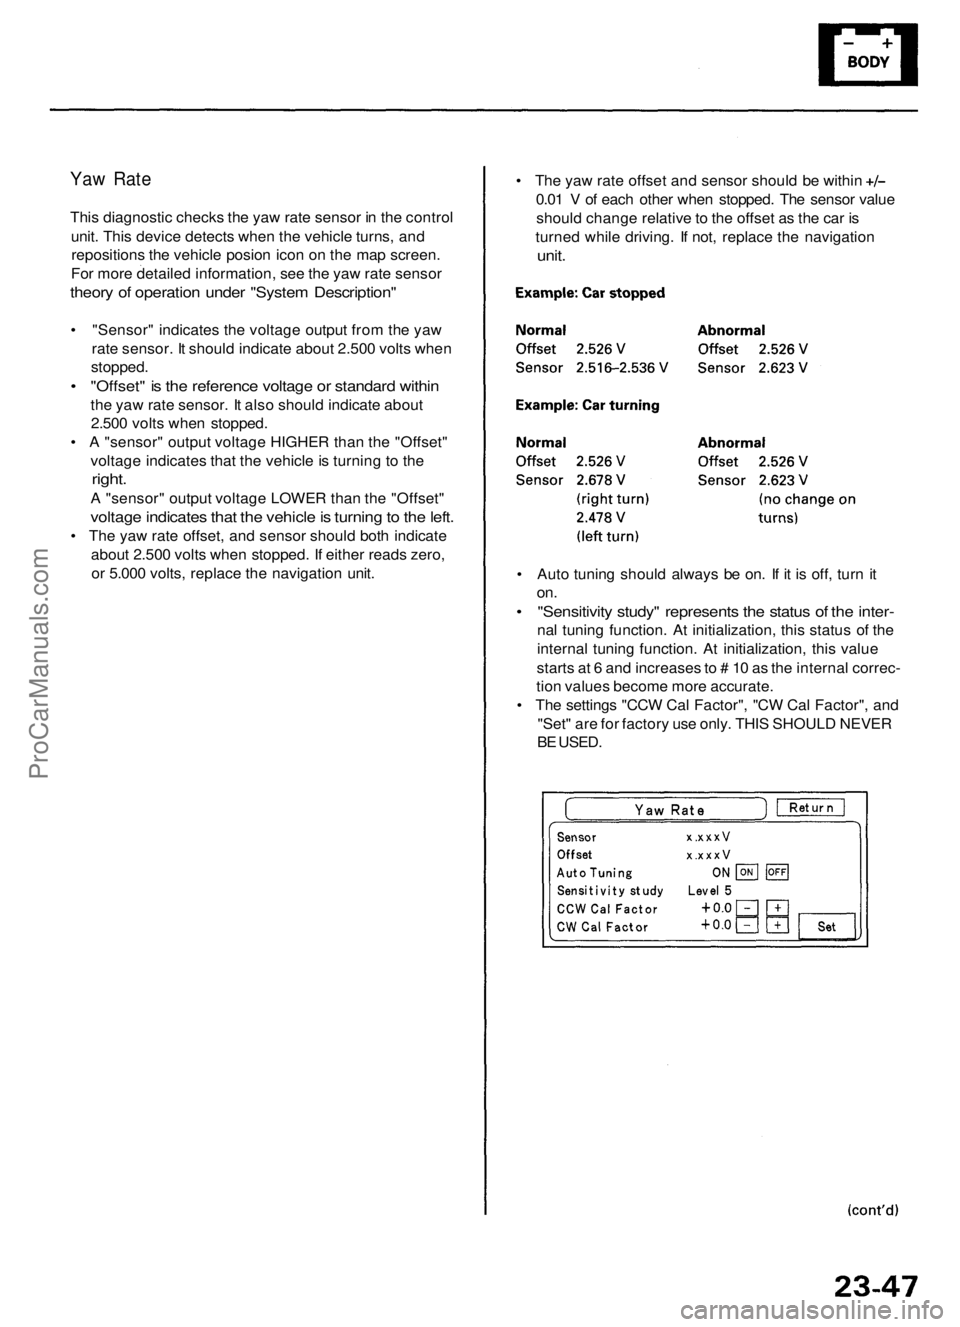
Yaw Rate
This diagnostic checks the yaw rate sensor in the control
unit. This device detects when the vehicle turns, and
repositions the vehicle posion icon on the map screen.
For more detailed information, see the yaw rate sensor
theory of operation under "System Description"
• "Sensor" indicates the voltage output from the yaw
rate sensor. It should indicate about 2.500 volts when
stopped.
• "Offset" is the reference voltage or standard within
the yaw rate sensor. It also should indicate about
2.500 volts when stopped.
• A "sensor" output voltage HIGHER than the "Offset"
voltage indicates that the vehicle is turning to the
right.
A "sensor" output voltage LOWER than the "Offset"
voltage indicates that the vehicle is turning to the left.
• The yaw rate offset, and sensor should both indicate
about 2.500 volts when stopped. If either reads zero,
or 5.000 volts, replace the navigation unit.
• The yaw rate offset and sensor should be within
0.01 V of each other when stopped. The sensor value
should change relative to the offset as the car is
turned while driving. If not, replace the navigation
unit.
• Auto tuning should always be on. If it is off, turn it
on.
• "Sensitivity study" represents the status of the inter-
nal tuning function. At initialization, this status of the
internal tuning function. At initialization, this value
starts at 6 and increases to # 10 as the internal correc-
tion values become more accurate.
• The settings "CCW Cal Factor", "CW Cal Factor", and
"Set" are for factory use only. THIS SHOULD NEVER
BE USED.ProCarManuals.com
Page 274 of 1954
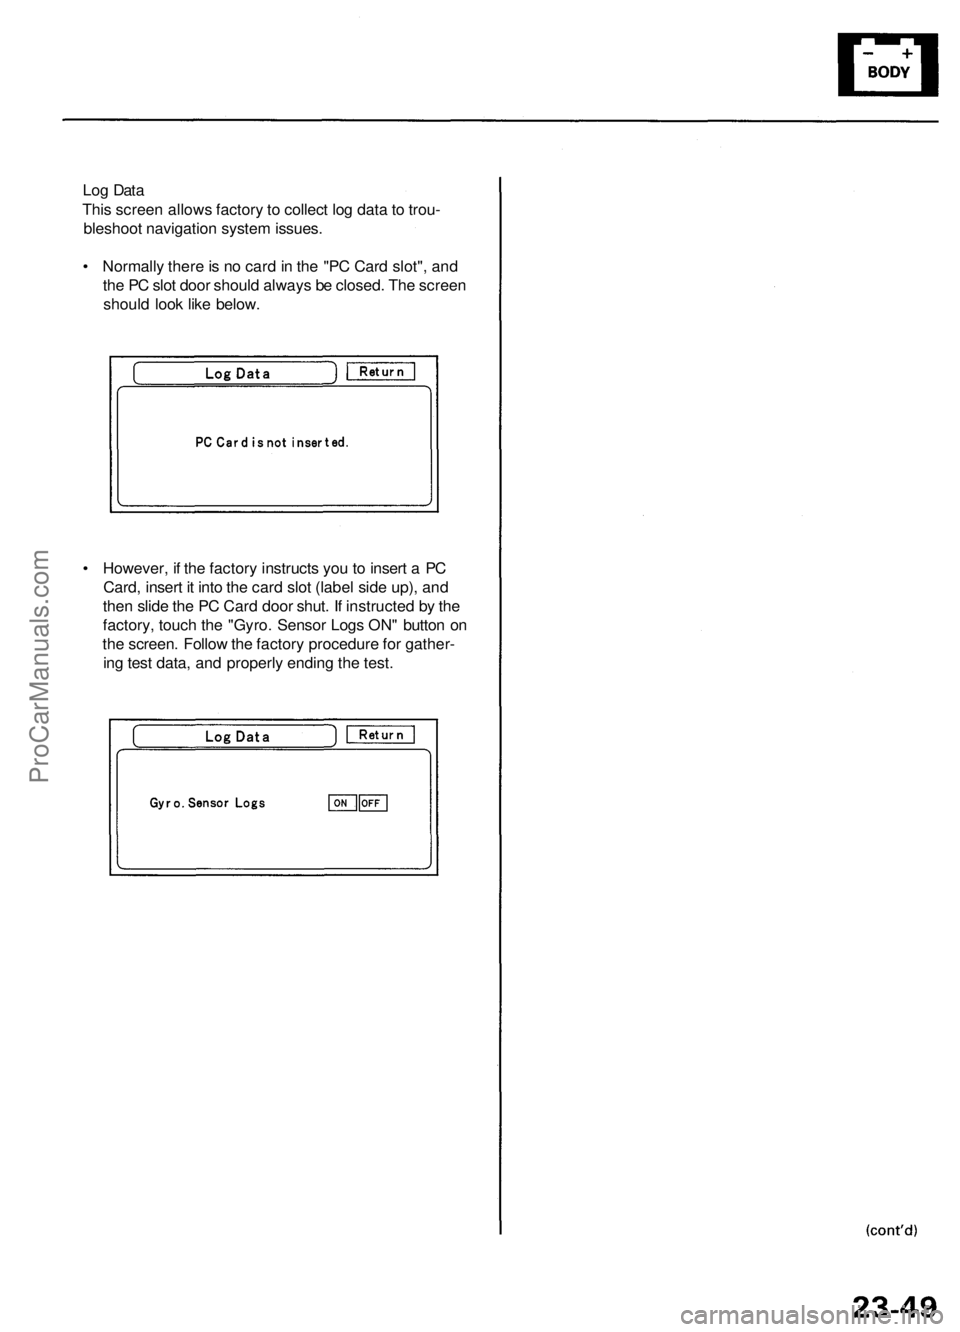
Log Data
This screen allows factory to collect log data to trou-
bleshoot navigation system issues.
• Normally there is no card in the "PC Card slot", and
the PC slot door should always be closed. The screen
should look like below.
• However, if the factory instructs you to insert a PC
Card, insert it into the card slot (label side up), and
then slide the PC Card door shut. If instructed by the
factory, touch the "Gyro. Sensor Logs ON" button on
the screen. Follow the factory procedure for gather-
ing test data, and properly ending the test.ProCarManuals.com
Page 356 of 1954

Cruise Control
Control Unit Input Test (cont'd)
Cavity Wire
Test condition
Test: Desired result
Possible cause if result is not obtained
3
13
7
6
14
12
2
5
10
9
11
1
BLK
LT GRN
LT GRN/BLK
LT GRN/RED
PNK
BLU/WHT
GRY
GRN/WHT
BLU/YEL
BRN
BRN/BLK
BRN/WHT
Under all conditions
Ignition switch ON (II) and
main switch ON
Resume button pushed
Cancel button pushed
Set button pushed
Cancel button pushed
Shift lever in , or
Ignition switch ON (II), and
main switch ON; raise the
front of the vehicle, and rotate
one wheel slowly while
holding the other wheel.
Ignition switch ON (II), main
switch ON; brake pedal
pressed, then released
Brake pedal pressed then
released
Ignition switch ON (II)
Under all conditions
Under all conditions
Under all conditions
Check for continuity to ground:
There should be continuity.
Check for voltage to ground:
There should be battery voltage.
Check for voltage to ground:
There should be battery voltage.
When testing terminal No. 7, there
should be no voltage on terminal No. 6.
Check for voltage to ground:
There should be battery voltage.
When testing terminal No. 7, there
should be voltage on terminal No. 6.
Check for voltage to ground:
There should be battery voltage.
When testing terminal No. 6, there
should be no voltage on terminal No. 7.
Check for voltage to ground:
There should be battery voltage.
When testing terminal No. 6, there
should be voltage on terminal No. 7.
Check for continuity to ground:
There should be continuity.
NOTE: There should be no continuity
when the shift lever is in other positions.
Check for voltage between the
BLU/ WHT and BLK terminals:
There should be cycle 0 - 5 V or
battery voltage.
Check for voltage to ground:
There should be 0 V with the pedal
pressed, and battery voltage with
the pedal released.
Check for voltage to ground:
There should be battery voltage with
the pedal pressed, and 0 V with the
pedal released.
Attach to ground:
The cruise light in the gauge assembly
should come on.
Check for resistance to ground:
There should be 80 -120
Check for resistance to ground:
There should be 70 -110
Check for resistance to ground:
There should be 40 - 60
• Poor ground (G401, G402)
• An open in the wire
• Blown No. 20 (20 A) fuse in the
under-dash fuse/relay box
• Faulty main switch
• An open in the wire
• Blown No. 39 (15 A) fuse in the
under-hood fuse/relay box
• Faulty horn relay
• Faulty set/resume/cancel switch
• Faulty cable reel
• An open in the wire
• Short between LT GRN/BLK and
LT GRN/RED wires
• Blown No. 39 (15 A) fuse in the
under-hood fuse/relay box
• Faulty horn relay
• Faulty set/resume/cancel switch
• Faulty cable reel
• An open in the wire
• Blown No. 39 (15 A) fuse in the
under-hood fuse/relay box
• Faulty horn relay
• Faulty set/resume/cancel switch
• Faulty cable reel
• An open in the wire
• Short between LT GRN/BLK and
LT GRN/RED wires
• Blown No. 39 (15 A) fuse in the
under-hood fuse/relay box
• Faulty horn relay
• Faulty set/resume/cancel switch
• Faulty cable reel
• An open in the wire
• Faulty A/T gear position switch
• Poor ground (G401, G402)
• An open in the wire
• Faulty vehicle speed sensor (VSS)
• An open in the wire
• Short to ground
• Blown No. 39 (15 A) fuse in the
under-hood fuse/relay box
• Faulty brake switch
• An open in the wire
• Blown No. 39 (15 A) fuse in the
under-hood fuse/relay box
• Faulty brake switch
• An open in the wire
• Blown bulb
• Faulty gauge circuit
• An open in the wire
• Faulty actuator solenoid
• An open in the wireProCarManuals.com
Page 371 of 1954
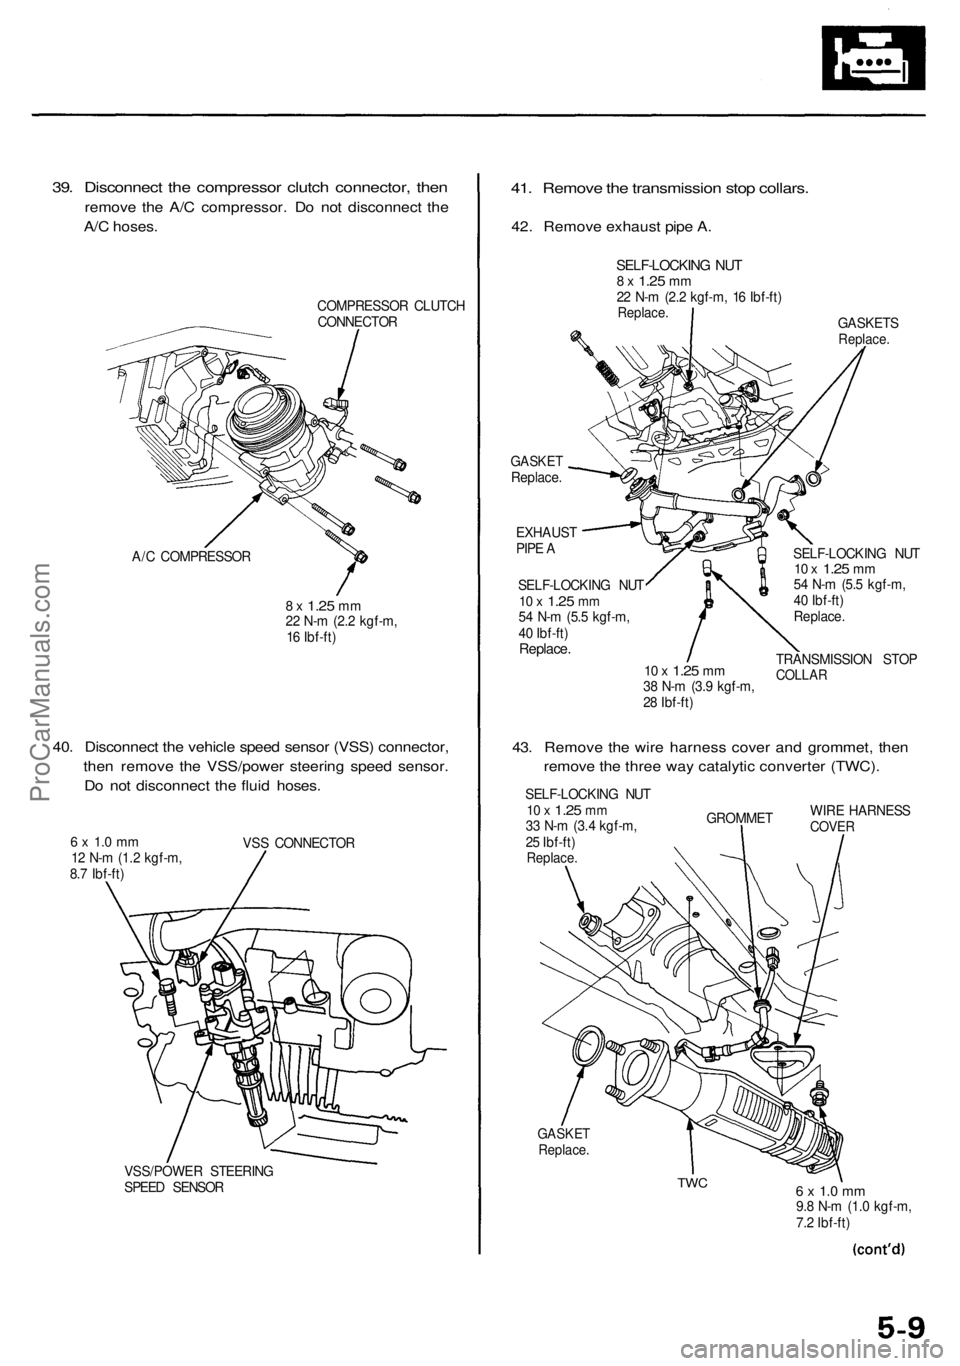
39. Disconnect the compressor clutch connector, then
remove the A/C compressor. Do not disconnect the
A/C hoses.
COMPRESSOR CLUTCH
CONNECTOR
A/C COMPRESSOR
8 x
1.25
mm
22 N-m (2.2 kgf-m,
16 Ibf-ft)
40. Disconnect the vehicle speed sensor (VSS) connector,
then remove the VSS/power steering speed sensor.
Do not disconnect the fluid hoses.
6 x 1.0 mm
12 N-m (1.2 kgf-m,
8.7 Ibf-ft)
VSS CONNECTOR
VSS/POWER STEERING
SPEED SENSOR
41. Remove the transmission stop collars.
42. Remove exhaust pipe A.
GASKETS
Replace.
GASKET
Replace.
EXHAUST
PIPE A
SELF-LOCKING NUT
10 x
1.25
mm
54 N-m (5.5 kgf-m,
40 Ibf-ft)
Replace.
10 x
1.25
mm
38 N-m (3.9 kgf-m,
28 Ibf-ft)
SELF-LOCKING NUT
10 x
1.25
mm
54 N-m (5.5 kgf-m,
40 Ibf-ft)
Replace.
TRANSMISSION STOP
COLLAR
43. Remove the wire harness cover and grommet, then
remove the three way catalytic converter (TWC).
SELF-LOCKING NUT
10 x
1.25
mm
33 N-m (3.4 kgf-m,
25 Ibf-ft)
Replace.
GROMMET
WIRE HARNESS
COVER
GASKET
Replace.
TWC
6 x 1.0 mm
9.8 N-m (1.0 kgf-m,
7.2 Ibf-ft)
SELF-LOCKING NUT
8 x
1.25
mm
22 N-m (2.2 kgf-m, 16 Ibf-ft)
Replace.ProCarManuals.com
Page 493 of 1954
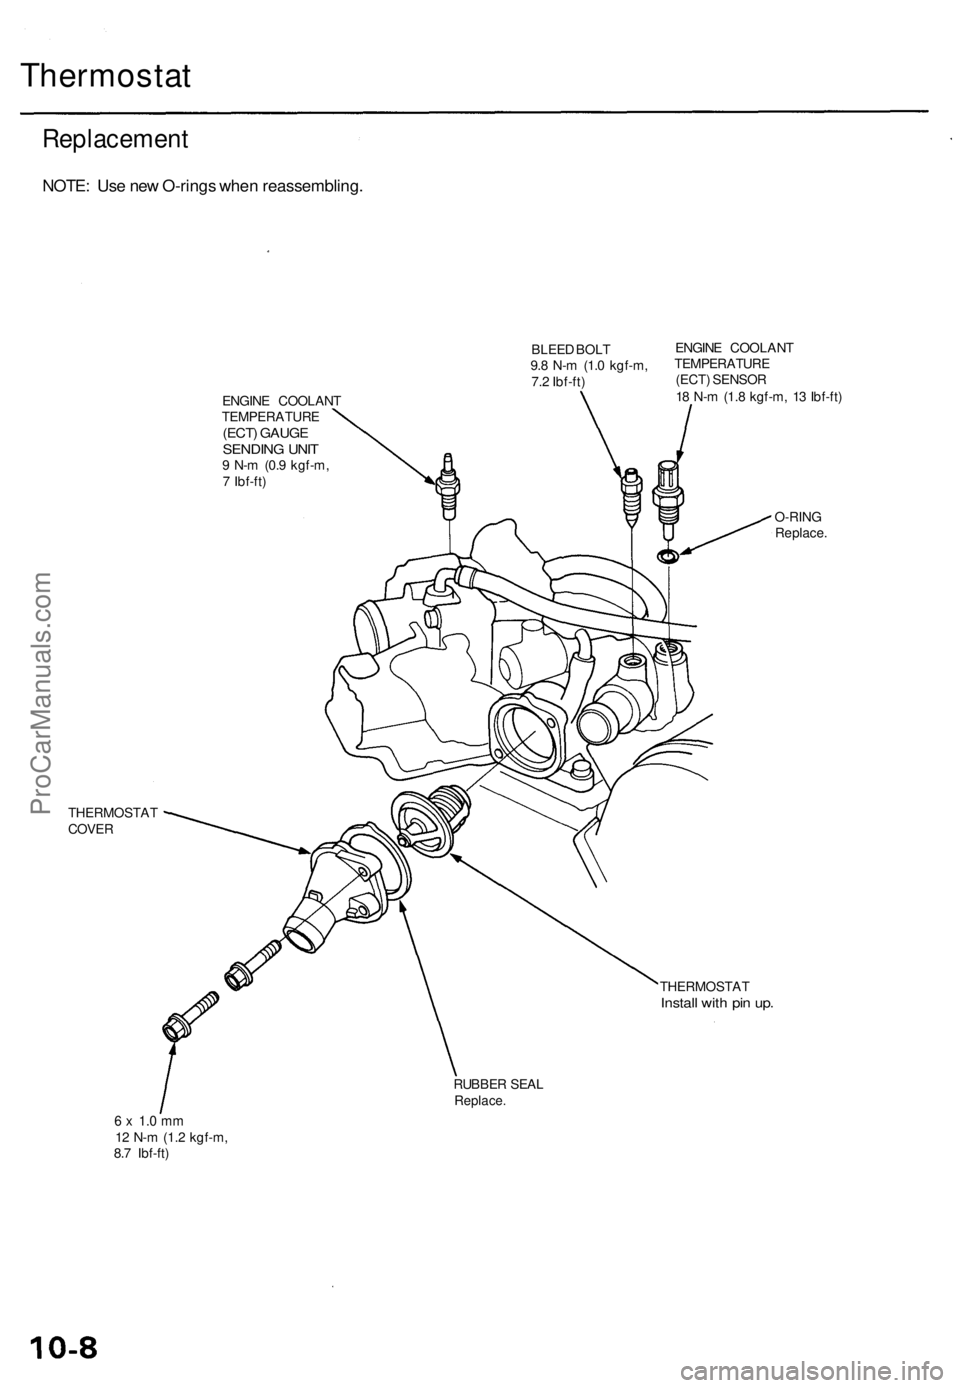
Thermostat
Replacement
NOTE: Use new O-rings when reassembling.
BLEED BOLT
9.8 N-m (1.0 kgf-m,
7.2 Ibf-ft)
ENGINE COOLANT
TEMPERATURE
(ECT) GAUGE
SENDING UNIT
9 N-m (0.9 kgf-m,
7 Ibf-ft)
ENGINE COOLANT
TEMPERATURE
(ECT) SENSOR
18 N-m (1.8 kgf-m, 13 Ibf-ft)
THERMOSTAT
COVER
O-RING
Replace.
THERMOSTAT
Install with pin up.
RUBBER SEAL
Replace.
6 x 1.0 mm
12 N-m (1.2 kgf-m,
8.7 Ibf-ft)ProCarManuals.com
Page 498 of 1954
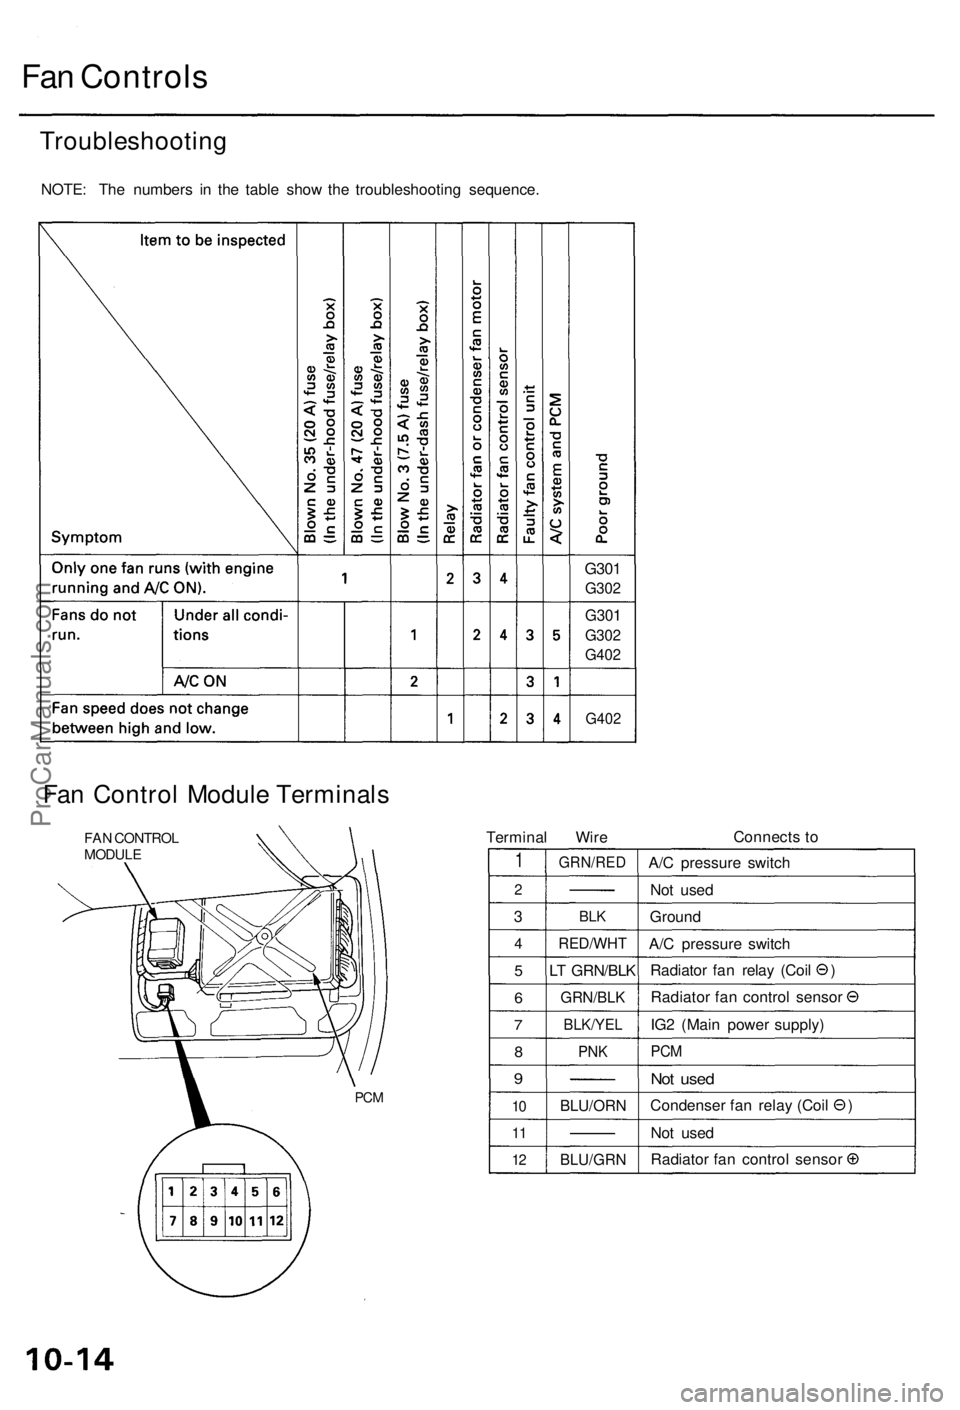
Fan Controls
Troubleshooting
NOTE: The numbers in the table show the troubleshooting sequence.
G301
G302
G301
G302
G402
G402
Fan Control Module Terminals
FAN CONTROL
MODULE
Terminal Wire
Connects to
1
2
3
4
5
6
7
8
9
10
11
12
GRN/RED
BLK
RED/WHT
LT GRN/BLK
GRN/BLK
BLK/YEL
PNK
BLU/ORN
BLU/GRN
A/C pressure switch
Not used
Ground
A/C pressure switch
Radiator fan relay (Coil )
Radiator fan control sensor
IG2 (Main power supply)
PCM
Not used
Condenser fan relay (Coil )
Not used
Radiator fan control sensor
PCMProCarManuals.com
Page 499 of 1954
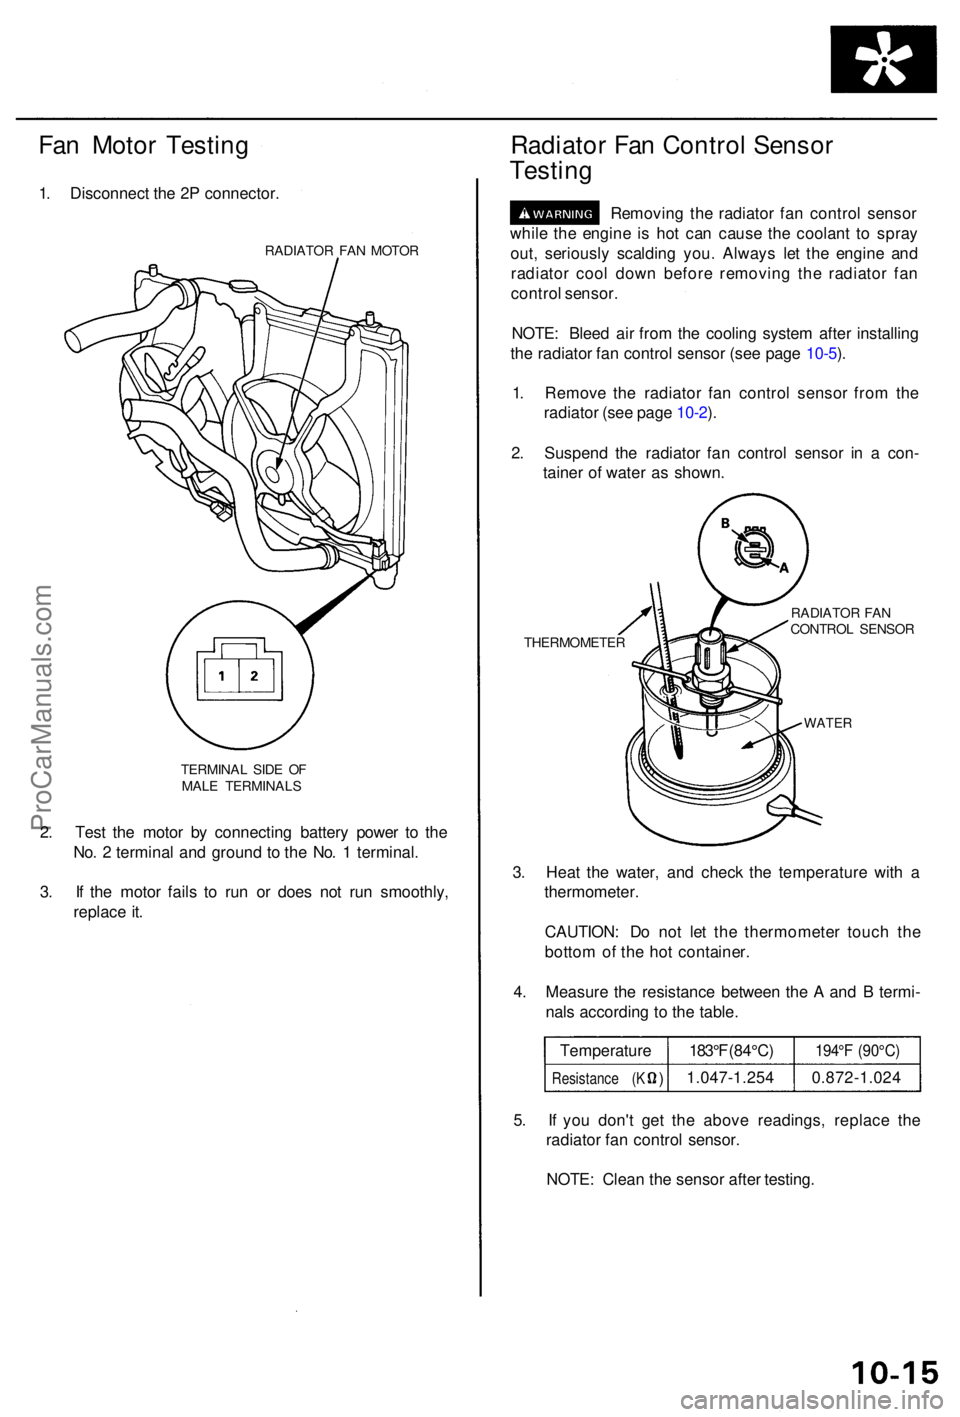
Fan Moto r Testin g
1. Disconnec t th e 2 P connector .
RADIATOR FA N MOTO R
TERMINA L SID E O F
MAL E TERMINAL S
2. Tes t th e moto r b y connectin g batter y powe r t o th e
No . 2 termina l an d groun d t o th e No . 1 terminal .
3 . I f th e moto r fail s t o ru n o r doe s no t ru n smoothly ,
replac e it .
Radiato r Fa n Contro l Senso r
Testin g
Removin g th e radiato r fa n contro l senso r
whil e th e engin e i s ho t ca n caus e th e coolan t t o spra y
out , seriousl y scaldin g you . Alway s le t th e engin e an d
radiato r coo l dow n befor e removin g th e radiato r fa n
contro l sensor .
NOTE : Blee d ai r fro m th e coolin g syste m afte r installin g
th e radiato r fa n contro l senso r (se e pag e 10-5 ).
1 . Remov e th e radiato r fa n contro l senso r fro m th e
radiato r (se e pag e 10-2 ).
2 . Suspen d th e radiato r fa n contro l senso r i n a con -
taine r o f wate r a s shown .
THERMOMETE R RADIATO
R FA N
CONTRO L SENSO R
WATER
3. Hea t th e water , an d chec k th e temperatur e wit h a
thermometer .
CAUTION : D o no t le t th e thermomete r touc h th e
botto m o f th e ho t container .
4 . Measur e th e resistanc e betwee n th e A an d B termi -
nal s accordin g t o th e table .
Temperatur e
Resistance ( K ) 183°
F (84°C )
1.047-1.25 4
194°F (90°C )
0.872-1.02 4
5 . I f yo u don' t ge t th e abov e readings , replac e th e
radiato r fa n contro l sensor .
NOTE : Clea n th e senso r afte r testing .
ProCarManuals.com
Page 502 of 1954
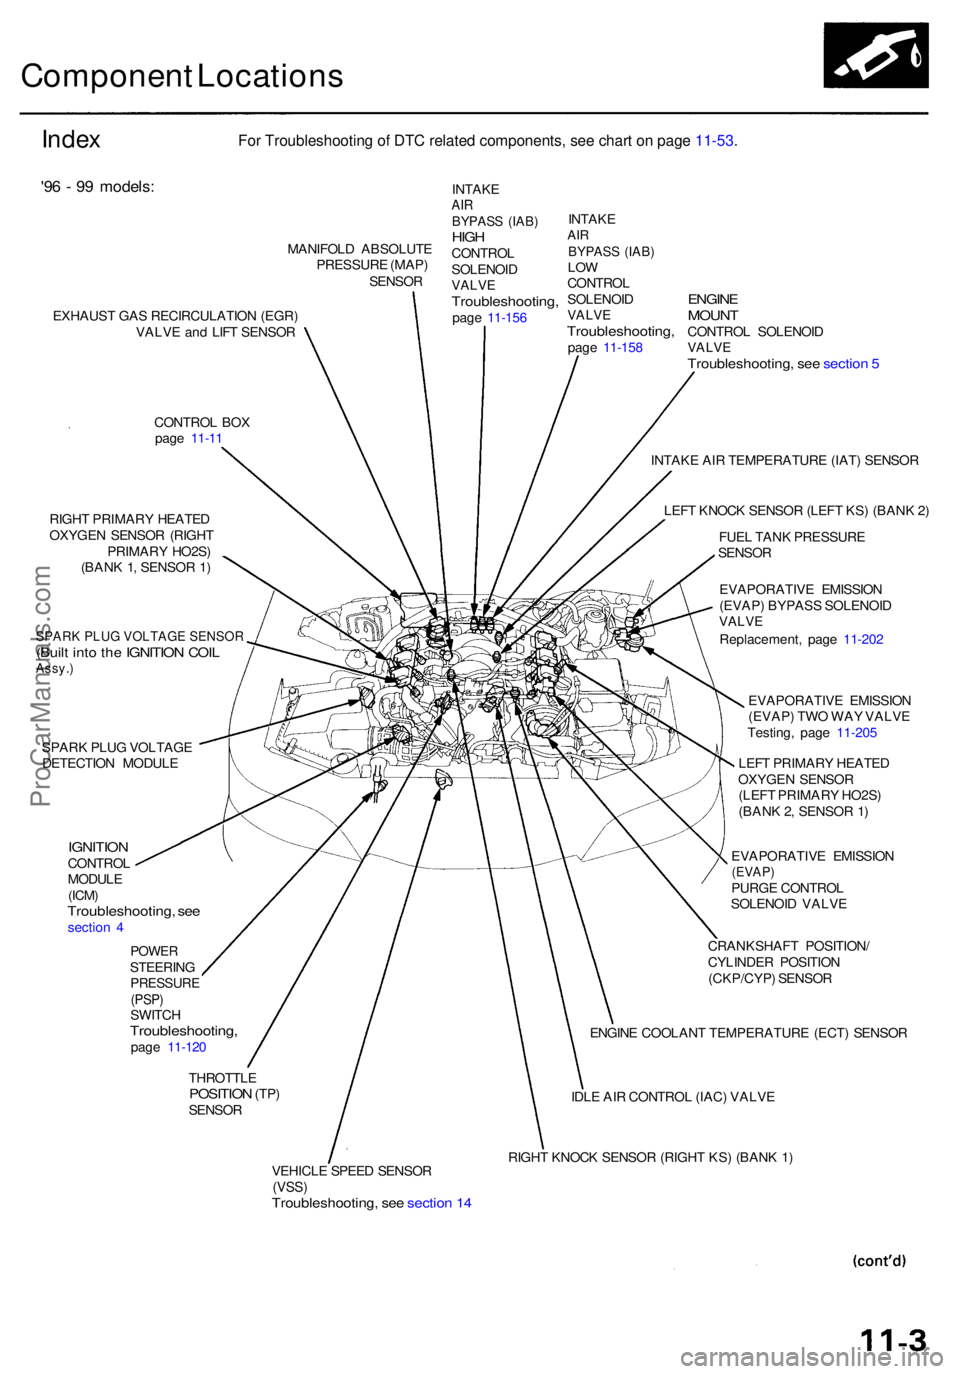
Component Location s
Index
'96 - 9 9 models :
MANIFOL D ABSOLUT E
PRESSUR E (MAP )
SENSO R
EXHAUS T GA S RECIRCULATIO N (EGR )
VALV E an d LIF T SENSO R
CONTRO L BO X
pag e 11-1 1
RIGH T PRIMAR Y HEATE D
OXYGE N SENSO R (RIGH T
PRIMAR Y HO2S )
(BAN K 1 , SENSO R 1 )
SPARK PLUG VOLTAGE SENSOR(Buil t int o th e IGNITIO N COI LAssy. )
INTAK EAIRBYPAS S (IAB )HIGHCONTRO L
SOLENOI D
VALVETroubleshooting ,page 11-15 6 INTAK
E
AIRBYPAS S (IAB )LOWCONTRO L
SOLENOI D
VALVETroubleshooting ,page 11-15 8
SPAR K PLU G VOLTAG E
DETECTIO N MODUL E
ENGINEMOUN TCONTRO L SOLENOI DVALVETroubleshooting , se e sectio n 5
THROTTL EPOSITION (TP)
SENSO R
VEHICL E SPEE D SENSO R
(VSS)Troubleshooting , se e sectio n 1 4
IDL E AI R CONTRO L (IAC ) VALV E
RIGH T KNOC K SENSO R (RIGH T KS ) (BAN K 1 )
ENGIN
E COOLAN T TEMPERATUR E (ECT ) SENSO R
CRANKSHAF
T POSITION /
CYLINDE R POSITIO N
(CKP/CYP ) SENSO R
EVAPORATIV
E EMISSIO N
(EVAP)PURGE CONTRO L
SOLENOI D VALV E
LEF
T PRIMAR Y HEATE D
OXYGE N SENSO R
(LEF T PRIMAR Y HO2S )
(BAN K 2, SENSO R 1 )
POWE RSTEERIN GPRESSUR E(PSP)SWITC HTroubleshooting ,page 11-12 0
IGNITIO NCONTRO L
MODUL E
(ICM)Troubleshooting , se esectio n 4 EVAPORATIV
E EMISSIO N
(EVAP ) TW O WA Y VALV E
Testing , pag e 11-20 5
EVAPORATIV
E EMISSIO N
(EVAP ) BYPAS S SOLENOI D
VALVEReplacement , pag e 11-20 2
FUE
L TAN K PRESSUR E
SENSO R
LEF
T KNOC K SENSO R (LEF T KS ) (BAN K 2 )
INTAK
E AI R TEMPERATUR E (IAT ) SENSO R
For Troubleshooting of DTC related components, see chart on page 11-53.
ProCarManuals.com
Page 512 of 1954
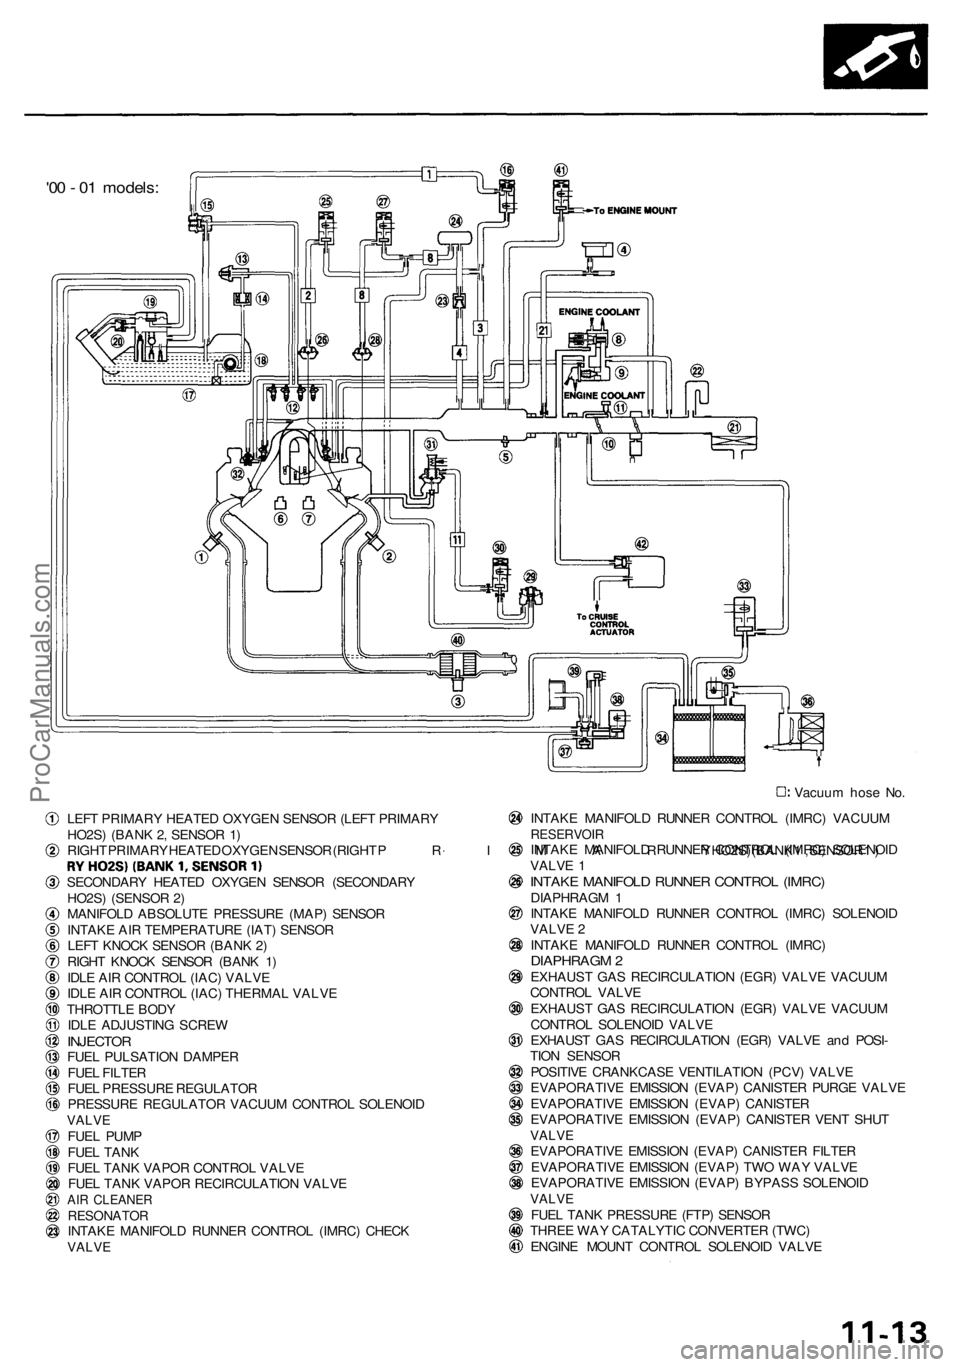
'00 - 01 models:
Vacuum hose No.
LEFT PRIMARY HEATED OXYGEN SENSOR (LEFT PRIMARY
HO2S) (BANK 2, SENSOR 1)
RIGHT PRIMARY HEATED OXYGEN SENSOR (RIGHT
PRIMARY
HO2S) (BANK
1,
SENSOR
1)
SECONDARY HEATED OXYGEN SENSOR (SECONDARY
HO2S) (SENSOR 2)
MANIFOLD ABSOLUTE PRESSURE (MAP) SENSOR
INTAKE AIR TEMPERATURE (IAT) SENSOR
LEFT KNOCK SENSOR (BANK 2)
RIGHT KNOCK SENSOR (BANK 1)
IDLE AIR CONTROL (IAC) VALVE
IDLE AIR CONTROL (IAC) THERMAL VALVE
THROTTLE BODY
IDLE ADJUSTING SCREW
INJECTOR
FUEL PULSATION DAMPER
FUEL FILTER
FUEL PRESSURE REGULATOR
PRESSURE REGULATOR VACUUM CONTROL SOLENOID
VALVE
FUEL PUMP
FUEL TANK
FUEL TANK VAPOR CONTROL VALVE
FUEL TANK VAPOR RECIRCULATION VALVE
AIR CLEANER
RESONATOR
INTAKE MANIFOLD RUNNER CONTROL (IMRC) CHECK
VALVE
INTAKE MANIFOLD RUNNER CONTROL (IMRC) VACUUM
RESERVOIR
INTAKE MANIFOLD RUNNER CONTROL (IMRC) SOLENOID
VALVE 1
INTAKE MANIFOLD RUNNER CONTROL (IMRC)
DIAPHRAGM 1
INTAKE MANIFOLD RUNNER CONTROL (IMRC) SOLENOID
VALVE 2
INTAKE MANIFOLD RUNNER CONTROL (IMRC)
DIAPHRAGM 2
EXHAUST GAS RECIRCULATION (EGR) VALVE VACUUM
CONTROL VALVE
EXHAUST GAS RECIRCULATION (EGR) VALVE VACUUM
CONTROL SOLENOID VALVE
EXHAUST GAS RECIRCULATION (EGR) VALVE and POSI-
TION SENSOR
POSITIVE CRANKCASE VENTILATION (PCV) VALVE
EVAPORATIVE EMISSION (EVAP) CANISTER PURGE VALVE
EVAPORATIVE EMISSION (EVAP) CANISTER
EVAPORATIVE EMISSION (EVAP) CANISTER VENT SHUT
VALVE
EVAPORATIVE EMISSION (EVAP) CANISTER FILTER
EVAPORATIVE EMISSION (EVAP) TWO WAY VALVE
EVAPORATIVE EMISSION (EVAP) BYPASS SOLENOID
VALVE
FUEL TANK PRESSURE (FTP) SENSOR
THREE WAY CATALYTIC CONVERTER (TWC)
ENGINE MOUNT CONTROL SOLENOID VALVEProCarManuals.com
Page 516 of 1954
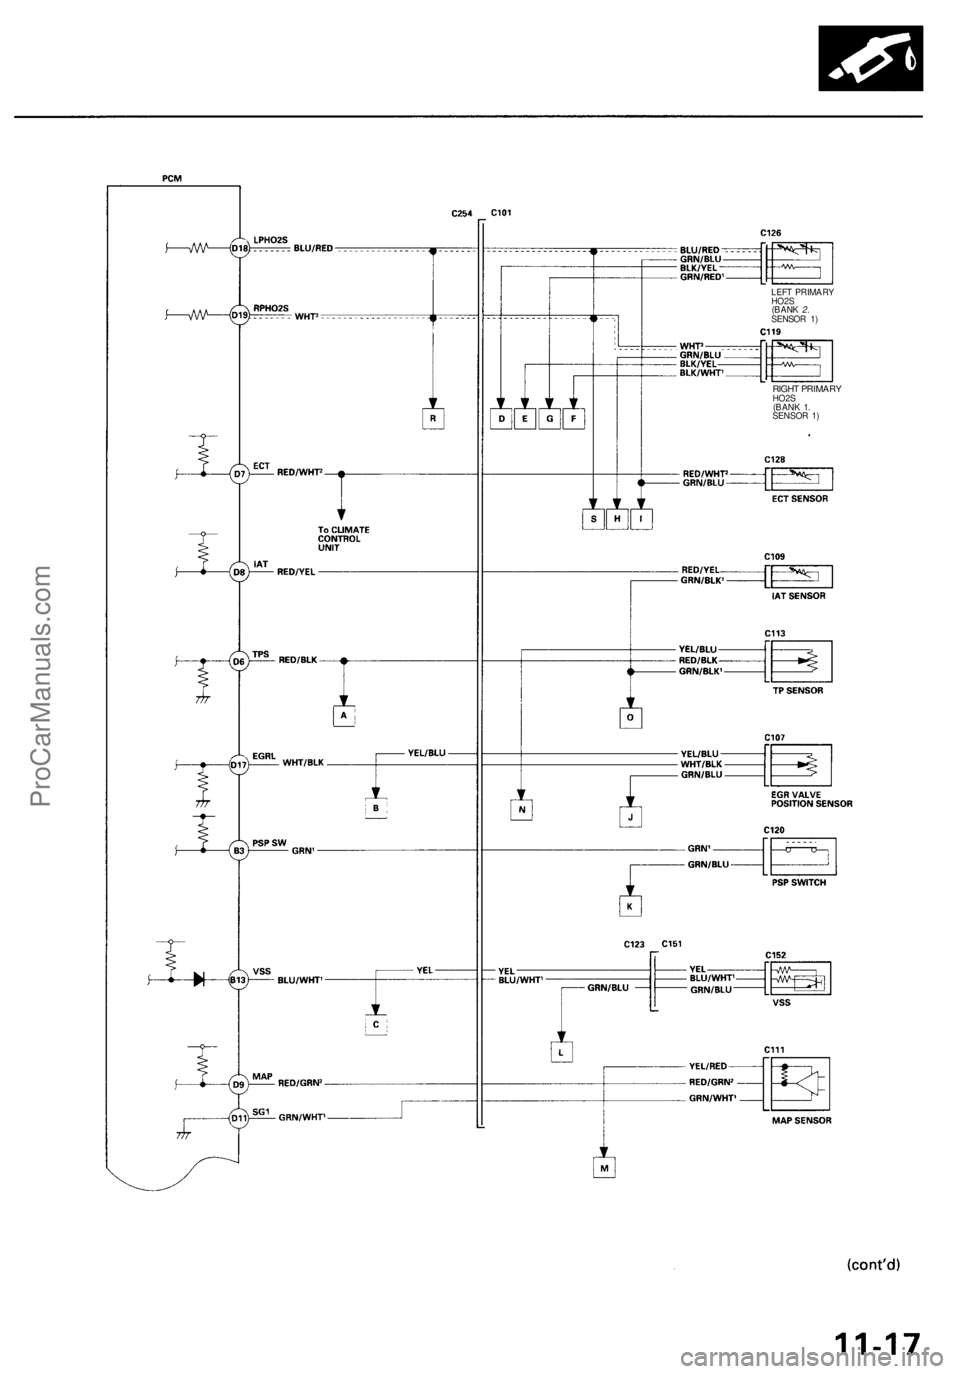
LEFT PRIMARY
HO2S
(BANK 2.
SENSOR 1)
RIGHT PRIMARY
HO2S
(BANK 1.
SENSOR 1)ProCarManuals.com