sensor ACURA RL KA9 1996 Service Owner's Manual
[x] Cancel search | Manufacturer: ACURA, Model Year: 1996, Model line: RL KA9, Model: ACURA RL KA9 1996Pages: 1954, PDF Size: 61.44 MB
Page 174 of 1954
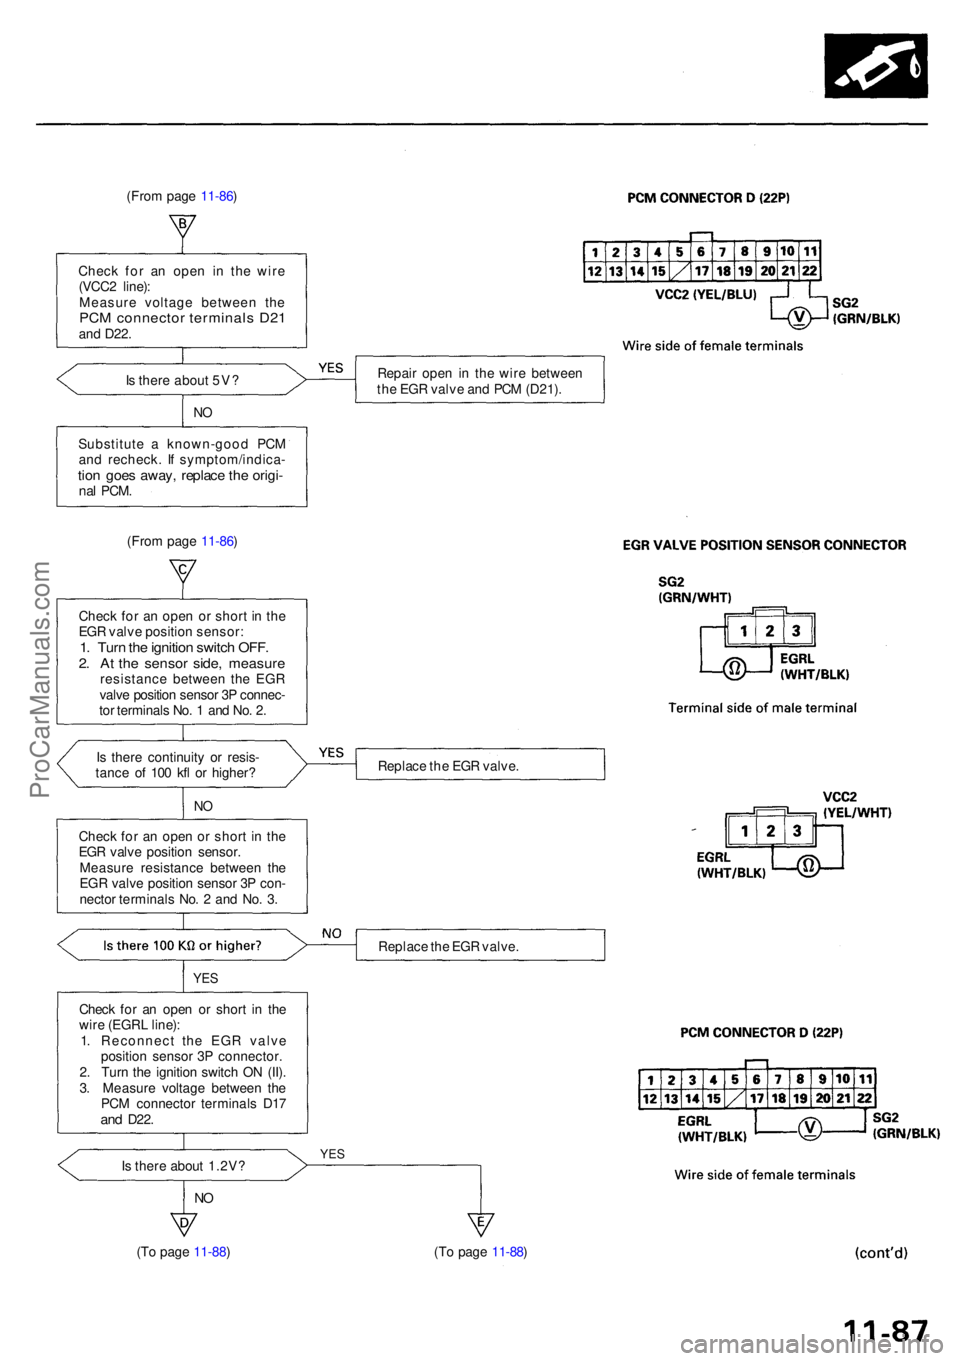
(From pag e 11-86 )
Chec k fo r a n ope n i n th e wir e
(VCC 2 line) :
Measur e voltag e betwee n th e
PCM connecto r terminal s D2 1and D22 .
Is ther e abou t 5V ?
NO
Substitut e a known-goo d PC M
an d recheck . I f symptom/indica -
tion goe s away , replac e th e origi -nal PCM .
Repai r ope n i n th e wir e betwee n
th e EG R valv e an d PC M (D21) .
(Fro m pag e 11-86 )
Chec k fo r a n ope n o r shor t i n th e
EG R valv e positio n sensor :
1. Tur n th e ignitio n switc h OFF .2. A t th e senso r side , measur eresistanc e betwee n th e EG R
valv e positio n senso r 3 P connec -
to r terminal s No . 1 an d No . 2 .
I s ther e continuit y o r resis -
tanc e o f 10 0 kf l o r higher ?
NO
Chec k fo r a n ope n o r shor t i n th e
EG R valv e positio n sensor .
Measur e resistanc e betwee n th e
EG R valv e positio n senso r 3 P con -
necto r terminal s No . 2 an d No . 3 .
YE S
Chec k fo r a n ope n o r shor t i n th e
wir e (EGR L line) :
1 . Reconnec t th e EG R valv e
positio n senso r 3 P connector .
2 . Tur n th e ignitio n switc h O N (II) .
3 . Measur e voltag e betwee n th e
PC M connecto r terminal s D1 7
and D22 .
Is ther e abou t 1.2V ?
NO
(T o pag e 11-88 ) Replac
e th e EG R valve .
Replac e th e EG R valve .
YES
(To pag e 11-88 )
ProCarManuals.com
Page 177 of 1954
Emission Control System
Exhaust Gas Recirculation (EGR) System (cont'd)
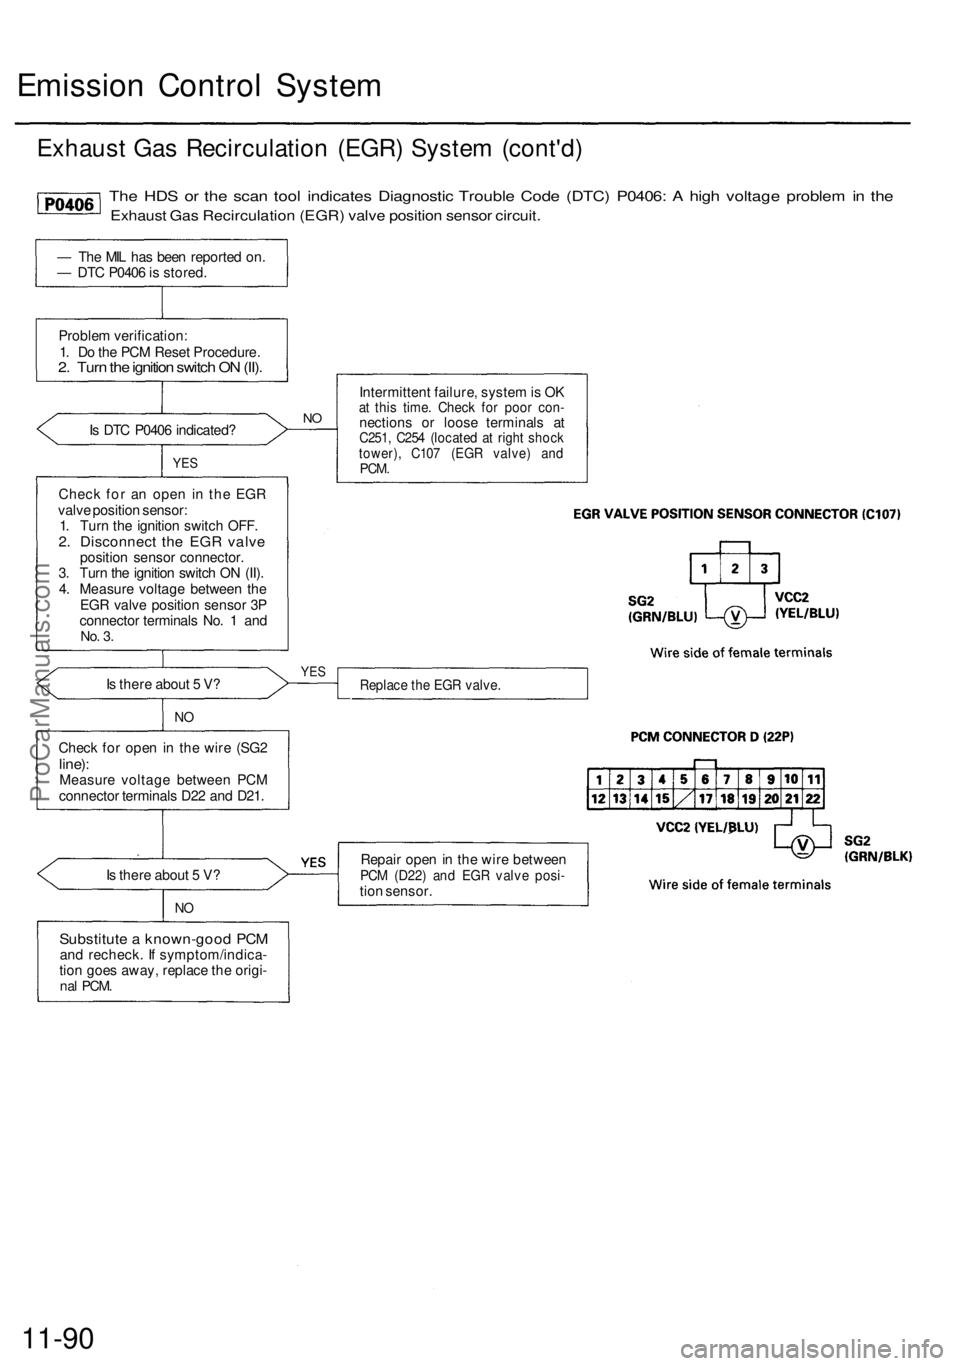
The HDS or the scan tool indicates Diagnostic Trouble Code (DTC) P0406: A high voltage problem in the
Exhaust Gas Recirculation (EGR) valve position sensor circuit.
— The MIL has been reported on.
— DTC P0406 is stored.
Problem verification:
1. Do the PCM Reset Procedure.
2. Turn the ignition switch ON (II).
Is DTC P0406 indicated?
YES
Check for an open in the EGR
valve position sensor:
1. Turn the ignition switch OFF.
2. Disconnect the EGR valve
position sensor connector.
3. Turn the ignition switch ON (II).
4. Measure voltage between the
EGR valve position sensor 3P
connector terminals No. 1 and
No. 3.
Is there about 5 V?
NO
Check for open in the wire (SG2
line):
Measure voltage between PCM
connector terminals D22 and D21.
Is there about 5 V?
NO
Substitute a known-good PCM
and recheck. If symptom/indica-
tion goes away, replace the origi-
nal
PCM.
NO
Intermittent failure, system is OK
at this time. Check for poor con-
nections or loose terminals at
C251, C254 (located at right shock
tower), C107 (EGR valve) and
PCM.
YES
Replace the EGR valve.
Repair open in the wire between
PCM (D22) and EGR valve posi-
tion sensor.
11-90ProCarManuals.com
Page 239 of 1954
Navigation System
System Description (cont'd)
Overview
The Acura Navigation System is a highly-sophisticated, hybrid locating system that uses satellites and a map database to
show you where you are and to help guide you to a desired destination.
The navigation system receives signals from the Global Positioning System (GPS), a network of 24 satellites in orbit
around the earth. By receiving signals from serveral of these satellites, the navigation system can determine the latitude,
longitude, and elevation of the vehicle. In addition, signals from the system's yaw rate sensor and the PCM (vehicle
speed pulse) enable the system to keep track of the vehicle's direction and speed of travel.
This hybrid system has advantages over a system that is either entirely self-contained or one that relies totally on the
GPS. For example, the self-contained portion of the system can keep track of vehicle position even when satellite signals
cannot be received. When the navigation system is on, the GPS can keep track of the vehicle position even when the vehi-
cle is transported by ferry.
The navigation system applies all this location, direction, and speed information to the maps and calculates a route to the
destination entered. As you drive to that destination, the system provides both visual and audio guidance.
This navigation system also has voice recognition that allows voice control of most of the navigation functions. The TALK
and BACK buttons on the steering wheel activate the voice control.
The illumination signal is used for two purposes. The display unit uses the signal to light up the hard buttons surrounding
the display. In addition the signal is used by the navigation unit to automatically switch from the "Day" to "Night" display
mode when the headlights are on. This automatic switching occurs only if the "Display" setting in setup screen 1 is set to
"AUTO". If the headlights are on and the customer has the dash light brightness control to "full bright," then this overrides
the "Night" mode.
The use of the audio speakers follows a hierarchy. The highest priority is the OnStar voice, followed by the navigation voice,
and finally the radio/CD. The audio unit enforces this hierarchy. The GA-Net bus is used to pass commands to mute the speak-
ers, and to disable the voice control system. Prior systems used dedicated wires to accomplish this function.
• If On-Star is in use, the audio unit passes a command on the GA-Net bus to the navigation unit to disable the voice control
system. The navigation unit then ignores the voice control switch, and temporarily ceases voice route guidance prompts.
• When the navigation system issues route guidance, the navigation unit uses the GA-Net bus to tell the audio unit to mute just
the front speakers. When the voice control system is being used (the TALK/BACK buttons), the navigation unit uses the GA-
Net bus to tell the audio unit to mute all speakers.ProCarManuals.com
Page 242 of 1954
Yaw Rate Sensor
The yaw rate sensor (located in the navigation unit) detects the direction change (angular speed) of the vehicle. The sen-
sor is an oscillation gyro built into the navigation unit.
Sensor Element Structure
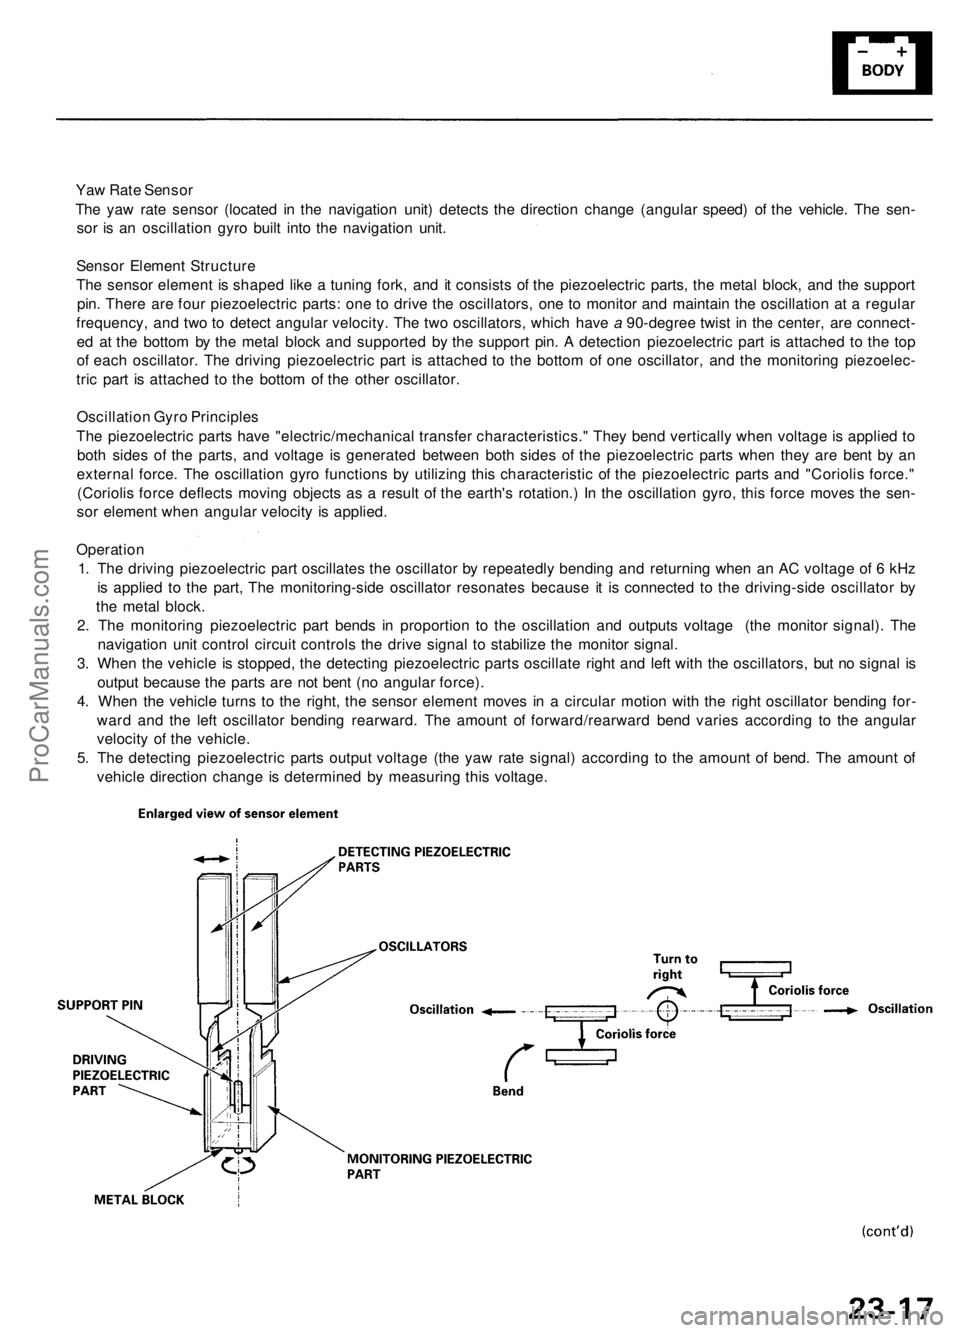
The sensor element is shaped like a tuning fork, and it consists of the piezoelectric parts, the metal block, and the support
pin. There are four piezoelectric parts: one to drive the oscillators, one to monitor and maintain the oscillation at a regular
frequency, and two to detect angular velocity. The two oscillators, which have a 90-degree twist in the center, are connect-
ed at the bottom by the metal block and supported by the support pin. A detection piezoelectric part is attached to the top
of each oscillator. The driving piezoelectric part is attached to the bottom of one oscillator, and the monitoring piezoelec-
tric part is attached to the bottom of the other oscillator.
Oscillation Gyro Principles
The piezoelectric parts have "electric/mechanical transfer characteristics." They bend vertically when voltage is applied to
both sides of the parts, and voltage is generated between both sides of the piezoelectric parts when they are bent by an
external force. The oscillation gyro functions by utilizing this characteristic of the piezoelectric parts and "Coriolis force."
(Coriolis force deflects moving objects as a result of the earth's rotation.) In the oscillation gyro, this force moves the sen-
sor element when angular velocity is applied.
Operation
1. The driving piezoelectric part oscillates the oscillator by repeatedly bending and returning when an AC voltage of 6 kHz
is applied to the part, The monitoring-side oscillator resonates because it is connected to the driving-side oscillator by
the metal block.
2. The monitoring piezoelectric part bends in proportion to the oscillation and outputs voltage (the monitor signal). The
navigation unit control circuit controls the drive signal to stabilize the monitor signal.
3. When the vehicle is stopped, the detecting piezoelectric parts oscillate right and left with the oscillators, but no signal is
output because the parts are not bent (no angular force).
4. When the vehicle turns to the right, the sensor element moves in a circular motion with the right oscillator bending for-
ward and the left oscillator bending rearward. The amount of forward/rearward bend varies according to the angular
velocity of the vehicle.
5. The detecting piezoelectric parts output voltage (the yaw rate signal) according to the amount of bend. The amount of
vehicle direction change is determined by measuring this voltage.ProCarManuals.com
Page 244 of 1954
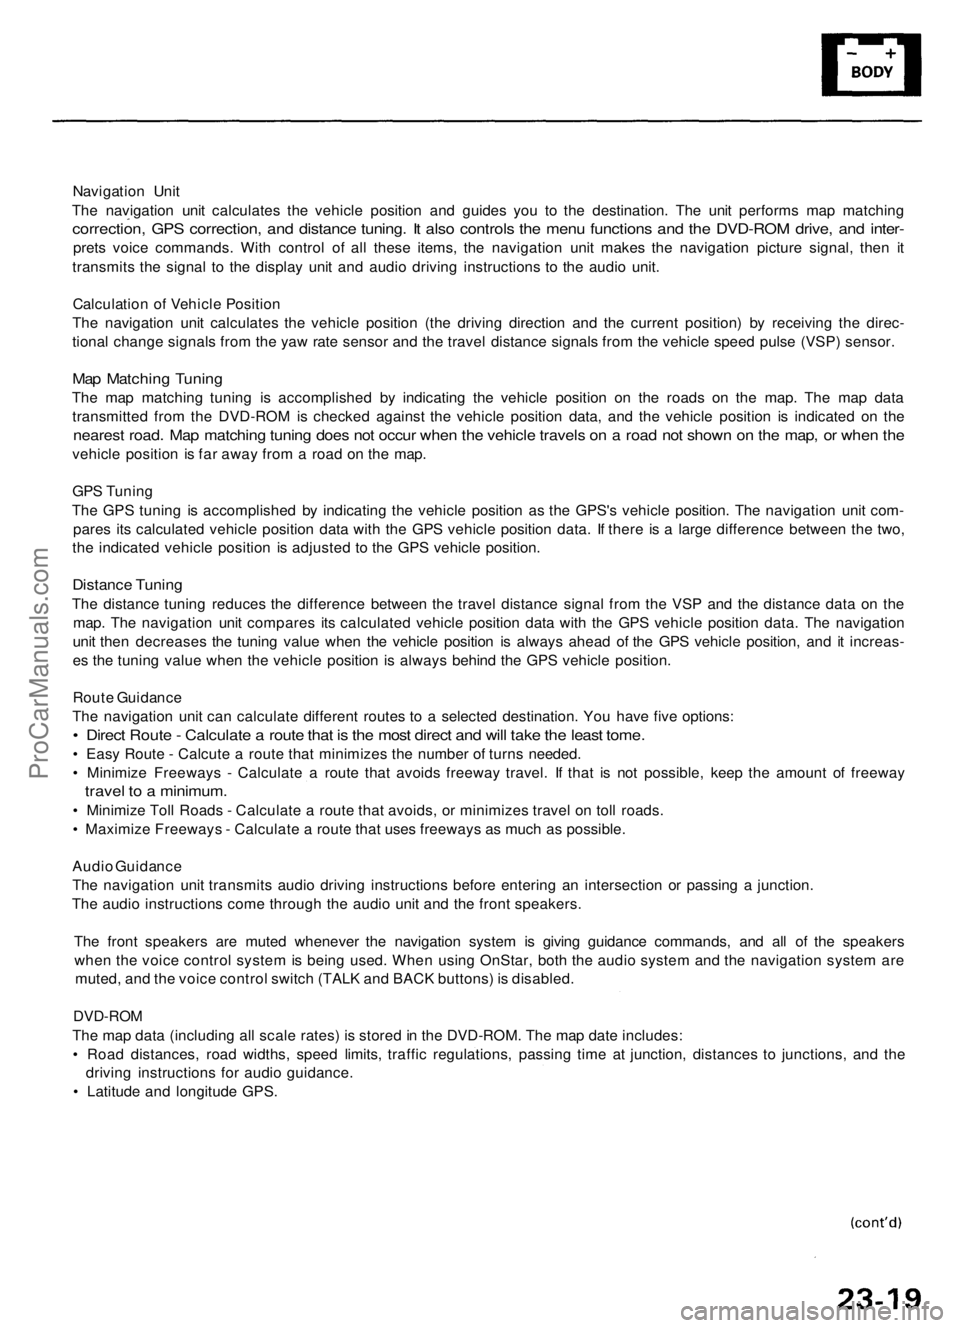
Navigation Unit
The navigation unit calculates the vehicle position and guides you to the destination. The unit performs map matching
correction, GPS correction, and distance tuning. It also controls the menu functions and the DVD-ROM drive, and inter-
prets voice commands. With control of all these items, the navigation unit makes the navigation picture signal, then it
transmits the signal to the display unit and audio driving instructions to the audio unit.
Calculation of Vehicle Position
The navigation unit calculates the vehicle position (the driving direction and the current position) by receiving the direc-
tional change signals from the yaw rate sensor and the travel distance signals from the vehicle speed pulse (VSP) sensor.
Map Matching Tuning
The map matching tuning is accomplished by indicating the vehicle position on the roads on the map. The map data
transmitted from the DVD-ROM is checked against the vehicle position data, and the vehicle position is indicated on the
nearest road. Map matching tuning does not occur when the vehicle travels on a road not shown on the map, or when the
vehicle position is far away from a road on the map.
GPS Tuning
The GPS tuning is accomplished by indicating the vehicle position as the GPS's vehicle position. The navigation unit com-
pares its calculated vehicle position data with the GPS vehicle position data. If there is a large difference between the two,
the indicated vehicle position is adjusted to the GPS vehicle position.
Distance Tuning
The distance tuning reduces the difference between the travel distance signal from the VSP and the distance data on the
map. The navigation unit compares its calculated vehicle position data with the GPS vehicle position data. The navigation
unit then decreases the tuning value when the vehicle position is always ahead of the GPS vehicle position, and it increas-
es the tuning value when the vehicle position is always behind the GPS vehicle position.
Route Guidance
The navigation unit can calculate different routes to a selected destination. You have five options:
• Direct Route - Calculate a route that is the most direct and will take the least tome.
• Easy Route - Calcute a route that minimizes the number of turns needed.
• Minimize Freeways - Calculate a route that avoids freeway travel. If that is not possible, keep the amount of freeway
travel to a minimum.
• Minimize Toll Roads - Calculate a route that avoids, or minimizes travel on toll roads.
• Maximize Freeways - Calculate a route that uses freeways as much as possible.
Audio Guidance
The navigation unit transmits audio driving instructions before entering an intersection or passing a junction.
The audio instructions come through the audio unit and the front speakers.
The front speakers are muted whenever the navigation system is giving guidance commands, and all of the speakers
when the voice control system is being used. When using OnStar, both the audio system and the navigation system are
muted, and the voice control switch (TALK and BACK buttons) is disabled.
DVD-ROM
The map data (including all scale rates) is stored in the DVD-ROM. The map date includes:
• Road distances, road widths, speed limits, traffic regulations, passing time at junction, distances to junctions, and the
driving instructions for audio guidance.
• Latitude and longitude GPS.ProCarManuals.com
Page 245 of 1954
Navigation System
System Description (cont'd)
Audio Unit
The audio unit receives the audio driving instructions from the navigation unit and transmits the instructions through the
front speakers even when the audio system is in use.
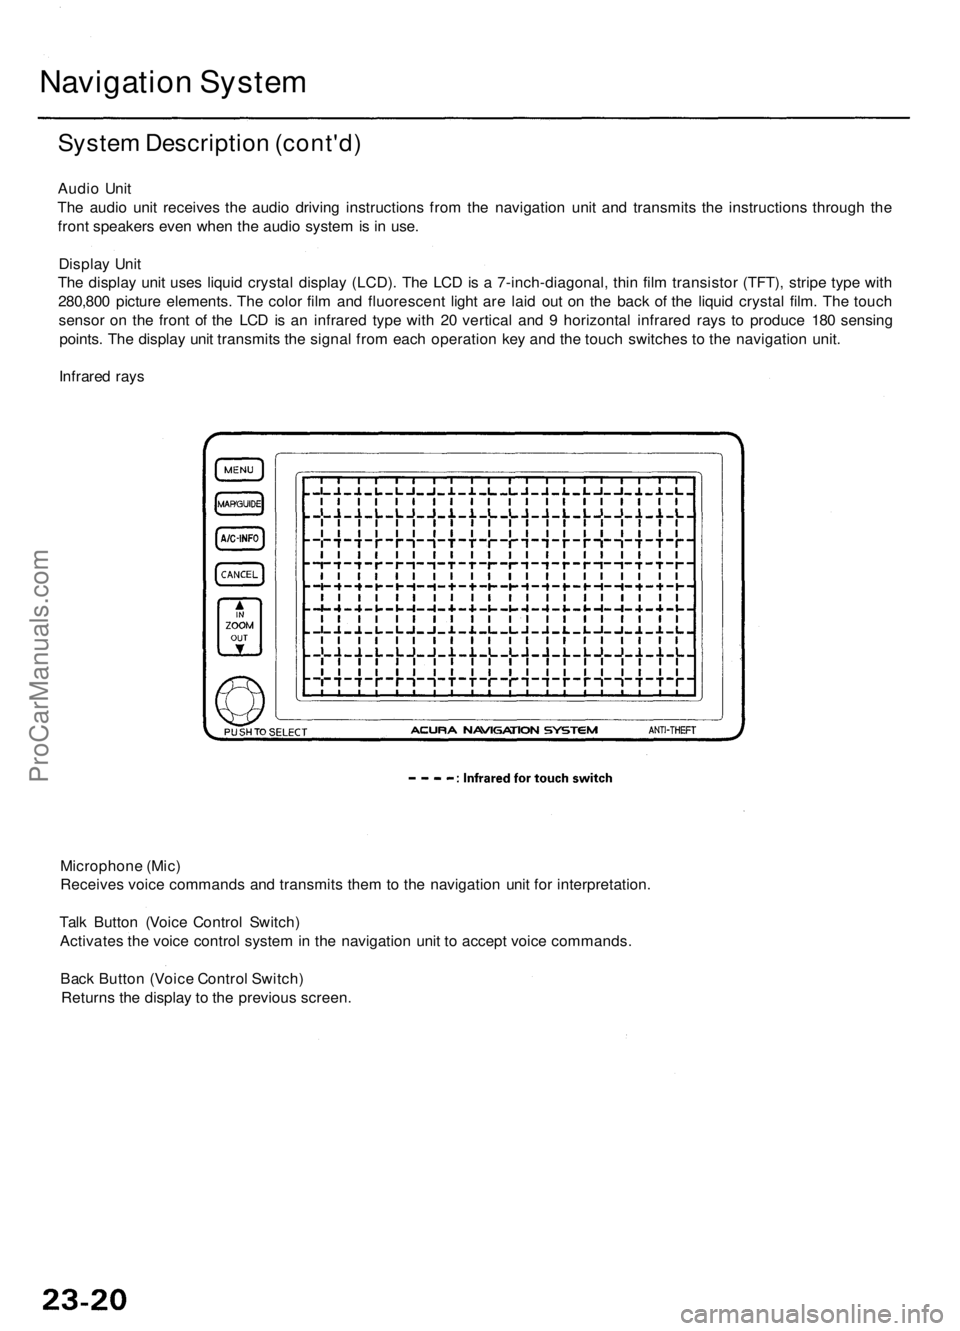
Display Unit
The display unit uses liquid crystal display (LCD). The LCD is a 7-inch-diagonal, thin film transistor (TFT), stripe type with
280,800 picture elements. The color film and fluorescent light are laid out on the back of the liquid crystal film. The touch
sensor on the front of the LCD is an infrared type with 20 vertical and 9 horizontal infrared rays to produce 180 sensing
points. The display unit transmits the signal from each operation key and the touch switches to the navigation unit.
Infrared rays
Microphone (Mic)
Receives voice commands and transmits them to the navigation unit for interpretation.
Talk Button (Voice Control Switch)
Activates the voice control system in the navigation unit to accept voice commands.
Back Button (Voice Control Switch)
Returns the display to the previous screen.ProCarManuals.com
Page 246 of 1954
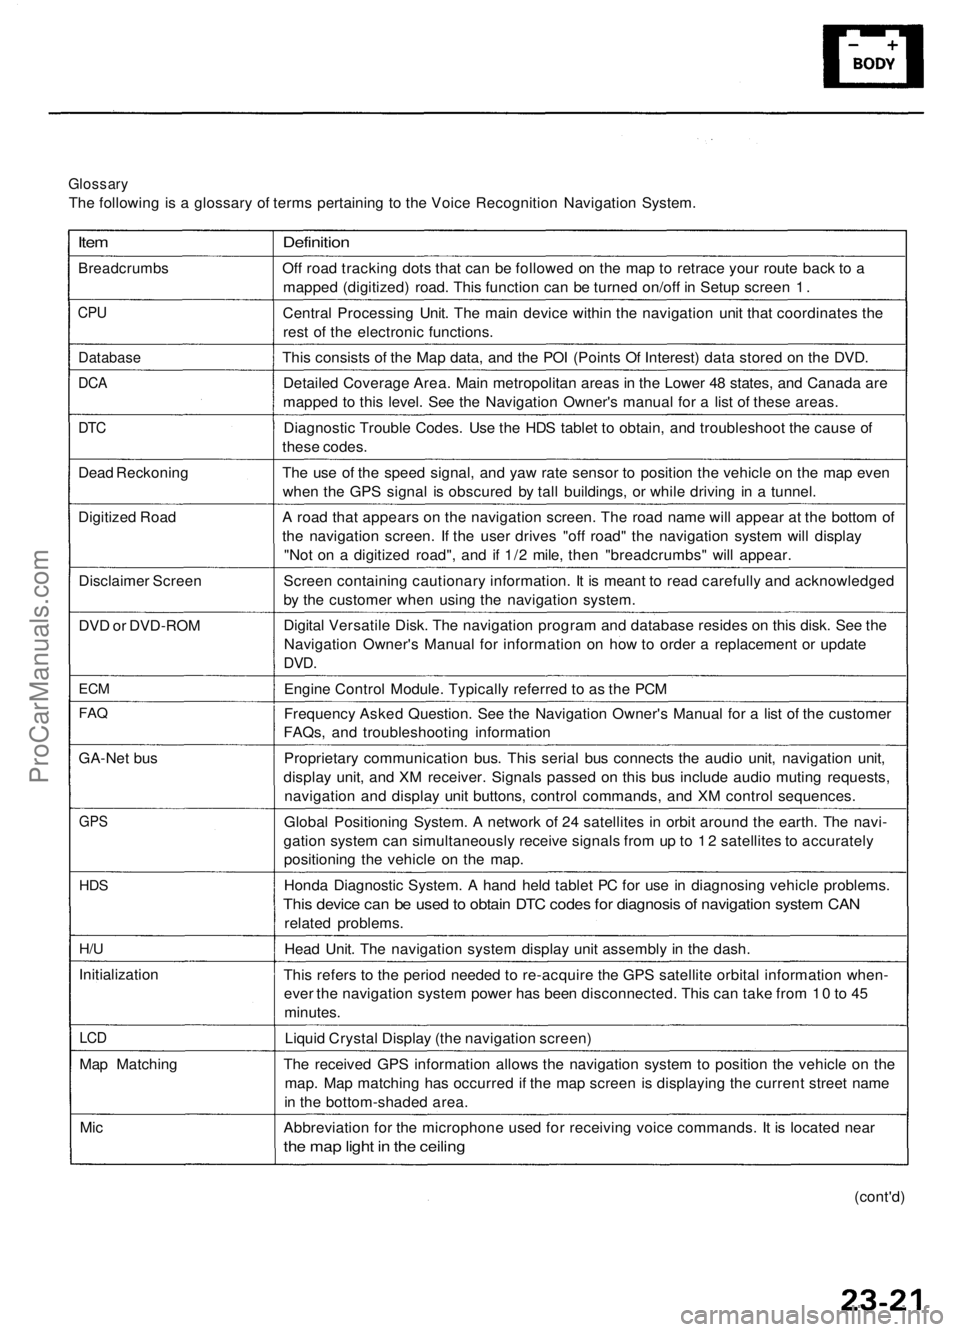
Glossary
The following is a glossary of terms pertaining to the Voice Recognition Navigation System.
Item
Breadcrumbs
CPU
Database
DCA
DTC
Dead Reckoning
Digitized Road
Disclaimer Screen
DVD or DVD-ROM
ECM
FAQ
GA-Net bus
GPS
HDS
H/U
Initialization
LCD
Map Matching
Mic
Definition
Off road tracking dots that can be followed on the map to retrace your route back to a
mapped (digitized) road. This function can be turned on/off in Setup screen 1.
Central Processing Unit. The main device within the navigation unit that coordinates the
rest of the electronic functions.
This consists of the Map data, and the POI (Points Of Interest) data stored on the DVD.
Detailed Coverage Area. Main metropolitan areas in the Lower 48 states, and Canada are
mapped to this level. See the Navigation Owner's manual for a list of these areas.
Diagnostic Trouble Codes. Use the HDS tablet to obtain, and troubleshoot the cause of
these codes.
The use of the speed signal, and yaw rate sensor to position the vehicle on the map even
when the GPS signal is obscured by tall buildings, or while driving in a tunnel.
A road that appears on the navigation screen. The road name will appear at the bottom of
the navigation screen. If the user drives "off road" the navigation system will display
"Not on a digitized road", and if 1/2 mile, then "breadcrumbs" will appear.
Screen containing cautionary information. It is meant to read carefully and acknowledged
by the customer when using the navigation system.
Digital Versatile Disk. The navigation program and database resides on this disk. See the
Navigation Owner's Manual for information on how to order a replacement or update
DVD.
Engine Control Module. Typically referred to as the PCM
Frequency Asked Question. See the Navigation Owner's Manual for a list of the customer
FAQs, and troubleshooting information
Proprietary communication bus. This serial bus connects the audio unit, navigation unit,
display unit, and XM receiver. Signals passed on this bus include audio muting requests,
navigation and display unit buttons, control commands, and XM control sequences.
Global Positioning System. A network of 24 satellites in orbit around the earth. The navi-
gation system can simultaneously receive signals from up to 12 satellites to accurately
positioning the vehicle on the map.
Honda Diagnostic System. A hand held tablet PC for use in diagnosing vehicle problems.
This device can be used to obtain DTC codes for diagnosis of navigation system CAN
related problems.
Head Unit. The navigation system display unit assembly in the dash.
This refers to the period needed to re-acquire the GPS satellite orbital information when-
ever the navigation system power has been disconnected. This can take from 10 to 45
minutes.
Liquid Crystal Display (the navigation screen)
The received GPS information allows the navigation system to position the vehicle on the
map. Map matching has occurred if the map screen is displaying the current street name
in the bottom-shaded area.
Abbreviation for the microphone used for receiving voice commands. It is located near
the map light in the ceiling
(cont'd)ProCarManuals.com
Page 248 of 1954
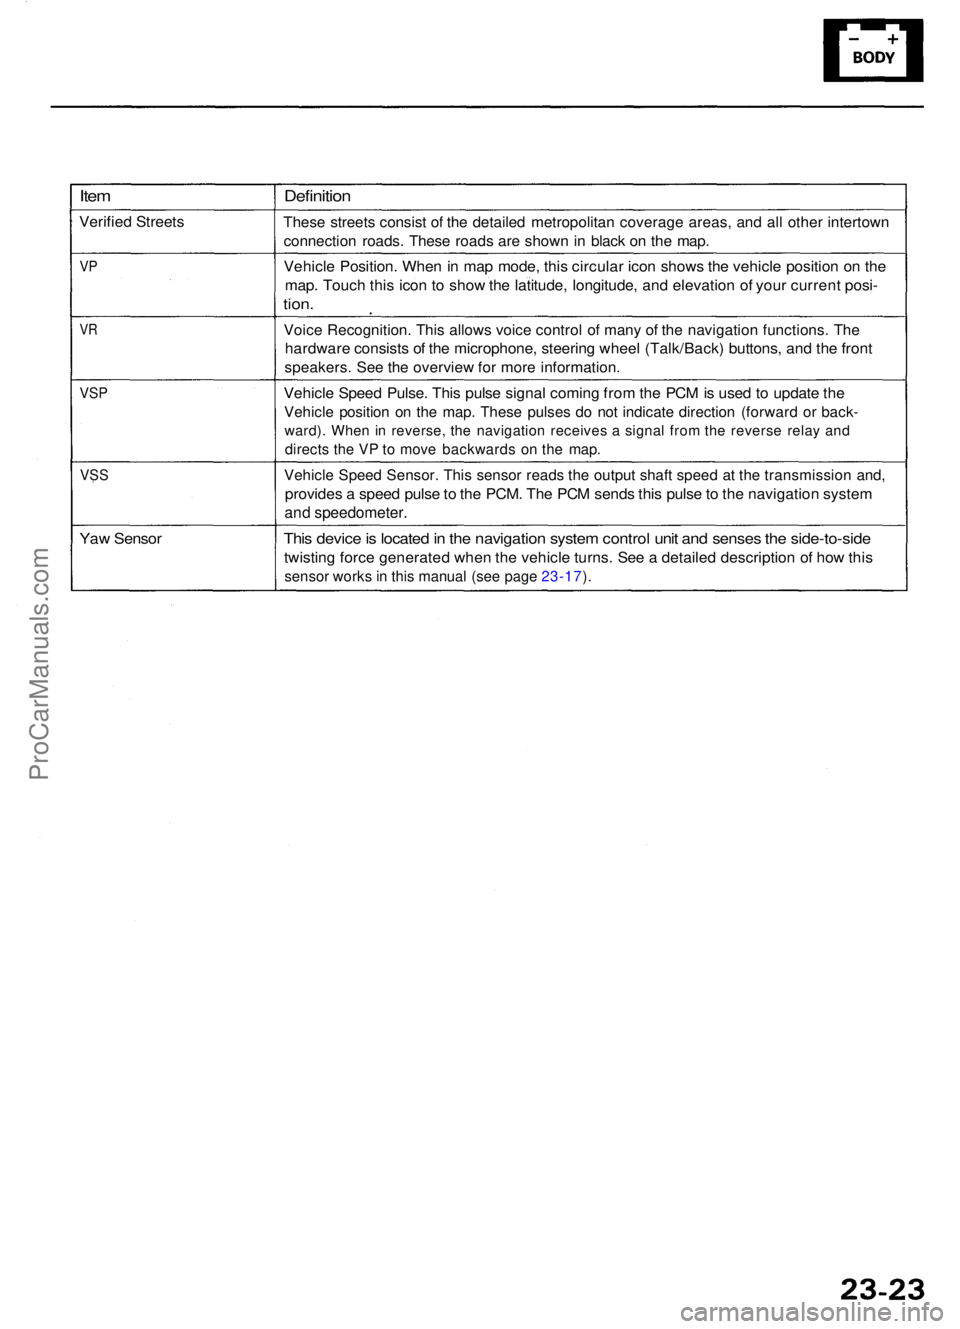
Item
Verifie d Street s
VP
V R
VS P
VS S
Yaw Senso r
Definitio n
These street s consis t o f th e detaile d metropolita n coverag e areas , an d al l othe r intertow n
connectio n roads . Thes e road s ar e show n i n blac k o n th e map .
Vehicl e Position . Whe n in ma p mode , thi s circula r ico n show s th e vehicl e positio n o n th e
map . Touc h thi s ico n t o sho w th e latitude , longitude , an d elevatio n o f you r curren t posi -
tion.
Voic e Recognition . Thi s allow s voic e contro l o f man y o f th e navigatio n functions . Th e
hardwar e consist s o f th e microphone , steerin g whee l (Talk/Back ) buttons , an d th e fron t
speakers . Se e th e overvie w fo r mor e information .
Vehicle Spee d Pulse . Thi s puls e signa l comin g fro m th e PC M is use d t o updat e th e
Vehicl e positio n o n th e map . Thes e pulse s d o no t indicat e directio n (forwar d o r back -
ward) . Whe n i n reverse , th e navigatio n receive s a signa l fro m th e revers e rela y an d
direct s th e V P to mov e backward s o n th e map .
Vehicl e Spee d Sensor . Thi s senso r read s th e outpu t shaf t spee d a t th e transmissio n and ,
provide s a spee d puls e to th e PCM . Th e PC M send s thi s puls e to th e navigatio n syste m
and speedometer .
This devic e is locate d in th e navigatio n syste m contro l uni t an d sense s th e side-to-sid e
twisting forc e generate d whe n th e vehicl e turns . Se e a detaile d descriptio n o f ho w thi s
senso r work s in thi s manua l (se e pag e 23-17 ).
ProCarManuals.com
Page 260 of 1954
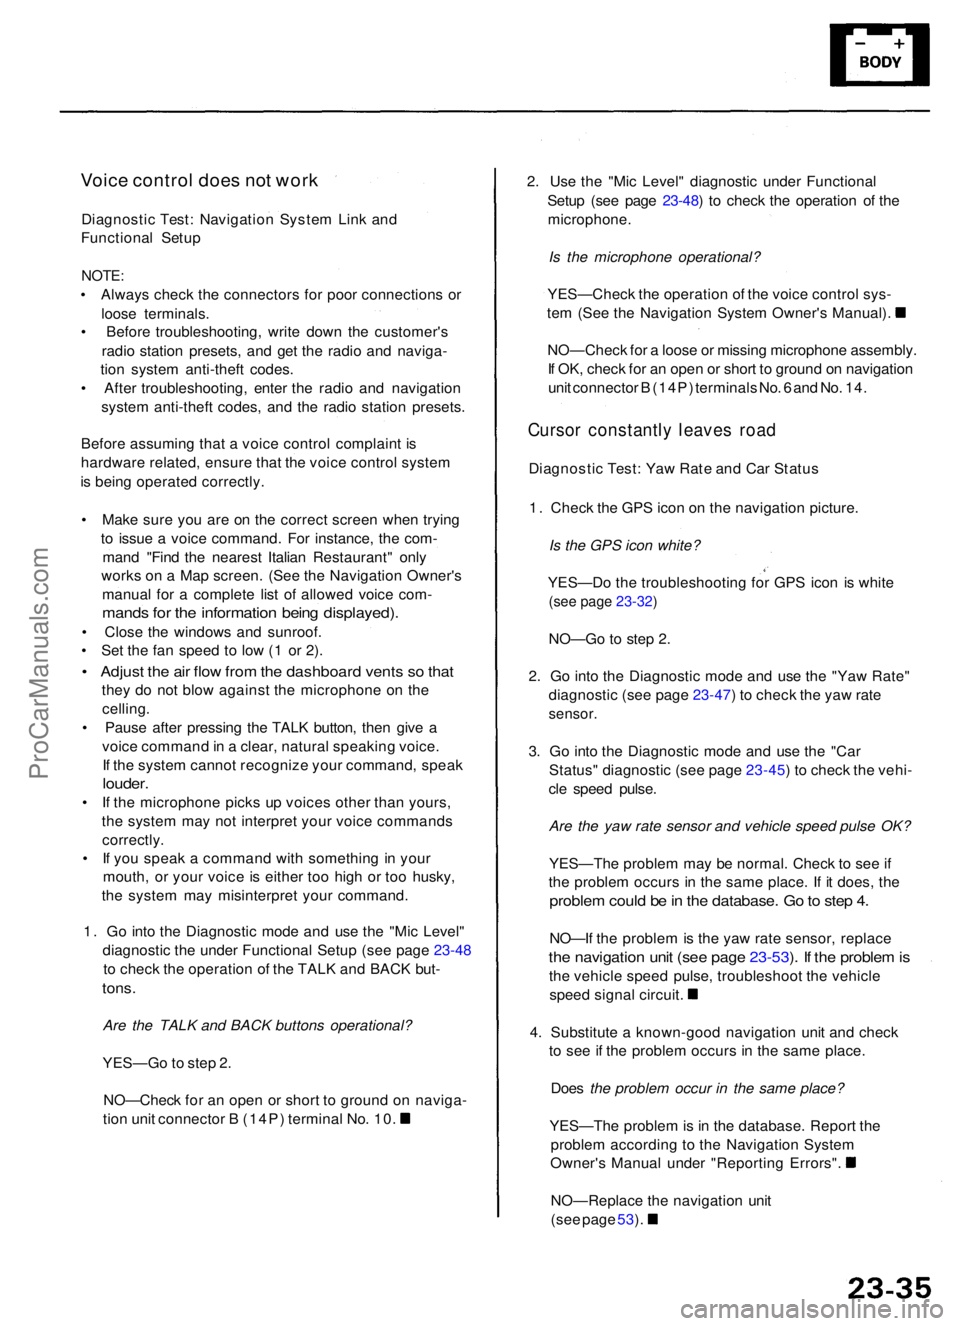
Voice contro l doe s no t wor k
Diagnosti c Test : Navigatio n Syste m Lin k an d
Functiona l Setu p
NOTE :
• Alway s chec k th e connector s fo r poo r connection s o r
loos e terminals .
• Befor e troubleshooting , writ e dow n th e customer' s
radi o statio n presets , an d ge t th e radi o an d naviga -
tio n syste m anti-thef t codes .
• Afte r troubleshooting , ente r th e radi o an d navigatio n
syste m anti-thef t codes , an d th e radi o statio n presets .
Befor e assumin g tha t a voic e contro l complain t i s
hardwar e related , ensur e tha t th e voic e contro l syste m
i s bein g operate d correctly .
• Mak e sur e yo u ar e o n th e correc t scree n whe n tryin g
t o issu e a voic e command . Fo r instance , th e com -
man d "Fin d th e neares t Italia n Restaurant " onl y
work s o n a Ma p screen . (Se e th e Navigatio n Owner' s
manua l fo r a complet e lis t o f allowe d voic e com -
mand s fo r th e informatio n bein g displayed) .
• Clos e th e window s an d sunroof .
• Se t th e fa n spee d t o lo w (1 o r 2) .
• Adjus t th e ai r flo w fro m th e dashboar d vent s s o tha t
they d o no t blo w agains t th e microphon e o n th e
celling .
• Paus e afte r pressin g th e TAL K button , the n giv e a
voic e comman d in a clear , natura l speakin g voice .
I f th e syste m canno t recogniz e you r command , spea k
louder .
• I f th e microphon e pick s u p voice s othe r tha n yours ,
th e syste m ma y no t interpre t you r voic e command s
correctly .
• I f yo u spea k a comman d wit h somethin g in you r
mouth , o r you r voic e is eithe r to o hig h o r to o husky ,
th e syste m ma y misinterpre t you r command .
1 . G o int o th e Diagnosti c mod e an d us e th e "Mi c Level "
diagnosti c th e unde r Functiona l Setu p (se e pag e 23 -48
t o chec k th e operatio n o f th e TAL K an d BAC K but -
tons.
Are the TALK and BACK buttons operational?
YES—G o to ste p 2 .
NO—Chec k fo r a n ope n o r shor t t o groun d o n naviga -
tio n uni t connecto r B (14P ) termina l No . 10 . 2
. Us e th e "Mi c Level " diagnosti c unde r Functiona l
Setu p (se e pag e 23-48 ) t o chec k th e operatio n o f th e
microphone .
Is the microphone operational?
YES—Chec k th e operatio n o f th e voic e contro l sys -
te m (Se e th e Navigatio n Syste m Owner' s Manual) .
NO—Chec k fo r a loos e o r missin g microphon e assembly .
I f OK , chec k fo r a n ope n o r shor t t o groun d o n navigatio n
uni t connecto r B (14P ) terminal s No . 6 an d No . 14 .
Curso r constantl y leave s roa d
Diagnosti c Test : Ya w Rat e an d Ca r Statu s
1 . Chec k th e GP S ico n o n th e navigatio n picture .
Is the GPS icon white?
YES—D o th e troubleshootin g fo r GP S ico n i s whit e
(see page 23-32)
NO—G o t o ste p 2 .
2 . G o int o th e Diagnosti c mod e an d us e th e "Ya w Rate "
diagnosti c (se e pag e 23-47 ) t o chec k th e ya w rat e
sensor .
3. G o int o th e Diagnosti c mod e an d us e th e "Ca r
Status " diagnosti c (se e pag e 23-45 ) t o chec k th e vehi -
cl e spee d pulse .
Are the yaw rate sensor and vehicle speed pulse OK?
YES—Th e proble m ma y b e normal . Chec k t o se e if
th e proble m occur s i n th e sam e place . I f i t does , th e
proble m coul d b e in th e database . G o to ste p 4 .
NO—I f th e proble m is th e ya w rat e sensor , replac e
the navigatio n uni t (se e pag e 23-53 ). I f th e proble m is
th e vehicl e spee d pulse , troubleshoo t th e vehicl e
spee d signa l circuit .
4 . Substitut e a known-goo d navigatio n uni t an d chec k
t o se e if th e proble m occur s i n th e sam e place .
Doe s the problem occur in the same place?
YES—Th e proble m is in th e database . Repor t th e
proble m accordin g t o th e Navigatio n Syste m
Owner' s Manua l unde r "Reportin g Errors" .
NO—Replac e th e navigatio n uni t
(se e pag e 53 ).
ProCarManuals.com
Page 268 of 1954
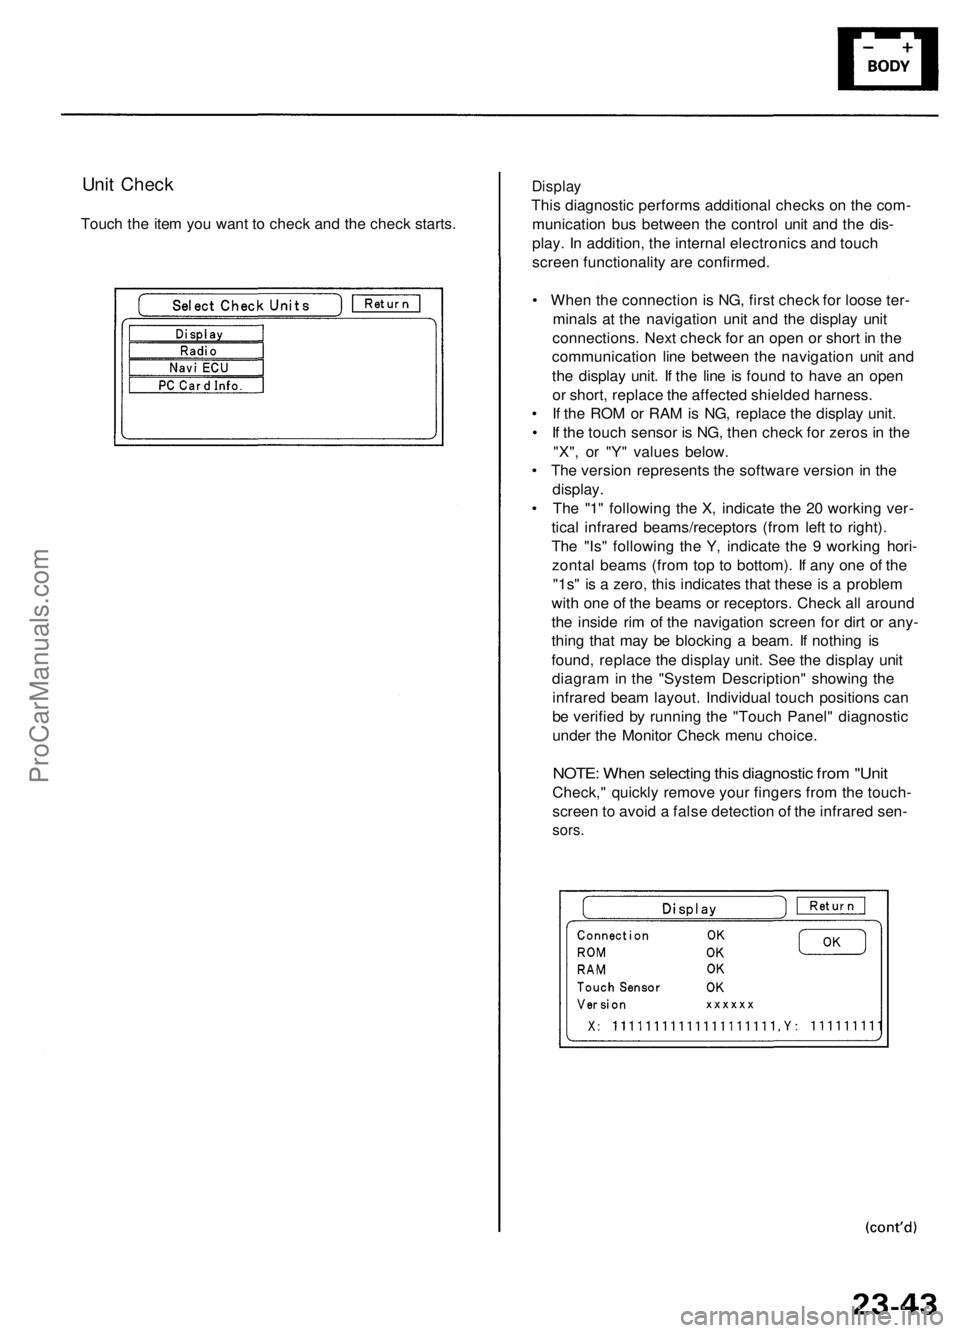
Unit Check
Touch the item you want to check and the check starts.
Display
This diagnostic performs additional checks on the com-
munication bus between the control unit and the dis-
play. In addition, the internal electronics and touch
screen functionality are confirmed.
• When the connection is NG, first check for loose ter-
minals at the navigation unit and the display unit
connections. Next check for an open or short in the
communication line between the navigation unit and
the display unit. If the line is found to have an open
or short, replace the affected shielded harness.
• If the ROM or RAM is NG, replace the display unit.
• If the touch sensor is NG, then check for zeros in the
"X", or "Y" values below.
• The version represents the software version in the
display.
• The "1" following the X, indicate the 20 working ver-
tical infrared beams/receptors (from left to right).
The "Is" following the Y, indicate the 9 working hori-
zontal beams (from top to bottom). If any one of the
"1s" is a zero, this indicates that these is a problem
with one of the beams or receptors. Check all around
the inside rim of the navigation screen for dirt or any-
thing that may be blocking a beam. If nothing is
found, replace the display unit. See the display unit
diagram in the "System Description" showing the
infrared beam layout. Individual touch positions can
be verified by running the "Touch Panel" diagnostic
under the Monitor Check menu choice.
NOTE: When selecting this diagnostic from "Unit
Check," quickly remove your fingers from the touch-
screen to avoid a false detection of the infrared sen-
sors.ProCarManuals.com