buttons Acura RLX 2014 Owner's Manual
[x] Cancel search | Manufacturer: ACURA, Model Year: 2014, Model line: RLX, Model: Acura RLX 2014Pages: 518, PDF Size: 15.83 MB
Page 3 of 518
2Quick Reference Guide
Quick Reference GuideVisual Index
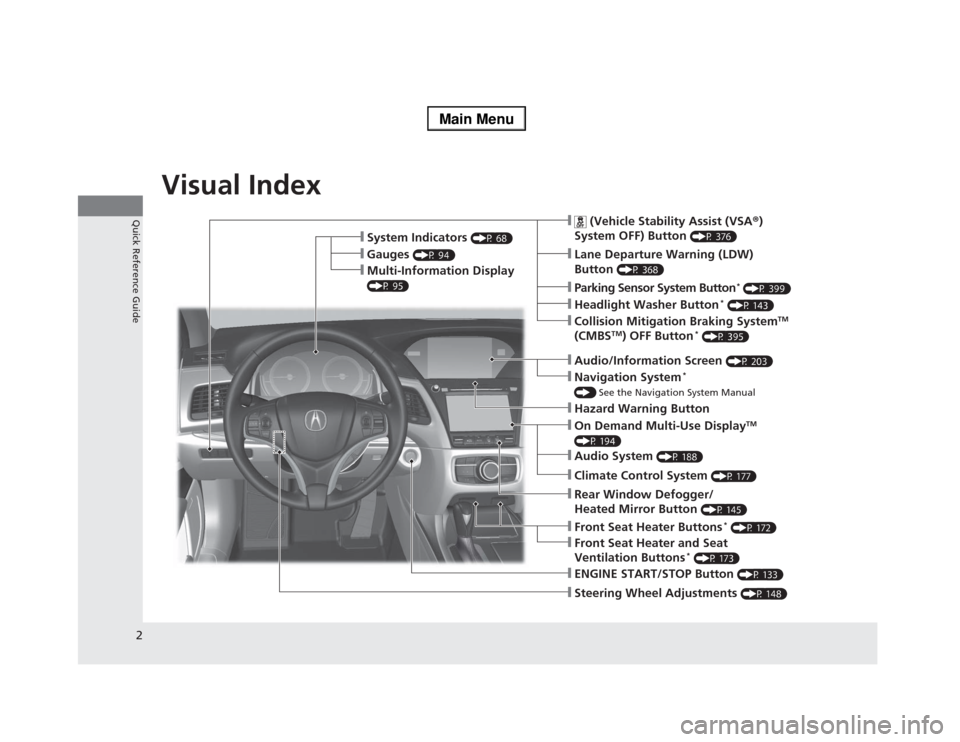
❙Steering Wheel Adjustments
(P 148)
❙ENGINE START/STOP Button
(P 133)
❙
(Vehicle Stability Assist (VSA®)
System OFF) Button
(P 376)
❙Lane Departure Warning (LDW)
Button
(P 368)
❙Parking Sensor System Button
* (P 399)
❙Collision Mitigation Braking System
TM
(CMBS
TM) OFF Button
* (P 395)
❙Navigation System
*
() See the Navigation System Manual❙Audio/Information Screen
(P 203)
❙Hazard Warning Button❙On Demand Multi-Use Display
TM
(P 194)❙Audio System
(P 188)
❙System Indicators
(P 68)
❙Gauges
(P 94)
❙Multi-Information Display (P 95)
❙Climate Control System
(P 177)
❙Rear Window Defogger/
Heated Mirror Button
(P 145)
❙Front Seat Heater Buttons
* (P 172)
❙Headlight Washer Button
* (P 143)
❙Front Seat Heater and Seat
Ventilation Buttons
* (P 173)
Page 4 of 518
3Quick Reference Guide
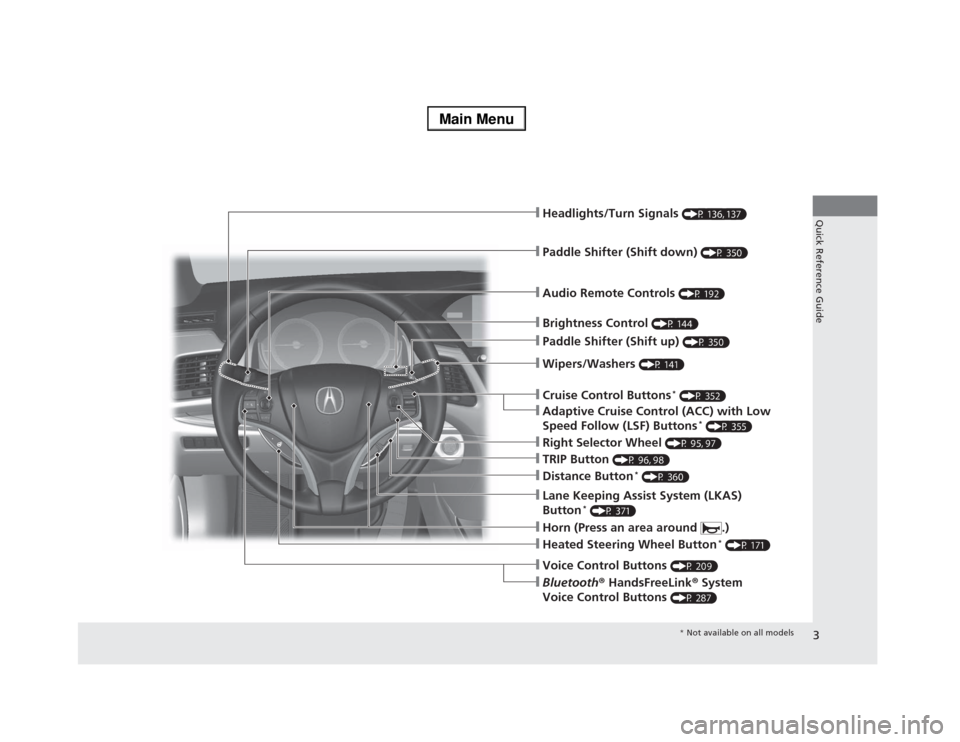
❙Wipers/Washers
(P 141)
❙Audio Remote Controls
(P 192)
❙Headlights/Turn Signals
(P 136, 137)
❙Paddle Shifter (Shift down)
(P 350)
❙Paddle Shifter (Shift up)
(P 350)
❙Horn (Press an area around .)❙Voice Control Buttons
(P 209)
❙Bluetooth® HandsFreeLink® System
Voice Control Buttons
(P 287)
❙Brightness Control
(P 144)
❙Cruise Control Buttons
* (P 352)
❙Adaptive Cruise Control (ACC) with Low
Speed Follow (LSF) Buttons
* (P 355)
❙TRIP Button
(P 96, 98)
❙Distance Button
* (P 360)
❙Lane Keeping Assist System (LKAS)
Button
* (P 371)
❙Right Selector Wheel
(P 95, 97)
❙Heated Steering Wheel Button
* (P 171)
* Not available on all models
Page 5 of 518
Visual Index
4Quick Reference Guide
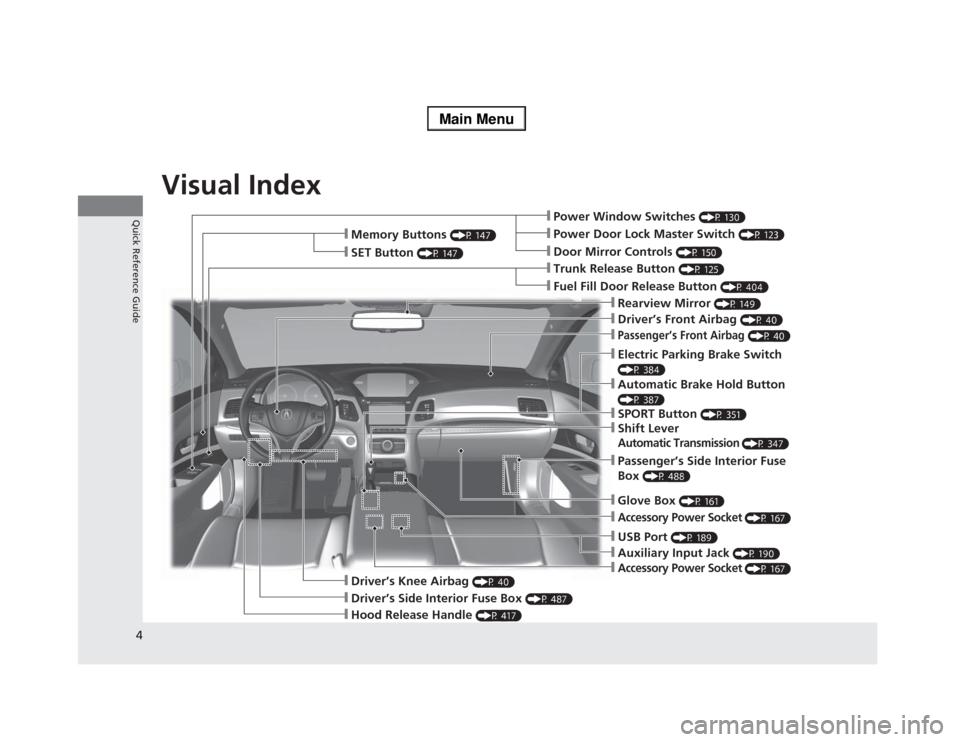
❙Power Window Switches
(P 130)
❙Driver’s Front Airbag
(P 40)
❙Trunk Release Button
(P 125)
❙Hood Release Handle
(P 417)
❙Driver’s Side Interior Fuse Box
(P 487)
❙Passenger’s Front Airbag
(P 40)
❙Shift LeverAutomatic Transmission
(P 347)
❙Glove Box
(P 161)
❙Driver’s Knee Airbag
(P 40)
❙Door Mirror Controls
(P 150)
❙Power Door Lock Master Switch
(P 123)
❙Fuel Fill Door Release Button
(P 404)
❙Electric Parking Brake Switch (P 384)❙Passenger’s Side Interior Fuse
Box
(P 488)
❙Accessory Power Socket
(P 167)
❙Accessory Power Socket
(P 167)
❙Auxiliary Input Jack
(P 190)
❙USB Port
(P 189)
❙Memory Buttons
(P 147)
❙SET Button
(P 147)
❙Rearview Mirror
(P 149)
❙SPORT Button
(P 351)
❙Automatic Brake Hold Button (P 387)
Page 14 of 518
13Quick Reference Guide
Features
(P 187)
Audio system
(P 193)
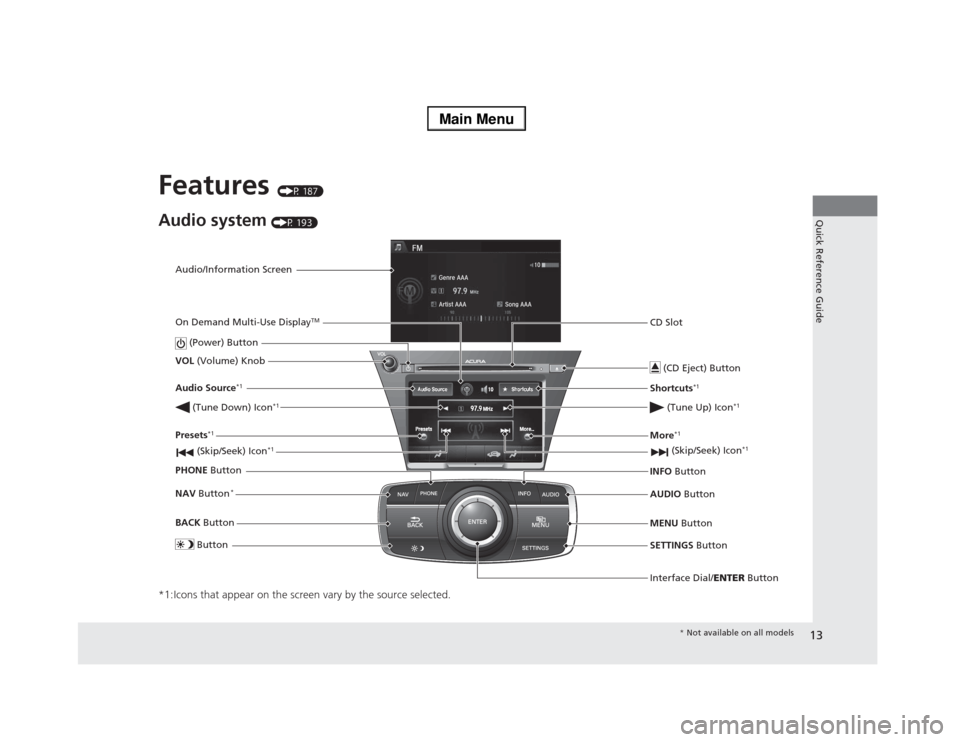
*1:Icons that appear on the screen vary by the source selected.
Audio/Information Screen
Interface Dial/ENTER Button (Power) Button
CD Slot
(CD Eject) ButtonSETTINGS Button VOL (Volume) Knob
BACK Button NAV Button
*
MENU Button AUDIO Button INFO Button On Demand Multi-Use Display
TM
PHONE Button (Tune Down) Icon
*1
(Skip/Seek) Icon
*1
Audio Source
*1
(Skip/Seek) Icon
*1
Presets
*1
(Tune Up) Icon
*1
More
*1
Button
Shortcuts
*1
* Not available on all models
Page 68 of 518
67
Instrument Panel
This chapter describes the buttons, indicators, and gauges that are used while driving.
Indicators............................................ 68
Multi-Information Display Warning and
Information Messages ...................... 84
Gauges and Multi-Information Display... 94
Gauges .............................................. 94
Multi-Information Display .................. 95
Page 119 of 518
uuLocking and Unlocking the DoorsuLocking/Unlocking the Doors from the Outside
118Controls
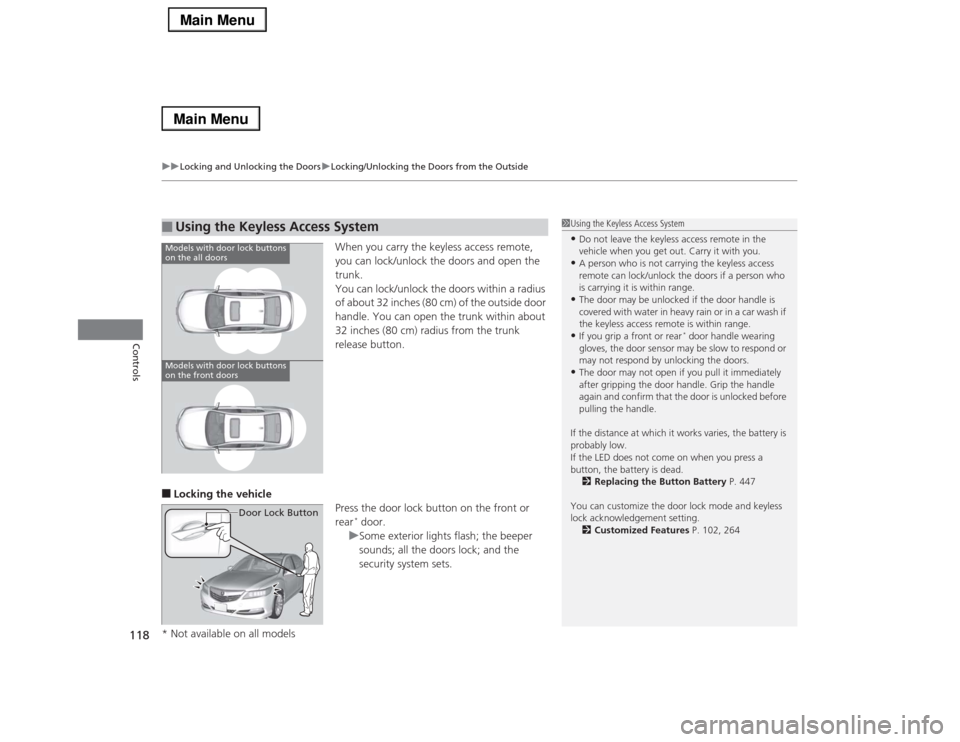
When you carry the keyless access remote,
you can lock/unlock the doors and open the
trunk.
You can lock/unlock the doors within a radius
of about 32 inches (80 cm) of the outside door
handle. You can open the trunk within about
32 inches (80 cm) radius from the trunk
release button.
■Locking the vehicle
Press the door lock button on the front or
rear
* door.
uSome exterior lights flash; the beeper
sounds; all the doors lock; and the
security system sets.
■
Using the Keyless Access System
1Using the Keyless Access System•Do not leave the keyless access remote in the
vehicle when you get out. Carry it with you.•A person who is not carrying the keyless access
remote can lock/unlock the doors if a person who
is carrying it is within range.•The door may be unlocked if the door handle is
covered with water in heavy rain or in a car wash if
the keyless access remote is within range.•If you grip a front or rear
* door handle wearing
gloves, the door sensor may be slow to respond or
may not respond by unlocking the doors.
•The door may not open if you pull it immediately
after gripping the door handle. Grip the handle
again and confirm that the door is unlocked before
pulling the handle.
If the distance at which it works varies, the battery is
probably low.
If the LED does not come on when you press a
button, the battery is dead.
2Replacing the Button Battery P. 447
You can customize the door lock mode and keyless
lock acknowledgement setting.
2Customized Features P. 102, 264
Models with door lock buttons
on the all doorsModels with door lock buttons
on the front doors
Door Lock Button
* Not available on all models
Page 148 of 518
147
uuOperating the Switches Around the Steering WheeluDriving Position Memory System
Controls
1.Set the power mode to ON. Adjust the
driver’s seat, the steering wheel and the
door mirrors to the desired position.
2.Press the SET button.
uYou will hear the beep, and the memory
button indicator light will blink.
3.Press memory button
(1
or
(2
within five
seconds of pressing the SET button.
uOnce the seat, the steering wheel and
the outside mirror positions have been
memorized, the indicator light on the
button you pressed stays on.
1.Move the shift lever to
(P
.
2.Apply the parking brake.
3.Press a memory button ((1
or
(2
).
uYou will hear the beep, and the indicator
light will blink.
The seat, the steering wheel and the door
mirrors will automatically move to the
memorized positions. When it has finished
moving, you will hear the beep, and the
indicator light stays on.
■
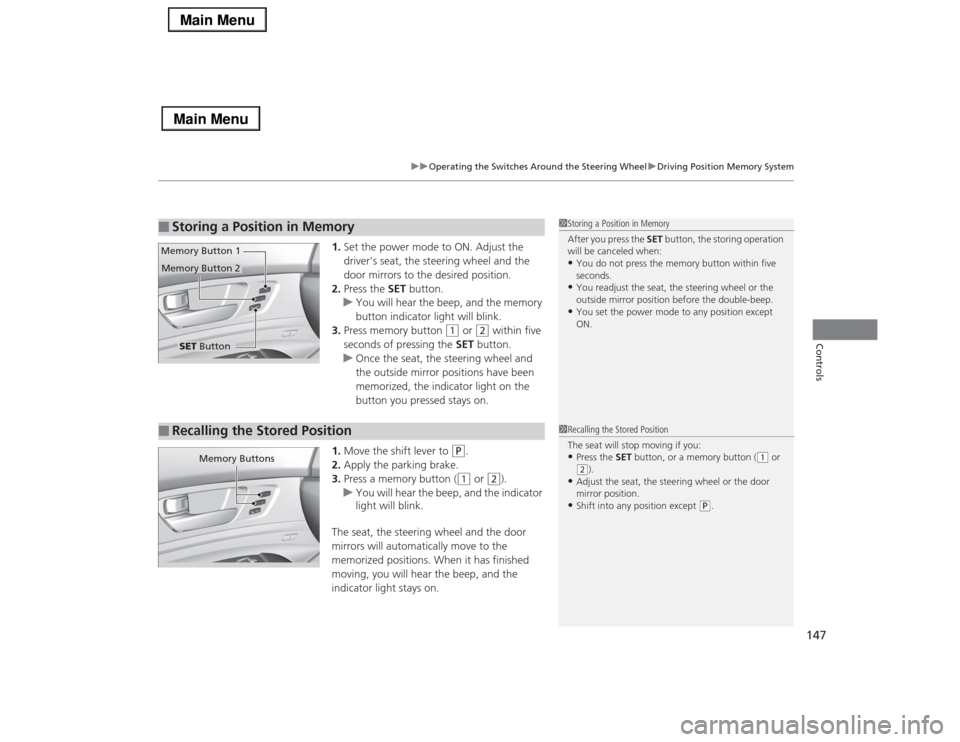
Storing a Position in Memory
1Storing a Position in Memory
After you press the SET button, the storing operation
will be canceled when:•You do not press the memory button within five
seconds.•You readjust the seat, the steering wheel or the
outside mirror position before the double-beep.•You set the power mode to any position except
ON.
SET Button Memory Button 1
Memory Button 2■
Recalling the Stored Position
1Recalling the Stored Position
The seat will stop moving if you:•Press the SET button, or a memory button (
(1 or
(2).
•Adjust the seat, the steering wheel or the door
mirror position.•Shift into any position except
(P.
Memory Buttons
Page 178 of 518
177
Continued
Controls
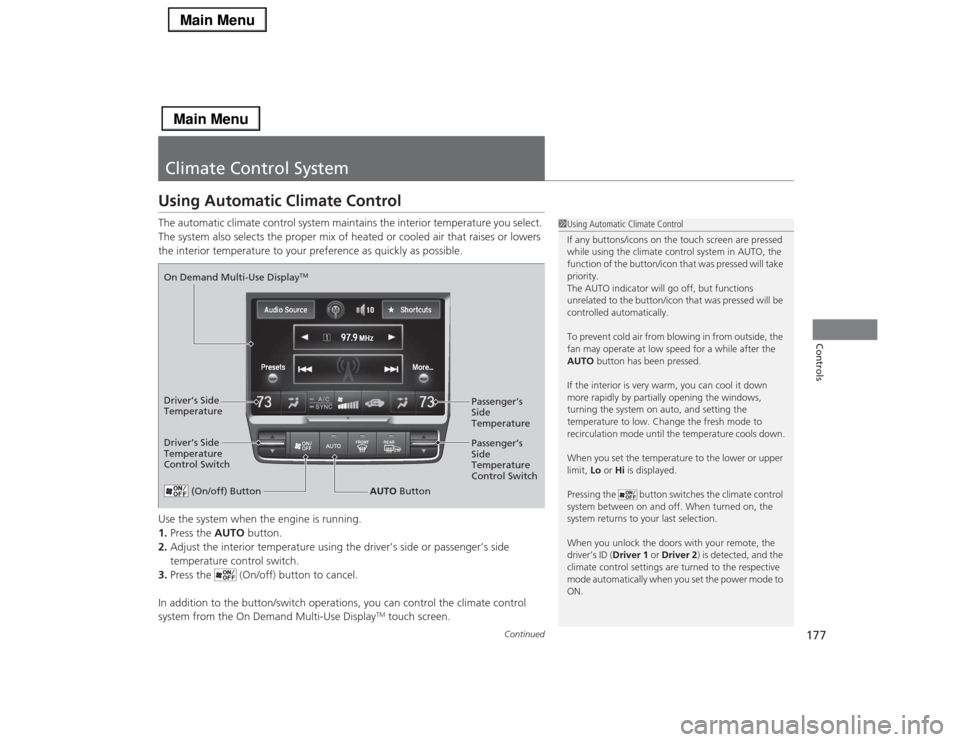
Climate Control SystemUsing Automatic Climate ControlThe automatic climate control system maintains the interior temperature you select.
The system also selects the proper mix of heated or cooled air that raises or lowers
the interior temperature to your preference as quickly as possible.
Use the system when the engine is running.
1.Press the AUTO button.
2.Adjust the interior temperature using the driver’s side or passenger’s side
temperature control switch.
3.Press the (On/off) button to cancel.
In addition to the button/switch operations, you can control the climate control
system from the On Demand Multi-Use Display
TM touch screen.
1Using Automatic Climate Control
If any buttons/icons on the touch screen are pressed
while using the climate control system in AUTO, the
function of the button/icon that was pressed will take
priority.
The AUTO indicator will go off, but functions
unrelated to the button/icon that was pressed will be
controlled automatically.
To prevent cold air from blowing in from outside, the
fan may operate at low speed for a while after the
AUTO button has been pressed.
If the interior is very warm, you can cool it down
more rapidly by partially opening the windows,
turning the system on auto, and setting the
temperature to low. Change the fresh mode to
recirculation mode until the temperature cools down.
When you set the temperature to the lower or upper
limit, Lo or Hi is displayed.
Pressing the button switches the climate control
system between on and off. When turned on, the
system returns to your last selection.
When you unlock the doors with your remote, the
driver’s ID (Driver 1 or Driver 2) is detected, and the
climate control settings are turned to the respective
mode automatically when you set the power mode to
ON.
(On/off) Button
AUTO Button On Demand Multi-Use Display
TM
Driver’s Side
Temperature
Control SwitchPassenger’s
Side
Temperature
Control Switch Passenger’s
Side
Temperature Driver’s Side
Temperature
Page 189 of 518
188Features
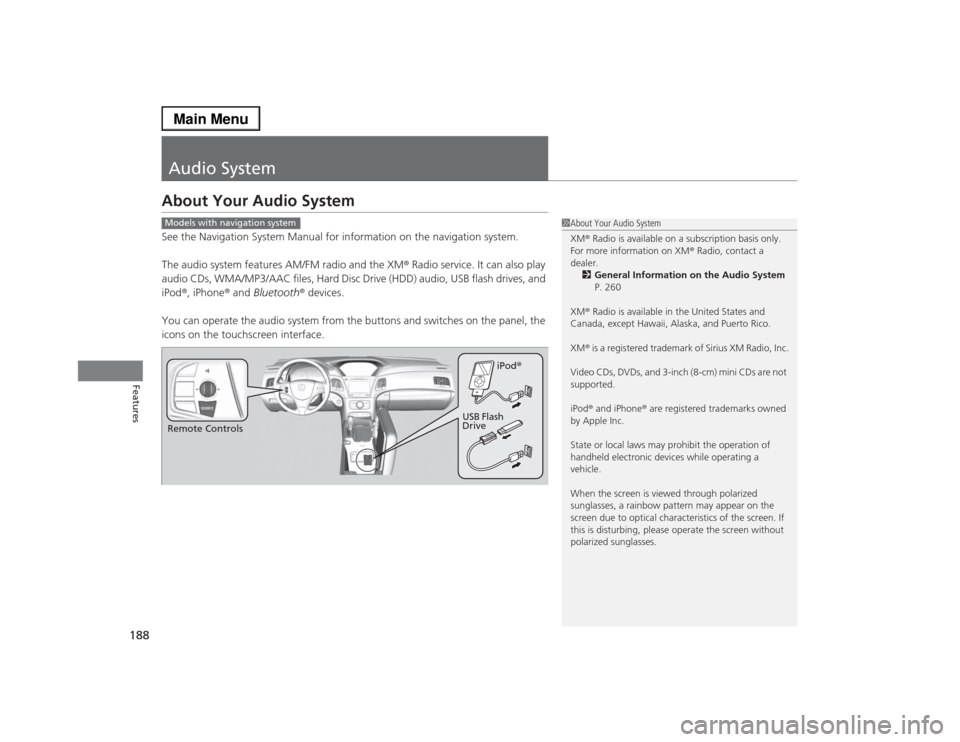
Audio SystemAbout Your Audio SystemSee the Navigation System Manual for information on the navigation system.
The audio system features AM/FM radio and the XM® Radio service. It can also play
audio CDs, WMA/MP3/AAC files, Hard Disc Drive (HDD) audio, USB flash drives, and
iPod®, iPhone® and Bluetooth® devices.
You can operate the audio system from the buttons and switches on the panel, the
icons on the touchscreen interface.
1About Your Audio System
XM® Radio is available on a subscription basis only.
For more information on XM® Radio, contact a
dealer.
2General Information on the Audio System
P. 260
XM® Radio is available in the United States and
Canada, except Hawaii, Alaska, and Puerto Rico.
XM® is a registered trademark of Sirius XM Radio, Inc.
Video CDs, DVDs, and 3-inch (8-cm) mini CDs are not
supported.
iPod® and iPhone® are registered trademarks owned
by Apple Inc.
State or local laws may prohibit the operation of
handheld electronic devices while operating a
vehicle.
When the screen is viewed through polarized
sunglasses, a rainbow pattern may appear on the
screen due to optical characteristics of the screen. If
this is disturbing, please operate the screen without
polarized sunglasses.
Models with navigation systemRemote ControlsiPod®
USB Flash
Drive
Page 204 of 518
203
uuAudio System Basic OperationuAudio/Information Screen
Continued
Features
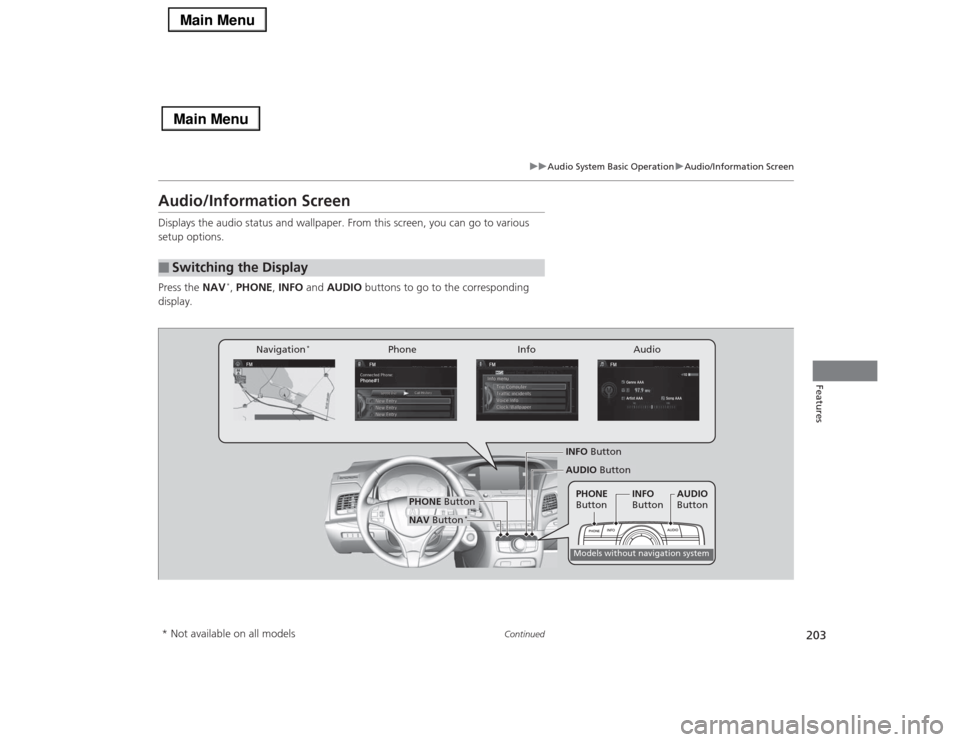
Audio/Information ScreenDisplays the audio status and wallpaper. From this screen, you can go to various
setup options.
Press the NAV
*, PHONE, INFO and AUDIO buttons to go to the corresponding
display.
■
Switching the Display
Audio Info Navigation
*
Phone
AUDIO Button
NAV Button
*
PHONE Button
INFO ButtonModels without navigation systemPHONE
ButtonINFO
ButtonAUDIO
Button
* Not available on all models