light Acura RLX 2015 Workshop Manual
[x] Cancel search | Manufacturer: ACURA, Model Year: 2015, Model line: RLX, Model: Acura RLX 2015Pages: 521, PDF Size: 22.24 MB
Page 174 of 521

Continued
173
uuInterior Lights/Interior Convenience Items uInterior Convenience Items
Controls
If the power mode is in ON:
Seat heater - The HI setting heats the seats
faster than the LO setting.
Seat ventilation - The HI setting ventilates
the seats faster than the LO setting.
Press the seat heater or the seat ventilation
button:
Once - The HI setting (three indicators on)
Twice - The MID setting (two indicators on)
Three times - The LO setting
Four times - The OFF setting (no indicators on)
When a comfortable temperature is reached
while using the seat heaters in HI, select MID
or LO to keep the seat warm.
■
Front Seat Heaters and Seat Ventilation
*
1 Front Seat Heaters and Seat Ventilation
*
Do not use the seat heaters and the seat ventilation
even in LO when the engine is OFF. Under such
conditions, the battery may be weakened, making
the engine difficult to start.
3
WARNING
Heat induced burns are possible when
using seat heaters.
Persons with a diminished ability to sense
temperature (e.g., persons with diabetes,
lower-limb nerve damage, or paralysis) or
with sensitive skin should not use seat
heaters.
* Not available on all models
Page 175 of 521

uuInterior Lights/Interior Convenience Items uInterior Convenience Items
174Controls
If the power mode is in ON: The HI setting
heats the seats faster than the LO setting.
There is no heater in the rear center seating
position.
Press the seat heater button:
Once - The HI setting (three indicators on)
Twice - The MID setting (two indicators on)
Three times - The LO setting
Four times - The OFF setting (no indicators on)
When a comfortable temperature is reached
while using the seat heaters in HI, select MID
or LO to keep the seat warm.
To open the sunglasses holder, push and
release the indent. To close, push it again until
it latches.
You can store eyeglasses and other small
items in this holder.
■
Rear Seat Heaters
*
1Rear Seat Heaters
*
Do not use the seat heaters even in LO when the
engine is off. Under such conditions, the battery may
be weakened, making the engine difficult to start.
3
WARNING
Heat induced burns are possible when
using seat heaters.
Persons with a diminished ability to sense
temperature (e.g., persons with diabetes,
lower-limb nerve damage, or paralysis) or
with sensitive skin should not use seat
heaters.
■
Sunglasses Holder
1Sunglasses Holder
Keep the holder closed while driving except when
accessing stored items.
Push
* Not available on all models
Page 176 of 521
Continued
175
uuInterior Lights/Interior Convenience Items uInterior Convenience Items
Controls
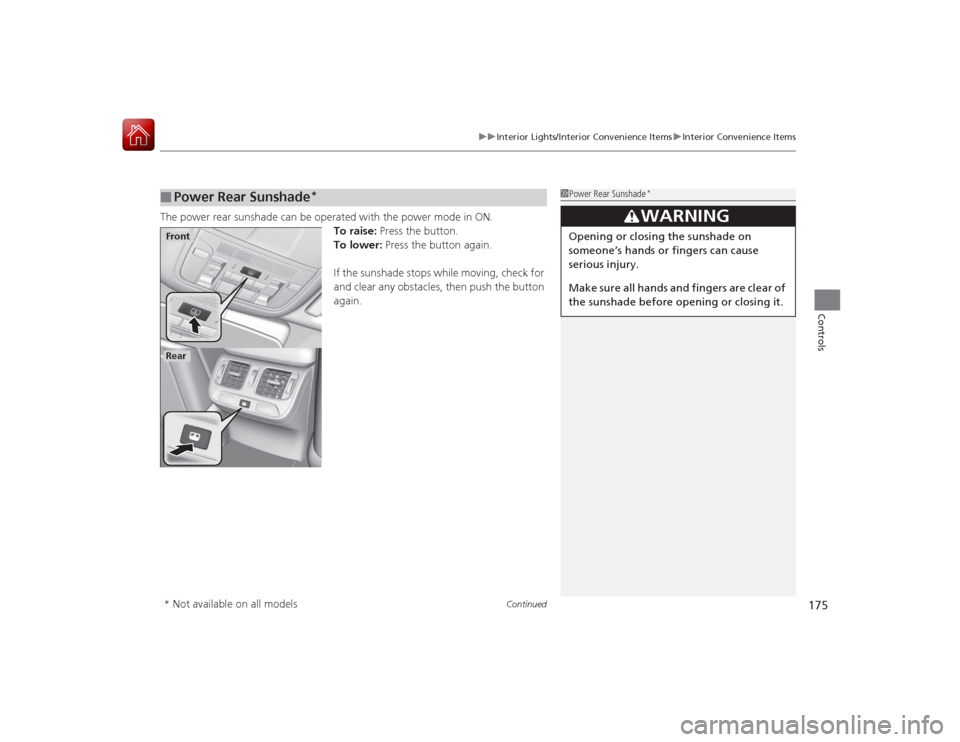
The power rear sunshade can be operated with the power mode in ON.
To raise: Press the button.
To lower: Press the button again.
If the sunshade stops while moving, check for
and clear any obstacles, then push the button
again.■
Power Rear Sunshade
*
1 Power Rear Sunshade
*
3
WARNING
Opening or closing the sunshade on
someone’s hands or fingers can cause
serious injury.
Make sure all hands and fingers are clear of
the sunshade before openin g or closing it.
FrontRear* Not available on all models
Page 177 of 521
uuInterior Lights/Interior Convenience Items uInterior Convenience Items
176Controls
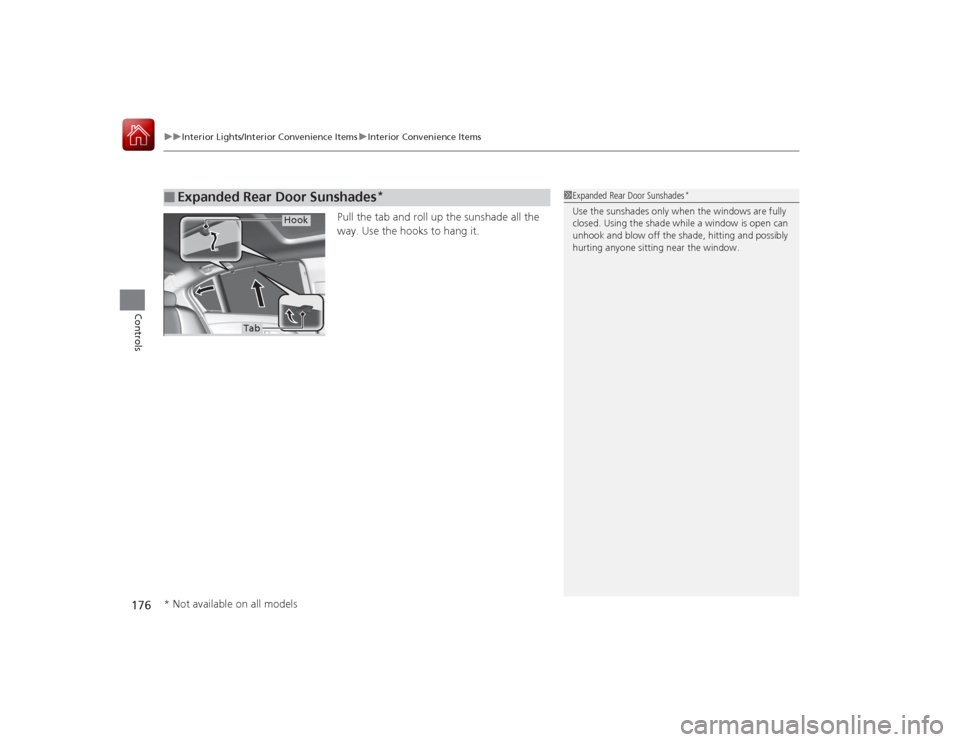
Pull the tab and roll up the sunshade all the
way. Use the hooks to hang it.
■
Expanded Rear Door Sunshades
*
1Expanded Rear Door Sunshades
*
Use the sunshades only when the windows are fully
closed. Using the shade while a window is open can
unhook and blow off the shade, hitting and possibly
hurting anyone sitting near the window.
Hook
Tab
* Not available on all models
Page 181 of 521
uuClimate Control System uUsing Automatic Climate Control
180Controls
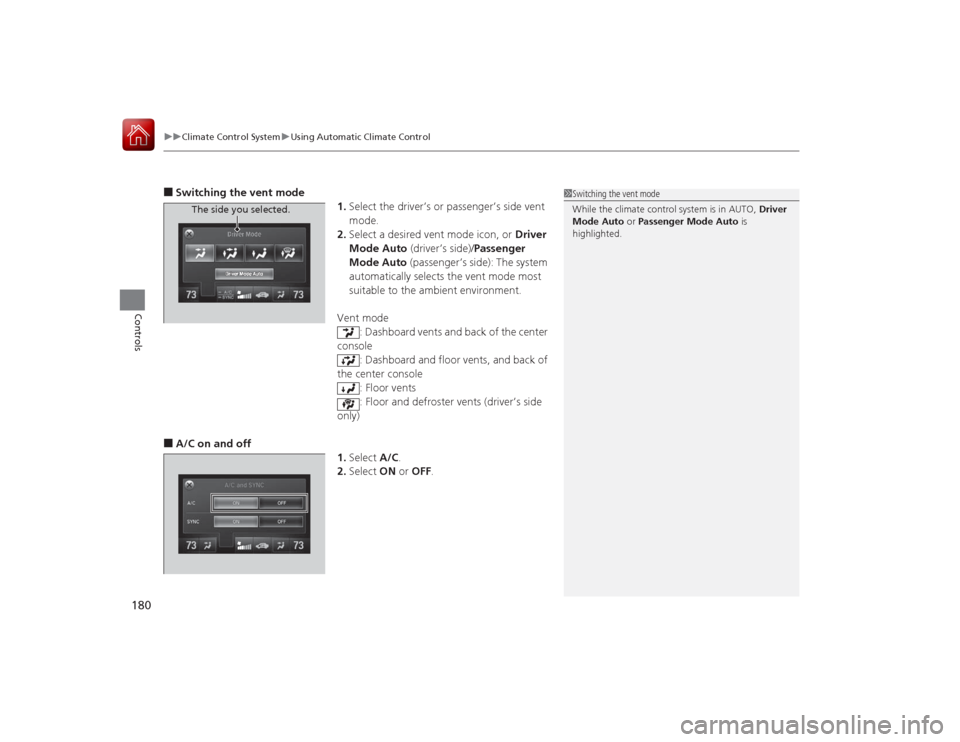
■Switching the vent mode
1.Select the driver’s or passenger’s side vent
mode.
2. Select a desired vent mode icon, or Driver
Mode Auto (driver’s side)/ Passenger
Mode Auto (passenger’s side): The system
automatically selects the vent mode most
suitable to the ambient environment.
Vent mode : Dashboard vents and back of the center
console
: Dashboard and floor vents, and back of
the center console : Floor vents
: Floor and defroster vents (driver’s side
only)■A/C on and off 1.Select A/C.
2. Select ON or OFF .
1Switching the vent mode
While the climate control system is in AUTO, Driver
Mode Auto or Passenger Mode Auto is
highlighted.
The side you selected.
Page 182 of 521

Continued
181
uuClimate Control System uUsing Automatic Climate Control
Controls
■SYNC on and off
1.Select SYNC.
2. Select ON for synchronized mode, and OFF
for dual mode.
u When in synchronized mode, the
passenger’s side temperature and vent
mode become the same as the driver’s
side settings.
3. Adjust the temperature or change the
mode from the driver’s side.■Changing the fan speed
1.Select .
2. Change the fan speed with one of the
following:
The fan speed level indicators: Select your
desired speed level. The smaller indicator is
for a slower speed, and the larger for a
faster speed.
(+
/(-
: To go up or down one level at a
time.
Fan AUTO : The system automatically
selects the fan speed most suitable to the
ambient environment.
1 SYNC on and off
When you press the button, the system changes
to synchronized mode.
When the system is in dual mode, the driver’s side
temperature and vent mode, and the passenger’s
side temperature and vent mode can be set
separately.You can also return to dual mode by changing the
passenger’s side temperature or switching the vent mode.The system adjusts each temperature based on the
information of the sunlight sensor and the sun
position updated by the navigation system’s GPS.Models with navigation system1Changing the fan speed
While the climate control system is in AUTO, Fan
AUTO is highlighted.
Fan Speed Level Indicators
Page 183 of 521
uuClimate Control System uUsing Automatic Climate Control
182Controls
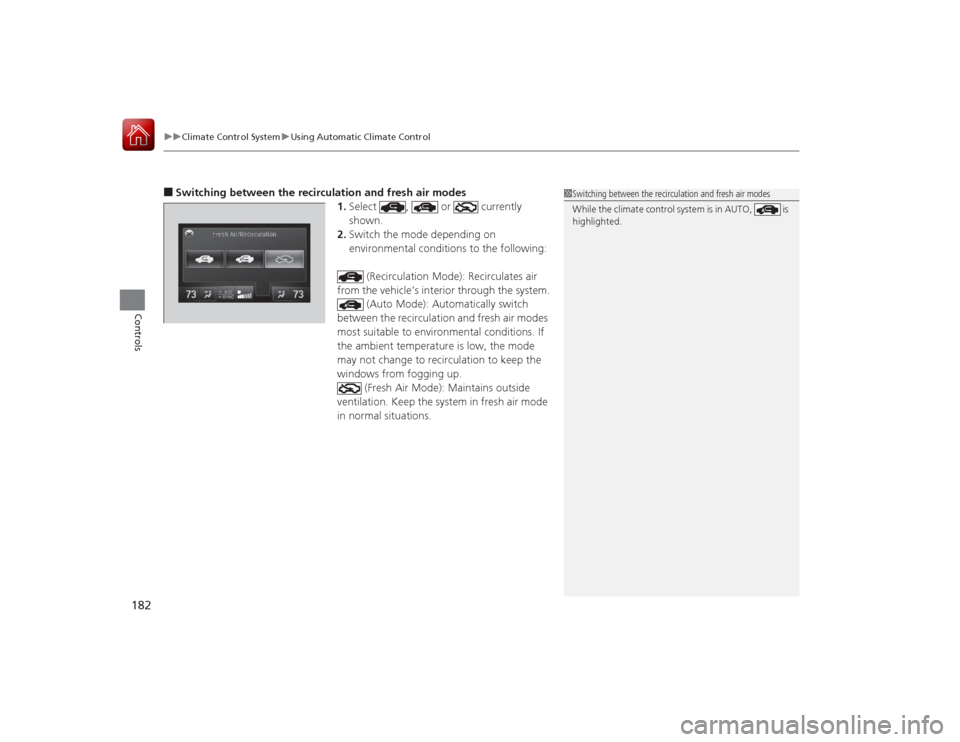
■Switching between the recirculation and fresh air modes
1.Select , or currently
shown.
2. Switch the mode depending on
environmental conditions to the following:
(Recirculation Mode): Recirculates air
from the vehicle’s interior through the system. (Auto Mode): Automatically switch
between the recirculation and fresh air modes
most suitable to environme ntal conditions. If
the ambient temperature is low, the mode
may not change to recirculation to keep the
windows from fogging up. (Fresh Air Mode): Maintains outside
ventilation. Keep the system in fresh air mode
in normal situations.
1 Switching between the recirculation and fresh air modes
While the climate control system is in AUTO, is
highlighted.
Page 190 of 521
189
uuAudio System uUSB Port
Features
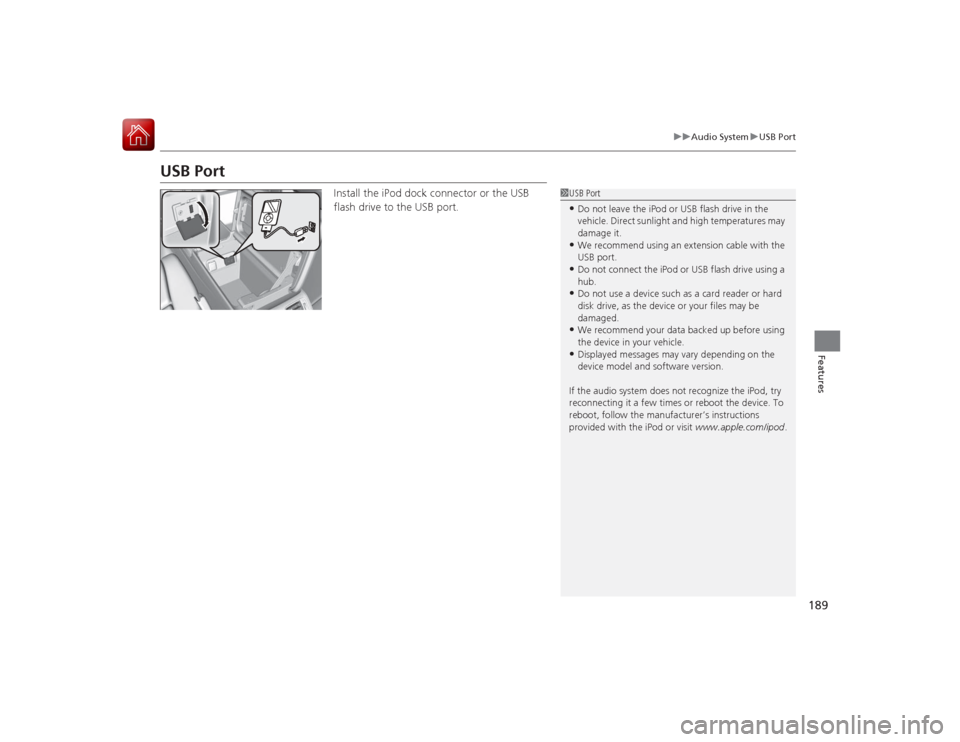
USB Port
Install the iPod dock connector or the USB
flash drive to the USB port.
1USB Port•Do not leave the iPod or USB flash drive in the
vehicle. Direct sunlight and high temperatures may
damage it.•We recommend using an extension cable with the
USB port.•Do not connect the iPod or USB flash drive using a
hub.•Do not use a device such as a card reader or hard
disk drive, as the device or your files may be
damaged.•We recommend your data backed up before using
the device in your vehicle.•Displayed messages may vary depending on the
device model and software version.
If the audio system does not recognize the iPod, try
reconnecting it a few times or reboot the device. To
reboot, follow the manufacturer’s instructions
provided with the iPod or visit www.apple.com/ipod.
Page 209 of 521
208
uuAudio System Basic Operation uVoice Control Operation
Features
Voice Control OperationYour vehicle has a voice control system that allows hands-free operation of most of
the navigation
*/audio system functions.
The voice control system uses the (Talk) and (hang-up/back) buttons on the
steering wheel and a microphone near the map lights on the ceiling.
To achieve optimum voice recognition when using the voice control system:
• Make sure the correct screen is displayed for the voice command that you are
using.
• Close the windows and moonroof.
• Adjust the dashboard and side vents so air does not blow onto the microphone
on the ceiling.
• Speak clearly in a clear, natural speaking voice without pausing between words.
• Reduce any background noise if possible. The system may misinterpret your
command if more than one person is speaking at the same time.
• Refer to the Voice Help feature.
2 Refer to the Navigation System Manual
*
■
Voice Recognition
1Voice Control Operation
When you press the button, a helpful prompt asks
what you would like to do. Press and release the
button again to bypass this prompt and give a
command.1Voice Recognition
The voice control system can only be used from the
driver’s seat because the microphone unit removes
noises from the front passenger’s side.
* Not available on all models
Page 230 of 521

Continued
229
uuAudio System Basic Operation uPlaying Hard Disc Drive (HDD) Audio
Features
1. Press the MENU button.
2. Rotate to select Music Search, then
press .
3. Rotate , move or , then press to
select a track from the Music Search list.
u Title information is displayed if found in
the Gracenote ® Album Info (Gracenote ®
Media Database) stored on the HDD.
u The HDD has two types of playlists:
original playlists and user playlists. An
original playlist is automatically created
for each album when a music CD is
recorded. You can customize up to six
user playlists provided on the HDD by
adding tracks from your original playlists.
You can also select a track by the following
procedure.
1. Rotate or press to display the song
list.
2. Rotate , move or , then press to
select a track from the list.
■
How to Select a Track from the Music Search List
1How to Select a Track from the Music Search List
You can control the HDD audio using voice
commands.
2 Voice Control Operation P. 208
2 Song By Voice
TM (SBV) P. 241
Music tracks recorded on HDD cannot be recorded
onto CDs or other devices.
Tracks are recorded at four times the playback speed
using ultra-efficient compression technology;
therefore, sound quality may vary slightly from the
original.
If the HDD is ever replaced, all music data is lost and
cannot be recovered.
If there is a problem, you may see an error message
on the display. 2 Hard Disc Drive (HDD) Audio P. 254