lock Acura RLX 2017 Quick Guide
[x] Cancel search | Manufacturer: ACURA, Model Year: 2017, Model line: RLX, Model: Acura RLX 2017Pages: 73, PDF Size: 7.37 MB
Page 21 of 73
34 || 35
V EHICLE C ONTROLS
V
EHICLE C ONTROLS
TABLE OF
CONTENTS
INDEX
VISUAL INDEX
VOICE COMMAND INDEX
SAFETY
INFORMATION
CLIENT
INFORMATION
INSTRUMENT PANEL
SPECIFICATIONS
VEHICLE
CONTROLS
MAINTENANCE
AUDIO AND
CONNECTIVITY
HANDLING THE UNEXPECTED
BLUETOOTH®
HANDSFREELINK®
DRIVING
ACURALINK®
NAVIGATION
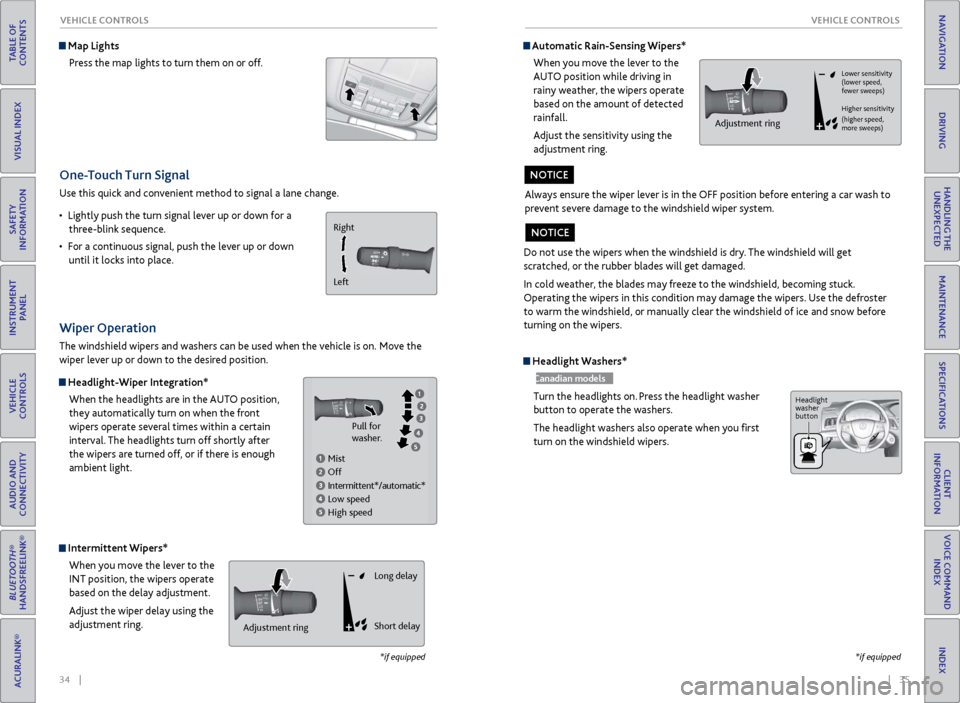
One-Touch Turn Signal
Use this quick and convenient method to signal a lane change.
•
Lightl
y push the turn signal lever up or down for a
three-blink sequence.
•
F
or a continuous signal, push the lever up or down
until it locks into place.
*if equipped
Wiper Operation
The windshield wipers and washers can be used when the vehicle is on. Move the
wiper lever up or down to the desired position.
Headlight-Wiper Integration*
When the headlights are in the AUTO position,
they automatically turn on when the front
wipers operate several times within a certain
interval. The headlights turn off shortly after
the wipers are turned off, or if there is enough
ambient light.
Intermittent Wipers*When you move the lever to the
INT position, the wipers operate
based on the delay adjustment.
Adjust the wiper delay using the
adjustment ring.
Map LightsPress the map lights to turn them on or off.
Right
Left
Mist
Off
Intermittent*/automatic*
Low speed
High speed Pull for
washer.
Headlight Washers*
Canadian models
Turn the headlights on. Press the headlight washer
button to operate the washers.
The headlight washers also operate when you first
turn on the windshield wipers.
*if equipped
Automatic Rain-Sensing Wipers*
When you move the lever to the
AUTO position while driving in
rainy weather, the wipers operate
based on the amount of detected
rainfall.
Adjust the sensitivity using the
adjustment ring.
Always ensure the wiper lever is in the OFF position before entering a car wash to
prevent severe damage to the windshield wiper system.
NOTICE
Adjustment ringAdjustment ring Long delay
Short delay
Do not use the wipers when the windshield is dry. The windshield will get
scratched, or the rubber blades will get damaged.
In cold weather, the blades may freeze to the windshield, becoming stuck.
Operating the wipers in this condition may damage the wipers. Use the defroster
to warm the windshield, or manually clear the windshield of ice and snow before
turning on the wipers.
NOTICE
Lower sensitivity
(lower speed,
fewer sweeps)
Higher sensitivity
(higher speed,
more sweeps)
Adjustment ring
Headlight
washer
button
Page 22 of 73
36 || 37
V EHICLE C ONTROLS
V
EHICLE C ONTROLS
TABLE OF
CONTENTS
INDEX
VISUAL INDEX
VOICE COMMAND INDEX
SAFETY
INFORMATION
CLIENT
INFORMATION
INSTRUMENT PANEL
SPECIFICATIONS
VEHICLE
CONTROLS
MAINTENANCE
AUDIO AND
CONNECTIVITY
HANDLING THE UNEXPECTED
BLUETOOTH®
HANDSFREELINK®
DRIVING
ACURALINK®
NAVIGATION
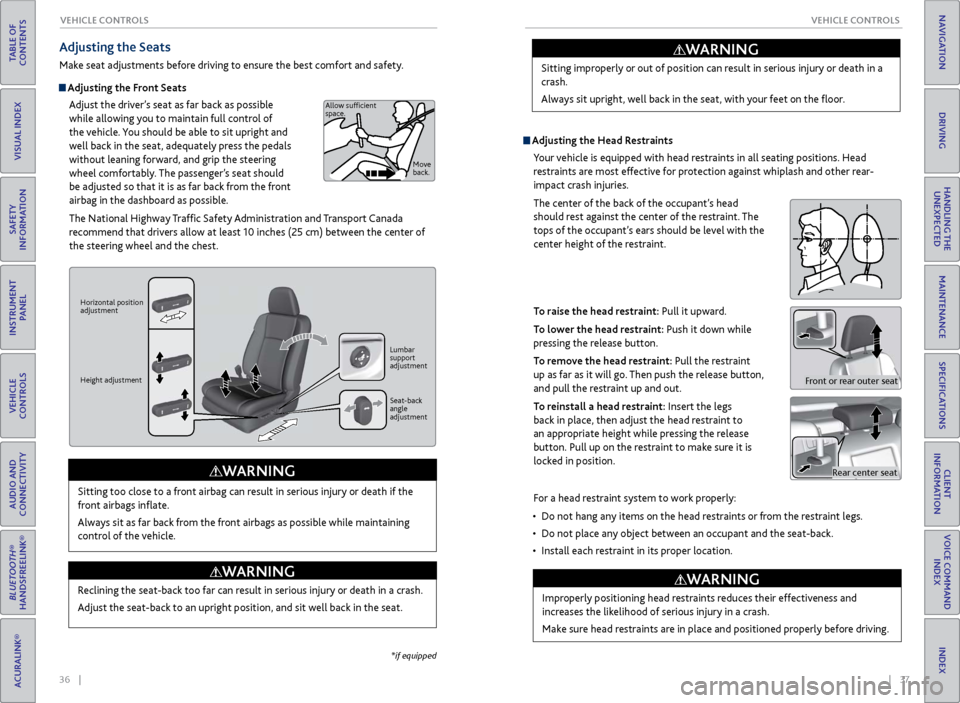
Adjusting the Seats
Make seat adjustments before driving to ensure the best comfort and safety.
Adjusting the Front Seats
Adjust the driver’s seat as far back as possible
while allowing you to maintain full control of
the vehicle. You should be able to sit upright and
well back in the seat, adequately press the pedals
without leaning forward, and grip the steering
wheel comfortably. The passenger’s seat should
be adjusted so that it is as far back from the front
airbag in the dashboard as possible.
The National Highway Traffic Safety Administration and Transport Canada
recommend that drivers allow at least 10 inches (25 cm) between the center of
the steering wheel and the chest.
Sitting too close to a front airbag can result in serious injury or death if the
front airbags inflate.
Always sit as far back from the front airbags as possible while maintaining
control of the vehicle.
WARNING
Allow sufficient
space. Move
back.
Horizontal position
adjustment
Height adjustment Lumbar
support
adjustment
Seat-back
angle
adjustment
Reclining the seat-back too far can result in serious injury or death in a crash.
Adjust the seat-back to an upright position, and sit well back in the seat.
WARNING
*if equipped
Adjusting the
Head Restraints
Your vehicle is equipped with head restraints in all seating positions. Head
restraints are most effective for protection against whiplash and other rear-
impact crash injuries.
The center of the back of the occupant’s head
should rest against the center of the restraint. The
tops of the occupant’s ears should be level with the
center height of the restraint.
To raise the head restraint: Pull it upward.
To lower the head restraint: Push it down while
pressing the release button.
To remove the head restraint: Pull the restraint
up as far as it will go. Then push the release button,
and pull the restraint up and out.
To reinstall a head restraint: Insert the legs
back in place, then adjust the head restraint to
an appropriate height while pressing the release
button. Pull up on the restraint to make sure it is
locked in position. Sitting improperly or out of position can result in serious injury or death in a
crash.
Always sit upright, well back in the seat, with your feet on the floor.
WARNING
Rear center seat
Front or rear outer seat
For a head restraint system to work properly:
•
Do not hang an
y items on the head restraints or from the restraint legs.
•
Do not place an
y object between an occupant and the seat-back.
•
Install each r
estraint in its proper location.
Improperly positioning head restraints reduces their effectiveness and
increases the likelihood of serious injury in a crash.
Make sure head restraints are in place and positioned properly before driving.
WARNING
Page 23 of 73
38 || 39
V EHICLE C ONTROLS
V
EHICLE C ONTROLS
TABLE OF
CONTENTS
INDEX
VISUAL INDEX
VOICE COMMAND INDEX
SAFETY
INFORMATION
CLIENT
INFORMATION
INSTRUMENT PANEL
SPECIFICATIONS
VEHICLE
CONTROLS
MAINTENANCE
AUDIO AND
CONNECTIVITY
HANDLING THE UNEXPECTED
BLUETOOTH®
HANDSFREELINK®
DRIVING
ACURALINK®
NAVIGATION
Failure to reinstall, or correctly reinstall, the head restraints can result in
severe injury during a crash.
Always replace the head restraints before driving.
WARNING
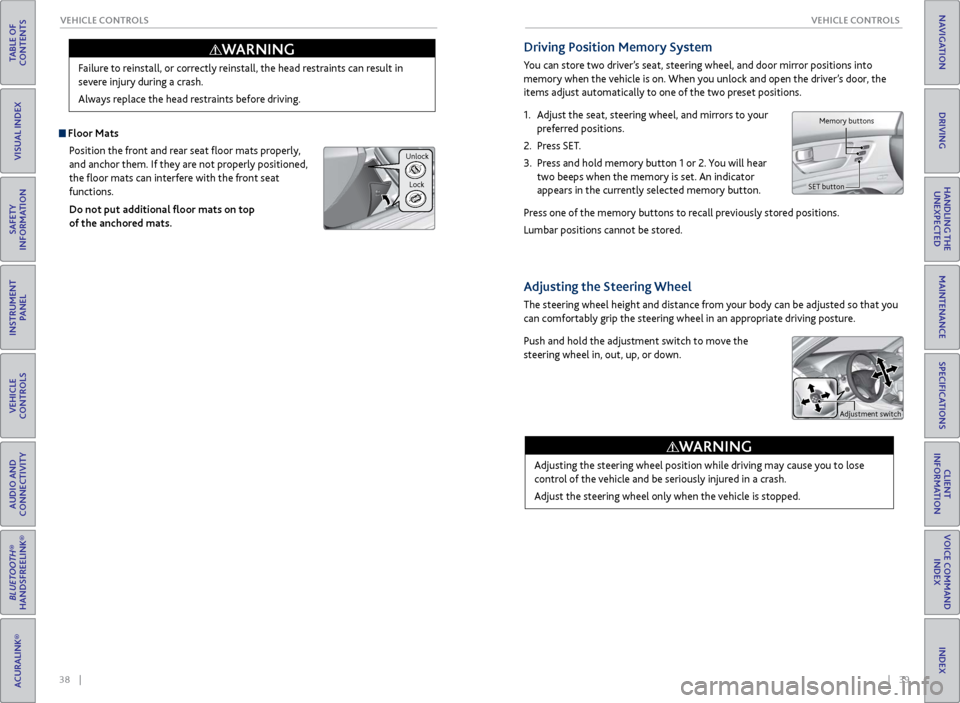
Floor Mats
Position the front and rear seat floor mats properly,
and anchor them. If they are not properly positioned,
the floor mats can interfere with the front seat
functions.
Do not put additional floor mats on top
of the anchored mats.
Unlock
Lock
Driving Position Memory System
You can store two driver’s seat, steering wheel, and door mirror positions into
memory when the vehicle is on. When you unlock and open the driver’s door, the
items adjust automatically to one of the two preset positions.
1.
A
djust the seat, steering wheel, and mirrors to your
preferred positions.
2.
Pr
ess SET.
3.
Pr
ess and hold memory button 1 or 2. You will hear
two beeps when the memory is set. An indicator
appears in the currently selected memory button.
Press one of the memory buttons to recall previously stored positions.
Lumbar positions cannot be stored.
Adjusting the Steering Wheel
The steering wheel height and distance from your body can be adjusted so that you
can comfortably grip the steering wheel in an appropriate driving posture.
Push and hold the adjustment switch to move the
steering wheel in, out, up, or down.
Adjusting the steering wheel position while driving may cause you to lose
control of the vehicle and be seriously injured in a crash.
Adjust the steering wheel only when the vehicle is stopped.
WARNING
Memory buttons
SET button
Adjustment switch
Page 24 of 73
40 || 41
V EHICLE C ONTROLS
V
EHICLE C ONTROLS
TABLE OF
CONTENTS
INDEX
VISUAL INDEX
VOICE COMMAND INDEX
SAFETY
INFORMATION
CLIENT
INFORMATION
INSTRUMENT PANEL
SPECIFICATIONS
VEHICLE
CONTROLS
MAINTENANCE
AUDIO AND
CONNECTIVITY
HANDLING THE UNEXPECTED
BLUETOOTH®
HANDSFREELINK®
DRIVING
ACURALINK®
NAVIGATION
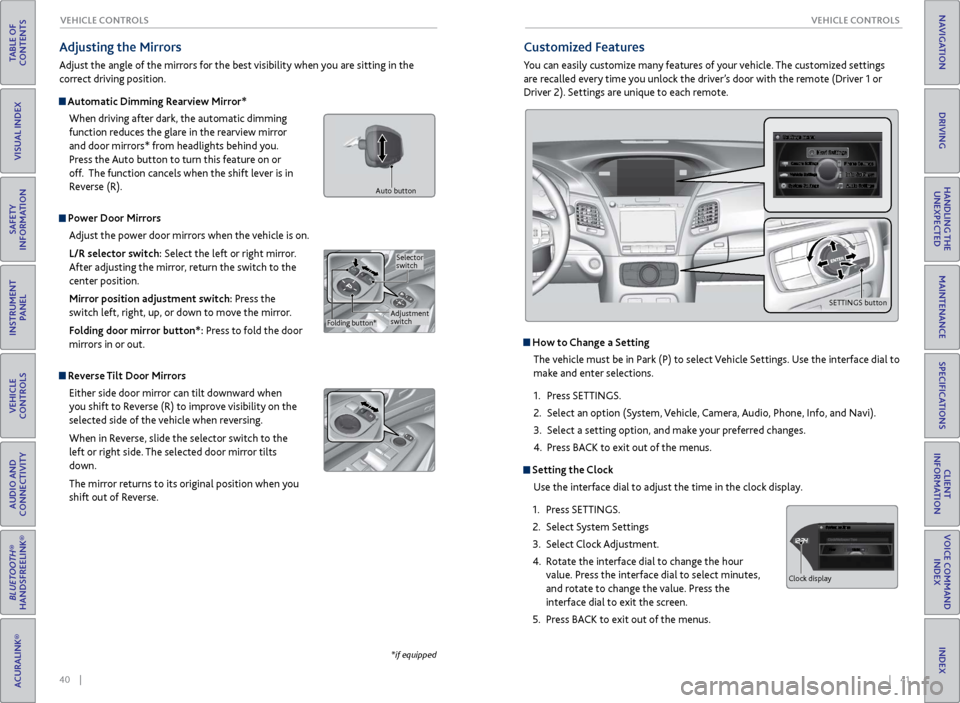
Adjusting the Mirrors
Adjust the angle of the mirrors for the best visibility when you are sitting in the
correct driving position.
Automatic Dimming Rearview Mirror*
When driving after dark, the automatic dimming
function reduces the glare in the rearview mirror
and door mirrors* from headlights behind you.
Press the Auto button to turn this feature on or
off. The function cancels when the shift lever is in
Reverse (R).
Power Door MirrorsAdjust the power door mirrors when the vehicle is on.
L/R selector switch: Select the left or right mirror.
After adjusting the mirror, return the switch to the
center position.
Mirror position adjustment switch: Press the
switch left, right, up, or down to move the mirror.
Folding door mirror button*: Press to fold the door
mirrors in or out.
Reverse Tilt Door MirrorsEither side door mirror can tilt downward when
you shift to Reverse (R) to improve visibility on the
selected side of the vehicle when reversing.
When in Reverse, slide the selector switch to the
left or right side. The selected door mirror tilts
down.
The mirror returns to its original position when you
shift out of Reverse.
*if equipped
Customized Features
You can easily customize many features of your vehicle. The customized settings
are recalled every time you unlock the driver’s door with the remote (Driver 1 or
Driver 2). Settings are unique to each remote.
How to Change a Setting
The vehicle must be in Park (P) to select Vehicle Settings. Use the interface dial to
make and enter selections.
1.
Pr
ess SETTINGS.
2.
Select an
option (System, Vehicle, Camera, Audio, Phone, Info, and Navi).
3.
Select a setting
option, and make your preferred changes.
4.
Pr
ess BACK to exit out of the menus.
Setting the Clock
Use the interface dial to adjust the time in the clock display.
1.
Pr
ess SETTINGS.
2.
Select S
ystem Settings
3.
Select
Clock Adjustment.
4.
R
otate the interface dial to change the hour
value. Press the interface dial to select minutes,
and rotate to change the value. Press the
interface dial to exit the screen.
5.
Pr
ess BACK to exit out of the menus.
Adjustment
switchSelector
switch
Folding button*
Auto button
SETTINGS button
Hour
Clock/Wallpaper Type
System settings
Clock display
Page 36 of 73
64 || 65
TABLE OF
CONTENTS
INDEX
VISUAL INDEX
VOICE COMMAND INDEX
SAFETY
INFORMATION
CLIENT
INFORMATION
INSTRUMENT PANEL
SPECIFICATIONS
VEHICLE
CONTROLS
MAINTENANCE
AUDIO AND
CONNECTIVITY
HANDLING THE UNEXPECTED
BLUETOOTH®
HANDSFREELINK®
DRIVING
ACURALINK®
NAVIGATION
Subscription Features
A subscription-based service that provides convenient features, such as collision
notification, emergency assistance, online security, and important messages about
your vehicle. Requires enrollment and privacy agreement. To subscribe or get more
information, contact a dealer or visit owners.acura.com (U.S.) or www.myacura.ca
(Canada).
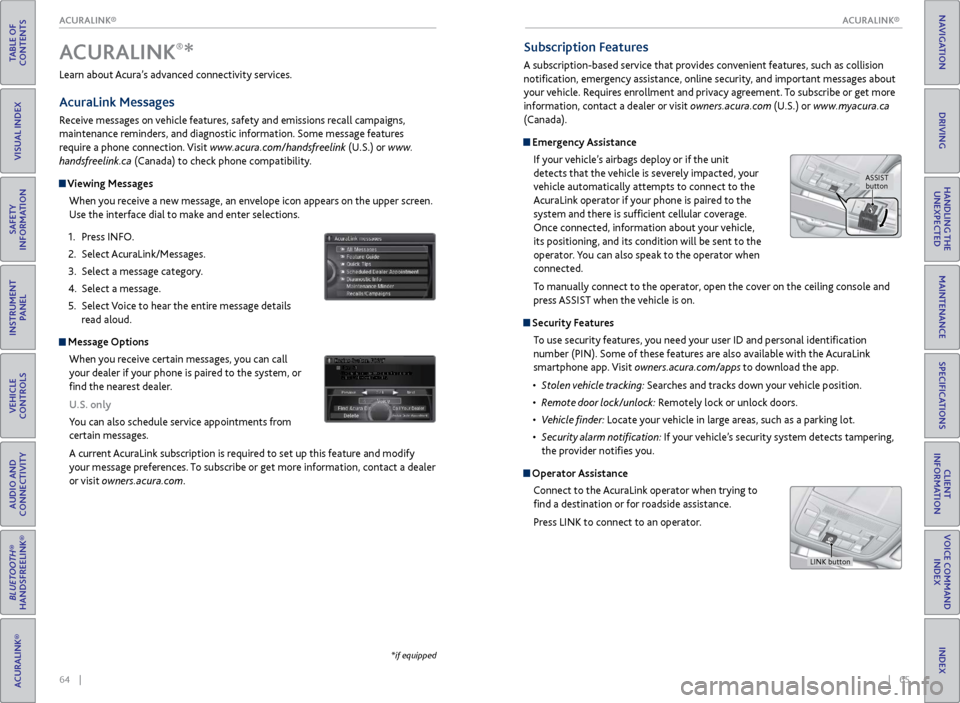
Emergency Assistance
If your vehicle’s airbags deploy or if the unit
detects that the vehicle is severely impacted, your
vehicle automatically attempts to connect to the
AcuraLink operator if your phone is paired to the
system and there is sufficient cellular coverage.
Once connected, information about your vehicle,
its positioning, and its condition will be sent to the
operator. You can also speak to the operator when
connected.
To manually connect to the operator, open the cover on the ceiling console and
press ASSIST when the vehicle is on.
Security Features
To use security features, you need your user ID and personal identification
number (PIN). Some of these features are also available with the AcuraLink
smartphone app. Visit owners.acura.com/apps to download the app.
•
S
tolen vehicle tracking: Searches and tracks down your vehicle position.
•
R
emote door lock/unlock: Remotely lock or unlock doors.
•
V
ehicle finder: Locate your vehicle in large areas, such as a parking lot.
•
S
ecurity alarm notification: If your vehicle’s security system detects tampering,
the provider notifies you.
Operator Assistance
Connect to the AcuraLink operator when trying to
find a destination or for roadside assistance.
Press LINK to connect to an operator.
Learn about Acura’s advanced connectivity services.
AcuraLink Messages
Receive messages on vehicle features, safety and emissions recall campaigns,
maintenance reminders, and diagnostic information. Some message features
require a phone connection. Visit www.acura.com/handsfreelink (U.S.) or
www.
handsfreelink.ca (Canada) to check phone compatibility.
Viewing Messages
When you receive a new message, an envelope icon appears on the upper screen.
Use the interface dial to make and enter selections.
1.
Pr
ess INFO.
2.
Select A
curaLink/Messages.
3.
Select a message category
.
4.
Select a message.
5.
Select
Voice to hear the entire message details
read aloud.
Message Options
When you receive certain messages, you can call
your dealer if your phone is paired to the system, or
find the nearest dealer.
U.S. only
You can also schedule service appointments from
certain messages.
A current AcuraLink subscription is required to set up this feature and modify
your message preferences. To subscribe or get more information, contact a dealer
or visit owners.acura.com.
Dec. 31, 2011
ACURALINK®*
*if equipped
ASSIST
button
LINK button
ACURALINK®
ACURALINK®
Page 40 of 73
72 || 73
DRIVING
NAVIGATION
TABLE OF
CONTENTS
INDEX
VISUAL INDEX
VOICE COMMAND INDEX
SAFETY
INFORMATION
CLIENT
INFORMATION
INSTRUMENT PANEL
SPECIFICATIONS
VEHICLE
CONTROLS
MAINTENANCE
AUDIO AND
CONNECTIVITY
HANDLING THE UNEXPECTED
BLUETOOTH®
HANDSFREELINK®
DRIVING
ACURALINK®
NAVIGATION
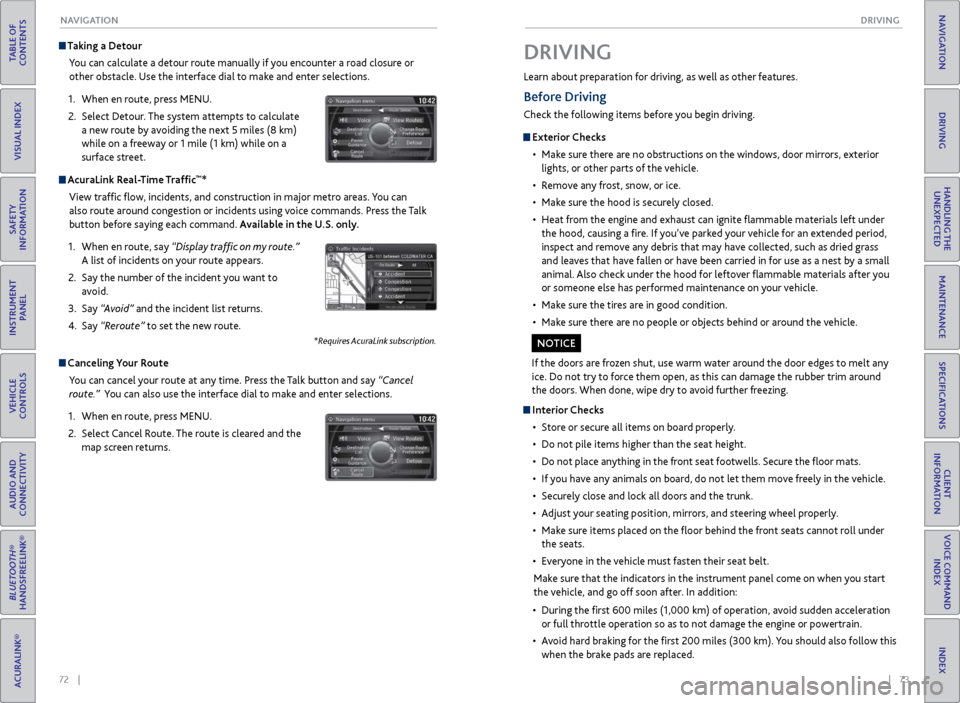
Taking a Detour
You can calculate a detour route manually if you encounter a road closure or
other obstacle. Use the interface dial to make and enter selections.
1.
When en r
oute, press MENU.
2.
Select Detour
. The system attempts to calculate
a new route by avoiding the next 5 miles (8 km)
while on a freeway or 1 mile (1 km) while on a
surface street.
AcuraLink Real-Time Traffic™*
View traffic flow, incidents, and construction in major metro areas. You can
also route around congestion or incidents using voice commands. Press the Talk
button before saying each command. Available in the U.S. only.
1.
When en r
oute, say “Display traffic on my route.”
A list of incidents on your route appears.
2.
Say the
number of the incident you want to
avoid.
3.
Say
“Avoid” and the incident list returns.
4.
Say
“Reroute” to set the new route.
*Requires AcuraLink subscription.
Canceling Your Route You can cancel your route at any time. Press the Talk button and say “Cancel
route.” You can also use the interface dial to make and enter selections.
1.
When en r
oute, press MENU.
2.
Select
Cancel Route. The route is cleared and the
map screen returns.
Learn about preparation for driving, as well as other features.
DRIVING
If the doors are frozen shut, use warm water around the door edges to melt any
ice. Do not try to force them open, as this can damage the rubber trim around
the doors. When done, wipe dry to avoid further freezing.
NOTICE
Interior Checks
•
Stor
e or secure all items on board properly.
•
Do not pile items higher
than the seat height.
•
Do not place an
ything in the front seat footwells. Secure the floor mats.
•
If
you have any animals on board, do not let them move freely in the vehicle.
•
Secur
ely close and lock all doors and the trunk.
•
A
djust your seating position, mirrors, and steering wheel properly.
•
Mak
e sure items placed on the floor behind the front seats cannot roll under
the seats.
•
Ev
eryone in the vehicle must fasten their seat belt.
Make sure that the indicators in the instrument panel come on when you start
the vehicle, and go off soon after. In addition:
•
During
the first 600 miles (1,000 km) of operation, avoid sudden acceleration
or full throttle operation so as to not damage the engine or powertrain.
•
A
void hard braking for the first 200 miles (300 km). You should also follow this
when the brake pads are replaced.
Before Driving
Check the following items before you begin driving.
Exterior Checks
•
Mak
e sure there are no obstructions on the windows, door mirrors, exterior
lights, or other parts of the vehicle.
•
R
emove any frost, snow, or ice.
•
Mak
e sure the hood is securely closed.
•
Heat
from the engine and exhaust can ignite flammable materials left under
the hood, causing a fire. If you’ve parked your vehicle for an extended period,
inspect and remove any debris that may have collected, such as dried grass
and leaves that have fallen or have been carried in for use as a nest by a small
animal. Also check under the hood for leftover flammable materials after you
or someone else has performed maintenance on your vehicle.
•
Mak
e sure the tires are in good condition.
•
Mak
e sure there are no people or objects behind or around the vehicle.
Page 42 of 73
76 || 77
DRIVING
DRIVING
TABLE OF
CONTENTS
INDEX
VISUAL INDEX
VOICE COMMAND INDEX
SAFETY
INFORMATION
CLIENT
INFORMATION
INSTRUMENT PANEL
SPECIFICATIONS
VEHICLE
CONTROLS
MAINTENANCE
AUDIO AND
CONNECTIVITY
HANDLING THE UNEXPECTED
BLUETOOTH®
HANDSFREELINK®
DRIVING
ACURALINK®
NAVIGATION
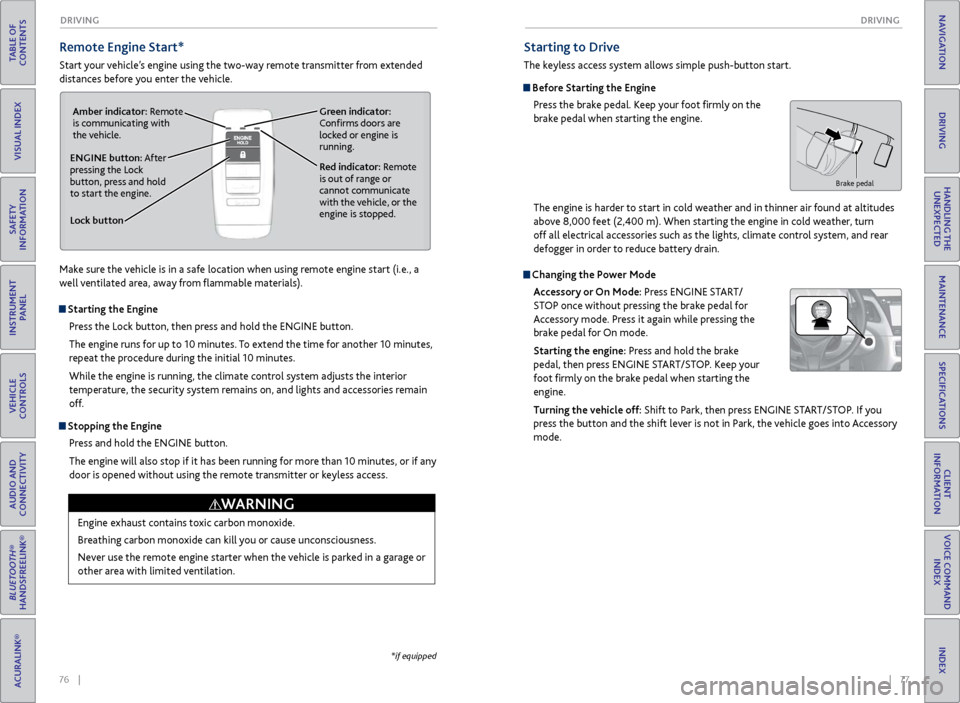
Remote Engine Start*
Start your vehicle’s engine using the two-way remote transmitter from extended
distances before you enter the vehicle.
Lock button
ENGINE button: After
pressing the Lock
button, press and hold
to start the engine.Red indicator: Remote
is out of range or
cannot communicate
with the vehicle, or the
engine is stopped.
Amber indicator: Remote
is communicating with
the vehicle.
Green indicator:
Confirms doors are
locked or engine is
running.
Starting the Engine
Press the Lock button, then press and hold the ENGINE button.
The engine runs for up to 10 minutes. To extend the time for another 10 minutes,
repeat the procedure during the initial 10 minutes.
While the engine is running, the climate control system adjusts the interior
temperature, the security system remains on, and lights and accessories remain
off.
Stopping the EnginePress and hold the ENGINE button.
The engine will also stop if it has been running for more than 10 minutes, or if any
door is opened without using the remote transmitter or keyless access.
Engine exhaust contains toxic carbon monoxide.
Breathing carbon monoxide can kill you or cause unconsciousness.
Never use the remote engine starter when the vehicle is parked in a garage or
other area with limited ventilation.
WARNING
*if equipped
Make sure the vehicle is in a safe location when using remote engine start (i.e., a
well ventilated area, away from flammable materials).
Starting to Drive
The keyless access system allows simple push-button start.
Before Starting the Engine Press the brake pedal. Keep your foot firmly on the
brake pedal when starting the engine.
Changing the Power Mode
Accessory or On Mode: Press ENGINE START/
STOP once without pressing the brake pedal for
Accessory mode. Press it again while pressing the
brake pedal for On mode.
Starting the engine: Press and hold the brake
pedal, then press ENGINE START/STOP. Keep your
foot firmly on the brake pedal when starting the
engine.
Turning the vehicle off: Shift to Park, then press ENGINE START/STOP. If you
press the button and the shift lever is not in Park, the vehicle goes into Accessory
mode.
Brake pedal
The engine is harder to start in cold weather and in thinner air found at altitudes
above 8,000 feet (2,400 m). When starting the engine in cold weather, turn
off all electrical accessories such as the lights, climate control system, and rear
defogger in order to reduce battery drain.
Page 43 of 73
78 || 79
DRIVING
DRIVING
TABLE OF
CONTENTS
INDEX
VISUAL INDEX
VOICE COMMAND INDEX
SAFETY
INFORMATION
CLIENT
INFORMATION
INSTRUMENT PANEL
SPECIFICATIONS
VEHICLE
CONTROLS
MAINTENANCE
AUDIO AND
CONNECTIVITY
HANDLING THE UNEXPECTED
BLUETOOTH®
HANDSFREELINK®
DRIVING
ACURALINK®
NAVIGATION
When you change the shift lever from D to R and vice versa, come to a
complete stop and keep the brake pedal pressed. Operating the shift lever
before the vehicle has come to a complete standstill can damage the
transmission.
Do not operate the shift lever while pressing the accelerator pedal. You could
damage the transmission.
NOTICE
Shifting
Change your vehicle’s gears to begin driving.
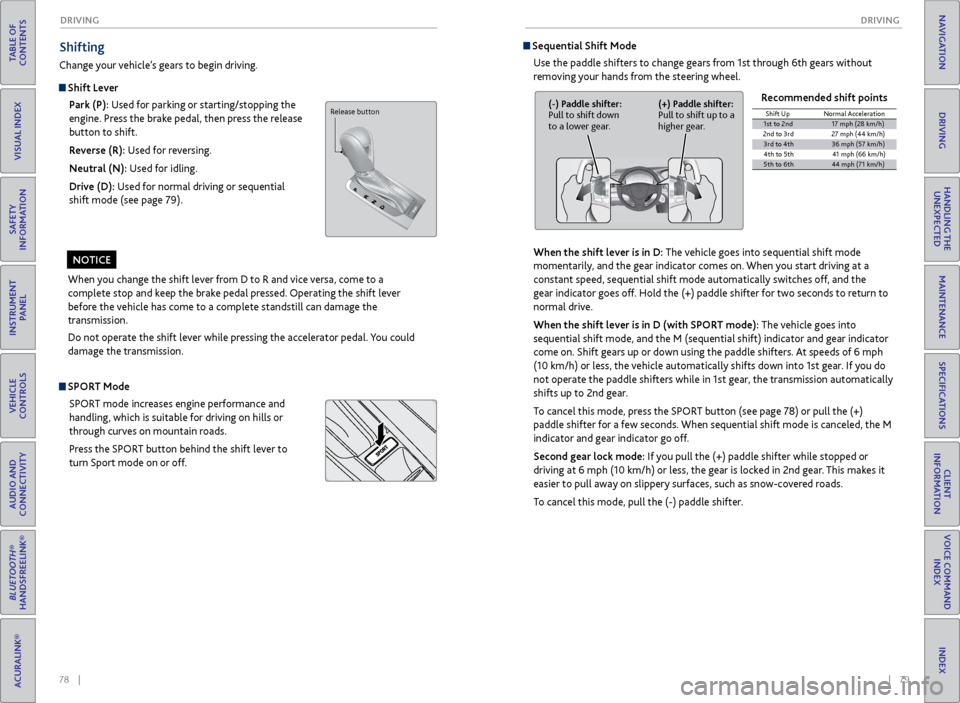
Shift Lever
Park (P): Used for parking or starting/stopping the
engine. Press the brake pedal, then press the release
button to shift.
Reverse (R): Used for reversing.
Neutral (N): Used for idling.
Drive (D): Used for normal driving or sequential
shift mode (see page 79).
Sequential Shift Mode
Use the paddle shifters to change gears from 1st through 6th gears without
removing your hands from the steering wheel.
When the shift lever is in D: The vehicle goes into sequential shift mode
momentarily, and the gear indicator comes on. When you start driving at a
constant speed, sequential shift mode automatically switches off, and the
gear indicator goes off. Hold the (+) paddle shifter for two seconds to return to
normal drive.
When the shift lever is in D (with SPORT mode): The vehicle goes into
sequential shift mode, and the M (sequential shift) indicator and gear indicator
come on. Shift gears up or down using the paddle shifters. At speeds of 6 mph
(10 km/h) or less, the vehicle automatically shifts down into 1st gear. If you do
not operate the paddle shifters while in 1st gear, the transmission automatically
shifts up to 2nd gear.
To cancel this mode, press the SPORT button (see page 78) or pull the (+)
paddle shifter for a few seconds. When sequential shift mode is canceled, the M
indicator and gear indicator go off.
Second gear lock mode: If you pull the (+) paddle shifter while stopped or
driving at 6 mph (10 km/h) or less, the gear is locked in 2nd gear. This makes it
easier to pull away on slippery surfaces, such as snow-covered roads.
To cancel this mode, pull the (-) paddle shifter. Recommended shift points
(-) Paddle shifter:
Pull to shift down
to a lower gear.
(+) Paddle shifter:
Pull to shift up to a
higher gear.Shift Up
Normal Acceleration1st to 2n d17 mph (28 km/h)
2nd to 3r d2 7 mph (44 km/h)
3rd to 4th36 mph (57 km/h)
4th to 5t h4 1 mph (66 km/h )
5th to 6th44 mph (71 km/h)
SPORT Mode
SPORT mode increases engine performance and
handling, which is suitable for driving on hills or
through curves on mountain roads.
Press the SPORT button behind the shift lever to
turn Sport mode on or off.
Release button
Page 44 of 73
80 || 81
DRIVING
DRIVING
TABLE OF
CONTENTS
INDEX
VISUAL INDEX
VOICE COMMAND INDEX
SAFETY
INFORMATION
CLIENT
INFORMATION
INSTRUMENT PANEL
SPECIFICATIONS
VEHICLE
CONTROLS
MAINTENANCE
AUDIO AND
CONNECTIVITY
HANDLING THE UNEXPECTED
BLUETOOTH®
HANDSFREELINK®
DRIVING
ACURALINK®
NAVIGATION
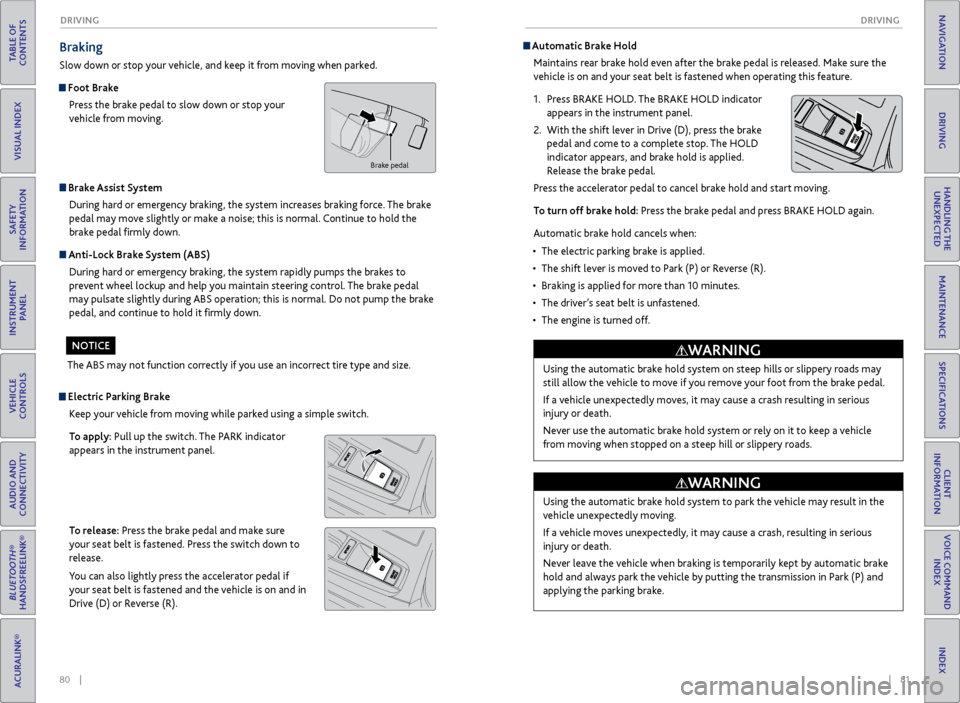
Braking
Slow down or stop your vehicle, and keep it from moving when parked.
Foot Brake
Press the brake pedal to slow down or stop your
vehicle from moving.
Brake Assist System During hard or emergency braking, the system increases braking force. The brake
pedal may move slightly or make a noise; this is normal. Continue to hold the
brake pedal firmly down.
Anti-Lock Brake System (ABS) During hard or emergency braking, the system rapidly pumps the brakes to
prevent wheel lockup and help you maintain steering control. The brake pedal
may pulsate slightly during ABS operation; this is normal. Do not pump the brake
pedal, and continue to hold it firmly down.
The ABS may not function correctly if you use an incorrect tire type and size.
NOTICE
Electric Parking Brake Keep your vehicle from moving while parked using a simple switch.
To apply: Pull up the switch. The PARK indicator
appears in the instrument panel.
To release: Press the brake pedal and make sure
your seat belt is fastened. Press the switch down to
release.
You can also lightly press the accelerator pedal if
your seat belt is fastened and the vehicle is on and in
Drive (D) or Reverse (R).
Automatic Brake HoldMaintains rear brake hold even after the brake pedal is released. Make sure the
vehicle is on and your seat belt is fastened when operating this feature.
1.
Pr
ess BRAKE HOLD. The BRAKE HOLD indicator
appears in the instrument panel.
2.
With
the shift lever in Drive (D), press the brake
pedal and come to a complete stop. The HOLD
indicator appears, and brake hold is applied.
Release the brake pedal.
Press the accelerator pedal to cancel brake hold and start moving.
To turn off brake hold: Press the brake pedal and press BRAKE HOLD again.
Automatic brake hold cancels when:
•
The electric parking brak
e is applied.
•
The shift lev
er is moved to Park (P) or Reverse (R).
•
Braking is applied
for more than 10 minutes.
•
The
driver’s seat belt is unfastened.
•
The
engine is turned off.
Brake pedal
Using the automatic brake hold system on steep hills or slippery roads may
still allow the vehicle to move if you remove your foot from the brake pedal.
If a vehicle unexpectedly moves, it may cause a crash resulting in serious
injury or death.
Never use the automatic brake hold system or rely on it to keep a vehicle
from moving when stopped on a steep hill or slippery roads.
WARNING
Using the automatic brake hold system to park the vehicle may result in the
vehicle unexpectedly moving.
If a vehicle moves unexpectedly, it may cause a crash, resulting in serious
injury or death.
Never leave the vehicle when braking is temporarily kept by automatic brake
hold and always park the vehicle by putting the transmission in Park (P) and
applying the parking brake.
WARNING
Page 53 of 73
98 || 99
HANDLING THE UNEXPECTED
HANDLING THE UNEXPECTED
TABLE OF
CONTENTS
INDEX
VISUAL INDEX
VOICE COMMAND INDEX
SAFETY
INFORMATION
CLIENT
INFORMATION
INSTRUMENT PANEL
SPECIFICATIONS
VEHICLE
CONTROLS
MAINTENANCE
AUDIO AND
CONNECTIVITY
HANDLING THE UNEXPECTED
BLUETOOTH®
HANDSFREELINK®
DRIVING
ACURALINK®
NAVIGATION
HANDLING THE UNEXPECTED
Learn about what to do in critical or emergency situations.
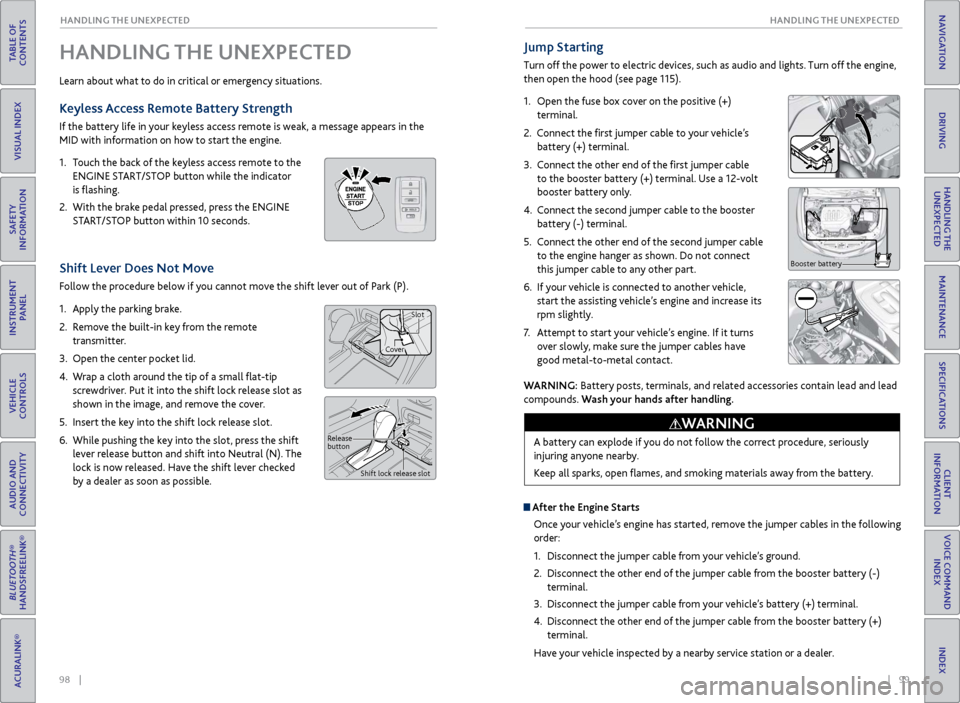
Keyless Access Remote Battery Strength
If the battery life in your keyless access remote is weak, a message appears in the
MID with information on how to start the engine.
1.
T
ouch the back of the keyless access remote to the
ENGINE START/STOP button while the indicator
is flashing.
2.
With
the brake pedal pressed, press the ENGINE
START/STOP button within 10 seconds.
Shift Lever Does Not Move
Follow the procedure below if you cannot move the shift lever out of Park (P).
1.
Appl
y the parking brake.
2.
R
emove the built-in key from the remote
transmitter.
3.
Open
the center pocket lid.
4.
W
rap a cloth around the tip of a small flat-tip
screwdriver. Put it into the shift lock release slot as
shown in the image, and remove the cover.
5.
Insert
the key into the shift lock release slot.
6.
While pushing
the key into the slot, press the shift
lever release button and shift into Neutral (N). The
lock is now released. Have the shift lever checked
by a dealer as soon as possible.
Jump Starting
Turn off the power to electric devices, such as audio and lights. Turn off the engine,
then open the hood (see page 115).
1.
Open the fuse box cover on the positive (+)
terminal.
2.
Connect the first jumper cable to your vehicle’s battery (+) terminal.
3.
C
onnect the other end of the first jumper cable
to the booster battery (+) terminal. Use a 12-volt
booster battery only.
4.
C
onnect the second jumper cable to the booster
battery (-) terminal.
5.
C
onnect the other end of the second jumper cable
to the engine hanger as shown. Do not connect
this jumper cable to any other part.
6.
If
your vehicle is connected to another vehicle,
start the assisting vehicle’s engine and increase its
rpm slightly.
7.
A
ttempt to start your vehicle’s engine. If it turns
over slowly, make sure the jumper cables have
good metal-to-metal contact.
Booster battery
WARNING: Battery posts, terminals, and related accessories contain lead and lead
compounds. Wash your hands after handling.
A battery can explode if you do not follow the correct procedure, seriously
injuring anyone nearby.
Keep all sparks, open flames, and smoking materials away from the battery.
WARNING
Release
button Shift lock release slot
CoverSlot
After the Engine Starts
Once your vehicle’s engine has started, remove the jumper cables in the following
order:
1.
Disconnect
the jumper cable from your vehicle’s ground.
2.
Disconnect
the other end of the jumper cable from the booster battery (-)
terminal.
3.
Disconnect
the jumper cable from your vehicle’s battery (+) terminal.
4.
Disconnect
the other end of the jumper cable from the booster battery (+)
terminal.
Have your vehicle inspected by a nearby service station or a dealer.