change wheel Acura RLX 2017 Quick Guide
[x] Cancel search | Manufacturer: ACURA, Model Year: 2017, Model line: RLX, Model: Acura RLX 2017Pages: 73, PDF Size: 7.37 MB
Page 17 of 73
26 || 27
I NSTRUMENT P
ANELI
NSTRUMENT P
ANEL
TABLE OF
CONTENTS
INDEX
VISUAL INDEX
VOICE COMMAND INDEX
SAFETY
INFORMATION
CLIENT
INFORMATION
INSTRUMENT PANEL
SPECIFICATIONS
VEHICLE
CONTROLS
MAINTENANCE
AUDIO AND
CONNECTIVITY
HANDLING THE UNEXPECTED
BLUETOOTH®
HANDSFREELINK®
DRIVING
ACURALINK®
NAVIGATION
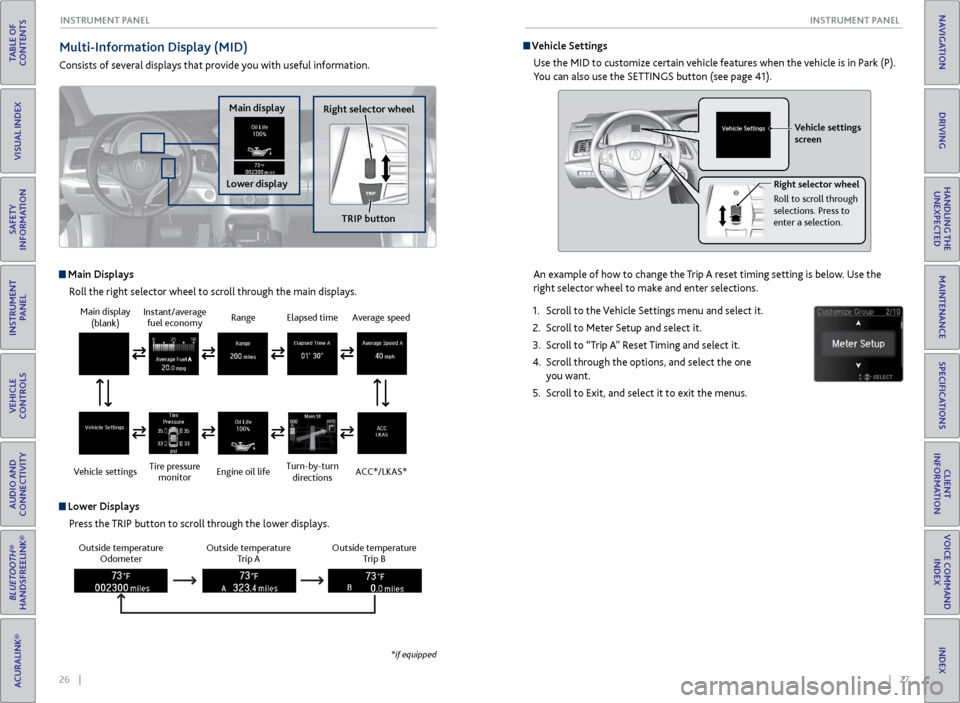
Multi-Information Display (MID)
Consists of several displays that provide you with useful information.
Main Displays
Roll the right selector wheel to scroll through the main displays.
Outside temperature Odometer Outside temperature
Trip A Outside temperature
Trip B
Lower Displays
Press the TRIP button to scroll through the lower displays.
Main display (blank)
Vehicle settings Instant/average
fuel economy
Tire pressure monitor Range
Engine oil lifeElapsed time
Turn-by-turn directionsAverage speed
ACC*/LKAS*
*if equipped
Main display
Lower displayRight selector wheel
TRIP button
Vehicle SettingsUse the MID to customize certain vehicle features when the vehicle is in Park (P).
You can also use the SETTINGS button (see page 41).
An example of how to change the Trip A reset timing setting is below. Use the
right selector wheel to make and enter selections.
1.
Scr
oll to the Vehicle Settings menu and select it.
2.
Scr
oll to Meter Setup and select it.
3.
Scr
oll to “Trip A” Reset Timing and select it.
4.
Scr
oll through the options, and select the one
you want.
5.
Scr
oll to Exit, and select it to exit the menus.
Vehicle settings
screen
Right selector wheel
Roll to scroll through
selections. Press to
enter a selection.
Page 27 of 73
46 || 47
AUDIO AND CONNECTIVITY
AUDIO AND CONNECTIVITY
TABLE OF
CONTENTS
INDEX
VISUAL INDEX
VOICE COMMAND INDEX
SAFETY
INFORMATION
CLIENT
INFORMATION
INSTRUMENT PANEL
SPECIFICATIONS
VEHICLE
CONTROLS
MAINTENANCE
AUDIO AND
CONNECTIVITY
HANDLING THE UNEXPECTED
BLUETOOTH®
HANDSFREELINK®
DRIVING
ACURALINK®
NAVIGATION
Learn how to operate the vehicle’s audio system.
Basic Audio Operation
Connect audio devices and operate buttons and displays for the audio system.
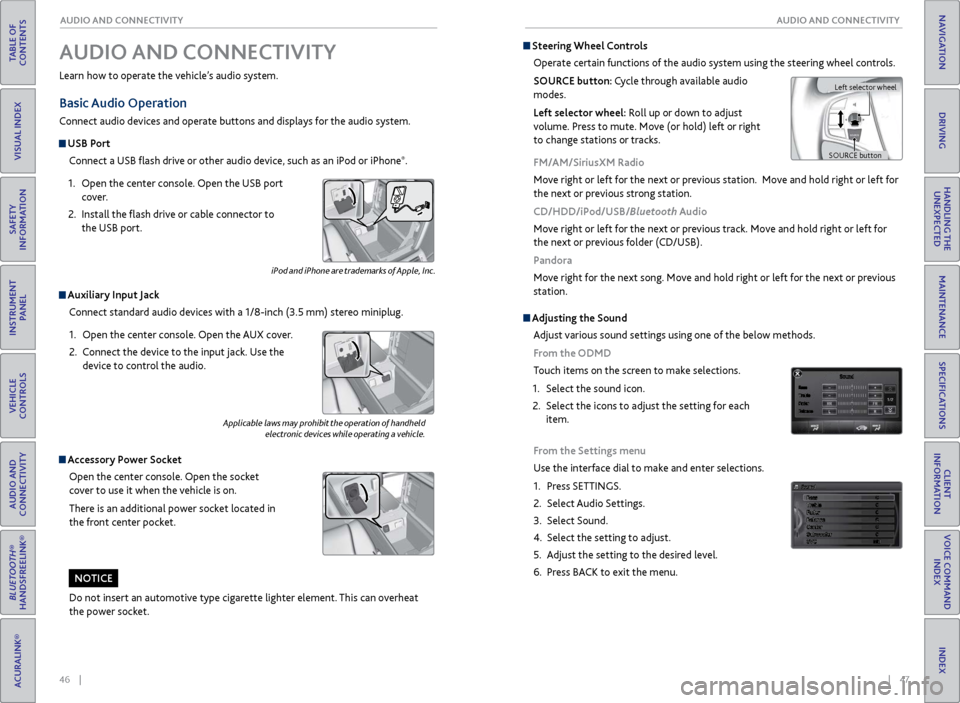
USB Port
Connect a USB flash drive or other audio device, such as an iPod or iPhone
®.
1.
Open
the center console. Open the USB port
cover.
2.
Install the
flash drive or cable connector to
the USB port.
Auxiliary Input Jack
Connect standard audio devices with a 1/8-inch (3.5 mm) stereo miniplug.
1.
Open
the center console. Open the AUX cover.
2.
C
onnect the device to the input jack. Use the
device to control the audio.
Accessory Power Socket
Open the center console. Open the socket
cover to use it when the vehicle is on.
There is an additional power socket located in
the front center pocket.
Adjusting the Sound
Adjust various sound settings using one of the below methods.
From the ODMD
Touch items on the screen to make selections.
1.
Select
the sound icon.
2.
Select
the icons to adjust the setting for each
item.
From the Settings menu
Use the interface dial to make and enter selections.
1.
Pr
ess SETTINGS.
2.
Select Audio
Settings.
3.
Select Sound.
4.
Select the
setting to adjust.
5.
A
djust the setting to the desired level.
6.
Pr
ess BACK to exit the menu.
Applicable laws may prohibit the operation of handheld electronic devices while operating a vehicle.
AUDIO AND CONNECTIVITY
iPod and iPhone are trademarks of Apple, Inc.
Do not insert an automotive type cigarette lighter element. This can overheat
the power socket.
NOTICE
Steering Wheel Controls
Operate certain functions of the audio system using the steering wheel controls.
SOURCE button: Cycle through available audio
modes.
Left selector wheel: Roll up or down to adjust
volume. Press to mute. Move (or hold) left or right
to change stations or tracks.
FM/AM/SiriusXM Radio
Move right or left for the next or previous station. Move and hold right or left for
the next or previous strong station.
CD/HDD/iPod/USB/Bluetooth Audio
Move right or left for the next or previous track. Move and hold right or left for
the next or previous folder (CD/USB).
Pandora
Move right for the next song. Move and hold right or left for the next or previous
station.
Left selector wheel
SOURCE button
Page 37 of 73
66 || 67
NAVIGATION
NAVIGATION
TABLE OF
CONTENTS
INDEX
VISUAL INDEX
VOICE COMMAND INDEX
SAFETY
INFORMATION
CLIENT
INFORMATION
INSTRUMENT PANEL
SPECIFICATIONS
VEHICLE
CONTROLS
MAINTENANCE
AUDIO AND
CONNECTIVITY
HANDLING THE UNEXPECTED
BLUETOOTH®
HANDSFREELINK®
DRIVING
ACURALINK®
NAVIGATION
Learn how to enter a destination and operate the navigation system.
Basic Navigation Operation
A real-time navigation system uses GPS and a map database to show your current
location and help guide you to a desired destination. You can operate the system
using voice commands or the system controls.
To reduce the potential for driver distraction, certain manual functions may
be inoperable or grayed out while the vehicle is moving. Voice commands are
always available.
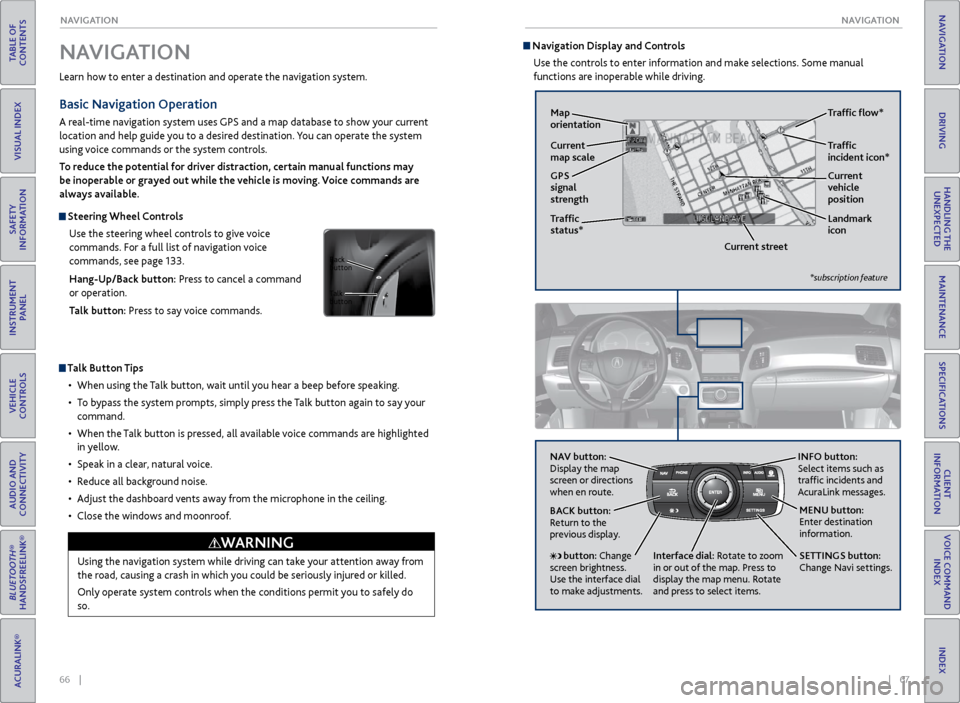
Steering Wheel Controls
Use the steering wheel controls to give voice
commands. For a full list of navigation voice
commands, see page 133.
Hang-Up/Back button: Press to cancel a command
or operation.
Talk button: Press to say voice commands.
Talk Button Tips
•
When using
the Talk button, wait until you hear a beep before speaking.
•
T
o bypass the system prompts, simply press the Talk button again to say your
command.
•
When
the Talk button is pressed, all available voice commands are highlighted
in yellow.
•
Speak in a clear
, natural voice.
•
R
educe all background noise.
•
A
djust the dashboard vents away from the microphone in the ceiling.
•
Close
the windows and moonroof.
Using the navigation system while driving can take your attention away from
the road, causing a crash in which you could be seriously injured or killed.
Only operate system controls when the conditions permit you to safely do
so.
WARNING
NAVIGATION
Talk
button Back
button
Navigation Display and Controls Use the controls to enter information and make selections. Some manual
functions are inoperable while driving.
NAV button:
Display the map
screen or directions
when en route. INFO
button:
Select items such as
traffic incidents and
AcuraLink messages.
BACK button:
Return to the
previous display.
SETTINGS button:
Change Navi settings. MENU button:
Enter destination
information.
button: Change
screen brightness.
Use the interface dial
to make adjustments. Interface dial:
Rotate to zoom
in or out of the map. Press to
display the map menu. Rotate
and press to select items.
GPS
signal
strength Traffic
incident icon*
Traffic
status* Traffic flow*
Current
map scale Current
vehicle
position
Map
orientation
Current streetLandmark
icon
*subscription feature
Page 43 of 73
78 || 79
DRIVING
DRIVING
TABLE OF
CONTENTS
INDEX
VISUAL INDEX
VOICE COMMAND INDEX
SAFETY
INFORMATION
CLIENT
INFORMATION
INSTRUMENT PANEL
SPECIFICATIONS
VEHICLE
CONTROLS
MAINTENANCE
AUDIO AND
CONNECTIVITY
HANDLING THE UNEXPECTED
BLUETOOTH®
HANDSFREELINK®
DRIVING
ACURALINK®
NAVIGATION
When you change the shift lever from D to R and vice versa, come to a
complete stop and keep the brake pedal pressed. Operating the shift lever
before the vehicle has come to a complete standstill can damage the
transmission.
Do not operate the shift lever while pressing the accelerator pedal. You could
damage the transmission.
NOTICE
Shifting
Change your vehicle’s gears to begin driving.
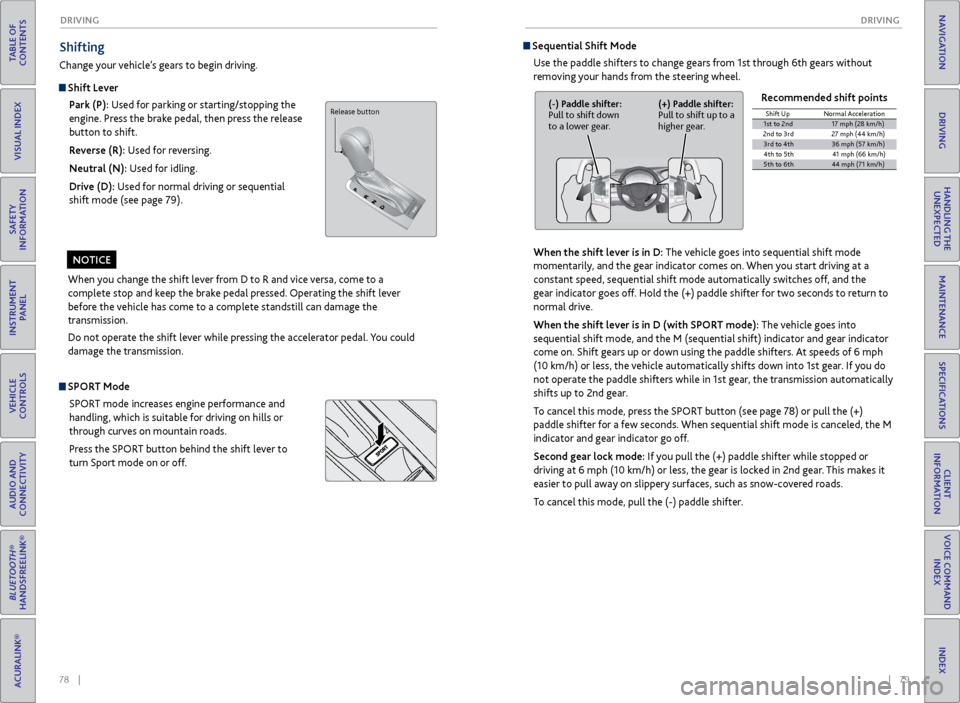
Shift Lever
Park (P): Used for parking or starting/stopping the
engine. Press the brake pedal, then press the release
button to shift.
Reverse (R): Used for reversing.
Neutral (N): Used for idling.
Drive (D): Used for normal driving or sequential
shift mode (see page 79).
Sequential Shift Mode
Use the paddle shifters to change gears from 1st through 6th gears without
removing your hands from the steering wheel.
When the shift lever is in D: The vehicle goes into sequential shift mode
momentarily, and the gear indicator comes on. When you start driving at a
constant speed, sequential shift mode automatically switches off, and the
gear indicator goes off. Hold the (+) paddle shifter for two seconds to return to
normal drive.
When the shift lever is in D (with SPORT mode): The vehicle goes into
sequential shift mode, and the M (sequential shift) indicator and gear indicator
come on. Shift gears up or down using the paddle shifters. At speeds of 6 mph
(10 km/h) or less, the vehicle automatically shifts down into 1st gear. If you do
not operate the paddle shifters while in 1st gear, the transmission automatically
shifts up to 2nd gear.
To cancel this mode, press the SPORT button (see page 78) or pull the (+)
paddle shifter for a few seconds. When sequential shift mode is canceled, the M
indicator and gear indicator go off.
Second gear lock mode: If you pull the (+) paddle shifter while stopped or
driving at 6 mph (10 km/h) or less, the gear is locked in 2nd gear. This makes it
easier to pull away on slippery surfaces, such as snow-covered roads.
To cancel this mode, pull the (-) paddle shifter. Recommended shift points
(-) Paddle shifter:
Pull to shift down
to a lower gear.
(+) Paddle shifter:
Pull to shift up to a
higher gear.Shift Up
Normal Acceleration1st to 2n d17 mph (28 km/h)
2nd to 3r d2 7 mph (44 km/h)
3rd to 4th36 mph (57 km/h)
4th to 5t h4 1 mph (66 km/h )
5th to 6th44 mph (71 km/h)
SPORT Mode
SPORT mode increases engine performance and
handling, which is suitable for driving on hills or
through curves on mountain roads.
Press the SPORT button behind the shift lever to
turn Sport mode on or off.
Release button
Page 48 of 73
88 || 89
DRIVING
DRIVING
TABLE OF
CONTENTS
INDEX
VISUAL INDEX
VOICE COMMAND INDEX
SAFETY
INFORMATION
CLIENT
INFORMATION
INSTRUMENT PANEL
SPECIFICATIONS
VEHICLE
CONTROLS
MAINTENANCE
AUDIO AND
CONNECTIVITY
HANDLING THE UNEXPECTED
BLUETOOTH®
HANDSFREELINK®
DRIVING
ACURALINK®
NAVIGATION
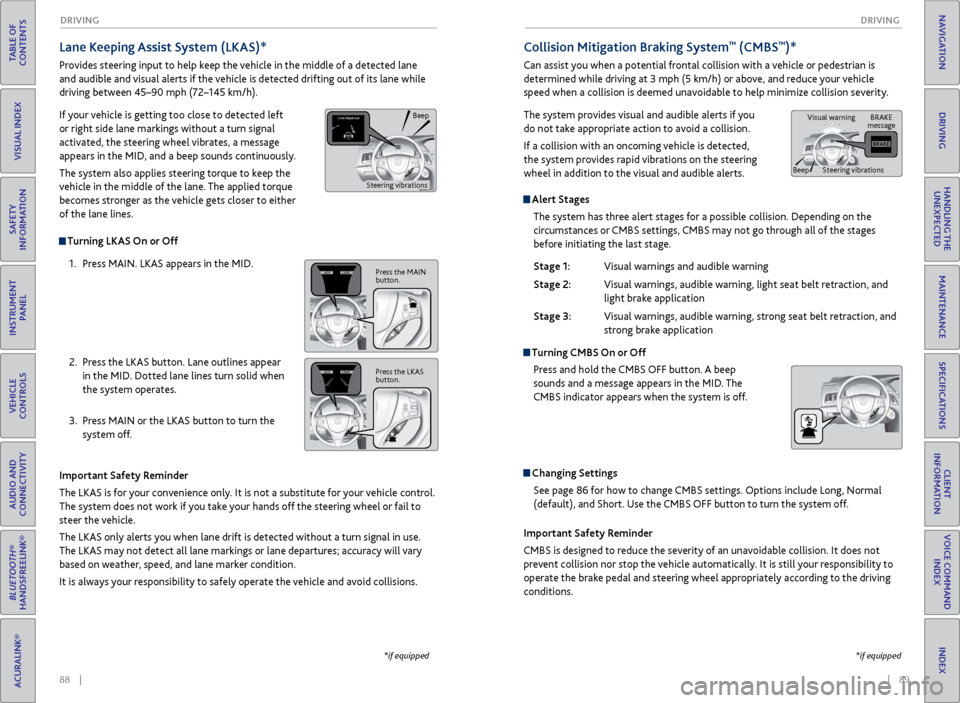
Alert Stages
The system has three alert stages for a possible collision. Depending on the
circumstances or CMBS settings, CMBS may not go through all of the stages
before initiating the last stage.
Stage 1:
Visual warnings
and audible warning
Stage 2:
Visual
warnings, audible warning, light seat belt retraction, and
light brak
e application
Stage 3:
Visual
warnings, audible warning, strong seat belt retraction, and
str
ong brake application
Turning CMBS On or OffPress and hold the CMBS OFF button. A beep
sounds and a message appears in the MID. The
CMBS indicator appears when the system is off.
Changing SettingsSee page 86 for how to change CMBS settings. Options include Long, Normal
(default), and Short. Use the CMBS OFF button to turn the system off.
Lane Keeping Assist System (LKAS)*
Provides steering input to help keep the vehicle in the middle of a detected lane
and audible and visual alerts if the vehicle is detected drifting out of its lane while
driving between 45–90 mph (72–145 km/h).
If your vehicle is getting too close to detected left
or right side lane markings without a turn signal
activated, the steering wheel vibrates, a message
appears in the MID, and a beep sounds continuously.
The system also applies steering torque to keep the
vehicle in the middle of the lane. The applied torque
becomes stronger as the vehicle gets closer to either
of the lane lines.
Important Safety Reminder
The LKAS is for your convenience only. It is not a substitute for your vehicle control.
The system does not work if you take your hands off the steering wheel or fail to
steer the vehicle.
The LKAS only alerts you when lane drift is detected without a turn signal in use.
The LKAS may not detect all lane markings or lane departures; accuracy will vary
based on weather, speed, and lane marker condition.
It is always your responsibility to safely operate the vehicle and avoid collisions.
Turning LKAS On or Off
1.
Pr
ess MAIN. LKAS appears in the MID.
2.
Pr
ess the LKAS button. Lane outlines appear
in the MID. Dotted lane lines turn solid when
the system operates.
3.
Pr
ess MAIN or the LKAS button to turn the
system off.
*if equipped
Collision Mitigation Braking System™ (CMBS™)*
Can assist you when a potential frontal collision with a vehicle or pedestrian is
determined while driving at 3 mph (5 km/h) or above, and reduce your vehicle
speed when a collision is deemed unavoidable to help minimize collision severity.
The system provides visual and audible alerts if you
do not take appropriate action to avoid a collision.
If a collision with an oncoming vehicle is detected,
the system provides rapid vibrations on the steering
wheel in addition to the visual and audible alerts.
Important Safety Reminder
CMBS is designed to reduce the severity of an unavoidable collision. It does not
prevent collision nor stop the vehicle automatically. It is still your responsibility to
operate the brake pedal and steering wheel appropriately according to the driving
conditions.
*if equipped
Beep
Steering vibrations
Press the MAIN
button.
Press the LKAS
button.
BRAKE
message
Beep Visual warning
Steering vibrations
Page 49 of 73
90 || 91
DRIVING
DRIVING
TABLE OF
CONTENTS
INDEX
VISUAL INDEX
VOICE COMMAND INDEX
SAFETY
INFORMATION
CLIENT
INFORMATION
INSTRUMENT PANEL
SPECIFICATIONS
VEHICLE
CONTROLS
MAINTENANCE
AUDIO AND
CONNECTIVITY
HANDLING THE UNEXPECTED
BLUETOOTH®
HANDSFREELINK®
DRIVING
ACURALINK®
NAVIGATION
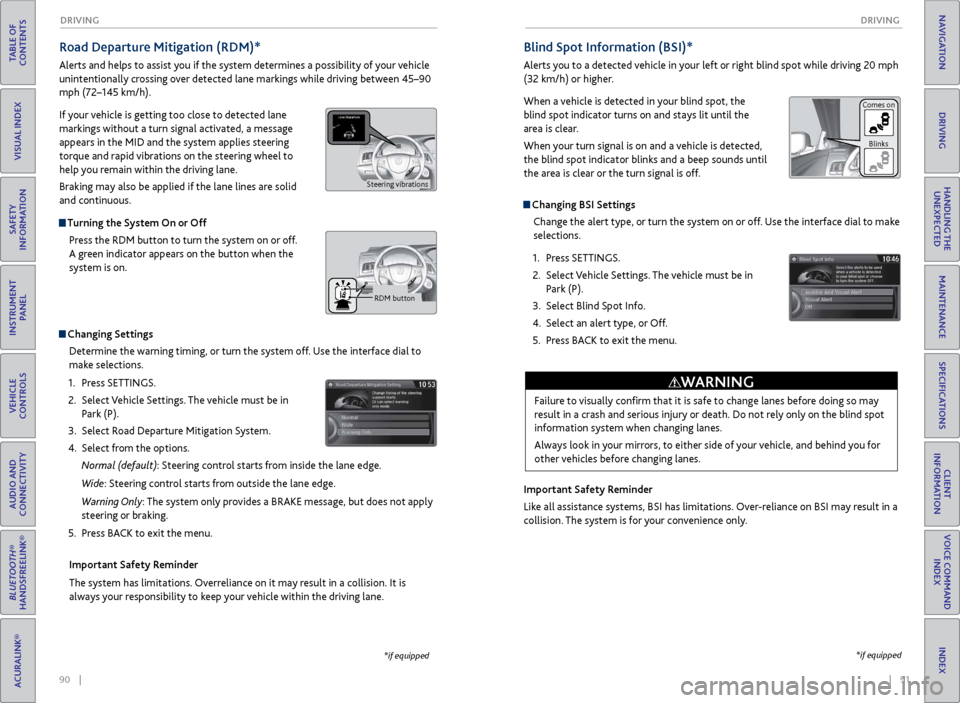
Road Departure Mitigation (RDM)*
Alerts and helps to assist you if the system determines a possibility of your vehicle
unintentionally crossing over detected lane markings while driving between 45–90
mph (72–145 km/h).
If your vehicle is getting too close to detected lane
markings without a turn signal activated, a message
appears in the MID and the system applies steering
torque and rapid vibrations on the steering wheel to
help you remain within the driving lane.
Braking may also be applied if the lane lines are solid
and continuous.
Turning the System On or Off
Press the RDM button to turn the system on or off.
A green indicator appears on the button when the
system is on.
Indicator
Changing SettingsDetermine the warning timing, or turn the system off. Use the interface dial to
make selections.
1.
Pr
ess SETTINGS.
2.
Select
Vehicle Settings. The vehicle must be in
Park (P).
3.
Select R
oad Departure Mitigation System.
4.
Select
from the options.
Normal (default): Steering control starts from inside the lane edge.
Wide: Steering control starts from outside the lane edge.
Warning Only: The system only provides a BRAKE message, but does not apply
steering or braking.
5.
Pr
ess BACK to exit the menu.
Important Safety Reminder
The system has limitations. Overreliance on it may result in a collision. It is
always your responsibility to keep your vehicle within the driving lane.
*if equipped
Blind Spot Information (BSI)*
Alerts you to a detected vehicle in your left or right blind spot while driving 20 mph
(32 km/h) or higher.
When a vehicle is detected in your blind spot, the
blind spot indicator turns on and stays lit until the
area is clear.
When your turn signal is on and a vehicle is detected,
the blind spot indicator blinks and a beep sounds until
the area is clear or the turn signal is off.
Changing BSI Settings Change the alert type, or turn the system on or off. Use the interface dial to make
selections.
1.
Pr
ess SETTINGS.
2.
Select
Vehicle Settings. The vehicle must be in
Park (P).
3.
Select Blind
Spot Info.
4.
Select
an alert type, or Off.
5.
Pr
ess BACK to exit the menu.
Important Safety Reminder
Like all assistance systems, BSI has limitations. Over-reliance on BSI may result in a
collision. The system is for your convenience only.
*if equipped
Failure to visually confirm that it is safe to change lanes before doing so may
result in a crash and serious injury or death. Do not rely only on the blind spot
information system when changing lanes.
Always look in your mirrors, to either side of your vehicle, and behind you for
other vehicles before changing lanes.
WARNING
Comes on Blinks
Steering vibrations
RDM button
Page 54 of 73
100 || 101
HANDLING THE UNEXPECTED
HANDLING THE UNEXPECTED
TABLE OF
CONTENTS
INDEX
VISUAL INDEX
VOICE COMMAND INDEX
SAFETY
INFORMATION
CLIENT
INFORMATION
INSTRUMENT PANEL
SPECIFICATIONS
VEHICLE
CONTROLS
MAINTENANCE
AUDIO AND
CONNECTIVITY
HANDLING THE UNEXPECTED
BLUETOOTH®
HANDSFREELINK®
DRIVING
ACURALINK®
NAVIGATION
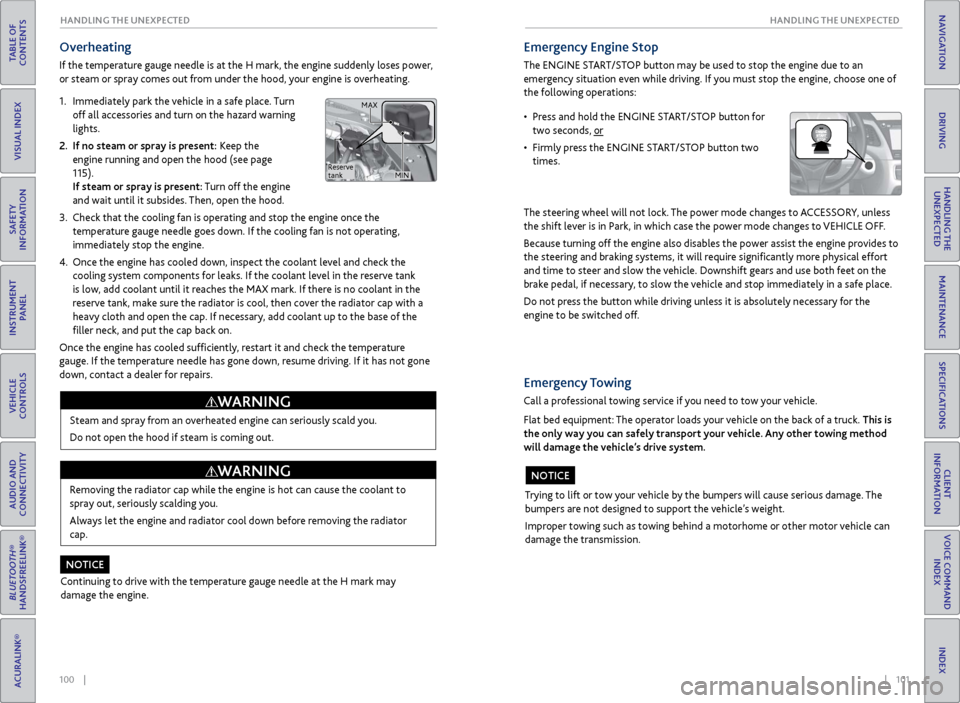
Overheating
If the temperature gauge needle is at the H mark, the engine suddenly loses power,
or steam or spray comes out from under the hood, your engine is overheating.
1.
Immediatel
y park the vehicle in a safe place. Turn
off all accessories and turn on the hazard warning
lights.
2.
If no steam
or spray is present: Keep the
engine running and open the hood (see page
115).
If steam or spray is present: Turn off the engine
and wait until it subsides. Then, open the hood.
3.
Check that the
cooling fan is operating and stop the engine once the
temperature gauge needle goes down. If the cooling fan is not operating,
immediately stop the engine.
4.
Once
the engine has cooled down, inspect the coolant level and check the
cooling system components for leaks. If the coolant level in the reserve tank
is low, add coolant until it reaches the MAX mark. If there is no coolant in the
reserve tank, make sure the radiator is cool, then cover the radiator cap with a
heavy cloth and open the cap. If necessary, add coolant up to the base of the
filler neck, and put the cap back on.
Once the engine has cooled sufficiently, restart it and check the temperature
gauge. If the temperature needle has gone down, resume driving. If it has not gone
down, contact a dealer for repairs.
Steam and spray from an overheated engine can seriously scald you.
Do not open the hood if steam is coming out.
WARNING
Removing the radiator cap while the engine is hot can cause the coolant to
spray out, seriously scalding you.
Always let the engine and radiator cool down before removing the radiator
cap.
WARNING
Continuing to drive with the temperature gauge needle at the H mark may
damage the engine.
NOTICE
Emergency Engine Stop
The ENGINE START/STOP button may be used to stop the engine due to an
emergency situation even while driving. If you must stop the engine, choose one of
the following operations:
The steering wheel will not lock. The power mode changes to ACCESSORY, unless
the shift lever is in Park, in which case the power mode changes to VEHICLE OFF.
Because turning off the engine also disables the power assist the engine provides to
the steering and braking systems, it will require significantly more physical effort
and time to steer and slow the vehicle. Downshift gears and use both feet on the
brake pedal, if necessary, to slow the vehicle and stop immediately in a safe place.
Do not press the button while driving unless it is absolutely necessary for the
engine to be switched off.
• Press and hold the ENGINE START/STOP button for two seconds, or
•
Firml
y press the ENGINE START/STOP button two
times.
Trying to lift or tow your vehicle by the bumpers will cause serious damage. The
bumpers are not designed to support the vehicle’s weight.
Improper towing such as towing behind a motorhome or other motor vehicle can
damage the transmission.
NOTICE
Emergency Towing
Call a professional towing service if you need to tow your vehicle.
Flat bed equipment: The operator loads your vehicle on the back of a truck. This is
the only way you can safely transport your vehicle. Any other towing method
will damage the vehicle’s drive system.
Reserve
tank MAX
MIN
Page 56 of 73
104 || 105
HANDLING THE UNEXPECTED
HANDLING THE UNEXPECTED
TABLE OF
CONTENTS
INDEX
VISUAL INDEX
VOICE COMMAND INDEX
SAFETY
INFORMATION
CLIENT
INFORMATION
INSTRUMENT PANEL
SPECIFICATIONS
VEHICLE
CONTROLS
MAINTENANCE
AUDIO AND
CONNECTIVITY
HANDLING THE UNEXPECTED
BLUETOOTH®
HANDSFREELINK®
DRIVING
ACURALINK®
NAVIGATION
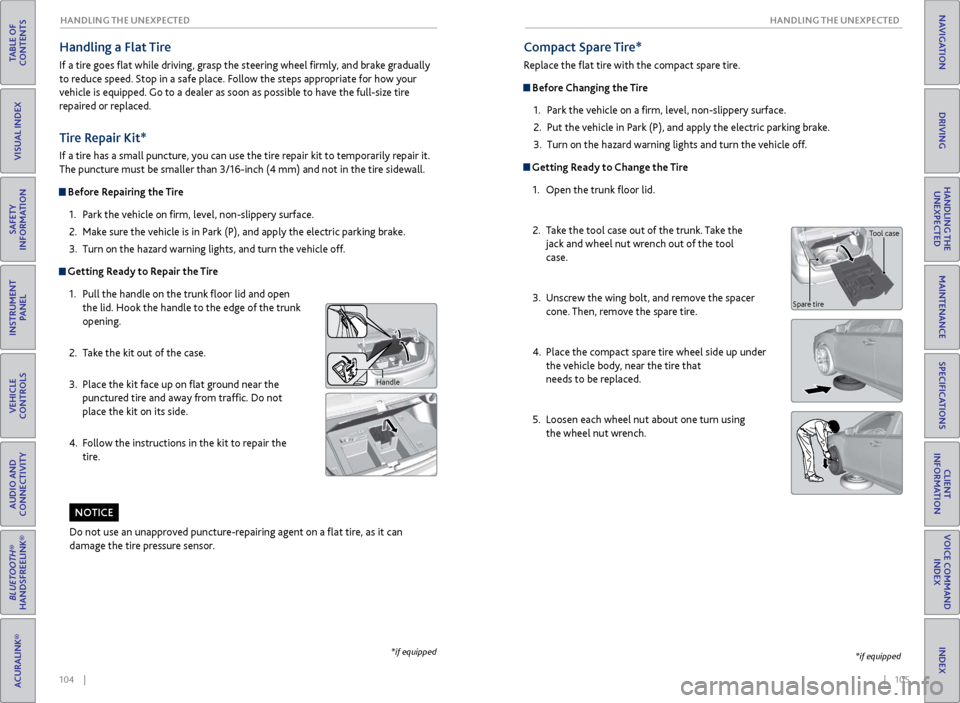
Tire Repair Kit*
If a tire has a small puncture, you can use the tire repair kit to temporarily repair it.
The puncture must be smaller than 3/16-inch (4 mm) and not in the tire sidewall.
Before Repairing the Tire
1.
P
ark the vehicle on firm, level, non-slippery surface.
2.
Mak
e sure the vehicle is in Park (P), and apply the electric parking brake.
3.
Turn on the
hazard warning lights, and turn the vehicle off.
Getting Ready to Repair the Tire1.
Pull the
handle on the trunk floor lid and open
the lid. Hook the handle to the edge of the trunk
opening.
2.
T
ake the kit out of the case.
3.
Place
the kit face up on flat ground near the
punctured tire and away from traffic. Do not
place the kit on its side.
4.
F
ollow the instructions in the kit to repair the
tire.
Handle
Compact Spare Tire*
Replace the flat tire with the compact spare tire.
Before Changing the Tire
1.
P
ark the vehicle on a firm, level, non-slippery surface.
2.
Put
the vehicle in Park (P), and apply the electric parking brake.
3.
Turn on the
hazard warning lights and turn the vehicle off.
Getting Ready to Change the Tire1.
Open the trunk
floor lid.
2.
T
ake the tool case out of the trunk. Take the
jack and wheel nut wrench out of the tool
case.
3.
Unscr
ew the wing bolt, and remove the spacer
cone. Then, remove the spare tire.
4.
Place
the compact spare tire wheel side up under
the vehicle body, near the tire that
needs to be replaced.
5.
Loosen each
wheel nut about one turn using
the wheel nut wrench.
*if equipped
Do not use an unapproved puncture-repairing agent on a flat tire, as it can
damage the tire pressure sensor.
NOTICE
Tool case
Spare tire
Handling a Flat Tire
If a tire goes flat while driving, grasp the steering wheel firmly, and brake gradually
to reduce speed. Stop in a safe place. Follow the steps appropriate for how your
vehicle is equipped. Go to a dealer as soon as possible to have the full-size tire
repaired or replaced.
*if equipped
Page 57 of 73
106 || 107
HANDLING THE UNEXPECTED
HANDLING THE UNEXPECTED
TABLE OF
CONTENTS
INDEX
VISUAL INDEX
VOICE COMMAND INDEX
SAFETY
INFORMATION
CLIENT
INFORMATION
INSTRUMENT PANEL
SPECIFICATIONS
VEHICLE
CONTROLS
MAINTENANCE
AUDIO AND
CONNECTIVITY
HANDLING THE UNEXPECTED
BLUETOOTH®
HANDSFREELINK®
DRIVING
ACURALINK®
NAVIGATION
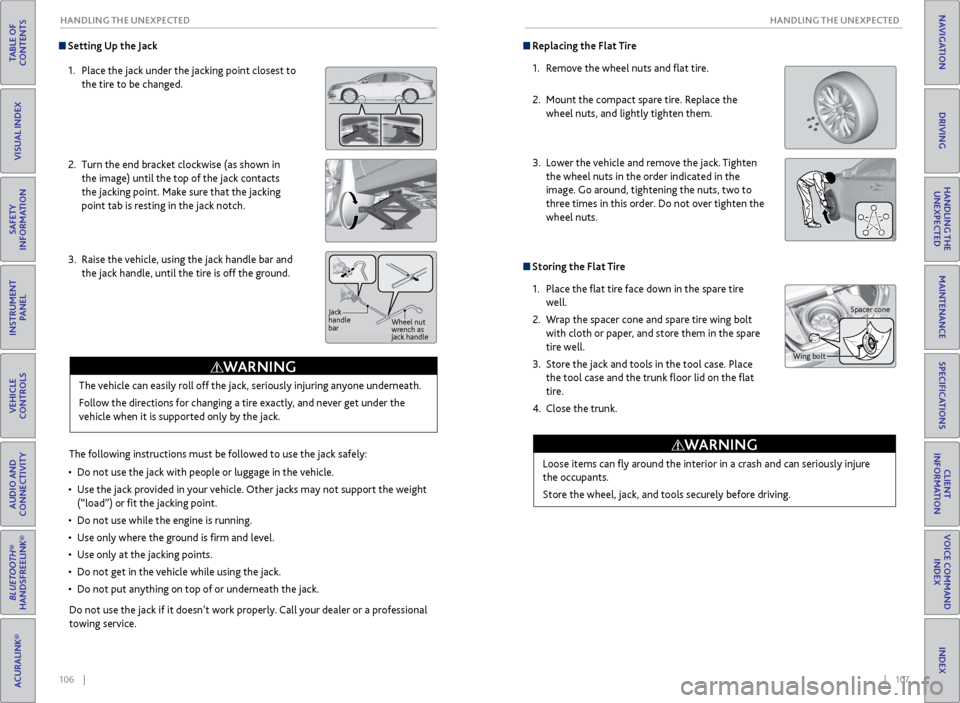
Setting Up the Jack
1.
Place
the jack under the jacking point closest to
the tire to be changed.
2.
Turn
the end bracket clockwise (as shown in
the image) until the top of the jack contacts
the jacking point. Make sure that the jacking
point tab is resting in the jack notch.
3.
Raise
the vehicle, using the jack handle bar and
the jack handle, until the tire is off the ground.
The following instructions must be followed to use the jack safely:
•
Do not use
the jack with people or luggage in the vehicle.
•
Use
the jack provided in your vehicle. Other jacks may not support the weight
(“load”) or fit the jacking point.
•
Do not use
while the engine is running.
•
Use
only where the ground is firm and level.
•
Use
only at the jacking points.
•
Do not get in
the vehicle while using the jack.
•
Do
not put anything on top of or underneath the jack.
The vehicle can easily roll off the jack, seriously injuring anyone underneath.
Follow the directions for changing a tire exactly, and never get under the
vehicle when it is supported only by the jack.
WARNING
Do not use the jack if it doesn’t work properly. Call your dealer or a professional
towing service.
Jack
handle
bar
Wheel nut
wrench as
jack handle
Replacing the Flat Tire
1.
R
emove the wheel nuts and flat tire.
2.
Mount the
compact spare tire. Replace the
wheel nuts, and lightly tighten them.
3.
Lower
the vehicle and remove the jack. Tighten
the wheel nuts in the order indicated in the
image. Go around, tightening the nuts, two to
three times in this order. Do not over tighten the
wheel nuts.
Storing the Flat Tire
1.
Place the
flat tire face down in the spare tire
well.
2.
W
rap the spacer cone and spare tire wing bolt
with cloth or paper, and store them in the spare
tire well.
3.
Stor
e the jack and tools in the tool case. Place
the tool case and the trunk floor lid on the flat
tire.
4.
Close the trunk.
Loose items can
fly around the interior in a crash and can seriously injure
the occupants.
Store the wheel, jack, and tools securely before driving.
WARNING
Wing bolt Spacer cone
Page 63 of 73
118 || 119
MAINTENANCE
MAINTENANCE
TABLE OF
CONTENTS
INDEX
VISUAL INDEX
VOICE COMMAND INDEX
SAFETY
INFORMATION
CLIENT
INFORMATION
INSTRUMENT PANEL
SPECIFICATIONS
VEHICLE
CONTROLS
MAINTENANCE
AUDIO AND
CONNECTIVITY
HANDLING THE UNEXPECTED
BLUETOOTH®
HANDSFREELINK®
DRIVING
ACURALINK®
NAVIGATION
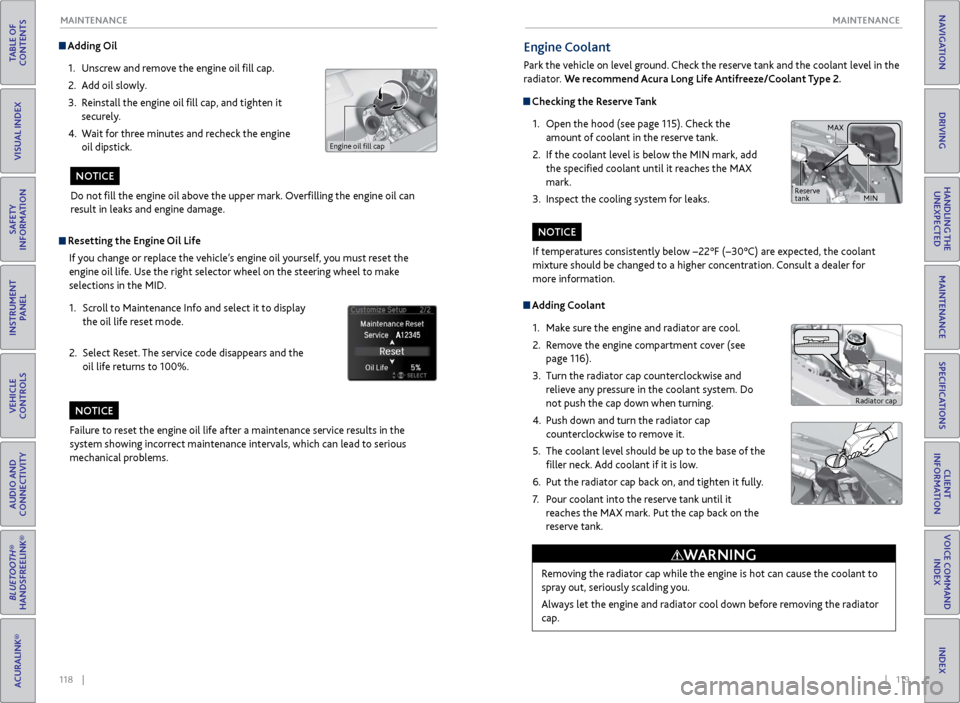
Adding Oil
1.
Unscr
ew and remove the engine oil fill cap.
2.
A
dd oil slowly.
3.
R
einstall the engine oil fill cap, and tighten it
securely.
4.
W
ait for three minutes and recheck the engine
oil dipstick.
Do not fill the engine oil above the upper mark. Overfilling the engine oil can
result in leaks and engine damage.
NOTICE
Resetting the Engine Oil Life
If you change or replace the vehicle’s engine oil yourself, you must reset the
engine oil life. Use the right selector wheel on the steering wheel to make
selections in the MID.
1.
Scr
oll to Maintenance Info and select it to display
the oil life reset mode.
2.
Select R
eset. The service code disappears and the
oil life returns to 100%.
Failure to reset the engine oil life after a maintenance service results in the
system showing incorrect maintenance intervals, which can lead to serious
mechanical problems.
NOTICE
Engine oil fill cap
Engine Coolant
Park the vehicle on level ground. Check the reserve tank and the coolant level in the
radiator. We recommend Acura Long Life Antifreeze/Coolant Type 2.
Checking the Reserve Tank
1.
Open
the hood (see page 115). Check the
amount of coolant in the reserve tank.
2.
If
the coolant level is below the MIN mark, add
the specified coolant until it reaches the MAX
mark.
3.
Inspect
the cooling system for leaks.
Adding Coolant1.
Mak
e sure the engine and radiator are cool.
2.
R
emove the engine compartment cover (see
page 116).
3.
Turn
the radiator cap counterclockwise and
relieve any pressure in the coolant system. Do
not push the cap down when turning.
4.
Push down
and turn the radiator cap
counterclockwise to remove it.
5.
The coolant lev
el should be up to the base of the
filler neck. Add coolant if it is low.
6.
Put
the radiator cap back on, and tighten it fully.
7.
P
our coolant into the reserve tank until it
reaches the MAX mark. Put the cap back on the
reserve tank.
Removing the radiator cap while the engine is hot can cause the coolant to
spray out, seriously scalding you.
Always let the engine and radiator cool down before removing the radiator
cap.
WARNING
If temperatures consistently below −22°F (−30°C) are expected, the coolant
mixture should be changed to a higher concentration. Consult a dealer for
more information.
NOTICE
Radiator cap
MAX
MIN
Reserve
tank