service Acura RLX 2017 Quick Guide
[x] Cancel search | Manufacturer: ACURA, Model Year: 2017, Model line: RLX, Model: Acura RLX 2017Pages: 73, PDF Size: 7.37 MB
Page 2 of 73
TABLE OF
CONTENTS
INDEX
VISUAL INDEX
VOICE COMMAND INDEX
SAFETY
INFORMATION
CLIENT
INFORMATION
INSTRUMENT PANEL
SPECIFICATIONS
VEHICLE
CONTROLS
MAINTENANCE
AUDIO AND
CONNECTIVITY
HANDLING THE UNEXPECTED
BLUETOOTH®
HANDSFREELINK®
DRIVING
ACURALINK®
NAVIGATION
DISCLOSURES
Devices That Emit Radio Waves
The following products and systems on your vehicle emit radio waves when in
operation:
• AcuraLink
• HomeLink
Universal Transceiver
• Audio system
• Immobiliz
er system
• Blind Spot Information (BSI)*
• K
eyless Access System
• Bluetooth Audio
•
Remote transmitter
• Bluetooth HandsFreeLink
•
Tire Pressure Monitoring System
• Collision Mitigation Braking System (CMBS)*
• Remote Engine Start*
Each of the above complies with the appropriate requirements or the required
standards of FCC (Federal Communications Commission) and Industry Canada,
described below:
As required by the FCC:
This device complies with Part 15 of the FCC rules. Operation is subject to the
following two conditions: (1) This device may not cause harmful interference, and
(2) this device must accept any interference received, including interference that
may cause undesired operation.
Changes or modifications not expressly approved by the party responsible for
compliance could void the user’s authority to operate the equipment.
As required by Industry Canada:
This device complies with Industry Canada licence-exempt RSS standard(s).
Operation is subject to the following two conditions: (1) this device may not
cause interference, and (2) this device must accept any interference, including
interference that may cause undesired operation of the device.
California Perchlorate Contamination Prevention Act The airbags, seat belt tensioners, and CR-type batteries in this vehicle may
contain perchlorate materials — special handling may apply. See www.dtsc.
ca.gov/hazardouswaste/perchlorate/ for more information.
California Proposition 65 WarningWARNING: This product contains or emits chemicals known to the state of
California to cause cancer and birth defects or other reproductive harm.
Event Data RecordersThis vehicle is equipped with an event data recorder (EDR). The main purpose
of an EDR is to record, in certain crash or near crash-like situations, such as an air
bag deployment or hitting a road obstacle, data that will assist in understanding
how a vehicle’s systems performed. The EDR is designed to record data related
to vehicle dynamics and safety systems for a short period of time, typically 30
seconds or less. The EDR in this vehicle is designed to record such data as:
•
How various
systems in your vehicle were operating;
•
Whether
or not the driver and passenger safety belts were buckled/
fastened;
•
How
far (if at all) the driver was depressing the accelerator and/or brake
pedal; and,
•
How
fast the vehicle was traveling.
These data can help provide a better understanding of the circumstances in which
crashes and injuries occur. NOTE: EDR data are recorded by your vehicle only if a
non-trivial crash situation occurs; no data are recorded by the EDR under normal
driving conditions and no personal data (e.g., name, gender, age, and crash
location) are recorded. However, other parties, such as law enforcement, could
combine the EDR data with the type of personally identifying data routinely
acquired during a crash investigation.
To read data recorded by an EDR, special equipment is required, and access to
the vehicle or the EDR is needed. In addition to the vehicle manufacturer, other
parties such as law enforcement that have the special equipment can read the
information if they have access to the vehicle or the EDR.
The data belong to the vehicle owner and may not be accessed by anyone else
except as legally required or with the permission of the vehicle owner.
Service Diagnostic Recorders This vehicle is equipped with service-related devices that record information
about powertrain performance. The data can be used to verify emissions law
requirements and/or help technicians diagnose and solve service problems. It
may also be combined with data from other sources for research purposes, but it
remains confidential.
*if equipped
Page 3 of 73
TABLE OF
CONTENTS
INDEX
VISUAL INDEX
VOICE COMMAND INDEX
SAFETY
INFORMATION
CLIENT
INFORMATION
INSTRUMENT PANEL
SPECIFICATIONS
VEHICLE
CONTROLS
MAINTENANCE
AUDIO AND
CONNECTIVITY
HANDLING THE UNEXPECTED
BLUETOOTH®
HANDSFREELINK®
DRIVING
ACURALINK®
NAVIGATION
TABLE OF CONTENTS
Acura Total Luxury Care Roadside Assistance
Your Acura TLC Roadside Assistance representative is here to help you 24 hours
a day, 7 days a week. Under your 4-year/50,000-mile (80,000 km) warranty, the
following benefits are available:
•
T
owing services — full cost of towing to the closest Acura dealer
•
R
oadside assistance — jump starting, fuel delivery, lockout, and flat tire
•
T
rip planning — detailed trip routing, emergency services, and more Call (800) 594-8500 (U.S.) or (800) 565-7587 (Canada)
Acura Client RelationsYour authorized Acura dealer should be able to answer any questions you have
about your vehicle. However, if you are dissatisfied with the information you
receive, you can call Acura Client Relations (see page 131).
Call (800) 382-2238 (U.S.) or (888) 922-8729 (Canada)
INTRODUCTION
This Owner’s Guide is intended to help you quickly get acquainted with your
2017 Acura RLX. It provides basic information and instructions on technology and
convenience features, as well as emergency procedures and how to get assistance.
This guide is for vehicles sold in the United States and Canada. It covers all RLX
models except for Sport Hybrid, so you may find descriptions of features and
equipment that are not in your vehicle.
Images throughout this guide are from U.S. vehicles and represent features and
equipment that are available on some, but not all, models. Images shown in this
guide should be considered examples and used for demonstration purposes only.
This guide is not intended to be a substitute for the Owner’s Manual. The Owner
Information CD enclosed in your glove box kit includes the Owner’s Manual,
Navigation Manual, and vehicle and tire warranties in electronic format. This
information can be viewed on a computer (PC
or Mac platform) and sav
ed
or printed for your reference. You can also visit owners.acura.com to view the
complete and most current information.
If you are the first registered owner of your vehicle, you may request a
complimentary printed copy of the Owner’s Manual, Navigation Manual, or Vehicle
Warranty within the first six months of vehicle purchase. To request a copy, visit
owners.acura.com and create or log in to your account. In Canada, please request a
copy from your Acura dealer.
American Honda Motor Company strives to be proactive in protecting our
environment and natural resources. By using electronic delivery for a considerable
portion of the information typically found in a vehicle owner’s manual, we are
further reducing our impact on the environment.
*if equipped
VISUAL INDEX
.......................................................
1
Steering Wheel and Nearby Controls
.................
1
Dashboard and Ceiling Controls
..........................
2
SAFETY INFORMATION
.......................................
3
Important Safety Information
.............................3
Seat Belts
.................................................................
5
Airbags
.....................................................................
8
Child Safety
...........................................................
14
Safety Label Locations........................................ 20
Reporting Safety Defects
....................................
21
INSTRUMENT PANEL..........................................22 Malfunction Indicators
.......................................
22
Condition Indicators
...........................................
24
On/Off Indicators
................................................
25
Multi-Information Display (MID)
.....................
26
VEHICLE CONTROLS
..........................................
28
Using the Remote Transmitter
..........................
28
Keyless Access System
.......................................
29
Door Operation from Inside the Vehicle
.........
30
Power Window Operation
..................................
31
Power Moonroof Operation
.............................
32
Interior and Exterior Lights
................................
33
One-Touch Turn Signal
.......................................
34
Wiper Operation
..................................................
34
Adjusting the Seats
.............................................
36
Driving Position Memory System
.....................
39
Adjusting the Steering Wheel
...........................
39
Adjusting the Mirrors
..........................................
40
Customized Features
...........................................
41
HomeLink
® Universal Transceiver ..................... 42
Climate C
ontrol System ..................................... 43
Seat Heaters and Ventilation*
..........................45AUDIO AND CONNECTIVITY
..........................
46
Basic Audio Operation ........................................
46
On-Demand Multi-Use Display (ODMD) .......
48
FM/AM Radio .......................................................
49
SiriusXM
® Radio ................................................... 50
C
ompact Disc (CD) or USB Flash Drive ............51
Hard Disk Drive (HDD) Audio
...........................52
iPod
® ....................................................................... 53
Bluet ooth® Audio ................................................. 54
P
andora® ................................................................ 55
A
curaLink featuring Aha™ ................................... 56
BL
UETOOTH
® HANDSFREELINK®...................... 57
Basic HFL Operation
............................................ 57
Pairing a Phone
.................................................... 59
Making a Call
........................................................ 60
SMS Text Messaging and E-Mail
....................... 63
Roadside Assistance*
.......................................... 63
ACURALINK
®* ..................................................... 64
A
curaLink Messages ............................................ 64
Subscription Features
......................................... 65
NAVIGATION
....................................................... 66
Basic Navigation Operation
.............................. 66
Entering a Destination
........................................ 69
Routing
................................................................... 71
Page 10 of 73
12 || 13
S AFETY
S
AFETY
TABLE OF
CONTENTS
INDEX
VISUAL INDEX
VOICE COMMAND INDEX
SAFETY
INFORMATION
CLIENT
INFORMATION
INSTRUMENT PANEL
SPECIFICATIONS
VEHICLE
CONTROLS
MAINTENANCE
AUDIO AND
CONNECTIVITY
HANDLING THE UNEXPECTED
BLUETOOTH®
HANDSFREELINK®
DRIVING
ACURALINK®
NAVIGATION
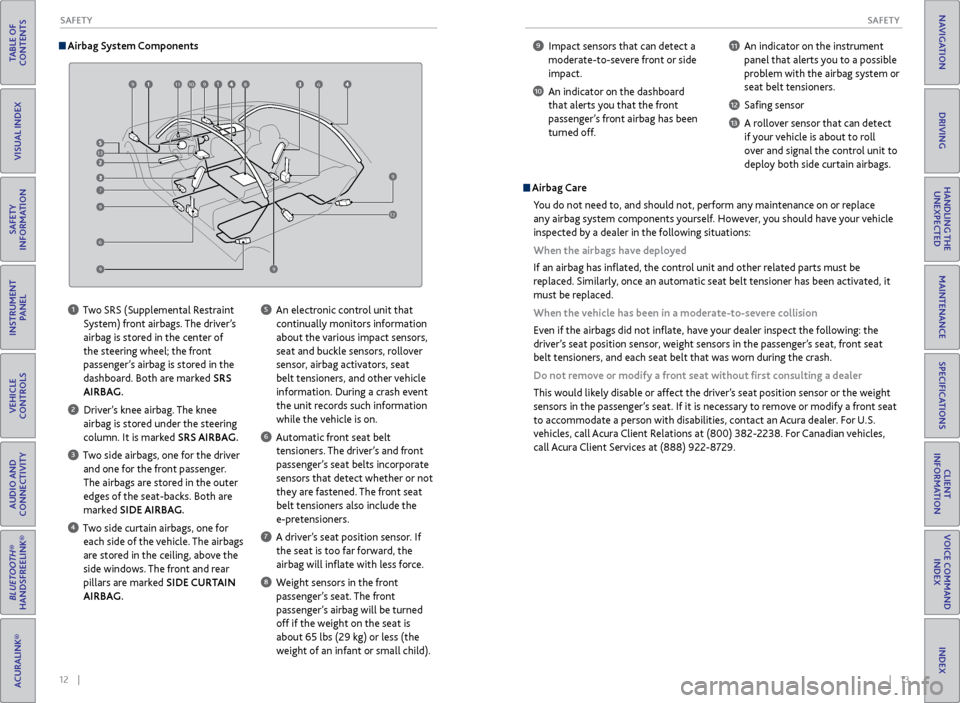
Airbag System Components
1 Two SRS (Supplemental Restraint
System) front airbags. The driver’s
airbag is stored in the center of
the steering wheel; the front
passenger’s airbag is stored in the
dashboard. Both are marked SRS
AIRBAG.
2 Driver’s knee airbag. The knee airbag is stored under the steering
column. It is marked SRS AIRBAG.
3 Two side airbags, one for the driver and one for the front passenger.
The airbags are stored in the outer
edges of the seat-backs. Both are
marked SIDE AIRBAG.
4 Two side curtain airbags, one for each side of the vehicle. The airbags
are stored in the ceiling, above the
side windows. The front and rear
pillars are marked SIDE CURTAIN
AIRBAG.
5 An electronic control unit that continually monitors information
about the various impact sensors,
seat and buckle sensors, rollover
sensor, airbag activators, seat
belt tensioners, and other vehicle
information. During a crash event
the unit records such information
while the vehicle is on.
6 Automatic front seat belt tensioners. The driver’s and front
passenger’s seat belts incorporate
sensors that detect whether or not
they are fastened. The front seat
belt tensioners also include the
e-pretensioners.
7 A driver’s seat position sensor. If the seat is too far forward, the
airbag will inflate with less force.
8 Weight sensors in the front passenger’s seat. The front
passenger’s airbag will be turned
off if the weight on the seat is
about 65 lbs (29 kg) or less (the
weight of an infant or small child).
9 Impact sensors that can detect a moderate-to-severe front or side
impact.
10 An indicator on the dashboard that alerts you that the front
passenger’s front airbag has been
turned off.
11 An indicator on the instrument panel that alerts you to a possible
problem with the airbag system or
seat belt tensioners.
12 Safing sensor
13 A rollover sensor that can detect if your vehicle is about to roll
over and signal the control unit to
deploy both side curtain airbags.
Airbag Care
You do not need to, and should not, perform any maintenance on or replace
any airbag system components yourself. However, you should have your vehicle
inspected by a dealer in the following situations:
When the airbags have deployed
If an airbag has inflated, the control unit and other related parts must be
replaced. Similarly, once an automatic seat belt tensioner has been activated, it
must be replaced.
When the vehicle has been in a moderate-to-severe collision
Even if the airbags did not inflate, have your dealer inspect the following: the
driver’s seat position sensor, weight sensors in the passenger’s seat, front seat
belt tensioners, and each seat belt that was worn during the crash.
Do not remove or modify a front seat without first consulting a dealer
This would likely disable or affect the driver’s seat position sensor or the weight
sensors in the passenger’s seat. If it is necessary to remove or modify a front seat
to accommodate a person with disabilities, contact an Acura dealer. For U.S.
vehicles, call Acura Client Relations at (800) 382-2238. For Canadian vehicles,
call Acura Client Services at (888) 922-8729.
9
13
7
9
9
91110986
9
12
6
Page 32 of 73
| 57
INDEX
VOICE COMMAND INDEX
CLIENT
INFORMATION
SPECIFICATIONS
MAINTENANCE
HANDLING THE UNEXPECTED
DRIVING
NAVIGATION
56 |AUDIO AND CONNECTIVITY
TABLE OF
CONTENTS
VISUAL INDEX
SAFETY
INFORMATION
INSTRUMENT PANEL
VEHICLE
CONTROLS
AUDIO AND
CONNECTIVITY
BLUETOOTH®
HANDSFREELINK®
ACURALINK®
AcuraLink featuring Aha™
Access music and information programming, location-based services, and social
media through the vehicle’s audio system. Visit www.acura.com/handsfreelink
(U.S.) or www.handsfreelink.ca (Canada) to check phone compatibility. Standard
data rates apply.
Visit owners.acura.com (U.S.) or www.myacura.ca (Canada) and download the
AcuraLink app to your phone prior to using this feature. Make sure you have an
active Aha account. Connect your phone when the vehicle is stopped.
Applicable laws may prohibit the operation of handheld electronic devices while operating a vehicle. Launch streaming audio on your phone only when safe to do so.
For iPhone:
•
C
onnect via Bluetooth HandsFreeLink (see page 59) or USB (see page 46).
•
A pop-up may appear
on your phone requesting you to allow access for Aha to be
launched.
•
If
Aha still does not operate, try rebooting the phone and reconnecting the cable if
necessary.
For other compatible smartphones:
•
C
onnect via Bluetooth HandsFreeLink (see page 59).
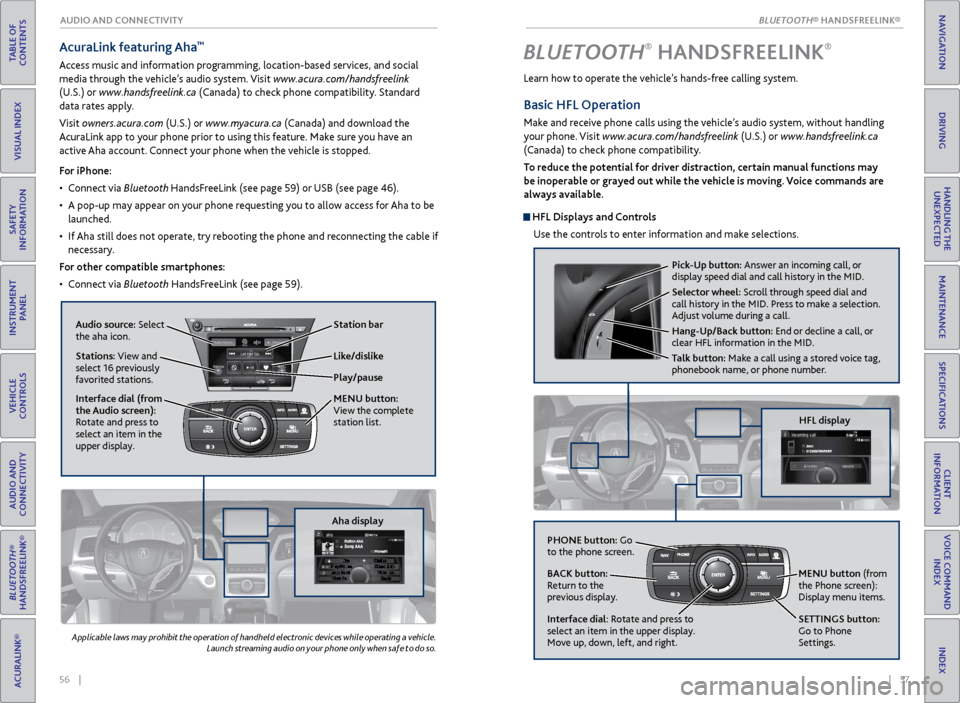
Aha display
Audio source: Select
the aha icon.
Stations: View and
select 16 previously
favorited stations.
Interface dial (from
the Audio screen):
Rotate and press to
select an item in the
upper display.
Play/pause Station bar
Like/dislike
MENU
button:
View the complete
station list.
BLUETOOTH® HANDSFREELINK®
Learn how to operate the vehicle’s hands-free calling system.
Basic HFL Operation
Make and receive phone calls using the vehicle’s audio system, without handling
your phone. Visit www.acura.com/handsfreelink (U.S.) or www.handsfreelink.ca
(Canada) to check phone compatibility.
To reduce the potential for driver distraction, certain manual functions may
be inoperable or grayed out while the vehicle is moving. Voice commands are
always available.
HFL Displays and Controls
Use the controls to enter information and make selections.
Pick-Up button: Answer an incoming call, or
display speed dial and call history in the MID.
Selector wheel: Scroll through speed dial and
call history in the MID. Press to make a selection.
Adjust volume during a call.
Hang-Up/Back button: End or decline a call, or
clear HFL information in the MID.
Talk button: Make a call using a stored voice tag,
phonebook name, or phone number.
PHONE button: Go
to the phone screen.
BACK button:
Return to the
previous display.
Interface dial: Rotate and press to
select an item in the upper display.
Move up, down, left, and right. MENU button (from
the Phone screen):
Display menu items.
SETTINGS button:
Go to Phone
Settings.
HFL display
BLUETOOTH® HANDSFREELINK®
BLUETOOTH® HANDSFREELINK®
Page 36 of 73
64 || 65
TABLE OF
CONTENTS
INDEX
VISUAL INDEX
VOICE COMMAND INDEX
SAFETY
INFORMATION
CLIENT
INFORMATION
INSTRUMENT PANEL
SPECIFICATIONS
VEHICLE
CONTROLS
MAINTENANCE
AUDIO AND
CONNECTIVITY
HANDLING THE UNEXPECTED
BLUETOOTH®
HANDSFREELINK®
DRIVING
ACURALINK®
NAVIGATION
Subscription Features
A subscription-based service that provides convenient features, such as collision
notification, emergency assistance, online security, and important messages about
your vehicle. Requires enrollment and privacy agreement. To subscribe or get more
information, contact a dealer or visit owners.acura.com (U.S.) or www.myacura.ca
(Canada).
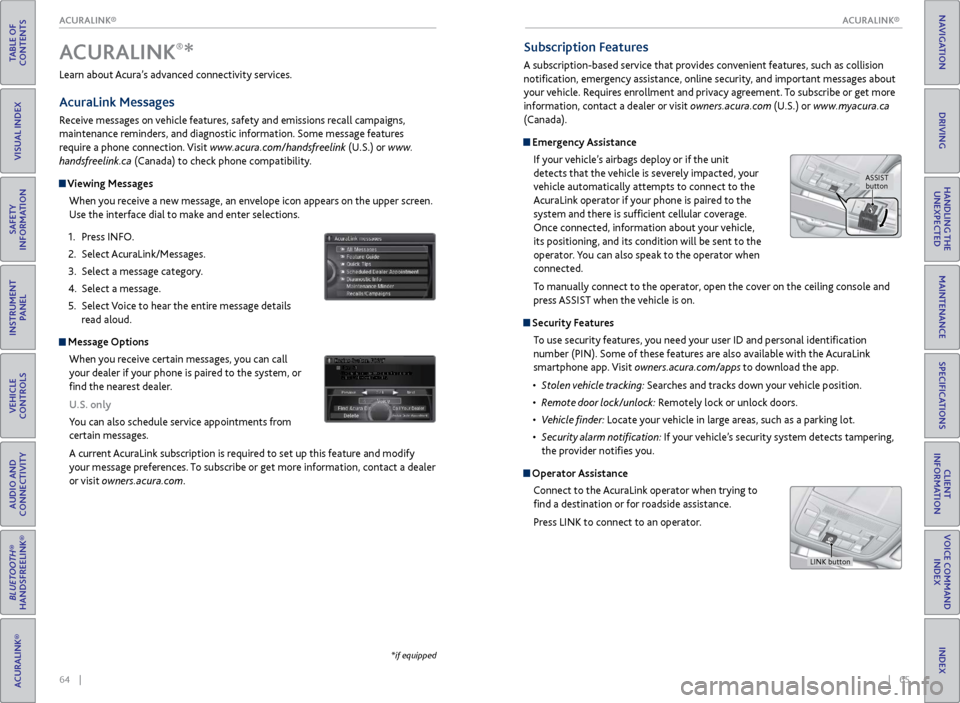
Emergency Assistance
If your vehicle’s airbags deploy or if the unit
detects that the vehicle is severely impacted, your
vehicle automatically attempts to connect to the
AcuraLink operator if your phone is paired to the
system and there is sufficient cellular coverage.
Once connected, information about your vehicle,
its positioning, and its condition will be sent to the
operator. You can also speak to the operator when
connected.
To manually connect to the operator, open the cover on the ceiling console and
press ASSIST when the vehicle is on.
Security Features
To use security features, you need your user ID and personal identification
number (PIN). Some of these features are also available with the AcuraLink
smartphone app. Visit owners.acura.com/apps to download the app.
•
S
tolen vehicle tracking: Searches and tracks down your vehicle position.
•
R
emote door lock/unlock: Remotely lock or unlock doors.
•
V
ehicle finder: Locate your vehicle in large areas, such as a parking lot.
•
S
ecurity alarm notification: If your vehicle’s security system detects tampering,
the provider notifies you.
Operator Assistance
Connect to the AcuraLink operator when trying to
find a destination or for roadside assistance.
Press LINK to connect to an operator.
Learn about Acura’s advanced connectivity services.
AcuraLink Messages
Receive messages on vehicle features, safety and emissions recall campaigns,
maintenance reminders, and diagnostic information. Some message features
require a phone connection. Visit www.acura.com/handsfreelink (U.S.) or
www.
handsfreelink.ca (Canada) to check phone compatibility.
Viewing Messages
When you receive a new message, an envelope icon appears on the upper screen.
Use the interface dial to make and enter selections.
1.
Pr
ess INFO.
2.
Select A
curaLink/Messages.
3.
Select a message category
.
4.
Select a message.
5.
Select
Voice to hear the entire message details
read aloud.
Message Options
When you receive certain messages, you can call
your dealer if your phone is paired to the system, or
find the nearest dealer.
U.S. only
You can also schedule service appointments from
certain messages.
A current AcuraLink subscription is required to set up this feature and modify
your message preferences. To subscribe or get more information, contact a dealer
or visit owners.acura.com.
Dec. 31, 2011
ACURALINK®*
*if equipped
ASSIST
button
LINK button
ACURALINK®
ACURALINK®
Page 52 of 73
96 || 97
DRIVING
DRIVING
TABLE OF
CONTENTS
INDEX
VISUAL INDEX
VOICE COMMAND INDEX
SAFETY
INFORMATION
CLIENT
INFORMATION
INSTRUMENT PANEL
SPECIFICATIONS
VEHICLE
CONTROLS
MAINTENANCE
AUDIO AND
CONNECTIVITY
HANDLING THE UNEXPECTED
BLUETOOTH®
HANDSFREELINK®
DRIVING
ACURALINK®
NAVIGATION
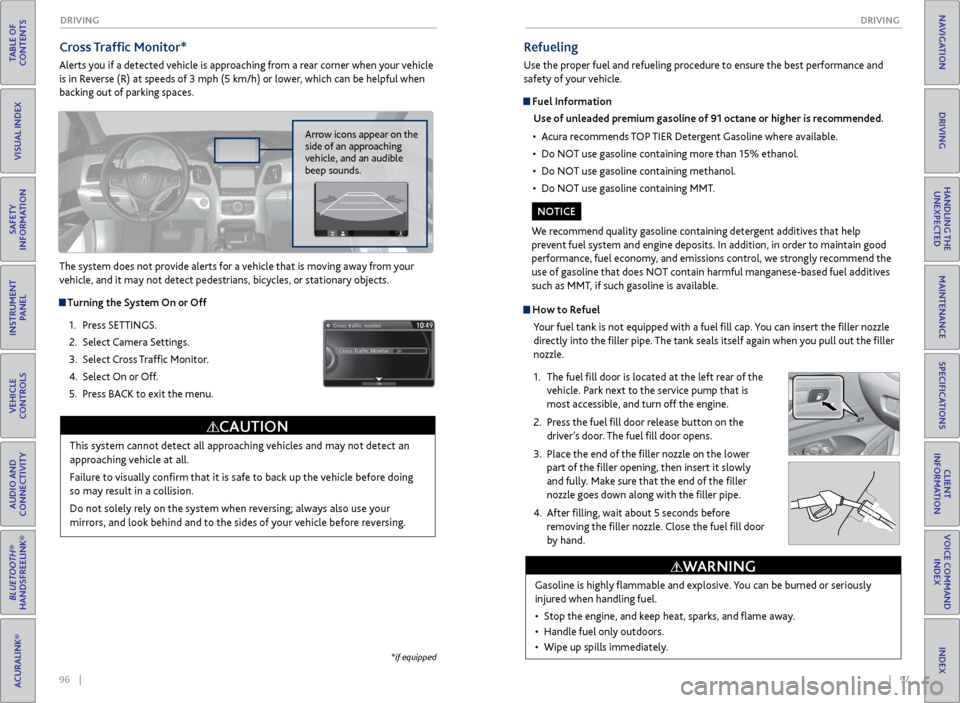
Cross Traffic Monitor*
Alerts you if a detected vehicle is approaching from a rear corner when your vehicle
is in Reverse (R) at speeds of 3 mph (5 km/h) or lower, which can be helpful when
backing out of parking spaces.
The system does not provide alerts for a vehicle that is moving away from your
vehicle, and it may not detect pedestrians, bicycles, or stationary objects.
Turning the System On or Off
1.
Pr
ess SETTINGS.
2.
Select Camera
Settings.
3.
Select
Cross Traffic Monitor.
4.
Select On
or Off.
5.
Pr
ess BACK to exit the menu.
This system cannot detect all approaching vehicles and may not detect an
approaching vehicle at all.
Failure to visually confirm that it is safe to back up the vehicle before doing
so may result in a collision.
Do not solely rely on the system when reversing; always also use your
mirrors, and look behind and to the sides of your vehicle before reversing.
CAUTION
Arrow icons appear on the
side of an approaching
vehicle, and an audible
beep sounds.
*if equipped
How to RefuelYour fuel tank is not equipped with a fuel fill cap. You can insert the filler nozzle
directly into the filler pipe. The tank seals itself again when you pull out the filler
nozzle.
1.
The
fuel fill door is located at the left rear of the
vehicle. Park next to the service pump that is
most accessible, and turn off the engine.
2.
Pr
ess the fuel fill door release button on the
driver’s door. The fuel fill door opens.
3.
Place the
end of the filler nozzle on the lower
part of the filler opening, then insert it slowly
and fully. Make sure that the end of the filler
nozzle goes down along with the filler pipe.
4.
After
filling, wait about 5 seconds before
removing the filler nozzle. Close the fuel fill door
by hand.
Refueling
Use the proper fuel and refueling procedure to ensure the best performance and
safety of your vehicle.
Fuel Information
Use of unleaded premium gasoline of 91 octane or higher is recommended.
•
A
cura recommends TOP TIER Detergent Gasoline where available.
•
Do NO
T use gasoline containing more than 15% ethanol.
•
Do NO
T use gasoline containing methanol.
•
Do NO
T use gasoline containing MMT.
We recommend quality gasoline containing detergent additives that help
prevent fuel system and engine deposits. In addition, in order to maintain good
performance, fuel economy, and emissions control, we strongly recommend the
use of gasoline that does NOT contain harmful manganese-based fuel additives
such as MMT, if such gasoline is available.
NOTICE
Gasoline is highly flammable and explosive. You can be burned or seriously
injured when handling fuel.
•
Stop
the engine, and keep heat, sparks, and flame away.
•
Handle
fuel only outdoors.
•
Wipe up spills immediatel
y.
WARNING
Page 53 of 73
98 || 99
HANDLING THE UNEXPECTED
HANDLING THE UNEXPECTED
TABLE OF
CONTENTS
INDEX
VISUAL INDEX
VOICE COMMAND INDEX
SAFETY
INFORMATION
CLIENT
INFORMATION
INSTRUMENT PANEL
SPECIFICATIONS
VEHICLE
CONTROLS
MAINTENANCE
AUDIO AND
CONNECTIVITY
HANDLING THE UNEXPECTED
BLUETOOTH®
HANDSFREELINK®
DRIVING
ACURALINK®
NAVIGATION
HANDLING THE UNEXPECTED
Learn about what to do in critical or emergency situations.
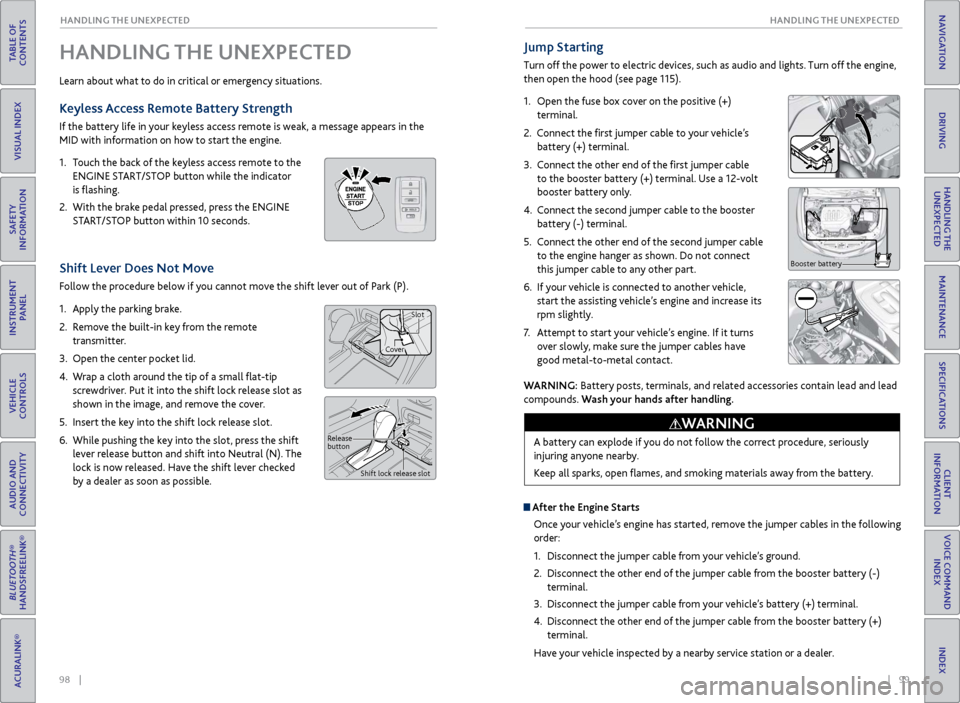
Keyless Access Remote Battery Strength
If the battery life in your keyless access remote is weak, a message appears in the
MID with information on how to start the engine.
1.
T
ouch the back of the keyless access remote to the
ENGINE START/STOP button while the indicator
is flashing.
2.
With
the brake pedal pressed, press the ENGINE
START/STOP button within 10 seconds.
Shift Lever Does Not Move
Follow the procedure below if you cannot move the shift lever out of Park (P).
1.
Appl
y the parking brake.
2.
R
emove the built-in key from the remote
transmitter.
3.
Open
the center pocket lid.
4.
W
rap a cloth around the tip of a small flat-tip
screwdriver. Put it into the shift lock release slot as
shown in the image, and remove the cover.
5.
Insert
the key into the shift lock release slot.
6.
While pushing
the key into the slot, press the shift
lever release button and shift into Neutral (N). The
lock is now released. Have the shift lever checked
by a dealer as soon as possible.
Jump Starting
Turn off the power to electric devices, such as audio and lights. Turn off the engine,
then open the hood (see page 115).
1.
Open the fuse box cover on the positive (+)
terminal.
2.
Connect the first jumper cable to your vehicle’s battery (+) terminal.
3.
C
onnect the other end of the first jumper cable
to the booster battery (+) terminal. Use a 12-volt
booster battery only.
4.
C
onnect the second jumper cable to the booster
battery (-) terminal.
5.
C
onnect the other end of the second jumper cable
to the engine hanger as shown. Do not connect
this jumper cable to any other part.
6.
If
your vehicle is connected to another vehicle,
start the assisting vehicle’s engine and increase its
rpm slightly.
7.
A
ttempt to start your vehicle’s engine. If it turns
over slowly, make sure the jumper cables have
good metal-to-metal contact.
Booster battery
WARNING: Battery posts, terminals, and related accessories contain lead and lead
compounds. Wash your hands after handling.
A battery can explode if you do not follow the correct procedure, seriously
injuring anyone nearby.
Keep all sparks, open flames, and smoking materials away from the battery.
WARNING
Release
button Shift lock release slot
CoverSlot
After the Engine Starts
Once your vehicle’s engine has started, remove the jumper cables in the following
order:
1.
Disconnect
the jumper cable from your vehicle’s ground.
2.
Disconnect
the other end of the jumper cable from the booster battery (-)
terminal.
3.
Disconnect
the jumper cable from your vehicle’s battery (+) terminal.
4.
Disconnect
the other end of the jumper cable from the booster battery (+)
terminal.
Have your vehicle inspected by a nearby service station or a dealer.
Page 54 of 73
100 || 101
HANDLING THE UNEXPECTED
HANDLING THE UNEXPECTED
TABLE OF
CONTENTS
INDEX
VISUAL INDEX
VOICE COMMAND INDEX
SAFETY
INFORMATION
CLIENT
INFORMATION
INSTRUMENT PANEL
SPECIFICATIONS
VEHICLE
CONTROLS
MAINTENANCE
AUDIO AND
CONNECTIVITY
HANDLING THE UNEXPECTED
BLUETOOTH®
HANDSFREELINK®
DRIVING
ACURALINK®
NAVIGATION
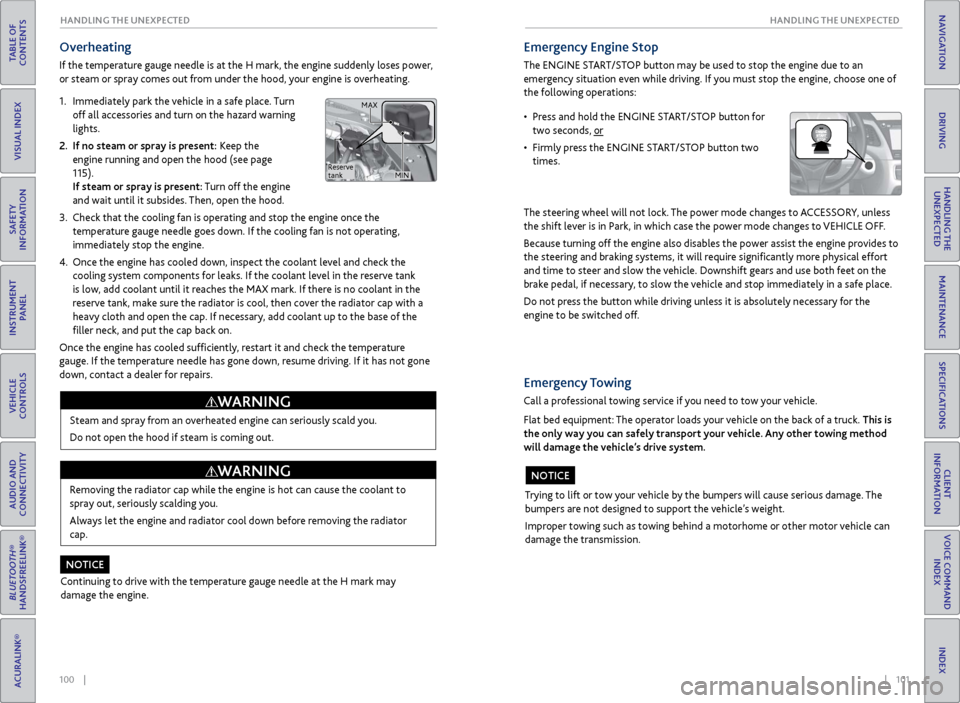
Overheating
If the temperature gauge needle is at the H mark, the engine suddenly loses power,
or steam or spray comes out from under the hood, your engine is overheating.
1.
Immediatel
y park the vehicle in a safe place. Turn
off all accessories and turn on the hazard warning
lights.
2.
If no steam
or spray is present: Keep the
engine running and open the hood (see page
115).
If steam or spray is present: Turn off the engine
and wait until it subsides. Then, open the hood.
3.
Check that the
cooling fan is operating and stop the engine once the
temperature gauge needle goes down. If the cooling fan is not operating,
immediately stop the engine.
4.
Once
the engine has cooled down, inspect the coolant level and check the
cooling system components for leaks. If the coolant level in the reserve tank
is low, add coolant until it reaches the MAX mark. If there is no coolant in the
reserve tank, make sure the radiator is cool, then cover the radiator cap with a
heavy cloth and open the cap. If necessary, add coolant up to the base of the
filler neck, and put the cap back on.
Once the engine has cooled sufficiently, restart it and check the temperature
gauge. If the temperature needle has gone down, resume driving. If it has not gone
down, contact a dealer for repairs.
Steam and spray from an overheated engine can seriously scald you.
Do not open the hood if steam is coming out.
WARNING
Removing the radiator cap while the engine is hot can cause the coolant to
spray out, seriously scalding you.
Always let the engine and radiator cool down before removing the radiator
cap.
WARNING
Continuing to drive with the temperature gauge needle at the H mark may
damage the engine.
NOTICE
Emergency Engine Stop
The ENGINE START/STOP button may be used to stop the engine due to an
emergency situation even while driving. If you must stop the engine, choose one of
the following operations:
The steering wheel will not lock. The power mode changes to ACCESSORY, unless
the shift lever is in Park, in which case the power mode changes to VEHICLE OFF.
Because turning off the engine also disables the power assist the engine provides to
the steering and braking systems, it will require significantly more physical effort
and time to steer and slow the vehicle. Downshift gears and use both feet on the
brake pedal, if necessary, to slow the vehicle and stop immediately in a safe place.
Do not press the button while driving unless it is absolutely necessary for the
engine to be switched off.
• Press and hold the ENGINE START/STOP button for two seconds, or
•
Firml
y press the ENGINE START/STOP button two
times.
Trying to lift or tow your vehicle by the bumpers will cause serious damage. The
bumpers are not designed to support the vehicle’s weight.
Improper towing such as towing behind a motorhome or other motor vehicle can
damage the transmission.
NOTICE
Emergency Towing
Call a professional towing service if you need to tow your vehicle.
Flat bed equipment: The operator loads your vehicle on the back of a truck. This is
the only way you can safely transport your vehicle. Any other towing method
will damage the vehicle’s drive system.
Reserve
tank MAX
MIN
Page 57 of 73
106 || 107
HANDLING THE UNEXPECTED
HANDLING THE UNEXPECTED
TABLE OF
CONTENTS
INDEX
VISUAL INDEX
VOICE COMMAND INDEX
SAFETY
INFORMATION
CLIENT
INFORMATION
INSTRUMENT PANEL
SPECIFICATIONS
VEHICLE
CONTROLS
MAINTENANCE
AUDIO AND
CONNECTIVITY
HANDLING THE UNEXPECTED
BLUETOOTH®
HANDSFREELINK®
DRIVING
ACURALINK®
NAVIGATION
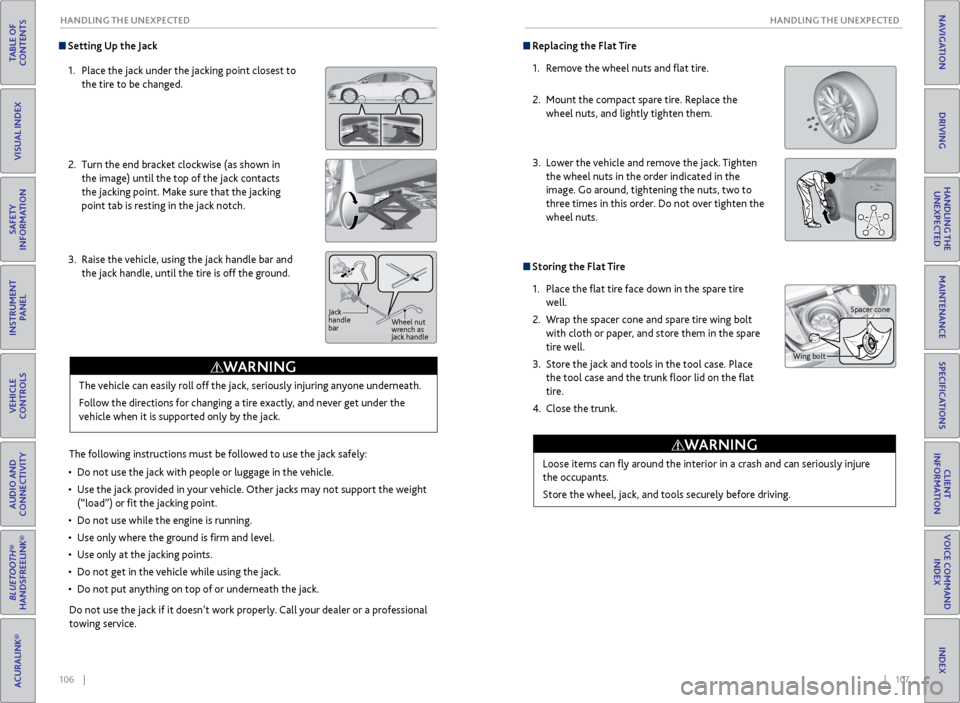
Setting Up the Jack
1.
Place
the jack under the jacking point closest to
the tire to be changed.
2.
Turn
the end bracket clockwise (as shown in
the image) until the top of the jack contacts
the jacking point. Make sure that the jacking
point tab is resting in the jack notch.
3.
Raise
the vehicle, using the jack handle bar and
the jack handle, until the tire is off the ground.
The following instructions must be followed to use the jack safely:
•
Do not use
the jack with people or luggage in the vehicle.
•
Use
the jack provided in your vehicle. Other jacks may not support the weight
(“load”) or fit the jacking point.
•
Do not use
while the engine is running.
•
Use
only where the ground is firm and level.
•
Use
only at the jacking points.
•
Do not get in
the vehicle while using the jack.
•
Do
not put anything on top of or underneath the jack.
The vehicle can easily roll off the jack, seriously injuring anyone underneath.
Follow the directions for changing a tire exactly, and never get under the
vehicle when it is supported only by the jack.
WARNING
Do not use the jack if it doesn’t work properly. Call your dealer or a professional
towing service.
Jack
handle
bar
Wheel nut
wrench as
jack handle
Replacing the Flat Tire
1.
R
emove the wheel nuts and flat tire.
2.
Mount the
compact spare tire. Replace the
wheel nuts, and lightly tighten them.
3.
Lower
the vehicle and remove the jack. Tighten
the wheel nuts in the order indicated in the
image. Go around, tightening the nuts, two to
three times in this order. Do not over tighten the
wheel nuts.
Storing the Flat Tire
1.
Place the
flat tire face down in the spare tire
well.
2.
W
rap the spacer cone and spare tire wing bolt
with cloth or paper, and store them in the spare
tire well.
3.
Stor
e the jack and tools in the tool case. Place
the tool case and the trunk floor lid on the flat
tire.
4.
Close the trunk.
Loose items can
fly around the interior in a crash and can seriously injure
the occupants.
Store the wheel, jack, and tools securely before driving.
WARNING
Wing bolt Spacer cone
Page 60 of 73
112 || 113
MAINTENANCE
MAINTENANCE
TABLE OF
CONTENTS
INDEX
VISUAL INDEX
VOICE COMMAND INDEX
SAFETY
INFORMATION
CLIENT
INFORMATION
INSTRUMENT PANEL
SPECIFICATIONS
VEHICLE
CONTROLS
MAINTENANCE
AUDIO AND
CONNECTIVITY
HANDLING THE UNEXPECTED
BLUETOOTH®
HANDSFREELINK®
DRIVING
ACURALINK®
NAVIGATION
Learn about basic maintenance that you can perform on the vehicle yourself, as
well as information about how to best maintain the vehicle.
Safety Precautions
Some of the most important safety precautions are listed below; however,
we cannot warn you of every conceivable hazard that can arise in performing
maintenance. Only you can decide whether or not you should perform a given task.
Maintenance Safety
•
T
o reduce the possibility of fire or explosion, keep cigarettes, sparks, and flames
away from the battery and all fuel-related parts.
•
Nev
er leave rags, towels, or other flammable objects under the hood. Heat
from the engine and exhaust can ignite them, causing a fire.
•
T
o clean parts, use a commercially available degreaser or parts cleaner, not
gasoline.
•
W
ear eye protection and protective clothing when working with the battery or
compressed air.
•
Do not run
the engine in confined spaces where carbon monoxide gas can
accumulate.
Vehicle Safety
•
The
vehicle must be in a stationary condition, and parked on level ground with
the parking brake set and the engine off.
•
Be awar
e that hot parts can burn you.
•
Be awar
e that moving parts can injure you.
MAINTENANCE
Improperly maintaining this vehicle or failing to correct a problem before
driving can cause a crash in which you can be seriously hurt or killed.
Always follow the inspection and maintenance recommendations according to
the schedules in this guide.
WARNING
Failure to properly follow maintenance instructions and precautions can cause
you to be seriously hurt or killed.
Always follow the procedures and precautions in this guide.
WARNING
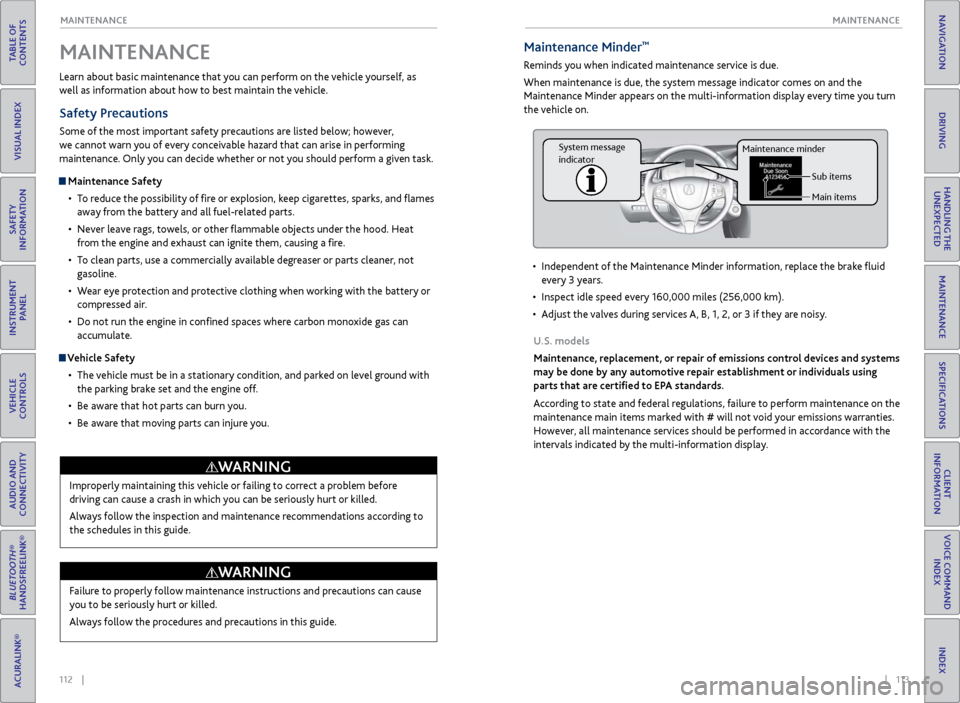
Maintenance Minder™
Reminds you when indicated maintenance service is due.
When maintenance is due, the system message indicator comes on and the
Maintenance Minder appears on the multi-information display every time you turn
the vehicle on.
•
Independent
of the Maintenance Minder information, replace the brake fluid
every 3 years.
•
Inspect idle speed ev
ery 160,000 miles (256,000 km).
•
A
djust the valves during services A, B, 1, 2, or 3 if they are noisy.
U.S. models
Maintenance, replacement, or repair of emissions control devices and systems
may be done by any automotive repair establishment or individuals using
parts that are certified to EPA standards.
According to state and federal regulations, failure to perform maintenance on the
maintenance main items marked with # will not void your emissions warranties.
However, all maintenance services should be performed in accordance with the
intervals indicated by the multi-information display.
Sub items
Main items
Maintenance minder
System message
indicator