turn signal Acura RLX 2017 Quick Guide
[x] Cancel search | Manufacturer: ACURA, Model Year: 2017, Model line: RLX, Model: Acura RLX 2017Pages: 73, PDF Size: 7.37 MB
Page 3 of 73
TABLE OF
CONTENTS
INDEX
VISUAL INDEX
VOICE COMMAND INDEX
SAFETY
INFORMATION
CLIENT
INFORMATION
INSTRUMENT PANEL
SPECIFICATIONS
VEHICLE
CONTROLS
MAINTENANCE
AUDIO AND
CONNECTIVITY
HANDLING THE UNEXPECTED
BLUETOOTH®
HANDSFREELINK®
DRIVING
ACURALINK®
NAVIGATION
TABLE OF CONTENTS
Acura Total Luxury Care Roadside Assistance
Your Acura TLC Roadside Assistance representative is here to help you 24 hours
a day, 7 days a week. Under your 4-year/50,000-mile (80,000 km) warranty, the
following benefits are available:
•
T
owing services — full cost of towing to the closest Acura dealer
•
R
oadside assistance — jump starting, fuel delivery, lockout, and flat tire
•
T
rip planning — detailed trip routing, emergency services, and more Call (800) 594-8500 (U.S.) or (800) 565-7587 (Canada)
Acura Client RelationsYour authorized Acura dealer should be able to answer any questions you have
about your vehicle. However, if you are dissatisfied with the information you
receive, you can call Acura Client Relations (see page 131).
Call (800) 382-2238 (U.S.) or (888) 922-8729 (Canada)
INTRODUCTION
This Owner’s Guide is intended to help you quickly get acquainted with your
2017 Acura RLX. It provides basic information and instructions on technology and
convenience features, as well as emergency procedures and how to get assistance.
This guide is for vehicles sold in the United States and Canada. It covers all RLX
models except for Sport Hybrid, so you may find descriptions of features and
equipment that are not in your vehicle.
Images throughout this guide are from U.S. vehicles and represent features and
equipment that are available on some, but not all, models. Images shown in this
guide should be considered examples and used for demonstration purposes only.
This guide is not intended to be a substitute for the Owner’s Manual. The Owner
Information CD enclosed in your glove box kit includes the Owner’s Manual,
Navigation Manual, and vehicle and tire warranties in electronic format. This
information can be viewed on a computer (PC
or Mac platform) and sav
ed
or printed for your reference. You can also visit owners.acura.com to view the
complete and most current information.
If you are the first registered owner of your vehicle, you may request a
complimentary printed copy of the Owner’s Manual, Navigation Manual, or Vehicle
Warranty within the first six months of vehicle purchase. To request a copy, visit
owners.acura.com and create or log in to your account. In Canada, please request a
copy from your Acura dealer.
American Honda Motor Company strives to be proactive in protecting our
environment and natural resources. By using electronic delivery for a considerable
portion of the information typically found in a vehicle owner’s manual, we are
further reducing our impact on the environment.
*if equipped
VISUAL INDEX
.......................................................
1
Steering Wheel and Nearby Controls
.................
1
Dashboard and Ceiling Controls
..........................
2
SAFETY INFORMATION
.......................................
3
Important Safety Information
.............................3
Seat Belts
.................................................................
5
Airbags
.....................................................................
8
Child Safety
...........................................................
14
Safety Label Locations........................................ 20
Reporting Safety Defects
....................................
21
INSTRUMENT PANEL..........................................22 Malfunction Indicators
.......................................
22
Condition Indicators
...........................................
24
On/Off Indicators
................................................
25
Multi-Information Display (MID)
.....................
26
VEHICLE CONTROLS
..........................................
28
Using the Remote Transmitter
..........................
28
Keyless Access System
.......................................
29
Door Operation from Inside the Vehicle
.........
30
Power Window Operation
..................................
31
Power Moonroof Operation
.............................
32
Interior and Exterior Lights
................................
33
One-Touch Turn Signal
.......................................
34
Wiper Operation
..................................................
34
Adjusting the Seats
.............................................
36
Driving Position Memory System
.....................
39
Adjusting the Steering Wheel
...........................
39
Adjusting the Mirrors
..........................................
40
Customized Features
...........................................
41
HomeLink
® Universal Transceiver ..................... 42
Climate C
ontrol System ..................................... 43
Seat Heaters and Ventilation*
..........................45AUDIO AND CONNECTIVITY
..........................
46
Basic Audio Operation ........................................
46
On-Demand Multi-Use Display (ODMD) .......
48
FM/AM Radio .......................................................
49
SiriusXM
® Radio ................................................... 50
C
ompact Disc (CD) or USB Flash Drive ............51
Hard Disk Drive (HDD) Audio
...........................52
iPod
® ....................................................................... 53
Bluet ooth® Audio ................................................. 54
P
andora® ................................................................ 55
A
curaLink featuring Aha™ ................................... 56
BL
UETOOTH
® HANDSFREELINK®...................... 57
Basic HFL Operation
............................................ 57
Pairing a Phone
.................................................... 59
Making a Call
........................................................ 60
SMS Text Messaging and E-Mail
....................... 63
Roadside Assistance*
.......................................... 63
ACURALINK
®* ..................................................... 64
A
curaLink Messages ............................................ 64
Subscription Features
......................................... 65
NAVIGATION
....................................................... 66
Basic Navigation Operation
.............................. 66
Entering a Destination
........................................ 69
Routing
................................................................... 71
Page 4 of 73
| 1
V
ISUAL
I
NDEX
INDEX
VOICE COMMAND
INDEX
CLIENT
INFORMATION
SPECIFICATIONS
MAINTENANCE
HANDLING THE UNEXPECTED
DRIVING
NAVIGATION
TABLE OF
CONTENTS
VISUAL INDEX
SAFETY
INFORMATION
INSTRUMENT PANEL
VEHICLE
CONTROLS
AUDIO AND
CONNECTIVITY
BLUETOOTH®
HANDSFREELINK®
ACURALINK®
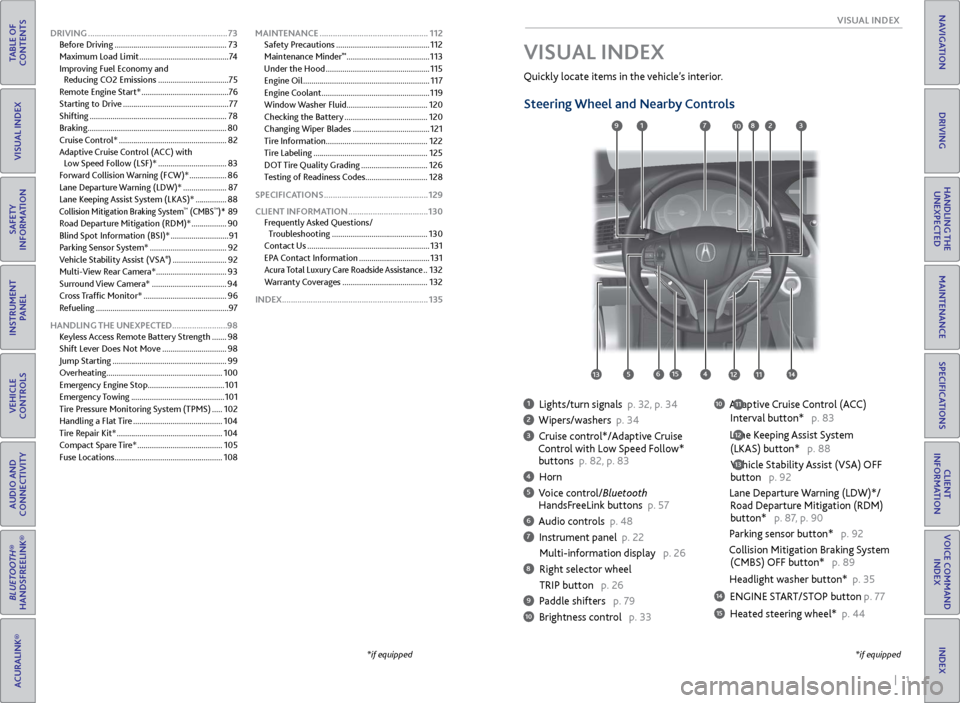
1 Lights/turn signals p. 32, p. 34
2 Wipers/washers p. 34
3 Cruise control*/Adaptive Cruise
Control with Low Speed Follow*
buttons p. 82, p. 83
4 Horn
5 Voice control/Bluetooth HandsF reeLink buttons p. 57
6 Audio controls p. 48
7 Instrument panel p. 22
Multi-information
display p. 26
8 Right selector wheel
TRIP button
p. 26
9 Paddle shifters p. 79
10 Brightness control p. 33
Quickly locate items in the vehicle’s interior.
Steering Wheel and Nearby Controls
10 Adaptive Cruise Control (ACC)
Interval button*
p. 83
Lane Keeping Assist System
(LKAS) button*
p. 88
Vehicle Stability Assist (VSA) OFF
button
p. 92
Lane Departure Warning (LDW)*/
R
oad Departure Mitigation (RDM)
button*
p. 87, p. 90
Parking sensor button* p. 92
Collision Mitigation Braking System
(CMBS)
OFF button* p. 89
Headlight washer button* p. 35
14 ENGINE START/STOP button p. 77
15 Heated steering wheel* p. 44
VISUAL INDEX
*if equipped
12
*if equipped
11
13
127
4
8
135615
9310
111214
DRIVING ............................................................... 73
Befor e Driving ...................................................... 73
Maximum Load Limit
........................................... 74
Improving Fuel Economy and Reducing CO2 Emissions
..................................75
Remote Engine Start*
..........................................76
Starting to Drive
................................................... 77
Shifting
.................................................................. 78
Braking
................................................................... 80
Cruise Control*
.................................................... 82
Adaptive Cruise Control (ACC)
with
Low Speed Follow (LSF)*
.................................83
Forward Collision Warning (FCW)*
..................86
Lane Departure Warning (LDW)*
.....................87
Lane Keeping Assist System (LKAS)*
...............88
Collision Mitigation Braking System™ (CMBS™)* 89
R
oad Departure Mitigation (RDM)*
................. 90
Blind Spot Information (BSI)*
............................ 91
Parking Sensor System*
..................................... 92
Vehicle Stability Assist (VSA
®) .......................... 92
Multi-
View Rear Camera*
.................................. 93
Surround View Camera*
.................................... 94
Cross Traffic Monitor*
........................................ 96
Refueling
................................................................ 97
HANDLING THE UNEXPECTED .........................98
Keyless Access Remote Battery Strength
.......98
Shift Lever Does Not Move
............................... 98
Jump Starting
....................................................... 99
Overheating........................................................ 100
Emergency Engine Stop
..................................... 101
Emergency Towing
............................................. 101
Tire Pressure Monitoring System (TPMS)
.....102
Handling a Flat Tire
........................................... 104
Tire Repair Kit*
................................................... 104
Compact Spare Tire*
......................................... 105
Fuse Locations
.................................................... 108MAINTENANCE
.................................................
112
Safety Precautions .............................................
112
Maintenance Minder
™ ........................................ 113
Under the
Hood
.................................................. 115
Engine Oil
............................................................. 117
Engine Coolant
.................................................... 119
Window Washer Fluid ....................................... 120
Checking the Battery
........................................ 120
Changing Wiper Blades
..................................... 121
Tire Information
................................................. 122
Tire Labeling
....................................................... 125
DOT Tire Quality Grading
................................ 126
Testing of Readiness Codes .............................. 128
SPECIFICATIONS
............................................... 129
CLIENT INFORMATION
.................................... 130
Frequently Asked Questions/ Troubleshooting
.............................................. 130
Contact Us
........................................................... 131
EPA Contact Information
.................................. 131
Acura Total Luxury Care Roadside Assistance ..132
Warranty Coverages
......................................... 132
INDEX.................................................................. 135
Page 10 of 73
12 || 13
S AFETY
S
AFETY
TABLE OF
CONTENTS
INDEX
VISUAL INDEX
VOICE COMMAND INDEX
SAFETY
INFORMATION
CLIENT
INFORMATION
INSTRUMENT PANEL
SPECIFICATIONS
VEHICLE
CONTROLS
MAINTENANCE
AUDIO AND
CONNECTIVITY
HANDLING THE UNEXPECTED
BLUETOOTH®
HANDSFREELINK®
DRIVING
ACURALINK®
NAVIGATION
Airbag System Components
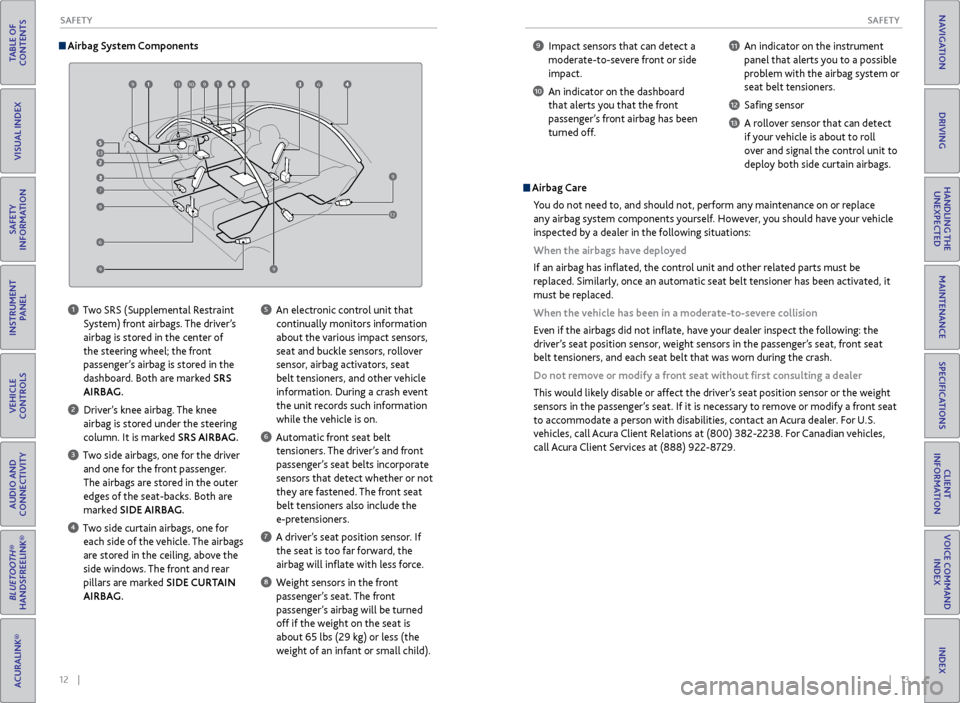
1 Two SRS (Supplemental Restraint
System) front airbags. The driver’s
airbag is stored in the center of
the steering wheel; the front
passenger’s airbag is stored in the
dashboard. Both are marked SRS
AIRBAG.
2 Driver’s knee airbag. The knee airbag is stored under the steering
column. It is marked SRS AIRBAG.
3 Two side airbags, one for the driver and one for the front passenger.
The airbags are stored in the outer
edges of the seat-backs. Both are
marked SIDE AIRBAG.
4 Two side curtain airbags, one for each side of the vehicle. The airbags
are stored in the ceiling, above the
side windows. The front and rear
pillars are marked SIDE CURTAIN
AIRBAG.
5 An electronic control unit that continually monitors information
about the various impact sensors,
seat and buckle sensors, rollover
sensor, airbag activators, seat
belt tensioners, and other vehicle
information. During a crash event
the unit records such information
while the vehicle is on.
6 Automatic front seat belt tensioners. The driver’s and front
passenger’s seat belts incorporate
sensors that detect whether or not
they are fastened. The front seat
belt tensioners also include the
e-pretensioners.
7 A driver’s seat position sensor. If the seat is too far forward, the
airbag will inflate with less force.
8 Weight sensors in the front passenger’s seat. The front
passenger’s airbag will be turned
off if the weight on the seat is
about 65 lbs (29 kg) or less (the
weight of an infant or small child).
9 Impact sensors that can detect a moderate-to-severe front or side
impact.
10 An indicator on the dashboard that alerts you that the front
passenger’s front airbag has been
turned off.
11 An indicator on the instrument panel that alerts you to a possible
problem with the airbag system or
seat belt tensioners.
12 Safing sensor
13 A rollover sensor that can detect if your vehicle is about to roll
over and signal the control unit to
deploy both side curtain airbags.
Airbag Care
You do not need to, and should not, perform any maintenance on or replace
any airbag system components yourself. However, you should have your vehicle
inspected by a dealer in the following situations:
When the airbags have deployed
If an airbag has inflated, the control unit and other related parts must be
replaced. Similarly, once an automatic seat belt tensioner has been activated, it
must be replaced.
When the vehicle has been in a moderate-to-severe collision
Even if the airbags did not inflate, have your dealer inspect the following: the
driver’s seat position sensor, weight sensors in the passenger’s seat, front seat
belt tensioners, and each seat belt that was worn during the crash.
Do not remove or modify a front seat without first consulting a dealer
This would likely disable or affect the driver’s seat position sensor or the weight
sensors in the passenger’s seat. If it is necessary to remove or modify a front seat
to accommodate a person with disabilities, contact an Acura dealer. For U.S.
vehicles, call Acura Client Relations at (800) 382-2238. For Canadian vehicles,
call Acura Client Services at (888) 922-8729.
9
13
7
9
9
91110986
9
12
6
Page 16 of 73
24 || 25
I NSTRUMENT P
ANELI
NSTRUMENT P
ANEL
TABLE OF
CONTENTS
INDEX
VISUAL INDEX
VOICE COMMAND INDEX
SAFETY
INFORMATION
CLIENT
INFORMATION
INSTRUMENT PANEL
SPECIFICATIONS
VEHICLE
CONTROLS
MAINTENANCE
AUDIO AND
CONNECTIVITY
HANDLING THE UNEXPECTED
BLUETOOTH®
HANDSFREELINK®
DRIVING
ACURALINK®
NAVIGATION
BSI* off
ACC* on LKAS* on
SPORT mode on
Automatic brake hold on
Automatic brake activated
Ca nada
U.S.
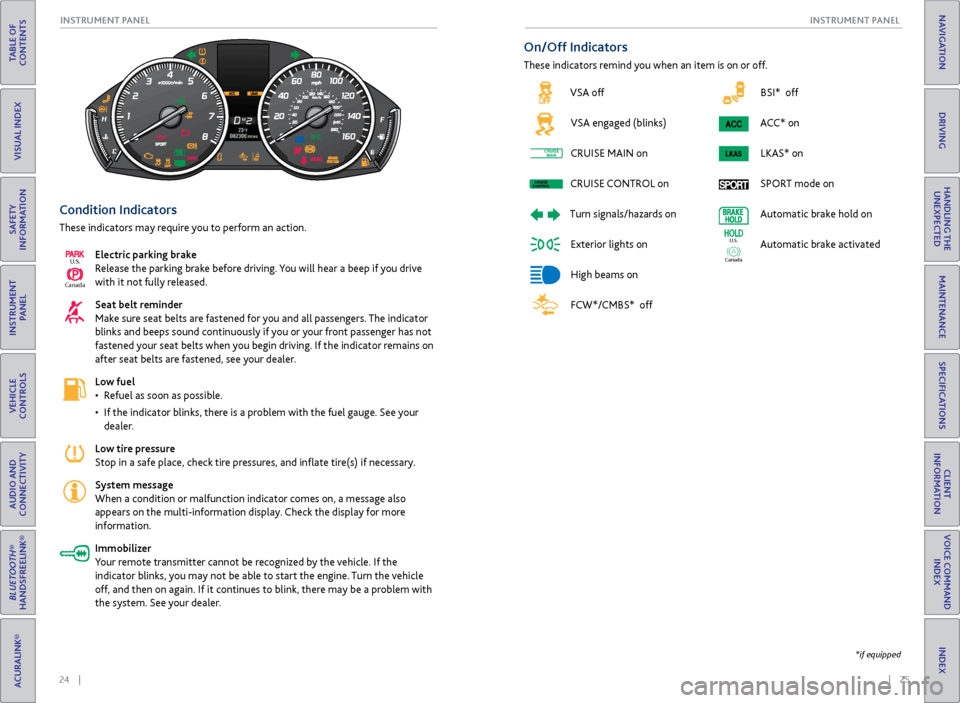
Condition Indicators
These indicators may require you to perform an action.
Electric parking brake
Release the parking brake before driving. You will hear a beep if you drive
with it not fully released.
Seat belt reminder
Make sure seat belts are fastened for you and all passengers. The indicator
blinks and beeps sound continuously if you or your front passenger has not
fastened your seat belts when you begin driving. If the indicator remains on
after seat belts are fastened, see your dealer.
Low fuel
•
R
efuel as soon as possible.
•
If
the indicator blinks, there is a problem with the fuel gauge. See your
dealer.
Low tire pressure
Stop in a safe place, check tire pressures, and inflate tire(s) if necessary.
System message
When a condition or malfunction indicator comes on, a message also
appears on the multi-information display. Check the display for more
information.
Immobilizer
Your remote transmitter cannot be recognized by the vehicle. If the
indicator blinks, you may not be able to start the engine. Turn the vehicle
off, and then on again. If it continues to blink, there may be a problem with
the system. See your dealer.
Ca nada
U.S.
On/Off Indicators
These indicators remind you when an item is on or off.
*if equipped
VSA off
VSA engaged (blinks)
CRUISE
MAIN on
CRUISE
CONTROL
on
Turn
signals/hazards on
Exterior lights on
High beams on
FCW*/CMBS* off
CRUISEMAINCRUISE
CONTROLCRUISE
MAINCRUISE
CONTROL
Page 21 of 73
34 || 35
V EHICLE C ONTROLS
V
EHICLE C ONTROLS
TABLE OF
CONTENTS
INDEX
VISUAL INDEX
VOICE COMMAND INDEX
SAFETY
INFORMATION
CLIENT
INFORMATION
INSTRUMENT PANEL
SPECIFICATIONS
VEHICLE
CONTROLS
MAINTENANCE
AUDIO AND
CONNECTIVITY
HANDLING THE UNEXPECTED
BLUETOOTH®
HANDSFREELINK®
DRIVING
ACURALINK®
NAVIGATION
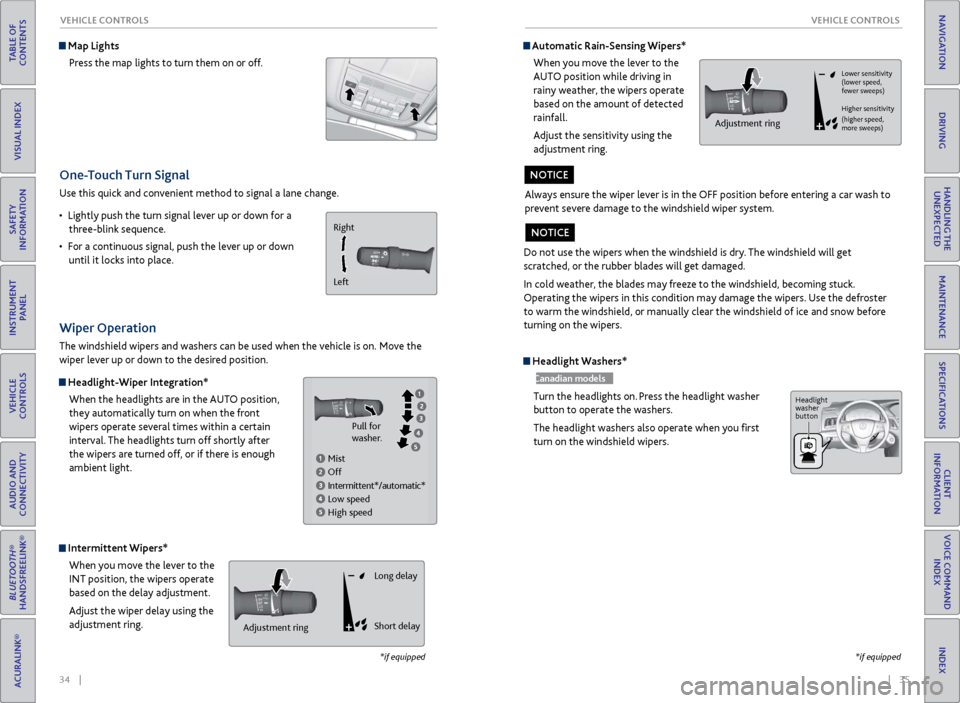
One-Touch Turn Signal
Use this quick and convenient method to signal a lane change.
•
Lightl
y push the turn signal lever up or down for a
three-blink sequence.
•
F
or a continuous signal, push the lever up or down
until it locks into place.
*if equipped
Wiper Operation
The windshield wipers and washers can be used when the vehicle is on. Move the
wiper lever up or down to the desired position.
Headlight-Wiper Integration*
When the headlights are in the AUTO position,
they automatically turn on when the front
wipers operate several times within a certain
interval. The headlights turn off shortly after
the wipers are turned off, or if there is enough
ambient light.
Intermittent Wipers*When you move the lever to the
INT position, the wipers operate
based on the delay adjustment.
Adjust the wiper delay using the
adjustment ring.
Map LightsPress the map lights to turn them on or off.
Right
Left
Mist
Off
Intermittent*/automatic*
Low speed
High speed Pull for
washer.
Headlight Washers*
Canadian models
Turn the headlights on. Press the headlight washer
button to operate the washers.
The headlight washers also operate when you first
turn on the windshield wipers.
*if equipped
Automatic Rain-Sensing Wipers*
When you move the lever to the
AUTO position while driving in
rainy weather, the wipers operate
based on the amount of detected
rainfall.
Adjust the sensitivity using the
adjustment ring.
Always ensure the wiper lever is in the OFF position before entering a car wash to
prevent severe damage to the windshield wiper system.
NOTICE
Adjustment ringAdjustment ring Long delay
Short delay
Do not use the wipers when the windshield is dry. The windshield will get
scratched, or the rubber blades will get damaged.
In cold weather, the blades may freeze to the windshield, becoming stuck.
Operating the wipers in this condition may damage the wipers. Use the defroster
to warm the windshield, or manually clear the windshield of ice and snow before
turning on the wipers.
NOTICE
Lower sensitivity
(lower speed,
fewer sweeps)
Higher sensitivity
(higher speed,
more sweeps)
Adjustment ring
Headlight
washer
button
Page 28 of 73
48 || 49
AUDIO AND CONNECTIVITY
AUDIO AND CONNECTIVITY
TABLE OF
CONTENTS
INDEX
VISUAL INDEX
VOICE COMMAND INDEX
SAFETY
INFORMATION
CLIENT
INFORMATION
INSTRUMENT PANEL
SPECIFICATIONS
VEHICLE
CONTROLS
MAINTENANCE
AUDIO AND
CONNECTIVITY
HANDLING THE UNEXPECTED
BLUETOOTH®
HANDSFREELINK®
DRIVING
ACURALINK®
NAVIGATION
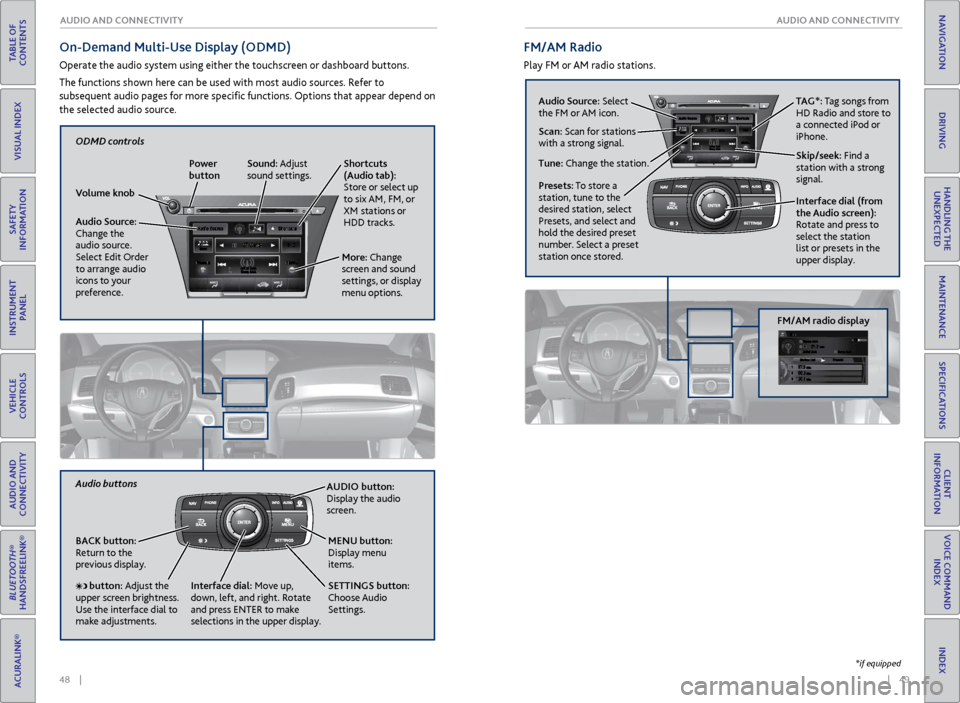
On-Demand Multi-Use Display (ODMD)
Operate the audio system using either the touchscreen or dashboard buttons.
The functions shown here can be used with most audio sources. Refer to
subsequent audio pages for more specific functions. Options that appear depend on
the selected audio source.
FM/AM Radio
Play FM or AM radio stations.
Audio Source: Select
the FM or AM icon.
Skip/seek: Find a
station with a strong
signal. TAG*: Tag songs from
HD Radio and store to
a connected iPod or
iPhone.
Tune: Change the station. Scan: Scan for stations
with a strong signal.
Interface dial (from
the Audio screen):
Rotate and press to
select the station
list or presets in the
upper display.
Presets: To store a
station, tune to the
desired station, select
Presets, and select and
hold the desired preset
number. Select a preset
station once stored.
FM/AM radio display
AUDIO button:
Display the audio
screen.
BACK button:
Return to the
previous display. SETTINGS button:
Choose Audio
Settings. MENU button:
Display menu
items.
button: Adjust the
upper screen brightness.
Use the interface dial to
make adjustments. Interface dial:
Move up,
down, left, and right. Rotate
and press ENTER to make
selections in the upper display.
Audio buttons
Shortcuts
(Audio tab):
Store or select up
to six AM, FM, or
XM stations or
HDD tracks.
Volume knob Power
button
Audio Source:
Change the
audio source.
Select Edit Order
to arrange audio
icons to your
preference. More: Change
screen and sound
settings, or display
menu options.Sound: Adjust
sound settings.
ODMD controls
*if equipped
Page 37 of 73
66 || 67
NAVIGATION
NAVIGATION
TABLE OF
CONTENTS
INDEX
VISUAL INDEX
VOICE COMMAND INDEX
SAFETY
INFORMATION
CLIENT
INFORMATION
INSTRUMENT PANEL
SPECIFICATIONS
VEHICLE
CONTROLS
MAINTENANCE
AUDIO AND
CONNECTIVITY
HANDLING THE UNEXPECTED
BLUETOOTH®
HANDSFREELINK®
DRIVING
ACURALINK®
NAVIGATION
Learn how to enter a destination and operate the navigation system.
Basic Navigation Operation
A real-time navigation system uses GPS and a map database to show your current
location and help guide you to a desired destination. You can operate the system
using voice commands or the system controls.
To reduce the potential for driver distraction, certain manual functions may
be inoperable or grayed out while the vehicle is moving. Voice commands are
always available.
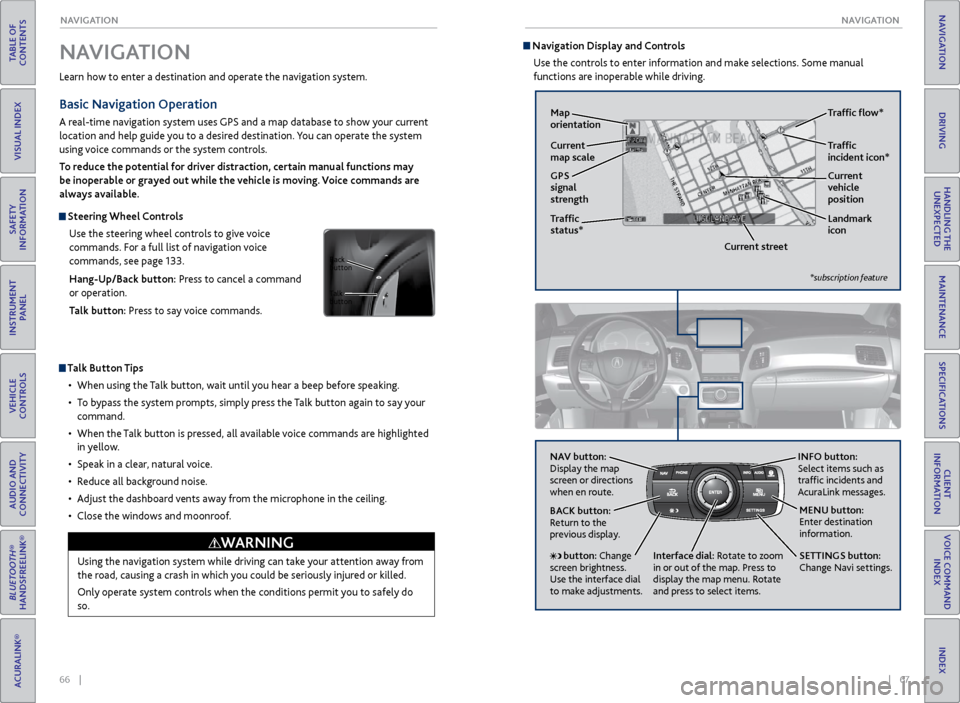
Steering Wheel Controls
Use the steering wheel controls to give voice
commands. For a full list of navigation voice
commands, see page 133.
Hang-Up/Back button: Press to cancel a command
or operation.
Talk button: Press to say voice commands.
Talk Button Tips
•
When using
the Talk button, wait until you hear a beep before speaking.
•
T
o bypass the system prompts, simply press the Talk button again to say your
command.
•
When
the Talk button is pressed, all available voice commands are highlighted
in yellow.
•
Speak in a clear
, natural voice.
•
R
educe all background noise.
•
A
djust the dashboard vents away from the microphone in the ceiling.
•
Close
the windows and moonroof.
Using the navigation system while driving can take your attention away from
the road, causing a crash in which you could be seriously injured or killed.
Only operate system controls when the conditions permit you to safely do
so.
WARNING
NAVIGATION
Talk
button Back
button
Navigation Display and Controls Use the controls to enter information and make selections. Some manual
functions are inoperable while driving.
NAV button:
Display the map
screen or directions
when en route. INFO
button:
Select items such as
traffic incidents and
AcuraLink messages.
BACK button:
Return to the
previous display.
SETTINGS button:
Change Navi settings. MENU button:
Enter destination
information.
button: Change
screen brightness.
Use the interface dial
to make adjustments. Interface dial:
Rotate to zoom
in or out of the map. Press to
display the map menu. Rotate
and press to select items.
GPS
signal
strength Traffic
incident icon*
Traffic
status* Traffic flow*
Current
map scale Current
vehicle
position
Map
orientation
Current streetLandmark
icon
*subscription feature
Page 47 of 73
86 || 87
DRIVING
DRIVING
TABLE OF
CONTENTS
INDEX
VISUAL INDEX
VOICE COMMAND INDEX
SAFETY
INFORMATION
CLIENT
INFORMATION
INSTRUMENT PANEL
SPECIFICATIONS
VEHICLE
CONTROLS
MAINTENANCE
AUDIO AND
CONNECTIVITY
HANDLING THE UNEXPECTED
BLUETOOTH®
HANDSFREELINK®
DRIVING
ACURALINK®
NAVIGATION
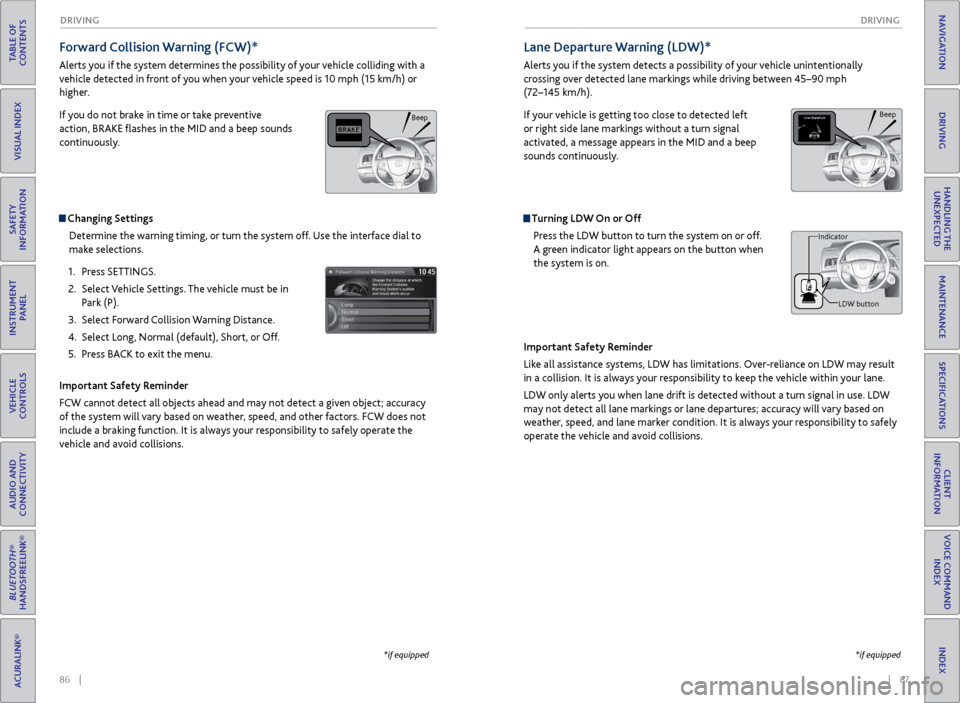
Forward Collision Warning (FCW)*
Alerts you if the system determines the possibility of your vehicle colliding with a
vehicle detected in front of you when your vehicle speed is 10 mph (15 km/h) or
higher.
If you do not brake in time or take preventive
action, BRAKE flashes in the MID and a beep sounds
continuously.
Changing Settings
Determine the warning timing, or turn the system off. Use the interface dial to
make selections.
1.
Pr
ess SETTINGS.
2.
Select
Vehicle Settings. The vehicle must be in
Park (P).
3.
Select F
orward Collision Warning Distance.
4.
Select Long
, Normal (default), Short, or Off.
5.
Pr
ess BACK to exit the menu.
Important Safety Reminder
FCW cannot detect all objects ahead and may not detect a given object; accuracy
of the system will vary based on weather, speed, and other factors. FCW does not
include a braking function. It is always your responsibility to safely operate the
vehicle and avoid collisions.
*if equipped
Lane Departure Warning (LDW)*
Alerts you if the system detects a possibility of your vehicle unintentionally
crossing over detected lane markings while driving between 45–90 mph
(72–145 km/h).
If your vehicle is getting too close to detected left
or right side lane markings without a turn signal
activated, a message appears in the MID and a beep
sounds continuously.
Turning LDW On or Off Press the LDW button to turn the system on or off.
A green indicator light appears on the button when
the system is on.
Important Safety Reminder
Like all assistance systems, LDW has limitations. Over-reliance on LDW may result
in a collision. It is always your responsibility to keep the vehicle within your lane.
LDW only alerts you when lane drift is detected without a turn signal in use. LDW
may not detect all lane markings or lane departures; accuracy will vary based on
weather, speed, and lane marker condition. It is always your responsibility to safely
operate the vehicle and avoid collisions.
Beep
LDW button
Indicator
*if equipped
Beep
Page 48 of 73
88 || 89
DRIVING
DRIVING
TABLE OF
CONTENTS
INDEX
VISUAL INDEX
VOICE COMMAND INDEX
SAFETY
INFORMATION
CLIENT
INFORMATION
INSTRUMENT PANEL
SPECIFICATIONS
VEHICLE
CONTROLS
MAINTENANCE
AUDIO AND
CONNECTIVITY
HANDLING THE UNEXPECTED
BLUETOOTH®
HANDSFREELINK®
DRIVING
ACURALINK®
NAVIGATION
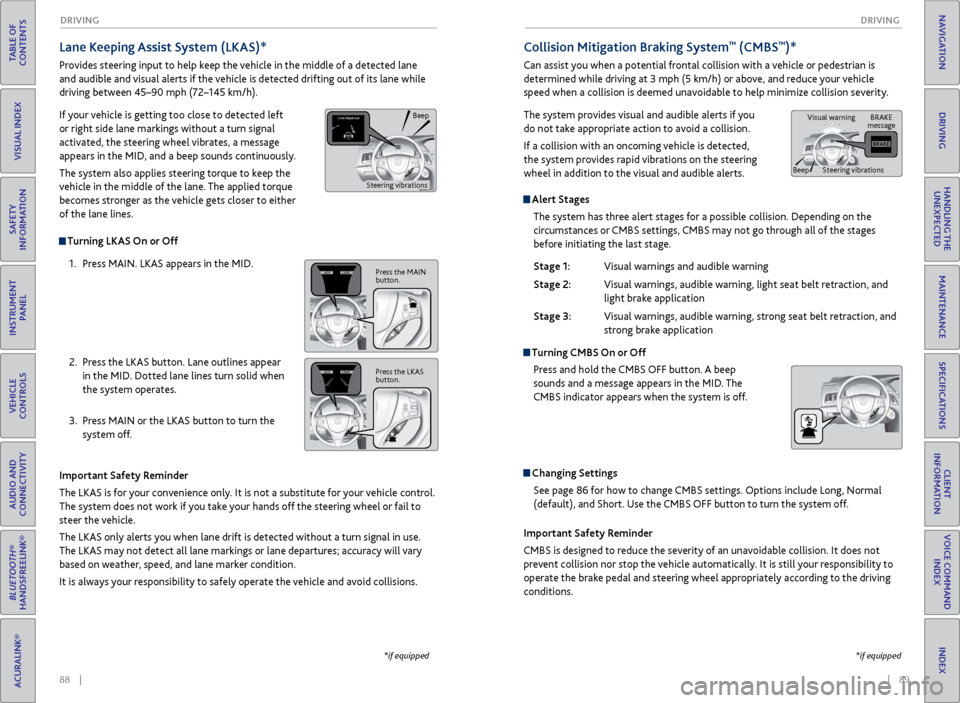
Alert Stages
The system has three alert stages for a possible collision. Depending on the
circumstances or CMBS settings, CMBS may not go through all of the stages
before initiating the last stage.
Stage 1:
Visual warnings
and audible warning
Stage 2:
Visual
warnings, audible warning, light seat belt retraction, and
light brak
e application
Stage 3:
Visual
warnings, audible warning, strong seat belt retraction, and
str
ong brake application
Turning CMBS On or OffPress and hold the CMBS OFF button. A beep
sounds and a message appears in the MID. The
CMBS indicator appears when the system is off.
Changing SettingsSee page 86 for how to change CMBS settings. Options include Long, Normal
(default), and Short. Use the CMBS OFF button to turn the system off.
Lane Keeping Assist System (LKAS)*
Provides steering input to help keep the vehicle in the middle of a detected lane
and audible and visual alerts if the vehicle is detected drifting out of its lane while
driving between 45–90 mph (72–145 km/h).
If your vehicle is getting too close to detected left
or right side lane markings without a turn signal
activated, the steering wheel vibrates, a message
appears in the MID, and a beep sounds continuously.
The system also applies steering torque to keep the
vehicle in the middle of the lane. The applied torque
becomes stronger as the vehicle gets closer to either
of the lane lines.
Important Safety Reminder
The LKAS is for your convenience only. It is not a substitute for your vehicle control.
The system does not work if you take your hands off the steering wheel or fail to
steer the vehicle.
The LKAS only alerts you when lane drift is detected without a turn signal in use.
The LKAS may not detect all lane markings or lane departures; accuracy will vary
based on weather, speed, and lane marker condition.
It is always your responsibility to safely operate the vehicle and avoid collisions.
Turning LKAS On or Off
1.
Pr
ess MAIN. LKAS appears in the MID.
2.
Pr
ess the LKAS button. Lane outlines appear
in the MID. Dotted lane lines turn solid when
the system operates.
3.
Pr
ess MAIN or the LKAS button to turn the
system off.
*if equipped
Collision Mitigation Braking System™ (CMBS™)*
Can assist you when a potential frontal collision with a vehicle or pedestrian is
determined while driving at 3 mph (5 km/h) or above, and reduce your vehicle
speed when a collision is deemed unavoidable to help minimize collision severity.
The system provides visual and audible alerts if you
do not take appropriate action to avoid a collision.
If a collision with an oncoming vehicle is detected,
the system provides rapid vibrations on the steering
wheel in addition to the visual and audible alerts.
Important Safety Reminder
CMBS is designed to reduce the severity of an unavoidable collision. It does not
prevent collision nor stop the vehicle automatically. It is still your responsibility to
operate the brake pedal and steering wheel appropriately according to the driving
conditions.
*if equipped
Beep
Steering vibrations
Press the MAIN
button.
Press the LKAS
button.
BRAKE
message
Beep Visual warning
Steering vibrations
Page 49 of 73
90 || 91
DRIVING
DRIVING
TABLE OF
CONTENTS
INDEX
VISUAL INDEX
VOICE COMMAND INDEX
SAFETY
INFORMATION
CLIENT
INFORMATION
INSTRUMENT PANEL
SPECIFICATIONS
VEHICLE
CONTROLS
MAINTENANCE
AUDIO AND
CONNECTIVITY
HANDLING THE UNEXPECTED
BLUETOOTH®
HANDSFREELINK®
DRIVING
ACURALINK®
NAVIGATION
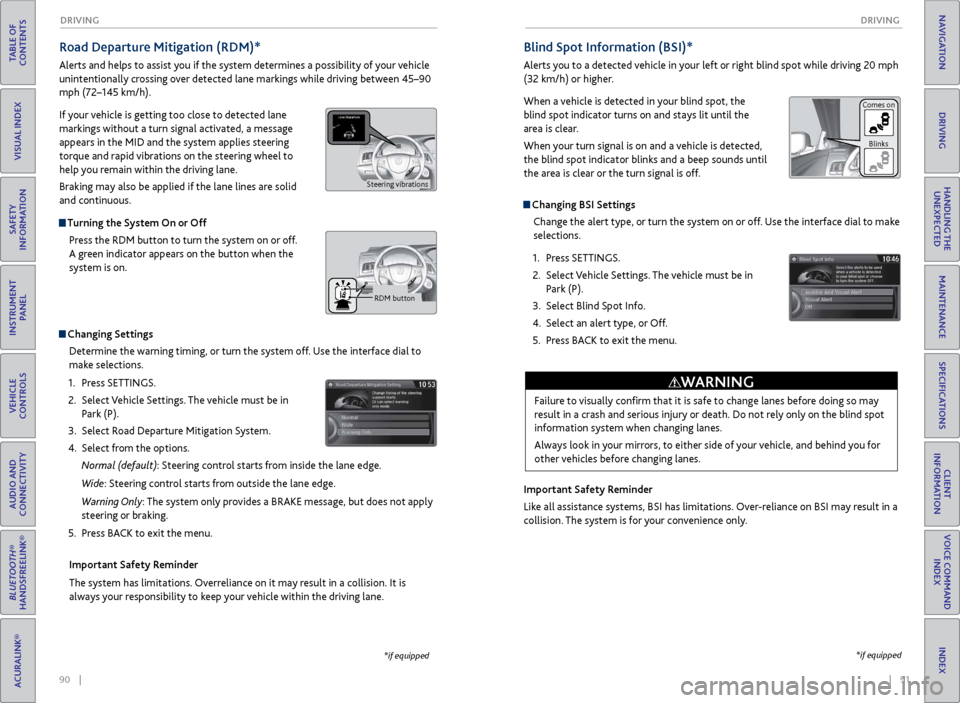
Road Departure Mitigation (RDM)*
Alerts and helps to assist you if the system determines a possibility of your vehicle
unintentionally crossing over detected lane markings while driving between 45–90
mph (72–145 km/h).
If your vehicle is getting too close to detected lane
markings without a turn signal activated, a message
appears in the MID and the system applies steering
torque and rapid vibrations on the steering wheel to
help you remain within the driving lane.
Braking may also be applied if the lane lines are solid
and continuous.
Turning the System On or Off
Press the RDM button to turn the system on or off.
A green indicator appears on the button when the
system is on.
Indicator
Changing SettingsDetermine the warning timing, or turn the system off. Use the interface dial to
make selections.
1.
Pr
ess SETTINGS.
2.
Select
Vehicle Settings. The vehicle must be in
Park (P).
3.
Select R
oad Departure Mitigation System.
4.
Select
from the options.
Normal (default): Steering control starts from inside the lane edge.
Wide: Steering control starts from outside the lane edge.
Warning Only: The system only provides a BRAKE message, but does not apply
steering or braking.
5.
Pr
ess BACK to exit the menu.
Important Safety Reminder
The system has limitations. Overreliance on it may result in a collision. It is
always your responsibility to keep your vehicle within the driving lane.
*if equipped
Blind Spot Information (BSI)*
Alerts you to a detected vehicle in your left or right blind spot while driving 20 mph
(32 km/h) or higher.
When a vehicle is detected in your blind spot, the
blind spot indicator turns on and stays lit until the
area is clear.
When your turn signal is on and a vehicle is detected,
the blind spot indicator blinks and a beep sounds until
the area is clear or the turn signal is off.
Changing BSI Settings Change the alert type, or turn the system on or off. Use the interface dial to make
selections.
1.
Pr
ess SETTINGS.
2.
Select
Vehicle Settings. The vehicle must be in
Park (P).
3.
Select Blind
Spot Info.
4.
Select
an alert type, or Off.
5.
Pr
ess BACK to exit the menu.
Important Safety Reminder
Like all assistance systems, BSI has limitations. Over-reliance on BSI may result in a
collision. The system is for your convenience only.
*if equipped
Failure to visually confirm that it is safe to change lanes before doing so may
result in a crash and serious injury or death. Do not rely only on the blind spot
information system when changing lanes.
Always look in your mirrors, to either side of your vehicle, and behind you for
other vehicles before changing lanes.
WARNING
Comes on Blinks
Steering vibrations
RDM button