air condition ACURA TL 1995 Service Repair Manual
[x] Cancel search | Manufacturer: ACURA, Model Year: 1995, Model line: TL, Model: ACURA TL 1995Pages: 1771, PDF Size: 62.49 MB
Page 47 of 1771
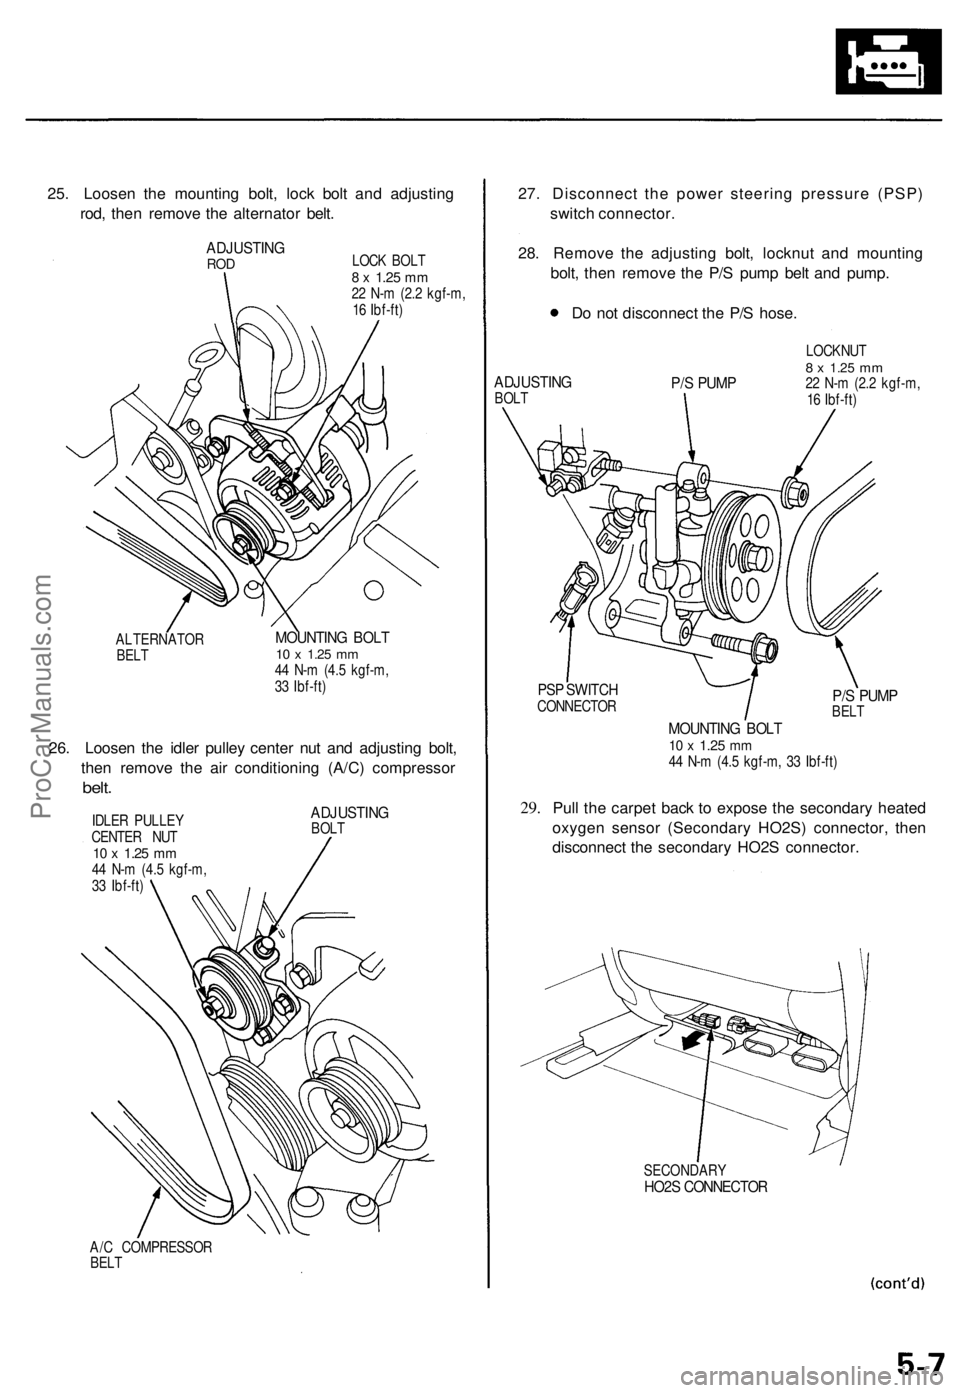
25. Loosen the mounting bolt, lock bolt and adjusting
rod, then remove the alternator belt.
ADJUSTING
ROD
LOCK BOLT
8 x
1.25
mm
22 N-m (2.2 kgf-m,
16 Ibf-ft)
ALTERNATOR
BELT
MOUNTING BOLT
10 x
1.25
mm
44 N-m (4.5 kgf-m,
33 Ibf-ft)
26. Loosen the idler pulley center nut and adjusting bolt,
then remove the air conditioning (A/C) compressor
belt.
IDLER PULLEY
CENTER NUT
10 x
1.25
mm
44 N-m (4.5 kgf-m,
33 Ibf-ft)
ADJUSTING
BOLT
A/C COMPRESSOR
BELT
27. Disconnect the power steering pressure (PSP)
switch connector.
28. Remove the adjusting bolt, locknut and mounting
bolt, then remove the P/S pump belt and pump.
Do not disconnect the P/S hose.
ADJUSTING
BOLT
P/S PUMP
LOCKNUT
8 x
1.25
mm
22 N-m (2.2 kgf-m,
16 Ibf-ft)
PSP SWITCH
CONNECTOR
29.
P/S PUMP
BELT
MOUNTING BOLT
10 x
1.25
mm
44 N-m (4.5 kgf-m, 33 Ibf-ft)
Pull the carpet back to expose the secondary heated
oxygen sensor (Secondary HO2S) connector, then
disconnect the secondary HO2S connector.
SECONDARY
HO2S CONNECTORProCarManuals.com
Page 184 of 1771
Troubleshooting
Troubleshootin g Procedure s (cont'd )
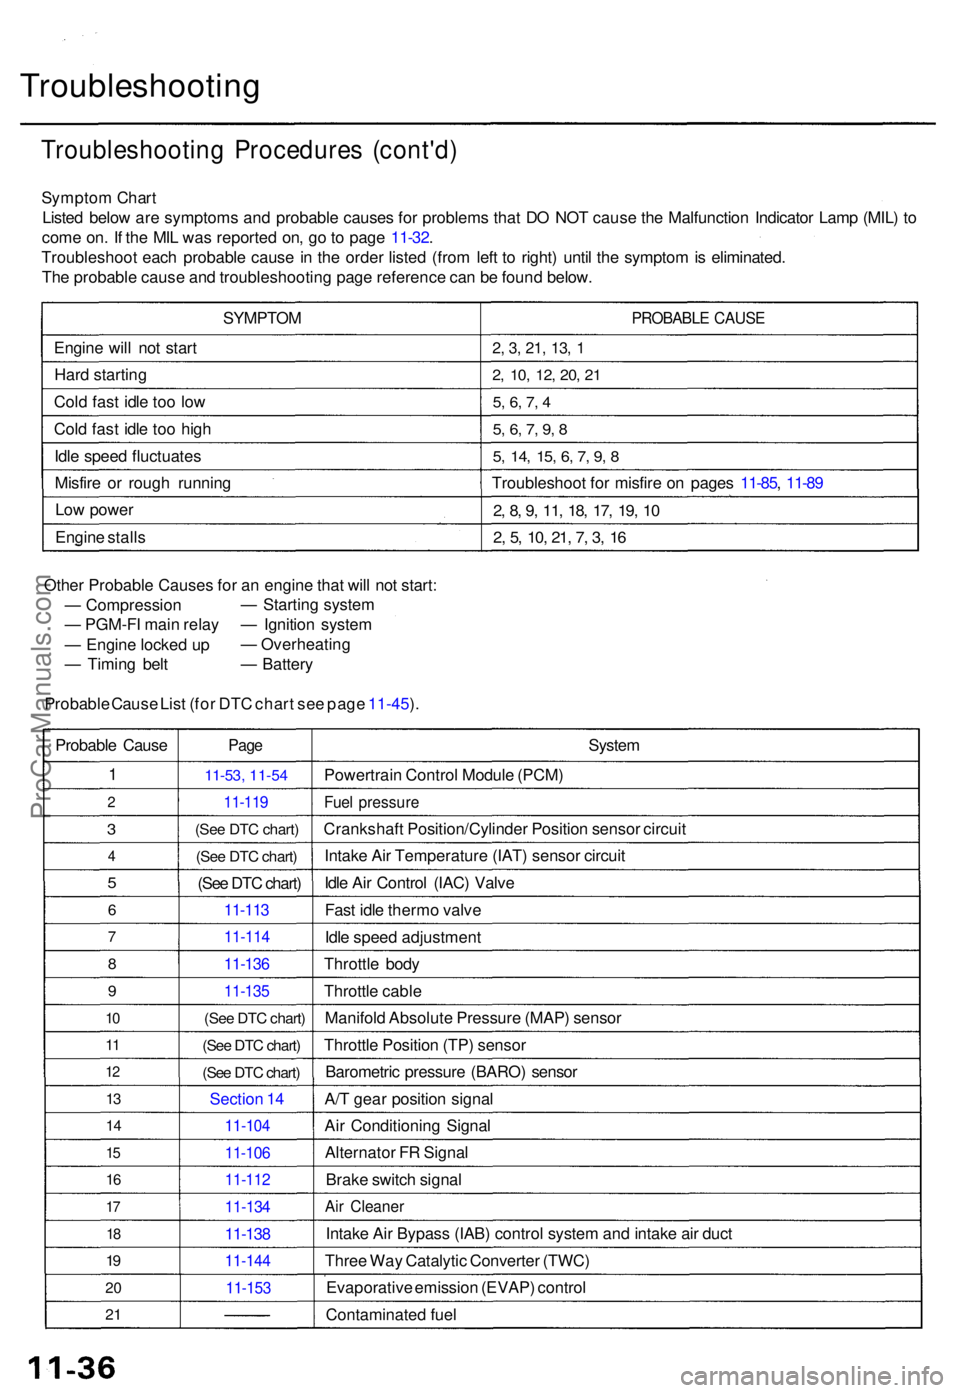
Sympto m Char t
Liste d belo w ar e symptom s an d probabl e cause s fo r problem s tha t D O NO T caus e th e Malfunctio n Indicato r Lam p (MIL ) t o
com e on . I f th e MI L wa s reporte d on , g o to pag e 11-32 .
Troubleshoo t eac h probabl e caus e in th e orde r liste d (fro m lef t t o right ) unti l th e sympto m is eliminated .
Th e probabl e caus e an d troubleshootin g pag e referenc e ca n b e foun d below .
SYMPTO M
Engin e wil l no t star t
Har d startin g
Col d fas t idl e to o lo w
Col d fas t idl e to o hig h
Idl e spee d fluctuate s
Misfir e o r roug h runnin g
Lo w powe r
Engin e stall s
PROBABL E CAUS E
2, 3 , 21 , 13 , 1
2 , 10 , 12 , 20 , 2 1
5, 6 , 7 , 4
5 , 6 , 7 , 9 , 8
5 , 14 , 15 , 6 , 7 , 9 , 8
Troubleshoo t fo r misfir e o n page s 11-85 , 11-8 9
2, 8 , 9 , 11 , 18 , 17 , 19 , 1 0
2, 5 , 10 , 21 , 7 , 3 , 1 6
Othe r Probabl e Cause s fo r a n engin e tha t wil l no t start :
— Compressio n
— PGM-F I mai n rela y
— Engin e locke d u p
— Timin g bel t
Probabl e Caus e Lis t (for DTC chart see page 11-45).
—
Startin g syste m
— Ignitio n syste m
— Overheatin g
— Batter y
Probabl e Caus e
1
2
3
4
5
6
7
8
9
10
1 1
1 2
13
1 4
15
1 6
17
18
19
2 0
2 1
Pag e
11-5 3, 11-54
11-11 9
(See DTC chart)
(See DTC chart)
(See DTC chart)
11-113
11-11 4
11-136
11-13 5
(See DTC chart)
(See DTC chart)
(See DTC chart)
Sectio n 1 4
11-10 4
11-106
11-112
11-13 4
11-138
11-14 4
11-153
System
Powertrai n Contro l Modul e (PCM )
Fuel pressur e
Crankshaf t Position/Cylinde r Positio n senso r circui t
Intak e Ai r Temperatur e (IAT ) senso r circui t
Idl e Ai r Contro l (IAC ) Valv e
Fas t idl e therm o valv e
Idl e spee d adjustmen t
Throttl e bod y
Throttl e cabl e
Manifol d Absolut e Pressur e (MAP ) senso r
Throttl e Positio n (TP ) senso r
Barometri c pressur e (BARO ) senso r
A/ T gea r positio n signa l
Ai r Conditionin g Signa l
Alternato r F R Signa l
Brak e switc h signa l
Air Cleane r
Intake Ai r Bypas s (IAB ) contro l syste m an d intak e ai r duc t
Thre e Wa y Catalyti c Converte r (TWC )
Evaporativ e emissio n (EVAP ) contro l
Contaminate d fue l
ProCarManuals.com
Page 186 of 1771
Troubleshooting
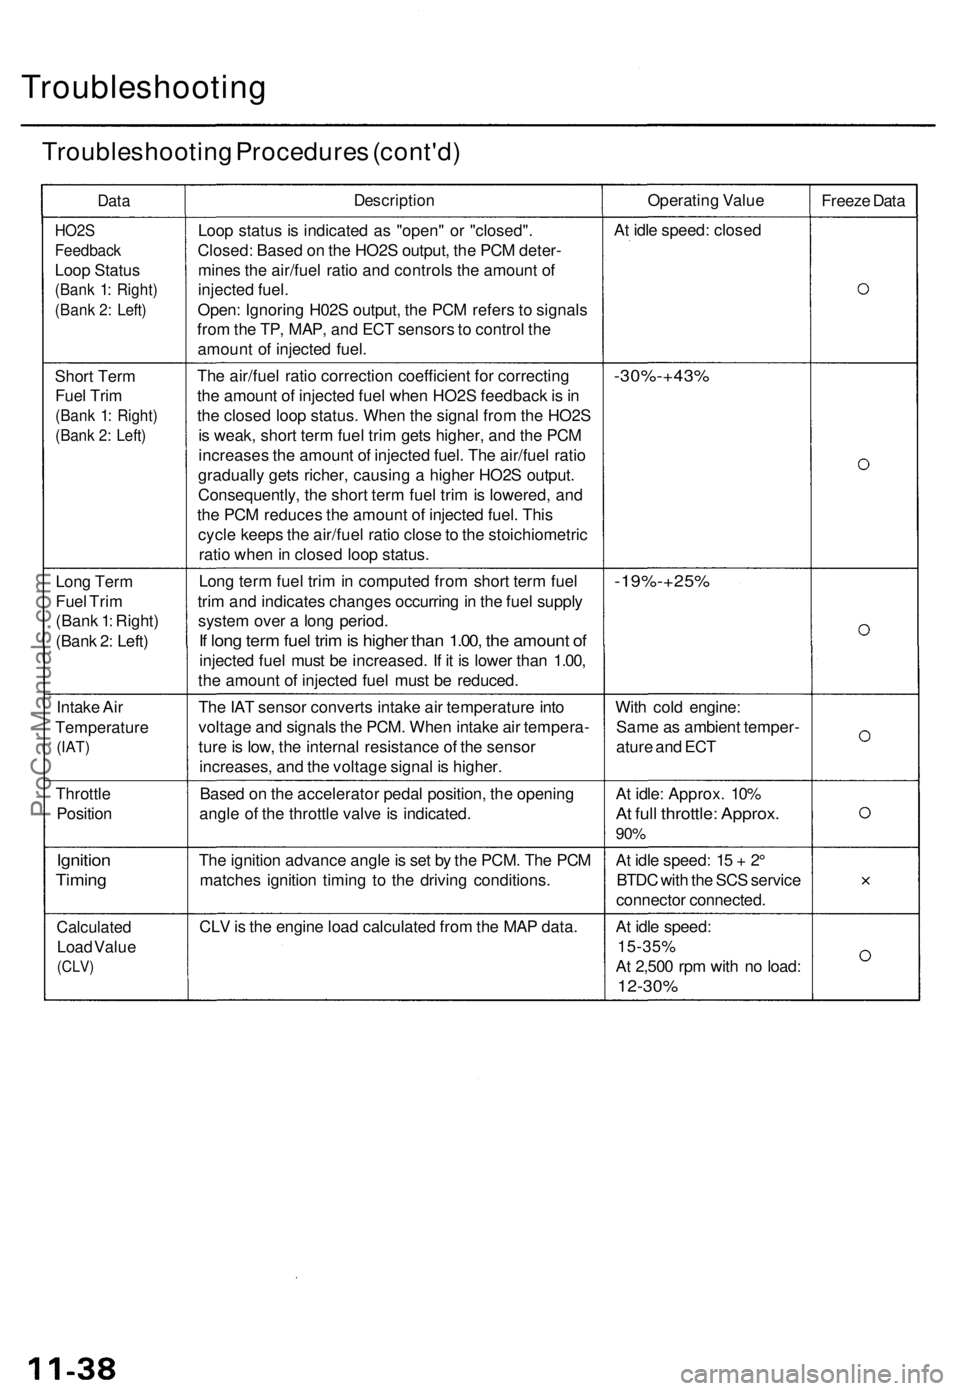
Troubleshooting Procedure s (cont'd )
DataDescriptio nOperating Valu e
Freeze Dat a
HO2 S
Feedbac k
Loop Statu s
(Bank 1 : Right )
(Bank 2 : Left )
Loop statu s i s indicate d a s "open " o r "closed" .
Closed: Based o n th e HO2 S output , th e PC M deter -
mine s th e air/fue l rati o an d control s th e amoun t o f
injecte d fuel .
Open : Ignorin g H02 S output , th e PC M refer s t o signal s
fro m th e TP , MAP , an d EC T sensor s to contro l th e
amoun t o f injecte d fuel . A
t idl e speed : close d
Shor t Ter m
Fue l Tri m
(Ban k 1 : Right )
(Bank 2 : Left )
The air/fue l rati o correctio n coefficien t fo r correctin g
th e amoun t o f injecte d fue l whe n HO2 S feedbac k is in
th e close d loo p status . Whe n th e signa l fro m th e HO2 S
i s weak , shor t ter m fue l tri m get s higher , an d th e PC M
increase s th e amoun t o f injecte d fuel . Th e air/fue l rati o
graduall y get s richer , causin g a highe r HO2 S output .
Consequently , th e shor t ter m fue l tri m is lowered , an d
th e PC M reduce s th e amoun t o f injecte d fuel . Thi s
cycl e keep s th e air/fue l rati o close to th e stoichiometri c
rati o whe n in close d loo p status .-30%-+43 %
Long Ter m
Fue l Tri m
(Ban k 1 : Right )
(Ban k 2 : Left ) Lon
g ter m fue l tri m in compute d fro m shor t ter m fue l
tri m an d indicate s change s occurrin g in th e fue l suppl y
syste m ove r a lon g period .
If lon g ter m fue l tri m is highe r tha n 1.00 , th e amoun t o f
injecte d fue l mus t b e increased . I f i t i s lowe r tha n 1.00 ,
th e amoun t o f injecte d fue l mus t b e reduced .
-19%-+25 %
Intake Ai r
Temperatur e
(IAT)
The IA T senso r convert s intak e ai r temperatur e int o
voltag e an d signal s th e PCM . Whe n intak e ai r tempera -
tur e is low , th e interna l resistanc e o f th e senso r
increases , an d th e voltag e signa l i s higher . Wit
h col d engine :
Sam e a s ambien t temper -
atur e an d EC T
Throttl e
Positio n Base
d o n th e accelerato r peda l position , th e openin g
angl e o f th e throttl e valv e is indicated . A
t idle : Approx . 10 %
At ful l throttle : Approx .
90%
Ignitio n
Timing
The ignitio n advanc e angl e is se t b y th e PCM . Th e PC M
matche s ignitio n timin g t o th e drivin g conditions .A
t idl e speed : 1 5 + 2°
BTD C wit h th e SC S servic e
connecto r connected .
Calculated
Load Valu e
(CLV )
CLV is th e engin e loa d calculate d fro m th e MA P data . At idl e speed :
15-35 %
A t 2,50 0 rp m wit h n o load :
12-30 %
ProCarManuals.com
Page 198 of 1771
Troubleshooting
How to Read Flowcharts
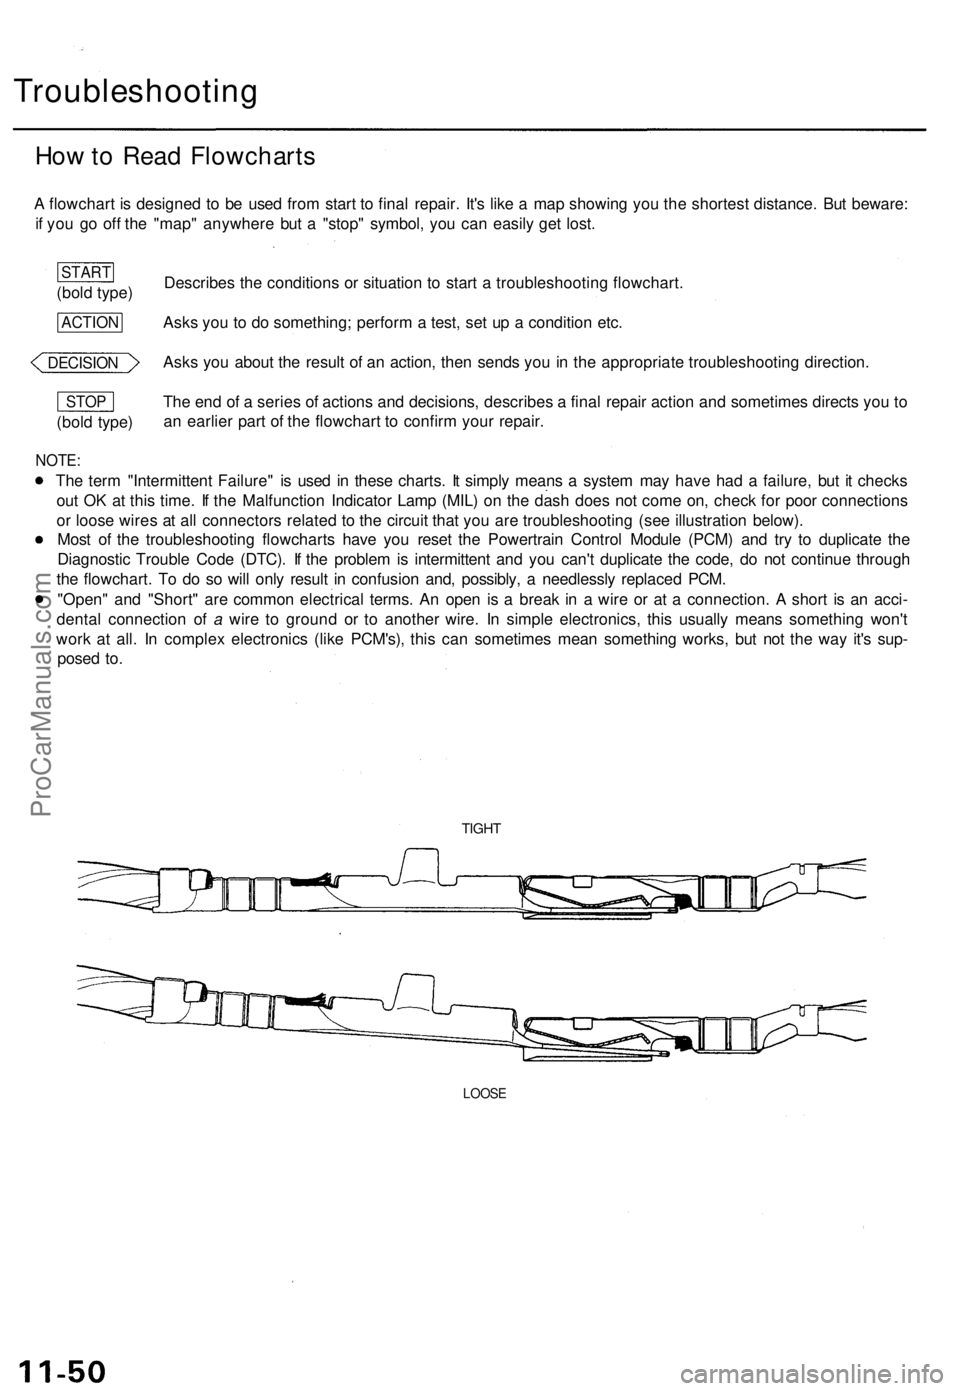
A flowchart is designed to be used from start to final repair. It's like a map showing you the shortest distance. But beware:
if you go off the "map" anywhere but a "stop" symbol, you can easily get lost.
Describes the conditions or situation to start a troubleshooting flowchart.
Asks you to do something; perform a test, set up a condition etc.
Asks you about the result of an action, then sends you in the appropriate troubleshooting direction.
The end of a series of actions and decisions, describes a final repair action and sometimes directs you to
an earlier part of the flowchart to confirm your repair.
NOTE:
The term "Intermittent Failure" is used in these charts. It simply means a system may have had a failure, but it checks
out OK at this time. If the Malfunction Indicator Lamp (MIL) on the dash does not come on, check for poor connections
or loose wires at all connectors related to the circuit that you are troubleshooting (see illustration below).
Most of the troubleshooting flowcharts have you reset the Powertrain Control Module (PCM) and try to duplicate the
Diagnostic Trouble Code (DTC). If the problem is intermittent and you can't duplicate the code, do not continue through
the flowchart. To do so will only result in confusion and, possibly, a needlessly replaced PCM.
"Open" and "Short" are common electrical terms. An open is a break in a wire or at a connection. A short is an acci-
dental connection of a wire to ground or to another wire. In simple electronics, this usually means something won't
work at all. In complex electronics (like PCM's), this can sometimes mean something works, but not the way it's sup-
posed to.
TIGHT
LOOSE
(bold type)
STOP
DECISION
ACTION
(bold type)
STARTProCarManuals.com
Page 199 of 1771
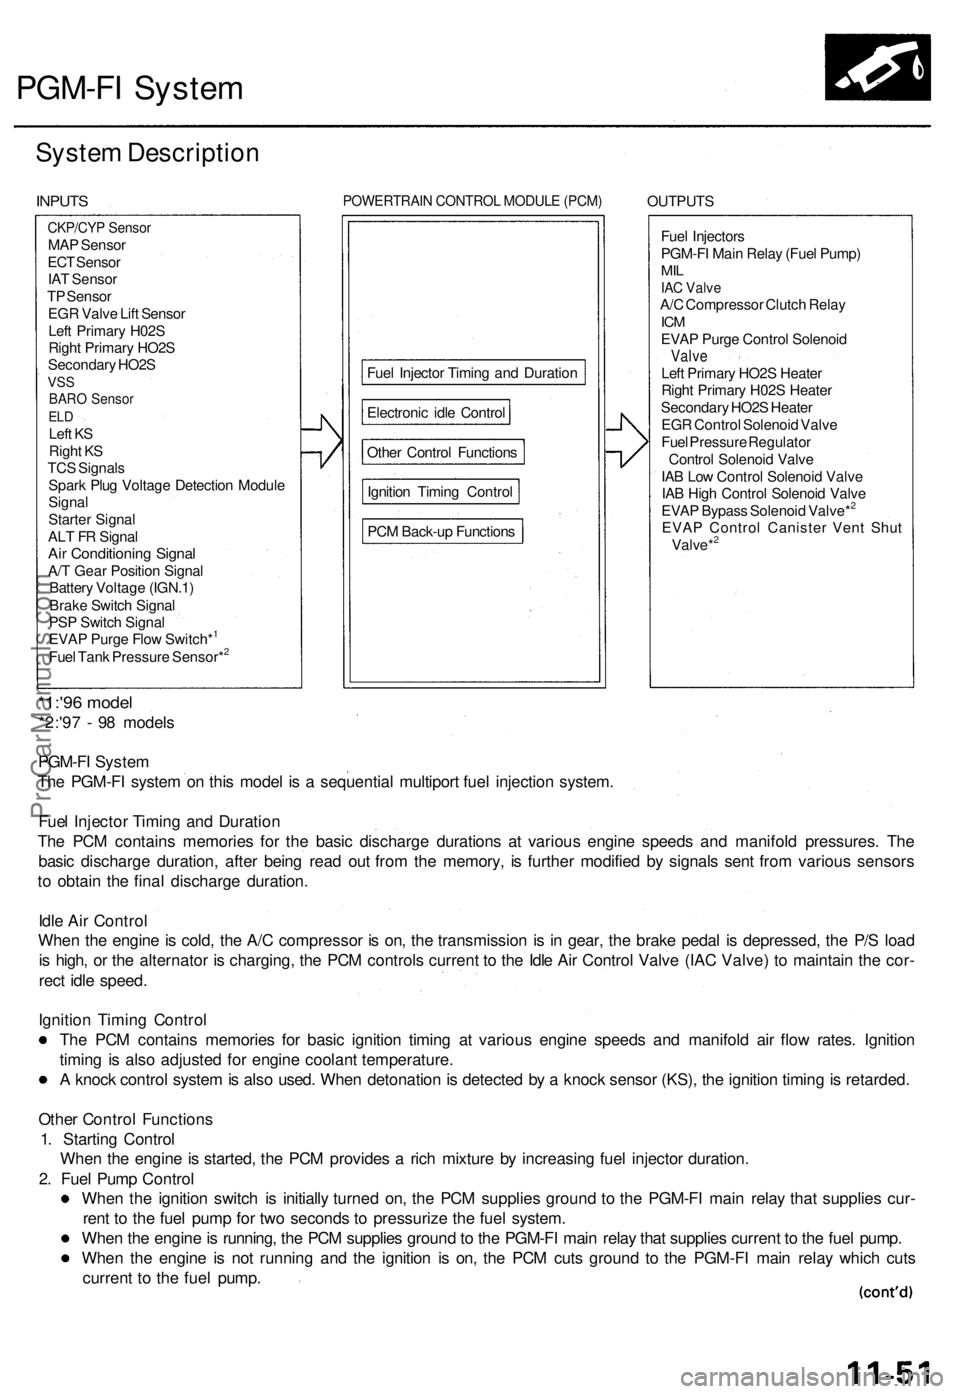
PGM-FI Syste m
System Descriptio n
INPUTS POWERTRAI N CONTRO L MODUL E (PCM ) OUTPUT S
Fue l Injector s
PGM-F I Mai n Rela y (Fue l Pump )
MILIAC Valv eA/C Compresso r Clutc h Rela yICMEVA P Purg e Contro l Solenoi dValveLeft Primar y HO2 S Heate r
Righ t Primar y H02 S Heate r
Secondar y HO2 S Heate r
EG R Contro l Solenoi d Valv e
Fue l Pressur e Regulato r
Contro l Solenoi d Valv e
IA B Lo w Contro l Solenoi d Valv e
IA B Hig h Contro l Solenoi d Valv e
EVA P Bypas s Solenoi d Valve*
2
EVA P Contro l Caniste r Ven t Shu t
Valve*2
*1:'9 6 mode l
*2:'97 - 9 8 model s
PGM-F I Syste m
Th e PGM-F I syste m o n thi s mode l i s a sequentia l multipor t fue l injectio n system .
Fue l Injecto r Timin g an d Duratio n
Th e PC M contain s memorie s fo r th e basi c discharg e duration s a t variou s engin e speed s an d manifol d pressures . Th e
basi c discharg e duration , afte r bein g rea d ou t fro m th e memory , i s furthe r modifie d b y signal s sen t fro m variou s sensor s
t o obtai n th e fina l discharg e duration .
Idl e Ai r Contro l
Whe n th e engin e is cold , th e A/ C compresso r i s on , th e transmissio n i s i n gear , th e brak e peda l i s depressed , th e P/ S loa d
i s high , o r th e alternato r i s charging , th e PC M control s curren t t o th e Idl e Ai r Contro l Valv e (IA C Valve ) t o maintai n th e cor -
rec t idl e speed .
Ignitio n Timin g Contro l
Th e PC M contain s memorie s fo r basi c ignitio n timin g a t variou s engin e speed s an d manifol d ai r flo w rates . Ignitio n
timin g i s als o adjuste d fo r engin e coolan t temperature .
A knoc k contro l syste m is als o used . Whe n detonatio n is detecte d b y a knoc k senso r (KS) , th e ignitio n timin g is retarded .
Othe r Contro l Function s
1 . Startin g Contro l
Whe n th e engin e is started , th e PC M provide s a ric h mixtur e b y increasin g fue l injecto r duration .
2 . Fue l Pum p Contro l
Whe n th e ignitio n switc h i s initiall y turne d on , th e PC M supplie s groun d t o th e PGM-F I mai n rela y tha t supplie s cur -
ren t t o th e fue l pum p fo r tw o second s t o pressuriz e th e fue l system .
Whe n th e engin e is running , th e PC M supplie s groun d to th e PGM-F I mai n rela y tha t supplie s curren t t o th e fue l pump .
Whe n th e engin e i s no t runnin g an d th e ignitio n i s on , th e PC M cut s groun d t o th e PGM-F I mai n rela y whic h cut s
curren t t o th e fue l pump .
CKP/CY P Senso rMAP Senso r
EC T Senso r
IA T Senso r
T P Senso r
EG R Valv e Lif t Senso r
Lef t Primar y H02 S
Righ t Primar y HO2 S
Secondar y HO2 S
VSSBAR O Senso rELDLef t K S
Righ t K S
TC S Signal s
Spar k Plu g Voltag e Detectio n Modul e
Signa l
Starte r Signa l
AL T F R Signa l
Air Conditionin g Signa lA/T Gea r Positio n Signa l
Batter y Voltag e (IGN.1 )
Brak e Switc h Signa l
PS P Switc h Signa l
EVA P Purg e Flo w Switch*
1
Fue l Tan k Pressur e Sensor*2
PC M Back-u p Function s
Ignitio
n Timin g Contro l
Othe
r Contro l Function s
Electroni
c idl e Contro l
Fue
l Injecto r Timin g an d Duratio n
ProCarManuals.com
Page 200 of 1771
PGM-FI System
System Description (cont'd)
3. Fuel Cut-off Control
During deceleration with the throttle valve closed, current to the fuel injectors is cut off to improve fuel economy at
speeds over 1,000 rpm.
Fuel cut-off action also takes place when engine speed exceeds 6,500 rpm, regardless of the position of the throttle
valve, to protect the engine from over-revving.
4. A/C Compressor Clutch Relay .
When the PCM receives a demand for cooling from the air conditioning system, it delays the compressor from being
energized, and enriches the mixture to assure a smooth transition to the A/C mode.
5. Evaporative Emission (EVAP) Purge Control Solenoid Valve
'96 model: When the engine coolant temperature is below 158°F (70°C), the PCM controls the EVAP purge control
solenoid valve which cuts vacuum to the EVAP purge control canister diaphragm.
'97 - 98 models: When the engine coolant temperature is above 99°F (37°C), the PCM controls the EVAP purge control
solenoid valve which controls vacuum to the EVAP purge control canister.
6. Intake Air Bypass (IAB) Low Control Solenoid Valve, Intake Air Bypass (IAB) High Control Solenoid Valve
When engine speed is below 3,350 rpm, the IAB High Control Solenoid Valve and IAB Low Control Solenoid Valve are
activated by a signal from the PCM. Intake air flows through a long chamber path, increasing torque at low RPM.
When engine speed is 3,350 - 3,950 rpm, the IAB Low Control Solenoid Valve is deactivated by the PCM. Intake air
flows through a short chamber path, increasing mid-range torque.
When the engine rpm is above 3,950 rpm, the IAB Low Control Solenoid Valve and IAB High Control Solenoid Valve are
deactivated by the PCM. This creates a very short intake path and increases high-speed torque.
7. Exhaust Gas Recirculation (EGR) Control Solenoid Valve
When the EGR is required for control of oxides of nitrogen (NOx) emissions, the PCM controls the EGR control solenoid
valve which supplies regulated vacuum to the EGR valve.
ECM Fail-safe/Back-up Functions
1. Fail-safe Function
When an abnormality occurs in a signal from a sensor, the PCM ignores that signal and assumes a pre-programmed
value for that sensor that allows the engine to continue to run.
2. Back-up Function
When an abnormality occurs in the PCM itself, the fuel injectors are controlled by a back-up circuit independent of the
system in order to permit minimal driving.
3. Self-diagnosis Function [Malfunction Indicator Lamp (MIL)]
When an abnormality occurs in a signal from a sensor, the PCM supplies ground for the MIL and stores the DTC in
erasable memory. When the ignition is initially turned on, the PCM supplies ground for the MIL for two seconds to
check the MIL bulb condition.
4. Two Driving Cycle Detection Method
To prevent false indications, the two driving cycle detection method is used for the H02S, fuel metering-related, idle
control system, ECT sensor, EGR system, TWC, EVAP control system and other self-diagnostic functions. When an
abnormality occurs, the PCM stores it in its memory. When the same abnormality recurs after the ignition switch is
turned OFF and ON (II) again, the PCM informs the driver by lighting the MIL.
However, to ease troubleshooting, this function is cancelled when you short the service check connector. The MIL will
then blink immediately when an abnormality occurs.ProCarManuals.com
Page 207 of 1771
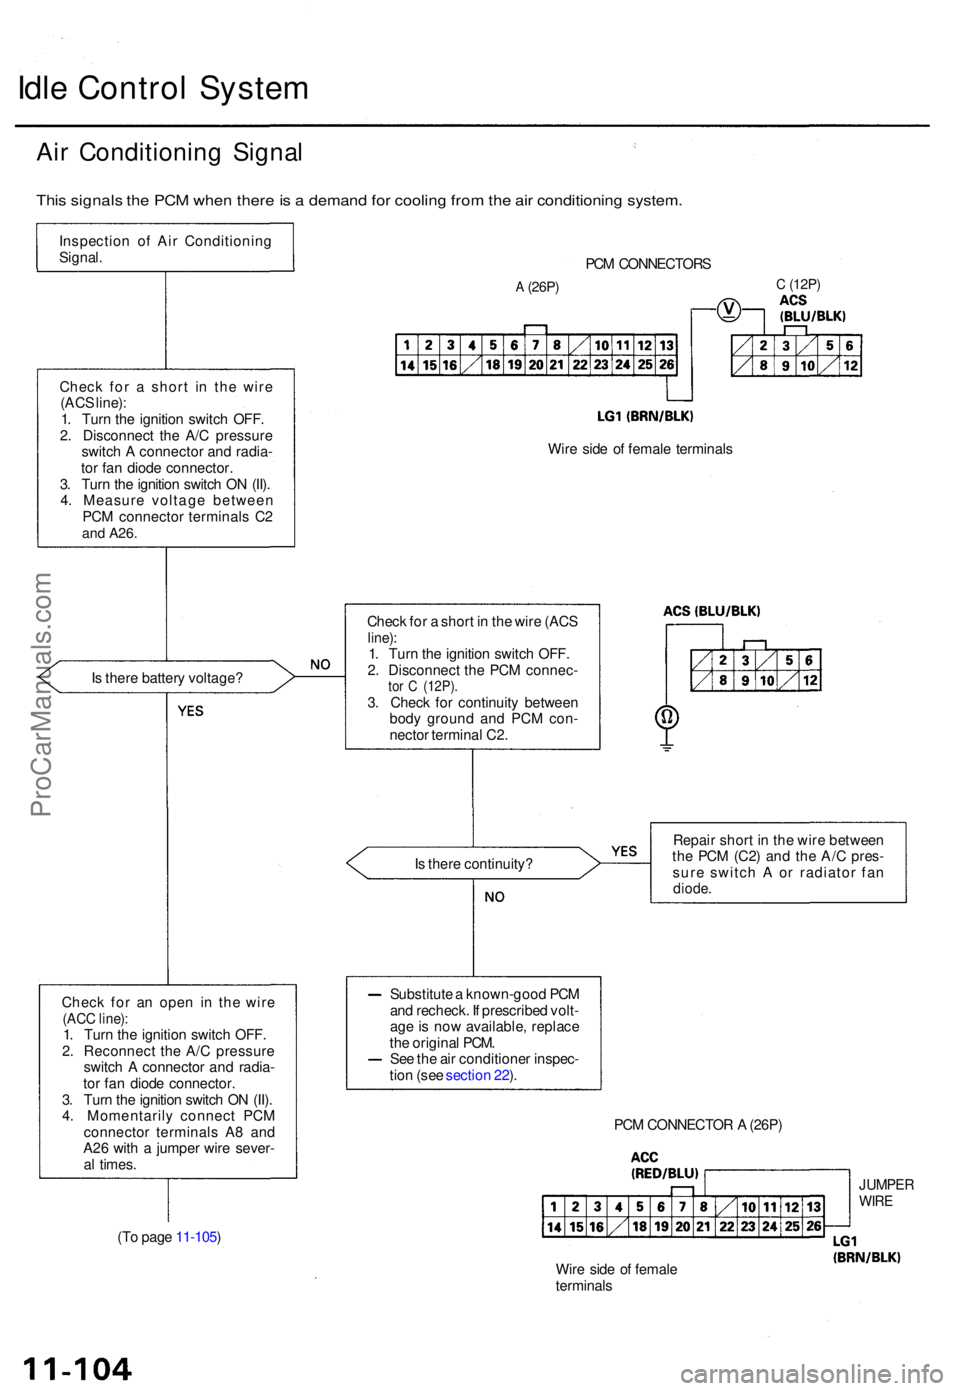
Idle Contro l Syste m
Air Conditionin g Signa l
This signal s th e PC M whe n ther e is a deman d fo r coolin g fro m th e ai r conditionin g system .
Inspectio n o f Ai r Conditionin g
Signal .
Chec k fo r a shor t i n th e wir e
(AC S line) :
1 . Tur n th e ignitio n switc h OFF .
2 . Disconnec t th e A/ C pressur e
switc h A connecto r an d radia -
to r fa n diod e connector .
3 . Tur n th e ignitio n switc h O N (II) .
4 . Measur e voltag e betwee n
PC M connecto r terminal s C 2
and A26 .
Is ther e batter y voltage ?
Chec k fo r a n ope n i n th e wir e
(ACC line) :1. Tur n th e ignitio n switc h OFF .
2 . Reconnec t th e A/ C pressur e
switc h A connecto r an d radia -
to r fa n diod e connector .
3 . Tur n th e ignitio n switc h O N (II) .
4 . Momentaril y connec t PC M
connecto r terminal s A 8 an d
A2 6 wit h a jumpe r wir e sever -
a l times .
(T o pag e 11-105 )
A (26P)
PCM CONNECTOR S
C (12P )
Wire sid e o f femal e terminal s
Chec k fo r a shor t i n th e wir e (AC S
line):1. Tur n th e ignitio n switc h OFF .
2 . Disconnec t th e PC M connec -
tor C (12P) .3. Chec k fo r continuit y betwee n
bod y groun d an d PC M con -
necto r termina l C2 .
I s ther e continuity ? Repai
r shor t i n th e wir e betwee n
th e PC M (C2 ) an d th e A/ C pres -
sur e switc h A or radiato r fa n
diode .
Substitut e a known-goo d PC M
an d recheck . I f prescribe d volt -
ag e is no w available , replac e
th e origina l PCM .
Se e th e ai r conditione r inspec -
tio n (se e sectio n 22 ).
PCM CONNECTO R A (26P )
Wir e sid e o f femal e
terminal s
JUMPERWIRE
ProCarManuals.com
Page 240 of 1771
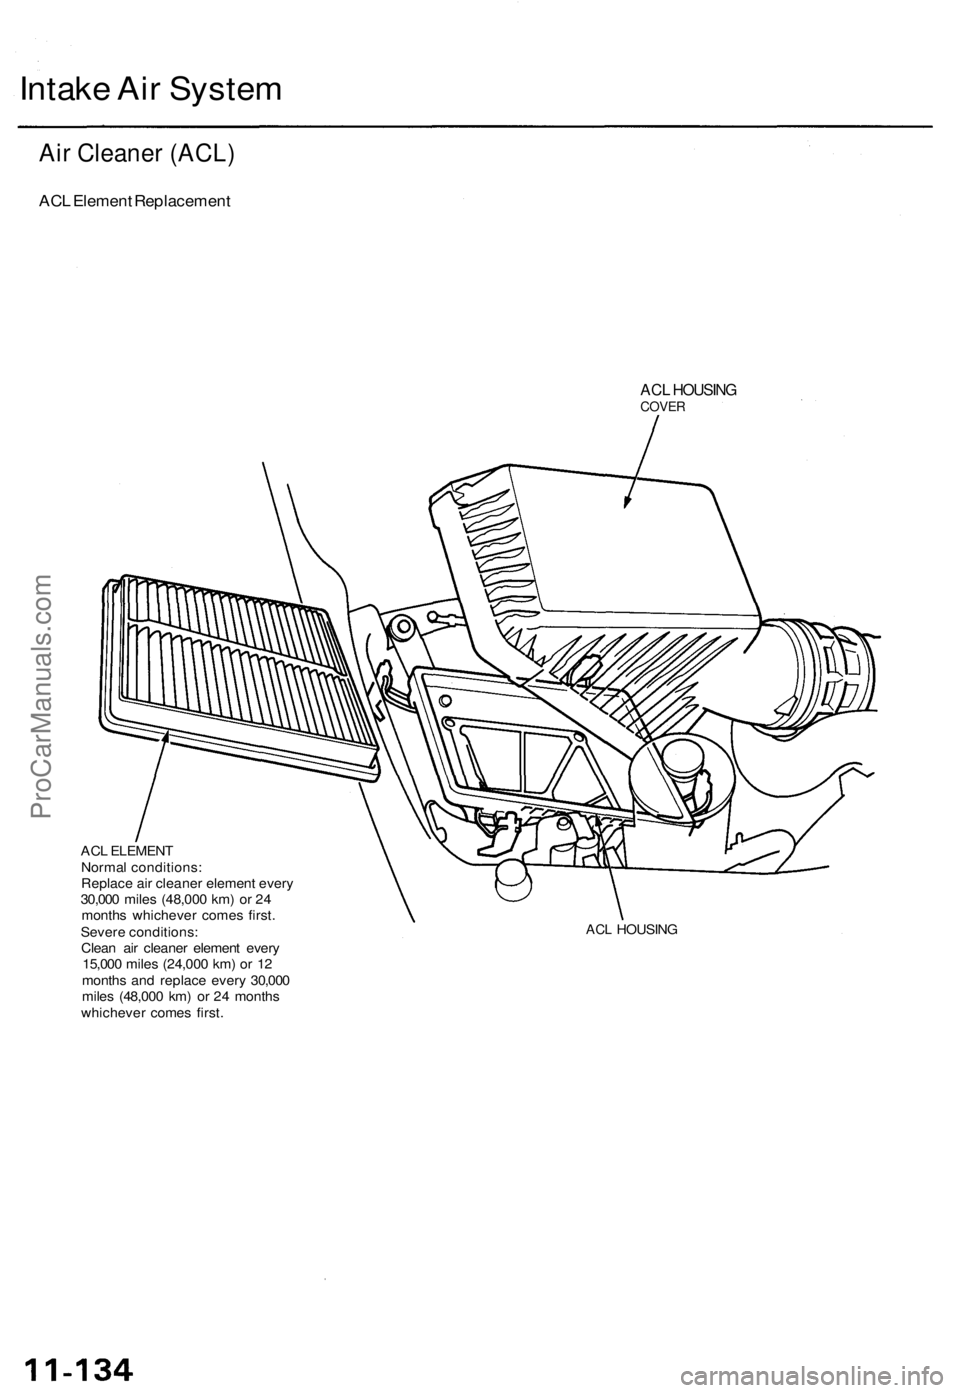
Intake Ai r Syste m
Air Cleane r (ACL )
ACL Elemen t Replacemen t
ACL HOUSIN GCOVER
ACL ELEMEN T
Norma l conditions :
Replac e ai r cleane r elemen t ever y
30,00 0 mile s (48,00 0 km ) o r 2 4
month s whicheve r come s first .
Sever e conditions :
Clea n ai r cleane r elemen t ever y
15,00 0 mile s (24,00 0 km ) o r 1 2
month s an d replace every 30,00 0
mile s (48,00 0 km ) o r 2 4 month s
whicheve r come s first .
ACL HOUSIN G
ProCarManuals.com
Page 336 of 1771
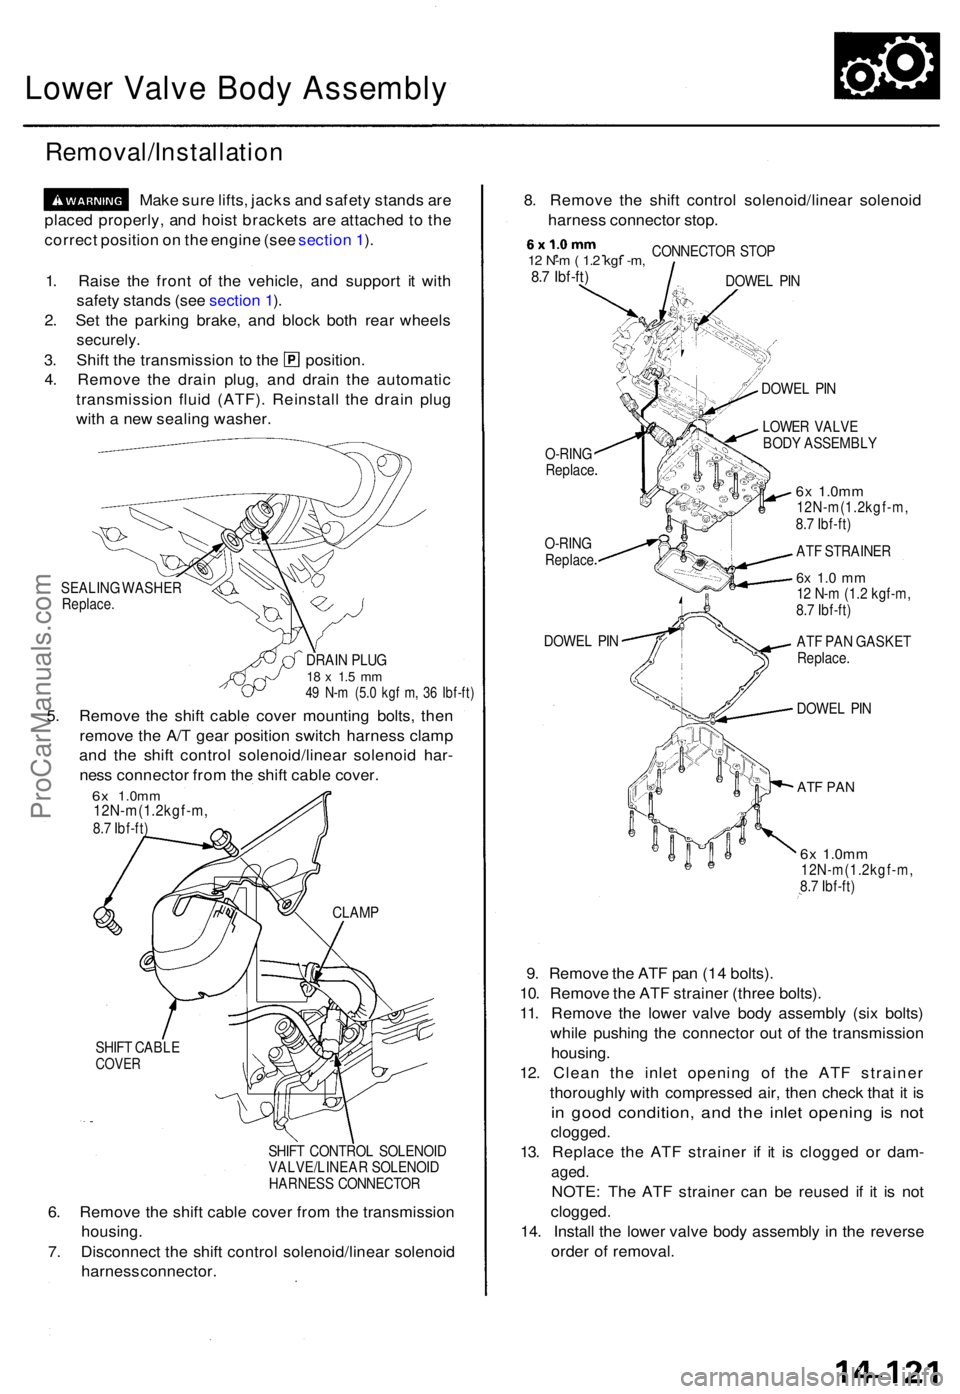
Lower Valv e Bod y Assembl y
Removal/Installatio n
Make sur e lifts , jack s an d safet y stand s ar e
place d properly , an d hois t bracket s ar e attache d to th e
correc t positio n o n th e engin e (se e sectio n 1 ).
SEALIN G WASHE RReplace.
DRAIN PLU G18 x 1. 5 m m49 N- m (5. 0 kg f m , 3 6 Ibf-ft )
5. Remov e th e shif t cabl e cove r mountin g bolts , the n
remov e th e A/ T gea r positio n switc h harnes s clam p
an d th e shif t contro l solenoid/linea r solenoi d har -
nes s connecto r fro m th e shif t cabl e cover .
6x 1.0m m12N-m(1.2kgf-m ,8.7 Ibf-ft )
SHIF T CABL E
COVER
SHIFT CONTRO L SOLENOI D
VALVE/LINEA R SOLENOI D
HARNES S CONNECTO R
6. Remov e th e shif t cabl e cove r fro m th e transmissio n
housing.
7. Disconnec t th e shif t contro l solenoid/linea r solenoi d
harnes s connector . 8
. Remov e th e shif t contro l solenoid/linea r solenoi d
harnes s connecto r stop .
, . .12 N- m ( 1. 2 kg f -m ,8.7 Ibf-ft )
CONNECTO R STO P
DOWE L PI N
O-RIN G
Replac e
O-RINGReplac e
DOWEL PI N DOWE
L PI N
LOWE R VALV E
BOD Y ASSEMBL Y
6x 1.0m m12N-m(1.2kgf-m ,
8. 7 Ibf-ft )
AT F STRAINE R
6x 1. 0 m m12 N- m (1.2 kgf-m ,
8. 7 Ibf-ft )
AT F PA N GASKE T
Replace .
DOWEL PI N
AT F PA N
6x 1.0m m12N-m(1.2kgf-m ,
8. 7 Ibf-ft )
9. Remov e th e AT F pa n (1 4 bolts) .
10 . Remov e th e AT F straine r (thre e bolts) .
11 . Remov e th e lowe r valv e bod y assembl y (si x bolts )
whil e pushin g th e connecto r ou t o f th e transmissio n
housing .
12 . Clea n th e inle t openin g o f th e AT F straine r
thoroughl y wit h compresse d air , the n chec k tha t i t i s
in goo d condition , an d th e inle t openin g i s no t
clogged .
13. Replac e th e AT F straine r i f i t i s clogge d o r dam -
aged.
NOTE : Th e AT F straine r ca n b e reuse d i f i t i s no t
clogged .
14 . Instal l th e lowe r valv e bod y assembly in th e revers e
orde r o f removal .
1
. Rais e th e fron t o f th e vehicle , an d suppor t i t wit h
safet y stand s (se e sectio n 1 ).
2 . Se t th e parkin g brake , an d bloc k bot h rea r wheel s
securely .
3. Shif t th e transmissio n t o th e position .
4 . Remov e th e drai n plug , an d drai n th e automati c
transmissio n flui d (ATF) . Reinstal l th e drai n plu g
wit h a ne w sealin g washer .
CLAMP
ProCarManuals.com
Page 354 of 1771
NOTE:
Clean all parts thoroughly in solvent or carburetor
cleaner, and dry with compressed air.
Blow out all passages.
When removing the lower valve body assembly,
replace the following:
-O-rings
-ATF pan gasket
CAUTION: Do not turn over the transmission before
removing the ATF pan.
1. Remove the shift control solenoid/linear solenoid
harness connector stop.
2. Remove the ATF pan (14 bolts).
3. Remove the ATF strainer (three bolts).
4. Remove the lower valve body assembly (six bolts)
while pushing the connector out of the transmission
housing.
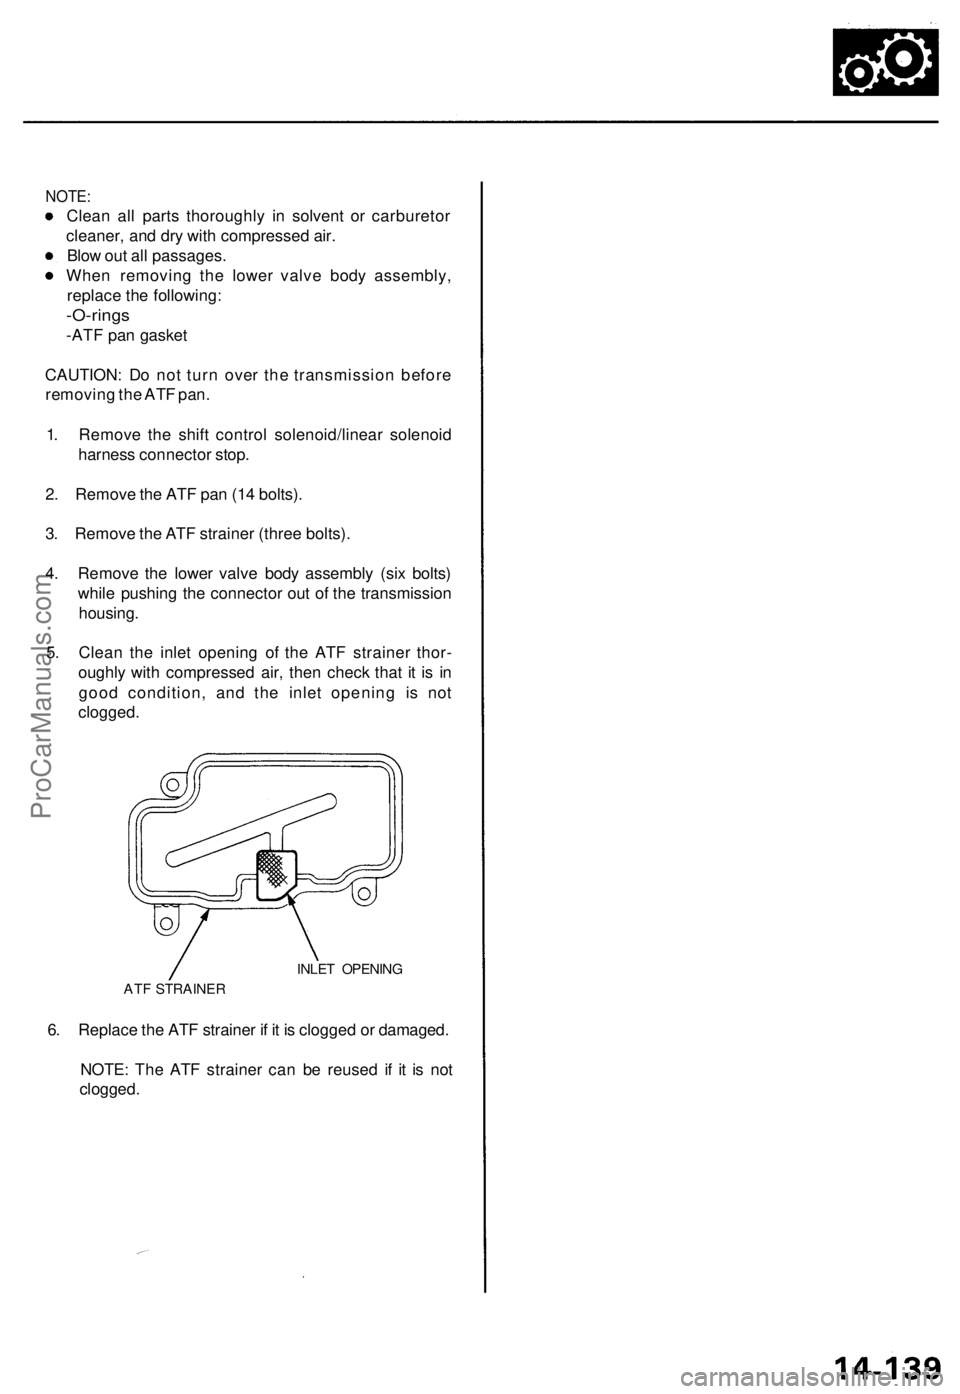
5. Clean the inlet opening of the ATF strainer thor-
oughly with compressed air, then check that it is in
good condition, and the inlet opening is not
clogged.
INLET OPENING
ATF STRAINER
6. Replace the ATF strainer if it is clogged or damaged.
NOTE: The ATF strainer can be reused if it is not
clogged.ProCarManuals.com