display Acura TL 2000 3.2 User Guide
[x] Cancel search | Manufacturer: ACURA, Model Year: 2000, Model line: TL, Model: Acura TL 2000Pages: 311, PDF Size: 3.05 MB
Page 129 of 311
Audio System
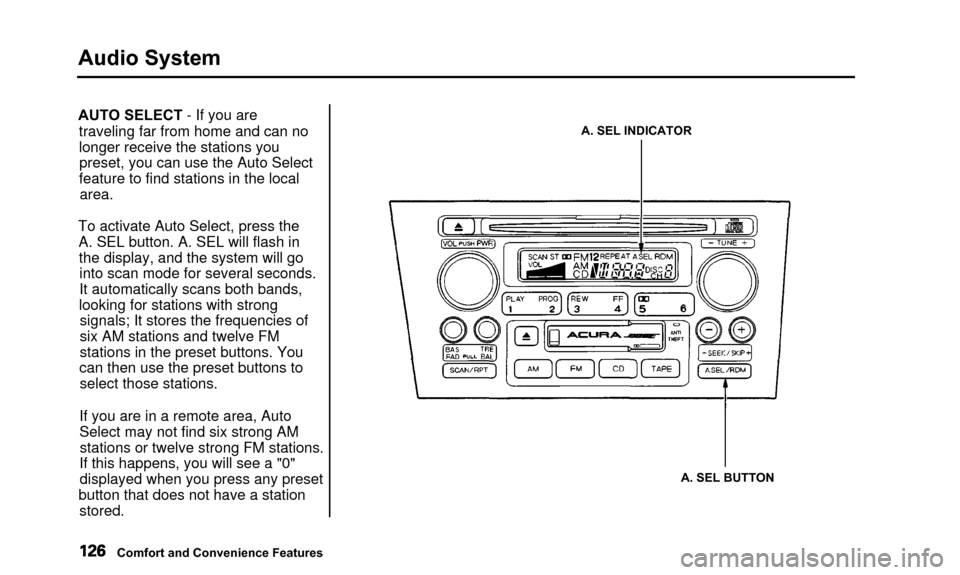
AUTO SELECT - If you aretraveling far from home and can no
longer receive the stations youpreset, you can use the Auto Select
feature to find stations in the local area.
To activate Auto Select, press the A. SEL button. A. SEL will flash inthe display, and the system will gointo scan mode for several seconds.
It automatically scans both bands,
looking for stations with strong signals; It stores the frequencies of
six AM stations and twelve FM
stations in the preset buttons. You
can then use the preset buttons to select those stations.
If you are in a remote area, Auto
Select may not find six strong AM stations or twelve strong FM stations.
If this happens, you will see a "0" displayed when you press any preset
button that does not have a station stored.A. SEL INDICATOR
A. SEL BUTTON
Comfort and Convenience Features
Page 132 of 311
Audio System
Audio System LightingYou can use the instrument panel brightness control knob to adjust the
illumination of the audio system (see
page 64). The audio system
illuminates when the parking lightsare on, even if the radio is turned off.
Radio Frequencies
Your Acura's radio can receive the complete AM and FM bands.
Those bands cover these frequen- cies:
AM band: 530 to 1,710 kilohertz
FM band: 87.7 to 107.9 megahertz
Radio stations on the AM band are
assigned frequencies at least ten
kilohertz apart (530, 540, 550). Stations on the FM band are
assigned frequencies at least 0.2
megahertz apart (87.9, 88.1, 88.3). Stations must use these exact
frequencies. It is fairly common for stations to round-off the frequency in
their advertising, so your radio could display a frequency of 100.9 even
though the announcer may identify
the station as "FM101."
Radio Reception How well your Acura's radio receivesstations is dependent on many
factors, such as the distance from
the station's transmitter, nearby
large objects, and atmospheric conditions.
A radio station's signal gets weaker as you get farther away from its
transmitter. If you are listening to an
AM station, you will notice the sound volume becoming weaker, and the station drifting in and out. If you are
listening to an FM station, you will see the stereo indicator flickering off
and on as the signal weakens.
Eventually, the stereo indicator will go off and the sound will fade
completely as you get out of range of
the station's signal.
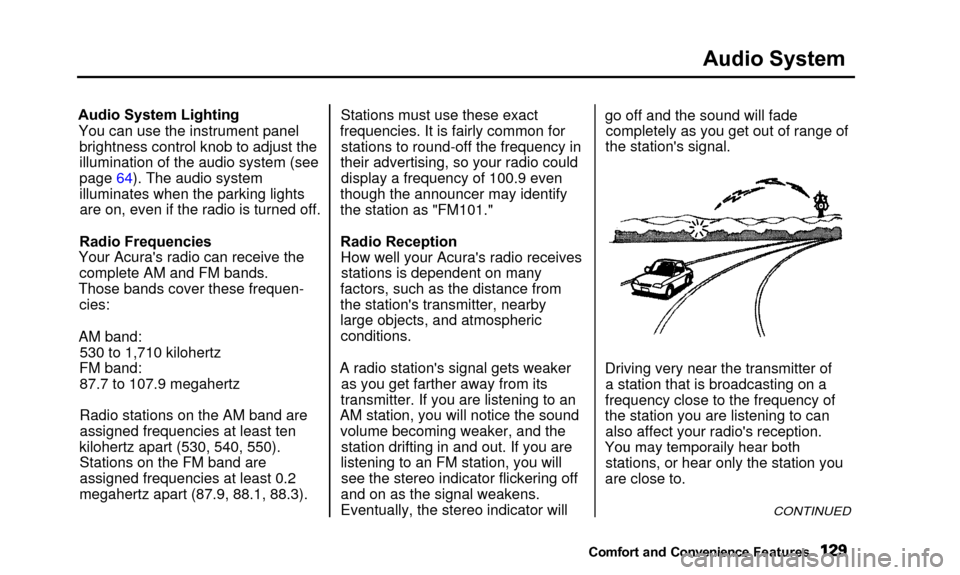
Driving very near the transmitter of a station that is broadcasting on a
frequency close to the frequency of
the station you are listening to can also affect your radio's reception.
Yo u
ma
y
temporaril
y
hea
r
bot
h
stations, or hear only the station you
are close to.
CONTINUED
Comfort and Convenienc e Features
You may temporaily hear both
Page 134 of 311
Audio System
Operating the CD Player
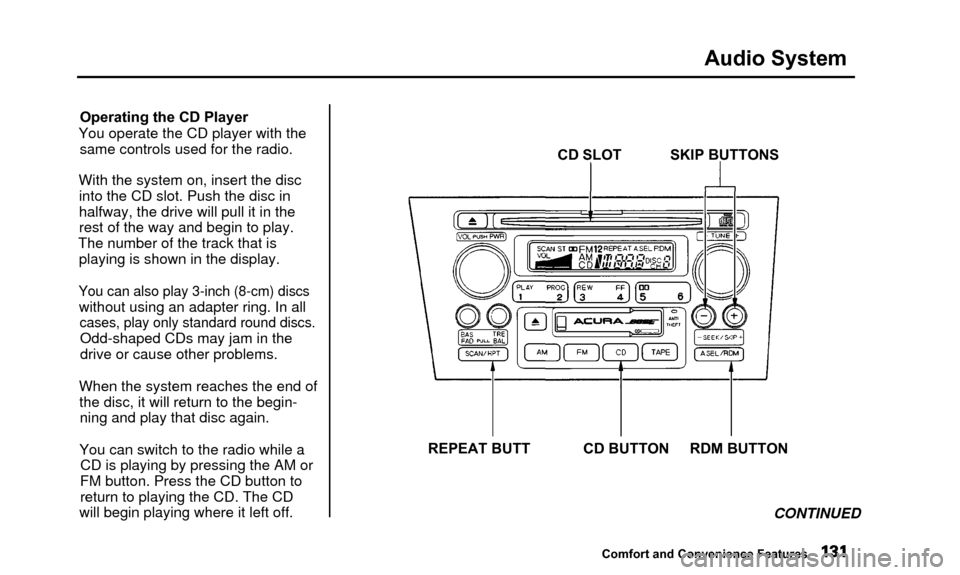
You operate the CD player with the same controls used for the radio.
With the system on, insert the disc into the CD slot. Push the disc in
halfway, the drive will pull it in the
rest of the way and begin to play.
The number of the track that is playing is shown in the display.
You can also play 3-inch (8-cm) discs
without using an adapter ring. In all
cases, play only standard round discs.
Odd-shaped CDs may jam in the
drive or cause other problems.
When the system reaches the end of the disc, it will return to the begin-ning and play that disc again.
You can switch to the radio while a CD is playing by pressing the AM or
FM button. Press the CD button to
return to playing the CD. The CD
will begin playing where it left off. CD SLOT SKIP BUTTONS
REPEAT BUTT CD BUTTON RDM BUTTON CONTINUED
Comfort and Convenience Features
Page 135 of 311
Audio System
If you turn the system off while a CD
is playing, either with the PWR/VOL
knob or by turning off the ignition, the disc will stay in the drive. When
you turn the system back on, the CD
will begin playing where it left off.
Press the eject button to remove the
disc from the drive.
If you eject the disc, but do not
remove it from the slot, the system
will automatically reload the disc after 15 seconds and put the CD
player in pause mode. To begin
playing the disc, press the CD button.
You can use the SKIP buttons while a disc is playing to select passages
and change tracks.
To move rapidly within a track, press and hold an appropriate SKIP button.
Press the button to move forward,
or the button to move backward.
Release the button when the system
reaches the point you want.
Each time you press the button
and release it, the system skips
forward to the beginning of the next
track. Press and release the
button to skip backward to the
beginning of the current track. Press and release it again to skip to the
beginning of the previous track. REPEAT - To activate the Repeat
feature, press and release the Repeat
button. You will see REPEAT in the display. The system continuously
replays the current track. Press the
Repeat button again to turn it off.
RANDOM PLAY - This feature,
when activated, plays the tracks on the CD in random order, rather thanin the order they are recorded on theCD. To activate Random Play, press
the RDM button. You will see RDM in the display. The system will then
select and play tracks randomly.
This continues until you deactivate Random Play by pressing the RDM
button again.
Comfort and Convenience Features
Page 136 of 311
Audio System
Operating the CD Changer
(Optional)
A Compact Disc changer is available for your vehicle. It holds up to six discs, providing several hours of
continuous entertainment. You
operate this CD changer with the same controls used for the in-dash
CD player.
Load the desired CDs in the magazine and load the magazine in
the changer according to the instructions that came with the unit.
Play only standard round discs. Odd-
shaped CDs may jam in the drive or
cause other problems.
To select the CD changer, press the CD button. The disc and track
numbers will be displayed. To select a different disc, press the
appropriate preset button (1—6). If
you select an empty slot in the magazine, the changer will, after
finding that slot empty, try to load the CD in the next slot. This
continues until it finds a CD to load
and play.
If you load a CD in the in-dash player
while the changer is playing a CD, the system will stop the changer and
begin playing the in-dash CD. To select the changer again, press the
CD button. Play will begin where it
left off. Use the CD button to switch
between the player and the changer.
If you eject the in-dash CD while it is
playing, the system will automatically switch to the CD changer and begin
play where it left off. If there are no CDs in the changer, the display will
flash. You will have to select another mode (AM or FM) with the FM or
AM button. When you switch back to CD mode,
the system selects the same unit (in- dash or changer) that was playing
when you switched out of CD mode.
To use the SKIP, REPEAT, and RANDOM functions, refer to the in-
dash player operating instructions.
Comfort and Convenience Features
Page 138 of 311
Audio System
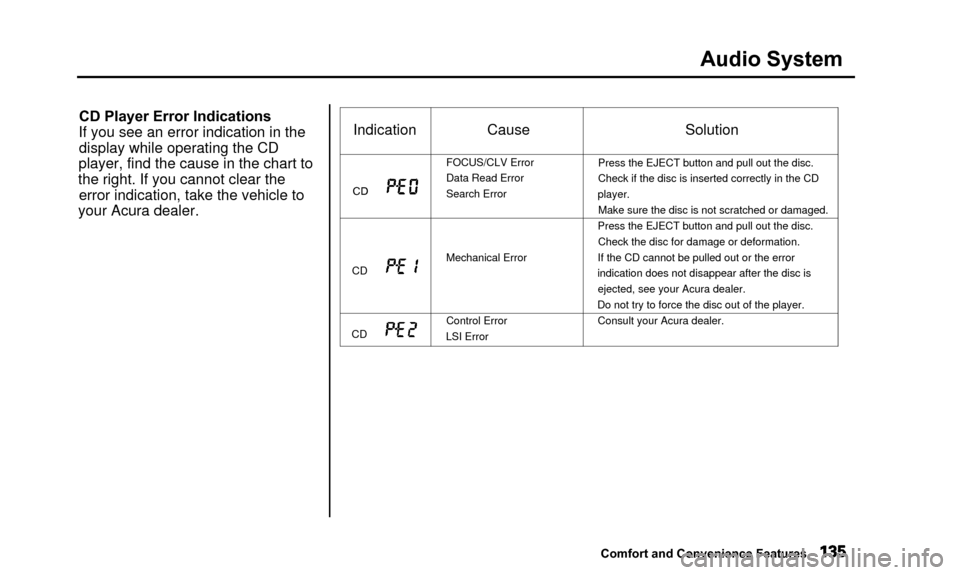
CD Player Error Indications
If you see an error indication in the display while operating the CD
player, find the cause in the chart to
the right. If you cannot clear the error indication, take the vehicle to
your Acura dealer.
Comfort and Convenience Features
Indication
CD
CD
CD
Cause
FOCUS/CLV Error
Data Read Error
Search Error
Mechanical Error
Control Error
LSI Error
Solution
Press the EJECT button and pull out the disc.
Check if the disc is inserted correctly in the CD
player. Make sure the disc is not scratched or damaged.
Press the EJECT button and pull out the disc. Check the disc for damage or deformation.
If the CD cannot be pulled out or the error
indication does not disappear after the disc is ejected, see your Acura dealer.
Do not try to force the disc out of the player.
Consult your Acura dealer.
Page 139 of 311
Audio System
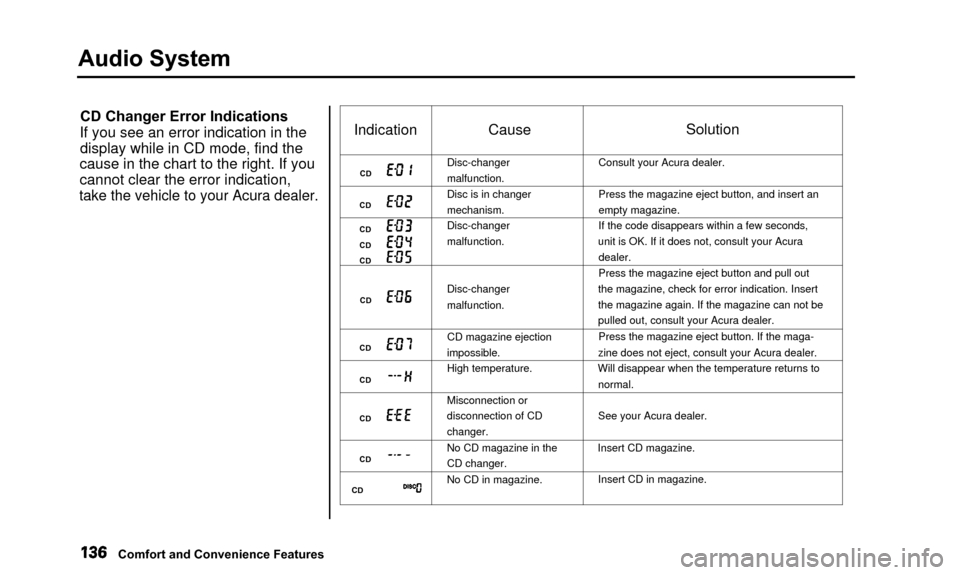
CD Changer Error Indications
If you see an error indication in the display while in CD mode, find the
cause in the chart to the right. If you
cannot clear the error indication,
take the vehicle to your Acura dealer.
Indication
CD
CD
CD
CD
CD
CD
CD
CD
CD
CD
CD
Cause
Disc-changer
malfunction.
Disc is in changer
mechanism.
Disc-changer
malfunction.
Disc-changer
malfunction.
CD magazine ejection
impossible.
High temperature.
Misconnection or
disconnection of CD
changer.
No CD magazine in the
CD changer.
No CD in magazine.
Solution
Consult your Acura dealer.
Press the magazine eject button, and insert an
empty magazine.
If the code disappears within a few seconds,
unit is OK. If it does not, consult your Acura dealer.
Press the magazine eject button and pull out
the magazine, check for error indication. Insert
the magazine again. If the magazine can not be
pulled out, consult your Acura dealer.
Press the magazine eject button. If the maga-
zine does not eject, consult your Acura dealer.
Will disappear when the temperature returns to
normal.
See your Acura dealer.
Insert CD magazine. Insert CD in magazine.
Comfort and Convenience Features
Page 141 of 311
Audio System
The tape direction indicator will lightto show you which side of the
cassette is playing. The indicates
the side you inserted facing upward is now playing. If you want to play
the other side, press the PROG
button.
Dolby B noise reduction turns on
when you insert a cassette. If the
tape was not recorded with Dolby B noise reduction, turn it off by
pressing the NR button.
When the system reaches the end of
the tape, it will automatically reverse direction and play the other side. If
you want to remove the cassette from the drive, press the EJECT
button. If you turn the system off while a
tape is playing, either with the PWR/
VOL knob or by turning off the ignition, the cassette will remain in
the drive. When you turn the system
back on, the tape will begin playing
where it left off.
To switch to the radio or CD player while a tape is playing, press the AM,FM or CD button. To change back to
the cassette player, push the TAPEbutton. Tape Search Functions
With a cassette playing, you can usethe FF, REW, SKIP, or REPEAT
function to find a desired program.
FF/REW - Fast Forward and Re-
wind move the tape rapidly. To re-
wind the tape, push the REW button.
You will see REW in the display. To fast forward the tape, push the FF
button. You will see FF displayed.
Press the PLAY button to take thesystem out of rewind or fast forward.
If the system reaches the end of the
tape while in fast forward or rewind, it automatically stops that function,
reverses direction, and begins to play.
Comfort and Convenience Features
Page 142 of 311
Audio System
SKIP — The skip function allows
you to find the beginning of a song or passage. To skip to the beginning
of a song or passage currently
playing, push the button. You willsee REW flashing in the display as
the tape rewinds. To skip to the
beginning of the next song, push the
button. You will see FF flashing in
the display as the tape fast forwards.
When the system finds the begin- ning of a song or passage, it goes
back to PLAY. REPEAT - The Repeat function
continuously replays the current
song or passage. Press the REPEAT
button to activate it; you will see
REPEAT displayed as a reminder.
When the system reaches the end of the song or passage currentlyplaying, it will automatically go into
rewind.
When it senses the beginning of the same song or passage, the system
returns to PLAY mode. It will
continue to repeat this same
program until you deactivate REPEAT by pressing the button
again. The SKIP and REPEAT functions
use silent periods on the tape to find
the end of a song or passage. These
features may not work to your satisfaction if there is almost no gap
between selections, a high noise
level between selections, or a silent
period in the middle of selection.
Comfort and Convenience Features
Page 144 of 311
Audio System
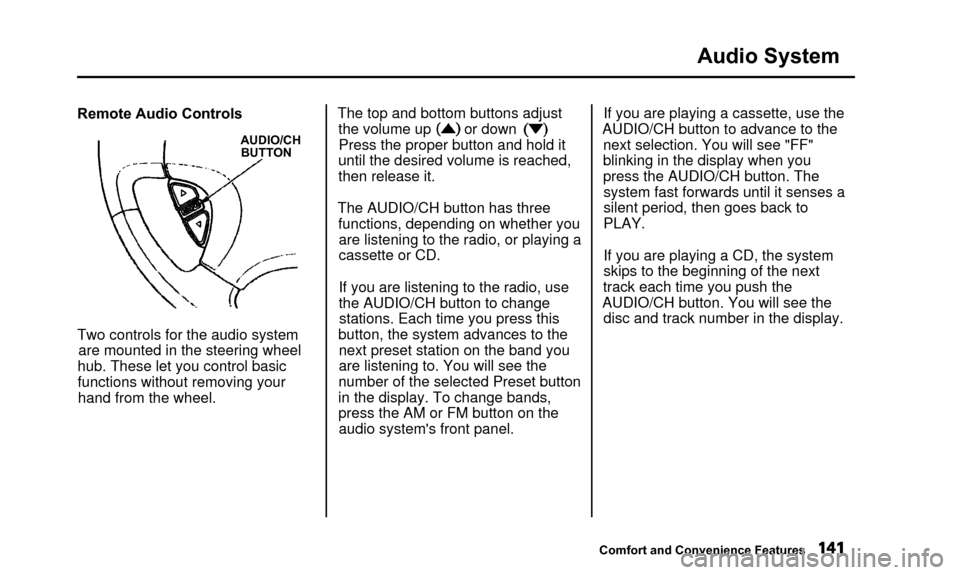
Remote Audio Controls
AUDIO/CHBUTTON
Two controls for the audio system
are mounted in the steering wheel
hub. These let you control basic
functions without removing your hand from the wheel. The top and bottom buttons adjust
the volume up or down
Press the proper button and hold it
until the desired volume is reached,
then release it.
The AUDIO/CH button has three functions, depending on whether youare listening to the radio, or playing a
cassette or CD.
If you are listening to the radio, use
the AUDIO/CH button to changestations. Each time you press this
button, the system advances to the next preset station on the band youare listening to. You will see the
number of the selected Preset button
in the display. To change bands,
press the AM or FM button on the audio system's front panel. If you are playing a cassette, use the
AUDIO/CH button to advance to the next selection. You will see "FF"blinking in the display when you
press the AUDIO/CH button. The system fast forwards until it senses a
silent period, then goes back to
PLAY.
If you are playing a CD, the system
skips to the beginning of the next
track each time you push the
AUDIO/CH button. You will see the disc and track number in the display.
Comfort and Convenience Features