Page Acura TL 2000 3.2 Owner's Guide
[x] Cancel search | Manufacturer: ACURA, Model Year: 2000, Model line: TL, Model: Acura TL 2000Pages: 311, PDF Size: 3.05 MB
Page 63 of 311
Gauges
Temperature Gauge
This shows the temperature of theengine's coolant. During normal
operation, the pointer should rise
from the bottom white mark to about the middle of the gauge. In severedriving conditions, such as very hot
weather or a long period of uphill driving, the pointer may rise to near
the upper red mark. If it reaches the red (Hot) mark, pull safely to theside of the road. Turn to page 265 for
instructions and precautions on
checking the engine's cooling system. Fuel Gauge
This shows how much fuel you have. It is most accurate when the car is on
level ground. It may show slightly
more or less than the actual amount
when you are driving on curvy or hilly roads.
The needle returns to the bottom after you turn off the ignition. The
gauge shows the fuel level reading
immediately after you turn the
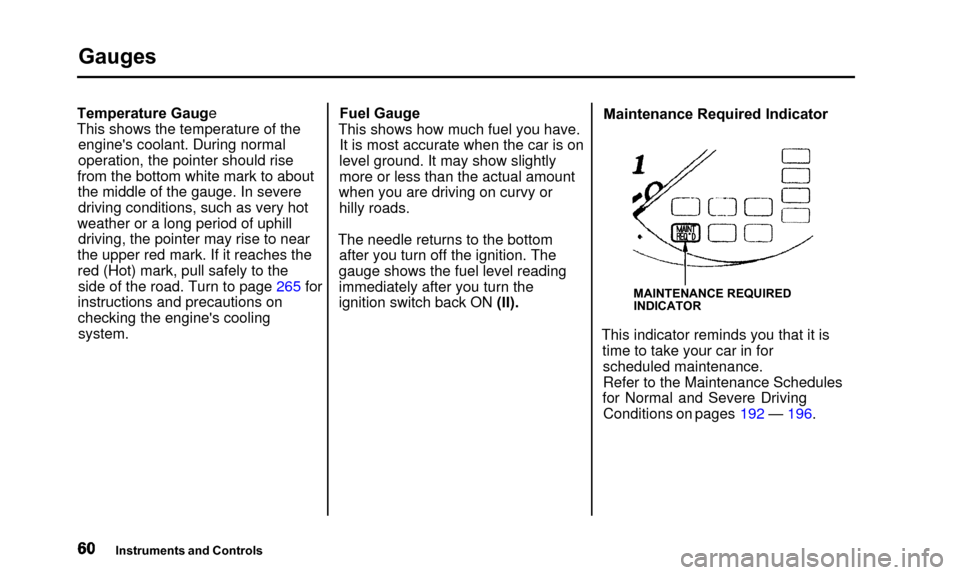
ignition switch back ON (II). Maintenance Required Indicator
MAINTENANCE REQUIRED
INDICATOR
This indicator reminds you that it is
time to take your car in forscheduled maintenance.Refer to the Maintenance Schedules
for Normal and Severe Driving Conditions on pages 192 — 196.
Instruments and Controls
Page 66 of 311
Controls Near the Steering Wheel
Headlights
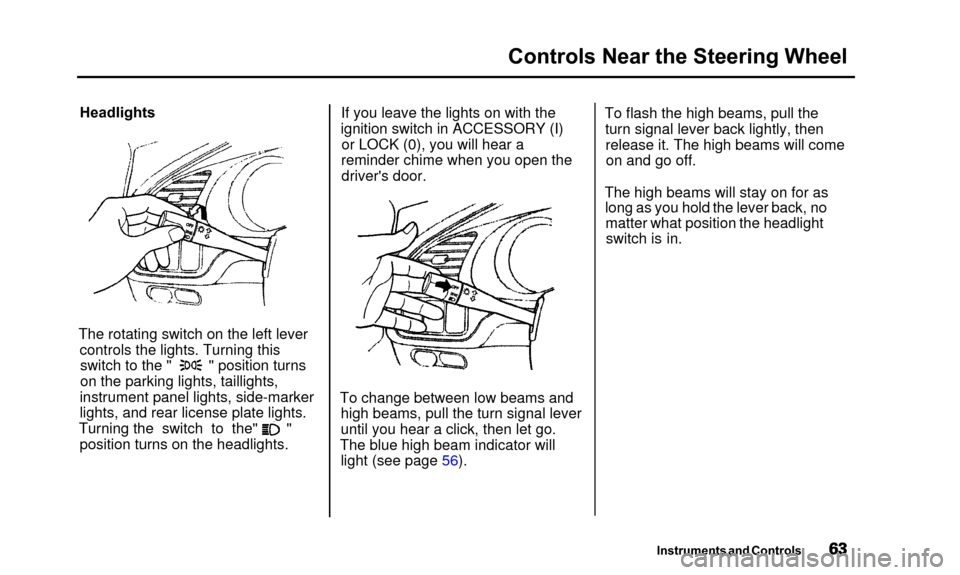
The rotating switch on the left lever controls the lights. Turning thisswitch to the " " position turns
on the parking lights, taillights,
instrument panel lights, side-marker
lights, and rear license plate lights.
Turning the switch to the" I " position turns on the headlights. If you leave the lights on with the
ignition switch in ACCESSORY (I) or LOCK (0), you will hear a
reminder chime when you open the driver's door.
To change between low beams and high beams, pull the turn signal lever
until you hear a click, then let go.
The blue high beam indicator will light (see page 56). To flash the high beams, pull the
turn signal lever back lightly, thenrelease it. The high beams will comeon and go off.
The high beams will stay on for as long as you hold the lever back, nomatter what position the headlightswitch is in.
Instruments and Controls
Page 71 of 311

Controls Near the Steering Wheel
Make sure the rear window is clear
and you have good visibility before
starting to drive.
The defogger and antenna wires on the inside of the rear window can beaccidentally damaged. When
cleaning the glass, always wipe side
to side. Steering Wheel Adjustment
See page 17 for important safety
information about how to properly
position the steering wheel.
Make any steering wheel adjustment
before you start driving.
Adjusting the steering wheelposition while driving may
cause you to lose control of the
car and be seriously injured in a
crash.
Adjust the steering wheel only
when the car is stopped.
To adjust the steering wheel upward or downward:
1. Push the lever under the steering column all the way down. 2. Move the steering wheel to the
desired position, making sure the
wheel points toward your chest, not toward your face. Make sure
you can see the instrument panel gauges and the indicator lights.
3. Push the lever up to lock the steering wheel in that position.
4. Make sure you have securely locked the steering wheel in place
by trying to move it up and down.
Instruments and Controls
Page 75 of 311

Steering Wheel Controls
When you push the CANCEL button,or tap the brake pedal, the CRUISECONTROL light on the instrument
panel will go out and the car will
begin to slow down. You can use the accelerator pedal in the normal way.
The system remembers the previously-set cruising speed. Toreturn to that speed, accelerate toabove 25 mph (40 km/h) and then
press the RESUME/accel button until the CRUISE CONTROL lightcomes on. The car will accelerate to
the same cruising speed as before. Pressing the Cruise Control Master
Switch turns the system completely
off and erases the previous cruising
speed from memory. To use the
system again, refer to Using the Cruise Control Remote Audio Controls
AUDIO/CH
BUTTON
These buttons let you control some
functions of the audio system with-
out removing your hands from the
wheel. Refer to page 141 for a com- plete explanation.
Instruments and Controls
Page 76 of 311

Keys and Locks
Keys
KEY MASTER
NUMBER KEY
PLATE (BLACK) VALET KEY
(GREY)
Your car comes with two master
keys and a valet key.
The master key fits all the locks on your car: • Ignition
• Doors• Glove box
• Trunk pass-through cover The valet key works only in the
ignition and the door locks. You can
keep the trunk, trunk pass-throughcover, and glove box locked when
you leave your car and the valet key at a parking facility.
You should have received a key number plate with your set of keys.
You will need this number if you have to get a lost key replaced. Keepthe plate stored in a safe place.
When replacing keys, use only
Acura-approved key blanks.
These keys contain electronic circuits that are activated by theImmobilizer System. They will not
work to start the engine if the circuits are damaged.
• Protect the keys from direct sunlight, high temperature, and
high humidity.
• Do not drop the keys or set heavy objects on them.
• Keep the keys away from liquids.If they get wet, dry them immedi-
ately with a soft cloth.
The keys do not contain batteries. Do not try to take them apart.
Remote Transmitter
Your car also comes with two remote transmitters; see page 78 for anexplanation of the operation.
Instruments and Controls
Page 79 of 311

Keys and Locks
ACCESSORY (I) - In this position,you can operate the audio systemand the accessory power socket.
ON (II) — This is the normal key
position when driving. All features
and accessories on the car are usable.
Several of the lights on the instru-
ment panel come on as a test when
you turn the ignition switch from
ACCESSORY to ON. START (III) - Use this position
only to start the engine. The switch
returns to ON (II) when you let go of
the key.
The engine will not start if the
Immobilizer System does not
recognize the key's coding (see page
74).
You will hear a reminder beeper if
you leave the key in the ignition
switch in the LOCK (0) or
ACCESSORY (I) position and open the driver's door. Remove the key to
turn off the beeper.
Instruments and Controls
Page 85 of 311

Keys and Locks
Trunk
TRUNK RELEASE BUTTON
You can open the trunk in three
ways:
• Press the trunk release button onthe driver's door.
• Reach through the trunk pass-through and pull the trunk release
handle.
• Press the trunk release button onthe remote transmitter.
TRUNK RELEASE HANDLE
To close the trunk, press down onthe trunk lid.
See page 156 for cargo loading and
weight limit information. Keep the trunk lid closed at all times whiledriving to avoid damaging the lid,
and to prevent exhaust gas from
getting into the interior. See Carbon
Monoxide Hazard on page 49.
TRUNK MAIN SWITCH
To protect items in the trunk when you need to give the key to someoneelse:
1. Disable the trunk release button on the driver's door by turning off
the trunk main switch in the glove
box.
Instruments and Controls
Page 86 of 311

Keys and Locks
2. Lock the glove box with themaster key. Make sure the trunk
pass-through cover is locked (see
page 92).
3. Give the person the valet key. Even if the trunk main switch is
turned off, you can open the trunk
with the remote transmitter.
GLOVE BOX
Open the glove box by squeezing the
handle. Close it with a firm push.
Lock or unlock the glove box with
the master key.
The glove box light comes on only when the instrument panel lights are on.
Instruments and Controls
Glove Box
An open glove box can cause
serious injury to your passenger
in a crash, even if the
passenger is wearing the seatbelt.
Always keep the glove box
closed while driving.
Page 92 of 311

Seat Adjustments
Driver's Seat Full Power
Adjustments
See pages 12 — 14 for important safety
information and warnings about how to
properly position seats and seat-backs.
The two power seat adjustment switches are on the outside edge of
the seat bottom. The horizontal switch adjusts the seat bottom in
several directions. The short verticalswitch adjusts the seat-back angle.
You can adjust the seat with the ignition switch in any position. Make
all adjustments before you start
driving. Push the horizontal switch forward
or backward to move the seat
forward or backward. Pull up or push down on the front of
the switch to move the seat bottom's
front edge up or down. Pull up or
push down on the rear of the switch
to move the rear of the seat bottom
up or down.
CONTINUED
Instruments and Controls
Page 94 of 311

Seat Adjustments
Driver's Lumbar Support
Vary the lumbar support by moving the lever on the right side of the seat-back. Pivot the lever forward
until it stops, then let it return. Doing
this several times adjusts the lumbar support through its full range. Head Restraints
RELEASE BUTTON
See page 14 for important safety
information and a warning about how to
properly position the head restraints.
The head restraints help protect you and your passengers from whiplash
and other injuries. They are most
effective when you adjust them so
the back of the occupant's head rests against the center of the restraint. A
taller person should adjust the
restraint as high as possible.
The front head restraints adjust for height. You need both hands toadjust the restraint. Do not attempt
to adjust it while driving. To raise it, pull upward. To lower the restraint,
push the release button sideways
and push the restraint down.
To remove a head restraint for cleaning or repair, pull it up as far as
it will go. Push the release button
and pull the restraint out of the seat-
back.
Instruments and Controls