check engine Acura TL 2004 Owner's Manual
[x] Cancel search | Manufacturer: ACURA, Model Year: 2004, Model line: TL, Model: Acura TL 2004Pages: 283, PDF Size: 3.84 MB
Page 19 of 283
If a seat belt does not seem to work
as it should, it may not protect the
occupant in a crash.Using a seat
belt that is not working properly can
result in serious injury or death.
Have your Acura dealer check the
belt as soon as possible.
See page f or additional
inf ormation about your seat belts
and how to take care of them.
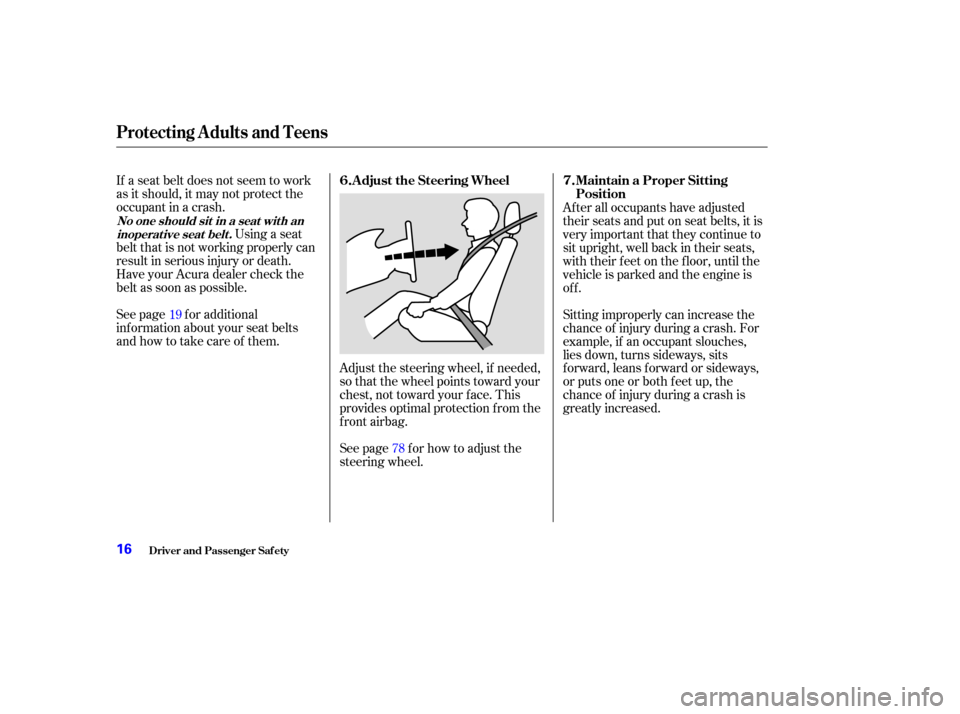
Adjust the steering wheel, if needed,
so that the wheel points toward your
chest, not toward your f ace. This
provides optimal protection f rom the
f ront airbag.
See page f or how to adjust the
steering wheel.After all occupants have adjusted
their seats and put on seat belts, it is
very important that they continue to
sit upright, well back in their seats,
with their feet on the floor, until the
vehicle is parked and the engine is
of f .
Sitting improperly can increase the
chance of injury during a crash. For
example, if an occupant slouches,
lies down, turns sideways, sits
forward, leans forward or sideways,
or puts one or both f eet up, the
chance of injury during a crash is
greatly increased.
19
78
Protecting A dults and Teens
No one should sit in a seat wit h aninoperat ive seat belt .
Adjust the Steering Wheel Maintain a Proper Sitting
Position
6.
7.
Driver and Passenger Saf ety16
Page 29 of 283
In a moderate to severe side impact,
sensors will detect rapid deceleration
and signal the control unit to
instantly inflate the side curtain
airbag on the driver’s or the
passenger’s side of the vehicle. If the
impact is on the passenger’s side, the
passenger’s side curtain airbag will
inflate even if there are no occupants
on that side of the vehicle.
To get the best protection f rom the
side curtain airbags, occupants
should wear their seat belts and sit
upright and well back in their seats.The SRS indicator alerts
you to a potential problem
with your airbags or seat belt
tensioners.
When you turn the ignition switch to
ON (II), this indicator will come on
brief ly then go out. This tells you
that the system is working properly.
If the indicator comes on at any
other time, or does not come on at all,
you should have the system checked
by your dealer. For example:
If the SRS indicator does not come
on after you turn the ignition to
ON (II).
If the indicator stays on after the
engine starts.
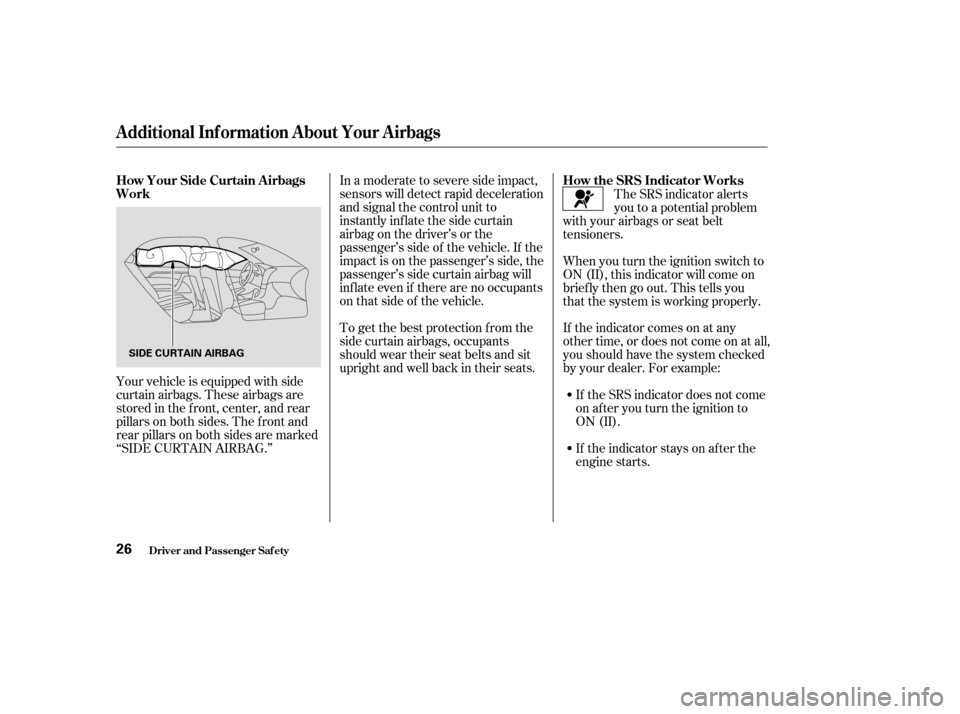
Your vehicle is equipped with side
curtain airbags. These airbags are
stored in the f ront, center, and rear
pillars on both sides. The f ront and
rear pillars on both sides are marked
‘‘SIDE CURTAIN AIRBAG.’’
Additional Inf ormation About Your Airbags
How Your Side Curtain A irbags
Work
How the SRS Indicator Works
Driver and Passenger Saf ety26
SIDE CURTAIN AIRBAG
Page 55 of 283

The instrument panel has many
indicators to give you important
inf ormation about your vehicle.
If you turn the ignition switch to ON
(II) bef ore f astening your belt, the
beeper sounds and the indicator
f lashes. If you do not f asten your
seat belt bef ore the beeper stops, the
indicator stops f lashing but remains
on.The engine can be severely damaged
if this indicator f lashes or stays on
when the engine is running. For
more inf ormation, see page .
If this indicator comes on when the
engine is running, the battery is not
being charged. For more inf ormation,
see page .
See page .This indicator has two f unctions:
Itcomesonwhenyouturnthe
ignition switch to ON (II). It is a
reminder to check the parking
brake. Driving with the parking
brake not f ully released can
damage the brakes and tires.
If it stays on after you have fully
released the parking brake while
the engine is running, or if it
comes on while driving, it can
indicate a problem in the brake
system. For more inf ormation, see
page .
If you drive without releasing the
parking brake, a chime will sound,
and you will see a ‘‘RELEASE
PARKING BRAKE’’ message in the
Multi-Inf ormation Display.
If you continue driving without
f astening your seat belt, the beeper
sounds and the indicator f lashes
again at regular intervals, and you
will see ‘‘FASTEN SEAT BELT’’ in
the multi-information display. 1.
2.
243 244
242
242
Instrument Panel Indicators
Inst rument s and Cont rols
Seat Belt Reminder
Indicator L ow Oil Pressure
Indicator
Charging System
Indicator
Malf unction Indicator
Lamp Parking Brake and
Brake System
Indicator
52
Canada
U.S.
Page 60 of 283
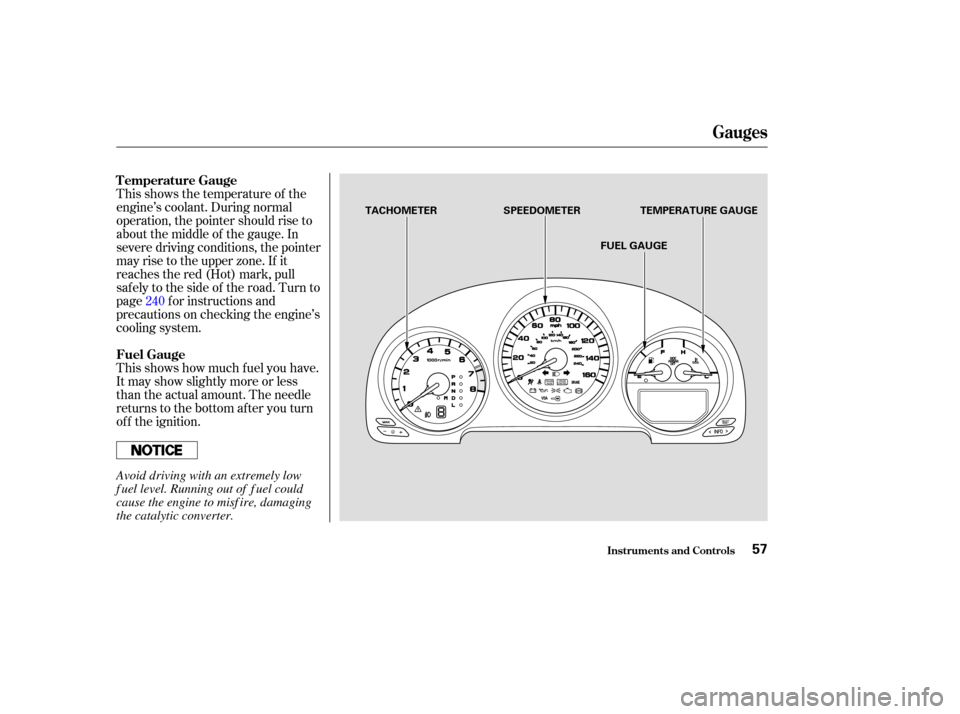
This shows the temperature of the
engine’s coolant. During normal
operation, the pointer should rise to
about the middle of the gauge. In
severe driving conditions, the pointer
may rise to the upper zone. If it
reaches the red (Hot) mark, pull
safely to the side of the road. Turn to
page f or instructions and
precautions on checking the engine’s
cooling system.
This shows how much f uel you have.
It may show slightly more or less
than the actual amount. The needle
returns to the bottom after you turn
of f the ignition.240
Gauges
Inst rument s and Cont rols
Temperature Gauge
Fuel Gauge
57
FUEL GAUGE
TEMPERATURE GAUGE
SPEEDOMETER
TACHOMETER
Avoid driving with an extremely low
f uel level. Running out of f uel could
cause the engine to misf ire, damaging
the catalytic converter.
Page 61 of 283
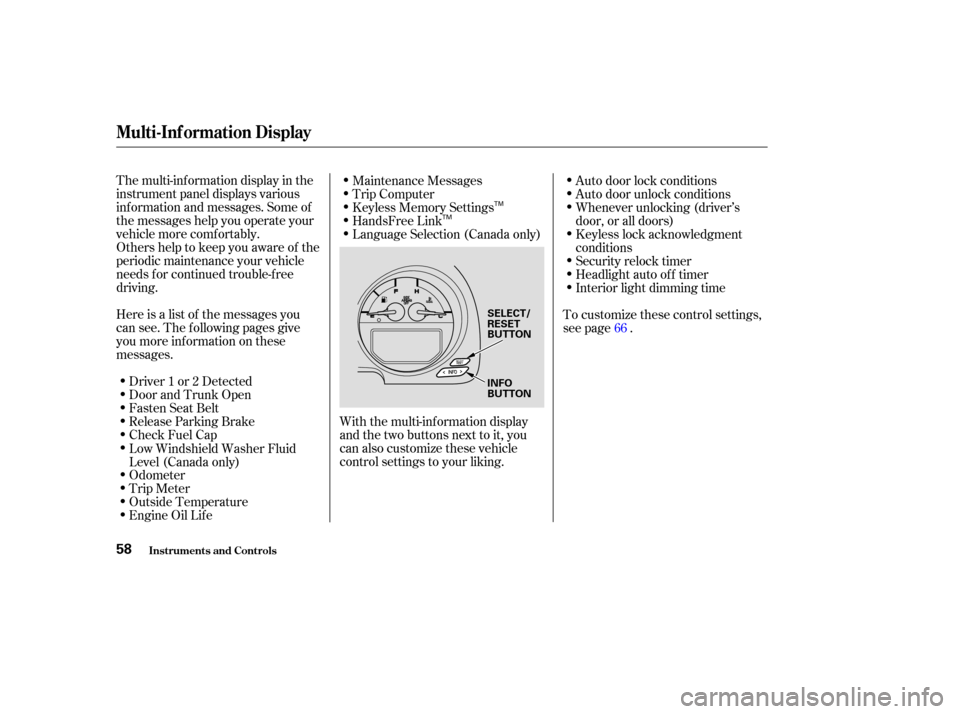
The multi-inf ormation display in the
instrument panel displays various
inf ormation and messages. Some of
the messages help you operate your
vehiclemorecomfortably.
Others help to keep you aware of the
periodic maintenance your vehicle
needs f or continued trouble-f ree
driving.
Here is a list of the messages you
can see. The f ollowing pages give
you more inf ormation on these
messages.Driver 1 or 2 Detected
Door and Trunk Open
Fasten Seat Belt
Release Parking Brake
Check Fuel Cap
Odometer
Trip Meter
Outside Temperature
Engine Oil Lif e Maintenance Messages
Trip Computer
Keyless Memory Settings
HandsFree Link
Language Selection (Canada only)
With the multi-information display
and the two buttons next to it, you
can also customize these vehicle
control settings to your liking. Auto door lock conditions
Auto door unlock conditions
Whenever unlocking (driver’s
door, or all doors)
Keyless lock acknowledgment
conditions
Security relock timer
Headlight auto of f timer
Interior light dimming time
To customize these control settings,
see page .
Low Windshield Washer Fluid
Level (Canada only) 66
Multi-Inf ormation Display
Inst rument s and Cont rols58
SELECT/
RESET
BUTTON
INFO
BUTTON
TM
TM
Page 102 of 283

If your vehicle’s battery is
disconnected or goes dead, or a f ront
window f use is removed, the AUTO
f unction could be disabled. If the
AUTO f unction is disabled, do the
f ollowing:The power window system has a key-
of f delay f unction. The windows will
stilloperateforupto10minutes
after you turn off the ignition.
Opening either f ront door cancels
the delay function. You must turn
the ignition switch to ON (II) again
bef ore you can operate the windows.
Start the engine. Push down on
the f ront window switch until the
window is f ully open.
Pull back on the f ront window
switch to close the window
completely, then hold the switch
f or a second or two more.
If the power windows do not operate
properly af ter resetting, have your
vehicle checked by an Acura dealer. 1.
2.
Power Windows
Inst rument s and Cont rols99
Page 170 of 283
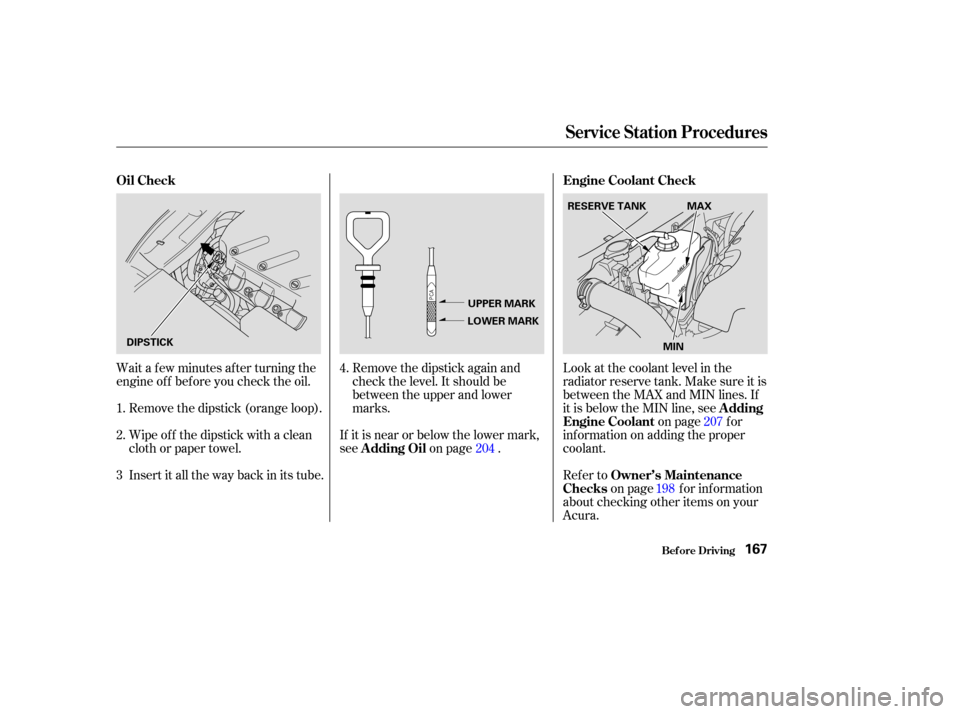
If it is near or below the lower mark,
seeon page .
Remove the dipstick again and
check the level. It should be
between the upper and lower
marks.
Look at the coolant level in the
radiator reserve tank. Make sure it is
between the MAX and MIN lines. If
it is below the MIN line, see
on page f or
inf ormation on adding the proper
coolant.
Refer to on page f or inf ormation
about checking other items on your
Acura.
Wait a f ew minutes af ter turning the
engine of f bef ore you check the oil.
Remove the dipstick (orange loop).
Wipe of f the dipstick with a clean
cloth or paper towel.
Insert it all the way back in its tube. 4.
1.
2.
3 198
204
207
Service Station Procedures
Oil Check
A dding OilEngine Coolant Check
A dding
Engine Coolant
Owner’s Maintenance
Checks
Bef ore Driving167
UPPER MARK
LOWER MARK
DIPSTICK RESERVE TANK
MINMAX
Page 171 of 283

Always maintain your vehicle
according to the maintenance
messages given by the multi-
inf ormation display. Seeon page
.
an underinf lated tire
causes more ‘‘rolling resistance,’’
which uses f uel.
The build-up of snow or mud on
your vehicle’s underside adds
weight and rolling resistance.
Frequent cleaning helps your f uel
mileage and reduces the chance of
corrosion.
Drive moderately. Rapid
acceleration, abrupt cornering,
and hard braking use more f uel.
Always drive in the highest gear
possible. Try to maintain a constant speed.
Everytimeyouslowdownand
speed up, your vehicle uses extra
fuel.Usethecruisecontrolwhen
appropriate.
Combine several short trips into
one.
The air conditioning puts an extra
load on the engine which makes it
usemorefuel.Usethefresh-air
ventilation when possible.
198
For example,
Fuel Economy
Improving Fuel Economy
Owner’s
Maintenance Checks
Bef ore Driving168
Page 179 of 283

Youshoulddothefollowingchecks
and adjustments every day bef ore
you drive your vehicle.Make sure all windows, mirrors,
and outside lights are clean and
unobstructed. Remove f rost, snow,
or ice.
Check that the hood and trunk are
f ully closed.
Visually check the tires. If a tire
looks low, use a gauge to check its
pressure.
Check that any items you may be
carrying with you inside are stored
properly or f astened down
securely. Check the seat adjustment (see
page ).
Check the adjustment of the
inside and outside mirrors (see
page ).
Check the steering wheel
adjustment (see page ).
Make sure the doors are securely
closed and locked.
When you start the engine, check
the gauges and indicator lights in the
instrument panel (see page ).
Fasten your seat belt. Check that
your passengers have f astened
their seat belts (see page ).
3. 2.
1.
4. 5.
6.
7.
8.
9. 88
91 78
14 51
Preparing to Drive
Driving176
Page 183 of 283

The 6-speed manual transmission
has an electric lockout so you cannot
accidentally shif t f rom Fif th to
Reverse instead of Sixth. If you
cannot shif t to Reverse when the
vehicle is stopped:With the clutch pedal pressed,
move the shift lever to the first/
second gear side of the Neutral
gate, then shif t to Reverse.If you are still unable to shif t to
Reverse, apply the parking brake
and turn the ignition key to
ACCESSORY (I) or LOCK (0).
Press the clutch pedal, and shif t to
Reverse.
With the clutch pedal still pressed,
start the engine.
If you need to use this procedure to
shif t to Reverse, your vehicle may be
developing a problem. Have the
vehicle checked by your Acura
dealer.
1. 2.
3.
4.
Driving
6-speed Manual T ransmission
Reverse Lockout
180