ESP Acura TL 2010 Navigation Manual
[x] Cancel search | Manufacturer: ACURA, Model Year: 2010, Model line: TL, Model: Acura TL 2010Pages: 174, PDF Size: 15.4 MB
Page 8 of 174
User Agreement
8 Navigation System
In using this HDD “Satellite Linked
Navigation System” (the “HDD”),
which includes HONDA MOTOR
CO., LTD. software, PIONEER
CORPORATION software, and
NAVTEQ database contents
(hereinafter referred to as “Licensors”),
you are bound by the terms and
conditions set forth below. By using
your copy of the HDD, you have
expressed your Agreement to the terms
and conditions of this Agreement. You
should, therefore, make sure that you
read and understand the following
provisions. If for any reason you do not
wish to be bound by the terms of this
Agreement, please return the HDD to
your dealer. • The HDD may not be copied,
duplicated, or otherwise modifi ed, in
whole or in part, without the express
written permission of the Licensors.
• The HDD may not be transferred or sublicensed to any third party for
profi t, rent or loan, or licensed for
reuse in any manner.
• The HDD may not be decompiled, reverse engineered or otherwise
disassembled, in whole or in part.
• The HDD may not be used in a network or by any other manner of
simultaneous use in multiple systems.
• The HDD is intended solely for personal use (or internal use where
the end-user is a business) by the
consumer. The HDD is not to be used
for commercial purposes. • The Licensors do not guarantee to the
client that the functions included in
the HDD meet the specifi c objectives
of the user.
• Licensor shall not be responsible for any damages caused by the use of
the HDD to the actual user or to any
third party.
• The warranty on the HDD shall not extend to an exchange or refund due
to misspelling, omission of letters, or
any other cosmetic discrepancy in the
contents of the HDD.
• The right to use the HDD shall expire either when the user destroys the
HDD or software, or when any of the
terms of this Agreement are violated
and the Licensors exercise the option
to revoke the license to use the HDD
or software.
2010 TL
Page 9 of 174
User Agreement
Navigation System9
• The terms and conditions hereof
apply to all subsequent users and
owners as well as to the original
purchaser.
• The logos of oil companies, hotels, convenience stores, and other
businesses are displayed for your
information and convenience, and
in no way imply any sponsorship,
approval or endorsement of these
companies, or their products.
The logos are trademarks of their
respective owners. The user shall indemnify and save
harmless the Licensors, and their
offi
cers, employees and agents, from
and against any claim, demand or
action, irrespective of the nature of the
cause of the claim, demand or action,
alleging loss, costs, expense, damages
or injuries (including injuries resulting
in death) arising out of the use or
possession of the HDD or software. Use, duplication, or disclosure of this
HDD by or on behalf of the United
States government is subject to
“Restricted Rights” as set forth at FAR
52.227-14, -19 or DFARS 252.227-
7013, as applicable. Manufacturers
are the Licensors, including HONDA
MOTOR CO., LTD., 2-1-1 Minami
Aoyama Minato-Ku Tokyo 107-8556
JAPAN., PIONEER CORPORATION,
1-4-1 Meguro Meguro-ku Tokyo 153-
8654 Japan., NAVTEQ Corporation,
425 W Randolph St. Chicago, IL
60606, USA.
2010 TL
Page 14 of 174
Getting Started
14 Navigation System
Using the Voice Control System
You should use the voice control system
as much as possible, and consider
manual entry using the Interface Dial
as a backup method.
Most of the system’s functions can be
controlled by voice commands activated
with the TA L K button. To control your
navigation system by voice:
• Press and release the TA L K button. A
pop-up voice icon
will appear in
the upper left corner of the screen.
• Wait for the beep.
• Give a voice command. (Voice commands that the system recognizes
are highlighted.)
Once the microphone picks up your
command, the system changes the
display in response to the command
and prompts you for the next command.
Using the TA L K button, answer the
prompts as required. If the system does not understand a
command or you wait too long to give
a command, it responds with “Pardon,”
“Please repeat,” or “Would you say
again.” If the system cannot perform
a command or the command is not
appropriate for the screen you are on, a
beep will sound.
You can fi
nd out which voice
commands are available for a particular
screen by saying “Help.” The system
will display and read the list of
available commands to you. (When
Help is grayed out, this feature cannot
be used.)
When you speak a command, the
system generally either repeats the
command as a confi rmation or asks you
for further information. If you do not
wish to hear this feedback, you can turn
it off.
However, hearing the feedback will
familiarize you with the way the system
expects commands to be phrased. See
the Voice Recognition Feedback
setting in SET UP. If you hear a prompt such as “Please
use the
Interface Dial to...” or “Please
choose an area with the Interface
Dial ,” the system is asking for input that
cannot be performed using the voice
control system.
Improving Voice Recognition
To achieve optimum voice recognition
when using the navigation system,
the following guidelines should be
followed:
NOTE:
Make sure the correct screen is
displayed for the voice command that
you are using. See Voice Command
Index on page 158 .
• It is best if the windows and sunroof are closed. If they are open, speak
a little louder to overcome the wind
noises.
2010 TL
Page 16 of 174
Getting Started
16 Navigation System
Entering Information
When the system needs input from you,
the display changes to a screen similar
to the one on the next page. You can
then use the displayed letters, numbers,
or symbols to enter information. You
can enter your keyboard input in either
of the following ways:
• Say the desired letter, number, or symbol on the screen if you are
entering a city or street name.
• Move the highlighting to the desired letter, number, or symbol by rotating
the Interface Dial knob , then push
in on the Interface Dial .
Each entered letter will appear at the
top of the display. To enter a space
between words, say “Space” or move
the Interface Dial to the right. To
delete an entry, say “Delete” or move
the Interface Dial to the left. If a letter has options (such as accent
marks or symbols), they will appear
in gray next to the selected letter on
the upper row. Move the Interface
Dial
up to select OPTION, and use
the Interface Dial knob to select the
letter.
To enter symbols, rotate the Interface
Dial Knob and select # or @, then
move the Interface Dial up to select
OPTION .
When entering an address, the system
searches the database for words that
match the letters you are entering. As a
result, you will notice that some letters
are no longer available.
When the system fi nds only one entry
that matches, it completes the name
entry for you. If the system fi nds more
than one entry that matches your input,
a list of these matches is displayed. Tip:
When entering a name of a city, street,
or place, or if you are unsure of the
spelling of the name, enter the letters
that you are sure of, then move the
Interface Dial
down to select LIST.
The system will display a list of names
that most closely match your input. For
each letter that is entered, the number
of corresponding choices is displayed
on the right-hand side.
2010 TL
Page 29 of 174
Entering a Destination
Navigation System29
Place Phone No. (See page 41 )
You can search for the destination by
inputting a place’s phone number.
Coordinate (See page 42 )
You can search for the destination by
inputting the latitude and longitude for
the destination.
Destination Lists (See page 43 )
You can edit and delete destinations and
waypoints that have been established,
and you can also view the map for the
entire route.
Intersection (see page 44 )
This selection allows you to enter the
names of two intersecting streets in
a city. This is useful if you know the
general location of your destination, but
not the exact address.
Map Input (See page 45 )
You can select a destination from the
MAP screen. By Address
After you select Address from the
MENU screen ( Dest. MENU 1), the
display changes to:
Tip:
• When entering an address by voice, it is more effi cient to say the city name
fi rst, then the street name.
• When entering an address by the Interface Dial , it is usually easier
to enter the street fi rst. A city or cities
that the street appears in will be
displayed. For your convenience, you
do not have to enter both city and
street. NOTE:
• If you fi nd that your city is not
listed, it may be part of a larger
metropolitan area. Try entering the
street fi rst.
• Prior to departure, you can set areas to avoid. The system then includes
them in its calculations for the
destination you have entered. See
Edit Avoid Area on page 106 .
Selecting the State or Province
The state you are in is displayed at
the top of the screen. If your desired
destination is in another state, select
CHANGE STATE by moving the
Interface Dial up.
The display then changes to the
Select a state screen. Use the voice
control system and say the name or
corresponding number of the state, or
rotate the Interface Dial knob to
select the state.
You can select either the Canada /AK
or USA tab by moving the Interface
Dial to the left or right. If you select
Canada /AK , Canada and Alaska
will be displayed. If you choose USA,
the American mainland, Hawaii, and
Puerto Rico will be displayed.
2010 TL
Page 96 of 174
System Setup
96 Navigation System
After you have used one of these
six options to enter the address, the
initial screen for entering the personal
address is redisplayed, with the
address shown in the “Address” fi eld.
If you have entered the address using
Place Name , Place Category , or
Place Phone No. , the phone number
corresponding to the address also
appears in the “Place Phone No.” fi eld. Edit Phone Number
You can enter the phone number of
the address. If the address was chosen
with
Place Name , Place Category ,
or Place Phone No. , and it has a
phone number, that number is entered
automatically.
Say or select Edit Phone No. to
display the Enter phone number
screen. Enter the phone number,
including the area code, by using the
voice control system (say the entire
phone number one digit at a time) or by
using the Interface Dial . Say or select
OK when fi nished. Edit Category
If desired, you can specify the category
of the address or the icon. Say or select
Edit Category to display the Select a
category
screen.
Scroll the screen and select a category by
saying the number next to your choice,
or by pushing in on the Interface Dial .
To add a new category, select New
Category from the list. To edit or
delete a category, select Edit by moving
the Interface Dial to the right. The
system will display the Select an edit
menu screen. Follow the on-screen
prompts to edit, or delete a category. If
you delete a category that was used to
categorize addresses, the category for
those addresses becomes “UNFILED.”
2010 TL
Page 121 of 174
System Setup
Navigation System121
Rearview Camera
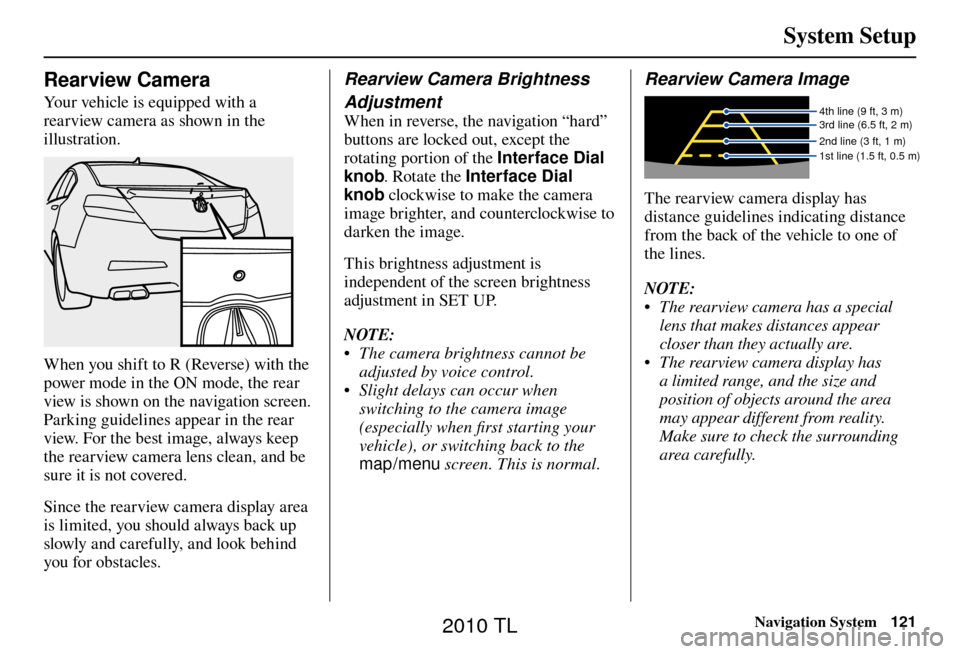
Your vehicle is equipped with a
rearview camera as shown in the
illustration.
When you shift to R (Reverse) with the
power mode in the ON mode, the rear
view is shown on the navigation screen.
Parking guidelines appear in the rear
view. For the best image, always keep
the rearview camera lens clean, and be
sure it is not covered.
Since the rearview camera display area
is limited, you should always back up
slowly and carefully, and look behind
you for obstacles.
Rearview Camera Brightness
Adjustment
When in reverse, the navigation “hard”
buttons are locked out, except the
rotating portion of the Interface Dial
knob. Rotate the Interface Dial
knob clockwise to make the camera
image brighter, and counterclockwise to
darken the image.
This brightness adjustment is
independent of the screen brightness
adjustment in SET UP.
NOTE:
• The camera brightness cannot be adjusted by voice control.
• Slight delays can occur when switching to the camera image
(especially when fi rst starting your
vehicle), or switching back to the
map/menu screen. This is normal.
Rearview Camera Image
4th line (9 ft, 3 m)
3rd line (6.5 ft, 2 m)
2nd line (3 ft, 1 m)
1st line (1.5 ft, 0.5 m)
The rearview camera display has
distance guidelines indicating distance
from the back of the vehicle to one of
the lines.
NOTE:
• The rearview camera has a special
lens that makes distances appear
closer than they actually are.
• The rearview camera display has a limited range, and the size and
position of objects around the area
may appear different from reality.
Make sure to check the surrounding
area carefully.
2010 TL
Page 127 of 174
Client Assistance
Navigation System127
Reporting Errors
Occasionally, you may encounter
database errors.
• If the error pertains to freeways and
main “verifi ed” roads shown in black
on the map, then report it online at
http://update.navteq.com / .
• If the error involves a purple “unverifi ed” road, then do not report
it. These areas have not been verifi ed
and are provided for reference only
(see Map Overview on page 6 ).
• For errors in points of interest (POI), like a business that has changed its
name, do not report them. Keep in
mind that depending on when the
data was collected, the database can
be out of date. The business may
have not reported the change(s), or
not be in the database at all. Update
Navigation DVDs are available for
purchase, usually in the fall of each
year. See Obtaining a Navigation
Update DVD on page 128 regarding
updates to the navigation system. • If the error does not involve the
database, such as vehicle position
icon error, screen error messages,
or other GPS related errors, see
Frequently Asked Questions o n
page 146 , System Limitations GPS
Reception IssuesPS Reception Issues
on page 124 , or Tr o u b l e s h o o t i n g on
page 154 . Acura Automobile Client Service
T
elephone: (800) 382-2238
Fa x: (310) 783-3535
Mail:
Acura Navi
America Honda Motor Co., Inc.
Acura Client Service
MS 500-2N-7E
1919 Tor r a nce Blvd.
Torrance, CA 90501-2746
2010 TL
Page 140 of 174
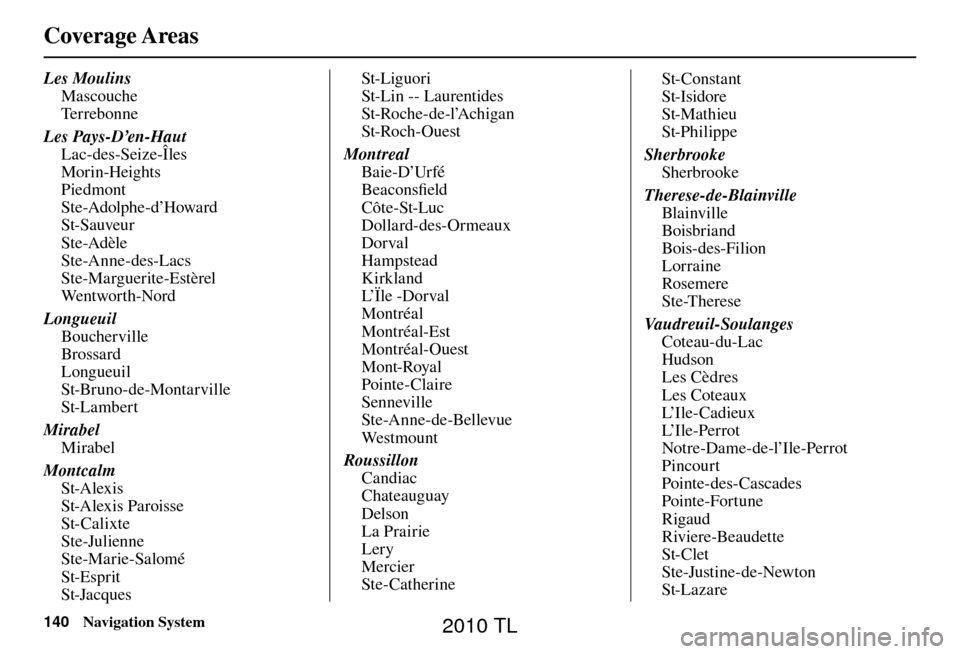
Coverage Areas
140 Navigation System
Les Moulins
Mascouche
Te r r e b o n n e
Les Pays-D’en-Haut Lac-des-Seize-Îles
Morin-Heights
Piedmont
Ste-Adolphe-d’Howard
St-Sauveur
Ste-Adèle
Ste-Anne-des-Lacs
Ste-Marguerite-Estèrel
We n t wo r t h - No r d
Longueuil Boucherville
Brossard
Longueuil
St-Bruno-de-Montarville
St-Lambert
Mirabel Mirabel
Montcalm St-Alexis
St-Alexis Paroisse
St-Calixte
Ste-Julienne
Ste-Marie-Salomé
St-Esprit
St-Jacques St-Liguori
St-Lin -- Laurentides
St-Roche-de-l’Achigan
St-Roch-Ouest
Montreal Baie-D’Urfé
Beaconsfi eld
Côte-St-Luc
Dollard-des-Ormeaux
Dorval
Hampstead
Kirkland
L’Ïle -Dorval
Montréal
Montréal-Est
Montréal-Ouest
Mont-Royal
Pointe-Claire
Senneville
Ste-Anne-de-Bellevue
We s t m o u n t
Roussillon Candiac
Chateauguay
Delson
La Prairie
Lery
Mercier
Ste-Catherine St-Constant
St-Isidore
St-Mathieu
St-Philippe
Sherbrooke Sherbrooke
Therese-de-Blainville Bla inville
Boisbriand
Bois-des-Filion
Lorraine
Rosemere
Ste-Therese
Va u d r e u i l - S o u l a n ge s Coteau-du-Lac
Hudson
Les Cèdres
Les Coteaux
L’ I l e - C a d i e u x
L’ I l e - P e r r o t
Notre-Dame-de-l’Ile-Perrot
Pincourt
Pointe-des-Cascades
Pointe-Fortune
Rigaud
Riviere-Beaudette
St-Clet
Ste-Justine-de-Newton
St-Lazare
2010 TL
Page 141 of 174
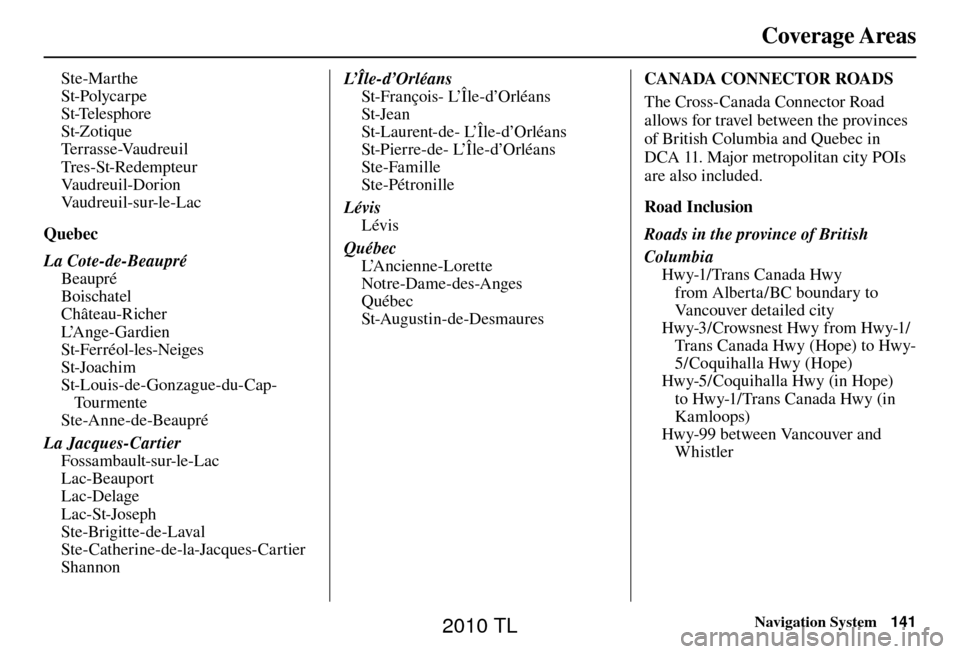
Coverage Areas
Navigation System141
Ste-Marthe
St-Polycarpe
St-Telesphore
St-Zotique
Te r r a s s e -Va u d r e u i l
Tres-St-Redempteur
Va u d r e u i l - D o r i o n
Va u d r e u i l - s u r- l e - L a c
Quebec
La Cote-de-Beaupré Beaupré
Boischatel
Château-Richer
L’A n g e - G a r d i e n
St-Ferréol-les-Neiges
St-Joachim
St-Louis-de-Gonzague-du-Cap-To u r m e n t e
Ste-Anne-de-Beaupré
La Jacques-Cartier Fossambault-sur-le-Lac
Lac-Beauport
Lac-Delage
Lac-St-Joseph
Ste-Brigitte-de-Laval
Ste-Catherine-de-la-Jacques-Cartier
Shannon L’ Î l e - d ’ O r l é a n s
St-François- L’Île-d’Orléans
St-Jean
St-Laurent-de- L’Île-d’Orléans
St-Pierre-de- L’Île-d’Orléans
Ste-Famille
Ste-Pétronille
Lévis Lévis
Québec L’A n c i e n n e - L o r e t t e
Notre-Dame-des-Anges
Québec
St-Augustin-de-Desmaures CANADA CONNECTOR ROADS
The Cross-Canada Connector Road
allows for travel between the provinces
of British Columbia and Quebec in
DCA 11. Major metropolitan city POIs
are also included.
Road Inclusion
Roads in the province of British
Columbia
Hwy-1/Trans Canada Hwy from Alberta/BC boundary to
Vancouver detailed city
Hwy-3 / Crowsnest Hwy from Hwy-1/ Trans Canada Hwy (Hope) to Hwy-
5/Coquihalla Hwy (Hope)
Hwy-5/Coquihalla Hwy (in Hope) to Hwy-1/Trans Canada Hwy (in
Kamloops)
Hwy-99 between Vancouver and Whistler
2010 TL