window Acura TL 2013 Navigation Manual
[x] Cancel search | Manufacturer: ACURA, Model Year: 2013, Model line: TL, Model: Acura TL 2013Pages: 183, PDF Size: 5.19 MB
Page 5 of 183
Introduction
Navigation System5
The navigation system applies location,
direction, and speed information to
the maps and calculates a route to the
destination you enter. As you drive to
that destination, the system provides
map and voice guidance.
The navigation system is easy to
use. The locations of many places of
business and entertainment are already
entered in the system. You can select
any of them as a destination by using
the Interface Dial or voice control.
There are several ways to enter a
destination, such as by point of interest
(POI), by address, by phone number,
and by selecting it from the map. The
last 50 destinations are saved for reuse
at a later date. The system also allows
you to store a home address to simplify
returning home from your destination. Accessories Precautions
If you have aftermarket front or side
window tinting installed, be aware that
if the tint has metallic properties, it
can seriously degrade or prevent GPS
reception. This is because the GPS
antenna is located behind the navigation
display in the center of the dashboard.
If you plan to install electronic
components such as radar detectors,
vehicle tracking devices, remote
starters, additional amplifi ers, or other
audio components, ensure that they are
not located near the navigation display
in the center of the dashboard, or near
the GPS antenna behind the navigation
display. Signal noise emanating from
these devices can cause intermittent
disruption of the navigation system.
Important Safety Information
The navigation system can distract your
attention from the road if you focus
on the screen or operate the system’s
controls while driving.
Enter as much information as possible
into the system before you begin
driving, or when the vehicle is stopped.
Then, as you drive, listen to the audio
instructions and use voice commands
when possible.
2013 TL
Page 14 of 183
Getting Started
14 Navigation System
Using the Voice Control System
You should use the voice control system
as much as possible, and consider
manual entry using the Interface Dial
as a backup method.
Most of the system’s functions can be
controlled by voice commands activated
with the TA L K button. To control your
navigation system by voice:
• Press and release the TA L K
button. On the map screen, a voice
recognition screen and pop-up voice
icon
are displayed. If you press
and release the TA L K button while
on any other screen, only the pop-up
voice icon
appears.
• Wait for the beep.
• Give a voice command. (Voice commands that the system recognizes
are highlighted.)
Once the microphone picks up your
command, the system changes the
display in response to the command
and prompts you for the next command.
Using the TA L K button, answer the
prompts as required. If the system does not understand a
command or you wait too long to give
a command on the Voice Recognition
Example Commands screen, it responds
with “Pardon? No command was heard.
Please press the
TA L K button and say
a command. To return to the previous
screen, press the BACK button.” On
any other screen, it responds with
“Pardon? No command was heard.
Please press the TA L K button and
say a command.” If the system cannot
perform a command or the command is
not appropriate for the screen you are
on, a beep will sound.
You can fi nd out which voice commands
are available for a particular screen by
saying “Help.” The system will display
and read the list of available commands
to you. (When Help is grayed out, this
feature cannot be used.)
When you speak a command, the
system generally either repeats the
command as a confi rmation or asks
you for further information. You can
bypass the feedback by pressing the
TA L K button again, or you can turn the
feedback off completely. However, hearing the feedback will
familiarize you with the way the system
expects commands to be phrased. See
the
Voice Recognition Tutor setting
in SET UP on page 104.
If you hear a prompt such as “Please
use the Interface Dial to...” or “Please
choose an area with the Interface
Dial ,” the system is asking for input that
cannot be performed using the voice
control system.
Improving Voice Recognition
To achieve optimum voice recognition
when using the navigation or Bluetooth®
HandsFreeLink® voice control system,
the following guidelines should be
followed:
NOTE:
Make sure the correct screen is
displayed for the voice command that
you are using. See Voice Command
Index on page 167 .
• It is best if the windows and sunroof are closed. If they are open, speak
a little louder to overcome the wind
noises.
2013 TL
Page 55 of 183
Driving to Your Destination
Navigation System55
Map Screen
When you select OK on the Calculate
route to screen, the map screen
appears, showing your highlighted route
(blue line) in real time.
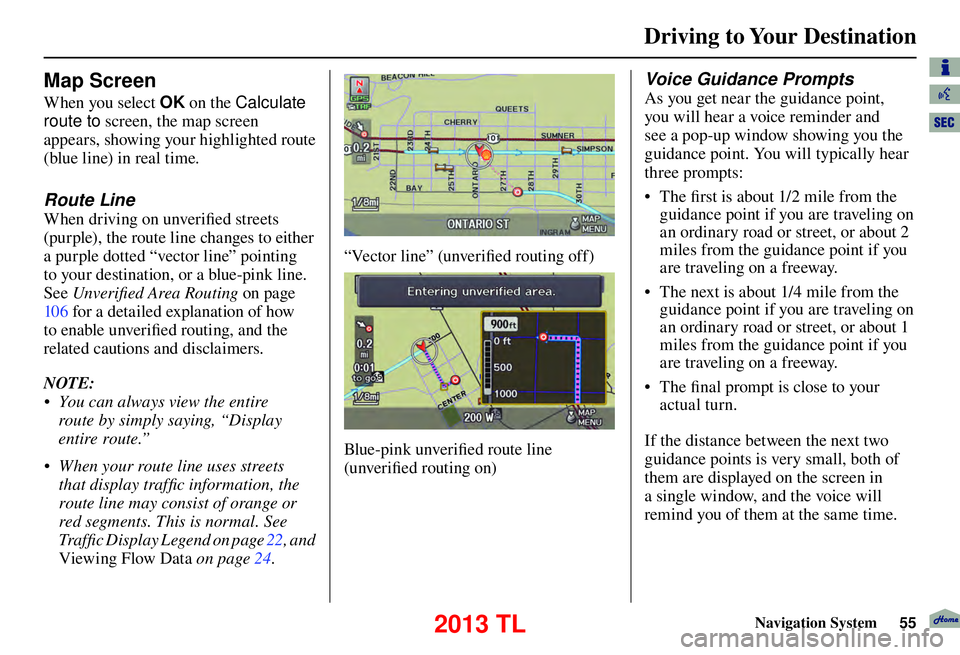
Route Line
When driving on unverifi ed streets
(purple), the route line changes to either
a purple dotted “vector line” pointing
to your destination, or a blue-pink line.
See Unverifi ed Area Routing on page
10 6 for a detailed explanation of how
to enable unverifi ed routing, and the
related cautions and disclaimers.
NOTE:
• You can always view the entire route by simply saying, “Display
entire route.”
• When your route line uses streets that display traffi c information, the
route line may consist of orange or
red segments. This is normal. See
Traffi c Display Legend on page 22 , and
Viewing Flow Data
on page 24 .
“Vector line” (unverifi ed routing off)
Blue-pink unverifi ed route line
(unverifi ed routing on)
Voice Guidance Prompts
As you get near the guidance point,
you will hear a voice reminder and
see a pop-up window showing you the
guidance point. You will typically hear
three prompts:
• The fi rst is about 1/2 mile from the
guidance point if you are traveling on
an ordinary road or street, or about 2
miles from the guidance point if you
are traveling on a freeway.
• The next is about 1/4 mile from the guidance point if you are traveling on
an ordinary road or street, or about 1
miles from the guidance point if you
are traveling on a freeway.
• The fi nal prompt is close to your
actual turn.
If the distance between the next two
guidance points is very small, both of
them are displayed on the screen in
a single window, and the voice will
remind you of them at the same time.
2013 TL
Page 56 of 183
Driving to Your Destination
56 Navigation System
NOTE:
• You can say “Voice” at any time, or
select Voic e after pushing in on the
Interface Dial to be reminded of the
next guidance point.
• Typically, a pop-up guidance window
shows your next turn, and a voice
guidance is heard. The timing of
guidance varies depending on the
type of road you are on and the
distance to the next guidance point.
When the guidance in unverifi ed areas,
the phrase “if possible” is inserted
before each guidance prompts. See
Unver ifi ed Area Routing on page 106
for more detailed information on the
unverifi ed routing.
2013 TL
Page 62 of 183
Driving to Your Destination
62 Navigation System
Guidance Mode
When en route to a destination, you
have two display options: single-screen
mode (the factory default) or split-
screen mode.
If you select the Guidance M enu on
the Map menu screen and then select
Guidance Mode , the Selection
screen will appear.
Single-screen mode - While the map
screen is displayed, only the map is
shown with occasional guidance pop-
up windows as you approach a
maneuver. When you press the MAP/
GUIDE button and switch to the
Guidance screen, only the Directions
screen is displayed.
Split-screen mode - While the map
screen is displayed, the map is on
the left of the screen, and the next
maneuver is on the right side of the
screen. You will see the same screen
setup when you press the MAP/
GUIDE button.
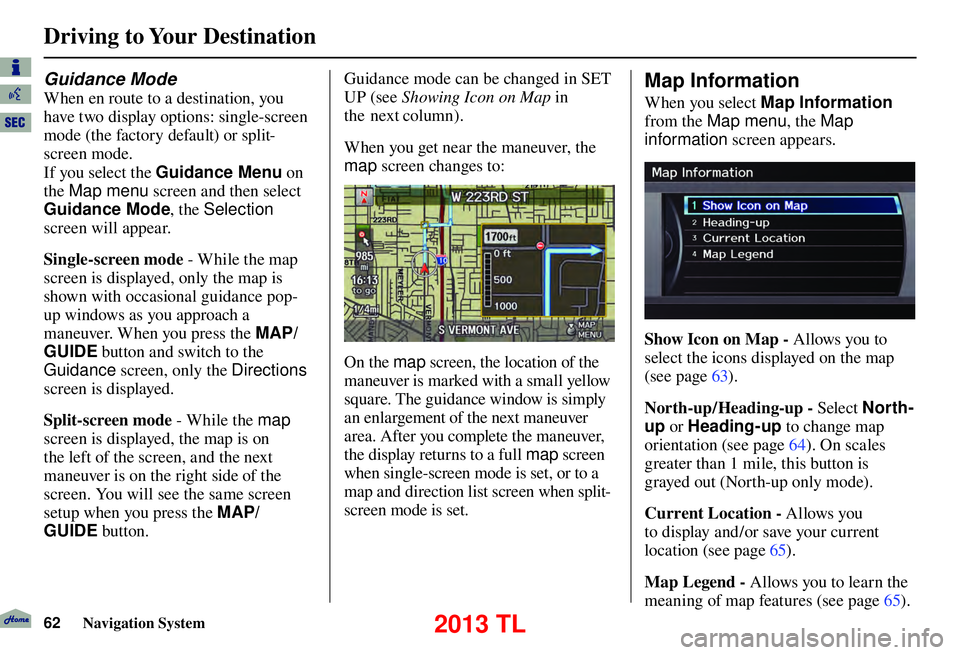
Map Information
When you select Map Information
from the Map menu , the Map
information screen appears.
Show Icon on Map - Allows you to
select the icons displayed on the map
(see page 63 ).
North-up /Heading-up - Select North-
up or Heading-up to change map
orientation (see page 64). On scales
greater than 1 mile, this button is
grayed out (North-up only mode).
Current Location - Allows you
to display and/or save your current
location (see page 65).
Map Legend - Allows you to learn the
meaning of map features (see page 65 ).
Guidance mode can be changed in SET
UP (see
Showing Icon on Map
When you get near the maneuver, the
map screen changes to:
On the map screen, the location of the
maneuver is marked with a small yellow
square. The guidance window is simply
an enlargement of the next maneuver
area. After you complete the maneuver,
the display returns to a full map screen
when single-screen mode is set, or to a
map and direction list screen when split-
screen mode is set.
in
the next column ).
2013 TL
Page 109 of 183

System Setup
Navigation System109
With Unveri� ed Area Routing
OFF , you are presented with a blue
“vector line” that always points to the
destination. You must manually choose
streets from the map that will lead
to your destination. No guidance is
provided, and there are no directions to
the destination.
With Unveri� ed Area Routing ON ,
a blue/pink route line is shown for
unverifi ed segments. Voice guidance
commands in unverifi ed areas always
end with “if possible.” This is your
signal that you should use additional
caution, and obey all traffi c restrictions.
The maneuver window “arrow” shows
any portions of unverifi ed turns in blue/
pink dashes.
These guidance maneuvers are only
a suggestion. You should always
confi rm that the maneuver is possible.
A directions list is also provided that
shows any unverifi ed roads in a blue
color, with pink arrows pointing to the
next maneuver. Unveri�
ed Area Routing “OFF”
NOTE:
For the pop-up menu displayed when
pushing in on the Interface Dial from
the map screen, Voic e is grayed out.
With Unverifi ed Area Routing OFF , no
Direction List is provided.
If you select Directions in the
Guidance Menu on the Map Menu
screen, you will receive guidance by
Directions while you are driving. Unveri�
ed Area Routing “ON”
2013 TL
Page 131 of 183
System Limitations
Navigation System131
Also, depending on your current view
of the sky and the position of the
satellites, the elevation may be shown
incorrectly.
You may also notice some delay of the
vehicle position icon at intersections;
this is normal.
GPS Reception Issues
The signals received from the GPS
satellites are extremely weak (less
than a millionth of the strength of
a local FM station) and require an
unobstructed view of sky. The signal
can easily be interrupted or interfered
with by the following:
• Aftermarket metallic window tint
above or to the sides of the GPS
antenna (located on the back of the
navigation display)
• Cell phones, PDAs, or other electronic devices docked in a cradle
or lying loose on the dashboard
• Remote starters or “hidden” vehicle tracking systems mounted near the
navigation unit • Other aftermarket audio electronic
devices mounted near the navigation
unit
• Trees, tall buildings, freeway overpasses, tunnels, or overhead
electrical power wires
Although the system will direct you
to your desired destination, it may not
always generate what you consider to
be the most direct route. Try changing
the method of routing. See Changing
the Routing Method on page 53 . You may
also have Unver ifi ed Area Routing set
to OFF. See Unverifi ed Area Routing on
page 10 6 .
Additionally, the mapping database
contains verifi ed and unverifi ed maps.
See Map Overview on page 6 . A
Disclaimer screen will warn you if
your route includes unverifi ed streets.
Unver ifi ed streets may be missing from
the map, in the wrong location, or have
an incorrect name or address range.
Exercise additional caution when
driving in these unverifi ed areas. The destination icon shows the
approximate location of the destination.
This occurs because a city block can
have as many as 100 possible addresses
(for example, the 1400 block is followed
by the 1500 block) Since most cities
use only a portion of the 100 possible
addresses (for example, in the 1400
block, the addresses may only go up to
1425 before the 1500 block starts), the
address 1425 will be shown a quarter of
the way down the block by the system
instead of at the end of the block where
the destination is actually located.
You may fi nd that the system
occasionally reboots. This is
indicated by the display returning to
the globe screen. A reboot can be
caused by a number of things, such
as extreme temperatures or shock
from bumpy roads. It does not
necessarily indicate a problem that
requires service. If this happens
frequently, please see your dealer.
System Limitations
2013 TL
Page 153 of 183

Coverage Areas
Navigation System153
Alaska, Hawaii, Canada,
Puerto Rico, and Mexico
This section describes the differences in
navigation system operation for vehicles
delivered in Alaska, Hawaii, Canada,
Puerto Rico, and Mexico.
Map Coverage
All roads displayed on the map screens
are detailed coverage roads. Text related
to “unverifi ed” roads or areas are not
applicable. The following topics do not
apply:
• Unverifi ed road descriptions (see
page 7, 106 )
• Cautions and pop-up windows related to unverifi ed roads (see page 74 )
• Setup entries that relate to turning on or off unverifi e d r o u t i n g ( s e e p a g e 10 7 )
Other Map Issues
• See the coverage section for a list of
islands with coverage (see page 136 ).
Address and POI Entry Screens
The following differences occur for
map, address, and POI selection:
• Entry of a destination address or POI on an island other than your current
island may result in a screen caution
message. This is normal because
there are no “ferry” routes between
islands available in the database.
Setup Screen Differences
The SET UP screen differences are
minor and are listed below. See the
Setup section (page 96 ) for additional
information.
AcuraLink / Messages
This item is grayed out on the SET UP
screen (Other ) because XM is not
available.
Traffi c & Weather Status
This item is grayed out on the SET UP
screen (Other ) because XM is not
available.
Puerto Rico and Mexico
If Street Name Guidance is set to
ON , the street names will not be read
out by voice guidance. This may change
with future data updates.
INFO Screen Differences
Messages
The INFO screen Messages feature
utilizes XM. Because XM is not
available, it is not displayed on the
INFO screen except messages such
as the diagnosis information for the
trouble of the car. In addition, the “Map
menu” item New Messages will
appear grayed out except messages such
as the diagnosis information for the
trouble of the car. This is normal.
2013 TL
Page 165 of 183
Glossary
Navigation System165
Initialization - This refers to the period
needed to reacquire the GPS satellite
orbital information whenever the
navigation system power has been
disconnected. This can take 10 to 45
minutes with the vehicle out in an
open area.
LCD - Liquid Crystal Display. The
navigation screen.
Map Matching - The received GPS information allows the navigation
system to position the vehicle on the
map. Map matching has occurred
if the map screen is displaying the
current street name in the bottom-
shaded area.
Mic -Abbreviation for the microphone
used for receiving voice commands.
It is located near the map lights in the
ceiling.
MW - Maneuver Window. While en
route to a destination, this window
displays information about the next
maneuver. Navi
- Abbreviation for the navigation
system.
North Pointer - The map symbol
showing the map orientation. See
page 64 .
Off road - This occurs when the user
leaves mapped roads. Off-road
tracking dots (“breadcrumbs”) are
displayed if the option is enabled in
the SETUP screen. The user can use
them to return to a mapped road. The
bottom of the navigation screen will
say, “Not on a digitized road.”
Outlying Areas - These are rural areas
that typically have only their main
roads mapped. All other roads are
shown in purple for reference only,
since they have not been verifi ed.
PIN - Personal Identifi cation Number.
A 4-digit number created by the
client to protect personal information. POI
- Point of Interest. These are the
businesses, schools, etc. found under
Place category or Place Name
on the DEST screen ( Dest. MENU 1 ).
See page 57 .
Polygon - Colored areas on the map
screen denoting parks, schools, etc.
See Map Screen “features” for a list
of the assigned colors. See page 57 .
Reminder - Automatic pop-up
Calendar message. See Calendar on
page 90 .
Security Code - Code needed to activate the navigation system or
audio system. See Entering the
Security Code on page 128 .
Unverifi ed Streets - These streets have
not been verifi ed for turn restrictions,
one-way, etc. They are shown in
purple on the map. Unverifi ed streets
may be missing from the map, shown
in the wrong location, or have an
incorrect name or address range.
2013 TL