display Acura TLX 2015 User Guide
[x] Cancel search | Manufacturer: ACURA, Model Year: 2015, Model line: TLX, Model: Acura TLX 2015Pages: 75, PDF Size: 24.55 MB
Page 27 of 75
46 || 47
AUDIO AND CONNECTIVITY
AUDIO AND CONNECTIVITY
TABLE OF
CONTENTS
INDEX
VISUAL INDEX
VOICE COMMAND INDEX
SAFETY
INFORMATION
CLIENT
INFORMATION
INSTRUMENT PANEL
SPECIFICATIONS
VEHICLE
CONTROLS
MAINTENANCE
AUDIO AND
CONNECTIVITY
HANDLING THE UNEXPECTED
BLUETOOTH®
HANDSFREELINK®
DRIVING
ACURALINK®
NAVIGATION
NAVAUDI OAUDIONAV
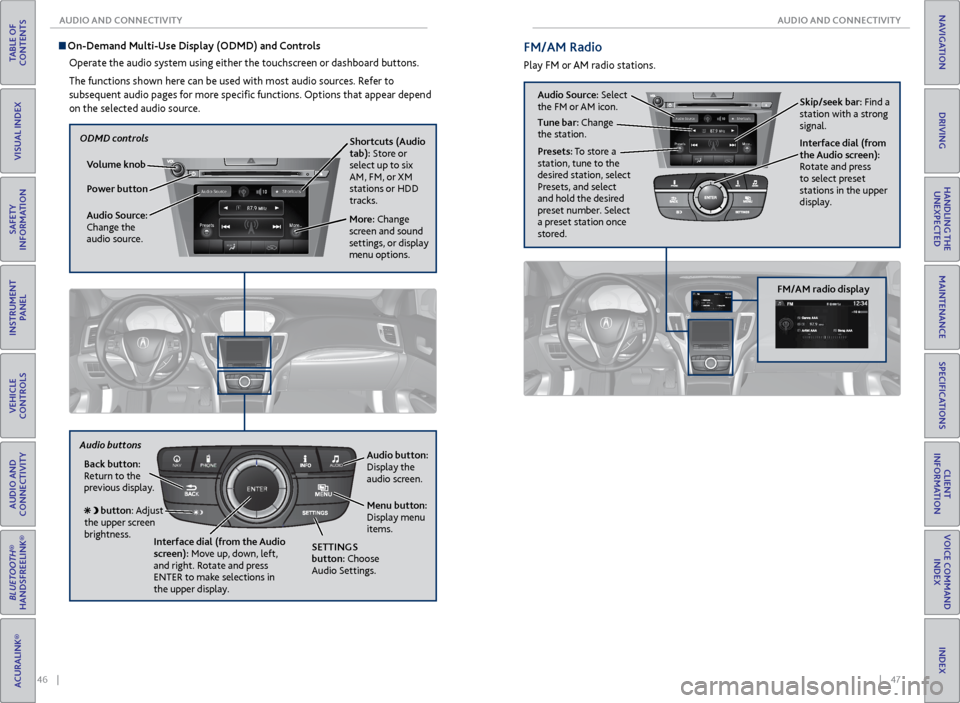
On-Demand Multi-Use Display (ODMD) and Controls
Operate the audio system using either the touchscreen or dashboard buttons.
The functions shown here can be used with most audio sources. Refer to
subsequent audio pages for more specific functions. Options that appear depend
on the selected audio source.
Power button Shortcuts (Audio
tab): Store or
select up to six
AM, FM, or XM
stations or HDD
tracks.
More: Change
screen and sound
settings, or display
menu options.
Volume knob
Audio Source:
Change the
audio source.
Back button:
Return to the
previous display.
Audio button:
Display the
audio screen.
Menu button:
Display menu
items.
Interface dial (from the Audio
screen): Move up, down, left,
and right. Rotate and press
ENTER to make selections in
the upper display.
button: Adjust
the upper screen
brightness.
Audio buttons
SETTINGS
button: Choose
Audio Settings.
ODMD controls
Audio Source: Select
the FM or AM icon. Skip/seek bar: Find a
station with a strong
signal.
Tune bar: Change
the station.
Presets: To store a
station, tune to the
desired station, select
Presets, and select
and hold the desired
preset number. Select
a preset station once
stored. Interface dial (from
the Audio screen):
Rotate and press
to select preset
stations in the upper
display.
FM/AM Radio
Play FM or AM radio stations.
FM/AM radio display
Page 28 of 75
48 || 49
AUDIO AND CONNECTIVITY
AUDIO AND CONNECTIVITY
TABLE OF
CONTENTS
INDEX
VISUAL INDEX
VOICE COMMAND INDEX
SAFETY
INFORMATION
CLIENT
INFORMATION
INSTRUMENT PANEL
SPECIFICATIONS
VEHICLE
CONTROLS
MAINTENANCE
AUDIO AND
CONNECTIVITY
HANDLING THE UNEXPECTED
BLUETOOTH®
HANDSFREELINK®
DRIVING
ACURALINK®
NAVIGATION
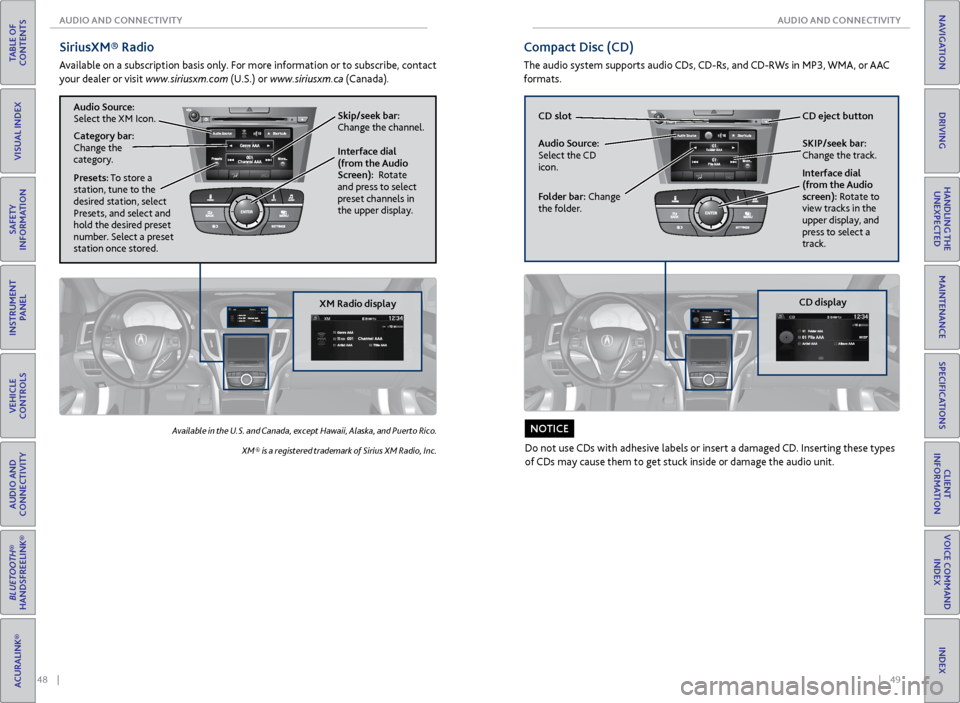
Audio Source:
Select the XM icon.
CATEGORY bar:
Change the category.
Compact Disc (CD)
The audio system supports audio CDs, CD-Rs, and CD-RWs in MP3, WMA, or AAC
formats.
Audio Source:
Select the CD
icon. CD slot CD eject button
SKIP/seek bar:
Change the track.
Folder bar: Change
the folder. Interface dial
(from the Audio
screen): Rotate to
view tracks in the
upper display, and
press to select a
track.
Do not use CDs with adhesive labels or insert a damaged CD. Inserting these types
of CDs may cause them to get stuck inside or damage the audio unit.
NOTICE
CD display
SiriusXM® Radio
Available on a subscription basis only. For more information or to subscribe, contact
your dealer or visit
www.siriusxm.com (U.S.) or www.siriusxm.ca (Canada).
Available in the U.S. and Canada, except Hawaii, Alaska, and Puerto Rico.
XM® is a registered trademark of Sirius XM Radio, Inc.
Skip/seek bar:
Change the channel.
Audio Source:
Select the XM Icon.
Category bar:
Change the
category. Interface dial
(from the Audio
Screen): Rotate
and press to select
preset channels in
the upper display.
XM Radio display
Presets: To store a
station, tune to the
desired station, select
Presets, and select and
hold the desired preset
number. Select a preset
station once stored.
Page 29 of 75
50 || 51
AUDIO AND CONNECTIVITY
AUDIO AND CONNECTIVITY
TABLE OF
CONTENTS
INDEX
VISUAL INDEX
VOICE COMMAND INDEX
SAFETY
INFORMATION
CLIENT
INFORMATION
INSTRUMENT PANEL
SPECIFICATIONS
VEHICLE
CONTROLS
MAINTENANCE
AUDIO AND
CONNECTIVITY
HANDLING THE UNEXPECTED
BLUETOOTH®
HANDSFREELINK®
DRIVING
ACURALINK®
NAVIGATION
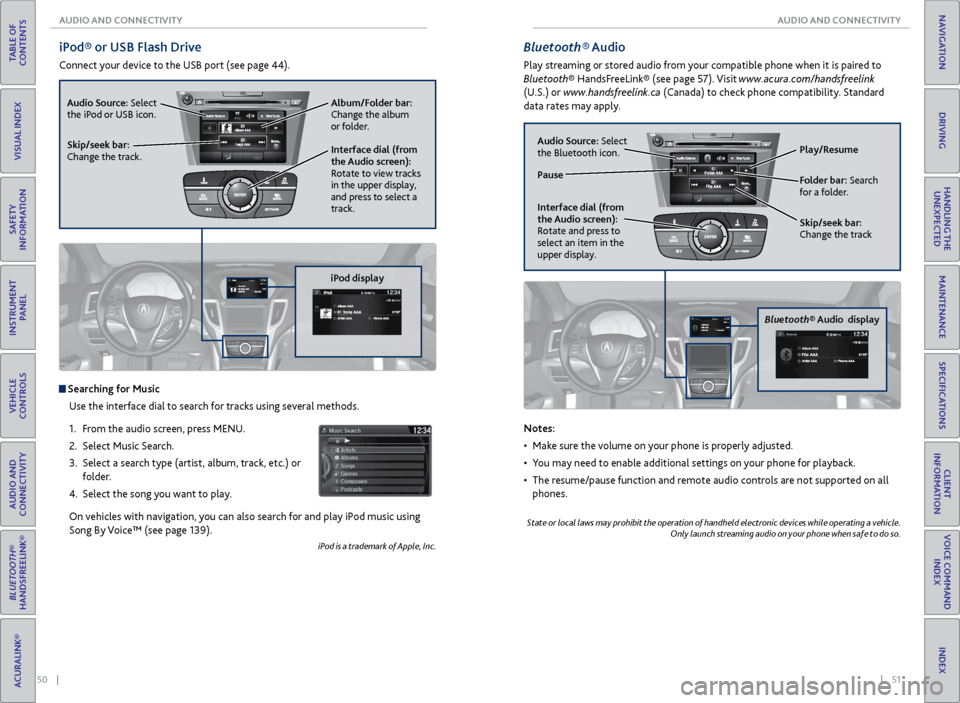
iPod® or USB Flash Drive
Connect your device to the USB port (see page 44).
Album/Folder bar:
Change the album
or folder.
Skip/seek bar:
Change the track. Audio Source: Select
the iPod or USB icon.
Interface dial (from
the Audio screen):
Rotate to view tracks
in the upper display,
and press to select a
track.
Searching for MusicUse the interface dial to search for tracks using several methods.
1. From the audio screen, press MENU.
2. Select Music Search.
3. Select a search type (artist, album, track, etc.) or
folder.
4. Select the song you want to play.
On vehicles with navigation, you can also search for and play iPod music using
Song By Voice™ (see page 139).
iPod is a trademark of Apple, Inc.
iPod display
Bluetooth® Audio
Play streaming or stored audio from your compatible phone when it is paired to
Bluetooth® HandsFreeLink® (see page 57). Visit www.acura.com/handsfreelink
(U.S.) or www.handsfreelink.ca (Canada) to check phone compatibility. Standard
data rates may apply.
Bluetooth® Audio display Play/Resume
Folder bar: Search
for a folder.
Skip/seek bar:
Change the track
Interface dial (from
the Audio screen):
Rotate and press to
select an item in the
upper display. Audio Source:
Select
the Bluetooth icon.
Pause
Notes:
• Make sure the volume on your phone is properly adjusted.
• You may need to enable additional settings on your phone for playback.
• The resume/pause function and remote audio controls are not supported on all
phones.
State or local laws may prohibit the operation of handheld electronic devices while operating a vehicle. Only launch streaming audio on your phone when safe to do so.
Page 30 of 75
52 || 53
AUDIO AND CONNECTIVITY
AUDIO AND CONNECTIVITY
TABLE OF
CONTENTS
INDEX
VISUAL INDEX
VOICE COMMAND INDEX
SAFETY
INFORMATION
CLIENT
INFORMATION
INSTRUMENT PANEL
SPECIFICATIONS
VEHICLE
CONTROLS
MAINTENANCE
AUDIO AND
CONNECTIVITY
HANDLING THE UNEXPECTED
BLUETOOTH®
HANDSFREELINK®
DRIVING
ACURALINK®
NAVIGATION
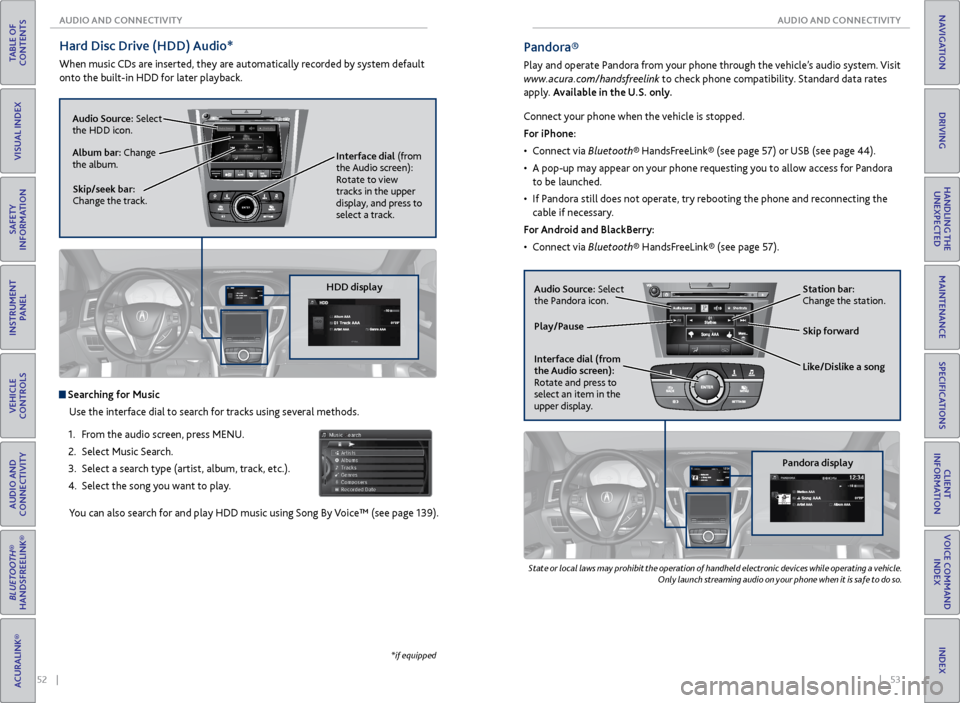
Hard Disc Drive (HDD) Audio*
When music CDs are inserted, they are automatically recorded by system default
onto the built-in HDD for later playback.
Searching for Music
Use the interface dial to search for tracks using several methods.
1. From the audio screen, press MENU.
2. Select Music Search.
3. Select a search type (artist, album, track, etc.).
4. Select the song you want to play.
You can also search for and play HDD music using Song By Voice™ (see page 139).
*if equipped
NAVAUDI OAUDIONAV
Audio Source: Select
the HDD icon.
Skip/seek bar:
Change the track. Interface dial
(from
the Audio screen):
Rotate to view
tracks in the upper
display, and press to
select a track.
Album bar: Change
the album.
HDD display
State or local laws may prohibit the operation of handheld electronic devices while operating a vehicle.
Only launch streaming audio on your phone when it is safe to do so.
Pandora®
Play and operate Pandora from your phone through the vehicle’s audio system. Visit
www.acura.com/handsfreelink to check phone compatibility. Standard data rates
apply. Available in the U.S. only.
Audio Source: Select
the Pandora icon.
Pandora displayStation bar:
Change the station.
Like/Dislike a song Skip forward
Interface dial (from
the Audio screen):
Rotate and press to
select an item in the
upper display.
Play/Pause
Connect your phone when the vehicle is stopped.
For iPhone:
• Connect via Bluetooth® HandsFreeLink® (see page 57) or USB (see page 44).
• A pop-up may appear on your phone requesting you to allow access for Pandora
to be launched.
• If Pandora still does not operate, try rebooting the phone and reconnecting the
cable if necessary.
For Android and BlackBerry:
• Connect via Bluetooth® HandsFreeLink® (see page 57).
Page 31 of 75
| 55
TABLE OF
CONTENTS
INDEX
VISUAL INDEX
VOICE COMMAND INDEX
SAFETY
INFORMATION
CLIENT
INFORMATION
INSTRUMENT PANEL
SPECIFICATIONS
VEHICLE
CONTROLS
MAINTENANCE
AUDIO AND
CONNECTIVITY
HANDLING THE UNEXPECTED
BLUETOOTH®
HANDSFREELINK®
DRIVING
ACURALINK®
NAVIGATION
54 | AUDIO AND CONNECTIVITY
TABLE OF
CONTENTS
INDEX
VISUAL INDEX
VOICE COMMAND INDEX
SAFETY
INFORMATION
CLIENT
INFORMATION
INSTRUMENT PANEL
SPECIFICATIONS
VEHICLE
CONTROLS
MAINTENANCE
AUDIO AND
CONNECTIVITY
HANDLING THE UNEXPECTED
BLUETOOTH®
HANDSFREELINK®
DRIVING
ACURALINK®
NAVIGATION
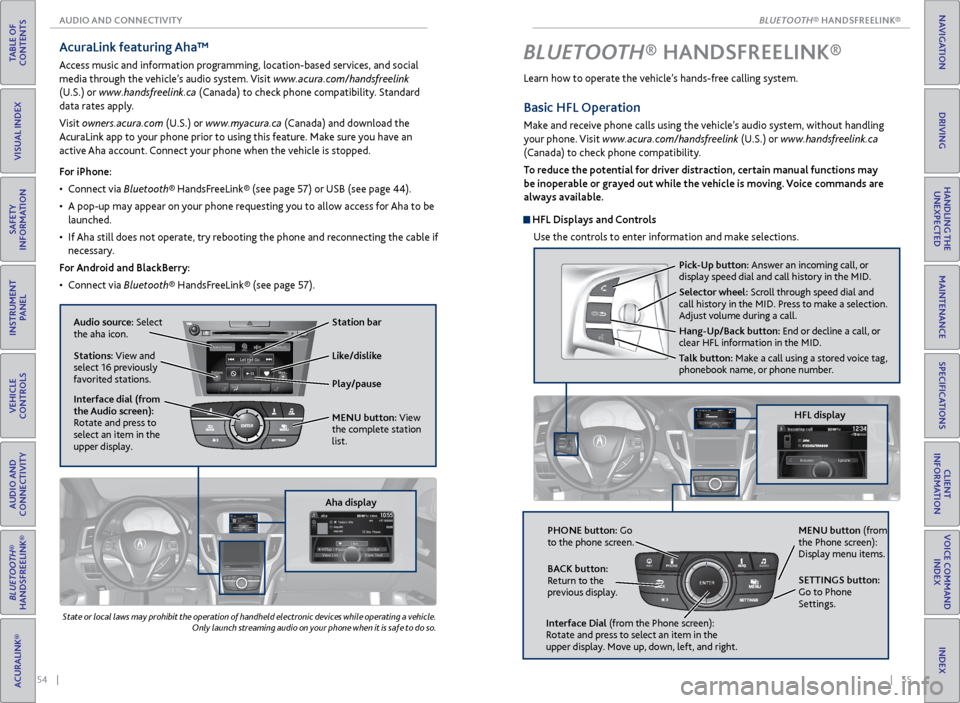
AcuraLink featuring Aha™
Access music and information programming, location-based services, and social
media through the vehicle’s audio system. Visit www.acura.com/handsfreelink
(U.S.) or www.handsfreelink.ca (Canada) to check phone compatibility. Standard
data rates apply.
Visit owners.acura.com (U.S.) or www.myacura.ca (Canada) and download the
AcuraLink app to your phone prior to using this feature. Make sure you have an
active Aha account. Connect your phone when the vehicle is stopped.
Play/pause
State or local laws may prohibit the operation of handheld electronic devices while operating a vehicle. Only launch streaming audio on your phone when it is safe to do so.
For iPhone:
• Connect via Bluetooth® HandsFreeLink® (see page 57) or USB (see page 44).
• A pop-up may appear on your phone requesting you to allow access for Aha to be
launched.
• If Aha still does not operate, try rebooting the phone and reconnecting the cable if
necessary.
For Android and BlackBerry:
• Connect via Bluetooth® HandsFreeLink® (see page 57).
Audio source: Select
the aha icon. Station bar
Like/dislike
Stations: View and
select 16 previously
favorited stations.
Interface dial (from
the Audio screen):
Rotate and press to
select an item in the
upper display. MENU button:
View
the complete station
list.
Aha display
NAVAUDI OAUDIONAV
BLUETOOTH® HANDSFREELINK ®
Learn how to operate the vehicle’s hands-free calling system.
HFL display
Pick-Up button: Answer an incoming call, or
display speed dial and call history in the MID.
Selector wheel: Scroll through speed dial and
call history in the MID. Press to make a selection.
Adjust volume during a call.
Hang-Up/Back button: End or decline a call, or
clear HFL information in the MID.
Talk button: Make a call using a stored voice tag,
phonebook name, or phone number.
PHONE button: Go
to the phone screen.
BACK button:
Return to the
previous display.
Interface Dial (from the Phone screen):
Rotate and press to select an item in the
upper display. Move up, down, left, and right. MENU button (from
the Phone screen):
Display menu items.
SETTINGS button:
Go to Phone
Settings.
Basic HFL Operation
Make and receive phone calls using the vehicle’s audio system, without handling
your phone. Visit www.acura.com/handsfreelink (U.S.) or www.handsfreelink.ca
(Canada) to check phone compatibility.
To reduce the potential for driver distraction, certain manual functions may
be inoperable or grayed out while the vehicle is moving. Voice commands are
always available.
HFL Displays and Controls
Use the controls to enter information and make selections.
BLUETOOTH
Page 32 of 75
56 || 57
TABLE OF
CONTENTS
INDEX
VISUAL INDEX
VOICE COMMAND INDEX
SAFETY
INFORMATION
CLIENT
INFORMATION
INSTRUMENT PANEL
SPECIFICATIONS
VEHICLE
CONTROLS
MAINTENANCE
AUDIO AND
CONNECTIVITY
HANDLING THE UNEXPECTED
BLUETOOTH®
HANDSFREELINK®
DRIVING
ACURALINK®
NAVIGATION
Voice Command Tips
• When using the Talk button, wait for a beep before saying a command.
• To bypass the system prompts, simply press the Talk button again to say your
command.
• When the Talk button is pressed, all available voice commands are highlighted
in yellow.
• Speak in a clear, natural voice.
• Reduce all background noise.
• Adjust the dashboard and side vents away from the microphone in the ceiling.
Fan speed may be temporarily reduced during voice recognition operation.
• Close the windows and moonroof.
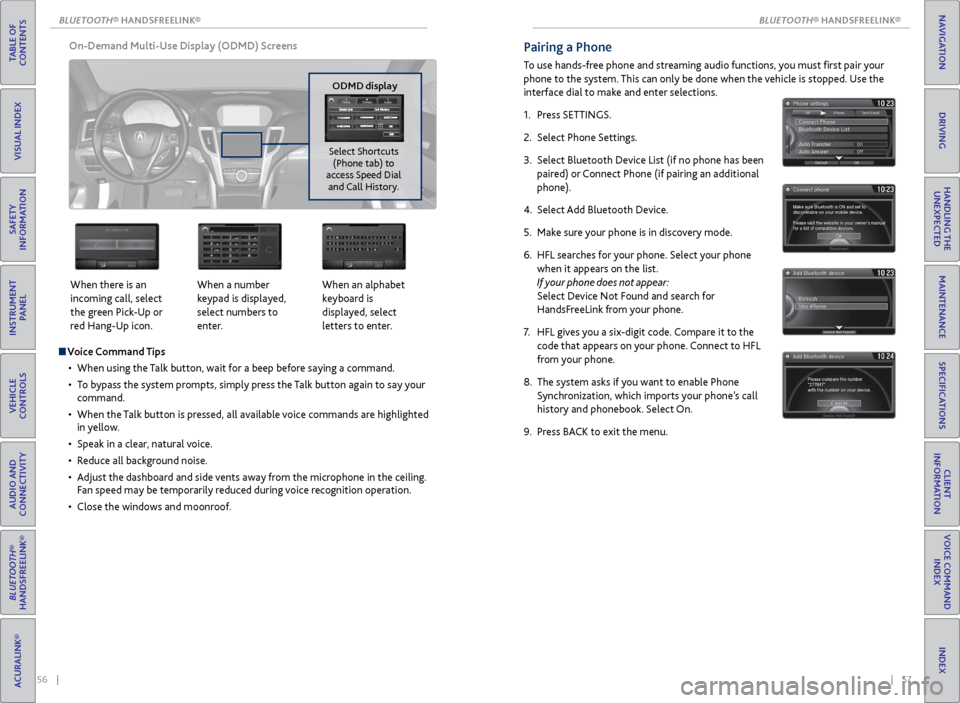
On-Demand Multi-Use Display (ODMD) Screens
When there is an
incoming call, select
the green Pick-Up or
red Hang-Up icon. When a number
keypad is displayed,
select numbers to
enter.When an alphabet
keyboard is
displayed, select
letters to enter.
ODMD display
Select Shortcuts (Phone tab) to
access Speed Dial and Call History.
Pairing a Phone
To use hands-free phone and streaming audio functions, you must first pair your
phone to the system. This can only be done when the vehicle is stopped. Use the
interface dial to make and enter selections.
1. Press SETTINGS.
2. Select Phone Settings.
3. Select Bluetooth Device List (if no phone has been
paired) or Connect Phone (if pairing an additional
phone).
4. Select Add Bluetooth Device.
5. Make sure your phone is in discovery mode.
6. HFL searches for your phone. Select your phone
when it appears on the list.
If your phone does not appear:
Select Device Not Found and search for
HandsFreeLink from your phone.
7. HFL gives you a six-digit code. Compare it to the
code that appears on your phone. Connect to HFL
from your phone.
8. The system asks if you want to enable Phone
Synchronization, which imports your phone’s call
history and phonebook. Select On.
9. Press BACK to exit the menu.
BLUETOOTH
Page 34 of 75
60 || 61
TABLE OF
CONTENTS
INDEX
VISUAL INDEX
VOICE COMMAND INDEX
SAFETY
INFORMATION
CLIENT
INFORMATION
INSTRUMENT PANEL
SPECIFICATIONS
VEHICLE
CONTROLS
MAINTENANCE
AUDIO AND
CONNECTIVITY
HANDLING THE UNEXPECTED
BLUETOOTH®
HANDSFREELINK®
DRIVING
ACURALINK®
NAVIGATION
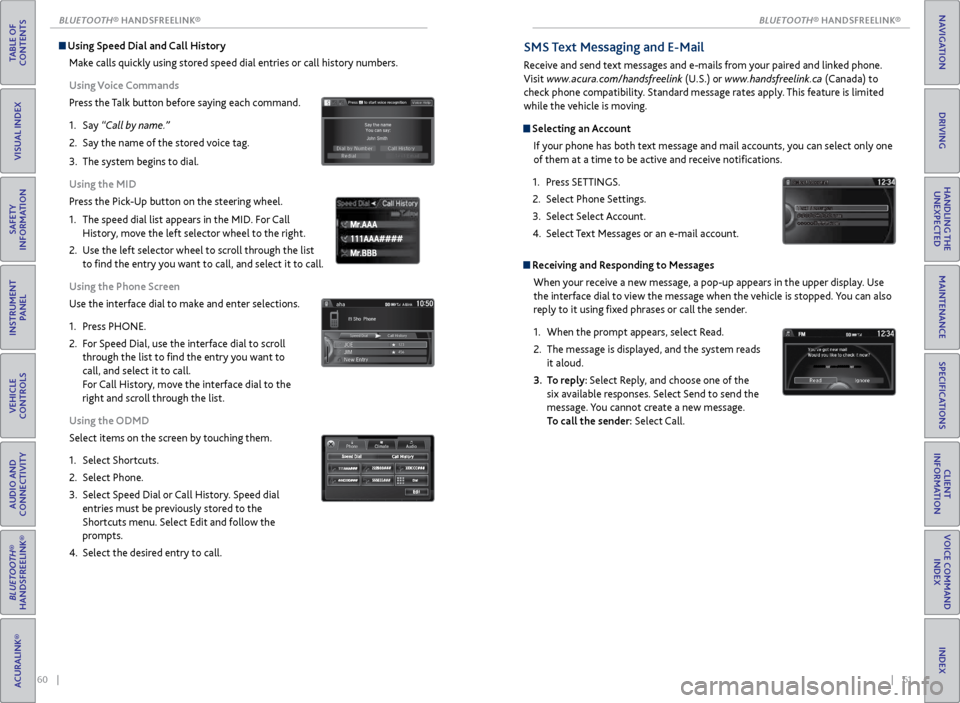
Using Speed Dial and Call History
Make calls quickly using stored speed dial entries or call history numbers.
Using Voice Commands
Press the Talk button before saying each command.
1. Say “Call by name.”
2. Say the name of the stored voice tag.
3. The system begins to dial.
Using the MID
Press the Pick-Up button on the steering wheel.
1. The speed dial list appears in the MID. For Call
History, move the left selector wheel to the right.
2. Use the left selector wheel to scroll through the list
to find the entry you want to call, and select it to call.
Using the Phone Screen
Use the interface dial to make and enter selections.
1. Press PHONE.
2. For Speed Dial, use the interface dial to scroll
through the list to find the entry you want to
call, and select it to call.
For Call History, move the interface dial to the
right and scroll through the list.
Using the ODMD
Select items on the screen by touching them.
1. Select Shortcuts.
2. Select Phone.
3. Select Speed Dial or Call History. Speed dial
entries must be previously stored to the
Shortcuts menu. Select Edit and follow the
prompts.
4. Select the desired entry to call.
111AAA####
Mr.AAA
Mr.BBB
111AAA####
Mr.AAA
Mr.BBB
SMS Text Messaging and E-Mail
Receive and send text messages and e-mails from your paired and linked phone.
Visit www.acura.com/handsfreelink (U.S.) or
www.handsfreelink.ca (Canada) to
check phone compatibility. Standard message rates apply. This feature is limited
while the vehicle is moving.
Selecting an Account
If your phone has both text message and mail accounts, you can select only one
of them at a time to be active and receive notifications.
1. Press SETTINGS.
2. Select Phone Settings.
3. Select Select Account.
4. Select Text Messages or an e-mail account.
Receiving and Responding to Messages
When your receive a new message, a pop-up appears in the upper display. Use
the interface dial to view the message when the vehicle is stopped. You can also
reply to it using fixed phrases or call the sender.
1. When the prompt appears, select Read.
2. The message is displayed, and the system reads
it aloud.
3. To reply: Select Reply, and choose one of the
six available responses. Select Send to send the
message. You cannot create a new message.
To call the sender: Select Call.
xyz xyz
BLUETOOTH® HANDSFREELINK®
BLUETOOTH® HANDSFREELINK®
Page 35 of 75
62 || 63
TABLE OF
CONTENTS
INDEX
VISUAL INDEX
VOICE COMMAND INDEX
SAFETY
INFORMATION
CLIENT
INFORMATION
INSTRUMENT PANEL
SPECIFICATIONS
VEHICLE
CONTROLS
MAINTENANCE
AUDIO AND
CONNECTIVITY
HANDLING THE UNEXPECTED
BLUETOOTH®
HANDSFREELINK®
DRIVING
ACURALINK®
NAVIGATION
Learn about Acura’s advanced connectivity services.
AcuraLink Messages
Receive messages on vehicle features, safety and emissions recall campaigns,
maintenance reminders, and diagnostic information. Some message features
require a phone connection. Visit www.acura.com/handsfreelink (U.S.) or www.
handsfreelink.ca (Canada) to check phone compatibility.
Viewing Messages
When you receive a new message, an icon appears on the upper right corner of
the upper screen. Use the interface dial to make and enter selections.
1. Press INFO.
2. Select AcuraLink Messages.
3. Select a message category.
4. Select a message.
5. Select Voice to hear the entire message details
read aloud.
Message Options
When you receive certain messages, you can call
your dealer if your phone is paired to the system,
find the nearest dealer, or schedule service
appointments. A current AcuraLink subscription
is required to set up this feature and modify your
message preferences.
A CURALINK®*
*if equipped
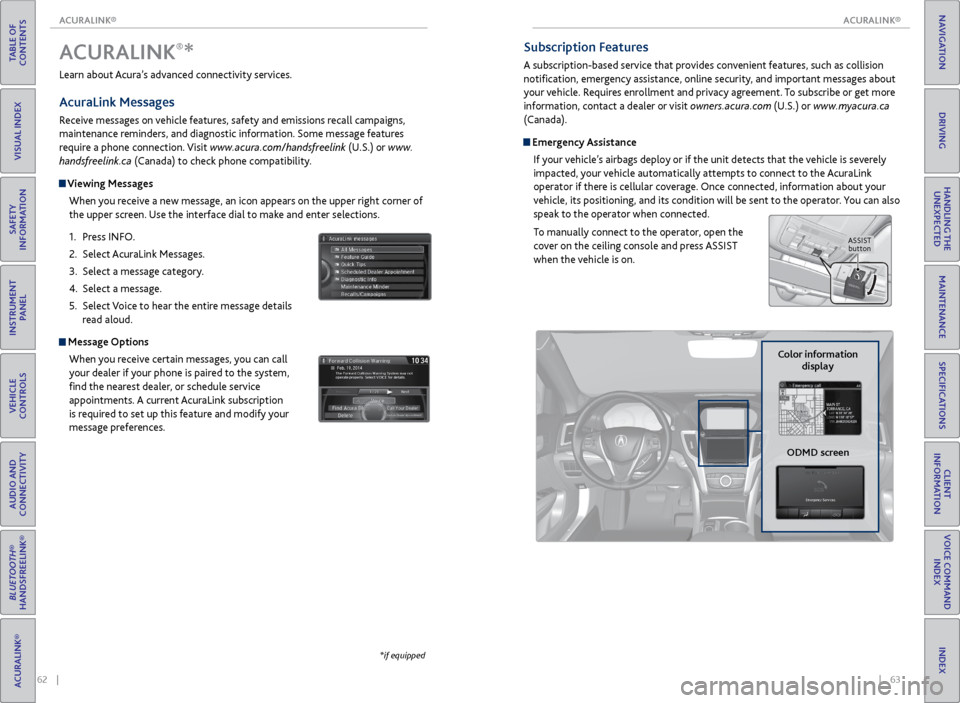
Subscription Features
A subscription-based service that provides convenient features, such as collision
notification, emergency assistance, online security, and important messages about
your vehicle. Requires enrollment and privacy agreement. To subscribe or get more
information, contact a dealer or visit owners.acura.com (U.S.) or www.myacura.ca
(Canada).
Emergency Assistance
If your vehicle’s airbags deploy or if the unit detects that the vehicle is severely
impacted, your vehicle automatically attempts to connect to the AcuraLink
operator if there is cellular coverage. Once connected, information about your
vehicle, its positioning, and its condition will be sent to the operator. You can also
speak to the operator when connected.
To manually connect to the operator, open the
cover on the ceiling console and press ASSIST
when the vehicle is on.
ASSIST button
Color information
display
ODMD screen
ACURALINK®
ACURALINK®
Page 37 of 75
66 || 67
NAVIGATION
NAVIGATION
TABLE OF
CONTENTS
INDEX
VISUAL INDEX
VOICE COMMAND INDEX
SAFETY
INFORMATION
CLIENT
INFORMATION
INSTRUMENT PANEL
SPECIFICATIONS
VEHICLE
CONTROLS
MAINTENANCE
AUDIO AND
CONNECTIVITY
HANDLING THE UNEXPECTED
BLUETOOTH®
HANDSFREELINK®
DRIVING
ACURALINK®
NAVIGATION
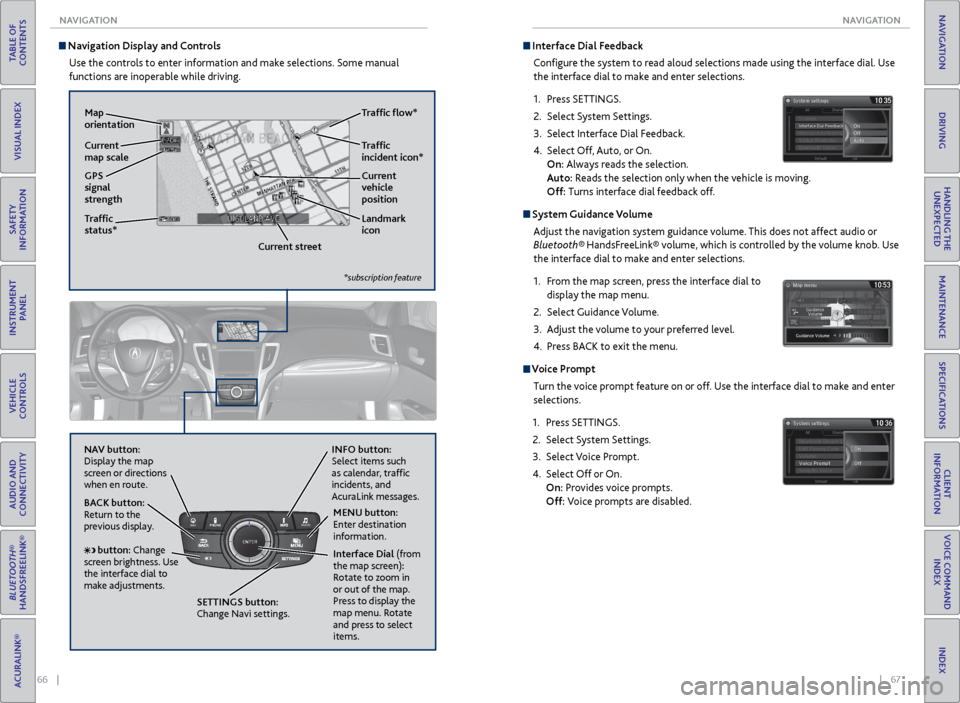
Navigation Display and Controls
Use the controls to enter information and make selections. Some manual
functions are inoperable while driving.
NAVAUDI OAUDIONAV
NAV button:
Display the map
screen or directions
when en route. INFO button:
Select items such
as calendar, traffic
incidents, and
AcuraLink messages.
BACK button:
Return to the
previous display.
SETTINGS button:
Change Navi settings. MENU button:
Enter destination
information.
button: Change
screen brightness. Use
the interface dial to
make adjustments. Interface Dial (from
the map screen):
Rotate to zoom in
or out of the map.
Press to display the
map menu. Rotate
and press to select
items.
GPS
signal
strength Traffic
incident icon*
Traffic
status* Traffic flow*
Current
map scale Current
vehicle
position
Map
orientation
Current streetLandmark
icon
*subscription feature
Interface Dial Feedback
Configure the system to read aloud selections made using the interface dial. Use
the interface dial to make and enter selections.
1. Press SETTINGS.
2. Select System Settings.
3. Select Interface Dial Feedback.
4. Select Off, Auto, or On.
On: Always reads the selection.
Auto: Reads the selection only when the vehicle is moving.
Off: Turns interface dial feedback off.
System Guidance Volume
Adjust the navigation system guidance volume. This does not affect audio or
Bluetooth® HandsFreeLink® volume, which is controlled by the volume knob. Use
the interface dial to make and enter selections.
1. From the map screen, press the interface dial to
display the map menu.
2. Select Guidance Volume.
3. Adjust the volume to your preferred level.
4. Press BACK to exit the menu.
Voice Prompt
Turn the voice prompt feature on or off. Use the interface dial to make and enter
selections.
1. Press SETTINGS.
2. Select System Settings.
3. Select Voice Prompt.
4. Select Off or On.
On: Provides voice prompts.
Off: Voice prompts are disabled.
Page 38 of 75
68 || 69
NAVIGATION
NAVIGATION
TABLE OF
CONTENTS
INDEX
VISUAL INDEX
VOICE COMMAND INDEX
SAFETY
INFORMATION
CLIENT
INFORMATION
INSTRUMENT PANEL
SPECIFICATIONS
VEHICLE
CONTROLS
MAINTENANCE
AUDIO AND
CONNECTIVITY
HANDLING THE UNEXPECTED
BLUETOOTH®
HANDSFREELINK®
DRIVING
ACURALINK®
NAVIGATION
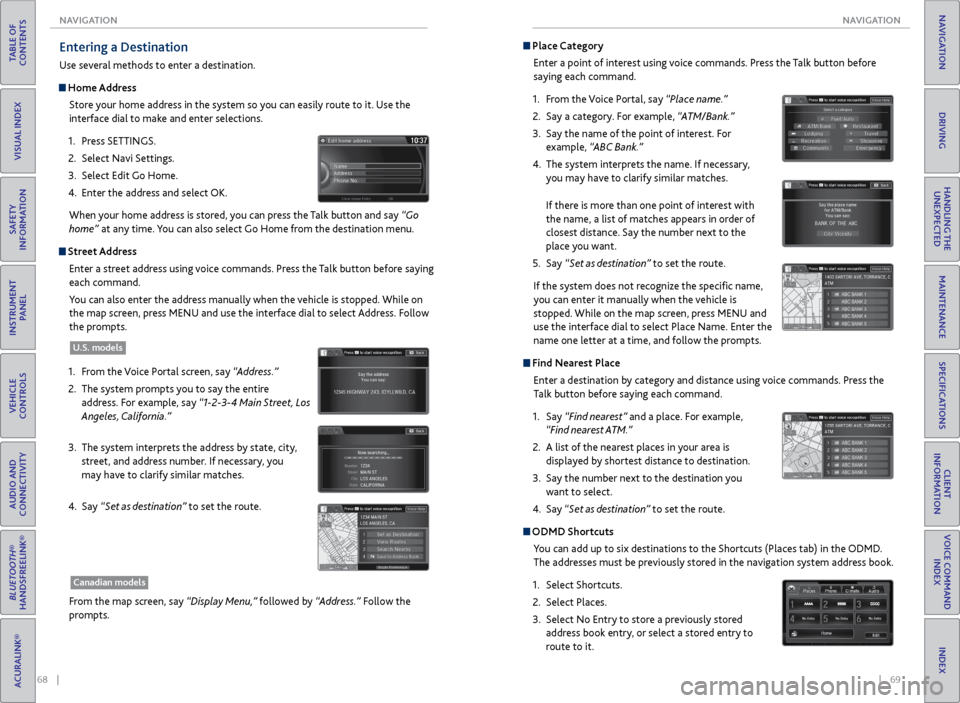
Place Category
Enter a point of interest using voice commands. Press the Talk button before
saying each command.
1. From the Voice Portal, say “Place name.”
2. Say a category. For example, “ATM/Bank.”
3. Say the name of the point of interest. For
example, “ABC Bank.”
4. The system interprets the name. If necessary,
you may have to clarify similar matches.
If there is more than one point of interest with
the name, a list of matches appears in order of
closest distance. Say the number next to the
place you want.
5. Say “Set as destination” to set the route.
If the system does not recognize the specific name,
you can enter it manually when the vehicle is
stopped. While on the map screen, press MENU and
use the interface dial to select Place Name. Enter the
name one letter at a time, and follow the prompts.
Find Nearest Place Enter a destination by category and distance using voice commands. Press the
Talk button before saying each command.
1. Say “Find nearest” and a place. For example,
“Find nearest ATM.”
2. A list of the nearest places in your area is
displayed by shortest distance to destination.
3. Say the number next to the destination you
want to select.
4. Say “Set as destination” to set the route.
ODMD Shortcuts
You can add up to six destinations to the Shortcuts (Places tab) in the ODMD.
The addresses must be previously stored in the navigation system address book.
1. Select Shortcuts.
2. Select Places.
3. Select No Entry to store a previously stored
address book entry, or select a stored entry to
route to it.
Entering a Destination
Use several methods to enter a destination.
Home Address
Store your home address in the system so you can easily route to it. Use the
interface dial to make and enter selections.
1. Press SETTINGS.
2. Select Navi Settings.
3. Select Edit Go Home.
4. Enter the address and select OK.
When your home address is stored, you can press the Talk button and say “Go
home” at any time. You can also select Go Home from the destination menu.
Street Address
Enter a street address using voice commands. Press the Talk button before saying
each command.
You can also enter the address manually when the vehicle is stopped. While on
the map screen, press MENU and use the interface dial to select Address. Follow
the prompts.
1. From the Voice Portal screen, say “Address.”
2. The system prompts you to say the entire
address. For example, say “1-2-3-4 Main Street, Los
Angeles, California.”
3. The system interprets the address by state, city,
street, and address number. If necessary, you
may have to clarify similar matches.
4. Say “Set as destination” to set the route.
From the map screen, say “Display Menu,” followed by “Address.” Follow the
prompts.
U.S. models
Canadian models