display Acura TLX 2015 Owner's Manual
[x] Cancel search | Manufacturer: ACURA, Model Year: 2015, Model line: TLX, Model: Acura TLX 2015Pages: 75, PDF Size: 24.55 MB
Page 39 of 75
70 || 71
NAVIGATION
NAVIGATION
TABLE OF
CONTENTS
INDEX
VISUAL INDEX
VOICE COMMAND INDEX
SAFETY
INFORMATION
CLIENT
INFORMATION
INSTRUMENT PANEL
SPECIFICATIONS
VEHICLE
CONTROLS
MAINTENANCE
AUDIO AND
CONNECTIVITY
HANDLING THE UNEXPECTED
BLUETOOTH®
HANDSFREELINK®
DRIVING
ACURALINK®
NAVIGATION
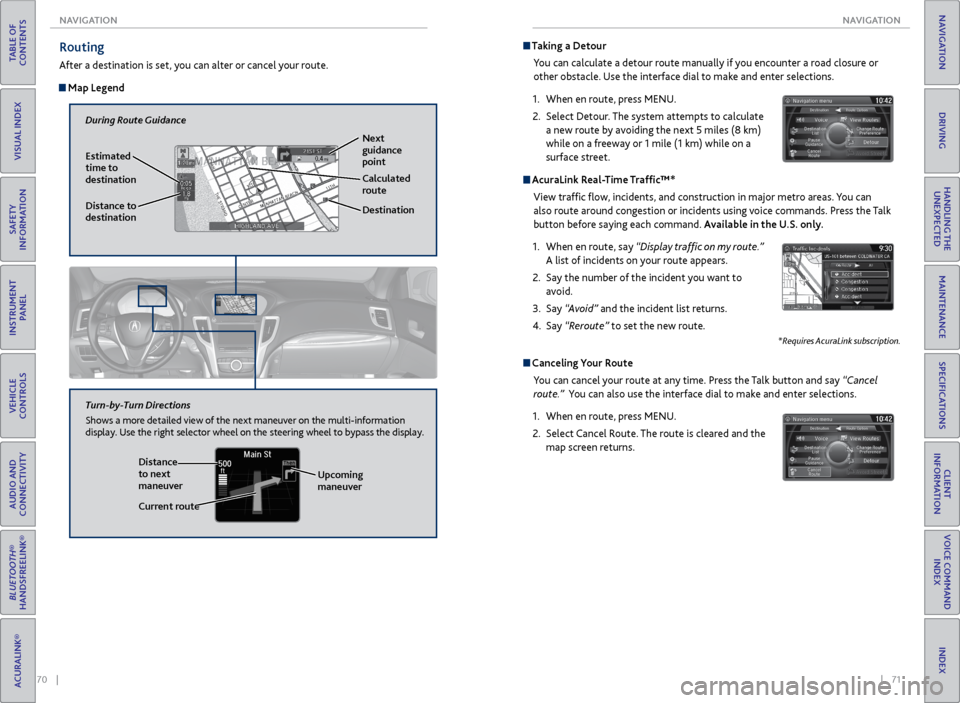
Routing
After a destination is set, you can alter or cancel your route.
Map Legend
During Route Guidance
Next
guidance
point
Estimated
time to
destination
Distance to
destination Destination
Calculated
route
Distance
to next
maneuver
Turn-by-Turn Directions
Shows a more detailed view of the next maneuver on the multi-information
display. Use the right selector wheel on the steering wheel to bypass the display.
Upcoming
maneuver
Current route
Taking a Detour
You can calculate a detour route manually if you encounter a road closure or
other obstacle. Use the interface dial to make and enter selections.
1. When en route, press MENU.
2. Select Detour. The system attempts to calculate
a new route by avoiding the next 5 miles (8 km)
while on a freeway or 1 mile (1 km) while on a
surface street.
AcuraLink Real-Time Traffic™*
View traffic flow, incidents, and construction in major metro areas. You can
also route around congestion or incidents using voice commands. Press the Talk
button before saying each command. Available in the U.S. only.
1. When en route, say “Display traffic on my route.”
A list of incidents on your route appears.
2. Say the number of the incident you want to
avoid.
3. Say “Avoid” and the incident list returns.
4. Say “Reroute” to set the new route.
*Requires AcuraLink subscription.
Canceling Your Route
You can cancel your route at any time. Press the Talk button and say “Cancel
route.” You can also use the interface dial to make and enter selections.
1. When en route, press MENU.
2. Select Cancel Route. The route is cleared and the
map screen returns.
Page 46 of 75
84 || 85
DRIVING
DRIVING
TABLE OF
CONTENTS
INDEX
VISUAL INDEX
VOICE COMMAND INDEX
SAFETY
INFORMATION
CLIENT
INFORMATION
INSTRUMENT PANEL
SPECIFICATIONS
VEHICLE
CONTROLS
MAINTENANCE
AUDIO AND
CONNECTIVITY
HANDLING THE UNEXPECTED
BLUETOOTH®
HANDSFREELINK®
DRIVING
ACURALINK®
NAVIGATION
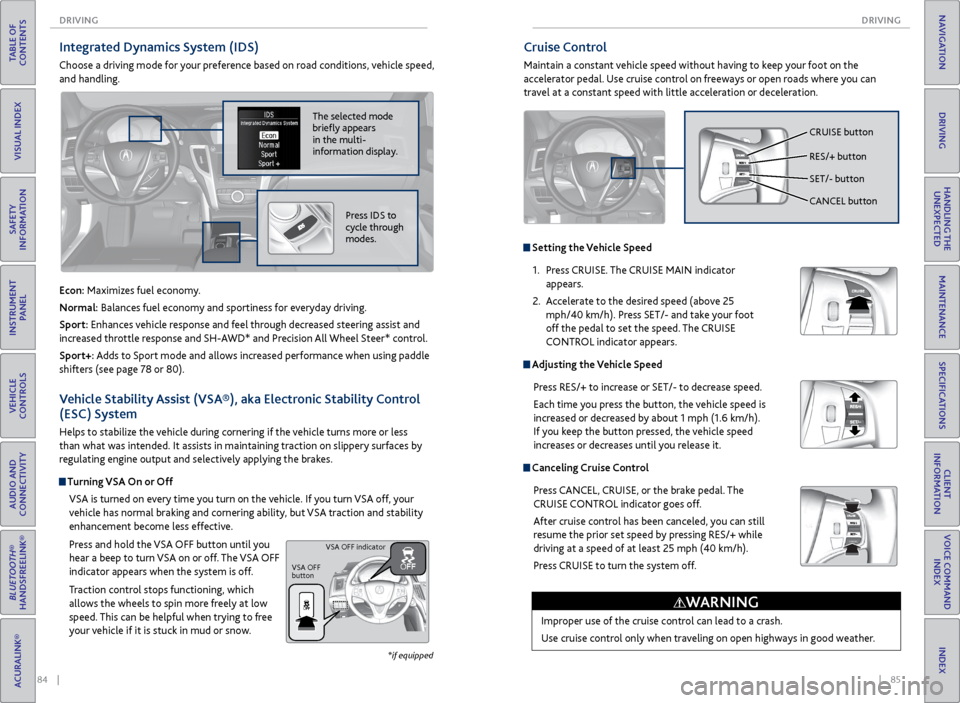
Cruise Control
Maintain a constant vehicle speed without having to keep your foot on the
accelerator pedal. Use cruise control on freeways or open roads where you can
travel at a constant speed with little acceleration or deceleration.
Improper use of the cruise control can lead to a crash.
Use cruise control only when traveling on open highways in good weather.
WARNING
Setting the Vehicle Speed1. Press CRUISE. The CRUISE MAIN indicator
appears.
2. Accelerate to the desired speed (above 25
mph/40 km/h). Press SET/- and take your foot
off the pedal to set the speed. The CRUISE
CONTROL indicator appears.
Adjusting the Vehicle Speed
Press RES/+ to increase or SET/- to decrease speed.
Each time you press the button, the vehicle speed is
increased or decreased by about 1 mph (1.6 km/h).
If you keep the button pressed, the vehicle speed
increases or decreases until you release it.
Canceling Cruise ControlPress CANCEL, CRUISE, or the brake pedal. The
CRUISE CONTROL indicator goes off.
After cruise control has been canceled, you can still
resume the prior set speed by pressing RES/+ while
driving at a speed of at least 25 mph (40 km/h).
Press CRUISE to turn the system off.
CRUISE button
RES/+ button
SET/- button
CANCEL button
Integrated Dynamics System (IDS)
Choose a driving mode for your preference based on road conditions, vehicle speed,
and handling.
Vehicle Stability Assist (VSA®), aka Electronic Stability Control
(ESC) System
Helps to stabilize the vehicle during cornering if the vehicle turns more or less
than what was intended. It assists in maintaining traction on slippery surfaces by
regulating engine output and selectively applying the brakes.
Turning VSA On or OffVSA is turned on every time you turn on the vehicle. If you turn VSA off, your
vehicle has normal braking and cornering ability, but VSA traction and stability
enhancement become less effective.
Press and hold the VSA OFF button until you
hear a beep to turn VSA on or off. The VSA OFF
indicator appears when the system is off.
Traction control stops functioning, which
allows the wheels to spin more freely at low
speed. This can be helpful when trying to free
your vehicle if it is stuck in mud or snow.
VSA OFF
button VSA OFF indicator
The selected mode
briefly appears
in the multi-
information display.
Econ: Maximizes fuel economy.
Normal: Balances fuel economy and sportiness for everyday driving.
Sport: Enhances vehicle response and feel through decreased steering assist and
increased throttle response and SH-AWD* and Precision All Wheel Steer* control.
Sport+: Adds to Sport mode and allows increased performance when using paddle
shifters (see page 78 or 80).
Press IDS to
cycle through
modes.
*if equipped
Page 47 of 75

86 || 87
DRIVING
DRIVING
TABLE OF
CONTENTS
INDEX
VISUAL INDEX
VOICE COMMAND INDEX
SAFETY
INFORMATION
CLIENT
INFORMATION
INSTRUMENT PANEL
SPECIFICATIONS
VEHICLE
CONTROLS
MAINTENANCE
AUDIO AND
CONNECTIVITY
HANDLING THE UNEXPECTED
BLUETOOTH®
HANDSFREELINK®
DRIVING
ACURALINK®
NAVIGATION
When in Operation
If a vehicle detected ahead of you slows down
abruptly, or if another vehicle cuts in front of
you, a beep sounds and BRAKE appears on the
multi-information display to alert you.
When a vehicle detected ahead is within ACC
with low speed follow range and stops, your
vehicle also stops. The Stopped message
appears on the multi-information display.
When the vehicle ahead of you starts again, the vehicle icon on the multi-
information display blinks. Press RES/+/SET/– up or down, or press the
accelerator pedal to resume the prior set speed.
Canceling ACCYou can press CANCEL or MAIN, or press the brake
pedal. The ACC indicator goes off.
Certain conditions may cause ACC to cancel
automatically. When this happens, a beep sounds
and a message appears on the multi-information
display.
After cruise control has been canceled, you can still
resume the prior set speed by pressing RES/ACCEL.
Improper use of ACC with LSF can lead to a crash.
Use ACC with LSF only when driving on expressways or freeways and in good
weather conditions.
WARNING
Exiting a vehicle that has been stopped while the ACC with LSF system is
operating can result in the vehicle moving without operator control. Always
make sure Park (P) is selected before exiting the vehicle.
A vehicle that moves without operator control can cause a crash, resulting in
serious injury or death.
Never exit a vehicle when the vehicle is stopped by ACC with LSF.
WARNING
ACC with LSF has limited braking capability and may not stop your vehicle in
time to avoid a collision with a vehicle that quickly stops in front of you.
Always be prepared to apply the brake pedal if the conditions require.
WARNING
Adaptive Cruise Control (ACC) with Low Speed Follow (LSF)*
Helps maintain a constant vehicle speed and a set following distance behind a
vehicle detected ahead of yours. When the vehicle ahead changes speed, ACC
senses the change and accelerates or decelerates to maintain a set interval.
MAIN button
RES/+ button
SET/- button
CANCEL button
Distance button
Activating and Setting the Vehicle Speed
1. Press MAIN. The ACC indicator appears.
2. Accelerate to the desired speed.
Above 25 mph (40 km/h): Press RES/+/SET/- and
take your foot off the pedal to set the speed
Below 25 mph (40 km/h) (Low Speed Follow):
Press SET/- to set the speed at 25 mph (40
km/h) or below.
Adjusting the Vehicle Speed Press RES/+ to increase or SET/- to decrease.
Each time you press the switch up or down, the
vehicle speed is increased or decreased by about 1
mph (1 km/h). If you keep the switch pressed up or
down, the vehicle speed increases or decreases by
10 mph (16 km/h) until you release it.
Adjusting the Vehicle Distance Press the Distance button to change the following
distance. Each time you press the button, the
following distance setting cycles through short,
middle, long, and extra long following distances.
Switching to Standard Cruise ControlPress and hold the Distance button.
*if equipped
Page 51 of 75
94 || 95
DRIVING
DRIVING
TABLE OF
CONTENTS
INDEX
VISUAL INDEX
VOICE COMMAND INDEX
SAFETY
INFORMATION
CLIENT
INFORMATION
INSTRUMENT PANEL
SPECIFICATIONS
VEHICLE
CONTROLS
MAINTENANCE
AUDIO AND
CONNECTIVITY
HANDLING THE UNEXPECTED
BLUETOOTH®
HANDSFREELINK®
DRIVING
ACURALINK®
NAVIGATION
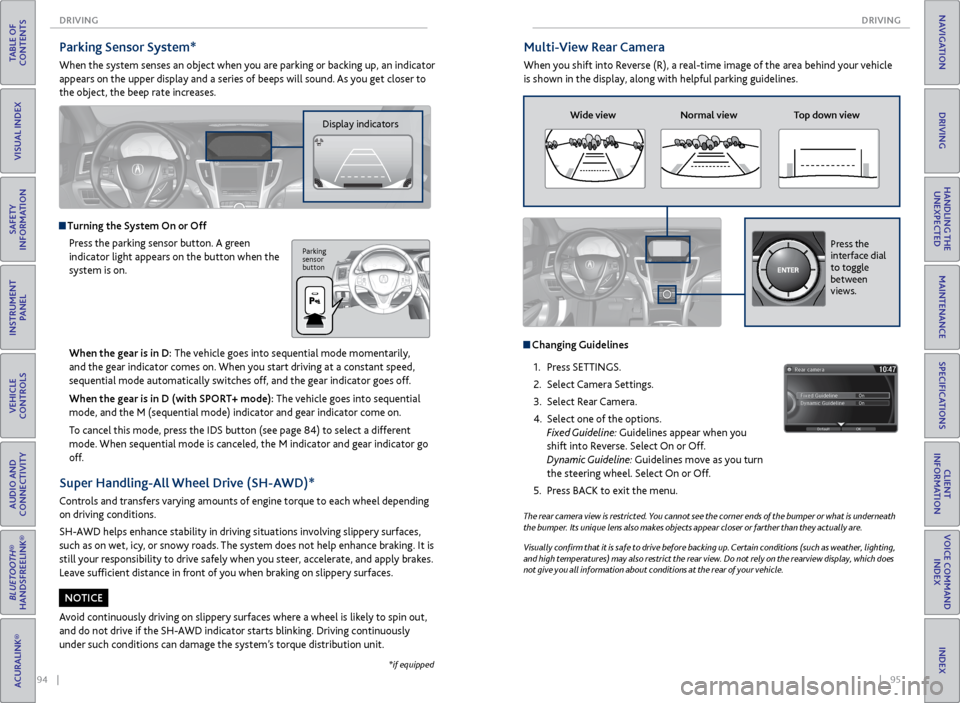
Multi-View Rear Camera
When you shift into Reverse (R), a real-time image of the area behind your vehicle
is shown in the display, along with helpful parking guidelines.
The rear camera view is restricted. You cannot see the corner ends of the bumper or what is underneath
the bumper. Its unique lens also makes objects appear closer or farther than they actually are.
Visually confirm that it is safe to drive before backing up. Certain conditions (such as weather, lighting,
and high temperatures) may also restrict the rear view. Do not rely on the rearview display, which does
not give you all information about conditions at the rear of your vehicle.
Wide view Normal view Top down view
Changing Guidelines
1. Press SETTINGS.
2. Select Camera Settings.
3. Select Rear Camera.
4. Select one of the options.
Fixed Guideline: Guidelines appear when you
shift into Reverse. Select On or Off.
Dynamic Guideline: Guidelines move as you turn
the steering wheel. Select On or Off.
5. Press BACK to exit the menu.
Press the
interface dial
to toggle
between
views.
Parking Sensor System*
When the system senses an object when you are parking or backing up, an indicator
appears on the upper display and a series of beeps will sound. As you get closer to
the object, the beep rate increases.
Display indicators
Turning the System On or Off
Press the parking sensor button. A green
indicator light appears on the button when the
system is on.
Parking
sensor
button
*if equipped
When the gear is in D: The vehicle goes into sequential mode momentarily,
and the gear indicator comes on. When you start driving at a constant speed,
sequential mode automatically switches off, and the gear indicator goes off.
When the gear is in D (with SPORT+ mode): The vehicle goes into sequential
mode, and the M (sequential mode) indicator and gear indicator come on.
To cancel this mode, press the IDS button (see page 84) to select a different
mode. When sequential mode is canceled, the M indicator and gear indicator go
off.
Super Handling-All Wheel Drive (SH-AWD)*
Controls and transfers varying amounts of engine torque to each wheel depending
on driving conditions.
SH-AWD helps enhance stability in driving situations involving slippery surfaces,
such as on wet, icy, or snowy roads. The system does not help enhance braking. It is
still your responsibility to drive safely when you steer, accelerate, and apply brakes.
Leave sufficient distance in front of you when braking on slippery surfaces.
Avoid continuously driving on slippery surfaces where a wheel is likely to spin out,
and do not drive if the SH-AWD indicator starts blinking. Driving continuously
under such conditions can damage the system’s torque distribution unit.
NOTICE
Page 55 of 75
102 || 103
HANDLING THE UNEXPECTED
HANDLING THE UNEXPECTED
TABLE OF
CONTENTS
INDEX
VISUAL INDEX
VOICE COMMAND INDEX
SAFETY
INFORMATION
CLIENT
INFORMATION
INSTRUMENT PANEL
SPECIFICATIONS
VEHICLE
CONTROLS
MAINTENANCE
AUDIO AND
CONNECTIVITY
HANDLING THE UNEXPECTED
BLUETOOTH®
HANDSFREELINK®
DRIVING
ACURALINK®
NAVIGATION
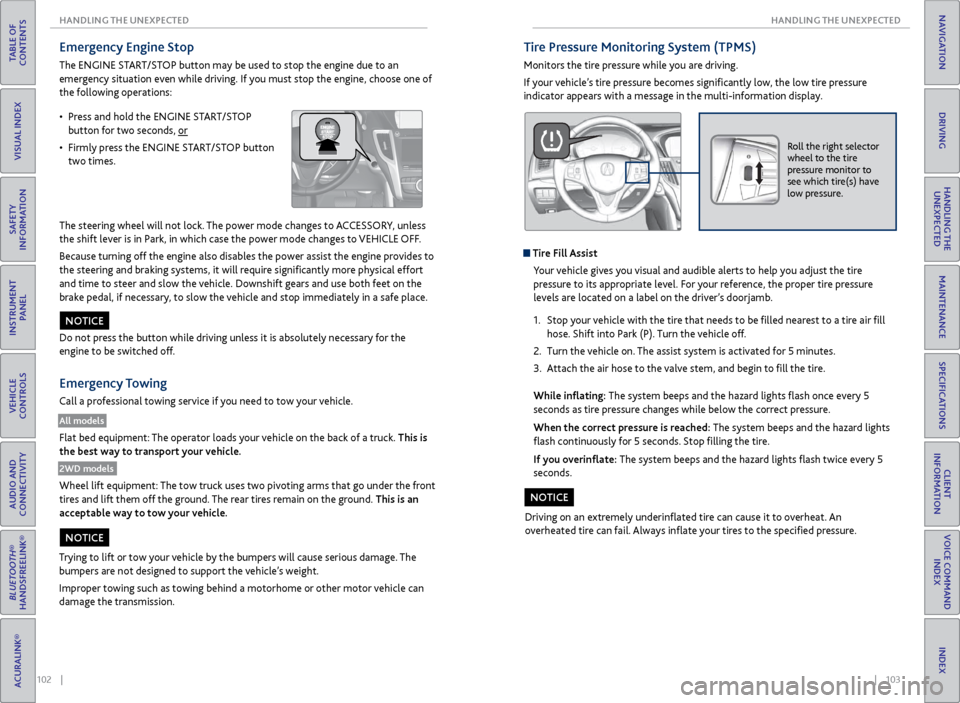
Emergency Engine Stop
The ENGINE START/STOP button may be used to stop the engine due to an
emergency situation even while driving. If you must stop the engine, choose one of
the following operations:
The steering wheel will not lock. The power mode changes to ACCESSORY, unless
the shift lever is in Park, in which case the power mode changes to VEHICLE OFF.
Because turning off the engine also disables the power assist the engine provides to
the steering and braking systems, it will require significantly more physical effort
and time to steer and slow the vehicle. Downshift gears and use both feet on the
brake pedal, if necessary, to slow the vehicle and stop immediately in a safe place.
Do not press the button while driving unless it is absolutely necessary for the
engine to be switched off.
Emergency Towing
Call a professional towing service if you need to tow your vehicle.
All models
Flat bed equipment: The operator loads your vehicle on the back of a truck. This is
the best way to transport your vehicle.
2WD models
Wheel lift equipment: The tow truck uses two pivoting arms that go under the front
tires and lift them off the ground. The rear tires remain on the ground. This is an
acceptable way to tow your vehicle.
NOTICE
Trying to lift or tow your vehicle by the bumpers will cause serious damage. The
bumpers are not designed to support the vehicle’s weight.
Improper towing such as towing behind a motorhome or other motor vehicle can
damage the transmission.
NOTICE
• Press and hold the ENGINE START/STOP
button for two seconds, or
• Firmly press the ENGINE START/STOP button
two times.
Tire Pressure Monitoring System (TPMS)
Monitors the tire pressure while you are driving.
If your vehicle’s tire pressure becomes significantly low, the low tire pressure
indicator appears with a message in the multi-information display.
Roll the right selector
wheel to the tire
pressure monitor to
see which tire(s) have
low pressure.
Tire Fill Assist
Your vehicle gives you visual and audible alerts to help you adjust the tire
pressure to its appropriate level. For your reference, the proper tire pressure
levels are located on a label on the driver’s doorjamb.
1. Stop your vehicle with the tire that needs to be filled nearest to a tire air fill
hose. Shift into Park (P). Turn the vehicle off.
2. Turn the vehicle on. The assist system is activated for 5 minutes.
3. Attach the air hose to the valve stem, and begin to fill the tire.
While inflating: The system beeps and the hazard lights flash once every 5
seconds as tire pressure changes while below the correct pressure.
When the correct pressure is reached: The system beeps and the hazard lights
flash continuously for 5 seconds. Stop filling the tire.
If you overinflate: The system beeps and the hazard lights flash twice every 5
seconds.
Driving on an extremely underinflated tire can cause it to overheat. An
overheated tire can fail. Always inflate your tires to the specified pressure.
NOTICE
Page 60 of 75
112 || 113
MAINTENANCE
MAINTENANCE
TABLE OF
CONTENTS
INDEX
VISUAL INDEX
VOICE COMMAND INDEX
SAFETY
INFORMATION
CLIENT
INFORMATION
INSTRUMENT PANEL
SPECIFICATIONS
VEHICLE
CONTROLS
MAINTENANCE
AUDIO AND
CONNECTIVITY
HANDLING THE UNEXPECTED
BLUETOOTH®
HANDSFREELINK®
DRIVING
ACURALINK®
NAVIGATION
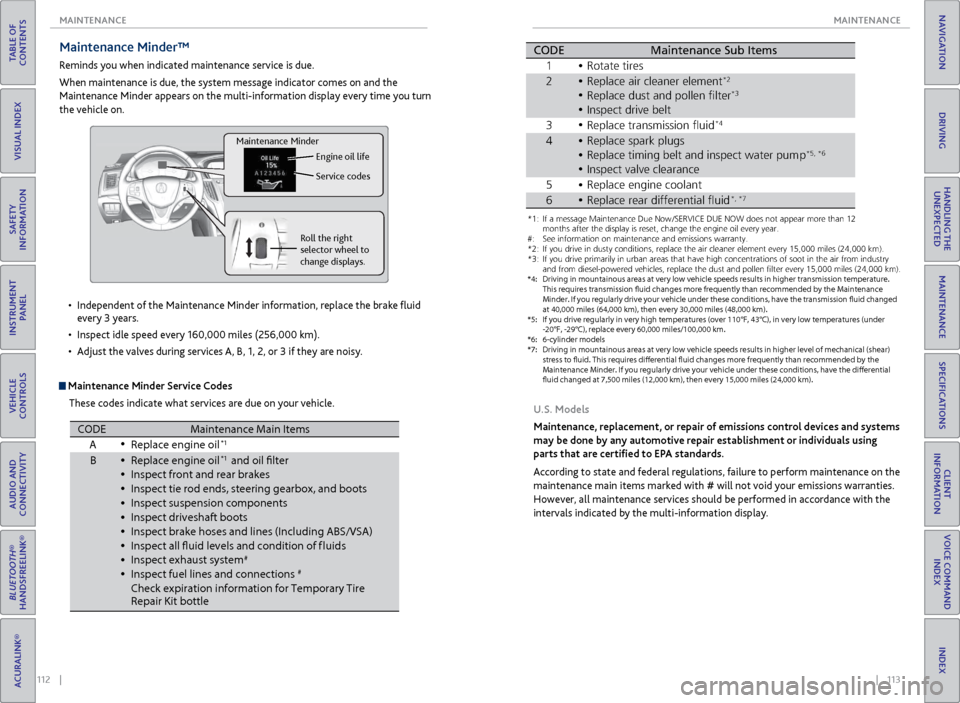
Maintenance Minder™
Reminds you when indicated maintenance service is due.
When maintenance is due, the system message indicator comes on and the
Maintenance Minder appears on the multi-information display every time you turn
the vehicle on.
Maintenance Minder Service Codes
These codes indicate what services are due on your vehicle.
•
Independent of the Maintenance Minder information, replace the brake fluid
every 3 years.
• Inspect idle speed every 160,000 miles (256,000 km).
• Adjust the valves during services A, B, 1, 2, or 3 if they are noisy.
Roll the right
selector wheel to
change displays. Engine oil life
Service codes
Maintenance Minder
CODEMaintenance Main Items
A Replace engine oi l*1
BReplace engine oi l*1 and oil flter
\fnspect front and re\rar bra\bes
\fnspect tie rod end\rs, steering gearbox,\r and boots
\fnspect suspension \rcomponent s
\fnspect driveshaft b\root s
\fnspect bra\be hoses \rand lines (\fncludin\rg ABS/VSA)
\fnspect all fuid le\rvels and condition\r of f luids
\fnspect exhaust sys\rte m
#
\fnspect fuel lines \rand connections#
Chec\b expiration in\rformation for Tempora\rry Tire
Repair Kit bottl e
*1:I f a message Maintenance Due Now /SERVICE DUE NOW does not appear m\hore than 1\f months
after the display is\h reset\b change the e\hngine oil every year\h.
*\f: If you drive in dus\hty conditions\b repla\hce the air cleaner \helement every 15\b000\h miles (\f4\b000 km) .
*3: If you drive primar\hily in urban areas \hthat have high conce\hntrations of soot \hin the air from ind\hustry and
from diesel-powered\h vehicles\b replace t\hhe dust and pollen f\hlter every 15\b000 mi\hles (\f4\b000 km) .
*4: Driving in mountai\hnous areas at very \hlow vehicle speeds r\hesults in higher tra\hnsmission temperat\hure.
This requires trans\hmission fuid change\hs more frequently t\hhan recommended by \hthe Maintenance
Minder. If you regularly drive your vehicle under these conditions\b have the transmission fuid changed
at 40\b000 miles (64\b0\h00 km)\b then every 3\h0\b000 miles (48\b000 k\hm) .
*5: If you drive regula\hrly in very high temp\heratures (over 110\h°F\b 43°C)\b in very lo\hw temperatures (un\hder
-\f0°F\b -\f9°C)\b replac\he every 60\b000 miles\h/100\b000 km.
*6: 6-cylinder models
CODE Maintenance Sub Items
1 Rotate tires
2 Replace air cleaner\r element
*2
Replace dust and p\rollen flter*3
3Replace transmissio\rn fui d*4
4Replace spar\b plugs\r
Replace timing belt\r and inspect water \rpump*5 *6
\fnspect valve clear\rance
5 Replace engine coo\rlan t
•
•
•
•
•
•
•
•
•
•
•
•
•
\fnspect drive belt•
•
•
•
•
•
*1: If a message Maint\Nenance Due N\fw /SE\bVICE DUE NOW d\fes n\N\ft appear m\fre than 1\N2 m\fnths after the disp\Nlay is reset, chang\Ne the engine \fil ev\Nery year .
#: See inf\frmati\fn \fn ma\Nintenance and emis\Nsi\fns warranty.
*2: If y\fu drive in dust\Ny c\fnditi\fns, replac\Ne the air cleaner el\Nement every 15,000 \Nmiles (24,000 km) .
*3: If y\fu drive primaril\Ny in urban areas tha\Nt have high c\fncent\Nrati\fns \ff s\f\ft in th\Ne air fr\fm industr y
and fr\fm diesel-p\fwe\Nred vehicles, replac\Ne the dust and p\fll\Nen flter every 15,00\N0 miles (24,000 km\N).
*4: Driving in mountai\ynous areas at very \y\fow vehic\fe s\beeds re\ysu\fts in higher tran\ysmission tem\beratur\ye.
This requires trans\ymission fuid change\ys more frequent\fy t\yhan recommended by t\yhe Maintenance
M inder. If you regu\far\fy drive your vehic\fe under these conditions, have the transmission fuid changed
at 40,000 mi\fes (64\y,000 km), then ever\yy 30,000 mi\fes (48,\y000 km).
*5: If you drive regu\fa\yr\fy in very high tem\b\yeratures (over 110\y°F, 43°C), in very \y\fow tem\beratures (u\ynder
-20°F, -29°C), re\b\f\yace every 60,000 mi\y\fes/100,000 km.
*6: 6-cy\finder mode\fs
*7: Driving in mountai\ynous areas at very \y\fow vehic\fe s\beeds re\ysu\fts in higher \feve\y\f of mechanica\f (shea\yr)
stress to fuid. Thi\ys requires diferen\ytia\f fuid changes mo\yre frequent\fy than r\yecommended by th e
M aintenance Minder. I\yf you regu\far\fy driv\ye your vehic\fe under\y these conditions, \yhave the diferentia\y\f
fuid changed at 7,5\y00 mi\fes (12,000 km\y), then every 15,00\y0 mi\fes (24,000 km)\y.
CODEMaintenance Sub Item s
1 \b\ftate tires
2\beplace air cleaner \Nelement*2
\beplace dust and p\f\Nllen flte r*3
Inspect drive belt
3 \beplace transmissi\fn\N fuid*4
4\beplace spark plugs
\beplace timing belt\N and inspect water \Npum p*5, *6
Inspect valve clea\Nrance
5 \beplace engine c\f\fla\Nnt
6\beplace rear differen\Ntial fui d*, *7
U.S. Models
Maintenance, replacement, or repair of emissions control devices and systems
may be done by any automotive repair establishment or individuals using
parts that are certified to EPA standards.
According to state and federal regulations, failure to perform maintenance on the
maintenance main items marked with # will not void your emissions warranties.
However, all maintenance services should be performed in accordance with the
intervals indicated by the multi-information display.
Page 62 of 75
116 || 117
MAINTENANCE
MAINTENANCE
TABLE OF
CONTENTS
INDEX
VISUAL INDEX
VOICE COMMAND INDEX
SAFETY
INFORMATION
CLIENT
INFORMATION
INSTRUMENT PANEL
SPECIFICATIONS
VEHICLE
CONTROLS
MAINTENANCE
AUDIO AND
CONNECTIVITY
HANDLING THE UNEXPECTED
BLUETOOTH®
HANDSFREELINK®
DRIVING
ACURALINK®
NAVIGATION
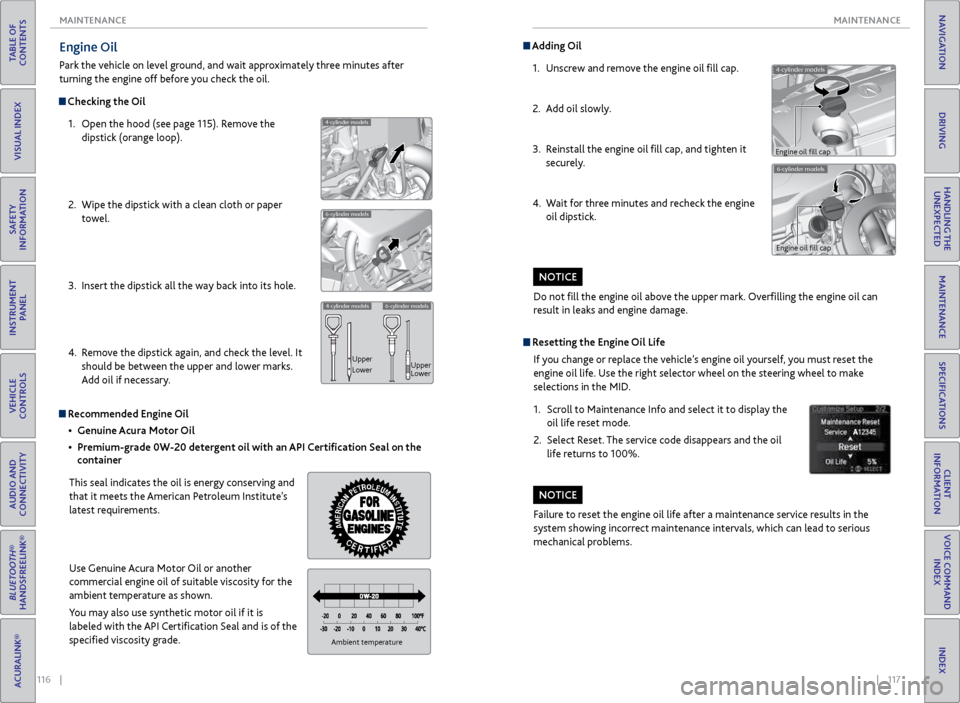
Engine Oil
Park the vehicle on level ground, and wait approximately three minutes after
turning the engine off before you check the oil.
Checking the Oil
1. Open the hood (see page 115). Remove the
dipstick (orange loop).
2. Wipe the dipstick with a clean cloth or paper
towel.
3. Insert the dipstick all the way back into its hole.
4. Remove the dipstick again, and check the level. It
should be between the upper and lower marks.
Add oil if necessary.
4-cylinder models
6-cylinder models
4-cylinder models6-cylinder models
Upper
Lower Upper
Lower
Recommended Engine Oil
• Genuine Acura Motor Oil
• Premium-grade 0W-20 detergent oil with an API Certification Seal on the
container
This seal indicates the oil is energy conserving and
that it meets the American Petroleum Institute’s
latest requirements.
Use Genuine Acura Motor Oil or another
commercial engine oil of suitable viscosity for the
ambient temperature as shown.
You may also use synthetic motor oil if it is
labeled with the API Certification Seal and is of the
specified viscosity grade.
Ambient temperature
Do not fill the engine oil above the upper mark. Overfilling the engine oil can
result in leaks and engine damage.
NOTICE
4-cylinder models
Adding Oil 1. Unscrew and remove the engine oil fill cap.
2. Add oil slowly.
3. Reinstall the engine oil fill cap, and tighten it
securely.
4. Wait for three minutes and recheck the engine
oil dipstick.
6-cylinder models
Engine oil fill cap
Engine oil fill cap
Resetting the Engine Oil Life
If you change or replace the vehicle’s engine oil yourself, you must reset the
engine oil life. Use the right selector wheel on the steering wheel to make
selections in the MID.
1. Scroll to Maintenance Info and select it to display the
oil life reset mode.
2. Select Reset. The service code disappears and the oil
life returns to 100%.
Failure to reset the engine oil life after a maintenance service results in the
system showing incorrect maintenance intervals, which can lead to serious
mechanical problems.
NOTICE
Page 63 of 75
118 || 119
MAINTENANCE
MAINTENANCE
TABLE OF
CONTENTS
INDEX
VISUAL INDEX
VOICE COMMAND INDEX
SAFETY
INFORMATION
CLIENT
INFORMATION
INSTRUMENT PANEL
SPECIFICATIONS
VEHICLE
CONTROLS
MAINTENANCE
AUDIO AND
CONNECTIVITY
HANDLING THE UNEXPECTED
BLUETOOTH®
HANDSFREELINK®
DRIVING
ACURALINK®
NAVIGATION
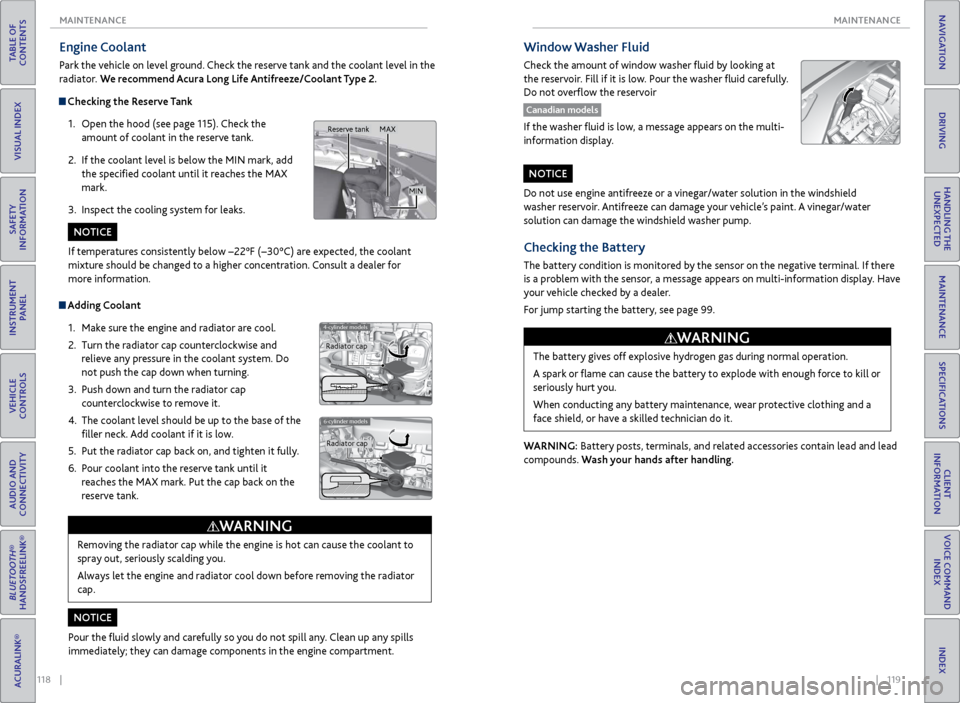
Engine Coolant
Park the vehicle on level ground. Check the reserve tank and the coolant level in the
radiator. We recommend Acura Long Life Antifreeze/Coolant Type 2.
Checking the Reserve Tank
1. Open the hood (see page 115). Check the
amount of coolant in the reserve tank.
2. If the coolant level is below the MIN mark, add
the specified coolant until it reaches the MAX
mark.
3. Inspect the cooling system for leaks.
Adding Coolant
1. Make sure the engine and radiator are cool.
2. Turn the radiator cap counterclockwise and
relieve any pressure in the coolant system. Do
not push the cap down when turning.
3. Push down and turn the radiator cap
counterclockwise to remove it.
4. The coolant level should be up to the base of the
filler neck. Add coolant if it is low.
5. Put the radiator cap back on, and tighten it fully.
6. Pour coolant into the reserve tank until it
reaches the MAX mark. Put the cap back on the
reserve tank.
4-cylinder models
6-cylinder models
Removing the radiator cap while the engine is hot can cause the coolant to
spray out, seriously scalding you.
Always let the engine and radiator cool down before removing the radiator
cap.
WARNING
If temperatures consistently below −22°F (−30°C) are expected, the coolant
mixture should be changed to a higher concentration. Consult a dealer for
more information.
Pour the fluid slowly and carefully so you do not spill any. Clean up any spills
immediately; they can damage components in the engine compartment.
NOTICE
NOTICE
Radiator cap Radiator cap
MAX
MIN
Reserve tank
Do not use engine antifreeze or a vinegar/water solution in the windshield
washer reservoir. Antifreeze can damage your vehicle’s paint. A vinegar/water
solution can damage the windshield washer pump.
NOTICE
Checking the Battery
The battery condition is monitored by the sensor on the negative terminal. If there
is a problem with the sensor, a message appears on multi-information display. Have
your vehicle checked by a dealer.
For jump starting the battery, see page 99.
WARNING: Battery posts, terminals, and related accessories contain lead and lead
compounds. Wash your hands after handling.The battery gives off explosive hydrogen gas during normal operation.
A spark or flame can cause the battery to explode with enough force to kill or
seriously hurt you.
When conducting any battery maintenance, wear protective clothing and a
face shield, or have a skilled technician do it.
WARNING
Window Washer Fluid
Check the amount of window washer fluid by looking at
the reservoir. Fill if it is low. Pour the washer fluid carefully.
Do not overflow the reservoir
Canadian models
If the washer fluid is low, a message appears on the multi-
information display.
Page 71 of 75
134 || 135
VOICE COMMAND INDEX
VOICE COMMAND INDEX
TABLE OF
CONTENTS
INDEX
VISUAL INDEX
VOICE COMMAND INDEX
SAFETY
INFORMATION
CLIENT
INFORMATION
INSTRUMENT PANEL
SPECIFICATIONS
VEHICLE
CONTROLS
MAINTENANCE
AUDIO AND
CONNECTIVITY
HANDLING THE UNEXPECTED
BLUETOOTH®
HANDSFREELINK®
DRIVING
ACURALINK®
NAVIGATION
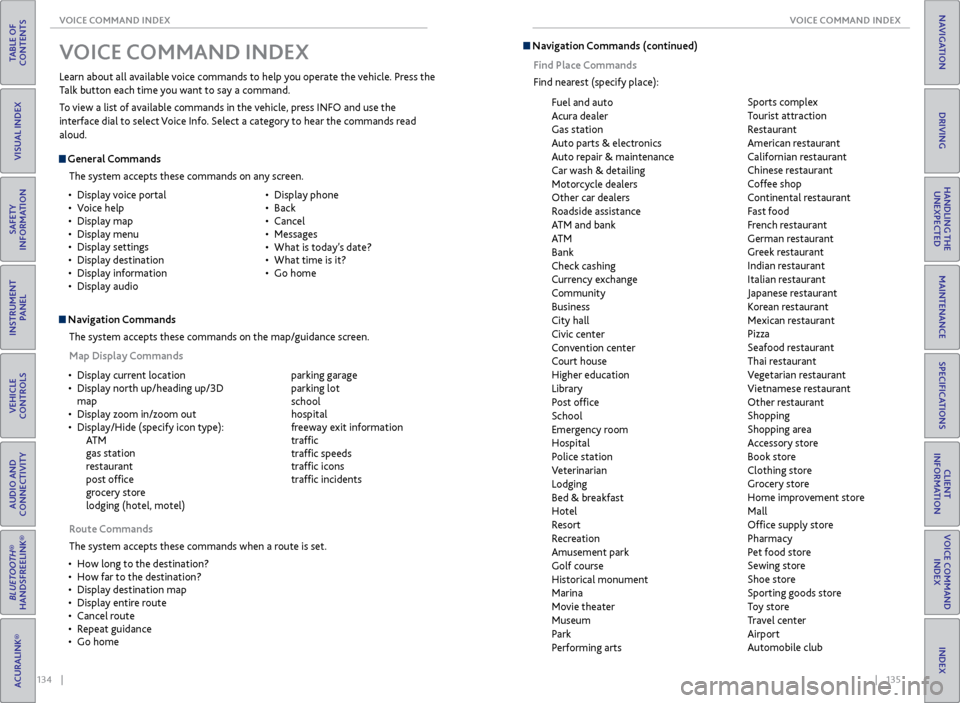
V OICE COMMAND INDEX
Learn about all available voice commands to help you operate the vehicle. Press the
Talk button each time you want to say a command.
To view a list of available commands in the vehicle, press INFO and use the
interface dial to select Voice Info. Select a category to hear the commands read
aloud.
General Commands
The system accepts these commands on any screen.
Navigation CommandsThe system accepts these commands on the map/guidance screen.
Map Display Commands
•
Display voice portal
• Voice help
• Display map
• Display menu
• Display settings
• Display destination
• Display information
• Display audio •
Display phone
• Back
• Cancel
• Messages
• What is today’s date?
• What time is it?
• Go home
Route Commands
The system accepts these commands when a route is set.
• How long to the destination?
• How far to the destination?
• Display destination map
• Display entire route
• Cancel route
• Repeat guidance
• Go home
•
Display current location
• Display north up/heading up/3D
map
• Display zoom in/zoom out
• Display/Hide (specify icon type):
AT M
gas station
restaurant
post office
grocery store
lodging (hotel, motel)
parking garage
parking lot
school
hospital
freeway exit information
traffic
traffic speeds
traffic icons
traffic incidents
Navigation Commands (continued)
Find Place Commands
Find nearest (specify place):
Fuel and auto
Acura dealer
Gas station
Auto parts & electronics
Auto repair & maintenance
Car wash & detailing
Motorcycle dealers
Other car dealers
Roadside assistance
ATM and bank
AT M
Bank
Check cashing
Currency exchange
Community
Business
City hall
Civic center
Convention center
Court house
Higher education
Library
Post office
School
Emergency room
Hospital
Police station
Veterinarian
Lodging
Bed & breakfast
Hotel
Resort
Recreation
Amusement park
Golf course
Historical monument
Marina
Movie theater
Museum
Park
Performing arts Sports complex
Tourist attraction
Restaurant
American restaurant
Californian restaurant
Chinese restaurant
Coffee shop
Continental restaurant
Fast food
French restaurant
German restaurant
Greek restaurant
Indian restaurant
Italian restaurant
Japanese restaurant
Korean restaurant
Mexican restaurant
Pizza
Seafood restaurant
Thai restaurant
Vegetarian restaurant
Vietnamese restaurant
Other restaurant
Shopping
Shopping area
Accessory store
Book store
Clothing store
Grocery store
Home improvement store
Mall
Office supply store
Pharmacy
Pet food store
Sewing store
Shoe store
Sporting goods store
Toy store
Travel center
Airport
Automobile club
Page 73 of 75

138 || 139
VOICE COMMAND INDEX
VOICE COMMAND INDEX
TABLE OF
CONTENTS
INDEX
VISUAL INDEX
VOICE COMMAND INDEX
SAFETY
INFORMATION
CLIENT
INFORMATION
INSTRUMENT PANEL
SPECIFICATIONS
VEHICLE
CONTROLS
MAINTENANCE
AUDIO AND
CONNECTIVITY
HANDLING THE UNEXPECTED
BLUETOOTH®
HANDSFREELINK®
DRIVING
ACURALINK®
NAVIGATION
AUX Commands
• Auxiliary play
Song By Voice™ Commands
Available for tracks stored on the HDD or iPod®.
• Music search
• What/Who am I listening to?
• Who is this? •
What’s playing?
• Who’s playing?
• What album is this?
Phone Commands
The system accepts these commands on the Voice Portal screen.
• Dial by number
• Dial by voice tag
• Dial (number)
• Dial (contact name)
On-screen Commands
The system accepts these commands on any screen where applicable. All
available on-screen voice commands are highlighted in yellow when you press
the Talk button.
Info CommandsThe system accepts these commands on the Info screen.
• AcuraLink messages
• Trip computer
• Traffic information
• Display clock/wallpaper
•
Next (or Down)
• Previous (or Up)
• OK
• Delete
•
iPod play
• iPod play track # (#: 1-30)
• iPod skip forward
• iPod skip back
• iPod track shuffle*
• iPod album shuffle*
• iPod track repeat* •
iPod normal play
• What/Who am I listening to?
• Who is this?
• What’s playing?
• Who’s playing?
• What album is this?
USB Commands
• USB play
• USB play track # (#: 1 to 30)
• USB skip forward
• USB skip back
• USB track random*
• USB track repeat*
• USB track scan* •
USB folder up
• USB folder down
• USB folder random*
• USB folder repeat*
• USB folder scan*
• USB normal play
iPod® Commands
• Pandora play
• Pandora skip forward
• Pandora station up
• Pandora station down
• Pandora pause •
Pandora resume
• Pandora thumbs up
• Pandora thumbs down
Pandora® Commands
• Aha radio play
• Aha radio skip forward
• Aha radio skip back
• Aha radio station up
• Aha radio station down •
Aha radio pause
• Aha radio resume
• Aha radio like
• Aha radio dislike
Aha Radio™ Commands
Bluetooth® Audio Commands
Commands may not work on some phones or devices.
• Bluetooth audio play
• Bluetooth audio skip forward
• Bluetooth audio skip back
• Bluetooth audio pause
• Bluetooth audio resume •
Bluetooth audio group up
• Bluetooth audio group down
• Bluetooth audio track random
• Bluetooth audio track repeat
* These commands toggle the function on and off, so
the command may not match your intended action.