lock Acura TLX 2015 Owner's Manual
[x] Cancel search | Manufacturer: ACURA, Model Year: 2015, Model line: TLX, Model: Acura TLX 2015Pages: 75, PDF Size: 24.55 MB
Page 55 of 75
102 || 103
HANDLING THE UNEXPECTED
HANDLING THE UNEXPECTED
TABLE OF
CONTENTS
INDEX
VISUAL INDEX
VOICE COMMAND INDEX
SAFETY
INFORMATION
CLIENT
INFORMATION
INSTRUMENT PANEL
SPECIFICATIONS
VEHICLE
CONTROLS
MAINTENANCE
AUDIO AND
CONNECTIVITY
HANDLING THE UNEXPECTED
BLUETOOTH®
HANDSFREELINK®
DRIVING
ACURALINK®
NAVIGATION
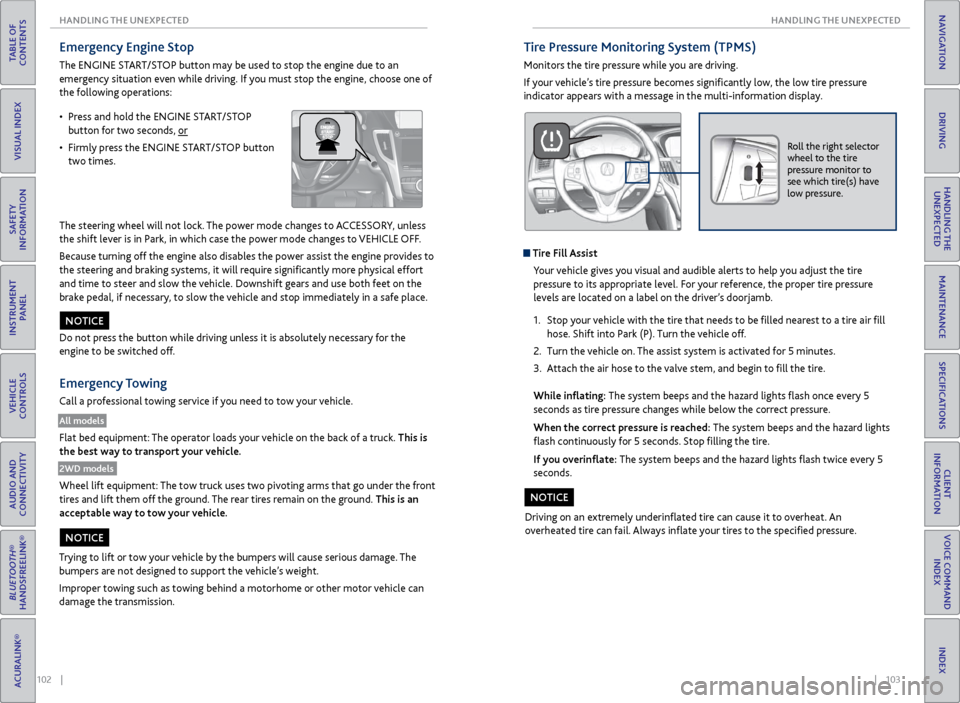
Emergency Engine Stop
The ENGINE START/STOP button may be used to stop the engine due to an
emergency situation even while driving. If you must stop the engine, choose one of
the following operations:
The steering wheel will not lock. The power mode changes to ACCESSORY, unless
the shift lever is in Park, in which case the power mode changes to VEHICLE OFF.
Because turning off the engine also disables the power assist the engine provides to
the steering and braking systems, it will require significantly more physical effort
and time to steer and slow the vehicle. Downshift gears and use both feet on the
brake pedal, if necessary, to slow the vehicle and stop immediately in a safe place.
Do not press the button while driving unless it is absolutely necessary for the
engine to be switched off.
Emergency Towing
Call a professional towing service if you need to tow your vehicle.
All models
Flat bed equipment: The operator loads your vehicle on the back of a truck. This is
the best way to transport your vehicle.
2WD models
Wheel lift equipment: The tow truck uses two pivoting arms that go under the front
tires and lift them off the ground. The rear tires remain on the ground. This is an
acceptable way to tow your vehicle.
NOTICE
Trying to lift or tow your vehicle by the bumpers will cause serious damage. The
bumpers are not designed to support the vehicle’s weight.
Improper towing such as towing behind a motorhome or other motor vehicle can
damage the transmission.
NOTICE
• Press and hold the ENGINE START/STOP
button for two seconds, or
• Firmly press the ENGINE START/STOP button
two times.
Tire Pressure Monitoring System (TPMS)
Monitors the tire pressure while you are driving.
If your vehicle’s tire pressure becomes significantly low, the low tire pressure
indicator appears with a message in the multi-information display.
Roll the right selector
wheel to the tire
pressure monitor to
see which tire(s) have
low pressure.
Tire Fill Assist
Your vehicle gives you visual and audible alerts to help you adjust the tire
pressure to its appropriate level. For your reference, the proper tire pressure
levels are located on a label on the driver’s doorjamb.
1. Stop your vehicle with the tire that needs to be filled nearest to a tire air fill
hose. Shift into Park (P). Turn the vehicle off.
2. Turn the vehicle on. The assist system is activated for 5 minutes.
3. Attach the air hose to the valve stem, and begin to fill the tire.
While inflating: The system beeps and the hazard lights flash once every 5
seconds as tire pressure changes while below the correct pressure.
When the correct pressure is reached: The system beeps and the hazard lights
flash continuously for 5 seconds. Stop filling the tire.
If you overinflate: The system beeps and the hazard lights flash twice every 5
seconds.
Driving on an extremely underinflated tire can cause it to overheat. An
overheated tire can fail. Always inflate your tires to the specified pressure.
NOTICE
Page 56 of 75
104 || 105
HANDLING THE UNEXPECTED
HANDLING THE UNEXPECTED
TABLE OF
CONTENTS
INDEX
VISUAL INDEX
VOICE COMMAND INDEX
SAFETY
INFORMATION
CLIENT
INFORMATION
INSTRUMENT PANEL
SPECIFICATIONS
VEHICLE
CONTROLS
MAINTENANCE
AUDIO AND
CONNECTIVITY
HANDLING THE UNEXPECTED
BLUETOOTH®
HANDSFREELINK®
DRIVING
ACURALINK®
NAVIGATION
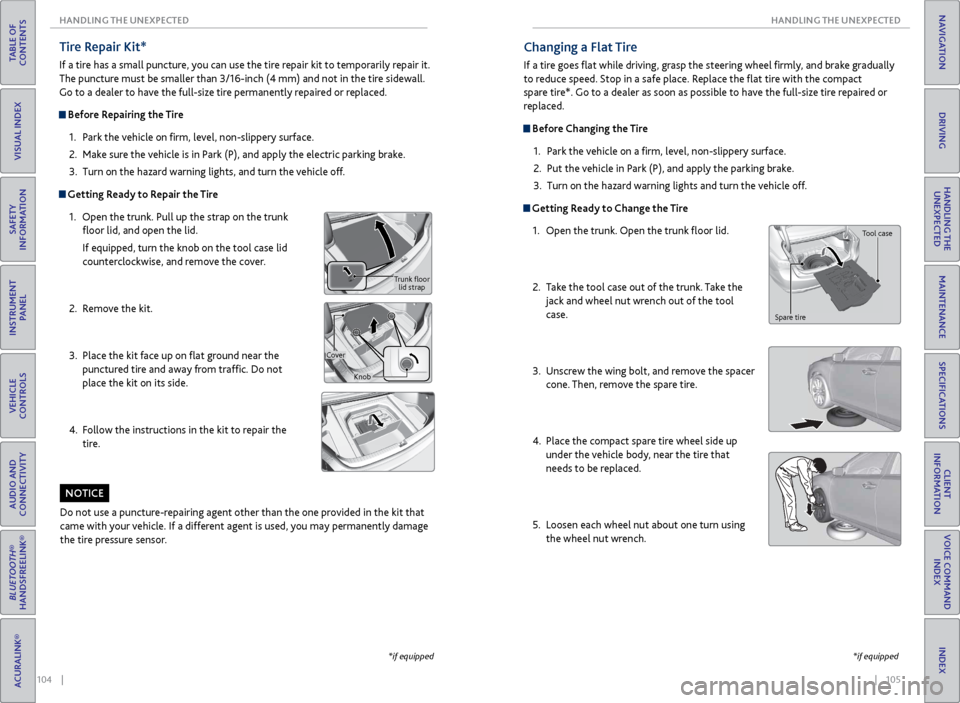
Tire Repair Kit*
If a tire has a small puncture, you can use the tire repair kit to temporarily repair it.
The puncture must be smaller than 3/16-inch (4 mm) and not in the tire sidewall.
Go to a dealer to have the full-size tire permanently repaired or replaced.
Before Repairing the Tire
1. Park the vehicle on firm, level, non-slippery surface.
2. Make sure the vehicle is in Park (P), and apply the electric parking brake.
3. Turn on the hazard warning lights, and turn the vehicle off.
Getting Ready to Repair the Tire
1. Open the trunk. Pull up the strap on the trunk
floor lid, and open the lid.
If equipped, turn the knob on the tool case lid
counterclockwise, and remove the cover.
2. Remove the kit.
3. Place the kit face up on flat ground near the
punctured tire and away from traffic. Do not
place the kit on its side.
4. Follow the instructions in the kit to repair the
tire.
Trunk floor
lid strap
Cover Knob
Do not use a puncture-repairing agent other than the one provided in the kit that
came with your vehicle. If a different agent is used, you may permanently damage
the tire pressure sensor.
NOTICE
*if equipped
Changing a Flat Tire
If a tire goes flat while driving, grasp the steering wheel firmly, and brake gradually
to reduce speed. Stop in a safe place. Replace the flat tire with the compact
spare tire*. Go to a dealer as soon as possible to have the full-size tire repaired or
replaced.
Before Changing the Tire1. Park the vehicle on a firm, level, non-slippery surface.
2. Put the vehicle in Park (P), and apply the parking brake.
3. Turn on the hazard warning lights and turn the vehicle off.
Getting Ready to Change the Tire
1. Open the trunk. Open the trunk floor lid.
2. Take the tool case out of the trunk. Take the
jack and wheel nut wrench out of the tool
case.
3. Unscrew the wing bolt, and remove the spacer
cone. Then, remove the spare tire.
4. Place the compact spare tire wheel side up
under the vehicle body, near the tire that
needs to be replaced.
5. Loosen each wheel nut about one turn using
the wheel nut wrench.
Tool case
Spare tire
*if equipped
Page 57 of 75
106 || 107
HANDLING THE UNEXPECTED
HANDLING THE UNEXPECTED
TABLE OF
CONTENTS
INDEX
VISUAL INDEX
VOICE COMMAND INDEX
SAFETY
INFORMATION
CLIENT
INFORMATION
INSTRUMENT PANEL
SPECIFICATIONS
VEHICLE
CONTROLS
MAINTENANCE
AUDIO AND
CONNECTIVITY
HANDLING THE UNEXPECTED
BLUETOOTH®
HANDSFREELINK®
DRIVING
ACURALINK®
NAVIGATION
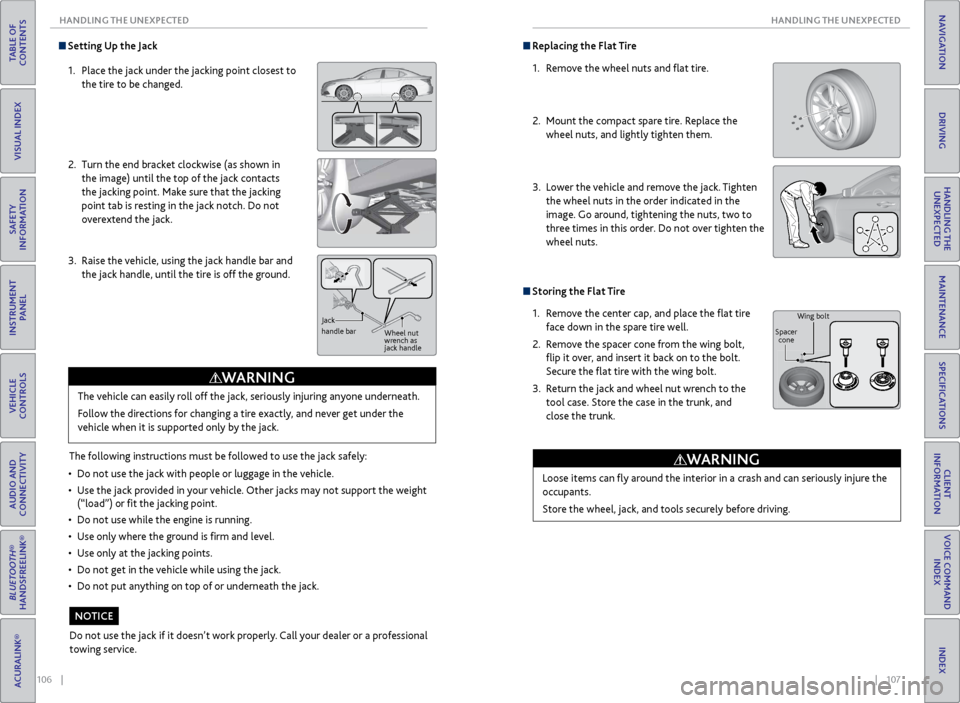
Setting Up the Jack
1. Place the jack under the jacking point closest to
the tire to be changed.
2. Turn the end bracket clockwise (as shown in
the image) until the top of the jack contacts
the jacking point. Make sure that the jacking
point tab is resting in the jack notch. Do not
overextend the jack.
3. Raise the vehicle, using the jack handle bar and
the jack handle, until the tire is off the ground.
The following instructions must be followed to use the jack safely:
• Do not use the jack with people or luggage in the vehicle.
• Use the jack provided in your vehicle. Other jacks may not support the weight
(“load”) or fit the jacking point.
• Do not use while the engine is running.
• Use only where the ground is firm and level.
• Use only at the jacking points.
• Do not get in the vehicle while using the jack.
• Do not put anything on top of or underneath the jack.The vehicle can easily roll off the jack, seriously injuring anyone underneath.
Follow the directions for changing a tire exactly, and never get under the
vehicle when it is supported only by the jack.
WARNING
Jack
handle bar
Wheel nut
wrench as
jack handle
Do not use the jack if it doesn’t work properly. Call your dealer or a professional
towing service.
NOTICE
Replacing the Flat Tire
1. Remove the wheel nuts and flat tire.
2. Mount the compact spare tire. Replace the
wheel nuts, and lightly tighten them.
3. Lower the vehicle and remove the jack. Tighten
the wheel nuts in the order indicated in the
image. Go around, tightening the nuts, two to
three times in this order. Do not over tighten the
wheel nuts.
Storing the Flat Tire
1. Remove the center cap, and place the flat tire
face down in the spare tire well.
2. Remove the spacer cone from the wing bolt,
flip it over, and insert it back on to the bolt.
Secure the flat tire with the wing bolt.
3. Return the jack and wheel nut wrench to the
tool case. Store the case in the trunk, and
close the trunk.
Loose items can fly around the interior in a crash and can seriously injure the
occupants.
Store the wheel, jack, and tools securely before driving.
WARNING
Wing bolt
Spacer cone
Page 58 of 75
108 || 109
HANDLING THE UNEXPECTED
HANDLING THE UNEXPECTED
TABLE OF
CONTENTS
INDEX
VISUAL INDEX
VOICE COMMAND INDEX
SAFETY
INFORMATION
CLIENT
INFORMATION
INSTRUMENT PANEL
SPECIFICATIONS
VEHICLE
CONTROLS
MAINTENANCE
AUDIO AND
CONNECTIVITY
HANDLING THE UNEXPECTED
BLUETOOTH®
HANDSFREELINK®
DRIVING
ACURALINK®
NAVIGATION
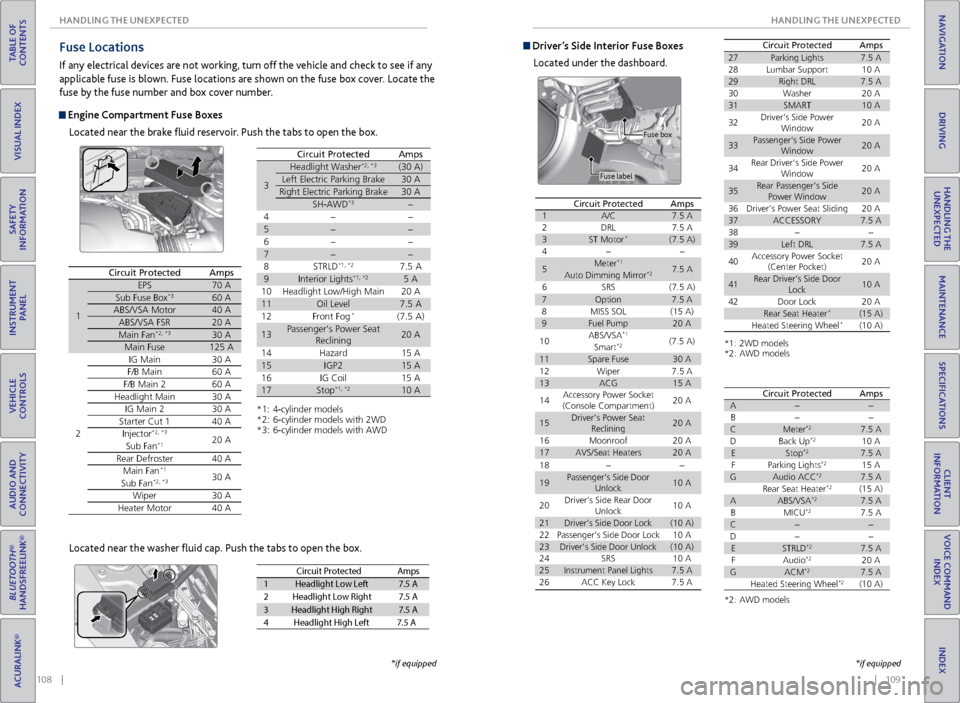
Fuse Locations
If any electrical devices are not working, turn off the vehicle and check to see if any
applicable fuse is blown. Fuse locations are shown on the fuse box cover. Locate the
fuse by the fuse number and box cover number.
Engine Compartment Fuse Boxes
Located near the brake fluid reservoir. Push the tabs to open the box.
Circuit ProtectedAmps
1
EPS70 ASub Fuse Bo x*360 AABS/VSA Motor40 AABS/VSA FSR20 AMain Fa n*2, *330 AMain Fuse125 A
2
IG Mai n30 AF/B Mai n60 AF/B Main 260 AHeadlight Main30 AIG Main 230 AStarter Cut 140 AInjector*2, *320 ASub Fan*1
Rear Defroster40 AMain Fa n*130 ASub Fa n*2, *3
Wiper30 AHeater Motor40 A
*1: 4-cylinder model s*2: 6-cylinder models with 2W D*3: 6-cylinder models with AW D
3
Headlight Washer*2, *3(30 A)
Left Electric Parking Brake30 A
Right Electric Parking Brake30 A
SH-AWD*3�
4� �
5��
6� �
7��
8S TRLD*1, *27.5 A
9Interior Lights*1, *25 A
10 Headlight Low/High Main 20 A
11Oil Level7.5 A
12 Front Fog*(7.5 A)
13Passenger’s Power Seat
Reclinin g20 A
14 Hazard 15 A
15IGP215 A
16 IG Coil 15 A
17Stop*1, *210 A
Circuit ProtectedAmps
Located near the washer fluid cap. Push the tabs to open the box.
Circuit Protecte dAmps
1Headlight Low Lef t7.5 A
2Headlight Low Right7.5 A
3Headlight High Right7.5 A
4H eadlight High Left 7.5 A
*if equipped
Driver’s Side Interior Fuse Boxes
Located under the dashboard.
Fuse label Fuse box
Circuit ProtectedAmps1A/C7.5
A2DRL7.5 A3ST Motor*(7.5 A)4��
5Meter*17.5 AAuto Dimming Mirror*2
6SRS(7.5 A)7Option7.5 A8MISS SO L(15 A)9Fuel Pump20 A
10ABS/VSA*1(7.5 A)Smart*2
11Spare Fuse30 A
18��
19Passenger’s Side Door
Unlock10 A
20Driver’s Side Rear Door
Unlock10 A
21Driver’s Side Door Lock(10 A)22Passenger’s Side Door Lock10 A23Driver’s Side Door Unlock(10 A)24SRS10 A25Instrument Panel Lights7.5 A26ACC Key Lock7.5 A
12Wiper7.5 A13ACG15 A
14Accessory Power Socket
(Console Compartment)20 A
15Driver’s Power Seat
Reclinin g20 A
16Moonroo f20 A17AVS/Seat Heaters20 A
Circuit ProtectedAmps
*1: 2WD models*2: AWD models
27Parking Lights7.5 A28Lumbar Suppor t10 A29Right DRL7.5 A30Washer20 A31SMART10 A
32Driver’s Side Power
Window20 A
33Passenger’s Side Power
Window20 A
34Rear Driver’s Side Power
Window20 A
35Rear Passenger’s Side
Power Window20 A
36Driver’s Power Seat Sliding20 A37ACCESSORY7.5 A38��39Left DRL7.5 A
40Accessory Power Socket
(Center Pocket )20 A
41Rear Driver’s Side Door
Lock10 A
42Door Lock20 ARear Seat Heater*(15 A)Heated Steering Wheel*(10 A)
*2: AWD models
Circuit Protecte dAmpsA��
B� �
CMeter*27.5 A
DB ack Up*210 AEStop*27.5 A
F Parking Lights*215 AGAudio ACC*27.5 A
Rear Seat Heater*2(15 A)AABS/VSA*27.5 A
BM ICU*27.5 AC��
D� �
ESTRLD*27.5 A
FA udio*220 AGACM*27.5 A
Heated Steering Wheel*2(10 A)
*if equipped
Page 61 of 75
114 || 115
MAINTENANCE
MAINTENANCE
TABLE OF
CONTENTS
INDEX
VISUAL INDEX
VOICE COMMAND INDEX
SAFETY
INFORMATION
CLIENT
INFORMATION
INSTRUMENT PANEL
SPECIFICATIONS
VEHICLE
CONTROLS
MAINTENANCE
AUDIO AND
CONNECTIVITY
HANDLING THE UNEXPECTED
BLUETOOTH®
HANDSFREELINK®
DRIVING
ACURALINK®
NAVIGATION
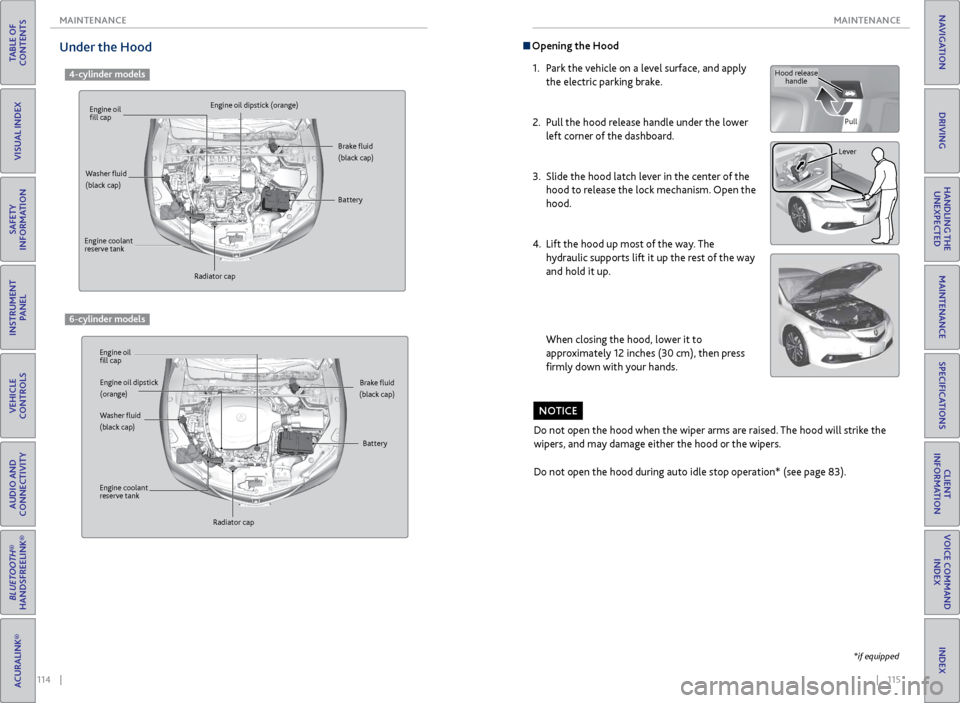
Opening the Hood
1. Park the vehicle on a level surface, and apply
the electric parking brake.
2. Pull the hood release handle under the lower
left corner of the dashboard.
3. Slide the hood latch lever in the center of the
hood to release the lock mechanism. Open the
hood.
4. Lift the hood up most of the way. The
hydraulic supports lift it up the rest of the way
and hold it up.
When closing the hood, lower it to
approximately 12 inches (30 cm), then press
firmly down with your hands.
Do not open the hood when the wiper arms are raised. The hood will strike the
wipers, and may damage either the hood or the wipers.
Do not open the hood during auto idle stop operation* (see page 83).
NOTICE
Hood release handle
Pull
Lever
*if equipped
Under the Hood
4-cylinder models
Engine oil
fill cap
Engine oil
fill cap Engine oil dipstick (orange)
Engine oil dipstick
(orange)
Washer fluid
(black cap)
Washer fluid
(black cap) Brake fluid
(black cap)
Brake fluid
(black cap)
Engine coolant
reserve tank
Engine coolant
reserve tank Radiator cap
Radiator cap Battery
Battery
6-cylinder models
Page 63 of 75
118 || 119
MAINTENANCE
MAINTENANCE
TABLE OF
CONTENTS
INDEX
VISUAL INDEX
VOICE COMMAND INDEX
SAFETY
INFORMATION
CLIENT
INFORMATION
INSTRUMENT PANEL
SPECIFICATIONS
VEHICLE
CONTROLS
MAINTENANCE
AUDIO AND
CONNECTIVITY
HANDLING THE UNEXPECTED
BLUETOOTH®
HANDSFREELINK®
DRIVING
ACURALINK®
NAVIGATION
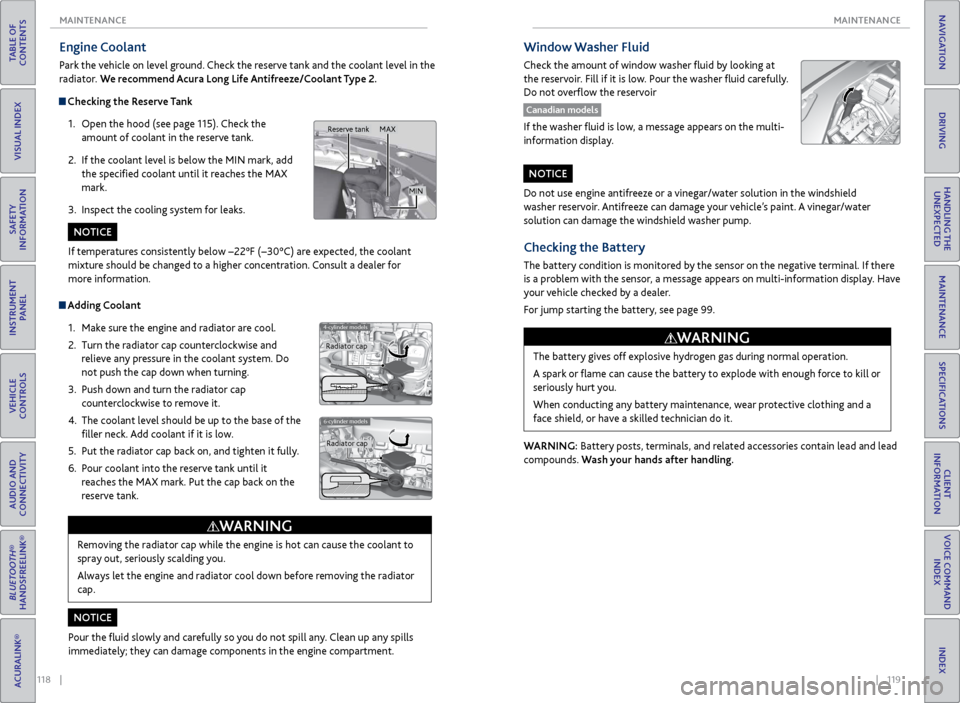
Engine Coolant
Park the vehicle on level ground. Check the reserve tank and the coolant level in the
radiator. We recommend Acura Long Life Antifreeze/Coolant Type 2.
Checking the Reserve Tank
1. Open the hood (see page 115). Check the
amount of coolant in the reserve tank.
2. If the coolant level is below the MIN mark, add
the specified coolant until it reaches the MAX
mark.
3. Inspect the cooling system for leaks.
Adding Coolant
1. Make sure the engine and radiator are cool.
2. Turn the radiator cap counterclockwise and
relieve any pressure in the coolant system. Do
not push the cap down when turning.
3. Push down and turn the radiator cap
counterclockwise to remove it.
4. The coolant level should be up to the base of the
filler neck. Add coolant if it is low.
5. Put the radiator cap back on, and tighten it fully.
6. Pour coolant into the reserve tank until it
reaches the MAX mark. Put the cap back on the
reserve tank.
4-cylinder models
6-cylinder models
Removing the radiator cap while the engine is hot can cause the coolant to
spray out, seriously scalding you.
Always let the engine and radiator cool down before removing the radiator
cap.
WARNING
If temperatures consistently below −22°F (−30°C) are expected, the coolant
mixture should be changed to a higher concentration. Consult a dealer for
more information.
Pour the fluid slowly and carefully so you do not spill any. Clean up any spills
immediately; they can damage components in the engine compartment.
NOTICE
NOTICE
Radiator cap Radiator cap
MAX
MIN
Reserve tank
Do not use engine antifreeze or a vinegar/water solution in the windshield
washer reservoir. Antifreeze can damage your vehicle’s paint. A vinegar/water
solution can damage the windshield washer pump.
NOTICE
Checking the Battery
The battery condition is monitored by the sensor on the negative terminal. If there
is a problem with the sensor, a message appears on multi-information display. Have
your vehicle checked by a dealer.
For jump starting the battery, see page 99.
WARNING: Battery posts, terminals, and related accessories contain lead and lead
compounds. Wash your hands after handling.The battery gives off explosive hydrogen gas during normal operation.
A spark or flame can cause the battery to explode with enough force to kill or
seriously hurt you.
When conducting any battery maintenance, wear protective clothing and a
face shield, or have a skilled technician do it.
WARNING
Window Washer Fluid
Check the amount of window washer fluid by looking at
the reservoir. Fill if it is low. Pour the washer fluid carefully.
Do not overflow the reservoir
Canadian models
If the washer fluid is low, a message appears on the multi-
information display.
Page 64 of 75
120 || 121
MAINTENANCE
MAINTENANCE
TABLE OF
CONTENTS
INDEX
VISUAL INDEX
VOICE COMMAND INDEX
SAFETY
INFORMATION
CLIENT
INFORMATION
INSTRUMENT PANEL
SPECIFICATIONS
VEHICLE
CONTROLS
MAINTENANCE
AUDIO AND
CONNECTIVITY
HANDLING THE UNEXPECTED
BLUETOOTH®
HANDSFREELINK®
DRIVING
ACURALINK®
NAVIGATION
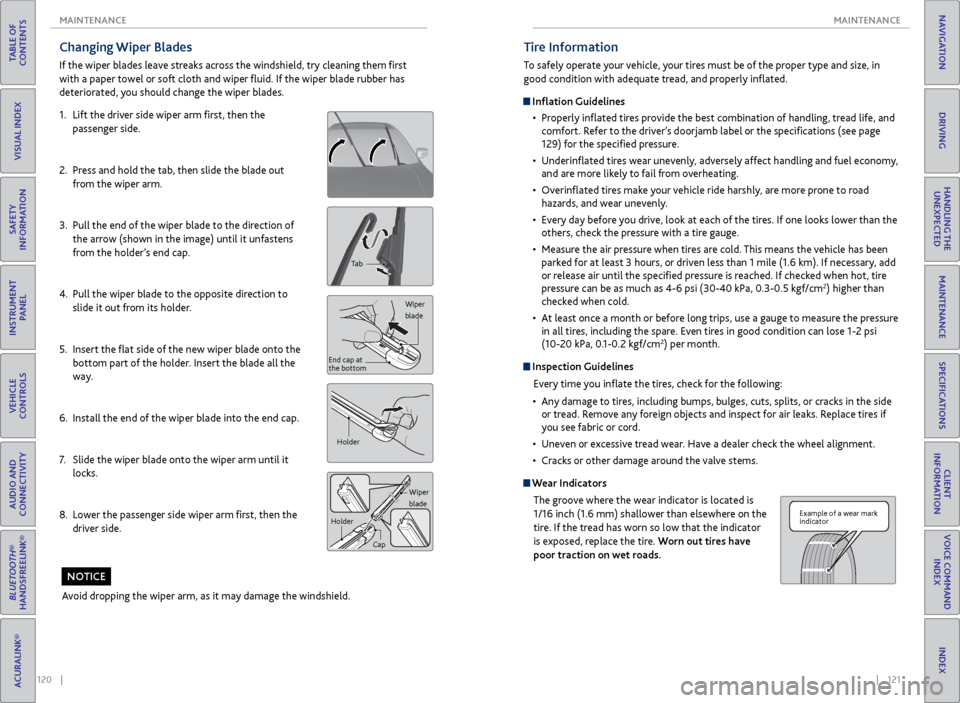
Changing Wiper Blades
If the wiper blades leave streaks across the windshield, try cleaning them first
with a paper towel or soft cloth and wiper fluid. If the wiper blade rubber has
deteriorated, you should change the wiper blades.
1. Lift the driver side wiper arm first, then the
passenger side.
2. Press and hold the tab, then slide the blade out
from the wiper arm.
3. Pull the end of the wiper blade to the direction of
the arrow (shown in the image) until it unfastens
from the holder’s end cap.
4. Pull the wiper blade to the opposite direction to
slide it out from its holder.
5. Insert the flat side of the new wiper blade onto the
bottom part of the holder. Insert the blade all the
way.
6. Install the end of the wiper blade into the end cap.
7. Slide the wiper blade onto the wiper arm until it
locks.
8. Lower the passenger side wiper arm first, then the
driver side.
Tab
Wiper
blade
End cap at
the bottom
Holder
Wiper
blade
Holder
Cap
Avoid dropping the wiper arm, as it may damage the windshield.
NOTICE
Tire Information
To safely operate your vehicle, your tires must be of the proper type and size, in
good condition with adequate tread, and properly inflated.
Inflation Guidelines• Properly inflated tires provide the best combination of handling, tread life, and
comfort. Refer to the driver’s doorjamb label or the specifications (see page
129) for the specified pressure.
• Underinflated tires wear unevenly, adversely affect handling and fuel economy,
and are more likely to fail from overheating.
• Overinflated tires make your vehicle ride harshly, are more prone to road
hazards, and wear unevenly.
• Every day before you drive, look at each of the tires. If one looks lower than the
others, check the pressure with a tire gauge.
• Measure the air pressure when tires are cold. This means the vehicle has been
parked for at least 3 hours, or driven less than 1 mile (1.6 km). If necessary, add
or release air until the specified pressure is reached. If checked when hot, tire
pressure can be as much as 4-6 psi (30-40 kPa, 0.3-0.5 kgf/cm
2) higher than
checked when cold.
• At least once a month or before long trips, use a gauge to measure the pressure
in all tires, including the spare. Even tires in good condition can lose 1-2 psi
(10-20 kPa, 0.1-0.2 kgf/cm
2) per month.
Inspection Guidelines
Every time you inflate the tires, check for the following:
• Any damage to tires, including bumps, bulges, cuts, splits, or cracks in the side
or tread. Remove any foreign objects and inspect for air leaks. Replace tires if
you see fabric or cord.
• Uneven or excessive tread wear. Have a dealer check the wheel alignment.
• Cracks or other damage around the valve stems.
Wear Indicators
The groove where the wear indicator is located is
1/16 inch (1.6 mm) shallower than elsewhere on the
tire. If the tread has worn so low that the indicator
is exposed, replace the tire. Worn out tires have
poor traction on wet roads.
Example of a wear mark
indicator
Page 69 of 75
130 || 131
CLIENT INFORMATION
SPECIFICATIONS
TABLE OF
CONTENTS
INDEX
VISUAL INDEX
VOICE COMMAND INDEX
SAFETY
INFORMATION
CLIENT
INFORMATION
INSTRUMENT PANEL
SPECIFICATIONS
VEHICLE
CONTROLS
MAINTENANCE
AUDIO AND
CONNECTIVITY
HANDLING THE UNEXPECTED
BLUETOOTH®
HANDSFREELINK®
DRIVING
ACURALINK®
NAVIGATION
Learn about information specific to you as an Acura client and how to get help.
Frequently Asked Questions/Troubleshooting
Below are some frequently asked questions and troubleshooting items that you
may have about the vehicle.
Q: How do I set the vehicle clock?
A: For vehicles without navigation, see page 40. For vehicles with navigation, the
time is automatically set using GPS signals.
Q: Why doesn’t the vehicle start when I press the ENGINE START/STOP button?
A: The brake pedal must be pressed to start the engine.
Q: What is the AUTO setting on my headlight lever?
A: When in the AUTO position, the vehicle’s exterior lights will automatically turn
on or off depending on the ambient lighting.
Q: Why won’t the driver’s door unlock when I grab the door handle, even though the
keyless access remote is within range?
A: If you pull the handle too quickly, the system may not have time to confirm the
door is unlocked. Wait to hear a beep to confirm the door is unlocked. If you are
wearing gloves, the system may be slow to respond.
Q: After my battery was disconnected or went dead, the audio system is asking for a
code. Where do I find this?
A: In most cases, you do not need to enter a code. Turn on the vehicle and the audio
system, and press and hold the power button until the system reactivates.
Q: Why can’t I select an item using the interface dial?*
A: To prevent driver distraction, certain items are limited are inoperable while the
vehicle is moving. Use voice commands or pull over to select the items.
Q: Where can I find the vehicle identification number (VIN)?
A: Check the label on the driver’s doorjamb.
Q: Why can’t I operate Pandora through the audio system?
A: Audio may be streaming through Bluetooth® Audio. Make sure Pandora mode
is selected and the phone cable is properly connected to the USB adapter. Some
phones may prompt you to “Allow” a connection.
CLIENT INFORMATION
*if equipped
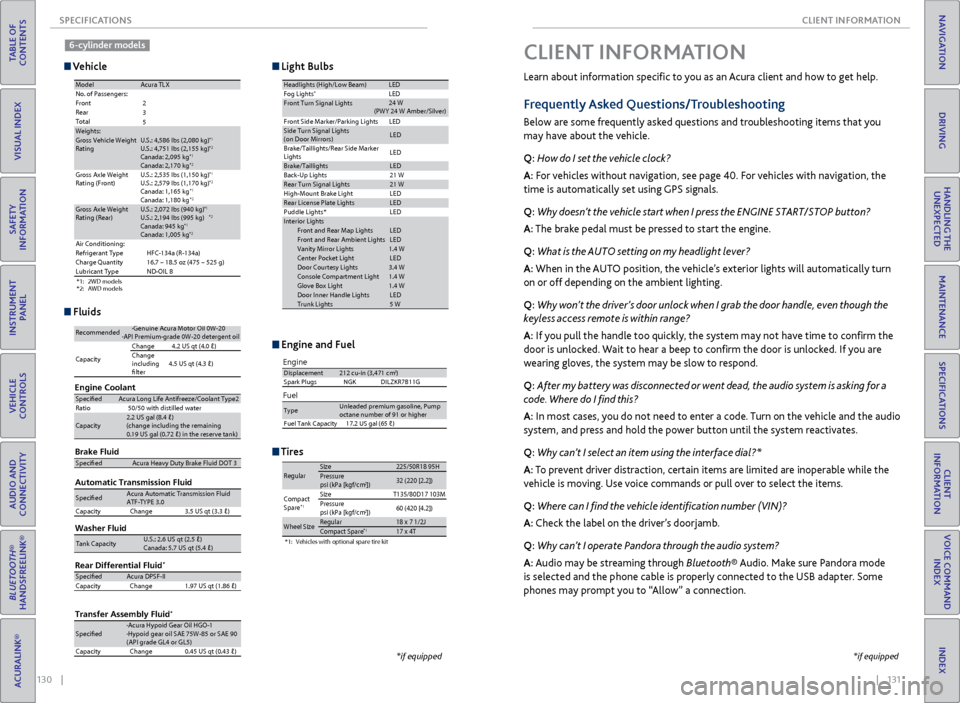
Vehicle
Engine and Fuel
Light Bulbs
Fluids
Tires
*1: 2WD models
*2: AWD models
ModelAcura TL XNo. of Passengers:
Front
Rear
Total
Weights:Gross Vehicle Weight
Rating U.S.: 4,586 lbs (2,080 kg)*1U.S.: 4,751 lbs (2,155 kg)*2Canada: 2,095 kg*1Canada: 2,170 kg*2Gross Axle Weight
Rating (Front )U.S.: 2,535 lbs (1,150 kg)*1U.S.: 2,579 lbs (1,170 kg)*2Canada: 1,165 kg*1Canada: 1,180 kg*2Gross Axle Weight
Rating (Rear)U.S.: 2,072 lbs (940 kg)*1U.S.: 2,194 lbs (995 kg)*2Canada: 945 kg*1Canada: 1,005 kg*2Air Conditioning:
Refrigerant Type HFC-134a (R-134a)
Charge Quantity 16.7 – 18.5 oz (475 – 525 g)
Lubricant Type ND-OIL 8
2
3
5
Headlights (High/Low Beam )LEDFog Lights*LEDFront Turn Signal Lights
Front Side Marker/Parking Lights LEDSide Turn Signal Lights
(on Door Mirrors)LE D
Brake/Taillights/Rear Side Marker
Light s LE
D
Brake/TaillightsLED
Back-Up Lights
Rear Turn Signal Lights21 W
High-M ount Brake Ligh t
Rear License Plate LightsLED
Puddle Lights * LED
In terior Light s
Front and Rear Map Lights LED
Front and Rear Ambient Lights LED
Vanity Mirror Lights 1.4 W
Center Pocket Light LED
Door Courtesy Light s3.4 W
Console Compartment Light 1.4 W
Glove Box Ligh t1 .4 W
Door Inner Handle Lights LED
Trunk Lights 5 W
21 W
LE D
24
W
(PWY 24 W Amber/Silver)
Brake Flui d
Automatic Transmission Flui dSpecifedAcura Heavy Duty B\krake \fluid DOT \b
SpecifedAcura Automatic Tra\knsmission \flui d
AT\f-TYPE \b. 0
Capacity Change \b.5 US qt (\b.\b�)
Engine Oil
Engine Coolan t
Recommended·Genuine Acura Mot\kor Oil 0W-2 0·API Premium-grade\k 0W-20 detergent o\ki l
Capacity Change
4.2 US qt (4.0 �)
Change
including
flter 4.5 US qt (4.\b �
)
SpecifedAcura Long Life An\ktifreeze/Coolant Ty\kpe2
Ratio 50/50 with distill\ked wate r
Capacity2.2 US gal (8.4 �)\k
(change including \kthe remaining
0.19 US gal (0.72 \k�) in the reserve \ktank )
Washer Fluid
Tank CapacityU.S.: 2.6 US qt (2\k.5 � )
Canada: 5.7 US qt \k(5.4 � )
Rear Differential Flui d*
Transfer Assembly Flui d*
SpecifedAcura DPS\f-II
Capacity Change 1.97 US qt (1.86 �\k)
Specifed·Acura Hypoid Gear\k Oil HGO-1
·Hypoid gear oil S\kAE 75W-85 or SAE 9 0
(API grade GL4 or \kGL5)
Capacity Change 0.45 US qt (0.4\b �)
Engine
Fuel
Displacement212 cu-in (3,471 cm3)
Spark Plugs NGKD ILZKR7B11G
TypeUnleaded premium gasoline, Pump
octane number of 91 or higher
Fuel Tank Capacity 17.2 US gal (65 �)
*1:Vehicles with optional spare tire kit
RegularSize225/50R 18 95HPressure
psi (kPa [kgf/cm2])32 (220 [2.2])
Compact
Spar e*1SizeT135/80D17 103M
Pressure
psi (kPa [kgf/cm
2]) 60
(420 [4.2])
Wheel SizeRegular18 x 7 1/2 JCompact Spar e*117 x 4T
*if equipped
6-cylinder models
Page 70 of 75

132 || 133
CLIENT INFORMATION
CLIENT INFORMATION
TABLE OF
CONTENTS
INDEX
VISUAL INDEX
VOICE COMMAND INDEX
SAFETY
INFORMATION
CLIENT
INFORMATION
INSTRUMENT PANEL
SPECIFICATIONS
VEHICLE
CONTROLS
MAINTENANCE
AUDIO AND
CONNECTIVITY
HANDLING THE UNEXPECTED
BLUETOOTH®
HANDSFREELINK®
DRIVING
ACURALINK®
NAVIGATION
Contact Us
Acura dealer personnel are trained professionals. They should be able to answer
all your questions. If you encounter a problem that your dealership does not solve
to your satisfaction, please discuss it with the dealership’s service manager or
general manager. If you are dissatisfied with the decision made by the dealership’s
management, contact Acura Client Relations/Services.
U.S. Owners:
American Honda Motor Co., Inc.
Acura Client Relations
1919 Torrance Blvd.
Mail Stop 500-2N-7E
Torrance, CA 90501-2746
Tel: (800) 382-2238
In Puerto Rico and
the U.S. Virgin Islands:
Bella International
P.O. Box 190816
San Juan, PR 00919-0816
Tel: (787) 620-7546 Canadian Owners:
Honda Canada, Inc.
Acura Client Services
180 Honda Blvd.
Markham, ON
L6C 0H9
Tel: (888) 922-8729
Fax: (877) 939-0909
E-Mail: [email protected]
Q: Is my phone compatible with Bluetooth features?
A:
Visit www.acura.com/handsfreelink (U.S) or www.handsfreelink.ca (Canada) to
check phone compatibility for Bluetooth® Audio, Bluetooth® HandsFreeLink®, and
SMS text messaging.
Q: Every time I press the Talk button, the system gives me voice prompts. Can I turn
these off?*
A: Press SETTINGS. Use the interface dial to select System Settings then Voice
Prompt. Select Off.
When you call or write, please give us the following information:
• Vehicle Identification Number
• Date of purchase
• Odometer reading of your vehicle
• Your name, address, and telephone number
• A detailed description of the problem
• Name of the dealer who sold the vehicle to you
*if equipped
Acura Total Luxury Care Roadside Assistance
Your Acura TLC Roadside Assistance representative is here to help you 24 hours a
day, 7 days a week by calling (800) 594-8500 (U.S.) or (800) 565-7587 (Canada).
Under your 4-year/50,000-mile (80,000 km) warranty, the following benefits are
available:
• Towing services — full cost of towing to the closest Acura dealer
• Roadside assistance — jump starting, fuel delivery, lockout, and flat tire
• Trip planning — detailed trip routing, emergency services, and more
Warranty Coverages
Below is a brief summary of the warranties covering your new vehicle.
New Vehicle Limited Warranty: Covers your new vehicle, except for the emissions
control system and accessories, against defects in materials and workmanship.
Emissions Control Systems Defects Warranty and Emissions Performance
Warranty: Covers your vehicle’s emissions control systems. Time, mileage, and
coverage are conditional.
Seat Belt Limited Warranty: Covers seat belts that fail to function properly.
Rust Perforation Limited Warranty: Covers all exterior body panels that rust
through from the inside.
Accessory Limited Warranty: Covers Acura accessories.
Replacement Parts Limited Warranty: Covers all Acura replacement parts against
defects in materials and workmanship.
Replacement Battery Limited Warranty: Provides prorated coverage for a
replacement battery purchased from an Acura dealer.
Replacement Muffler Lifetime Limited Warranty: Covers a replacement muffler
for the duration of the ownership.
Restrictions and exclusions apply to all these warranties. See the Owner
Information CD or visit owners.acura.com (U.S.) or www.myacura.ca (Canada)
for complete descriptions of each warranty, including time, mileage, and other
conditional limitations.
Your vehicle’s original tires are covered by their manufacturer. Tire warranty
information can be found on the Owner Information CD or owners.acura.com (U.S.)
or www.myacura.ca (Canada).
Page 73 of 75

138 || 139
VOICE COMMAND INDEX
VOICE COMMAND INDEX
TABLE OF
CONTENTS
INDEX
VISUAL INDEX
VOICE COMMAND INDEX
SAFETY
INFORMATION
CLIENT
INFORMATION
INSTRUMENT PANEL
SPECIFICATIONS
VEHICLE
CONTROLS
MAINTENANCE
AUDIO AND
CONNECTIVITY
HANDLING THE UNEXPECTED
BLUETOOTH®
HANDSFREELINK®
DRIVING
ACURALINK®
NAVIGATION
AUX Commands
• Auxiliary play
Song By Voice™ Commands
Available for tracks stored on the HDD or iPod®.
• Music search
• What/Who am I listening to?
• Who is this? •
What’s playing?
• Who’s playing?
• What album is this?
Phone Commands
The system accepts these commands on the Voice Portal screen.
• Dial by number
• Dial by voice tag
• Dial (number)
• Dial (contact name)
On-screen Commands
The system accepts these commands on any screen where applicable. All
available on-screen voice commands are highlighted in yellow when you press
the Talk button.
Info CommandsThe system accepts these commands on the Info screen.
• AcuraLink messages
• Trip computer
• Traffic information
• Display clock/wallpaper
•
Next (or Down)
• Previous (or Up)
• OK
• Delete
•
iPod play
• iPod play track # (#: 1-30)
• iPod skip forward
• iPod skip back
• iPod track shuffle*
• iPod album shuffle*
• iPod track repeat* •
iPod normal play
• What/Who am I listening to?
• Who is this?
• What’s playing?
• Who’s playing?
• What album is this?
USB Commands
• USB play
• USB play track # (#: 1 to 30)
• USB skip forward
• USB skip back
• USB track random*
• USB track repeat*
• USB track scan* •
USB folder up
• USB folder down
• USB folder random*
• USB folder repeat*
• USB folder scan*
• USB normal play
iPod® Commands
• Pandora play
• Pandora skip forward
• Pandora station up
• Pandora station down
• Pandora pause •
Pandora resume
• Pandora thumbs up
• Pandora thumbs down
Pandora® Commands
• Aha radio play
• Aha radio skip forward
• Aha radio skip back
• Aha radio station up
• Aha radio station down •
Aha radio pause
• Aha radio resume
• Aha radio like
• Aha radio dislike
Aha Radio™ Commands
Bluetooth® Audio Commands
Commands may not work on some phones or devices.
• Bluetooth audio play
• Bluetooth audio skip forward
• Bluetooth audio skip back
• Bluetooth audio pause
• Bluetooth audio resume •
Bluetooth audio group up
• Bluetooth audio group down
• Bluetooth audio track random
• Bluetooth audio track repeat
* These commands toggle the function on and off, so
the command may not match your intended action.