coolant temperature Acura TLX 2015 Owner's Guide
[x] Cancel search | Manufacturer: ACURA, Model Year: 2015, Model line: TLX, Model: Acura TLX 2015Pages: 75, PDF Size: 24.55 MB
Page 54 of 75

100 || 101
HANDLING THE UNEXPECTED
HANDLING THE UNEXPECTED
TABLE OF
CONTENTS
INDEX
VISUAL INDEX
VOICE COMMAND INDEX
SAFETY
INFORMATION
CLIENT
INFORMATION
INSTRUMENT PANEL
SPECIFICATIONS
VEHICLE
CONTROLS
MAINTENANCE
AUDIO AND
CONNECTIVITY
HANDLING THE UNEXPECTED
BLUETOOTH®
HANDSFREELINK®
DRIVING
ACURALINK®
NAVIGATION
WARNING: Battery posts, terminals, and related accessories contain lead and lead
compounds. Wash your hands after handling.
After the Engine Starts
Once your vehicle’s engine has started, remove the jumper cables in the following
order:
1. Disconnect the jumper cable from your vehicle’s ground.
2. Disconnect the other end of the jumper cable from the booster battery (-)
terminal.
3. Disconnect the jumper cable from your vehicle’s battery (+) terminal.
4. Disconnect the other end of the jumper cable from the booster battery (+)
terminal.
Have your vehicle inspected by a nearby service station or a dealer. A battery can explode if you do not follow the correct procedure, seriously
injuring anyone nearby.
Keep all sparks, open flames, and smoking materials away from the battery.
WARNING
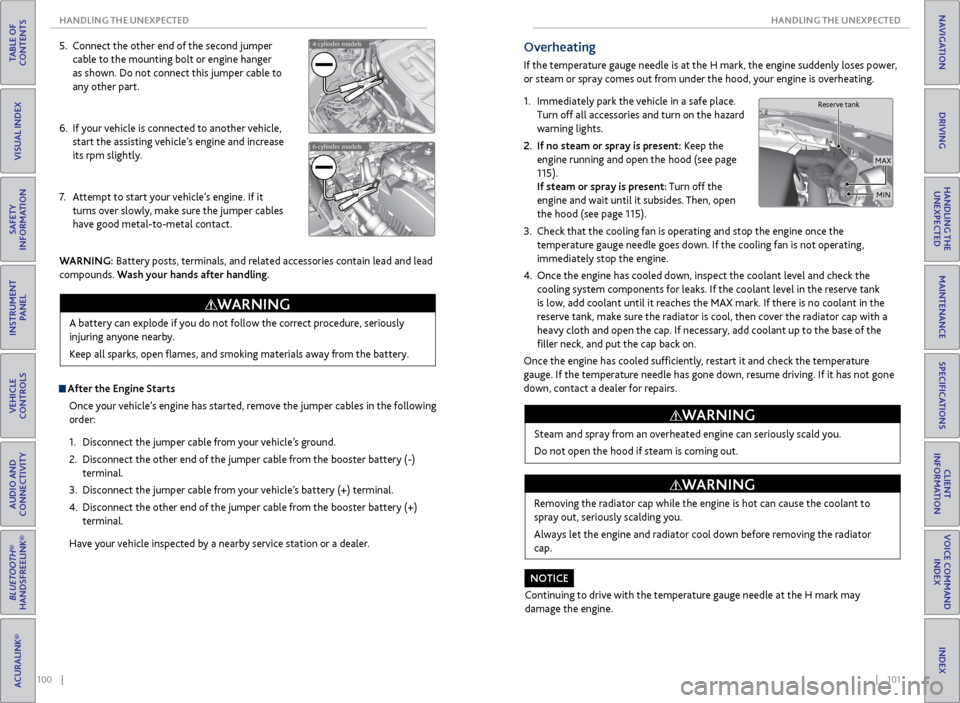
5.
Connect the other end of the second jumper
cable to the mounting bolt or engine hanger
as shown. Do not connect this jumper cable to
any other part.
6. If your vehicle is connected to another vehicle,
start the assisting vehicle’s engine and increase
its rpm slightly.
7. Attempt to start your vehicle’s engine. If it
turns over slowly, make sure the jumper cables
have good metal-to-metal contact.4-cylinder models
6-cylinder models
Overheating
If the temperature gauge needle is at the H mark, the engine suddenly loses power,
or steam or spray comes out from under the hood, your engine is overheating.
1. Immediately park the vehicle in a safe place.
Turn off all accessories and turn on the hazard
warning lights.
2. If no steam or spray is present: Keep the
engine running and open the hood (see page
115).
If steam or spray is present: Turn off the
engine and wait until it subsides. Then, open
the hood (see page 115).
3. Check that the cooling fan is operating and stop the engine once the
temperature gauge needle goes down. If the cooling fan is not operating,
immediately stop the engine.
4. Once the engine has cooled down, inspect the coolant level and check the
cooling system components for leaks. If the coolant level in the reserve tank
is low, add coolant until it reaches the MAX mark. If there is no coolant in the
reserve tank, make sure the radiator is cool, then cover the radiator cap with a
heavy cloth and open the cap. If necessary, add coolant up to the base of the
filler neck, and put the cap back on.
Once the engine has cooled sufficiently, restart it and check the temperature
gauge. If the temperature needle has gone down, resume driving. If it has not gone
down, contact a dealer for repairs.
Reserve tank
MAXMIN
Steam and spray from an overheated engine can seriously scald you.
Do not open the hood if steam is coming out.
WARNING
Removing the radiator cap while the engine is hot can cause the coolant to
spray out, seriously scalding you.
Always let the engine and radiator cool down before removing the radiator
cap.
WARNING
Continuing to drive with the temperature gauge needle at the H mark may
damage the engine.
NOTICE
Page 63 of 75

118 || 119
MAINTENANCE
MAINTENANCE
TABLE OF
CONTENTS
INDEX
VISUAL INDEX
VOICE COMMAND INDEX
SAFETY
INFORMATION
CLIENT
INFORMATION
INSTRUMENT PANEL
SPECIFICATIONS
VEHICLE
CONTROLS
MAINTENANCE
AUDIO AND
CONNECTIVITY
HANDLING THE UNEXPECTED
BLUETOOTH®
HANDSFREELINK®
DRIVING
ACURALINK®
NAVIGATION
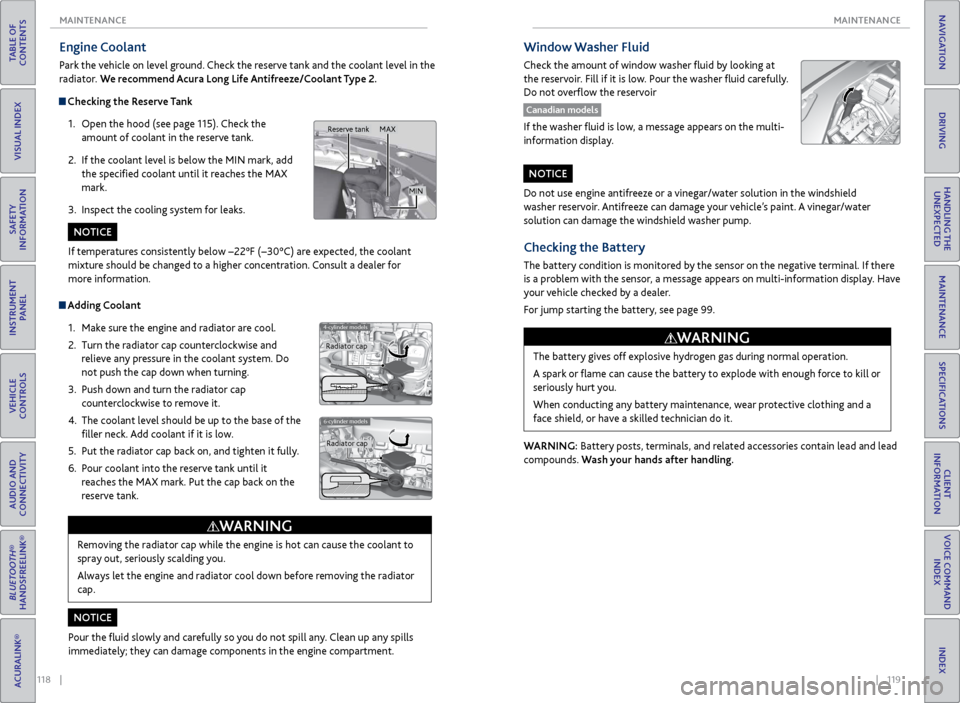
Engine Coolant
Park the vehicle on level ground. Check the reserve tank and the coolant level in the
radiator. We recommend Acura Long Life Antifreeze/Coolant Type 2.
Checking the Reserve Tank
1. Open the hood (see page 115). Check the
amount of coolant in the reserve tank.
2. If the coolant level is below the MIN mark, add
the specified coolant until it reaches the MAX
mark.
3. Inspect the cooling system for leaks.
Adding Coolant
1. Make sure the engine and radiator are cool.
2. Turn the radiator cap counterclockwise and
relieve any pressure in the coolant system. Do
not push the cap down when turning.
3. Push down and turn the radiator cap
counterclockwise to remove it.
4. The coolant level should be up to the base of the
filler neck. Add coolant if it is low.
5. Put the radiator cap back on, and tighten it fully.
6. Pour coolant into the reserve tank until it
reaches the MAX mark. Put the cap back on the
reserve tank.
4-cylinder models
6-cylinder models
Removing the radiator cap while the engine is hot can cause the coolant to
spray out, seriously scalding you.
Always let the engine and radiator cool down before removing the radiator
cap.
WARNING
If temperatures consistently below −22°F (−30°C) are expected, the coolant
mixture should be changed to a higher concentration. Consult a dealer for
more information.
Pour the fluid slowly and carefully so you do not spill any. Clean up any spills
immediately; they can damage components in the engine compartment.
NOTICE
NOTICE
Radiator cap Radiator cap
MAX
MIN
Reserve tank
Do not use engine antifreeze or a vinegar/water solution in the windshield
washer reservoir. Antifreeze can damage your vehicle’s paint. A vinegar/water
solution can damage the windshield washer pump.
NOTICE
Checking the Battery
The battery condition is monitored by the sensor on the negative terminal. If there
is a problem with the sensor, a message appears on multi-information display. Have
your vehicle checked by a dealer.
For jump starting the battery, see page 99.
WARNING: Battery posts, terminals, and related accessories contain lead and lead
compounds. Wash your hands after handling.The battery gives off explosive hydrogen gas during normal operation.
A spark or flame can cause the battery to explode with enough force to kill or
seriously hurt you.
When conducting any battery maintenance, wear protective clothing and a
face shield, or have a skilled technician do it.
WARNING
Window Washer Fluid
Check the amount of window washer fluid by looking at
the reservoir. Fill if it is low. Pour the washer fluid carefully.
Do not overflow the reservoir
Canadian models
If the washer fluid is low, a message appears on the multi-
information display.
Page 68 of 75

128 || 129
SPECIFICATIONS
MAINTENANCE
TABLE OF
CONTENTS
INDEX
VISUAL INDEX
VOICE COMMAND INDEX
SAFETY
INFORMATION
CLIENT
INFORMATION
INSTRUMENT PANEL
SPECIFICATIONS
VEHICLE
CONTROLS
MAINTENANCE
AUDIO AND
CONNECTIVITY
HANDLING THE UNEXPECTED
BLUETOOTH®
HANDSFREELINK®
DRIVING
ACURALINK®
NAVIGATION
Testing of Readiness Codes
Your vehicle has “Readiness Codes” as part of the onboard self-diagnostic system.
Some states refer to these codes as a test to see if your vehicle’s emissions
components are working properly. The codes may not be read if you go through the
testing just after the battery has gone dead or been disconnected.
To check if they are set, set the power mode to ON without starting the engine.
The malfunction indicator lamp will come on for several seconds. If it goes off, the
readiness codes are set. If it blinks five times, the readiness codes are not set.
If you are required to have your vehicle tested before the readiness codes are set,
prepare the vehicle for retesting by doing the following:
1. Fill the gas tank to approximately 3/4 full.
2. Park the vehicle and leave the engine off for 6 hours or more.
3. Make sure the ambient temperature is between 40°F and 95°F (4°C and 35°C).
4. Start the engine without touching the accelerator pedal, and let it idle for 20
seconds.
5. Keep the vehicle in Park. Increase the engine speed to 2,000 rpm, and hold it
there for about 3 minutes.
6. Let the engine idle with your foot off the accelerator for 20 seconds.
7. Select a nearby, lightly traveled major highway where you can maintain a speed
of 50 to 60 mph (80 to 97 km/h) for at least 20 minutes. Drive on the highway
with the vehicle in Drive. Do not use cruise control. When traffic allows, drive
for 90 seconds without using the accelerator pedal. (Vehicle speed may vary
slightly; this is OK.) If you cannot do this for a continuous 90 seconds because of
traffic conditions, drive for at least 30 seconds, then repeat two more times (for
a total of 90 seconds).
8. Drive in city/suburban traffic for at least 10 minutes. When traffic conditions
allow, let the vehicle coast for several seconds without using the accelerator
pedal or the brake pedal.
9. Park the vehicle and leave the engine off for 30 minutes.
The readiness codes are erased when the battery is disconnected, and set again
only after several days of driving under a variety of conditions.
If a testing facility determines that the readiness codes are not set, you may be
requested to return at a later date to complete the test, or see your dealer.
Vehicle
Engine and Fuel
Light Bulbs
Fluids
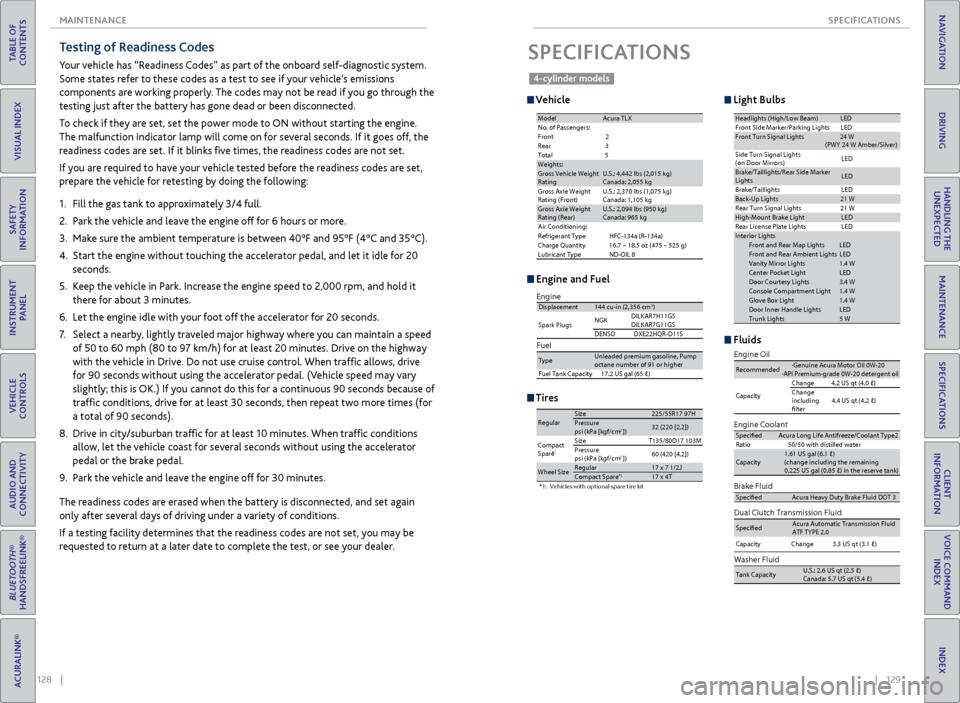
SPECIFICATIONS
Tires
ModelAcura TL XNo. of Passengers:
Front 2
Rear 3
Tota l5
Weights :Gross Vehicle Weight
Rating U.S.: 4,442 lbs (2,015 kg )
Canada: 2,055 kg
Gross Axle Weight
Rating (Front)U.S.: 2,370 lbs (1,075 kg )
Canada: 1,105 kg
Gross Axle Weight
Rating (Rear )U.S.: 2,094 lbs (950 kg )
Canada: 965 kg
Air Conditioning:
Refrigerant Type HFC-134a (R-134a)
Charge Quantity 16.7 – 18.5 oz (475 – 525 g)
Lubricant Type ND-OIL 8
Headlights (High/Low Beam )LEDFront Side Marker/Parking Lights LEDFront Turn Signal Lights 24 W
(PWY 24 W Amber/Silver)
Side Turn Signal Lights
(on Door Mirrors) LE
D
Brake/Taillights/Rear Side Marker
Light s LE
D
Brake/Taillights
Back-Up Lights21 W
Rear Turn Signal Lights
High-M ount Brake Ligh tLED
Rear License Plate Lights
In terior Light sFront and Rear Map LightsLEDFront and Rear Ambient Light sLEDVanity Mirror Lights1.4 WCenter Pocket LightLEDDoor Courtesy Lights3.4 WConsole Compartment Ligh t1.4 WGlove Box Ligh t1.4 WDoor Inner Handle LightsLEDTrunk Lights5 W
LE D
LE D
21
W
Brake Fluid
Dual Clutch Transmission Fluid
Specife dAcura Heavy Duty B\krake \fluid DOT \b
SpecifedAcura Automatic Tra\knsmission \fluid
AT\f TYPE 2.0
Engine Oi l
Engine Coolan
t
Recommended·Genuine Acura Mot\kor Oil 0W-2 0
·API Premium-grade\k 0W-20 detergent oi\k l
Capacity Change
4.2 US qt (4.0 �)
Change
including
flter 4.4 US qt (4.2 �
)
SpecifedAcura Long Life An\ktifreeze/Coolant Ty\kpe2
Ratio 50/50 with distill\ked wate r
Capacity \k Change \k \b.\b US \kqt (\b.1 �)
Capacity
1.61 US gal (6.1 �\k)
(change including \kthe remaining
0.225 US gal (0.85 �\k) in the reserve t\kank )
Washer Fluid
Tank CapacityU.S.: 2.6 US qt (2.5\k � )
Canada: 5.7 US qt \k(5.4 � )
Fuel
Displacement144 cu-in (2,356 cm3)
Spark Plugs NG
K DILKAR7H11GS
DILKAR7G11GS
DENSO DXE22HQR-D11 S
TypeUnleaded premium gasoline, Pump
octane number of 91 or higher
Fuel Tank Capacity 17.2 US gal (65 �)
Engine
*1:Vehicles with optional spare tire kit
RegularSize225/55R 17 97HPressure
psi (kPa [kgf/cm2])32 (220 [2.2])
Compact
Spar e*1SizeT135/80D17 103M
Pressure
psi (kPa [kgf/cm
2]) 60
(420 [4.2])
Wheel SizeRegular17 x 7 1/2 JCompact Spar e*117 x 4T
4-cylinder models