engine Acura TLX 2015 Owner's Guide
[x] Cancel search | Manufacturer: ACURA, Model Year: 2015, Model line: TLX, Model: Acura TLX 2015Pages: 75, PDF Size: 24.55 MB
Page 3 of 75
TABLE OF CONTENTS
Acura Total Luxury Care Roadside AssistanceYour Acura TLC Roadside Assistance representative is here to help you 24 hours
a day, 7 days a week. Under your 4-year/50,000-mile (80,000 km) warranty, the
following benefits are available:
• Towing services — full cost of towing to the closest Acura dealer
• Roadside assistance — jump starting, fuel delivery, lockout, and flat tire
• Trip planning — detailed trip routing, emergency services, and more
Call (800) 594-8500 (U.S.) or (800) 565-7587 (Canada)
Acura Client RelationsYour authorized Acura dealer should be able to answer any questions you have
about your vehicle. However, if you are dissatisfied with the information you
receive, you can call Acura Client Relations (see page 132).
Call (800) 382-2238 (U.S.) or (888) 922-8729 (Canada)
INTRODUCTION
This Owner’s Guide is intended to help you quickly get acquainted with your
2015 Acura TLX. It provides basic information and instructions on technology and
convenience features, as well as emergency procedures and how to get assistance.
This guide is for vehicles sold in the United States and Canada. It covers all TLX
models, so you may find descriptions of features and equipment that are not in
your vehicle.
Images throughout this guide are from U.S. vehicles and represent features and
equipment that are available on some, but not all, models. Images shown in this
guide should be considered examples and used for demonstration purposes only.
This guide is not intended to be a substitute for the Owner’s Manual. The Owner
Information CD enclosed in your glove box kit includes the Owner’s Manual,
Navigation Manual, Consumer Information Book, and vehicle and tire warranties
in electronic format. This information can be viewed on a computer (PC or Mac
platform) and saved or printed for your reference. You can also visit owners.acura.
com to view the complete and most current information.
If you are the first registered owner of your vehicle, you may request a
complimentary printed copy of the Owner’s Manual, Navigation Manual, Vehicle
Warranty, or Consumer Information Book. To request a copy, visit owners.acura.
com and create or log in to your account. In Canada, please request a copy from
your Acura dealer.
American Honda Motor Company strives to be proactive in protecting our
environment and natural resources. By using electronic delivery for a considerable
portion of the information typically found in a vehicle owner’s manual, we are
further reducing our impact on the environment. VISUAL INDEX ...................................
1
Steering Wheel and Nearby
Controls .............................................. 1
Dashboard and Ceiling Controls ..... 2
SAFETY INFORMATION .................. 3
Important Safety Information ....... 3
Seat Belts ........................................... 5
Airbags ............................................... 8
Child Safety .................................... 14
Safety Label Locations .................. 20
Reporting Safety Defects ............... 21
INSTRUMENT P ANEL .................... 22
Malfunction Indicators .................. 22
Condition Indicators ...................... 24
On/Off Indicators .......................... 25
Multi-Information Display ........... 26
VEHICLE CONTROLS ..................... 27
Using the Remote Transmitter ..... 27
Keyless Access System .................. 28
Door Operation from Inside the
Vehicle ............................................. 29
Power Window Operation ............ 30
Power Moonroof Operation .........31
Interior and Exterior Lights ...........32
One-Touch Turn Signal .................. 33
Wiper Operation ............................ 33
Adjusting the Seats ........................ 35
Driving Position Memory System ... 37
Adjusting the Steering Wheel ...... 38
Adjusting the Mirrors .....................39
Customized Features ..................... 40
HomeLink® Garage Opener .......... 41
Climate Control System ................42
Seat Heaters and Ventilation* ..... 43AUDIO AND CONNECTIVITY ......
44
Basic Audio Operation ................... 44
FM/AM Radio .................................. 47
SiriusXM® Radio ............................. 48
Compact Disc (CD) ........................ 49
iPod® or USB Flash Drive .............. 50
Bluetooth® Audio ............................ 51
Hard Disc Drive (HDD) Audio* .... 52
Pandora® ......................................... 53
AcuraLink featuring Aha™ ............ 54
BLUETOOTH® HANDSFREELINK ® ... 55
Basic HFL Operation ...................... 55
Pairing a Phone ............................... 57
Making a Call .................................. 58
SMS Text Messaging and E-Mail ... 61
A CURALINK
®* ................................. 62
AcuraLink Messages ....................... 62
Subscription Features .................... 63
NAVIGATION* ............................... 65
Basic Navigation Operation ......... 65
Entering a Destination .................. 68
Routing ............................................ 70
DRIVING .......................................... 72
Before Driving ................................. 72
Maximum Load Limit ..................... 73
Remote Engine Start* .................... 75
Starting to Drive ............................. 76
Shifting ............................................. 77
Braking ............................................. 81
Auto Idle Stop* ............................... 83
Integrated Dynamics System (IDS) ... 84
Vehicle Stability Assist (VSA®), aka
Electronic Stability Control (ESC)
System ............................................. 84
*if equipped
TABLE OF
CONTENTS
INDEX
VISUAL INDEX
VOICE COMMAND INDEX
SAFETY
INFORMATION
CLIENT
INFORMATION
INSTRUMENT PANEL
SPECIFICATIONS
VEHICLE
CONTROLS
MAINTENANCE
AUDIO AND
CONNECTIVITY
HANDLING THE UNEXPECTED
BLUETOOTH®
HANDSFREELINK®
DRIVING
ACURALINK®
NAVIGATION
Page 4 of 75
| 1
VISUAL INDEX
TABLE OF
CONTENTS
INDEX
VISUAL INDEX
VOICE COMMAND INDEX
SAFETY
INFORMATION
CLIENT
INFORMATION
INSTRUMENT PANEL
SPECIFICATIONS
VEHICLE
CONTROLS
MAINTENANCE
AUDIO AND
CONNECTIVITY
HANDLING THE UNEXPECTED
BLUETOOTH®
HANDSFREELINK®
DRIVING
ACURALINK®
NAVIGATION
Cruise Control ................................ 85
Adaptive Cruise Control (ACC) with
Low Speed Follow (LSF)* .............. 86
Forward Collision Warning (FCW)
with Pedestrian Detection* .......... 88
Lane Departure Warning (LDW)* ... 89
Lane Keeping Assist System
(LKAS)* ............................................ 90
Collision Mitigation Braking
System™ (CMBS™)* ...................... 91
Road Departure Mitigation (RDM)
System* ........................................... 92
Blind Spot Information (BSI)
System* ........................................... 93
Parking Sensor System* ................ 94
Super Handling-All Wheel Drive
(AWD)* ............................................ 94
Multi-View Rear Camera ............... 95
Cross Traffic Monitor* ................... 96
Refueling ......................................... 97
HANDLING THE UNEXPECTED ...98
Keyless Access Remote Battery
Strength ........................................... 98
Shift Lever Does Not Move* ........ 98
Jump Starting .................................. 99
Overheating ................................... 101
Emergency Engine Stop ............... 102
Emergency Towing ....................... 102
Tire Pressure Monitoring System
(TPMS) ........................................... 103
Tire Repair Kit* ............................. 104Changing a Flat Tire .....................
105
Fuse Locations .............................. 108
MAINTENANCE ............................. 111
Safety Precautions ........................ 111
Maintenance Minder™ ................. 112
Under the Hood ............................. 114
Engine Oil ....................................... 116
Engine Coolant .............................. 118
Window Washer Fluid .................. 119
Checking the Battery .................... 119
Changing Wiper Blades ............... 120
Tire Information ............................ 121
Tire Labeling .................................. 124
DOT Tire Quality Grading ........... 125
Tire Pressure Monitoring System
(TPMS) - Required Federal
Explanation .................................... 127
Testing of Readiness Codes ........ 128
SPECIFICATIONS ......................... 129
CLIENT INFORMATION ............... 131
Frequently Asked Questions/
Troubleshooting ............................ 131
Contact Us .................................... 132
Acura Total Luxury Care Roadside
Assistance ..................................... 133
Warranty Coverages .................... 133
V OICE COMMAND INDEX ......... 134
INDEX ............................................ 140
*if equipped
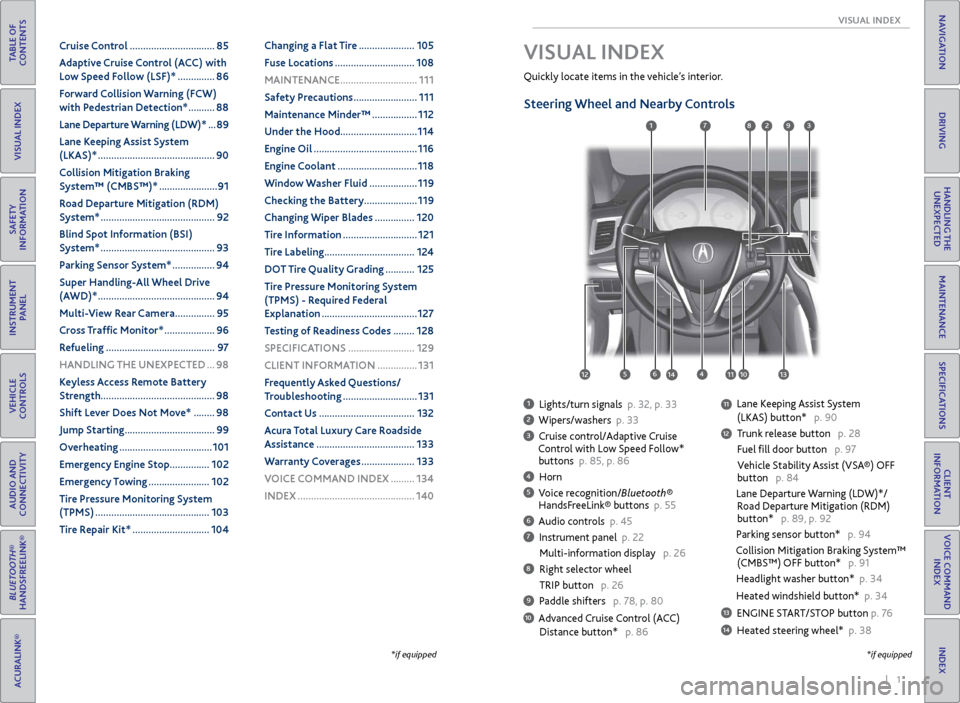
1 Lights/turn signals p. 32, p. 33
2 Wipers/washers p. 33
3 Cruise control/Adaptive Cruise
Control with Low Speed Follow*
buttons p. 85, p. 86
4 Horn
5 Voice recognition/Bluetooth®
HandsFreeLink® buttons p. 55
6 Audio controls p. 45
7 Instrument panel p. 22
Multi-information display p. 26
8 Right selector wheel
TRIP button p. 26
9 Paddle shifters p. 78, p. 80
10 Advanced Cruise Control (ACC)
Distance button* p. 86
Quickly locate items in the vehicle’s interior.
Steering Wheel and Nearby Controls
Lane Keeping Assist System
(LKAS) button* p. 90
Trunk release button p. 28
Fuel fill door button p. 97
Vehicle Stability Assist (VSA®) OFF
button p. 84
Lane Departure Warning (LDW)*/
Road Departure Mitigation (RDM)
button* p. 89, p. 92
Parking sensor button* p. 94
Collision Mitigation Braking System™
(CMBS™) OFF button* p. 91
Headlight washer button* p. 34
Heated windshield button* p. 34
13 ENGINE START/STOP button p. 76
14 Heated steering wheel* p. 38
VISUAL INDEX
*if equipped
1
1011
27
4
8
13
12
125614
93
11
Page 6 of 75
4 || 5
SAFETY
SAFETY
TABLE OF
CONTENTS
INDEX
VISUAL INDEX
VOICE COMMAND INDEX
SAFETY
INFORMATION
CLIENT
INFORMATION
INSTRUMENT PANEL
SPECIFICATIONS
VEHICLE
CONTROLS
MAINTENANCE
AUDIO AND
CONNECTIVITY
HANDLING THE UNEXPECTED
BLUETOOTH®
HANDSFREELINK®
DRIVING
ACURALINK®
NAVIGATION
Carbon Monoxide Gas
The engine exhaust from this vehicle contains carbon monoxide, a colorless,
odorless, and highly toxic gas. As long as you properly maintain your vehicle and
follow the instructions set forth below, you will not accumulate dangerous levels
of carbon monoxide gas in the vehicle interior.
Have the exhaust system inspected for leaks whenever:
• The exhaust system is making an unusual noise.
• The exhaust system may have been damaged.
• The vehicle is raised for an oil change.
When you operate a vehicle with the trunk open, airflow can pull exhaust gas into
the interior and create a hazardous condition. If you must drive with the trunk
open, open all the windows and set the climate control system as shown below.
1. Select the fresh air mode.
2. Select the
mode.
3. Set the fan speed to high.
4. Set the temperature control to a comfortable setting.
Adjust the climate control system in the same manner if you sit in your parked
vehicle with the engine running.
Carbon monoxide gas is toxic. Breathing it can cause unconsciousness and
even kill you.
Avoid any enclosed areas or activities that expose you to carbon monoxide.
WARNING
An enclosed area such as a garage can quickly fill up with carbon monoxide gas.
Do not run the engine with the garage door closed. Even when the garage door is
open, drive out of the garage immediately after starting the engine.
Seat Belts
A seat belt is your best protection in all types of collisions. Airbags are designed to
supplement seat belts, not replace them. So even though your vehicle is equipped
with airbags, make sure you and your passengers always wear your seat belts and
wear them properly.
Lap/Shoulder Seat BeltsAll five seating positions are equipped with lap/shoulder seat belts with
emergency locking retractors. In normal driving, the retractor lets you move
freely while keeping some tension on the belt. During a collision or sudden stop,
the retractor locks to restrain your body. The front passenger’s and rear seat belts
also have a lockable retractor for use with child seats.
The front seats are equipped with automatic seat belt tensioners to enhance
safety. The tensioners automatically tighten the front seat belts during a
moderate-to-severe front collision, sometimes even if the collision is not severe
enough to inflate the front airbags or the driver’s knee airbag.
Proper Use of Seat BeltsFollow these guidelines for proper use:
• All occupants should sit upright, well back in the seat, and remain in that
position for the duration of the trip. Slouching and leaning reduces the
effectiveness of the belt and can increase the chance of serious injury in a crash.
• Never place the shoulder part of a lap/shoulder seat belt under your arm or
behind your back. This could cause very serious injuries in a crash.
• Two people should never use the same seat belt. If they do, they could be very
seriously injured in a crash.
• Do not put any accessories on the seat belts. Devices intended to improve
comfort or reposition the shoulder part of a seat belt can reduce the protective
capability and increase the chance of serious injury in a crash.
• No one should sit in a seat with an inoperative seat belt or one that does not
appear to be working correctly. Using a seat belt that is not working properly
may not protect the occupant in a crash. Have a dealer check the belt as soon
as possible.
Not wearing a seat belt properly increases the chance of a serious injury or
death in a crash, even though your vehicle has airbags.
Be sure you and your passengers always wear seat belts and wear them
properly.
WARNING
Page 15 of 75
22 || 23
INSTRUMENT P
ANEL
INSTRUMENT P ANEL
TABLE OF
CONTENTS
INDEX
VISUAL INDEX
VOICE COMMAND INDEX
SAFETY
INFORMATION
CLIENT
INFORMATION
INSTRUMENT PANEL
SPECIFICATIONS
VEHICLE
CONTROLS
MAINTENANCE
AUDIO AND
CONNECTIVITY
HANDLING THE UNEXPECTED
BLUETOOTH®
HANDSFREELINK®
DRIVING
ACURALINK®
NAVIGATION
Indicators briefly appear with each engine start and then go out. Red and amber
indicators are most critical. Blue and green indicators are used for general
information.
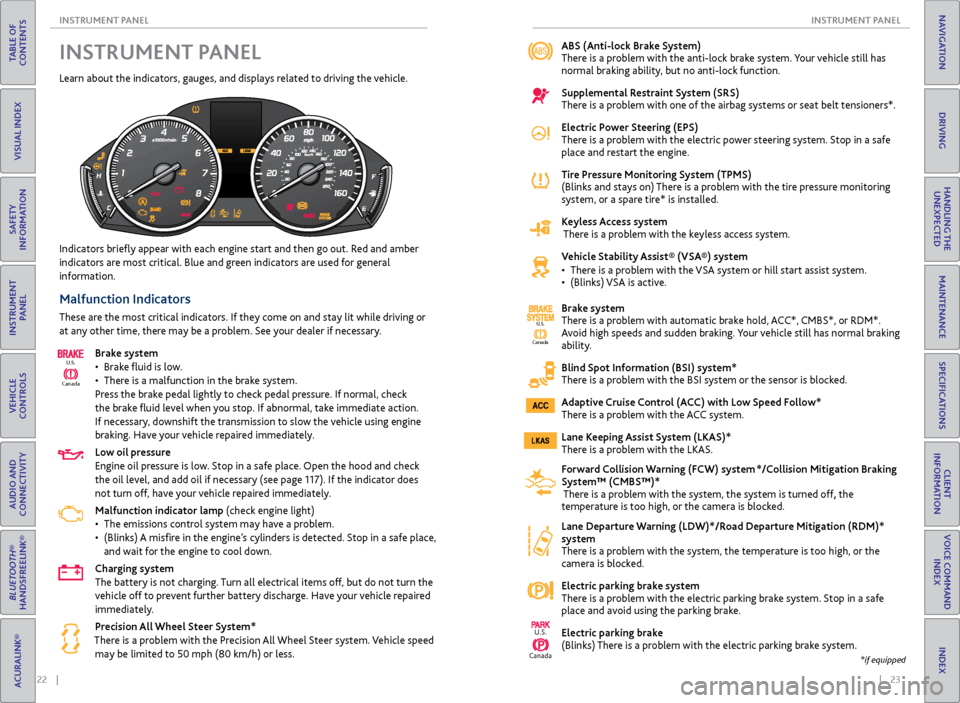
Malfunction Indicators
These are the most critical indicators. If they come on and stay lit while driving or
at any other time, there may be a problem. See your dealer if necessary.
Brake system
• Brake fluid is low.
• There is a malfunction in the brake system.
Press the brake pedal lightly to check pedal pressure. If normal, check
the brake fluid level when you stop. If abnormal, take immediate action.
If necessary, downshift the transmission to slow the vehicle using engine
braking. Have your vehicle repaired immediately.
Low oil pressure
Engine oil pressure is low. Stop in a safe place. Open the hood and check
the oil level, and add oil if necessary (see page 117). If the indicator does
not turn off, have your vehicle repaired immediately.
Malfunction indicator lamp (check engine light)
• The emissions control system may have a problem.
• (Blinks) A misfire in the engine’s cylinders is detected. Stop in a safe place,
and wait for the engine to cool down.
Charging system
The battery is not charging. Turn all electrical items off, but do not turn the
vehicle off to prevent further battery discharge. Have your vehicle repaired
immediately.
Precision All Wheel Steer System*
There is a problem with the Precision All Wheel Steer system. Vehicle speed may be limited to 50 mph (80 km/h) or less.
Ca nada
U.S.
INSTRUMENT P
ANEL
Learn about the indicators, gauges, and displays related to driving the vehicle.
ABS (Anti-lock Brake System)
There is a problem with the anti-lock brake system. Your vehicle still has
normal braking ability, but no anti-lock function.
Supplemental Restraint System (SRS)
There is a problem with one of the airbag systems or seat belt tensioners*.
Electric Power Steering (EPS)
There is a problem with the electric power steering system. Stop in a safe
place and restart the engine.
Tire Pressure Monitoring System (TPMS)
(Blinks and stays on) There is a problem with the tire pressure monitoring
system, or a spare tire* is installed.
Keyless Access system
There is a problem with the keyless access system.
Vehicle Stability Assist® (VSA®) system
• There is a problem with the VSA system or hill start assist system.
• (Blinks) VSA is active.
Brake system
There is a problem with automatic brake hold, ACC*, CMBS*, or RDM*.
Avoid high speeds and sudden braking. Your vehicle still has normal braking
ability.
Blind Spot Information (BSI) system*
There is a problem with the BSI system or the sensor is blocked.
Adaptive Cruise Control (ACC) with Low Speed Follow*
There is a problem with the ACC system.
Lane Keeping Assist System (LKAS)*
There is a problem with the LKAS.
Forward Collision Warning (FCW) system */Collision Mitigation Braking
System™ (CMBS™)*
There is a problem with the system, the system is turned off, the
temperature is too high, or the camera is blocked.
Lane Departure Warning (LDW)*/Road Departure Mitigation (RDM)*
system
There is a problem with the system, the temperature is too high, or the
camera is blocked.
Electric parking brake system
There is a problem with the electric parking brake system. Stop in a safe
place and avoid using the parking brake.
Electric parking brake
(Blinks) There is a problem with the electric parking brake system.
U.S.
Canada
Ca nada
U.S.
*if equipped
Page 16 of 75
24 || 25
INSTRUMENT P
ANEL
INSTRUMENT P ANEL
TABLE OF
CONTENTS
INDEX
VISUAL INDEX
VOICE COMMAND INDEX
SAFETY
INFORMATION
CLIENT
INFORMATION
INSTRUMENT PANEL
SPECIFICATIONS
VEHICLE
CONTROLS
MAINTENANCE
AUDIO AND
CONNECTIVITY
HANDLING THE UNEXPECTED
BLUETOOTH®
HANDSFREELINK®
DRIVING
ACURALINK®
NAVIGATION
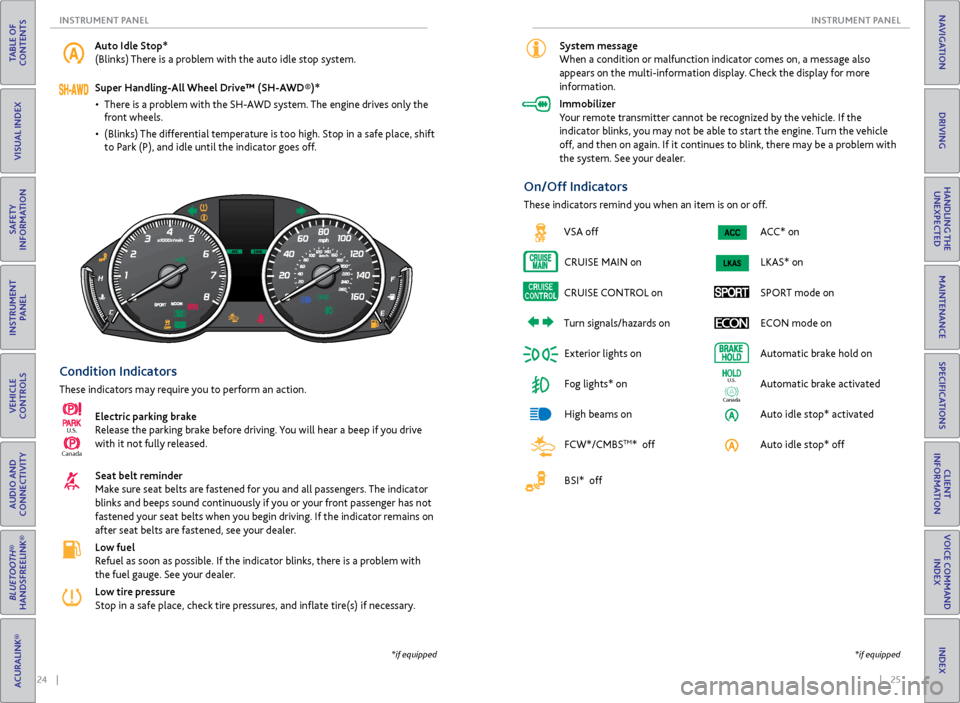
Condition Indicators
These indicators may require you to perform an action.
Electric parking brake
Release the parking brake before driving. You will hear a beep if you drive
with it not fully released.
Seat belt reminder
Make sure seat belts are fastened for you and all passengers. The indicator
blinks and beeps sound continuously if you or your front passenger has not
fastened your seat belts when you begin driving. If the indicator remains on
after seat belts are fastened, see your dealer.
Low fuel
Refuel as soon as possible. If the indicator blinks, there is a problem with
the fuel gauge. See your dealer.
Low tire pressure
Stop in a safe place, check tire pressures, and inflate tire(s) if necessary.
Canada
U.S.
*if equipped
Auto Idle Stop*
(Blinks) There is a problem with the auto idle stop system.
Super Handling-All Wheel Drive™ (SH-AWD®)*
• There is a problem with the SH-AWD system. The engine drives only the
front wheels.
• (Blinks) The differential temperature is too high. Stop in a safe place, shift
to Park (P), and idle until the indicator goes off.
ACC* onLKAS* on
SPORT mode on ECON mode on
Automatic brake hold on
Automatic brake activated
Auto idle stop* activated
Auto idle stop* off
Ca nada
U.S.
On/Off Indicators
These indicators remind you when an item is on or off.
*if equipped
System message
When a condition or malfunction indicator comes on, a message also
appears on the multi-information display. Check the display for more
information.
Immobilizer
Your remote transmitter cannot be recognized by the vehicle. If the
indicator blinks, you may not be able to start the engine. Turn the vehicle
off, and then on again. If it continues to blink, there may be a problem with
the system. See your dealer.
VSA off
CRUISE MAIN on
CRUISE CONTROL on
Turn signals/hazards on Exterior lights on
Fog lights* on
High beams on
FCW*/CMBS
TM* off
BSI* off
Page 17 of 75
26 || 27
VEHICLE CONTROLS
INSTRUMENT P ANEL
TABLE OF
CONTENTS
INDEX
VISUAL INDEX
VOICE COMMAND INDEX
SAFETY
INFORMATION
CLIENT
INFORMATION
INSTRUMENT PANEL
SPECIFICATIONS
VEHICLE
CONTROLS
MAINTENANCE
AUDIO AND
CONNECTIVITY
HANDLING THE UNEXPECTED
BLUETOOTH®
HANDSFREELINK®
DRIVING
ACURALINK®
NAVIGATION
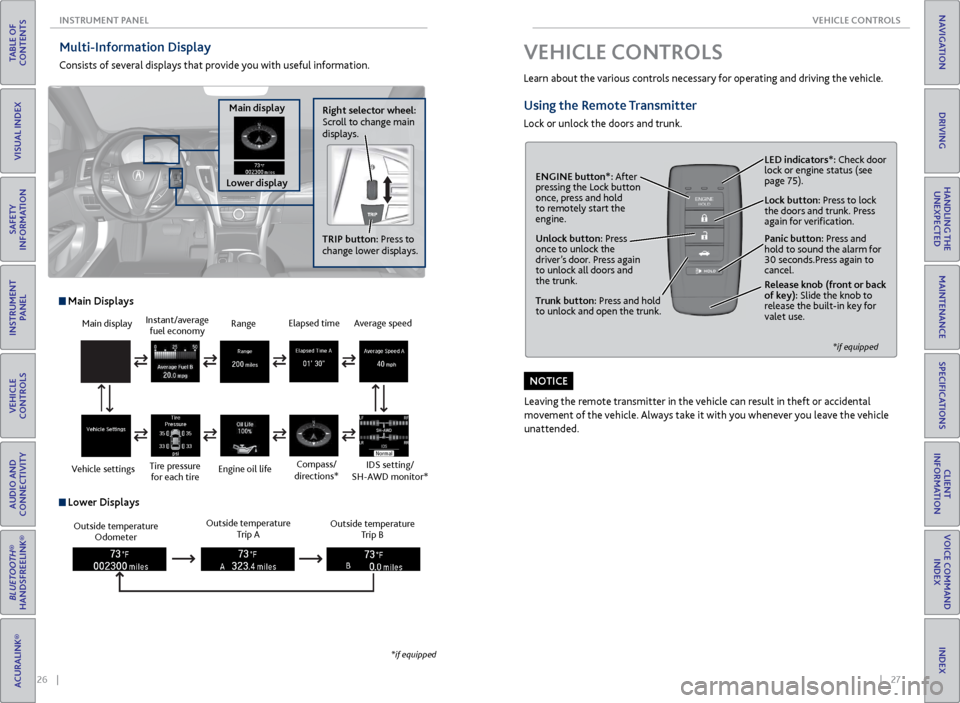
Multi-Information Display
Consists of several displays that provide you with useful information.
Right selector wheel:
Scroll to change main
displays.
Main display
Lower display TRIP button: Press to
change lower displays.
Main display
Vehicle settings Instant/average
fuel economy
Tire pressure for each tire Range
Engine oil life
Main Displays
Outside temperature Odometer Outside temperature
Trip A Outside temperature
Trip B
Lower Displays
Elapsed time
Compass/
directions*Average speed
IDS setting/
SH-AWD monitor*
*if equipped
VEHICLE CONTROLS
Learn about the various controls necessary for operating and driving the vehicle.
Using the Remote Transmitter
Lock or unlock the doors and trunk.
Unlock button: Press
once to unlock the
driver’s door. Press again
to unlock all doors and
the trunk.
Release knob (front or back
of key): Slide the knob to
release the built-in key for
valet use.
*if equipped
Trunk button: Press and hold
to unlock and open the trunk.Lock button: Press to lock
the doors and trunk. Press
again for verification. LED indicators*: Check door
lock or engine status (see
page 75).
Panic button: Press and
hold to sound the alarm for
30 seconds.Press again to
cancel.
ENGINE button*: After
pressing the Lock button
once, press and hold
to remotely start the
engine.
Leaving the remote transmitter in the vehicle can result in theft or accidental
movement of the vehicle. Always take it with you whenever you leave the vehicle
unattended.
NOTICE
Page 40 of 75
72 || 73
DRIVING
DRIVING
TABLE OF
CONTENTS
INDEX
VISUAL INDEX
VOICE COMMAND INDEX
SAFETY
INFORMATION
CLIENT
INFORMATION
INSTRUMENT PANEL
SPECIFICATIONS
VEHICLE
CONTROLS
MAINTENANCE
AUDIO AND
CONNECTIVITY
HANDLING THE UNEXPECTED
BLUETOOTH®
HANDSFREELINK®
DRIVING
ACURALINK®
NAVIGATION
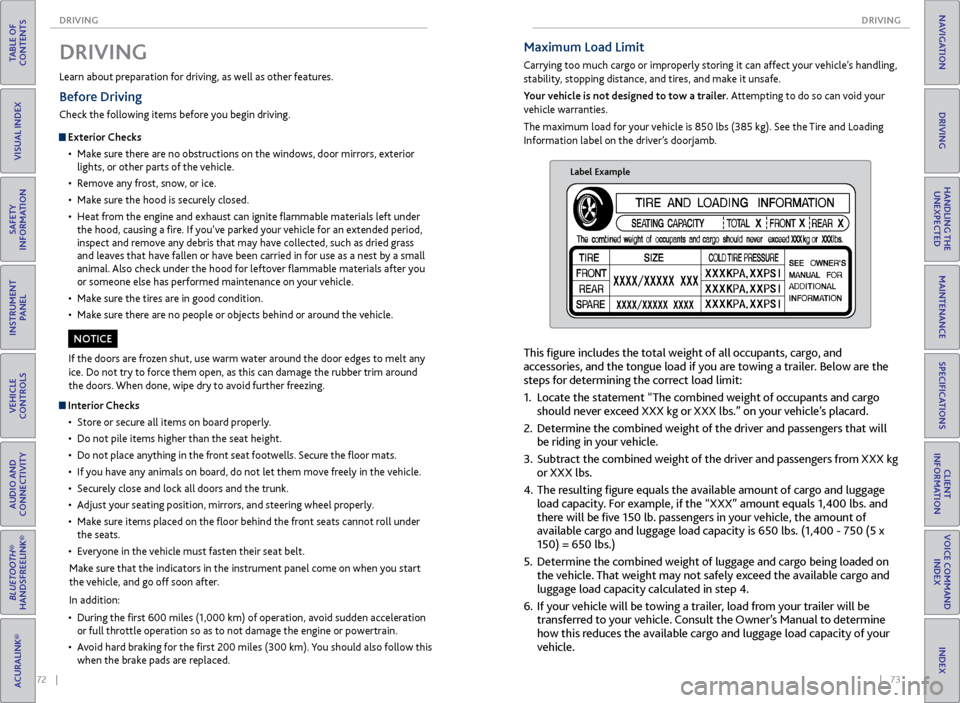
Maximum Load Limit
Carrying too much cargo or improperly storing it can affect your vehicle’s handling,
stability, stopping distance, and tires, and make it unsafe.
Your vehicle is not designed to tow a trailer. Attempting to do so can void your
vehicle warranties.
The maximum load for your vehicle is 850 lbs (385 kg). See the Tire and Loading
Information label on the driver’s doorjamb.
Label Example
This figure includes the total weight of all occupants, cargo, and
accessories, and the tongue load if you are towing a trailer. Below are the
steps for determining the correct load limit:
1. Locate the statement “The combined weight of occupants and cargo
should never exceed XXX kg or XXX lbs.” on your vehicle’s placard.
2. Determine the combined weight of the driver and passengers that will
be riding in your vehicle.
3. Subtract the combined weight of the driver and passengers from XXX kg
or XXX lbs.
4. The resulting figure equals the available amount of cargo and luggage
load capacity. For example, if the “XXX” amount equals 1,400 lbs. and
there will be five 150 lb. passengers in your vehicle, the amount of
available cargo and luggage load capacity is 650 lbs. (1,400 - 750 (5 x
150) = 650 lbs.)
5. Determine the combined weight of luggage and cargo being loaded on
the vehicle. That weight may not safely exceed the available cargo and
luggage load capacity calculated in step 4.
6. If your vehicle will be towing a trailer, load from your trailer will be
transferred to your vehicle. Consult the Owner’s Manual to determine
how this reduces the available cargo and luggage load capacity of your
vehicle.
Learn about preparation for driving, as well as other features.
DRIVING
If the doors are frozen shut, use warm water around the door edges to melt any
ice. Do not try to force them open, as this can damage the rubber trim around
the doors. When done, wipe dry to avoid further freezing.
NOTICE
Interior Checks
• Store or secure all items on board properly.
• Do not pile items higher than the seat height.
• Do not place anything in the front seat footwells. Secure the floor mats.
• If you have any animals on board, do not let them move freely in the vehicle.
• Securely close and lock all doors and the trunk.
• Adjust your seating position, mirrors, and steering wheel properly.
• Make sure items placed on the floor behind the front seats cannot roll under
the seats.
• Everyone in the vehicle must fasten their seat belt.
Make sure that the indicators in the instrument panel come on when you start
the vehicle, and go off soon after.
In addition:
• During the first 600 miles (1,000 km) of operation, avoid sudden acceleration
or full throttle operation so as to not damage the engine or powertrain.
• Avoid hard braking for the first 200 miles (300 km). You should also follow this
when the brake pads are replaced.
Before Driving
Check the following items before you begin driving.
Exterior Checks
• Make sure there are no obstructions on the windows, door mirrors, exterior
lights, or other parts of the vehicle.
• Remove any frost, snow, or ice.
• Make sure the hood is securely closed.
• Heat from the engine and exhaust can ignite flammable materials left under
the hood, causing a fire. If you’ve parked your vehicle for an extended period,
inspect and remove any debris that may have collected, such as dried grass
and leaves that have fallen or have been carried in for use as a nest by a small
animal. Also check under the hood for leftover flammable materials after you
or someone else has performed maintenance on your vehicle.
• Make sure the tires are in good condition.
• Make sure there are no people or objects behind or around the vehicle.
Page 41 of 75
74 || 75
DRIVING
DRIVING
TABLE OF
CONTENTS
INDEX
VISUAL INDEX
VOICE COMMAND INDEX
SAFETY
INFORMATION
CLIENT
INFORMATION
INSTRUMENT PANEL
SPECIFICATIONS
VEHICLE
CONTROLS
MAINTENANCE
AUDIO AND
CONNECTIVITY
HANDLING THE UNEXPECTED
BLUETOOTH®
HANDSFREELINK®
DRIVING
ACURALINK®
NAVIGATION
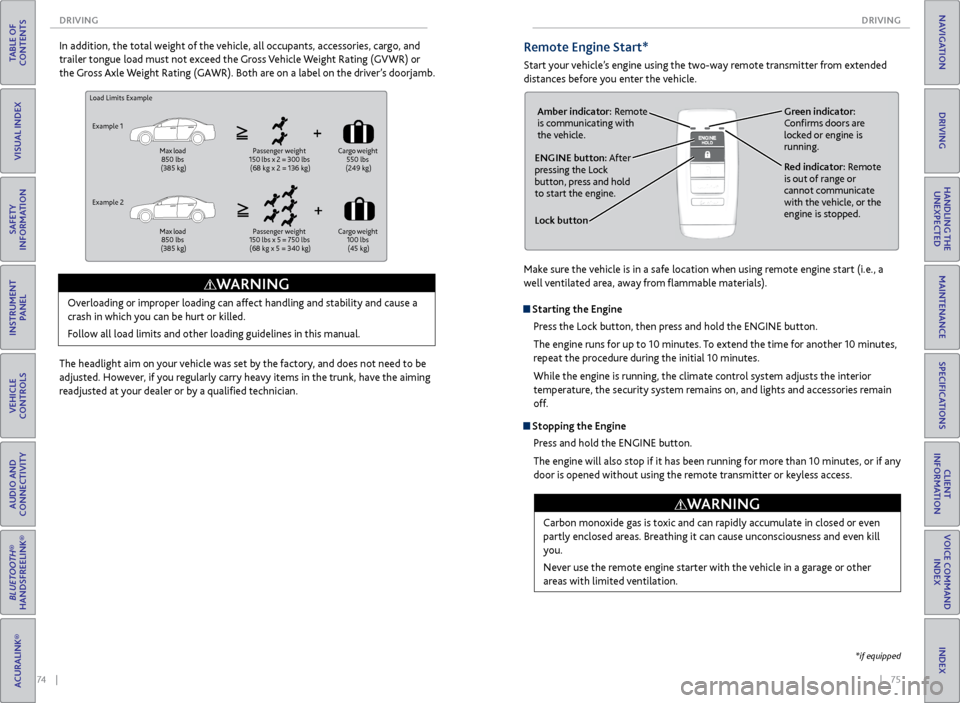
Load Limits Example
Example 1
Max load
850 lbs
(385 kg) Passenger weight
150 lbs x 2 = 300 lbs
(68 kg x 2 = 136 kg) Cargo
weight
550 lbs
(249 kg)
Example 2
Max load
850 lbs
(385 kg) Passenger weight
150 lbs x 5 = 750 lbs
(68 kg x 5 = 340 kg) Cargo
weight
100 lbs (45 kg)
Overloading or improper loading can affect handling and stability and cause a
crash in which you can be hurt or killed.
Follow all load limits and other loading guidelines in this manual.
WARNING
In addition, the total weight of the vehicle, all occupants, accessories, cargo, and
trailer tongue load must not exceed the Gross Vehicle Weight Rating (GVWR) or
the Gross Axle Weight Rating (GAWR). Both are on a label on the driver’s doorjamb.
The headlight aim on your vehicle was set by the factory, and does not need to be
adjusted. However, if you regularly carry heavy items in the trunk, have the aiming
readjusted at your dealer or by a qualified technician.Remote Engine Start*
Start your vehicle’s engine using the two-way remote transmitter from extended
distances before you enter the vehicle.
Lock button
ENGINE button: After
pressing the Lock
button, press and hold
to start the engine.Red indicator: Remote
is out of range or
cannot communicate
with the vehicle, or the
engine is stopped.
Amber indicator: Remote
is communicating with
the vehicle.
Green indicator:
Confirms doors are
locked or engine is
running.
Starting the Engine
Press the Lock button, then press and hold the ENGINE button.
The engine runs for up to 10 minutes. To extend the time for another 10 minutes,
repeat the procedure during the initial 10 minutes.
While the engine is running, the climate control system adjusts the interior
temperature, the security system remains on, and lights and accessories remain
off.
Stopping the EnginePress and hold the ENGINE button.
The engine will also stop if it has been running for more than 10 minutes, or if any
door is opened without using the remote transmitter or keyless access.
Carbon monoxide gas is toxic and can rapidly accumulate in closed or even
partly enclosed areas. Breathing it can cause unconsciousness and even kill
you.
Never use the remote engine starter with the vehicle in a garage or other
areas with limited ventilation.
WARNING
*if equipped
Make sure the vehicle is in a safe location when using remote engine start (i.e., a
well ventilated area, away from flammable materials).
Page 42 of 75
76 || 77
DRIVING
DRIVING
TABLE OF
CONTENTS
INDEX
VISUAL INDEX
VOICE COMMAND INDEX
SAFETY
INFORMATION
CLIENT
INFORMATION
INSTRUMENT PANEL
SPECIFICATIONS
VEHICLE
CONTROLS
MAINTENANCE
AUDIO AND
CONNECTIVITY
HANDLING THE UNEXPECTED
BLUETOOTH®
HANDSFREELINK®
DRIVING
ACURALINK®
NAVIGATION
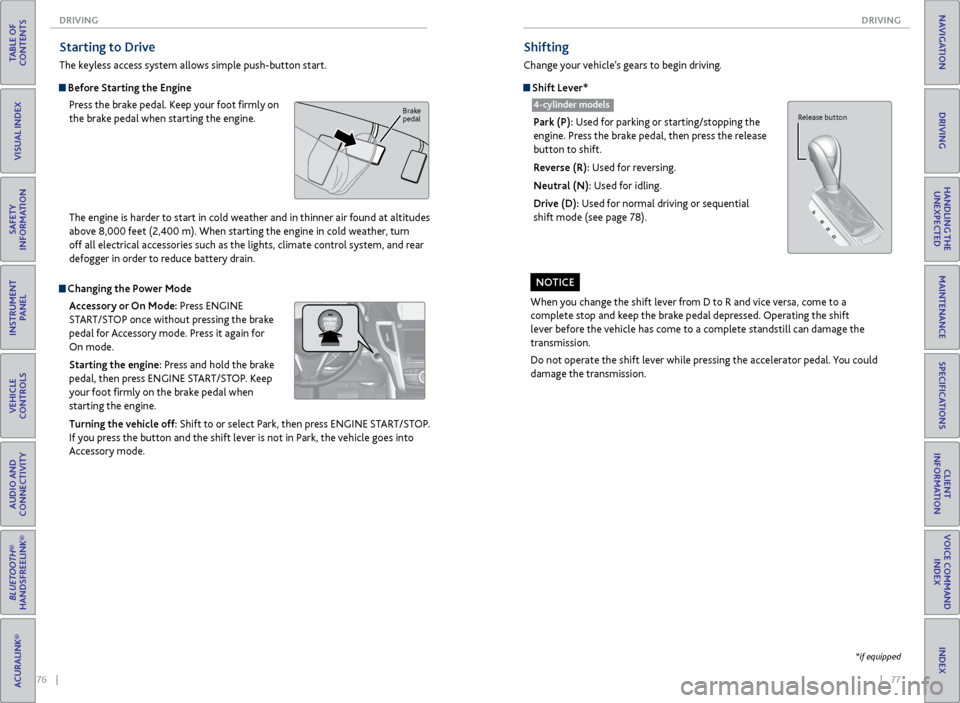
Starting to Drive
The keyless access system allows simple push-button start.
Before Starting the Engine
Press the brake pedal. Keep your foot firmly on
the brake pedal when starting the engine.
Brake
pedal
Changing the Power Mode
Accessory or On Mode: Press ENGINE
START/STOP once without pressing the brake
pedal for Accessory mode. Press it again for
On mode.
Starting the engine: Press and hold the brake
pedal, then press ENGINE START/STOP. Keep
your foot firmly on the brake pedal when
starting the engine.
Turning the vehicle off: Shift to or select Park, then press ENGINE START/STOP.
If you press the button and the shift lever is not in Park, the vehicle goes into
Accessory mode. The engine is harder to start in cold weather and in thinner air found at altitudes
above 8,000 feet (2,400 m). When starting the engine in cold weather, turn
off all electrical accessories such as the lights, climate control system, and rear
defogger in order to reduce battery drain.
When you change the shift lever from D to R and vice versa, come to a
complete stop and keep the brake pedal depressed. Operating the shift
lever before the vehicle has come to a complete standstill can damage the
transmission.
Do not operate the shift lever while pressing the accelerator pedal. You could
damage the transmission.
NOTICE
Shifting
Change your vehicle’s gears to begin driving.
Shift Lever*
Park (P): Used for parking or starting/stopping the
engine. Press the brake pedal, then press the release
button to shift.
Reverse (R): Used for reversing.
Neutral (N): Used for idling.
Drive (D): Used for normal driving or sequential
shift mode (see page 78).
Release button
*if equipped
4-cylinder models
Page 44 of 75
80 || 81
DRIVING
DRIVING
TABLE OF
CONTENTS
INDEX
VISUAL INDEX
VOICE COMMAND INDEX
SAFETY
INFORMATION
CLIENT
INFORMATION
INSTRUMENT PANEL
SPECIFICATIONS
VEHICLE
CONTROLS
MAINTENANCE
AUDIO AND
CONNECTIVITY
HANDLING THE UNEXPECTED
BLUETOOTH®
HANDSFREELINK®
DRIVING
ACURALINK®
NAVIGATION
Car Wash Mode
Follow the procedure below to use a conveyor-style car wash where you or
an attendant do not remain in the vehicle. Make sure the wiper lever is in the
OFF position (see page 33). You should inform the car wash attendant of this
procedure.
1. When the engine is running, apply the brake pedal and select Neutral (N).
2. Within 5 seconds, press the ENGINE START/STOP button. The vehicle goes
into Accessory mode.
This mode lasts for 15 minutes before the gear changes to Park and the vehicle
turns off.
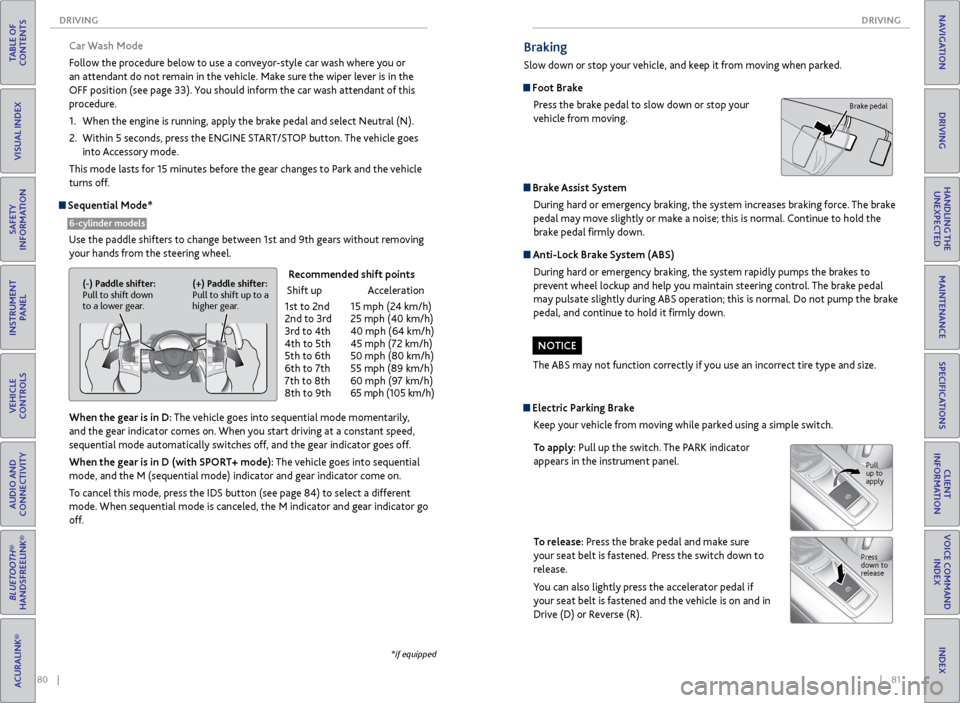
Sequential Mode*
Use the paddle shifters to change between 1st and 9th gears without removing your hands from the steering wheel.
When the gear is in D: The vehicle goes into sequential mode momentarily,
and the gear indicator comes on. When you start driving at a constant speed,
sequential mode automatically switches off, and the gear indicator goes off.
When the gear is in D (with SPORT+ mode): The vehicle goes into sequential
mode, and the M (sequential mode) indicator and gear indicator come on.
To cancel this mode, press the IDS button (see page 84) to select a different
mode. When sequential mode is canceled, the M indicator and gear indicator go
off.
6-cylinder models
(-) Paddle shifter:
Pull to shift down
to a lower gear. (+) Paddle shifter:
Pull to shift up to a
higher gear.
Recommended shift points
Shift up Acceleration
1st to 2nd 15 mph (24 km/h)
2nd to 3rd 25 mph (40 km/h)
3rd to 4th 40 mph (64 km/h)
4th to 5th 45 mph (72 km/h)
5th to 6th 50 mph (80 km/h)
6th to 7th 55 mph (89 km/h)
7th to 8th 60 mph (97 km/h)
8th to 9th 65 mph (105 km/h)
*if equipped
Braking
Slow down or stop your vehicle, and keep it from moving when parked.
Foot Brake
Press the brake pedal to slow down or stop your
vehicle from moving.
Brake Assist System During hard or emergency braking, the system increases braking force. The brake
pedal may move slightly or make a noise; this is normal. Continue to hold the
brake pedal firmly down.
Anti-Lock Brake System (ABS)
During hard or emergency braking, the system rapidly pumps the brakes to
prevent wheel lockup and help you maintain steering control. The brake pedal
may pulsate slightly during ABS operation; this is normal. Do not pump the brake
pedal, and continue to hold it firmly down.
The ABS may not function correctly if you use an incorrect tire type and size.
NOTICE
Brake pedal
Electric Parking Brake Keep your vehicle from moving while parked using a simple switch.
To apply: Pull up the switch. The PARK indicator
appears in the instrument panel.
To release: Press the brake pedal and make sure
your seat belt is fastened. Press the switch down to
release.
You can also lightly press the accelerator pedal if
your seat belt is fastened and the vehicle is on and in
Drive (D) or Reverse (R).
Pull
up to
apply
Press
down to
release