remove rear seat Acura TLX 2015 Owner's Guide
[x] Cancel search | Manufacturer: ACURA, Model Year: 2015, Model line: TLX, Model: Acura TLX 2015Pages: 75, PDF Size: 24.55 MB
Page 10 of 75
12 || 13
SAFETY
SAFETY
TABLE OF
CONTENTS
INDEX
VISUAL INDEX
VOICE COMMAND INDEX
SAFETY
INFORMATION
CLIENT
INFORMATION
INSTRUMENT PANEL
SPECIFICATIONS
VEHICLE
CONTROLS
MAINTENANCE
AUDIO AND
CONNECTIVITY
HANDLING THE UNEXPECTED
BLUETOOTH®
HANDSFREELINK®
DRIVING
ACURALINK®
NAVIGATION
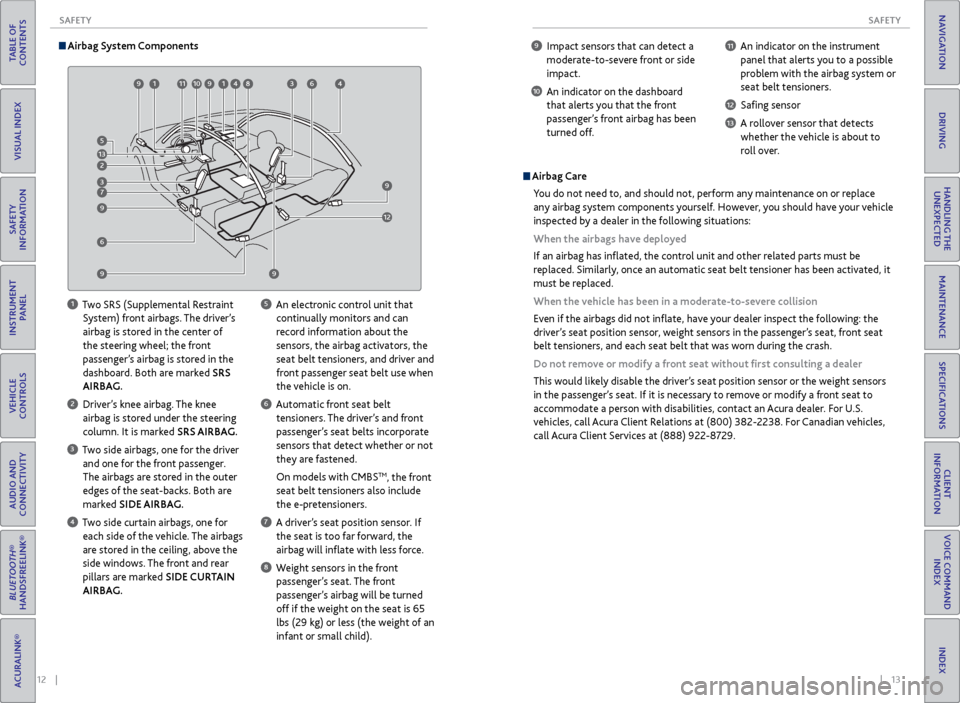
9 Impact sensors that can detect a
moderate-to-severe front or side
impact.
10 An indicator on the dashboard that alerts you that the front
passenger’s front airbag has been
turned off.
11 An indicator on the instrument panel that alerts you to a possible
problem with the airbag system or
seat belt tensioners.
12 Safing sensor
13 A rollover sensor that detects whether the vehicle is about to
roll over.
Airbag Care
You do not need to, and should not, perform any maintenance on or replace
any airbag system components yourself. However, you should have your vehicle
inspected by a dealer in the following situations:
When the airbags have deployed
If an airbag has inflated, the control unit and other related parts must be
replaced. Similarly, once an automatic seat belt tensioner has been activated, it
must be replaced.
When the vehicle has been in a moderate-to-severe collision
Even if the airbags did not inflate, have your dealer inspect the following: the
driver’s seat position sensor, weight sensors in the passenger’s seat, front seat
belt tensioners, and each seat belt that was worn during the crash.
Do not remove or modify a front seat without first consulting a dealer
This would likely disable the driver’s seat position sensor or the weight sensors
in the passenger’s seat. If it is necessary to remove or modify a front seat to
accommodate a person with disabilities, contact an Acura dealer. For U.S.
vehicles, call Acura Client Relations at (800) 382-2238. For Canadian vehicles,
call Acura Client Services at (888) 922-8729.
Airbag System Components
1 Two SRS (Supplemental Restraint
System) front airbags. The driver’s
airbag is stored in the center of
the steering wheel; the front
passenger’s airbag is stored in the
dashboard. Both are marked SRS
AIRBAG.
2 Driver’s knee airbag. The knee airbag is stored under the steering
column. It is marked SRS AIRBAG.
3 Two side airbags, one for the driver and one for the front passenger.
The airbags are stored in the outer
edges of the seat-backs. Both are
marked SIDE AIRBAG.
4 Two side curtain airbags, one for each side of the vehicle. The airbags
are stored in the ceiling, above the
side windows. The front and rear
pillars are marked SIDE CURTAIN
AIRBAG.
5 An electronic control unit that continually monitors and can
record information about the
sensors, the airbag activators, the
seat belt tensioners, and driver and
front passenger seat belt use when
the vehicle is on.
6 Automatic front seat belt tensioners. The driver’s and front
passenger’s seat belts incorporate
sensors that detect whether or not
they are fastened.
On models with CMBS
TM, the front
seat belt tensioners also include
the e-pretensioners.
7 A driver’s seat position sensor. If the seat is too far forward, the
airbag will inflate with less force.
8 Weight sensors in the front passenger’s seat. The front
passenger’s airbag will be turned
off if the weight on the seat is 65
lbs (29 kg) or less (the weight of an
infant or small child).
99 99
911 9194 98 93 94
96
91 910
9129
9
9
9
99 9
6 9
9
9
7
93 9
2
913 9
5
Page 13 of 75
18 || 19
SAFETY
SAFETY
TABLE OF
CONTENTS
INDEX
VISUAL INDEX
VOICE COMMAND INDEX
SAFETY
INFORMATION
CLIENT
INFORMATION
INSTRUMENT PANEL
SPECIFICATIONS
VEHICLE
CONTROLS
MAINTENANCE
AUDIO AND
CONNECTIVITY
HANDLING THE UNEXPECTED
BLUETOOTH®
HANDSFREELINK®
DRIVING
ACURALINK®
NAVIGATION
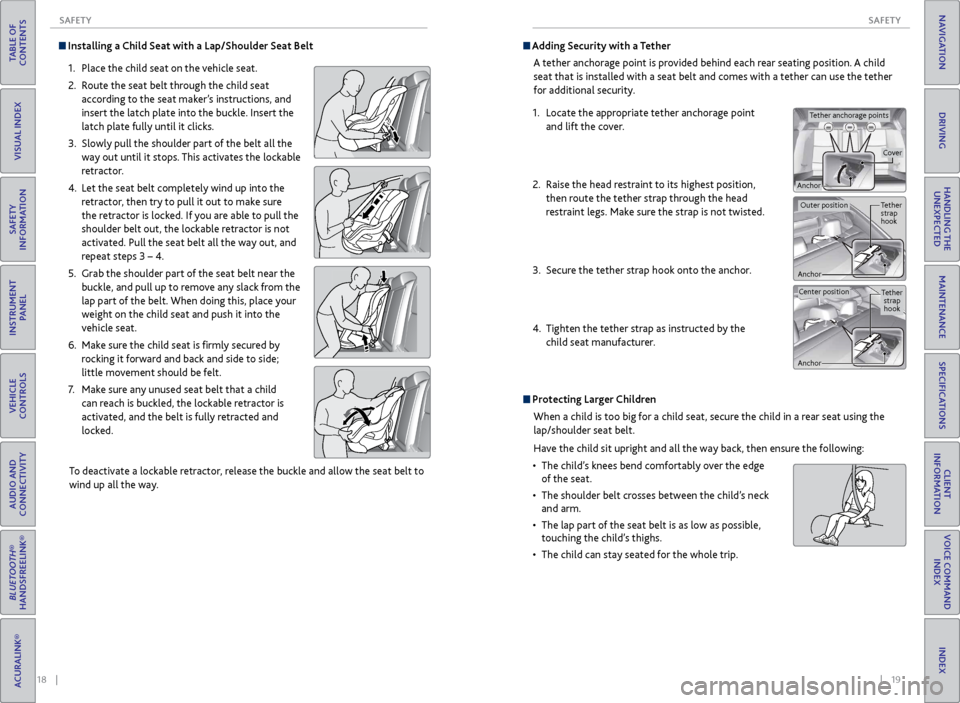
Installing a Child Seat with a Lap/Shoulder Seat Belt
1. Place the child seat on the vehicle seat.
2. Route the seat belt through the child seat
according to the seat maker’s instructions, and
insert the latch plate into the buckle. Insert the
latch plate fully until it clicks.
3. Slowly pull the shoulder part of the belt all the
way out until it stops. This activates the lockable
retractor.
4. Let the seat belt completely wind up into the
retractor, then try to pull it out to make sure
the retractor is locked. If you are able to pull the
shoulder belt out, the lockable retractor is not
activated. Pull the seat belt all the way out, and
repeat steps 3 – 4.
5. Grab the shoulder part of the seat belt near the
buckle, and pull up to remove any slack from the
lap part of the belt. When doing this, place your
weight on the child seat and push it into the
vehicle seat.
6. Make sure the child seat is firmly secured by
rocking it forward and back and side to side;
little movement should be felt.
7. Make sure any unused seat belt that a child
can reach is buckled, the lockable retractor is
activated, and the belt is fully retracted and
locked.
To deactivate a lockable retractor, release the buckle and allow the seat belt to
wind up all the way.
Protecting Larger Children When a child is too big for a child seat, secure the child in a rear seat using the
lap/shoulder seat belt.
Have the child sit upright and all the way back, then ensure the following:
• The child’s knees bend comfortably over the edge
of the seat.
• The shoulder belt crosses between the child’s neck
and arm.
• The lap part of the seat belt is as low as possible,
touching the child’s thighs.
• The child can stay seated for the whole trip.
Adding Security with a Tether
A tether anchorage point is provided behind each rear seating position. A child
seat that is installed with a seat belt and comes with a tether can use the tether
for additional security.
1. Locate the appropriate tether anchorage point
and lift the cover.
2. Raise the head restraint to its highest position,
then route the tether strap through the head
restraint legs. Make sure the strap is not twisted.
3. Secure the tether strap hook onto the anchor.
4. Tighten the tether strap as instructed by the
child seat manufacturer.
Tether
strap
hook
AnchorOuter position
Tether strap hook
AnchorCenter position
Tether anchorage points
Anchor
Cover
Page 22 of 75
36 || 37
VEHICLE CONTROLS
VEHICLE CONTROLS
TABLE OF
CONTENTS
INDEX
VISUAL INDEX
VOICE COMMAND INDEX
SAFETY
INFORMATION
CLIENT
INFORMATION
INSTRUMENT PANEL
SPECIFICATIONS
VEHICLE
CONTROLS
MAINTENANCE
AUDIO AND
CONNECTIVITY
HANDLING THE UNEXPECTED
BLUETOOTH®
HANDSFREELINK®
DRIVING
ACURALINK®
NAVIGATION
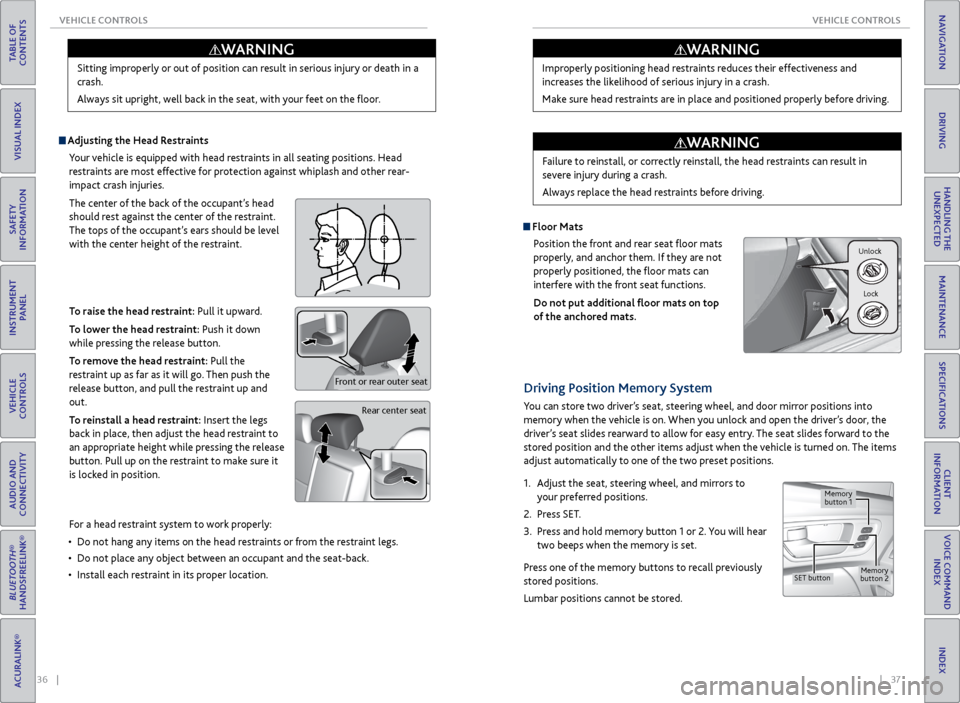
Adjusting the Head Restraints
Your vehicle is equipped with head restraints in all seating positions. Head
restraints are most effective for protection against whiplash and other rear-
impact crash injuries.
The center of the back of the occupant’s head
should rest against the center of the restraint.
The tops of the occupant’s ears should be level
with the center height of the restraint.
To raise the head restraint: Pull it upward.
To lower the head restraint: Push it down
while pressing the release button.
To remove the head restraint: Pull the
restraint up as far as it will go. Then push the
release button, and pull the restraint up and
out.
To reinstall a head restraint: Insert the legs
back in place, then adjust the head restraint to
an appropriate height while pressing the release
button. Pull up on the restraint to make sure it
is locked in position.
Sitting improperly or out of position can result in serious injury or death in a
crash.
Always sit upright, well back in the seat, with your feet on the floor.
WARNING
Rear center seat
Front or rear outer seat
For a head restraint system to work properly:
• Do not hang any items on the head restraints or from the restraint legs.
• Do not place any object between an occupant and the seat-back.
• Install each restraint in its proper location. Improperly positioning head restraints reduces their effectiveness and
increases the likelihood of serious injury in a crash.
Make sure head restraints are in place and positioned properly before driving.
Failure to reinstall, or correctly reinstall, the head restraints can result in
severe injury during a crash.
Always replace the head restraints before driving.
WARNING
WARNING
Floor Mats
Position the front and rear seat floor mats
properly, and anchor them. If they are not
properly positioned, the floor mats can
interfere with the front seat functions.
Do not put additional floor mats on top
of the anchored mats.
Unlock
Lock
Driving Position Memory System
You can store two driver’s seat, steering wheel, and door mirror positions into
memory when the vehicle is on. When you unlock and open the driver’s door, the
driver’s seat slides rearward to allow for easy entry. The seat slides forward to the
stored position and the other items adjust when the vehicle is turned on. The items
adjust automatically to one of the two preset positions.
1. Adjust the seat, steering wheel, and mirrors to
your preferred positions.
2. Press SET.
3. Press and hold memory button 1 or 2. You will hear
two beeps when the memory is set.
Press one of the memory buttons to recall previously
stored positions.
Lumbar positions cannot be stored.
Memory
button 1
Memory
button 2SET button
Page 45 of 75
82 || 83
DRIVING
DRIVING
TABLE OF
CONTENTS
INDEX
VISUAL INDEX
VOICE COMMAND INDEX
SAFETY
INFORMATION
CLIENT
INFORMATION
INSTRUMENT PANEL
SPECIFICATIONS
VEHICLE
CONTROLS
MAINTENANCE
AUDIO AND
CONNECTIVITY
HANDLING THE UNEXPECTED
BLUETOOTH®
HANDSFREELINK®
DRIVING
ACURALINK®
NAVIGATION
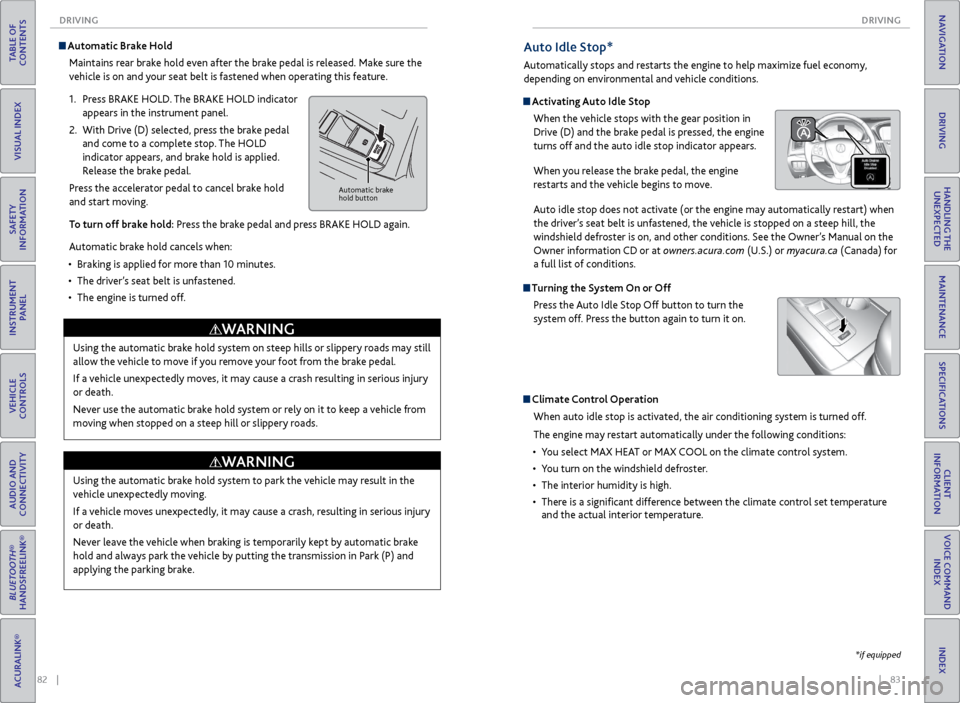
Automatic Brake Hold
Maintains rear brake hold even after the brake pedal is released. Make sure the
vehicle is on and your seat belt is fastened when operating this feature.
1. Press BRAKE HOLD. The BRAKE HOLD indicator
appears in the instrument panel.
2. With Drive (D) selected, press the brake pedal
and come to a complete stop. The HOLD
indicator appears, and brake hold is applied.
Release the brake pedal.
Press the accelerator pedal to cancel brake hold
and start moving.
To turn off brake hold: Press the brake pedal and press BRAKE HOLD again.
Automatic brake hold cancels when:
• Braking is applied for more than 10 minutes.
• The driver’s seat belt is unfastened.
• The engine is turned off.
Automatic brake
hold button
Using the automatic brake hold system on steep hills or slippery roads may still
allow the vehicle to move if you remove your foot from the brake pedal.
If a vehicle unexpectedly moves, it may cause a crash resulting in serious injury
or death.
Never use the automatic brake hold system or rely on it to keep a vehicle from
moving when stopped on a steep hill or slippery roads.
WARNING
Using the automatic brake hold system to park the vehicle may result in the
vehicle unexpectedly moving.
If a vehicle moves unexpectedly, it may cause a crash, resulting in serious injury
or death.
Never leave the vehicle when braking is temporarily kept by automatic brake
hold and always park the vehicle by putting the transmission in Park (P) and
applying the parking brake.
WARNING
Auto Idle Stop*
Automatically stops and restarts the engine to help maximize fuel economy,
depending on environmental and vehicle conditions.
Activating Auto Idle Stop
When the vehicle stops with the gear position in
Drive (D) and the brake pedal is pressed, the engine
turns off and the auto idle stop indicator appears.
When you release the brake pedal, the engine
restarts and the vehicle begins to move.
Auto idle stop does not activate (or the engine may automatically restart) when
the driver’s seat belt is unfastened, the vehicle is stopped on a steep hill, the
windshield defroster is on, and other conditions. See the Owner’s Manual on the
Owner information CD or at owners.acura.com (U.S.) or myacura.ca (Canada) for
a full list of conditions.
Turning the System On or Off
Press the Auto Idle Stop Off button to turn the
system off. Press the button again to turn it on.
Climate Control Operation
When auto idle stop is activated, the air conditioning system is turned off.
The engine may restart automatically under the following conditions:
• You select MAX HEAT or MAX COOL on the climate control system.
• You turn on the windshield defroster.
• The interior humidity is high.
• There is a significant difference between the climate control set temperature
and the actual interior temperature.
*if equipped