windshield Acura TLX 2015 Owner's Guide
[x] Cancel search | Manufacturer: ACURA, Model Year: 2015, Model line: TLX, Model: Acura TLX 2015Pages: 75, PDF Size: 24.55 MB
Page 4 of 75
| 1
VISUAL INDEX
TABLE OF
CONTENTS
INDEX
VISUAL INDEX
VOICE COMMAND INDEX
SAFETY
INFORMATION
CLIENT
INFORMATION
INSTRUMENT PANEL
SPECIFICATIONS
VEHICLE
CONTROLS
MAINTENANCE
AUDIO AND
CONNECTIVITY
HANDLING THE UNEXPECTED
BLUETOOTH®
HANDSFREELINK®
DRIVING
ACURALINK®
NAVIGATION
Cruise Control ................................ 85
Adaptive Cruise Control (ACC) with
Low Speed Follow (LSF)* .............. 86
Forward Collision Warning (FCW)
with Pedestrian Detection* .......... 88
Lane Departure Warning (LDW)* ... 89
Lane Keeping Assist System
(LKAS)* ............................................ 90
Collision Mitigation Braking
System™ (CMBS™)* ...................... 91
Road Departure Mitigation (RDM)
System* ........................................... 92
Blind Spot Information (BSI)
System* ........................................... 93
Parking Sensor System* ................ 94
Super Handling-All Wheel Drive
(AWD)* ............................................ 94
Multi-View Rear Camera ............... 95
Cross Traffic Monitor* ................... 96
Refueling ......................................... 97
HANDLING THE UNEXPECTED ...98
Keyless Access Remote Battery
Strength ........................................... 98
Shift Lever Does Not Move* ........ 98
Jump Starting .................................. 99
Overheating ................................... 101
Emergency Engine Stop ............... 102
Emergency Towing ....................... 102
Tire Pressure Monitoring System
(TPMS) ........................................... 103
Tire Repair Kit* ............................. 104Changing a Flat Tire .....................
105
Fuse Locations .............................. 108
MAINTENANCE ............................. 111
Safety Precautions ........................ 111
Maintenance Minder™ ................. 112
Under the Hood ............................. 114
Engine Oil ....................................... 116
Engine Coolant .............................. 118
Window Washer Fluid .................. 119
Checking the Battery .................... 119
Changing Wiper Blades ............... 120
Tire Information ............................ 121
Tire Labeling .................................. 124
DOT Tire Quality Grading ........... 125
Tire Pressure Monitoring System
(TPMS) - Required Federal
Explanation .................................... 127
Testing of Readiness Codes ........ 128
SPECIFICATIONS ......................... 129
CLIENT INFORMATION ............... 131
Frequently Asked Questions/
Troubleshooting ............................ 131
Contact Us .................................... 132
Acura Total Luxury Care Roadside
Assistance ..................................... 133
Warranty Coverages .................... 133
V OICE COMMAND INDEX ......... 134
INDEX ............................................ 140
*if equipped
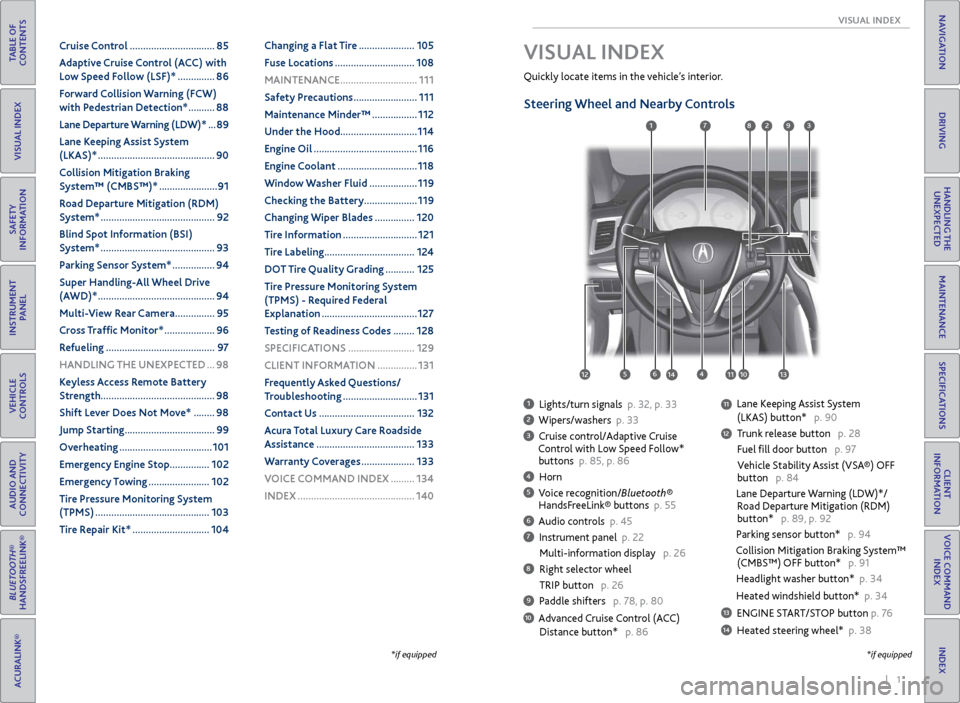
1 Lights/turn signals p. 32, p. 33
2 Wipers/washers p. 33
3 Cruise control/Adaptive Cruise
Control with Low Speed Follow*
buttons p. 85, p. 86
4 Horn
5 Voice recognition/Bluetooth®
HandsFreeLink® buttons p. 55
6 Audio controls p. 45
7 Instrument panel p. 22
Multi-information display p. 26
8 Right selector wheel
TRIP button p. 26
9 Paddle shifters p. 78, p. 80
10 Advanced Cruise Control (ACC)
Distance button* p. 86
Quickly locate items in the vehicle’s interior.
Steering Wheel and Nearby Controls
Lane Keeping Assist System
(LKAS) button* p. 90
Trunk release button p. 28
Fuel fill door button p. 97
Vehicle Stability Assist (VSA®) OFF
button p. 84
Lane Departure Warning (LDW)*/
Road Departure Mitigation (RDM)
button* p. 89, p. 92
Parking sensor button* p. 94
Collision Mitigation Braking System™
(CMBS™) OFF button* p. 91
Headlight washer button* p. 34
Heated windshield button* p. 34
13 ENGINE START/STOP button p. 76
14 Heated steering wheel* p. 38
VISUAL INDEX
*if equipped
1
1011
27
4
8
13
12
125614
93
11
Page 20 of 75
32 || 33
VEHICLE CONTROLS
VEHICLE CONTROLS
TABLE OF
CONTENTS
INDEX
VISUAL INDEX
VOICE COMMAND INDEX
SAFETY
INFORMATION
CLIENT
INFORMATION
INSTRUMENT PANEL
SPECIFICATIONS
VEHICLE
CONTROLS
MAINTENANCE
AUDIO AND
CONNECTIVITY
HANDLING THE UNEXPECTED
BLUETOOTH®
HANDSFREELINK®
DRIVING
ACURALINK®
NAVIGATION
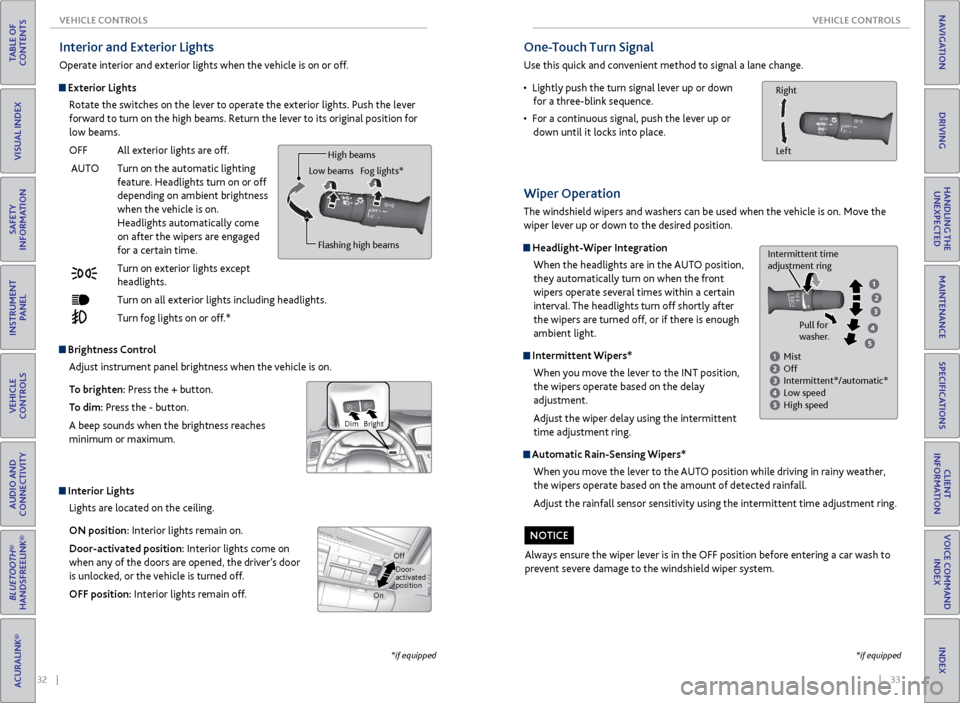
Interior and Exterior Lights
Operate interior and exterior lights when the vehicle is on or off.
Exterior Lights
Rotate the switches on the lever to operate the exterior lights. Push the lever
forward to turn on the high beams. Return the lever to its original position for
low beams.
OFF All exterior lights are off.
AUTO Turn on the automatic lighting
feature. Headlights turn on or off
depending on ambient brightness
when the vehicle is on.
Headlights automatically come
on after the wipers are engaged
for a certain time.
Turn on exterior lights except
headlights.
Turn on all exterior lights including headlights.
Turn fog lights on or off.*
Brightness Control
Adjust instrument panel brightness when the vehicle is on.
To brighten: Press the + button.
To dim: Press the - button.
A beep sounds when the brightness reaches
minimum or maximum.
Bright
Dim
Interior Lights
Lights are located on the ceiling.
ON position: Interior lights remain on.
Door-activated position: Interior lights come on
when any of the doors are opened, the driver’s door
is unlocked, or the vehicle is turned off.
OFF position: Interior lights remain off.
Door-
activated
position
On
Off
Flashing high beams
Low beams
High beams
Fog lights*
*if equipped
One-Touch Turn Signal
Use this quick and convenient method to signal a lane change.
• Lightly push the turn signal lever up or down
for a three-blink sequence.
• For a continuous signal, push the lever up or
down until it locks into place.
Right
Left
*if equipped
Wiper Operation
The windshield wipers and washers can be used when the vehicle is on. Move the
wiper lever up or down to the desired position.
Headlight-Wiper Integration
When the headlights are in the AUTO position,
they automatically turn on when the front
wipers operate several times within a certain
interval. The headlights turn off shortly after
the wipers are turned off, or if there is enough
ambient light.
Intermittent Wipers*When you move the lever to the INT position,
the wipers operate based on the delay
adjustment.
Adjust the wiper delay using the intermittent
time adjustment ring.
Automatic Rain-Sensing Wipers*
When you move the lever to the AUTO position while driving in rainy weather,
the wipers operate based on the amount of detected rainfall.
Adjust the rainfall sensor sensitivity using the intermittent time adjustment ring.
Always ensure the wiper lever is in the OFF position before entering a car wash to
prevent severe damage to the windshield wiper system.
Mist
Off
Intermittent*/automatic*
Low speed
High speed
Intermittent time
adjustment ring
Pull for
washer.
NOTICE
Page 21 of 75
34 || 35
VEHICLE CONTROLS
VEHICLE CONTROLS
TABLE OF
CONTENTS
INDEX
VISUAL INDEX
VOICE COMMAND INDEX
SAFETY
INFORMATION
CLIENT
INFORMATION
INSTRUMENT PANEL
SPECIFICATIONS
VEHICLE
CONTROLS
MAINTENANCE
AUDIO AND
CONNECTIVITY
HANDLING THE UNEXPECTED
BLUETOOTH®
HANDSFREELINK®
DRIVING
ACURALINK®
NAVIGATION
Do not use the wipers when the windshield is dry. The windshield will get
scratched, or the rubber blades will get damaged.
In cold weather, the blades may freeze to the windshield, becoming stuck.
Operating the wipers in this condition may damage the wipers. Use the defroster
to warm the windshield, or manually clear the windshield of ice and snow before
turning on the wipers.
NOTICE
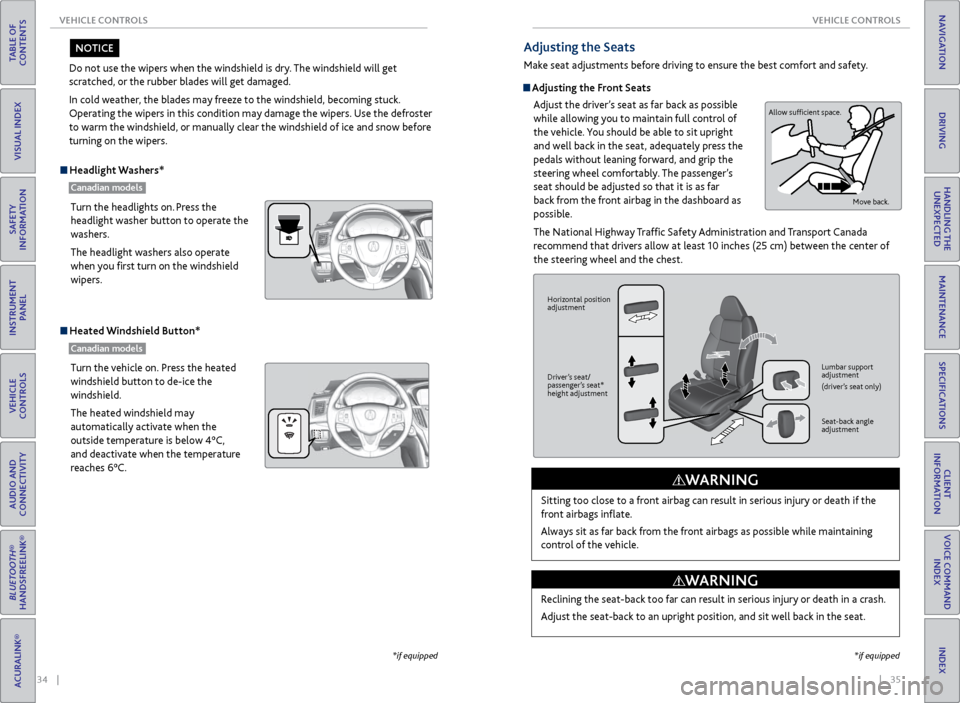
Headlight Washers*
Canadian models
Heated Windshield Button*
Canadian models
Turn the headlights on. Press the
headlight washer button to operate the
washers.
The headlight washers also operate
when you first turn on the windshield
wipers.
Turn the vehicle on. Press the heated
windshield button to de-ice the
windshield.
The heated windshield may
automatically activate when the
outside temperature is below 4°C,
and deactivate when the temperature
reaches 6°C.
*if equipped
Adjusting the Seats
Make seat adjustments before driving to ensure the best comfort and safety.
Adjusting the Front Seats
Adjust the driver’s seat as far back as possible
while allowing you to maintain full control of
the vehicle. You should be able to sit upright
and well back in the seat, adequately press the
pedals without leaning forward, and grip the
steering wheel comfortably. The passenger’s
seat should be adjusted so that it is as far
back from the front airbag in the dashboard as
possible.
The National Highway Traffic Safety Administration and Transport Canada
recommend that drivers allow at least 10 inches (25 cm) between the center of
the steering wheel and the chest.
Sitting too close to a front airbag can result in serious injury or death if the
front airbags inflate.
Always sit as far back from the front airbags as possible while maintaining
control of the vehicle.
WARNING
Allow sufficient space. Move back.
Horizontal position
adjustment
Driver’s seat/
passenger’s seat*
height adjustment Lumbar support
adjustment
(driver’s seat only)
Seat-back angle
adjustment
Reclining the seat-back too far can result in serious injury or death in a crash.
Adjust the seat-back to an upright position, and sit well back in the seat.
WARNING
*if equipped
Page 25 of 75
42 || 43
VEHICLE CONTROLS
VEHICLE CONTROLS
TABLE OF
CONTENTS
INDEX
VISUAL INDEX
VOICE COMMAND INDEX
SAFETY
INFORMATION
CLIENT
INFORMATION
INSTRUMENT PANEL
SPECIFICATIONS
VEHICLE
CONTROLS
MAINTENANCE
AUDIO AND
CONNECTIVITY
HANDLING THE UNEXPECTED
BLUETOOTH®
HANDSFREELINK®
DRIVING
ACURALINK®
NAVIGATION
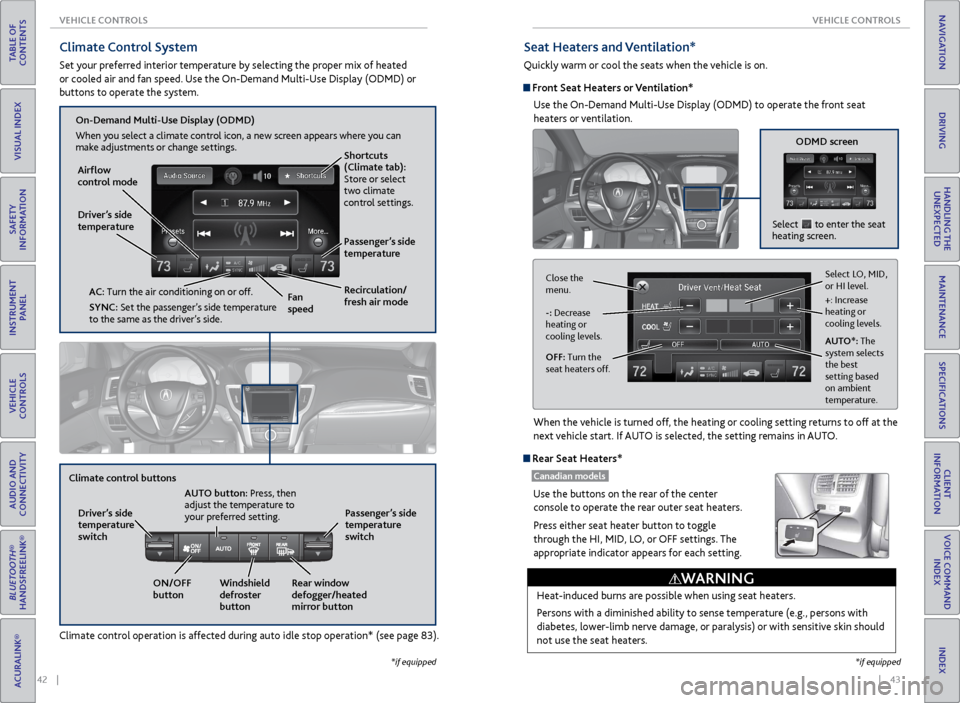
Climate Control System
Set your preferred interior temperature by selecting the proper mix of heated
or cooled air and fan speed. Use the On-Demand Multi-Use Display (ODMD) or
buttons to operate the system.
Climate control operation is affected during auto idle stop operation* (see page 83).
Recirculation/
fresh air mode
Driver’s side
temperature
On-Demand Multi-Use Display (ODMD)
When you select a climate control icon, a new screen appears where you can
make adjustments or change settings.
Airflow
control mode
AC: Turn the air conditioning on or off.
SYNC: Set the passenger’s side temperature
to the same as the driver’s side. Fan
speedPassenger’s side
temperature Shortcuts
(Climate tab):
Store or select
two climate
control settings.
Windshield
defroster
button
Driver’s side
temperature
switch
Climate control buttons
ON/OFF
buttonAUTO button: Press, then
adjust the temperature to
your preferred setting.
Rear window
defogger/heated
mirror buttonPassenger’s side
temperature
switch
*if equipped
Seat Heaters and Ventilation*
Quickly warm or cool the seats when the vehicle is on.
Front Seat Heaters or Ventilation*
Use the On-Demand Multi-Use Display (ODMD) to operate the front seat
heaters or ventilation.
When the vehicle is turned off, the heating or cooling setting returns to off at the
next vehicle start. If AUTO is selected, the setting remains in AUTO.
Rear Seat Heaters*
Canadian models
Use the buttons on the rear of the center console to operate the rear outer seat heaters.
Press either seat heater button to toggle
through the HI, MID, LO, or OFF settings. The
appropriate indicator appears for each setting.
Heat-induced burns are possible when using seat heaters.
Persons with a diminished ability to sense temperature (e.g., persons with
diabetes, lower-limb nerve damage, or paralysis) or with sensitive skin should
not use the seat heaters.
WARNING
*if equipped
ODMD screen
Select to enter the seat
heating screen.
Select LO, MID,
or HI level.
+: Increase
heating or
cooling levels.
AUTO*: The
system selects
the best
setting based
on ambient
temperature.
OFF: Turn the
seat heaters off. -: Decrease
heating or
cooling levels.
Close the
menu.
Page 45 of 75
82 || 83
DRIVING
DRIVING
TABLE OF
CONTENTS
INDEX
VISUAL INDEX
VOICE COMMAND INDEX
SAFETY
INFORMATION
CLIENT
INFORMATION
INSTRUMENT PANEL
SPECIFICATIONS
VEHICLE
CONTROLS
MAINTENANCE
AUDIO AND
CONNECTIVITY
HANDLING THE UNEXPECTED
BLUETOOTH®
HANDSFREELINK®
DRIVING
ACURALINK®
NAVIGATION
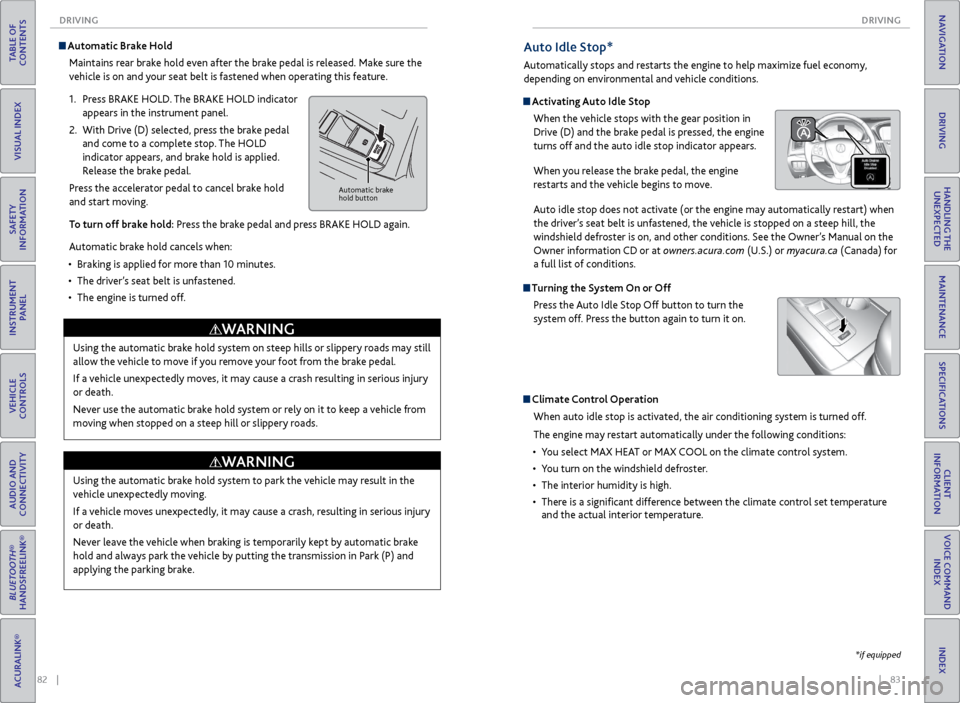
Automatic Brake Hold
Maintains rear brake hold even after the brake pedal is released. Make sure the
vehicle is on and your seat belt is fastened when operating this feature.
1. Press BRAKE HOLD. The BRAKE HOLD indicator
appears in the instrument panel.
2. With Drive (D) selected, press the brake pedal
and come to a complete stop. The HOLD
indicator appears, and brake hold is applied.
Release the brake pedal.
Press the accelerator pedal to cancel brake hold
and start moving.
To turn off brake hold: Press the brake pedal and press BRAKE HOLD again.
Automatic brake hold cancels when:
• Braking is applied for more than 10 minutes.
• The driver’s seat belt is unfastened.
• The engine is turned off.
Automatic brake
hold button
Using the automatic brake hold system on steep hills or slippery roads may still
allow the vehicle to move if you remove your foot from the brake pedal.
If a vehicle unexpectedly moves, it may cause a crash resulting in serious injury
or death.
Never use the automatic brake hold system or rely on it to keep a vehicle from
moving when stopped on a steep hill or slippery roads.
WARNING
Using the automatic brake hold system to park the vehicle may result in the
vehicle unexpectedly moving.
If a vehicle moves unexpectedly, it may cause a crash, resulting in serious injury
or death.
Never leave the vehicle when braking is temporarily kept by automatic brake
hold and always park the vehicle by putting the transmission in Park (P) and
applying the parking brake.
WARNING
Auto Idle Stop*
Automatically stops and restarts the engine to help maximize fuel economy,
depending on environmental and vehicle conditions.
Activating Auto Idle Stop
When the vehicle stops with the gear position in
Drive (D) and the brake pedal is pressed, the engine
turns off and the auto idle stop indicator appears.
When you release the brake pedal, the engine
restarts and the vehicle begins to move.
Auto idle stop does not activate (or the engine may automatically restart) when
the driver’s seat belt is unfastened, the vehicle is stopped on a steep hill, the
windshield defroster is on, and other conditions. See the Owner’s Manual on the
Owner information CD or at owners.acura.com (U.S.) or myacura.ca (Canada) for
a full list of conditions.
Turning the System On or Off
Press the Auto Idle Stop Off button to turn the
system off. Press the button again to turn it on.
Climate Control Operation
When auto idle stop is activated, the air conditioning system is turned off.
The engine may restart automatically under the following conditions:
• You select MAX HEAT or MAX COOL on the climate control system.
• You turn on the windshield defroster.
• The interior humidity is high.
• There is a significant difference between the climate control set temperature
and the actual interior temperature.
*if equipped
Page 48 of 75
88 || 89
DRIVING
DRIVING
TABLE OF
CONTENTS
INDEX
VISUAL INDEX
VOICE COMMAND INDEX
SAFETY
INFORMATION
CLIENT
INFORMATION
INSTRUMENT PANEL
SPECIFICATIONS
VEHICLE
CONTROLS
MAINTENANCE
AUDIO AND
CONNECTIVITY
HANDLING THE UNEXPECTED
BLUETOOTH®
HANDSFREELINK®
DRIVING
ACURALINK®
NAVIGATION
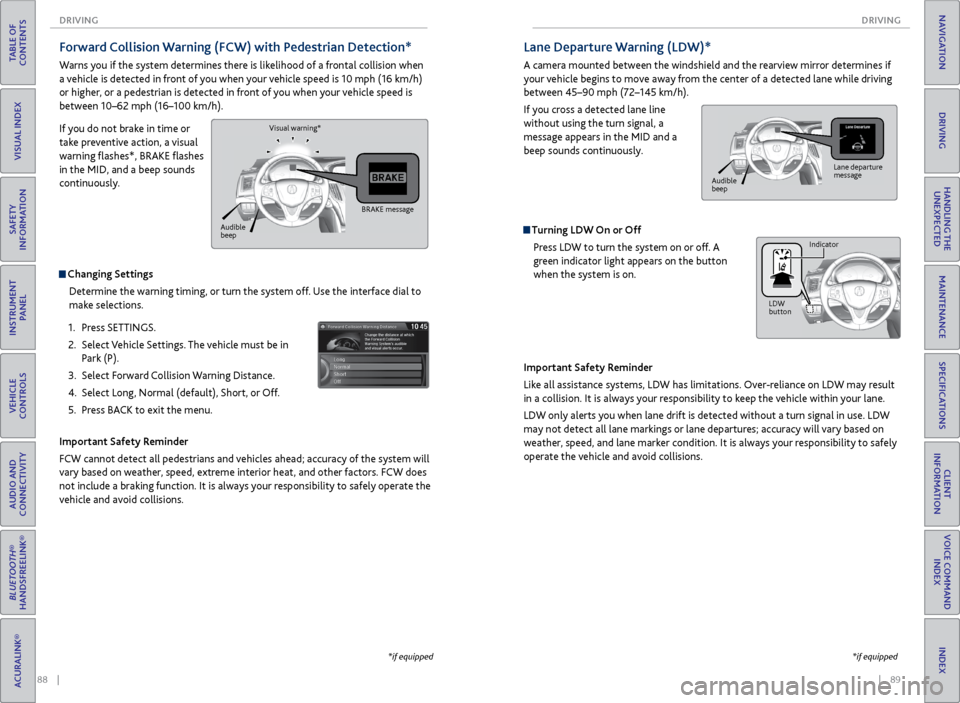
Lane Departure Warning (LDW)*
A camera mounted between the windshield and the rearview mirror determines if
your vehicle begins to move away from the center of a detected lane while driving
between 45–90 mph (72–145 km/h).
If you cross a detected lane line
without using the turn signal, a
message appears in the MID and a
beep sounds continuously.
Turning LDW On or Off
Press LDW to turn the system on or off. A
green indicator light appears on the button
when the system is on.
Important Safety Reminder
Like all assistance systems, LDW has limitations. Over-reliance on LDW may result
in a collision. It is always your responsibility to keep the vehicle within your lane.
LDW only alerts you when lane drift is detected without a turn signal in use. LDW
may not detect all lane markings or lane departures; accuracy will vary based on
weather, speed, and lane marker condition. It is always your responsibility to safely
operate the vehicle and avoid collisions.
Lane departure
message
Audible
beep
LDW
button Indicator
*if equipped
Forward Collision Warning (FCW) with Pedestrian Detection*
Warns you if the system determines there is likelihood of a frontal collision when
a vehicle is detected in front of you when your vehicle speed is 10 mph (16 km/h)
or higher, or a pedestrian is detected in front of you when your vehicle speed is
between 10–62 mph (16–100 km/h).
If you do not brake in time or
take preventive action, a visual
warning flashes*, BRAKE flashes
in the MID, and a beep sounds
continuously.
Changing Settings
Determine the warning timing, or turn the system off. Use the interface dial to
make selections.
1. Press SETTINGS.
2. Select Vehicle Settings. The vehicle must be in
Park (P).
3. Select Forward Collision Warning Distance.
4. Select Long, Normal (default), Short, or Off.
5. Press BACK to exit the menu.
Important Safety Reminder
FCW cannot detect all pedestrians and vehicles ahead; accuracy of the system will
vary based on weather, speed, extreme interior heat, and other factors. FCW does
not include a braking function. It is always your responsibility to safely operate the
vehicle and avoid collisions.
BRAKE message
Audible
beep Visual warning*
*if equipped
Page 49 of 75
90 || 91
DRIVING
DRIVING
TABLE OF
CONTENTS
INDEX
VISUAL INDEX
VOICE COMMAND INDEX
SAFETY
INFORMATION
CLIENT
INFORMATION
INSTRUMENT PANEL
SPECIFICATIONS
VEHICLE
CONTROLS
MAINTENANCE
AUDIO AND
CONNECTIVITY
HANDLING THE UNEXPECTED
BLUETOOTH®
HANDSFREELINK®
DRIVING
ACURALINK®
NAVIGATION
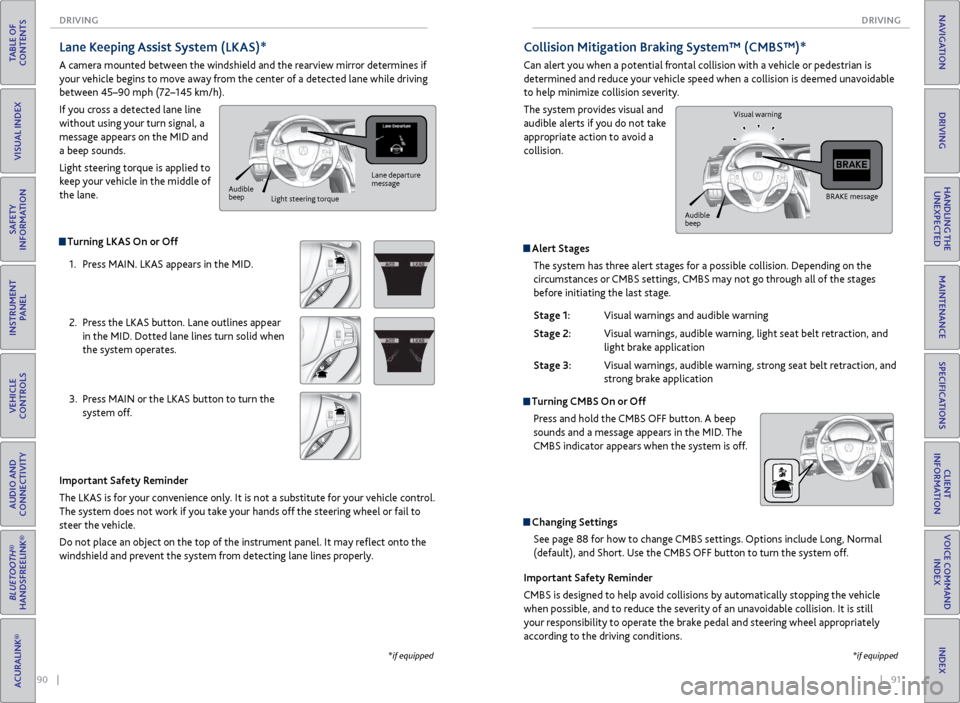
Collision Mitigation Braking System™ (CMBS™)*
Can alert you when a potential frontal collision with a vehicle or pedestrian is
determined and reduce your vehicle speed when a collision is deemed unavoidable
to help minimize collision severity.
The system provides visual and
audible alerts if you do not take
appropriate action to avoid a
collision.
Alert Stages
The system has three alert stages for a possible collision. Depending on the
circumstances or CMBS settings, CMBS may not go through all of the stages
before initiating the last stage.
Stage 1: Visual warnings and audible warning
Stage 2: Visual warnings, audible warning, light seat belt retraction, and
light brake application
Stage 3: Visual warnings, audible warning, strong seat belt retraction, and
strong brake application
Turning CMBS On or Off
Press and hold the CMBS OFF button. A beep
sounds and a message appears in the MID. The
CMBS indicator appears when the system is off.
Changing SettingsSee page 88 for how to change CMBS settings. Options include Long, Normal
(default), and Short. Use the CMBS OFF button to turn the system off.
Important Safety Reminder
CMBS is designed to help avoid collisions by automatically stopping the vehicle
when possible, and to reduce the severity of an unavoidable collision. It is still
your responsibility to operate the brake pedal and steering wheel appropriately
according to the driving conditions.
BRAKE message
Audible
beep Visual warning
*if equipped
Turning LKAS On or Off
1. Press MAIN. LKAS appears in the MID.
2. Press the LKAS button. Lane outlines appear
in the MID. Dotted lane lines turn solid when
the system operates.
3. Press MAIN or the LKAS button to turn the
system off.
Lane Keeping Assist System (LKAS)*
A camera mounted between the windshield and the rearview mirror determines if
your vehicle begins to move away from the center of a detected lane while driving
between 45–90 mph (72–145 km/h).
If you cross a detected lane line
without using your turn signal, a
message appears on the MID and
a beep sounds.
Light steering torque is applied to
keep your vehicle in the middle of
the lane.
Important Safety Reminder
The LKAS is for your convenience only. It is not a substitute for your vehicle control.
The system does not work if you take your hands off the steering wheel or fail to
steer the vehicle.
Do not place an object on the top of the instrument panel. It may reflect onto the
windshield and prevent the system from detecting lane lines properly.
Lane departure
message
Audible
beep Light steering torque
*if equipped
Page 50 of 75
92 || 93
DRIVING
DRIVING
TABLE OF
CONTENTS
INDEX
VISUAL INDEX
VOICE COMMAND INDEX
SAFETY
INFORMATION
CLIENT
INFORMATION
INSTRUMENT PANEL
SPECIFICATIONS
VEHICLE
CONTROLS
MAINTENANCE
AUDIO AND
CONNECTIVITY
HANDLING THE UNEXPECTED
BLUETOOTH®
HANDSFREELINK®
DRIVING
ACURALINK®
NAVIGATION
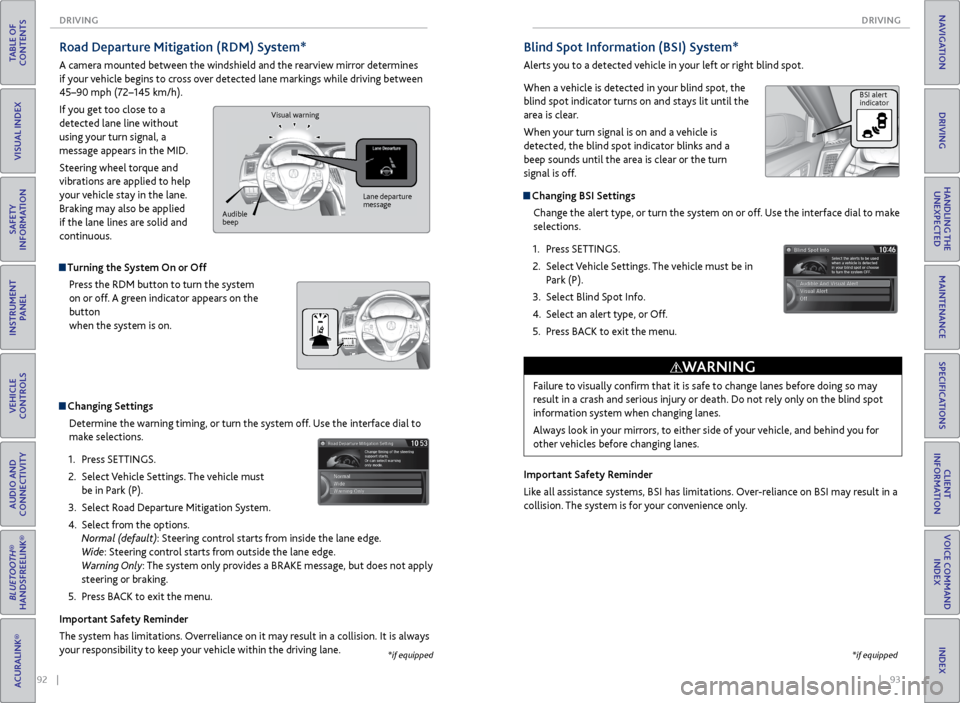
Blind Spot Information (BSI) System*
Alerts you to a detected vehicle in your left or right blind spot.
When a vehicle is detected in your blind spot, the
blind spot indicator turns on and stays lit until the
area is clear.
When your turn signal is on and a vehicle is
detected, the blind spot indicator blinks and a
beep sounds until the area is clear or the turn
signal is off.
Changing BSI Settings
Change the alert type, or turn the system on or off. Use the interface dial to make
selections.
1. Press SETTINGS.
2. Select Vehicle Settings. The vehicle must be in
Park (P).
3. Select Blind Spot Info.
4. Select an alert type, or Off.
5. Press BACK to exit the menu.
Important Safety Reminder
Like all assistance systems, BSI has limitations. Over-reliance on BSI may result in a
collision. The system is for your convenience only.
Failure to visually confirm that it is safe to change lanes before doing so may
result in a crash and serious injury or death. Do not rely only on the blind spot
information system when changing lanes.
Always look in your mirrors, to either side of your vehicle, and behind you for
other vehicles before changing lanes.
WARNING
BSI alert
indicator
*if equipped
Road Departure Mitigation (RDM) System*
A camera mounted between the windshield and the rearview mirror determines
if your vehicle begins to cross over detected lane markings while driving between
45–90 mph (72–145 km/h).
If you get too close to a
detected lane line without
using your turn signal, a
message appears in the MID.
Steering wheel torque and
vibrations are applied to help
your vehicle stay in the lane.
Braking may also be applied
if the lane lines are solid and
continuous.
Turning the System On or Off Press the RDM button to turn the system
on or off. A green indicator appears on the
button
when the system is on.
Changing SettingsDetermine the warning timing, or turn the system off. Use the interface dial to
make selections.
1. Press SETTINGS.
2. Select Vehicle Settings. The vehicle must
be in Park (P).
3. Select Road Departure Mitigation System.
4. Select from the options.
Normal (default): Steering control starts from inside the lane edge.
Wide: Steering control starts from outside the lane edge.
Warning Only: The system only provides a BRAKE message, but does not apply
steering or braking.
5. Press BACK to exit the menu.
Important Safety Reminder
The system has limitations. Overreliance on it may result in a collision. It is always
your responsibility to keep your vehicle within the driving lane.
Lane departure
message
Audible
beep Visual warning
*if equipped
Page 63 of 75
118 || 119
MAINTENANCE
MAINTENANCE
TABLE OF
CONTENTS
INDEX
VISUAL INDEX
VOICE COMMAND INDEX
SAFETY
INFORMATION
CLIENT
INFORMATION
INSTRUMENT PANEL
SPECIFICATIONS
VEHICLE
CONTROLS
MAINTENANCE
AUDIO AND
CONNECTIVITY
HANDLING THE UNEXPECTED
BLUETOOTH®
HANDSFREELINK®
DRIVING
ACURALINK®
NAVIGATION
Engine Coolant
Park the vehicle on level ground. Check the reserve tank and the coolant level in the
radiator. We recommend Acura Long Life Antifreeze/Coolant Type 2.
Checking the Reserve Tank
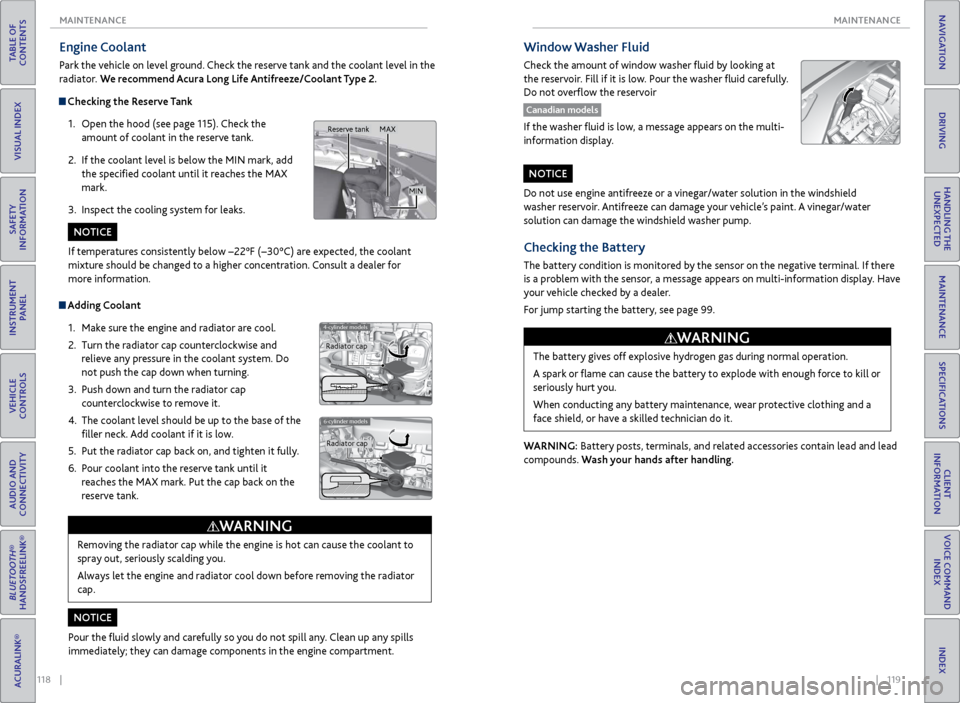
1. Open the hood (see page 115). Check the
amount of coolant in the reserve tank.
2. If the coolant level is below the MIN mark, add
the specified coolant until it reaches the MAX
mark.
3. Inspect the cooling system for leaks.
Adding Coolant
1. Make sure the engine and radiator are cool.
2. Turn the radiator cap counterclockwise and
relieve any pressure in the coolant system. Do
not push the cap down when turning.
3. Push down and turn the radiator cap
counterclockwise to remove it.
4. The coolant level should be up to the base of the
filler neck. Add coolant if it is low.
5. Put the radiator cap back on, and tighten it fully.
6. Pour coolant into the reserve tank until it
reaches the MAX mark. Put the cap back on the
reserve tank.
4-cylinder models
6-cylinder models
Removing the radiator cap while the engine is hot can cause the coolant to
spray out, seriously scalding you.
Always let the engine and radiator cool down before removing the radiator
cap.
WARNING
If temperatures consistently below −22°F (−30°C) are expected, the coolant
mixture should be changed to a higher concentration. Consult a dealer for
more information.
Pour the fluid slowly and carefully so you do not spill any. Clean up any spills
immediately; they can damage components in the engine compartment.
NOTICE
NOTICE
Radiator cap Radiator cap
MAX
MIN
Reserve tank
Do not use engine antifreeze or a vinegar/water solution in the windshield
washer reservoir. Antifreeze can damage your vehicle’s paint. A vinegar/water
solution can damage the windshield washer pump.
NOTICE
Checking the Battery
The battery condition is monitored by the sensor on the negative terminal. If there
is a problem with the sensor, a message appears on multi-information display. Have
your vehicle checked by a dealer.
For jump starting the battery, see page 99.
WARNING: Battery posts, terminals, and related accessories contain lead and lead
compounds. Wash your hands after handling.The battery gives off explosive hydrogen gas during normal operation.
A spark or flame can cause the battery to explode with enough force to kill or
seriously hurt you.
When conducting any battery maintenance, wear protective clothing and a
face shield, or have a skilled technician do it.
WARNING
Window Washer Fluid
Check the amount of window washer fluid by looking at
the reservoir. Fill if it is low. Pour the washer fluid carefully.
Do not overflow the reservoir
Canadian models
If the washer fluid is low, a message appears on the multi-
information display.
Page 64 of 75
120 || 121
MAINTENANCE
MAINTENANCE
TABLE OF
CONTENTS
INDEX
VISUAL INDEX
VOICE COMMAND INDEX
SAFETY
INFORMATION
CLIENT
INFORMATION
INSTRUMENT PANEL
SPECIFICATIONS
VEHICLE
CONTROLS
MAINTENANCE
AUDIO AND
CONNECTIVITY
HANDLING THE UNEXPECTED
BLUETOOTH®
HANDSFREELINK®
DRIVING
ACURALINK®
NAVIGATION
Changing Wiper Blades
If the wiper blades leave streaks across the windshield, try cleaning them first
with a paper towel or soft cloth and wiper fluid. If the wiper blade rubber has
deteriorated, you should change the wiper blades.
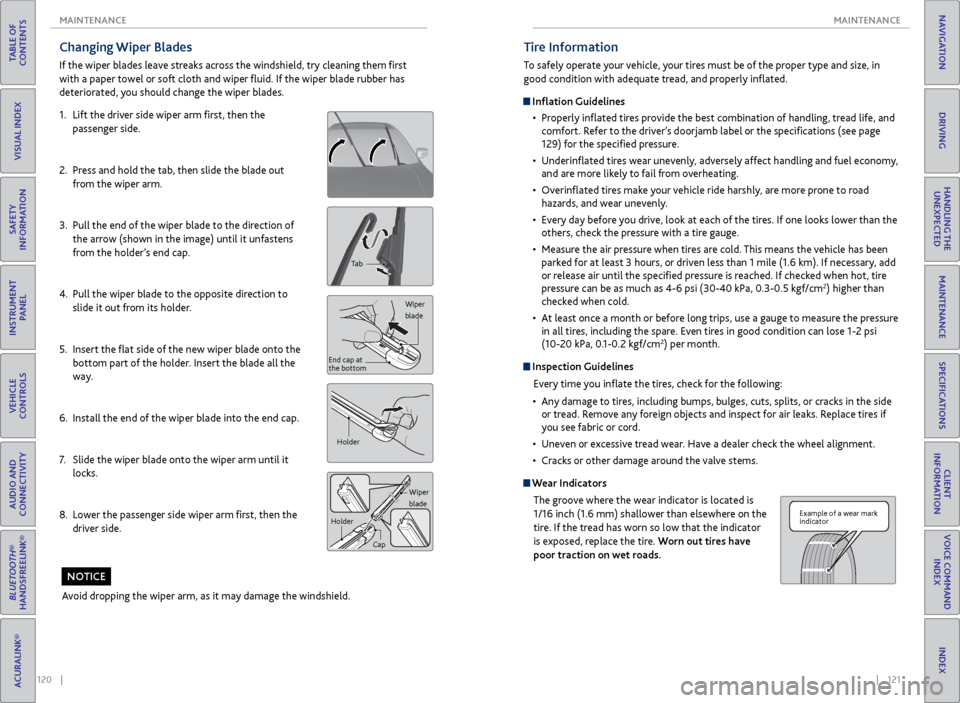
1. Lift the driver side wiper arm first, then the
passenger side.
2. Press and hold the tab, then slide the blade out
from the wiper arm.
3. Pull the end of the wiper blade to the direction of
the arrow (shown in the image) until it unfastens
from the holder’s end cap.
4. Pull the wiper blade to the opposite direction to
slide it out from its holder.
5. Insert the flat side of the new wiper blade onto the
bottom part of the holder. Insert the blade all the
way.
6. Install the end of the wiper blade into the end cap.
7. Slide the wiper blade onto the wiper arm until it
locks.
8. Lower the passenger side wiper arm first, then the
driver side.
Tab
Wiper
blade
End cap at
the bottom
Holder
Wiper
blade
Holder
Cap
Avoid dropping the wiper arm, as it may damage the windshield.
NOTICE
Tire Information
To safely operate your vehicle, your tires must be of the proper type and size, in
good condition with adequate tread, and properly inflated.
Inflation Guidelines• Properly inflated tires provide the best combination of handling, tread life, and
comfort. Refer to the driver’s doorjamb label or the specifications (see page
129) for the specified pressure.
• Underinflated tires wear unevenly, adversely affect handling and fuel economy,
and are more likely to fail from overheating.
• Overinflated tires make your vehicle ride harshly, are more prone to road
hazards, and wear unevenly.
• Every day before you drive, look at each of the tires. If one looks lower than the
others, check the pressure with a tire gauge.
• Measure the air pressure when tires are cold. This means the vehicle has been
parked for at least 3 hours, or driven less than 1 mile (1.6 km). If necessary, add
or release air until the specified pressure is reached. If checked when hot, tire
pressure can be as much as 4-6 psi (30-40 kPa, 0.3-0.5 kgf/cm
2) higher than
checked when cold.
• At least once a month or before long trips, use a gauge to measure the pressure
in all tires, including the spare. Even tires in good condition can lose 1-2 psi
(10-20 kPa, 0.1-0.2 kgf/cm
2) per month.
Inspection Guidelines
Every time you inflate the tires, check for the following:
• Any damage to tires, including bumps, bulges, cuts, splits, or cracks in the side
or tread. Remove any foreign objects and inspect for air leaks. Replace tires if
you see fabric or cord.
• Uneven or excessive tread wear. Have a dealer check the wheel alignment.
• Cracks or other damage around the valve stems.
Wear Indicators
The groove where the wear indicator is located is
1/16 inch (1.6 mm) shallower than elsewhere on the
tire. If the tread has worn so low that the indicator
is exposed, replace the tire. Worn out tires have
poor traction on wet roads.
Example of a wear mark
indicator