display Acura TLX 2015 Owner's Manual
[x] Cancel search | Manufacturer: ACURA, Model Year: 2015, Model line: TLX, Model: Acura TLX 2015Pages: 545, PDF Size: 19.64 MB
Page 3 of 545
ContentsThis owner’s manual should be considered a permanent part of the
vehicle and should remain with the vehicle when it is sold.
This owner’s manual covers all models of your vehicle. You may find
descriptions of equipment and features that are not on your
particular model.
Images throughout this owner’s manual (including the front cover)
represent features and equipment that are available on some, but
not all, models. Your particular model may not have some of these
features.
This owner’s manual is for vehicles sold in the United States and
Canada.
The information and specifications included in this publication were
in effect at the time of approval for printing. Honda Motor Co., Ltd.
reserves the right, however, to discontinue or change specifications
or design at any time without notice and without incurring any
obligation.
2Safe Driving P. 27For Safe Driving P. 28 Seat Belts P. 32 Airbags P. 392Instrument Panel P. 69Indicators P. 70 Gauges and Multi-Information Display P. 1172Controls P. 137Clock P. 138 Locking and Unlocking the Doors P. 139
Opening and Closing the Moonroof P. 160
Adjusting the Seats P. 1802 Features P. 209Audio System P. 210 Audio System Basic Operation P. 215
Customized Features P. 259 HomeLink® Universal Transceiver P. 2772 Driving P. 315Before Driving P. 316 Towing a Trailer P. 321
Multi-View Rear Camera P. 419 Refueling P. 4202 Maintenance P. 425Before Performing Maintenance P. 426 Maintenance Minder
TM P. 429
Checking and Maintaining Wiper Blades P. 454
Climate Control System Maintenance P. 469
2 Handling the Unexpected P. 475Tools P. 476 If a Tire Goes Flat P. 477
Overheating P. 503 Indicator, Coming On/Blinking P. 505
When You Cannot Open the Trunk P. 5172 Information P. 519Specifications P. 520 Identification Numbers P. 524
Emissions Testing P. 527 Warranty Coverages P. 529
Page 5 of 545
4Quick Reference Guide
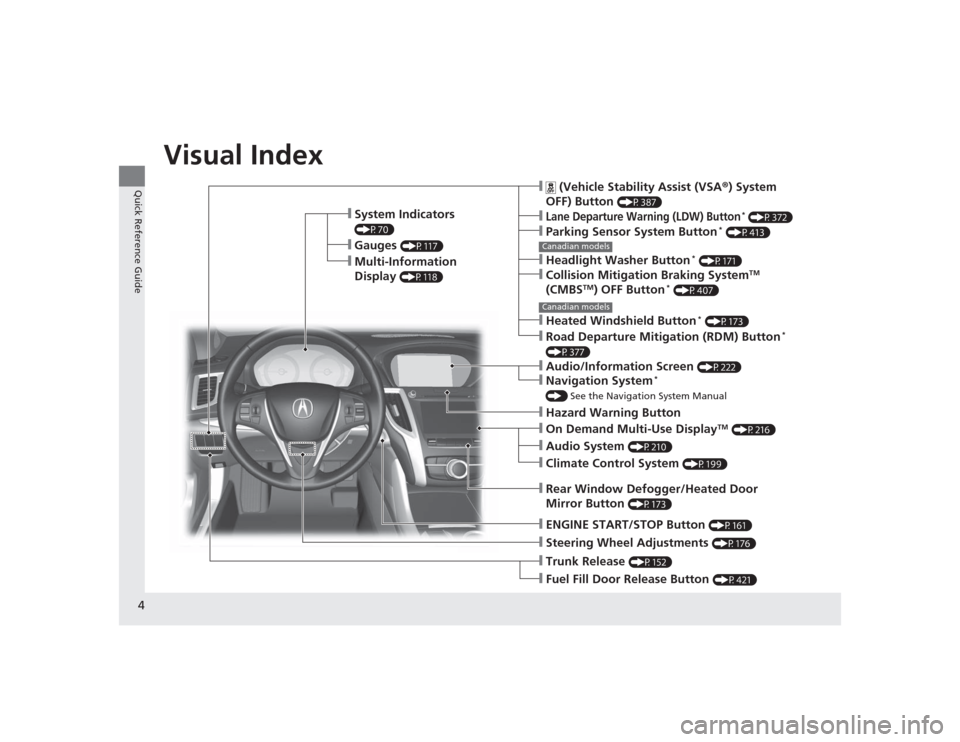
Quick Reference GuideVisual Index
❙System Indicators (P70)❙Gauges
(P117)
❙Multi-Information
Display
(P118)
❙Steering Wheel Adjustments
(P176)
❙ENGINE START/STOP Button
(P161)
❙Hazard Warning Button❙Rear Window Defogger/Heated Door
Mirror Button
(P173)
Canadian models❙
(Vehicle Stability Assist (VSA ®) System
OFF) Button
(P387)
❙Lane Departure Warning (LDW) Button
* (P372)
❙Parking Sensor System Button
* (P413)
❙Collision Mitigation Braking System
TM
(CMBS
TM) OFF Button
* (P407)
❙Headlight Washer Button
* (P171)
❙Heated Windshield Button
* (P173)
❙Road Departure Mitigation (RDM) Button
*
(P377)❙On Demand Multi-Use Display
TM (P216)
❙Audio System
(P210)
❙Climate Control System
(P199)
❙Trunk Release
(P152)
❙Fuel Fill Door Release Button
(P421)
Canadian models❙Navigation System
*
() See the Navigation System Manual❙Audio/Information Screen
(P222)
Page 12 of 545
11Quick Reference Guide
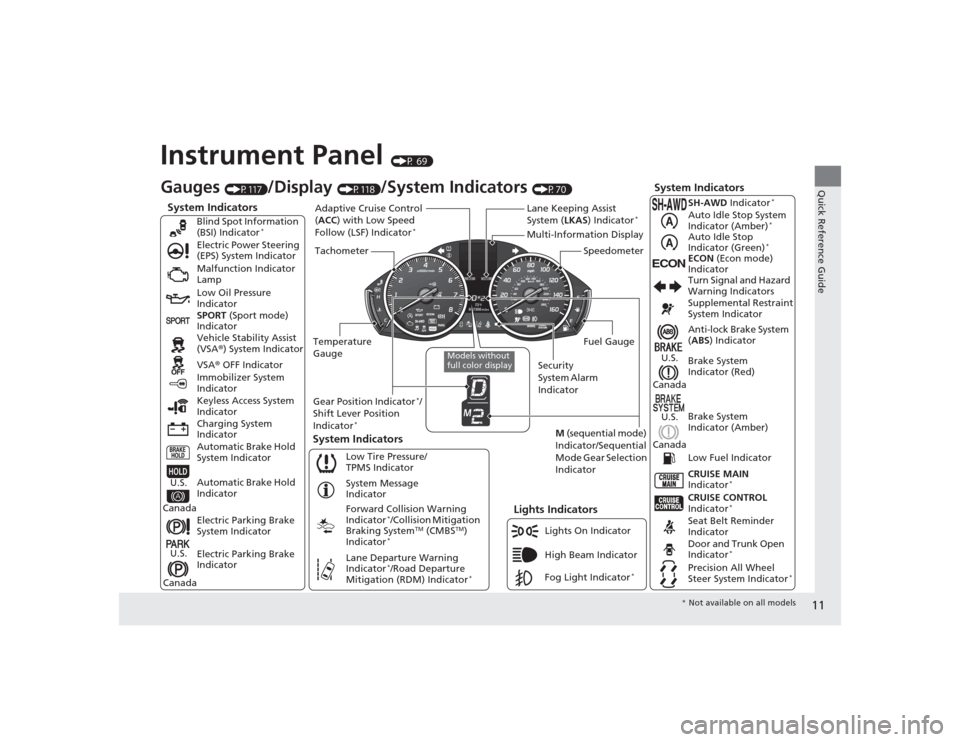
Instrument Panel
(P 69)
System Indicators
Malfunction Indicator
Lamp
Low Oil Pressure
Indicator
Charging System
Indicator Vehicle Stability Assist
(VSA®) System Indicator
VSA ® OFF Indicator
Electric Power Steering
(EPS) System Indicator
Lights Indicators
Lights On Indicator
High Beam Indicator
Immobilizer System
Indicator
System Indicators
System Message
Indicator
Gauges
(P117)
/Display
(P118)
/System Indicators
(P70)
Low Tire Pressure/
TPMS Indicator
Keyless Access System
Indicator
Electric Parking Brake
System Indicator
Electric Parking Brake
Indicator Automatic Brake Hold
System Indicator SPORT
(Sport mode)
Indicator Blind Spot Information
(BSI) Indicator
*
Forward Collision Warning
Indicator
*/Collision Mitigation
Braking System
TM (CMBS
TM)
Indicator
*
Lane Departure Warning
Indicator
*/Road Departure
Mitigation (RDM) Indicator
*
Automatic Brake Hold
Indicator
U.S.
CanadaU.S.
Canada
Fog Light Indicator
*
Temperature
Gauge Security
System Alarm
IndicatorFuel Gauge
Tachometer
Multi-Information Display
Speedometer
Gear Position Indicator
*/
Shift Lever Position
Indicator
*
M (sequential mode)
Indicator/Sequential
Mode Gear Selection
Indicator
System Indicators
Lane Keeping Assist
System ( LKAS) Indicator
*
Adaptive Cruise Control
(ACC ) with Low Speed
Follow (LSF) Indicator
*
Models without
full color display
Anti-lock Brake System
( ABS ) Indicator
Seat Belt Reminder
Indicator CRUISE CONTROL
Indicator
*
Brake System
Indicator (Red) Supplemental Restraint
System Indicator
CRUISE MAIN
Indicator
*
Low Fuel Indicator Turn Signal and Hazard
Warning Indicators
Brake System
Indicator (Amber)
U.S.
Canada
U.S.
Canada
Door and Trunk Open
Indicator
*
Precision All Wheel
Steer System Indicator
*
ECON
ECON (Econ mode)
Indicator SH-AWD Indicator
*
Auto Idle Stop System
Indicator (Amber)
*
Auto Idle Stop
Indicator (Green)
*
* Not available on all models
Page 16 of 545
15Quick Reference Guide
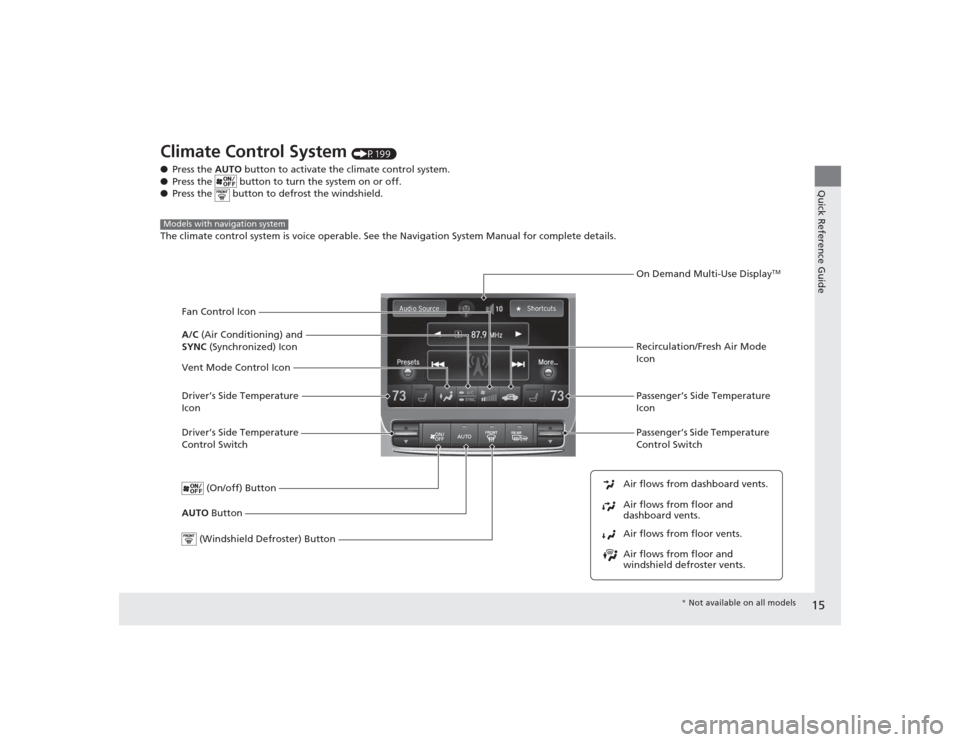
Climate Control System
(P199)
● Press the AUTO button to activate the climate control system.
● Press the button to turn the system on or off.
● Press the button to defrost the windshield.
The climate control system is voice operable. See the Navigation System Manual for complete details.
Models with navigation system
Driver’s Side Temperature
Control Switch
Air flows from floor and
windshield defroster vents. Air flows from floor vents. Air flows from floor and
dashboard vents. Air flows from dashboard vents.AUTO Button Passenger’s Side Temperature
Control Switch
(On/off) ButtonDriver’s Side Temperature
Icon Passenger’s Side Temperature
Icon
On Demand Multi-Use Display
TM
(Windshield Defroster) Button
Vent Mode Control Icon A/C
(Air Conditioning) and
SYNC (Synchronized) Icon
Recirculation/Fresh Air Mode
Icon
Fan Control Icon
*
Not available on all models
Page 17 of 545
16Quick Reference Guide
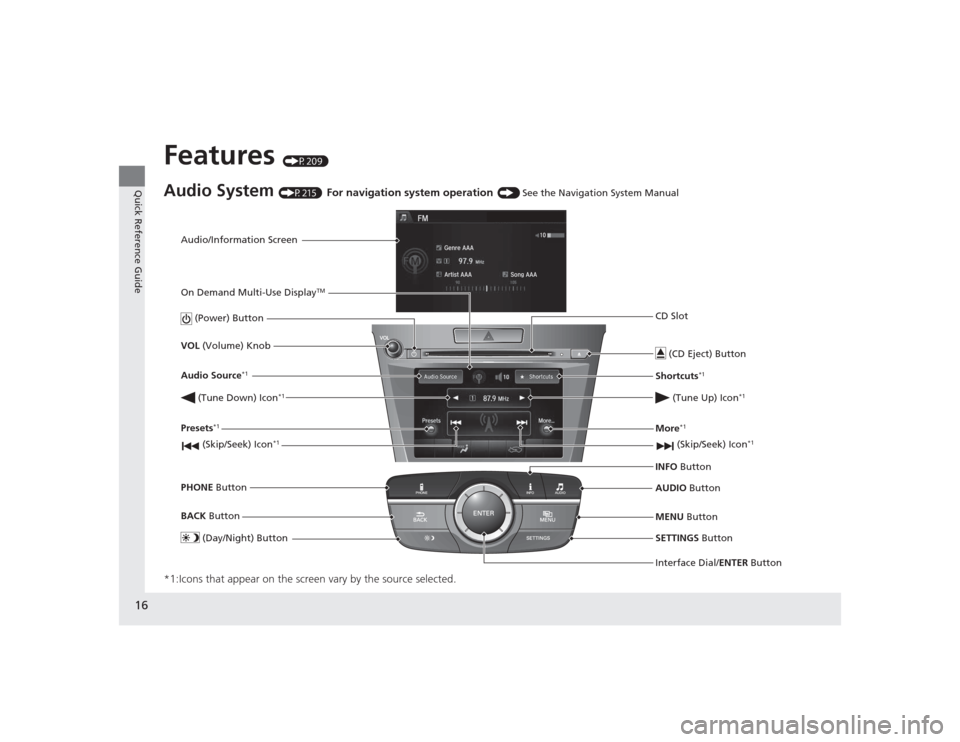
Features
(P209)
Audio System
(P215)
For navigation system operation
() See the Navigation System Manual
*1:Icons that appear on the screen vary by the source selected.
Audio/Information Screen
Interface Dial/ENTER Button
(Power) Button
CD Slot
(CD Eject) ButtonSETTINGS Button
VOL
(Volume) Knob
BACK Button
MENU Button
AUDIO
Button
INFO
Button
On Demand Multi-Use Display
TM
PHONE
Button
(Tune Down) Icon
*1
(Skip/Seek) Icon
*1
Audio Source
*1
(Skip/Seek) Icon
*1
Presets
*1
(Tune Up) Icon
*1
More
*1
(Day/Night) Button
Shortcuts
*1
Page 19 of 545
18Quick Reference Guide
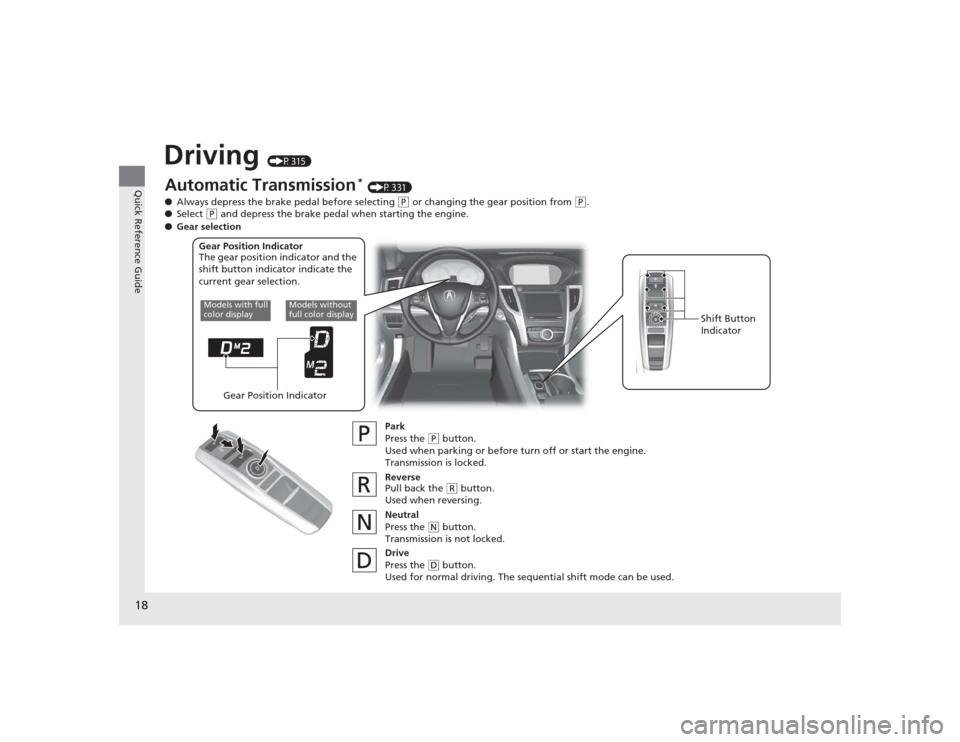
Driving
(P315)
Automatic Transmission
* (P331)
● Always depress the brake pedal before selecting
(P or changing the gear position from
(P.
● Select
(P and depress the brake pedal when starting the engine.
Park
Press the
(P button.
Used when parking or before turn off or start the engine.
Transmission is locked.
Reverse
Pull back the ( R button.
Used when reversing.
Neutral
Press the
( N button.
Transmission is not locked.
Drive
Press the ( D button.
Used for normal driving. The sequential shift mode can be used.
Gear Position Indicator
The gear position indicator and the
shift button indicator indicate the
current gear selection.
Gear Position Indicator Shift Button
Indicator
●
Gear selection
Models without
full color display
Models with full
color display
Page 20 of 545
19Quick Reference Guide
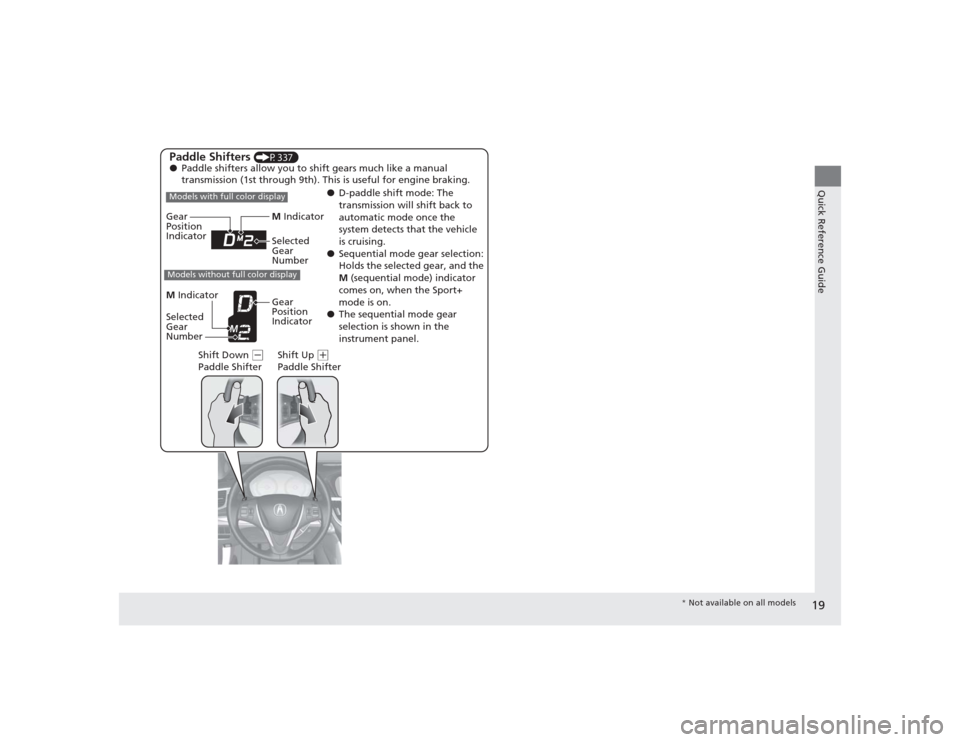
Paddle Shifters
(P337)
● Paddle shifters allow you to shift gears much like a manual
transmission (1st through 9th). This is useful for engine braking.
●D-paddle shift mode: The
transmission will shift back to
automatic mode once the
system detects that the vehicle
is cruising.
● Sequential mode gear selection:
Holds the selected gear, and the
M (sequential mode) indicator
comes on, when the Sport+
mode is on.
● The sequential mode gear
selection is shown in the
instrument panel.
Gear
Position
Indicator
Shift Down (-
Paddle Shifter Shift Up
(
+
Paddle Shifter
Selected
Gear
Number M Indicator
Models with full color displayModels without full color displayM Indicator
Selected
Gear
Number Gear
Position
Indicator
*
Not available on all models
Page 21 of 545
20Quick Reference Guide
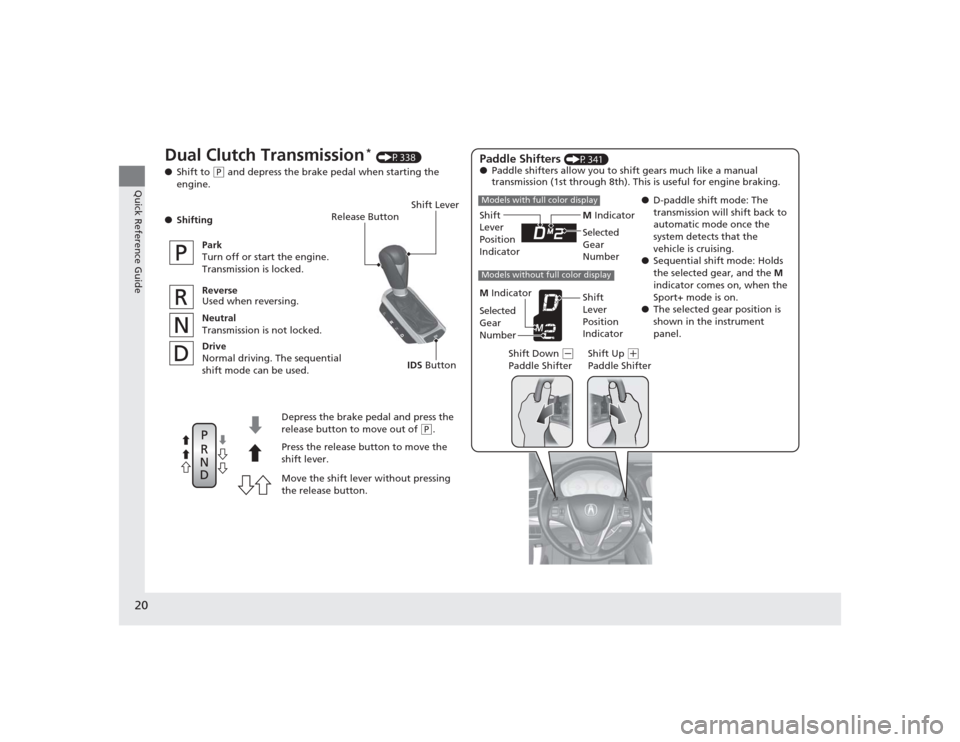
Release Button
Depress the brake pedal and press the
release button to move out of
( P.
Move the shift lever without pressing
the release button. Press the release button to move the
shift lever.
Dual Clutch Transmission
* (P338)
● Shift to
(P and depress the brake pedal when starting the
engine.
● Shifting
Park
Turn off or start the engine.
Transmission is locked.
Reverse
Used when reversing.
Neutral
Transmission is not locked.
Drive
Normal driving. The sequential
shift mode can be used.
Paddle Shifters
(P341)
● Paddle shifters allow you to shift gears much like a manual
transmission (1st through 8th). This is useful for engine braking.
●D-paddle shift mode: The
transmission will shift back to
automatic mode once the
system detects that the
vehicle is cruising.
● Sequential shift mode: Holds
the selected gear, and the M
indicator comes on, when the
Sport+ mode is on.
● The selected gear position is
shown in the instrument
panel.
M
Indicator
Shift
Lever
Position
Indicator
Shift Lever
Shift Down
(-
Paddle Shifter Shift Up
(
+
Paddle Shifter
Models with full color displayModels without full color display
Selected
Gear
Number
M Indicator
Shift
Lever
Position
Indicator
Selected
Gear
Number
IDS
Button
Page 32 of 545
31
uuFor Safe Driving uYour Vehicle’s Safety Features
Safe Driving
For the safety of you and your passengers, make a habit of checking these items
each time before you drive.
• After everyone has entered the vehicle, be sure all doors are closed and locked.
Locking the doors helps prevent an occupant from being ejected and an outsider
from unexpectedly opening a door.
2 Locking/Unlocking the Doors from the Inside P. 148
•Adjust your seat to a position suitable for driving. Be sure the front seats are
adjusted as far to the rear as possible while allowing the driver to control the
vehicle. Sitting too close to a front airbag can result in serious or fatal injury in a
crash.
2 Adjusting the Seats P. 180
•Adjust head restraints to the proper position. Head restraints are most effective
when the center of the head restraint aligns with the center of your head. Taller
persons should adjust their head restraint to the highest position.
2 Adjusting the Head Restraints P. 182
•Always wear your seat belt, and make sure you wear it properly. Confirm that any
passengers are properly belted as well.
2 Fastening a Seat Belt P. 35
•Protect children by using seat belts or child seats according to a child’s age, height
and weight.
2 Child Safety P. 54
■
Safety Checklist
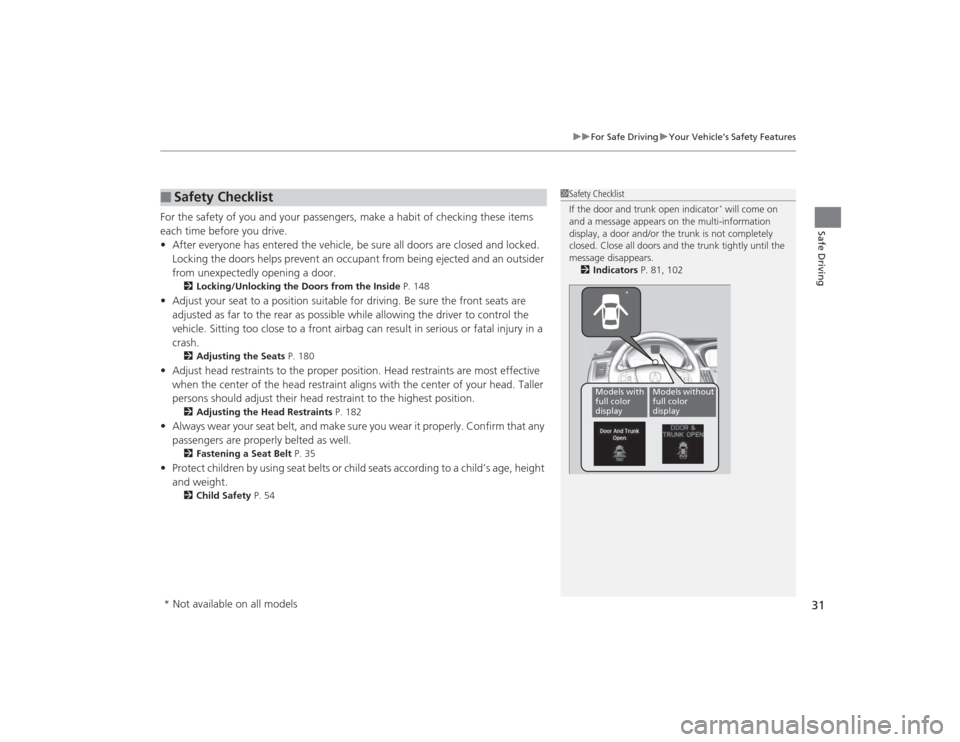
1Safety Checklist
If the door and trunk open indicator
* will come on
and a message appears on the multi-information
display, a door and/or the trunk is not completely
closed. Close all doors and the trunk tightly until the
message disappears.
2 Indicators P. 81, 102
*
Models with
full color
display
Models without
full color
display
* Not available on all models
Page 34 of 545
Continued
33
uuSeat Belts uAbout Your Seat Belts
Safe Driving
■Proper use of seat belts
Follow these guidelines for proper use:
• All occupants should sit upright, well back in the seat, and remain in that position
for the duration of the trip. Slouching and leaning reduce the effectiveness of the
belt and can increase the chance of serious injury in a crash.
• Never place the shoulder part of a lap/shoulder seat belt under your arm or
behind your back. This could cause very serious injuries in a crash.
• Two people should never use the same seat belt. If they do, they could be very
seriously injured in a crash.
• Do not put any accessories on the seat belts. Devices intended to improve comfort
or reposition the shoulder part of a seat belt can reduce the protective capability
and increase the chance of serious injury in a crash.
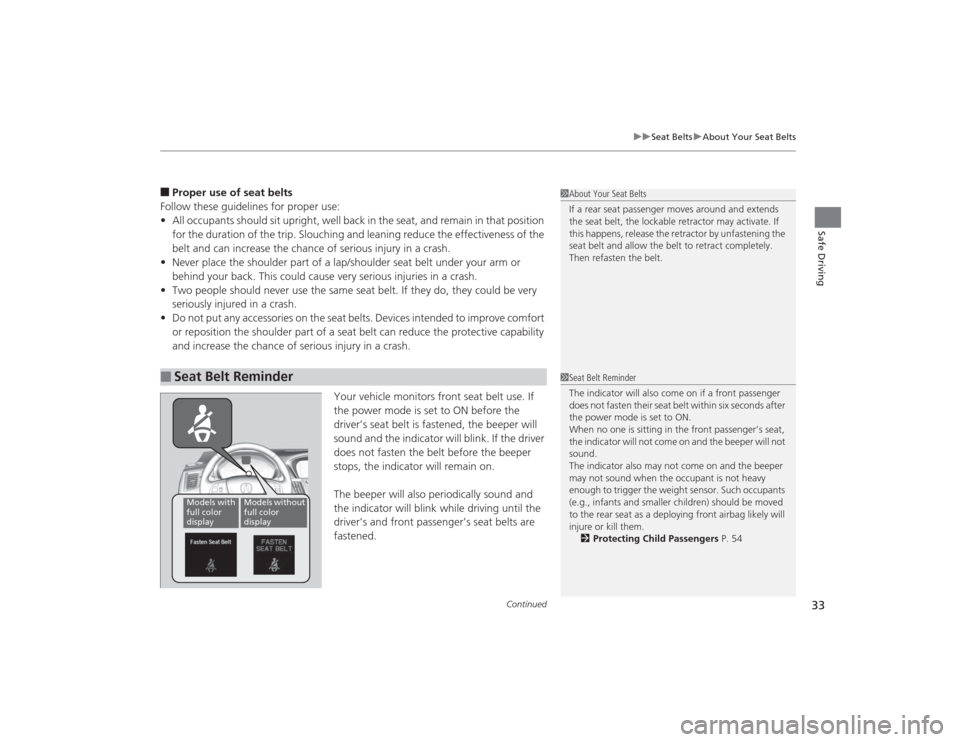
Your vehicle monitors front seat belt use. If
the power mode is set to ON before the
driver’s seat belt is fastened, the beeper will
sound and the indicator will blink. If the driver
does not fasten the belt before the beeper
stops, the indicator will remain on.
The beeper will also periodically sound and
the indicator will blink while driving until the
driver’s and front passenger’s seat belts are
fastened.■
Seat Belt Reminder
1About Your Seat Belts
If a rear seat passenger moves around and extends
the seat belt, the lockable retractor may activate. If
this happens, release the retractor by unfastening the
seat belt and allow the belt to retract completely.
Then refasten the belt.1 Seat Belt Reminder
The indicator will also come on if a front passenger
does not fasten their seat be lt within six seconds after
the power mode is set to ON.
When no one is sitting in the front passenger’s seat,
the indicator will not come on and the beeper will not
sound.
The indicator also may not come on and the beeper
may not sound when the occupant is not heavy
enough to trigger the weight sensor. Such occupants
(e.g., infants and smaller children) should be moved
to the rear seat as a depl oying front airbag likely will
injure or kill them. 2 Protecting Child Passengers P. 54
Models with
full color
display
Models without
full color
display