audio Acura TLX 2016 Owner's Manual
[x] Cancel search | Manufacturer: ACURA, Model Year: 2016, Model line: TLX, Model: Acura TLX 2016Pages: 553, PDF Size: 31.29 MB
Page 3 of 553

Contents
This owner’s manual should be considered a permanent part of the
vehicle and should remain with the vehicle when it is sold.
This owner’s manual covers all models of your vehicle. You may find
descriptions of equipment and features that are not on your
particular model.
Images throughout this owner’s manu al (including the front cover)
represent features and equipment that are available on some, but
not all, models. Your particular mo del may not have some of these
features.
This owner’s manual is for vehicles sold in the United States and
Canada.
The information and specifications in cluded in this publication were
in effect at the time of approval for printing. Honda Motor Co., Ltd.
reserves the right, however, to discontinue or change specifications
or design at any time without notice and without incurring any
obligation.2 Safe Driving P. 27
For Safe Driving P. 28 Seat Belts P. 32 Airbags P. 39
2Instrument Panel P. 69
Indicators P. 70 Gauges and Multi-Information Display P. 117
2Controls P. 137
Clock P. 138 Locking and Unlocking the Doors P. 139
Opening and Closing the Moonroof P. 160
Adjusting the Seats P. 180
2 Features P. 209
Audio System P. 210 Audio System Basic Operation P. 215
Customized Features P. 259 HomeLink® Universal Transceiver P. 277
2 Driving P. 317
Before Driving P. 318 Towing a Trailer P. 323
Multi-View Rear Camera P. 425 Refueling P. 426
2 Maintenance P. 431
Before Performing Maintenance P. 432 Maintenance MinderTM P. 435
Checking and Maintaining Wiper Blades P. 460
Climate Control System Maintenance P. 475
2Handling the Unexpected P. 481
Tools P. 482 If a Tire Goes Flat P. 483
Overheating P. 510 Indicator, Coming On/Blinking P. 512
When You Cannot Open the Trunk P. 524
2 Information P. 527
Specifications P. 528 Identification Numbers P. 532
Emissions Testing P. 535 Warranty Coverages P. 537
16 ACURA TLX-31TZ36100.book 2 ページ 2015年8月26日 水曜日 午後1時54分
Page 4 of 553

Contents
Child Safety P. 54Exhaust Gas Hazard P. 66Safety Labels P. 67
Opening and Closing the Trunk P. 152 Security System P. 155 Opening and Closing the Windows P. 158
Operating the Switches Around the Steering Wheel P. 161 Adjusting the Mirrors P. 177
Interior Lights/Interior Convenience It ems P. 187 Climate Control System P. 199
Audio Error Messages P. 250General Information on the Audio System P. 255
Bluetooth® HandsFreeLink ® P. 280 Compass* P. 314
When Driving P. 324 Braking P. 401Parking Your Vehicle P. 417
Fuel Economy P. 429 Accessories and Modifications P. 430
Maintenance Under the Hood P. 440 Replacing Light Bulbs P. 453
Checking and Maintaining Tires P. 462 Battery P. 471 Remote Transmitter Care P. 473
Cleaning P. 476
Engine Does Not Start P. 502Jump Starting P. 505 Shift Lever Does Not Move P. 509
Fuses P. 517 Emergency Towing P. 522 When You Cannot Unlock the Fuel Fill Door P. 523
Refueling P. 525
Devices that Emit Radio Waves P. 533 Reporting Safety Defects P. 534
Authorized Manuals P. 539 Client Service Information P. 540
Quick Reference GuideP. 4
Safe DrivingP. 27
Instrument PanelP. 69
ControlsP. 137
FeaturesP. 209
DrivingP. 317
MaintenanceP. 431
Handling the UnexpectedP. 481
InformationP. 527
IndexP. 542
16 ACURA TLX-31TZ36100.book 3 ページ 2015年8月26日 水曜日 午後1時54分
Page 5 of 553

4
Quick Reference Guide
Quick Reference Guide
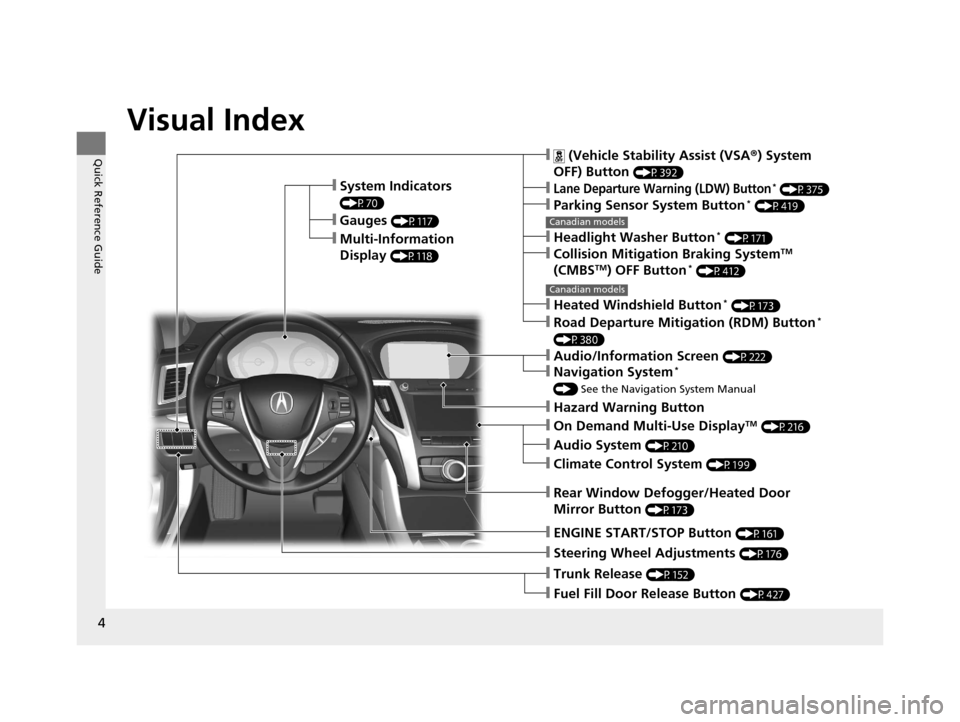
Visual Index
❙System Indicators
(P70)
❙Gauges (P117)
❙Multi-Information
Display
(P118)
❙Steering Wheel Adjustments (P176)
❙ENGINE START/STOP Button (P161)
❙Hazard Warning Button
❙Rear Window Defogger/Heated Door
Mirror Button
(P173)
Canadian models
❙ (Vehicle Stability Assist (VSA®) System
OFF) Button
(P392)
❙Lane Departure Warning (LDW) Button* (P375)
❙Parking Sensor System Button* (P419)
❙Collision Mitigation Braking SystemTM
(CMBSTM) OFF Button* (P412)
❙Headlight Washer Button* (P171)
❙Heated Windshield Button* (P173)
❙Road Departure Mitigation (RDM) Button*
(P380)
❙On Demand Multi-Use DisplayTM (P216)
❙Audio System (P210)
❙Climate Control System (P199)
❙Trunk Release (P152)
❙Fuel Fill Door Release Button (P427)
Canadian models
❙Navigation System*
() See the Navigation System Manual
❙Audio/Information Screen (P222)
16 ACURA TLX-31TZ36100.book 4 ページ 2015年8月26日 水曜日 午後1時54分
Page 6 of 553

5
Quick Reference Guide
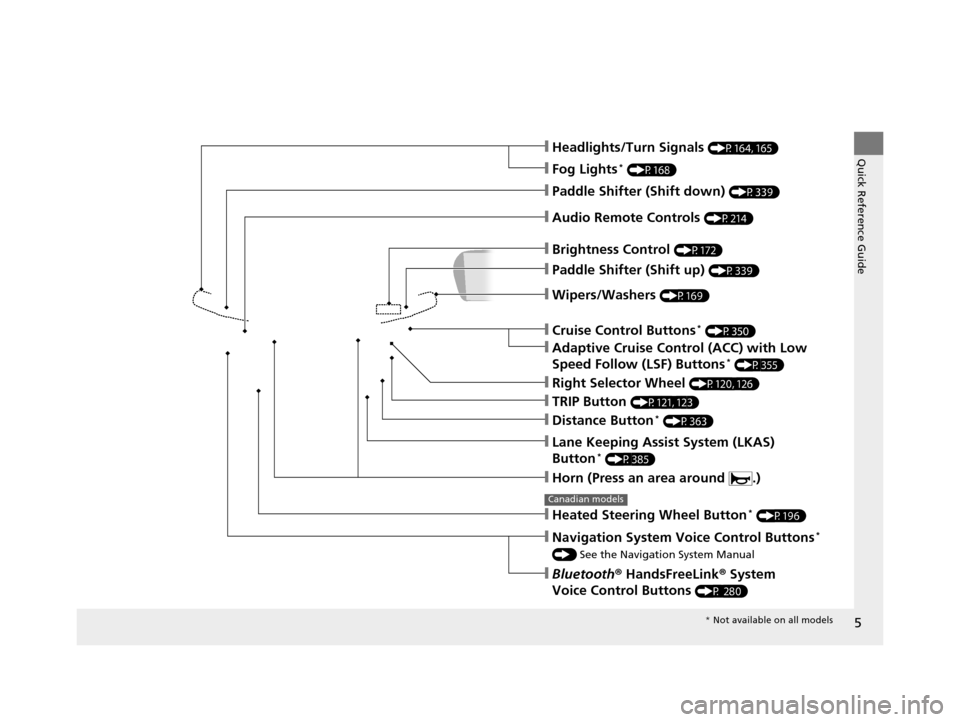
❙Wipers/Washers (P169)
❙Headlights/Turn Signals (P164, 165)
❙Paddle Shifter (Shift down) (P339)
❙Paddle Shifter (Shift up) (P339)
❙Horn (Press an area around .)
❙Navigation System Voice Control Buttons*
() See the Navigation System Manual
❙Bluetooth® HandsFreeLink ® System
Voice Control Buttons
(P 280)
❙Brightness Control (P172)
❙Cruise Control Buttons* (P350)
❙Adaptive Cruise Control (ACC) with Low
Speed Follow (LSF) Buttons* (P355)
❙TRIP Button (P121, 123)
❙Distance Button* (P363)
❙Lane Keeping Assist System (LKAS)
Button* (P385)
❙Right Selector Wheel (P120, 126)
❙Heated Steering Wheel Button* (P196)
Canadian models
❙Audio Remote Controls (P214)
❙Fog Lights* (P168)
* Not available on all models
16 ACURA TLX-31TZ36100.book 5 ページ 2015年8月26日 水曜日 午後1時54分
Page 17 of 553

16
Quick Reference Guide
Features (P209)
Audio System (P215) Image shown is for models without navigation system. For na vigation system operation
() See the Navigation System Manual
*1:Icons that appear on the screen vary by the source selected.
Audio/Information Screen
Interface Dial/ENTER Button
(Power) Button
CD Slot
(CD Eject) Button
SETTINGS Button
VOL
(Volume) Knob
BACK Button
MENU Button
AUDIO
Button
INFO
Button
On Demand Multi-Use Display
TM
PHONE
Button
(Tune Down) Icon
*1
(Skip/Seek) Icon*1
Audio Source*1
(Skip/Seek) Icon*1
Presets*1
(Tune Up) Icon*1
More*1
(Day/Night) Button
Shortcuts*1
16 ACURA TLX-31TZ36100.book 16 ページ 2015年8月26日 水曜日 午後1時54分
Page 18 of 553

17
Quick Reference Guide
Audio Remote Controls
(P214)
●SOURCE Button
Press to change the audio mode: FM/AM/
SiriusXM ®/CD/USB/iPod/Bluetooth® Audio/
Pandora ®
*/AhaTM */AUX.
● Left Selector Wheel
Roll to adjust the volume up/down.
Radio: Move to a side to change the
preset station.
Move to a side and hold to select
the next or previous strong station.
CD/USB device: Move to a side to skip to the
beginning of the next song or
return to the beginning of the
current song.
Move to a side and hold to change
a folder.
Left Selector Wheel
SOURCE Button
* Not available on all models
16 ACURA TLX-31TZ36100.book 17 ページ 2015年8月26日 水曜日 午後1時54分
Page 127 of 553

uuGauges and Multi-Information Display uMulti-Information Display
126
Instrument Panel
Use the multi-information display to customize certain features.
■How to customize
Select the Vehicle Settings screen by rolling the right selector wheel while the
power mode is in ON, and the vehicle is at a complete stop.
Push the right selector wheel.
■Customized Features1 Customized Features
To customize other features , roll the right selector
wheel.
2 List of customizable options P. 129
2 Example of customization settings P. 134
Customization is possible when you see the driver’s
ID ( Driver 1 or Driver 2) on the screen.
The driver’s ID indicates which remote transmitter
you have used to unlock the driver’s door. The
customized settings are recalled every time you
unlock the driver’s door with that remote.
Change to
( P before you attempt to change any
customized setting.
Customizing is also av ailable from the audio/
information screen.
You cannot have Vehicle Settings displayed on the
multi-information display while the audio/
information screen shows the same menu. 2 Customized Features P. 259
Right Selector Wheel
Roll: Changes the
customize menus and
items.
Push : Enters the selected
item.
Multi-information Display: Goes to Vehicle Settings.
Models without
full color displayModels with full
color display
16 ACURA TLX-31TZ36100.book 126 ページ 2015年8月26日 水曜日 午後1時54分
Page 139 of 553

138
Controls
Clock
Adjusting the Clock
You can also adjust the time manually in the audio/information screen, with the
power mode in ON.
■Using the Settings menu on th e audio/information screen
1. Press the SETTINGS button.
2. Rotate to select System Settings, then
press .
u Repeat the procedure to select Clock
Adjustment .
3. Rotate to change hour, then press .
4. Rotate to change minute, then press
.
■Adjusting the Time
1Adjusting the Clock
These indications are used to show how to operate
the interface dial.
Rotate to select.
Press to enter.
You can customize the clock display to show the 12
hour clock or 24 hour clock. 2 Customized Features P. 259
You can turn the clock display in the audio/
information screen on and off. 2 Customized Features P. 259
The clock is automatica lly updated through the
navigation system, so the ti me does not need to be
adjusted.
Models with navigation system
16 ACURA TLX-31TZ36100.book 138 ページ 2015年8月26日 水曜日 午後1時54分
Page 145 of 553

uuLocking and Unlocking the Doors uLocking/Unlocking the Doors from the Outside
144
Controls
■Unlocking the doors and the trunk
Grab the driver’s door handle:u The driver’s door unlocks.
u Some exterior lights flash twice and the
beeper sounds twice.
Grab the front passenger’s or rear
* door
handle: u All doors unlock.
u Some exterior lights flash twice and the
beeper sounds twice.
Press the trunk release button: u The trunk unlocks and opens.
u The beeper sounds.
2 Using the Trunk Release Button P. 153
Trunk
Release
Button
1Using the Keyless Access System
The light flash, beep a nd unlock settings can be
customized using the audio/information screen or
multi-information display. 2 Customized Features P. 126, 259
When you go into the front side of the keyless access
system working range with all the doors locked, the
puddle lights come on for 30 seconds.
The lights do not come on if you have previously
stayed within the range for more than two minutes,
or the doors have been locked for a few days.
The feature activates again after you drive the
vehicle, then lock the doors.
Models with puddle lights
* Not available on all models
16 ACURA TLX-31TZ36100.book 144 ページ 2015年8月26日 水曜日 午後1時54分
Page 150 of 553

Continued149
uuLocking and Unlocking the Doors uLocking/Unlocking the Doors from the Inside
Controls
Pull the front door inner handle.
u The door unlocks and opens in one
motion.
Unlocking and opening the driver’s door from the inner handle unlocks all the other
doors.
To avoid all the doors to be unlocked, use the lock tab on the driver’s door to unlock,
then lock again before opening the door. u This setting works for one time only. If you do not want all the doors to be
unlocked all the time, customize the Auto Door Unlock setting to Off using
the multi-information display or audio/information screen.
■Unlocking Using the Front Door Inner Handle1 Unlocking Using the Front Door Inner Handle
The front door inne r handles are designed to allow
front seat occupants to open the door in one motion.
However, this feature requires that front seat
occupants never pull a front door inner handle while
the vehicle is in motion.
Children should always ride in a rear seat where
childproof door locks are provided. 2 Childproof Door Locks P. 150
Inner Handle
16 ACURA TLX-31TZ36100.book 149 ページ 2015年8月26日 水曜日 午後1時54分