light Acura TLX 2017 Navigation Manual
[x] Cancel search | Manufacturer: ACURA, Model Year: 2017, Model line: TLX, Model: Acura TLX 2017Pages: 325, PDF Size: 19.46 MB
Page 7 of 325
6
Quick Reference GuideVoice Control Operation
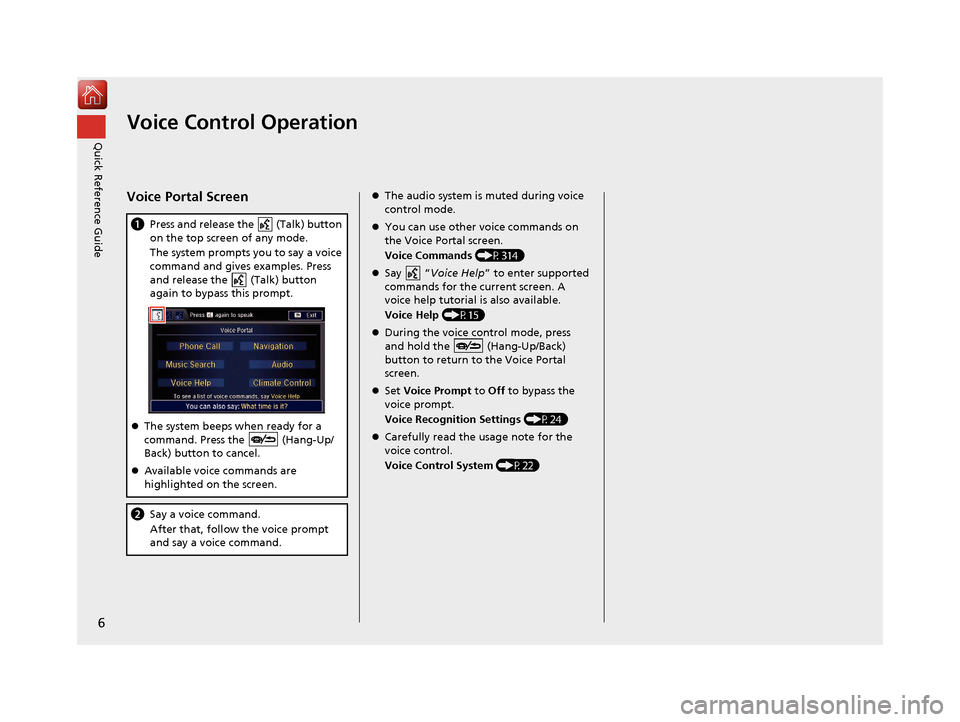
Voice Portal Screen
aPress and release the (Talk) button
on the top screen of any mode.
The system prompts you to say a voice
command and gives examples. Press
and release the (Talk) button
again to bypass this prompt.
The system beeps when ready for a
command. Press the (Hang-Up/
Back) button to cancel.
Available voice commands are
highlighted on the screen.
b Say a voice command.
After that, follow the voice prompt
and say a voice command.
The audio system is muted during voice
control mode.
You can use other voice commands on
the Voice Portal screen.
Voice Commands (P314)
Say “ Voice Help ” to enter supported
commands for the current screen. A
voice help tutorial is also available.
Voice Help (P15)
During the voice control mode, press
and hold the (Hang-Up/Back)
button to return to the Voice Portal
screen.
Set Voice Prompt to Off to bypass the
voice prompt.
Voice Recognition Settings (P24)
Carefully read the usage note for the
voice control.
Voice Control System (P22)
16 ACURA TLX NAVI-31TZ38100.book 6 ページ 2015年7月29日 水曜日 午後4時11分
Page 8 of 325
7
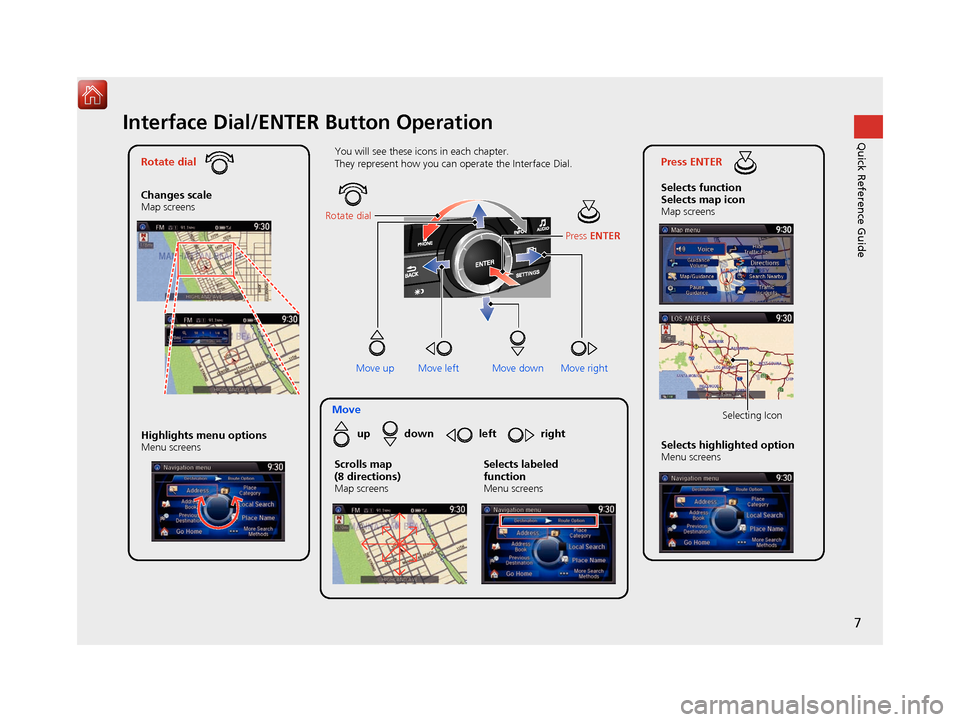
Quick Reference GuideInterface Dial/ENTER Button Operation
Rotate dial
Changes scale
Map screens
Press ENTER
Selects function
Selects map icon
Map screens
Moveup down left right
Highlights menu options
Menu screensSelects highlighted optionMenu screens Selecting Icon
You will see these icons in each chapter.
They represent how you can operate the Interface Dial.
Move up Move left Move rightScrolls map
(8 directions)
Map screens
Selects labeled
function
Menu screens
Rotate dial
Press ENTER
Move down
16 ACURA TLX NAVI-31TZ38100.book 7 ページ 2015年7月29日 水曜日 午後4時11分
Page 9 of 325
8
Quick Reference GuideHow to Enter Information
You can enter information (e.g., city names, street names, personal names, and business names comprising letters, numbers, and symbols)
when prompted on input screen.
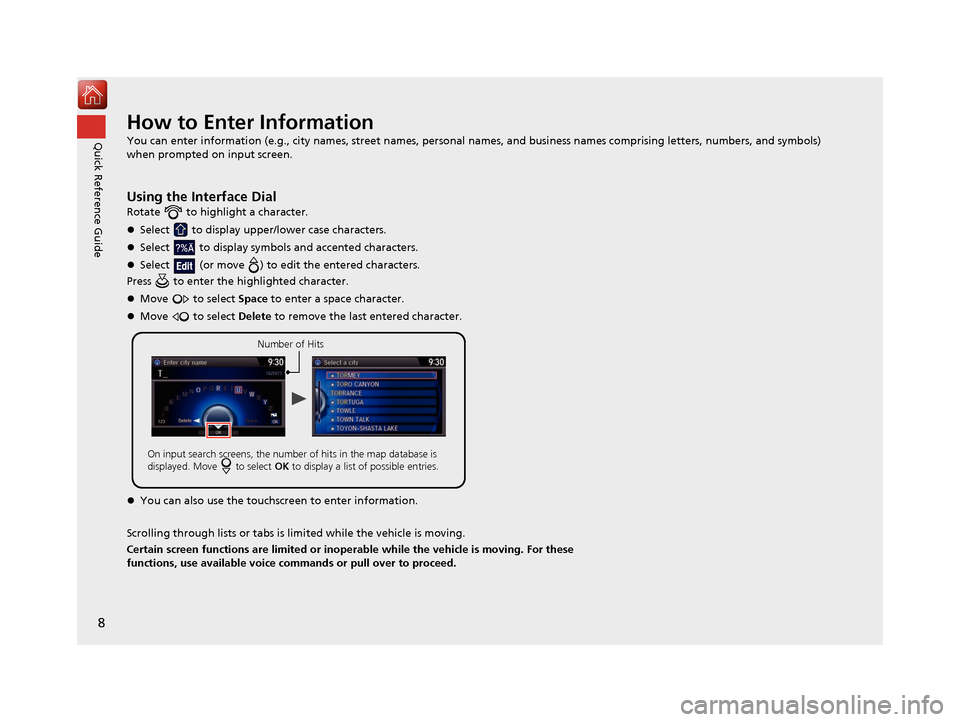
Using the Interface Dial
Rotate to highlight a character.
Select to display upper/lower case characters.
Select to display symbols and accented characters.
Select (or move ) to edit the entered characters.
Press to enter the highlighted character.
Move to select Space to enter a space character.
Move to select Delete to remove the last entered character.
You can also use the touchs creen to enter information.
Scrolling through lists or tabs is lim ited while the vehicle is moving.
Certain screen functions are limited or inoperable while the vehicle is moving. For these
functions, use available voice commands or pull over to proceed.
Number of Hits
On input search screens, the number of hits in the map database is
displayed. Move to select OK to display a list of possible entries.
16 ACURA TLX NAVI-31TZ38100.book 8 ページ 2015年7月29日 水曜日 午後4時11分
Page 23 of 325
22
System Setup
Voice Control System
Your vehicle has a voice control system that allows hands-free operation of most of
the navigation system functions.
The voice control system uses the ( Talk) and (Hang-Up/Back) buttons on
the steering wheel and a microphone near the map lights on the ceiling.
A “Getting Started” feature provides a tutorial that explains how to use the voice
control system.
2 Getting Started Tutorial P. 15
Command Input
If the system does not understand a command or you wait too long to give a
command, the system asks you to repeat the command.
When you give a command, the system gene rally either repeats the command as a
confirmation or asks you for further information. If you do not wish to hear this
feedback, you can turn it off. However, list ening to the feedback will help familiarize
you with the way the system expects commands to be phrased.
If the system cannot perform a command or the command is not appropriate for the
screen you are on, the system beeps.
On character input screens, a list of possibl e characters is displayed if the system
does not recognize your command.
You can find out which voice commands ar e available for a particular screen using
the “ Voice Help ” command. The system will displa y and read the list of available
commands to you.
2 Voice Help P. 15
1Voice Control System
When you press the (Talk) button, the system
prompts you to say a voice command and gives
examples. Press and release the (Talk) button
again to bypass this pr ompt and give a command.
1Command Input
The audio system is muted while using the voice
control system.
16 ACURA TLX NAVI-31TZ38100.book 22 ページ 2015年7月29日 水曜日 午後4時11分
Page 29 of 325
28
uuInterface Settings uClock Adjustment
System Setup
Clock Adjustment
H SETTINGS buttonuSystem Settings uClock
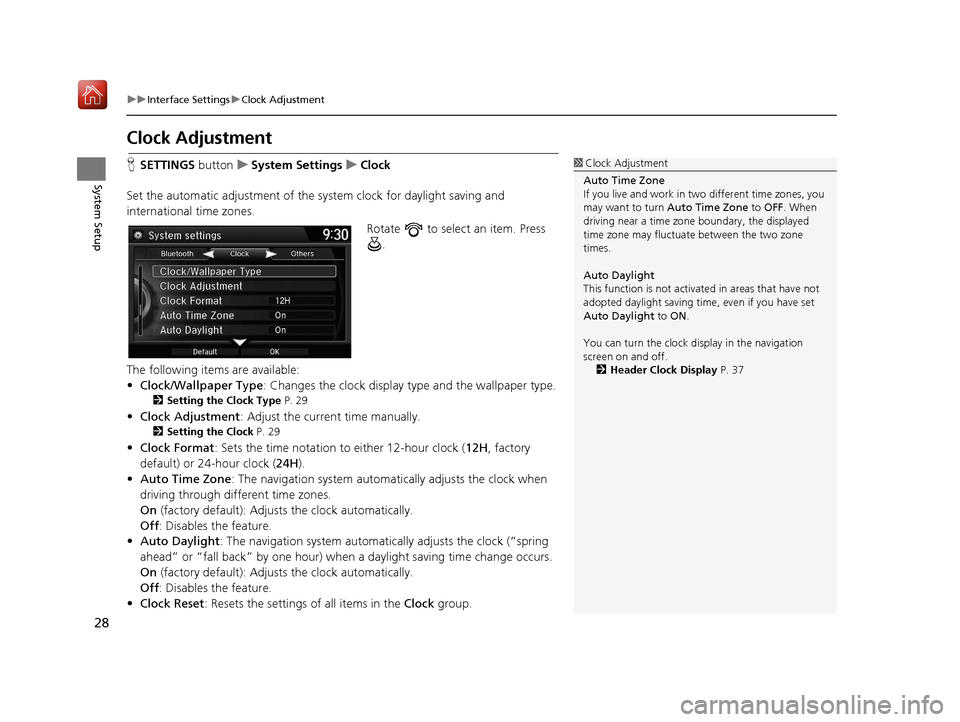
Set the automatic adjustment of the sy stem clock for daylight saving and
international time zones.
Rotate to select an item. Press .
The following items are available:
• Clock/Wallpaper Type : Changes the clock display type and the wallpaper type.
2Setting the Clock Type P. 29
•Clock Adjustment : Adjust the current time manually.
2Setting the Clock P. 29
•Clock Format : Sets the time notation to either 12-hour clock (12H, factory
default) or 24-hour clock ( 24H).
• Auto Time Zone : The navigation system automa tically adjusts the clock when
driving through different time zones.
On (factory default): Adjust s the clock automatically.
Off : Disables the feature.
• Auto Daylight : The navigation system automati cally adjusts the clock (“spring
ahead” or “fall back” by one hour) when a daylight saving time change occurs.
On (factory default): Adjust s the clock automatically.
Off : Disables the feature.
• Clock Reset : Resets the settings of all items in the Clock group.
1Clock Adjustment
Auto Time Zone
If you live and work in tw o different time zones, you
may want to turn Auto Time Zone to OFF. When
driving near a time zone boundary, the displayed
time zone may fluctuat e between the two zone
times.
Auto Daylight
This function is not activated in areas that have not
adopted daylight saving time , even if you have set
Auto Daylight to ON.
You can turn the clock di splay in the navigation
screen on and off.
2 Header Clock Display P. 37
16 ACURA TLX NAVI-31TZ38100.book 28 ページ 2015年7月29日 水曜日 午後4時11分
Page 49 of 325
48
uuPersonal Information uPrevious Destination
System Setup
Previous Destination
H SETTINGS buttonuNavi Settings uPersonal Info uPrevious Destination
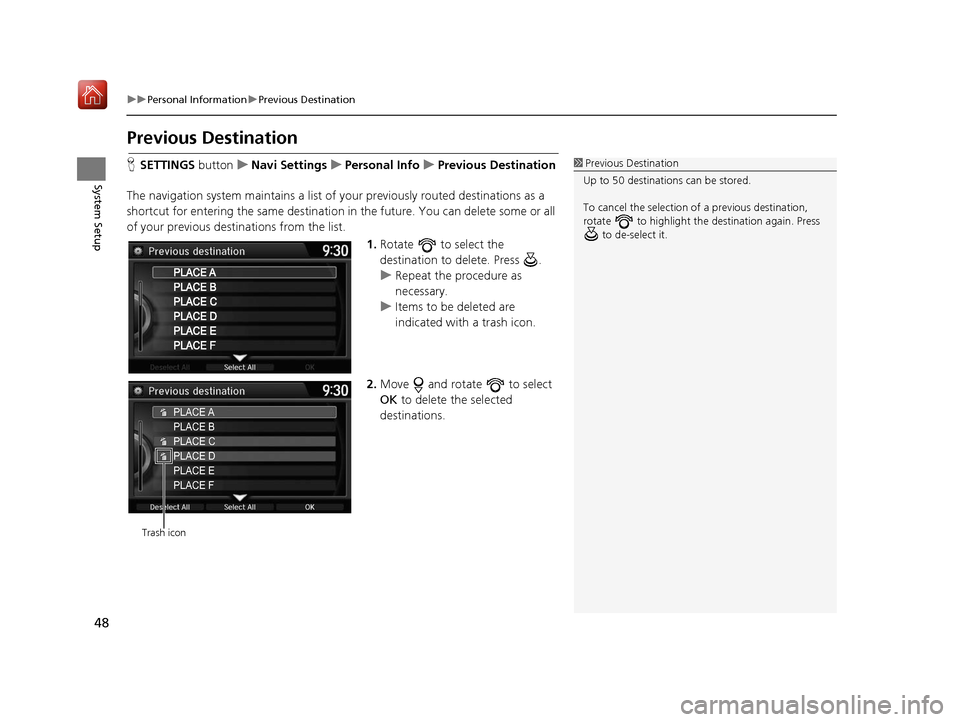
The navigation system maintain s a list of your previously routed destinations as a
shortcut for entering the same destination in the future. You can delete some or all
of your previous destinations from the list.
1.Rotate to select the
destination to delete. Press .
u Repeat the procedure as
necessary.
u Items to be deleted are
indicated with a trash icon.
2. Move and rotate to select
OK to delete the selected
destinations.1 Previous Destination
Up to 50 destinations can be stored.
To cancel the selection of a previous destination,
rotate to highlight the destination again. Press to de-select it.
PLACE A
PLACE B
PLACE C
PLACE D
PLACE E
PLACE F
Trash icon
16 ACURA TLX NAVI-31TZ38100.book 48 ページ 2015年7月29日 水曜日 午後4時11分
Page 50 of 325
49
uuPersonal Information uCategory History
System Setup
Category History
H SETTINGS button uNavi Settings uPersonal Info uCategory History
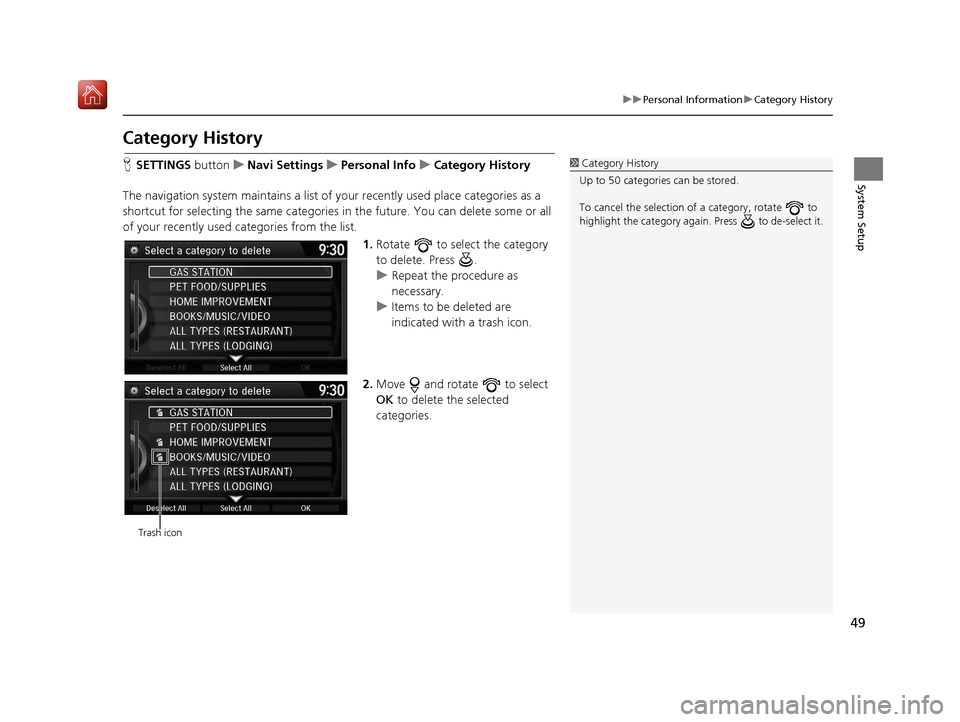
The navigation system maintains a list of your recently used place categories as a
shortcut for selecting the same categories in the future. You can delete some or all
of your recently used categories from the list.
1.Rotate to select the category
to delete. Press .
u Repeat the procedure as
necessary.
u Items to be deleted are
indicated with a trash icon.
2. Move and rotate to select
OK to delete the selected
categories.1 Category History
Up to 50 categories can be stored.
To cancel the selection of a category, rotate to
highlight the category again. Press to de-select it.
Trash icon
16 ACURA TLX NAVI-31TZ38100.book 49 ページ 2015年7月29日 水曜日 午後4時11分
Page 58 of 325

57
uuRouting uUnverified Routing
System SetupRoute lineThe route line uses verified
streets only (when possible).
If Straight Line Guide is set to
On , a pink vector line is
displayed on the map that
continually points to your
destination.
2 Straight Line Guide P. 78
A blue-pink route line highlights
suggested unverified streets on
the map while traveling to your
destination.
Cautionary
messages Cautionary pop-up screens and
voice announcements remind
you to obey all traffic
restrictions when
starting route
guidance, approaching an
unverified area, and entering an
unverified street. Cautionary pop-up screens and
voice announcements remind
you to obey all traffic
restrictions when entering an
unverified street.
Guidance
(map/voice)There is no turn-by-turn map or
voice guidance.Voice guidance commands end
with the phrase “if possible” to
remind you to verify all traffic
restrictions.
Directions list A direction list is typically not available. However, depending
on your route, directions are
provided to help you reach the
first available verified road. A direction list is provided
showing street names and turn
symbols in pink.
Differences
Off On (factory default)
16 ACURA TLX NAVI-31TZ38100.book 57 ページ 2015年7月29日 水曜日 午後4時11分
Page 60 of 325

59
uuRouting uEdit POI Search Radius Along Route
System Setup
Edit POI Search Ra dius Along Route
HSETTINGS button uNavi Settings uRouting uEdit POI Search Radius
Along Route
Select the distance from your highlighted ro ute line (on either side of your route)
that the system will search for a waypoint.
2Adding Waypoints P. 135
You can specify a different search distance for freeways/highways and surface
streets.
1.Rotate to select an item. Press
.
2. Rotate to select a search
distance. Press .
The following items are available:
• On Freeways (U.S.)/On highways (Canada): 1, 2, 5, or 10 miles (1.6, 3, 8, or 16
km) can be set. Factory default is 2 miles (3 km).
• On Surface Streets : 1/2, 1, 2, or 5 miles (0.8, 1.6, 3, or 8 km) can be set. Factory
default is 1/2 mile (0.8 km).
16 ACURA TLX NAVI-31TZ38100.book 59 ページ 2015年7月29日 水曜日 午後4時11分
Page 75 of 325
uuMap uColor
74
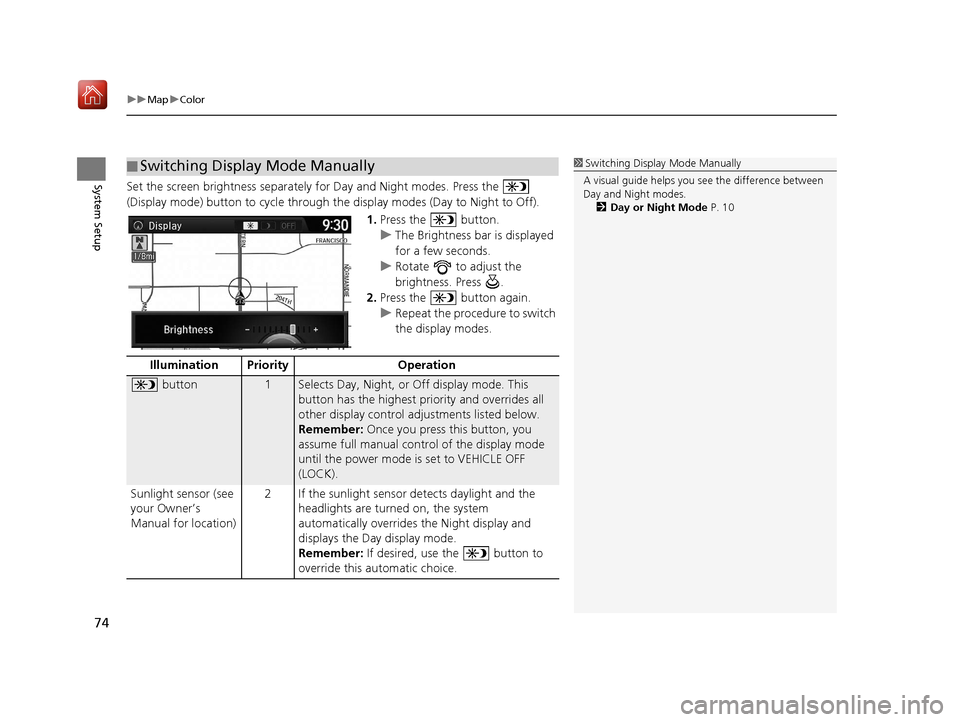
System SetupSet the screen brightness separately for Day and Night modes. Press the
(Display mode) button to cycle through th e display modes (Day to Night to Off).
1.Press the button.
u The Brightness bar is displayed
for a few seconds.
u Rotate to adjust the
brightness. Press .
2. Press the button again.
u Repeat the procedure to switch
the display modes.
■Switching Display Mode Manually1
Switching Display Mode Manually
A visual guide helps you se e the difference between
Day and Night modes.
2 Day or Night Mode P. 10
Illumination Priority Operation
button1Selects Day, Night, or Off display mode. This
button has the highest priority and overrides all
other display control adjustments listed below.
Remember: Once you press this button, you
assume full manual cont rol of the display mode
until the power mode is set to VEHICLE OFF
(LOCK).
Sunlight sensor (see
your Owner’s
Manual for location) 2 If the sunlight sensor detects daylight and the
headlights are turned on, the system
automatically overrides the Night display and
displays the Day display mode.
Remember: If desired, use the button to
override this automatic choice.
16 ACURA TLX NAVI-31TZ38100.book 74 ページ 2015年7月29日 水曜日 午後4時11分