ECO mode Acura TLX 2017 Owner's Guide
[x] Cancel search | Manufacturer: ACURA, Model Year: 2017, Model line: TLX, Model: Acura TLX 2017Pages: 75, PDF Size: 10.99 MB
Page 8 of 75
8 || 9
S AFETY
S
AFETY
Airbags
Your vehicle is equipped with several types of airbags: front airbags, driver’s knee
airbag, side airbags, and side curtain airbags.
Front Airbags (SRS)
The front SRS airbags inflate in a moderate-to-severe frontal collision to help
protect the head and chest of the driver and/or front passenger. They are housed
in the center of the steering wheel for the driver, and in the dashboard for the
front passenger. Both airbags are marked SRS AIRBAG.
SRS (Supplemental Restraint System) indicates that the airbags are designed to
supplement seat belts, not replace them. Seat belts are the occupant’s primary
restraint system.
Driver’s Knee AirbagThe driver’s knee SRS airbag inflates in a moderate-to-severe frontal collision
to help keep the driver in the proper position and to help maximize the benefit
provided by the vehicle’s other safety features.
Advanced Airbags
Your front airbags have advanced features to help reduce the likelihood of airbag-
related injuries to smaller occupants.
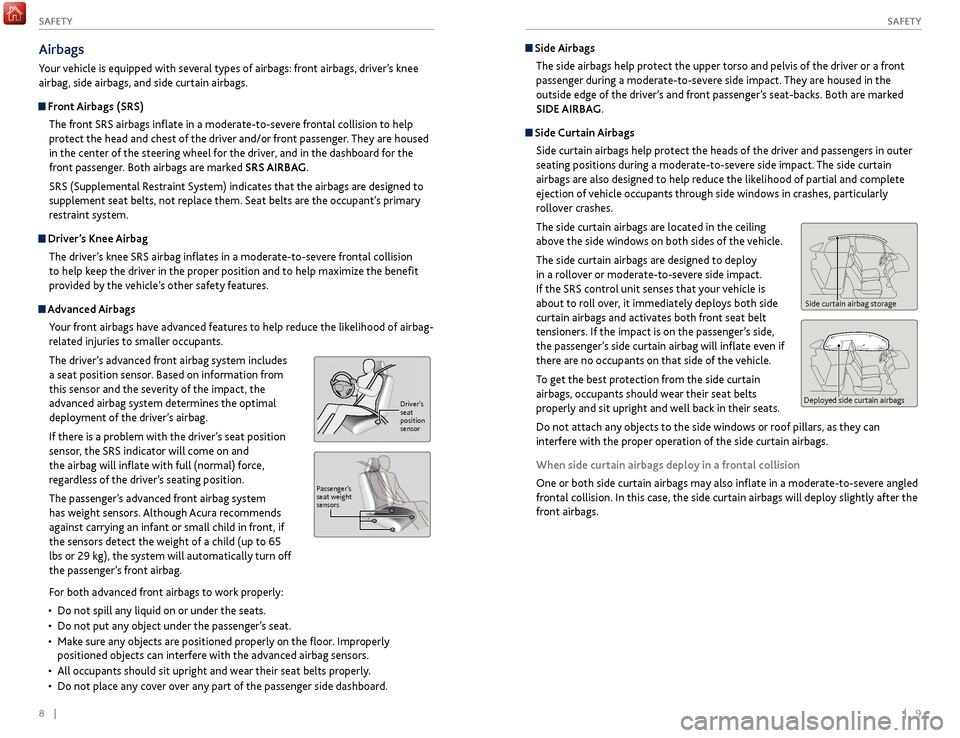
The driver’s advanced front airbag system includes
a seat position sensor. Based on information from
this sensor and the severity of the impact, the
advanced airbag system determines the optimal
deployment of the driver’s airbag.
If there is a problem with the driver’s seat position
sensor, the SRS indicator will come on and
the airbag will inflate with full (normal) force,
regardless of the driver’s seating position.
The passenger’s advanced front airbag system
has weight sensors. Although Acura recommends
against carrying an infant or small child in front, if
the sensors detect the weight of a child (up to 65
lbs or 29 kg), the system will automatically turn off
the passenger’s front airbag.
Side Airbags
The side airbags help protect the upper torso and pelvis of the driver or a front
passenger during a moderate-to-severe side impact. They are housed in the
outside edge of the driver’s and front passenger’s seat-backs. Both are marked
SIDE AIRBAG.
Side Curtain Airbags
Side curtain airbags help protect the heads of the driver and passengers in outer
seating positions during a moderate-to-severe side impact. The side curtain
airbags are also designed to help reduce the likelihood of partial and complete
ejection of vehicle occupants through side windows in crashes, particularly
rollover crashes.
The side curtain airbags are located in the ceiling
above the side windows on both sides of the vehicle.
The side curtain airbags are designed to deploy
in a rollover or moderate-to-severe side impact.
If the SRS control unit senses that your vehicle is
about to roll over, it immediately deploys both side
curtain airbags and activates both front seat belt
tensioners. If the impact is on the passenger’s side,
the passenger’s side curtain airbag will inflate even if
there are no occupants on that side of the vehicle.
To get the best protection from the side curtain
airbags, occupants should wear their seat belts
properly and sit upright and well back in their seats.
Do not attach any objects to the side windows or roof pillars, as they can
interfere with the proper operation of the side curtain airbags.
When side curtain airbags deploy in a frontal collision
One or both side curtain airbags may also inflate in a moderate-to-severe angled
frontal collision. In this case, the side curtain airbags will deploy slightly after the
front airbags.
Side curtain airbag storage
Deployed side curtain airbags
For both advanced front airbags to work properly:
•
Do not spill an
y liquid on or under the seats.
•
Do not put an
y object under the passenger’s seat.
•
Mak
e sure any objects are positioned properly on the floor. Improperly
positioned objects can interfere with the advanced airbag sensors.
•
All
occupants should sit upright and wear their seat belts properly.
•
Do not place an
y cover over any part of the passenger side dashboard.
Driver’s
seat
position
sensor
P assenger’ s
seat weight
sensors
Page 14 of 75
20 || 21
S AFETY
S
AFETY
Allowing a child age 12 or under to sit in the front can result in injury or
death if the passenger’s front airbag inflates.
If a larger child must ride in front, move the vehicle seat as far to the rear as
possible, have the child sit up properly and wear the seat belt properly, using
a booster seat if needed.
WARNING
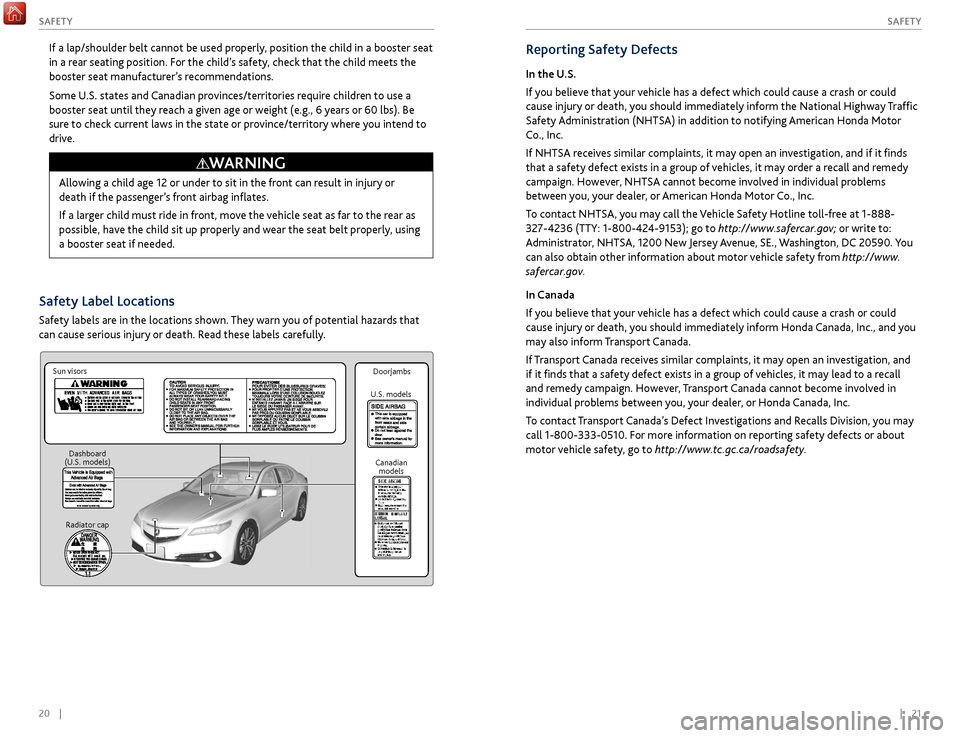
Safety Label Locations
Safety labels are in the locations shown. They warn you of potential hazards that
can cause serious injury or death. Read these labels carefully.
Reporting Safety Defects
In the U.S.
If you believe that your vehicle has a defect which could cause a crash or could
cause injury or death, you should immediately inform the National Highway Traffic
Safety Administration (NHTSA) in addition to notifying American Honda Motor
Co., Inc.
If NHTSA receives similar complaints, it may open an investigation, and if it finds
that a safety defect exists in a group of vehicles, it may order a recall and remedy
campaign. However, NHTSA cannot become involved in individual problems
between you, your dealer, or American Honda Motor Co., Inc.
To contact NHTSA, you may call the Vehicle Safety Hotline toll-free at 1-888-
327-4236 (TTY: 1-800-424-9153); go to http://www.safercar.gov; or write to:
Administrator, NHTSA, 1200 New Jersey Avenue, SE., Washington, DC 20590. You
can also obtain other information about motor vehicle safety from http://www.
safercar.gov.
In Canada
If you believe that your vehicle has a defect which could cause a crash or could
cause injury or death, you should immediately inform Honda Canada, Inc., and you
may also inform Transport Canada.
If Transport Canada receives similar complaints, it may open an investigation, and
if it finds that a safety defect exists in a group of vehicles, it may lead to a recall
and remedy campaign. However, Transport Canada cannot become involved in
individual problems between you, your dealer, or Honda Canada, Inc.
To contact Transport Canada’s Defect Investigations and Recalls Division, you may
call 1-800-333-0510. For more information on reporting safety defects or about
motor vehicle safety, go to http://www.tc.gc.ca/roadsafety.
If a lap/shoulder belt cannot be used properly, position the child in a booster seat
in a rear seating position. For the child’s safety, check that the child meets the
booster seat manufacturer’s recommendations.
Some U.S. states and Canadian provinces/territories require children to use a
booster seat until they reach a given age or weight (e.g., 6 years or 60 lbs). Be
sure to check current laws in the state or province/territory where you intend to
drive.
Radiator cap
Doorjambs
Sun visors
U.S. models
Canadian models
Dashboard
(U.S. models)
Page 16 of 75
24 || 25
I NSTRUMENT P
ANELI
NSTRUMENT P
ANEL
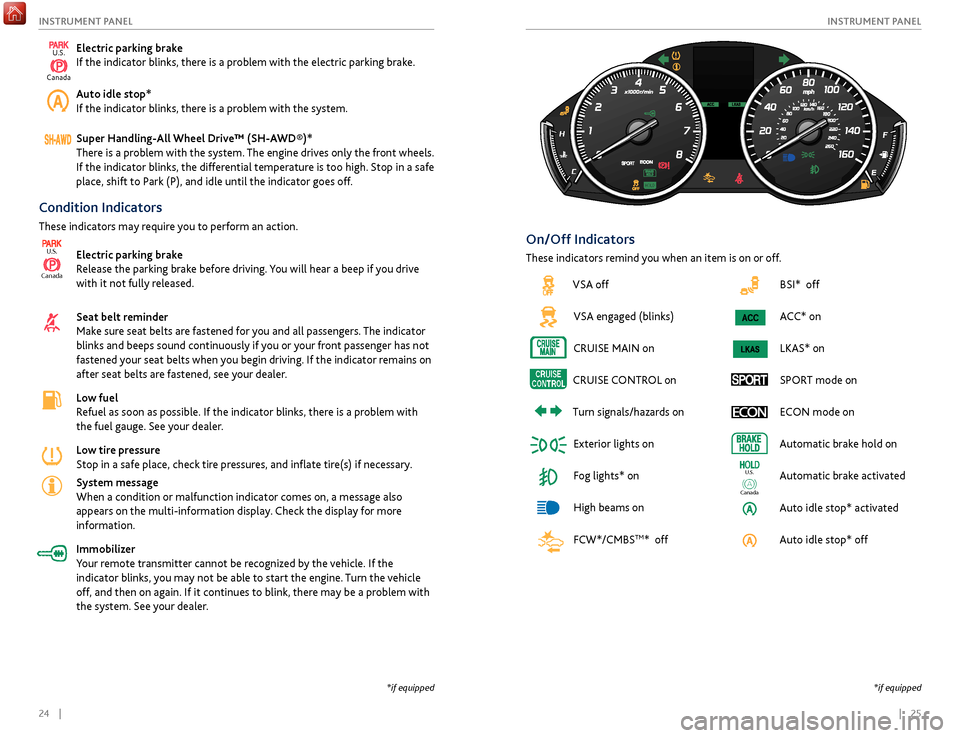
BSI* off
ACC* on
LKAS* on
SPORT mode on ECON mode on
Automatic brake hold on
Automatic brake activated
Auto idle stop* activated
Auto idle stop* off
Ca nada
U.S.
Condition Indicators
These indicators may require you to perform an action.
Electric parking brake
Release the parking brake before driving. You will hear a beep if you drive
with it not fully released.
Seat belt reminder
Make sure seat belts are fastened for you and all passengers. The indicator
blinks and beeps sound continuously if you or your front passenger has not
fastened your seat belts when you begin driving. If the indicator remains on
after seat belts are fastened, see your dealer.
Low fuel
Refuel as soon as possible. If the indicator blinks, there is a problem with
the fuel gauge. See your dealer.
Low tire pressure
Stop in a safe place, check tire pressures, and inflate tire(s) if necessary.
System message
When a condition or malfunction indicator comes on, a message also
appears on the multi-information display. Check the display for more
information.
Immobilizer
Your remote transmitter cannot be recognized by the vehicle. If the
indicator blinks, you may not be able to start the engine. Turn the vehicle
off, and then on again. If it continues to blink, there may be a problem with
the system. See your dealer.
Canada
U.S.
On/Off Indicators
These indicators remind you when an item is on or off.
*if equipped
*if equipped
Electric parking brake
If the indicator blinks, there is a problem with the electric parking brake.
Auto idle stop*
If the indicator blinks, there is a problem with the system.
Super Handling-All Wheel Drive™ (SH-AWD®)*
There is a problem with the system. The engine drives only the front wheels.
If the indicator blinks, the differential temperature is too high. Stop in a safe
place, shift to Park (P), and idle until the indicator goes off.
VSA offVSA engaged (blinks)
CRUISE
MAIN on
CRUISE
CONTROL
on
Turn
signals/hazards on
Exterior lights on
Fog lights* on
High beams on
FCW*/CMBS
TM* off
U.S.
Canada
Page 21 of 75
34 || 35
V EHICLE C ONTROLS
V
EHICLE C ONTROLS
Headlight Washers*
Canadian models
Turn the headlights on. Press the headlight washer
button to operate the washers.
The headlight washers also operate when you first
turn on the windshield wipers.
Heated Windshield Button*
Canadian models
Turn the vehicle on. Press the heated windshield
button to de-ice the windshield.
The heated windshield may automatically activate
when the outside temperature is below 4°C, and
deactivate when the temperature reaches 6°C.
*if equipped
*if equipped
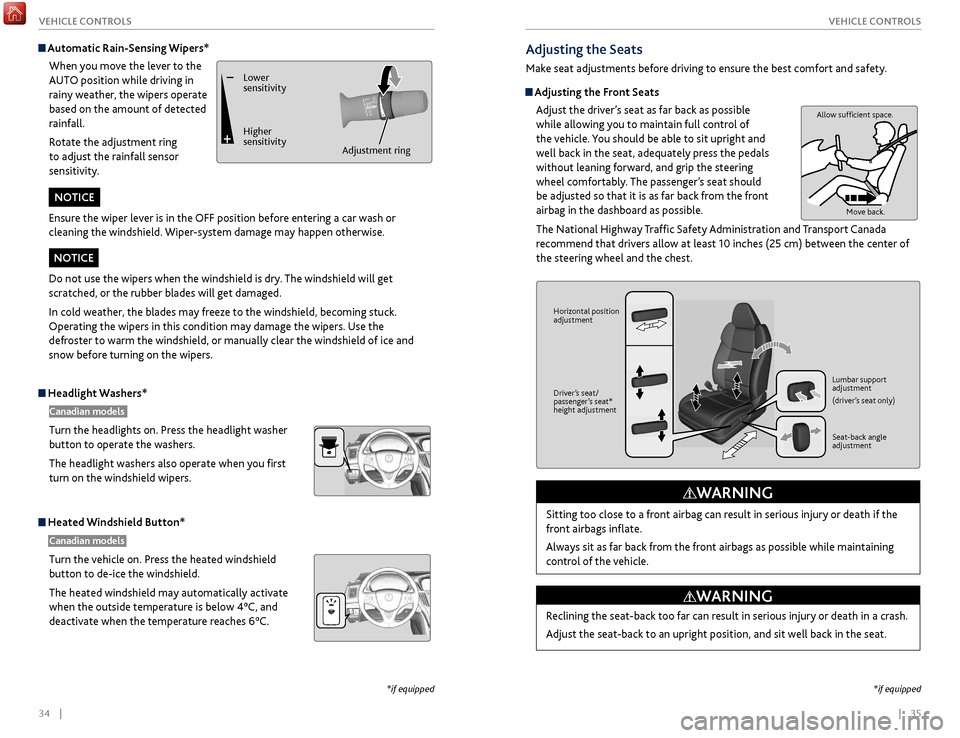
Adjusting the Seats
Make seat adjustments before driving to ensure the best comfort and safety.
Adjusting the Front Seats
Adjust the driver’s seat as far back as possible
while allowing you to maintain full control of
the vehicle. You should be able to sit upright and
well back in the seat, adequately press the pedals
without leaning forward, and grip the steering
wheel comfortably. The passenger’s seat should
be adjusted so that it is as far back from the front
airbag in the dashboard as possible.
The National Highway Traffic Safety Administration and Transport Canada
recommend that drivers allow at least 10 inches (25 cm) between the center of
the steering wheel and the chest.
Sitting too close to a front airbag can result in serious injury or death if the
front airbags inflate.
Always sit as far back from the front airbags as possible while maintaining
control of the vehicle.
WARNING
Allow sufficient space. Move back.
Horizontal position
adjustment
Driver’s seat/
passenger’s seat*
height adjustment Lumbar support
adjustment
(driver’s seat only)
Seat-back angle
adjustment
Reclining the seat-back too far can result in serious injury or death in a crash.
Adjust the seat-back to an upright position, and sit well back in the seat.
WARNING
Automatic Rain-Sensing Wipers*
When you move the lever to the
AUTO position while driving in
rainy weather, the wipers operate
based on the amount of detected
rainfall.
Rotate the adjustment ring
to adjust the rainfall sensor
sensitivity.
Lower
sensitivity
Higher
sensitivity Adjustment ring
Ensure the wiper lever is in the OFF position before entering a car wash or
cleaning the windshield. Wiper-system damage may happen otherwise.
NOTICE
Do not use the wipers when the windshield is dry. The windshield will get
scratched, or the rubber blades will get damaged.
In cold weather, the blades may freeze to the windshield, becoming stuck.
Operating the wipers in this condition may damage the wipers. Use the
defroster to warm the windshield, or manually clear the windshield of ice and
snow before turning on the wipers.
NOTICE
Page 30 of 75
52 || 53
A UDIO
AND
C ONNECTIVITY
A
UDIO AND C ONNECTIVITY
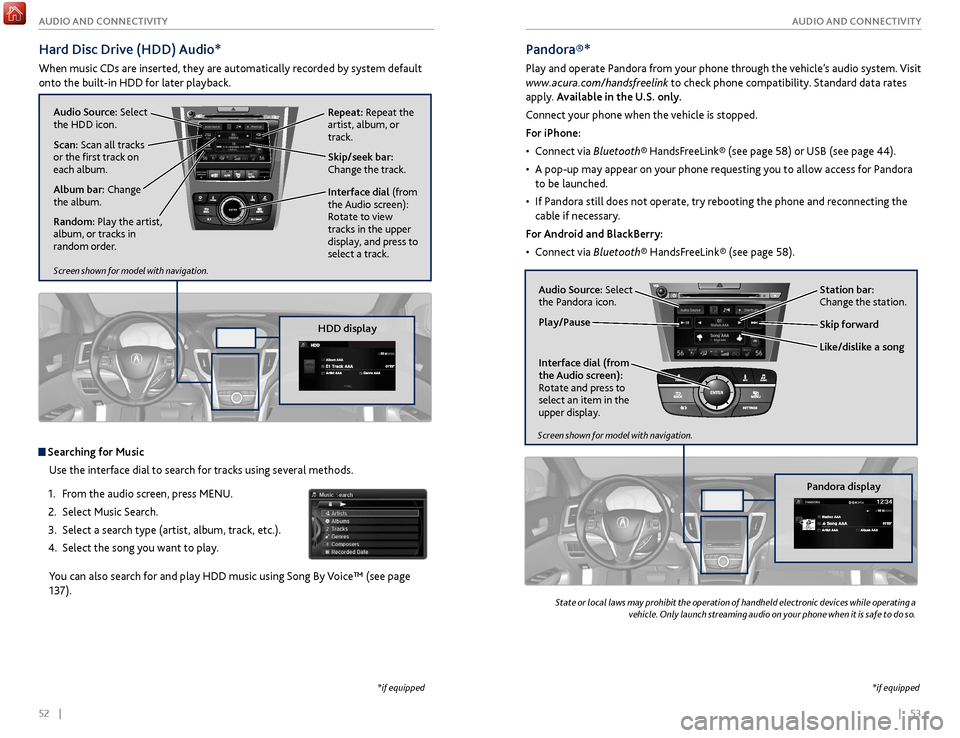
Hard Disc Drive (HDD) Audio*
When music CDs are inserted, they are automatically recorded by system default
onto the built-in HDD for later playback.
Searching for Music
Use the interface dial to search for tracks using several methods.
1.
F
rom the audio screen, press MENU.
2.
Select
Music Search.
3.
Select a sear
ch type (artist, album, track, etc.).
4.
Select the
song you want to play.
You can also search for and play HDD music using Song By Voice™ (see page
137).
*if equipped
NAVAUDIOAUDIONAV
Audio Source: Select
the HDD icon.
Scan: Scan all tracks
or the first track on
each album. Skip/seek bar:
Change the track.
Interface dial
(from
the Audio screen):
Rotate to view
tracks in the upper
display, and press to
select a track. Repeat: Repeat the
artist, album, or
track.
Album bar: Change
the album.
Random: Play the artist,
album, or tracks in
random order.
State or local laws may prohibit the operation of handheld electronic devices while operating a
vehicle. Only launch streaming audio on your phone when it is safe to do so.
Pandora®*
Play and operate Pandora from your phone through the vehicle’s audio system. Visit
www.acura.com/handsfreelink to check phone compatibility. Standard data rates
apply. Available in the U.S. only.
Connect your phone when the vehicle is stopped.
For iPhone:
•
C
onnect via Bluetooth® HandsFreeLink® (see page 58) or USB (see page 44).
•
A pop-up may appear
on your phone requesting you to allow access for Pandora
to be launched.
•
If P
andora still does not operate, try rebooting the phone and reconnecting the
cable if necessary.
For Android and BlackBerry:
•
C
onnect via Bluetooth® HandsFreeLink® (see page 58).
Audio Source: Select
the Pandora icon. Station bar:
Change the station.
Like/dislike a song Skip forward
Interface dial (from
the Audio screen):
Rotate and press to
select an item in the
upper display.
Play/Pause
Pandora display
Screen shown for model with navigation.
Screen shown for model with navigation.
HDD display
*if equipped
Page 31 of 75
54 || 55
AUDIO AND CONNECTIVITY
AUDIO AND CONNECTIVITY
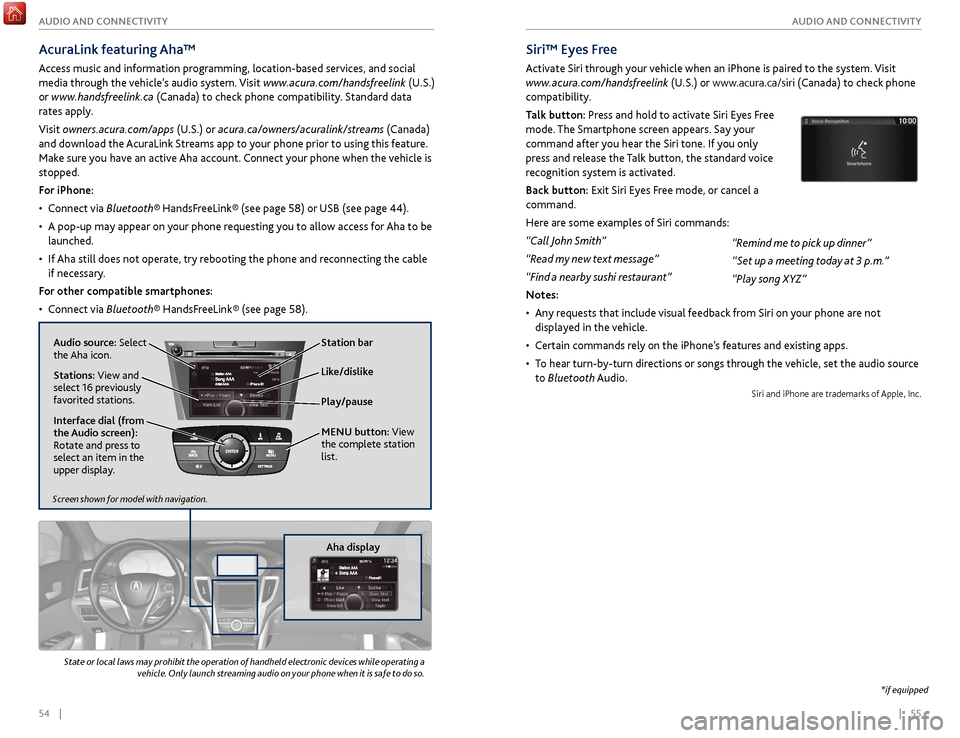
AcuraLink featuring Aha™
Access music and information programming, location-based services, and social
media through the vehicle’s audio system. Visit www.acura.com/handsfreelink (U.S.)
or www.handsfreelink.ca (Canada) to check phone compatibility. Standard data
rates apply.
Visit owners.acura.com/apps (U.S.) or acura.ca/owners/acuralink/streams (Canada)
and download the AcuraLink Streams app to your phone prior to using this feature.
Make sure you have an active Aha account. Connect your phone when the vehicle is
stopped.
For iPhone:
•
C
onnect via Bluetooth® HandsFreeLink® (see page 58) or USB (see page 44).
•
A pop-up may appear
on your phone requesting you to allow access for Aha to be
launched.
•
If
Aha still does not operate, try rebooting the phone and reconnecting the cable
if necessary.
For other compatible smartphones:
•
C
onnect via Bluetooth® HandsFreeLink® (see page 58).
Play/pause
State or local laws may prohibit the operation of handheld electronic devices while operating a
vehicle. Only launch streaming audio on your phone when it is safe to do so.
Audio source: Select
the Aha icon. Station bar
Like/dislike
Stations: View and
select 16 previously
favorited stations.
Interface dial (from
the Audio screen):
Rotate and press to
select an item in the
upper display. MENU
button: View
the complete station
list.
Screen shown for model with navigation.
Aha display
*if equipped
Siri™ Eyes Free
Activate Siri through your vehicle when an iPhone is paired to the system. Visit
www.acura.com/handsfreelink (U.S.) or www.acura.ca/siri (Canada) to check phone
compatibility.
Talk button: Press and hold to activate Siri Eyes Free
mode. The Smartphone screen appears. Say your
command after you hear the Siri tone. If you only
press and release the Talk button, the standard voice
recognition system is activated.
Back button: Exit Siri Eyes Free mode, or cancel a
command.
Here are some examples of Siri commands:
“Call John Smith”
“Read my new text message”
“Find a nearby sushi restaurant”
Notes:
•
An
y requests that include visual feedback from Siri on your phone are not
displayed in the vehicle.
•
C
ertain commands rely on the iPhone’s features and existing apps.
•
T
o hear turn-by-turn directions or songs through the vehicle, set the audio source
to Bluetooth Audio.
Siri and iPhone are trademarks of Apple, Inc.
“Remind me to pick up dinner”
“Set up a meeting today at 3 p.m.”
“Play song XYZ”
Page 43 of 75

78 || 79
DRIVING
DRIVING
*if equipped
Electronic Gear Selector*
6-cylinder models
Select the vehicle’s gear using a simple button interface. Apply the brake pedal
and select a gear.
Park (P): Press to put the vehicle in Park. A red
indicator appears.
Reverse (R): Pull back to put the vehicle in Reverse.
A green indicator appears.
Neutral (N): Press to put the vehicle in Neutral. A red indicator appears.
Drive (D): Press to put the vehicle in Drive. A green indicator appears. Release the
electric parking brake to begin driving (see page 81).
In freezing or sub-freezing conditions, the electronic gear selector response may
be slow. Always apply the brake pedal before shifting into Park (P), and confirm
that (P) is shown on the gear position indicator before releasing the brake.
Auto park mode
For your convenience, Park (P) is automatically engaged when the vehicle is
turned off, or when all of the following conditions are met: the vehicle is stopped,
the driver’s seat belt is unbuckled, and the driver’s door is opened. You should
always apply the brake and shift to Park when idling, or before exiting the vehicle.
If you select any gear other than Park when the driver’s door is opened and the
driver’s seat belt is unbuckled, Park is reengaged when the brake pedal is released. The vehicle can roll away if left unattended without confirming that Park
(P) is engaged. Always keep your foot on the brake pedal until you have
confirmed that (P) is shown on the gear position indicator.
WARNING
When you change from D to R and vice versa, or want to change to Park (P),
come to a complete stop and keep the brake pedal applied. Operating the gear
buttons before the vehicle has come to a complete standstill can damage the
transmission.
NOTICE
Sequential Shift Mode*
4-cylinder models
Use the paddle shifters to change gears without removing your hands from the
steering wheel.
When the shift lever is in D: The vehicle goes into sequential shift mode
momentarily, and the gear indicator comes on. When you start driving at a
constant speed, sequential shift mode automatically switches off, and the gear
indicator goes off.
When the shift lever is in D (with SPORT+ mode): The vehicle goes into
sequential shift mode, and the M (sequential shift) indicator and gear indicator
come on. At speeds of 2 mph (4 km/h) or less, the vehicle automatically shifts
down into 1st gear.
To cancel this mode, press the IDS button (see page 84) to select a different
mode. When sequential shift mode is canceled, the M indicator and gear
indicator go off.
Second gear lock mode (in SPORT+ mode): If you pull the (+) paddle shifter
while stopped or driving at 6 mph (10 km/h) or less, the gear is locked in 2nd
gear. This makes it easier to pull away on slippery surfaces such as snow-covered
roads. To cancel 2nd gear lock mode, pull the (-) paddle shifter.
(-) Paddle shifter:
Pull to shift down
to a lower gear. (+) Paddle shifter:
Pull to shift up to a
higher gear. Recommended shift points
Shift up
Acceleration
1st
to 2nd
15 mph (2
4 km/h)
2nd
to 3rd
25 mph (40 km/h)
3r
d to 4th
40 mph (64 km/h)
4th
to 5th
45 mph (7
2 km/h)
5th
to 6th
50 mph (80 km/h)
6th
to 7th
55 mph (89 km/h)
7th
to 8th
60 mph (9
7 km/h)
*if equipped
Page 44 of 75

80 || 81
DRIVING
DRIVING
Braking
Slow down or stop your vehicle, and keep it from moving when parked.
Foot Brake
Press the brake pedal to slow down or stop your
vehicle from moving.
Brake Assist SystemDuring hard or emergency braking, the system
increases braking force. The brake pedal may move
slightly or make a noise; this is normal. Continue to
hold the brake pedal firmly down.
Anti-Lock Brake System (ABS) During hard or emergency braking, the system rapidly pumps the brakes to
prevent wheel lockup and help you maintain steering control. The brake pedal
may pulsate slightly during ABS operation; this is normal. Do not pump the brake
pedal, and continue to hold it firmly down.
The ABS may not function correctly if you use an incorrect tire type and size.
NOTICE
Brake pedal
Electric Parking BrakeKeep your vehicle from moving while parked using a simple switch.
To apply: Pull up the switch. The PARK indicator
appears in the instrument panel.
To release: Press the brake pedal and make sure
your seat belt is fastened. Press the switch down to
release.
You can also lightly press the accelerator pedal if
your seat belt is fastened and the vehicle is on and in
Drive (D) or Reverse (R).
Pull
up to
apply
Press
down to
release.
Car wash mode
Follow the procedure below to use a conveyor-style car wash where you or
an attendant do not remain in the vehicle. Make sure the wiper lever is in the
OFF position (see page 33). You should inform the car wash attendant of this
procedure.
1.
When
the engine is running, apply the brake pedal and select Neutral (N).
2.
Within 5 seconds, pr
ess the ENGINE START/STOP button. The vehicle goes
into Accessory mode.
This mode lasts for 15 minutes before the gear changes to Park and the vehicle
turns off.
Sequential Mode* 6-cylinder models
Use the paddle shifters to change gears without removing your hands from the
steering wheel.
When the gear is in D: The vehicle goes into sequential mode momentarily,
and the gear indicator comes on. When you start driving at a constant speed,
sequential mode automatically switches off, and the gear indicator goes off.
When the gear is in D (with SPORT+ mode): The vehicle goes into sequential
mode, and the M (sequential mode) indicator and gear indicator come on.
To cancel this mode, press the IDS button (see page 84) to select a different
mode. When sequential mode is canceled, the M indicator and gear indicator go
off.
(-) Paddle shifter:
Pull to shift down
to a lower gear. (+) Paddle shifter:
Pull to shift up to a
higher gear. Recommended shift points
Shift up
Acceleration
1st
to 2nd
15 mph (2
4 km/h)
2nd
to 3rd
25 mph (40 km/h)
3r
d to 4th
40 mph (64 km/h)
4th
to 5th
45 mph (7
2 km/h)
5th
to 6th
50 mph (80 km/h)
6th
to 7th
55 mph (89 km/h)
7th
to 8th
60 mph (9
7 km/h)
8
th to 9th
65 mph (105 km/h)
*if equipped
Page 46 of 75

84 || 85
DRIVING
DRIVING
Cruise Control*
Maintain a constant vehicle speed without having to keep your foot on the
accelerator pedal. Use cruise control on freeways or open roads where you can
travel at a constant speed with little acceleration or deceleration.
Improper use of cruise control can lead to a crash.
Use cruise control only when traveling on open highways in good weather.
WARNING
Setting the Vehicle Speed1.
Press the CRUISE button. The CRUISE MAIN
indicator appears.
2.
Accelerate to the desired speed (above 25 mph/40
km/h). Take your foot off the pedal and press
the SET/- switch to set the speed. The CRUISE
CONTROL indicator appears.
Adjusting the Vehicle Speed Press the RES/+ switch to increase speed, or the
SET/- switch to decrease speed.
Each time you press the button, the vehicle speed is
increased or decreased by about 1 mph (1.6 km/h).
If you keep the button pressed, the vehicle speed
increases or decreases until you release it.
Canceling Cruise ControlPress either the CANCEL button or the CRUISE
button, or the brake pedal. The CRUISE CONTROL
indicator goes off.
After cruise control has been canceled, you can still
resume the prior set speed by pressing RES/+ while
driving at a speed of at least 25 mph (40 km/h).
Press the CRUISE button to turn the system off.
CRUISE button
RES/+ button
SET/- button
CANCEL button
Econ: Maximiz es fuel efficiency .
Normal: Balances fuel efficiency and sportiness for everyday driving.
Sport : Enhances vehicle r esponse and feel through decreased steering assist and
incr eased thr ottle response.
Sport+: Adds to Sport mode and allows incr eased performance when using paddle
shifters (see page 7 8 or page 80).
Vehicle Stability Assist (VSA®)
Also known as Electr onic Stability Contr ol (ESC ), VSA helps to stabilize the vehicle
during cornering if the vehicle turns mor e or less than what was intended. It assists
in maintaining traction on slippery surfaces b y regulating engine output and
selectiv ely appl ying the brak es.
Turning VSA On or Off
VSA is turned on every time y ou turn on the vehicle. If you turn VSA off, your
v ehicle has normal braking and cornering ability , but VSA traction and stability
enhancement become less effectiv e.
Pr ess and hold the VSA
OFF button until you
hear a beep to turn VSA on or off . The VSA OFF
indicator appears when the system is off.
T raction contr ol stops functioning , which
allows the wheels to spin mor e freel y at low
speed. This can be helpful when trying to free
y our vehicle if it is stuck in mud or snow.
Integrated Dynamics System (IDS)
Choose a driving mode for your pr eference based on road conditions, vehicle speed,
and handling.
VSA OFF
button VSA OFF
indicator
The selected mode
briefly appears
in the multi-
information display.
Press IDS to
cycle through
modes.
*if equipped
Page 54 of 75

100 || 101
HANDLING THE UNEXPECTED
HANDLING THE UNEXPECTED
WARNING: Battery posts, terminals, and related accessories contain lead and lead
compounds. Wash your hands after handling.
After the Engine Starts
Once your vehicle’s engine has started, remove the jumper cables in the following
order:
1.
Disconnect
the jumper cable from your vehicle’s ground.
2.
Disconnect
the other end of the jumper cable from the booster battery (-)
terminal.
3.
Disconnect
the jumper cable from your vehicle’s battery (+) terminal.
4.
Disconnect
the other end of the jumper cable from the booster battery (+)
terminal.
Have your vehicle inspected by a nearby service station or a dealer. A battery can explode if you do not follow the correct procedure, seriously
injuring anyone nearby.
Keep all sparks, open flames, and smoking materials away from the battery.
WARNING
Jump Starting
Turn off the power to electric devices, such as audio and lights. Turn off the engine,
then open the hood (see page 118).
1.
6-cylinder models:
Remove the engine
cover. Start on the passenger side, and lift the
outermost edge of the cover, removing it from
the pins. Move towards the driver side while
applying uniform upward pressure. Open the
battery terminal cover.
2.
All models:
Connect the first jumper cable to
your vehicle’s battery (+) terminal.
3.
C
onnect the other end of the first jumper
cable to the booster battery (+) terminal. Use
a 12-volt booster battery only (i.e., an assisting
vehicle or a rechargeable 12-volt battery pack).
4.
C
onnect the second jumper cable to the
booster battery (-) terminal.
5.
C
onnect the other end of the second jumper
cable to the mounting bolt or engine hanger
as shown. Do not connect this jumper cable to
any other part.
6.
If
your vehicle is connected to another vehicle,
start the assisting vehicle’s engine and increase
its rpm slightly.
7.
A
ttempt to start your vehicle’s engine. If it
turns over slowly, make sure the jumper cables
have good metal-to-metal contact.
6-cylinder models
Pin
Engine cover
6-cylinder models
Battery
terminal cover
4-cylinder models
Booster battery
6-cylinder models
Booster battery
4-cylinder models
6-cylinder models