change time Acura TLX 2017 Owner's Guide
[x] Cancel search | Manufacturer: ACURA, Model Year: 2017, Model line: TLX, Model: Acura TLX 2017Pages: 75, PDF Size: 10.99 MB
Page 2 of 75
DISCLOSURES
Devices That Emit Radio WavesThe following products and systems on your vehicle emit radio waves when in
operation: Event Data RecordersThis vehicle is equipped with an event data recorder (EDR). The main
purpose of an EDR is to record, in certain crash or near crash-like situations,
such as an air bag deployment or hitting a road obstacle, data that will assist
in understanding how a vehicle’s systems performed. The EDR is designed
to record data related to vehicle dynamics and safety systems for a short
period of time, typically 30 seconds or less. The EDR in this vehicle is
designed to record such data as:
•
How various
systems in your vehicle were operating;
•
Whether
or not the driver and passenger safety belts were buckled/
fastened;
•
How
far (if at all) the driver was depressing the accelerator and/or brake
pedal; and,
•
How
fast the vehicle was traveling.
These data can help provide a better understanding of the circumstances
in which crashes and injuries occur. NOTE: EDR data are recorded by your
vehicle only if a non-trivial crash situation occurs; no data are recorded by
the EDR under normal driving conditions and no personal data (e.g., name,
gender, age, and crash location) are recorded. However, other parties, such
as law enforcement, could combine the EDR data with the type of personally
identifying data routinely acquired during a crash investigation.
To read data recorded by an EDR, special equipment is required, and access to
the vehicle or the EDR is needed. In addition to the vehicle manufacturer, other
parties such as law enforcement that have the special equipment can read the
information if they have access to the vehicle or the EDR.
The data belong to the vehicle owner and may not be accessed by anyone else
except as legally required or with the permission of the vehicle owner.
Service Diagnostic Recorders This vehicle is equipped with service-related devices that record information
about powertrain performance. The data can be used to verify emissions law
requirements and/or help technicians diagnose and solve service problems. It
may also be combined with data from other sources for research purposes, but
it remains confidential.
*if equipped
• AcuraLink®
•
A
daptive Cruise Control (ACC)
with Low Speed Follow (LSF)*
•
Audio system
•
Blind
Spot Information (BSI)*
•
Bluet
ooth® Audio
•
Bluet
ooth® HandsFreeLink® •
C ollision Mitigation Braking
SystemTM (CMBS)*
•
HomeLink®
Universal Transceiver
•
Immobiliz
er system
•
K
eyless Access System
•
R
emote transmitter
•
Tir
e Pressure Monitoring System
Each of the above complies with the appropriate requirements or the required
standards of FCC (Federal Communications Commission) and Industry Canada,
described below:
As required by the FCC:
This device complies with Part 15 of the FCC rules. Operation is subject to the
following two conditions: (1) This device may not cause harmful interference, and
(2) this device must accept any interference received, including interference that
may cause undesired operation.
Changes or modifications not expressly approved by the party responsible for
compliance could void the user’s authority to operate the equipment.
As required by Industry Canada:
This device complies with Industry Canada licence-exempt RSS standard(s)
a. Operation is subject to the following two conditions: (1) this device may not
cause interference, and (2) this device must accept any interference, including
interference that may cause undesired operation of the device.
California Perchlorate Contamination Prevention Act The airbags, seat belt tensioners, and CR-type batteries in this vehicle may
contain perchlorate materials — special handling may apply. See www.dtsc.
ca.gov/hazardouswaste/perchlorate/ for more information.
California Proposition 65 WarningWARNING: This product contains or emits chemicals known to the state of
California to cause cancer and birth defects or other reproductive harm.
Page 6 of 75
4 || 5
S AFETY
S
AFETY
Carbon Monoxide Gas
The engine exhaust from this vehicle contains carbon monoxide, a colorless,
odorless, and highly toxic gas. As long as you properly maintain your vehicle and
follow the instructions set forth below, you will not accumulate dangerous levels
of carbon monoxide gas in the vehicle interior.
Have the exhaust system inspected for leaks whenever:
•
The exhaust system is making an unusual noise.
•
The exhaust system may hav
e been damaged.
•
The
vehicle is raised for an oil change.
When you operate a vehicle with the trunk open, airflow can pull exhaust gas into
the interior and create a hazardous condition. If you must drive with the trunk
open, open all the windows and set the climate control system as shown below.
1.
Select
the fresh air mode.
2.
Select the mode.
3.
Set the
fan speed to high.
4.
Set
the temperature control to a comfortable setting.
A
djust the climate control system in the same manner if you sit in your parked
vehicle with the engine running.
Carbon monoxide gas is toxic. Breathing it can cause unconsciousness and
even kill you.
Avoid any enclosed areas or activities that expose you to carbon monoxide.
WARNING
An enclosed area such as a garage can quickly fill up with carbon monoxide gas.
Do not run the engine with the garage door closed. Even when the garage door is
open, drive out of the garage immediately after starting the engine.
Seat Belts
A seat belt is your best protection in all types of collisions. Airbags are designed to
supplement seat belts, not replace them. So even though your vehicle is equipped
with airbags, make sure you and your passengers always wear your seat belts and
wear them properly.
Lap/Shoulder Seat BeltsAll five seating positions are equipped with lap/shoulder seat belts with
emergency locking retractors. In normal driving, the retractor lets you move
freely while keeping some tension on the belt. During a collision or sudden stop,
the retractor locks to restrain your body. The front passenger’s and rear seat belts
also have a lockable retractor for use with child seats.
The front seats are equipped with automatic seat belt tensioners to enhance
safety. The tensioners automatically tighten the front seat belts during a
moderate-to-severe front collision, sometimes even if the collision is not severe
enough to inflate the front airbags or the driver’s knee airbag.
Proper Use of Seat BeltsFollow these guidelines for proper use:
•
All
occupants should sit upright, well back in the seat, and remain in that
position for the duration of the trip. Slouching and leaning reduces the
effectiveness of the belt and can increase the chance of serious injury in a crash.
•
Nev
er place the shoulder part of a lap/shoulder seat belt under your arm or
behind your back. This could cause very serious injuries in a crash.
•
T
wo people should never use the same seat belt. If they do, they could be very
seriously injured in a crash.
•
Do not put an
y accessories on the seat belts. Devices intended to improve
comfort or reposition the shoulder part of a seat belt can reduce the protective
capability and increase the chance of serious injury in a crash.
•
No
one should sit in a seat with an inoperative seat belt or one that does not
appear to be working correctly. Using a seat belt that is not working properly
may not protect the occupant in a crash. Have a dealer check the belt as soon
as possible.
Not wearing a seat belt properly increases the chance of a serious injury or
death in a crash, even though your vehicle has airbags.
Be sure you and your passengers always wear seat belts and wear them
properly.
WARNING
Page 17 of 75
26 || 27
VEHICLE CONTROLS
I NSTRUMENT P
ANEL
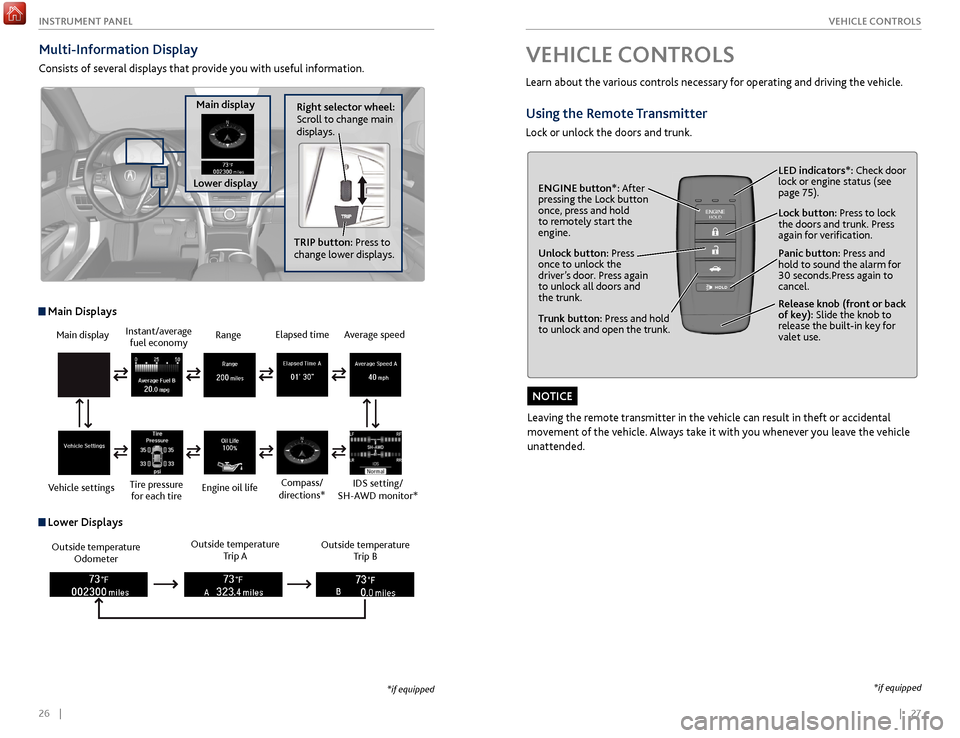
Multi-Information Display
Consists of several displays that provide you with useful information.
Right selector wheel:
Scroll to change main
displays.
Main display
Lower display TRIP button: Press to
change lower displays.
Main display
Vehicle settings Instant/average
fuel economy
Tire pressure for each tire Range
Engine oil life
Main Displays
Outside temperature Odometer Outside temperature
Trip A Outside temperature
Trip B
Lower Displays
Elapsed time
Compass/
directions*Average speed
IDS setting/
SH-AWD monitor*
*if equipped
VEHICLE CONTROLS
Learn about the various controls necessary for operating and driving the vehicle.
Using the Remote Transmitter
Lock or unlock the doors and trunk.
Leaving the remote transmitter in the vehicle can result in theft or accidental
movement of the vehicle. Always take it with you whenever you leave the vehicle
unattended.
NOTICE
Unlock button: Press
once to unlock the
driver’s door. Press again
to unlock all doors and
the trunk. Release knob (front or back
of key): Slide the knob to
release the built-in key for
valet use.
Trunk button: Press and hold
to unlock and open the trunk. Lock button: Press to lock
the doors and trunk. Press
again for verification. LED indicators*: Check door
lock or engine status (see
page 75).
Panic button: Press and
hold to sound the alarm for
30 seconds.Press again to
cancel.
ENGINE button*: After
pressing the Lock button
once, press and hold
to remotely start the
engine.
*if equipped
Page 20 of 75

32 || 33
V EHICLE C ONTROLS
V
EHICLE C ONTROLS
Interior and Exterior Lights
Operate interior and exterior lights when the vehicle is on or off.
Exterior Lights
Rotate the switches on the lever to operate the exterior lights. Push the lever
forward to turn on the high beams. Return the lever to its original position for
low beams.
OFF
All exterior lights ar
e off.
AUTO
Turn
on the automatic lighting
featur
e. Headlights turn on or
off depending on
ambient
brightness
when the vehicle is
on. Headlights automaticall
y come
on after
the wipers are engaged
for a certain
time.
Turn
on exterior lights except headlights.
Turn
on all exterior lights including headlights.
Turn
fog lights on or off.*
Brightness ControlAdjust instrument panel brightness when the vehicle is on.
To brighten: Press the + button.
To dim: Press the - button.
A beep sounds when the brightness reaches its
minimum or maximum.
Interior Lights Lights are located on the ceiling.
ON position: Interior lights remain on.
Door-activated position: Interior lights come on
when any of the doors are opened, the driver’s door
is unlocked, or the vehicle is turned off.
OFF position: Interior lights remain off.
BrightDim
Door-
activated
position
On
Off
Flashing high beams
Low
beams High beams
Fog
lights*
*if equipped
One-Touch Turn Signal
Use this quick and convenient method to signal a lane change.
•
Lightl
y push the turn signal lever up or down
for a three-blink sequence.
•
F
or a continuous signal, push the lever up or
down until it locks into place.
Right
Left
*if equipped
Wiper Operation
The windshield wipers and washers can be used when the vehicle is on. Move the
wiper lever up or down to the desired position.
Headlight-Wiper Integration
When the headlights are in the AUTO position,
they automatically turn on when the front
wipers operate several times within a certain
interval. The headlights turn off shortly after
the wipers are turned off, or if there is enough
ambient light.
Intermittent Wipers*When you move the lever to
the INT position, the wipers
operate based on the delay
adjustment.
Rotate the adjustment ring to
adjust the wiper delay.
Mist
Off
Intermittent*/automatic*
Low speed
High speed Pull for
washer.
Long delay
Short delay
Adjustment ring
Page 24 of 75
40 || 41
V EHICLE C ONTROLS
V
EHICLE C ONTROLS
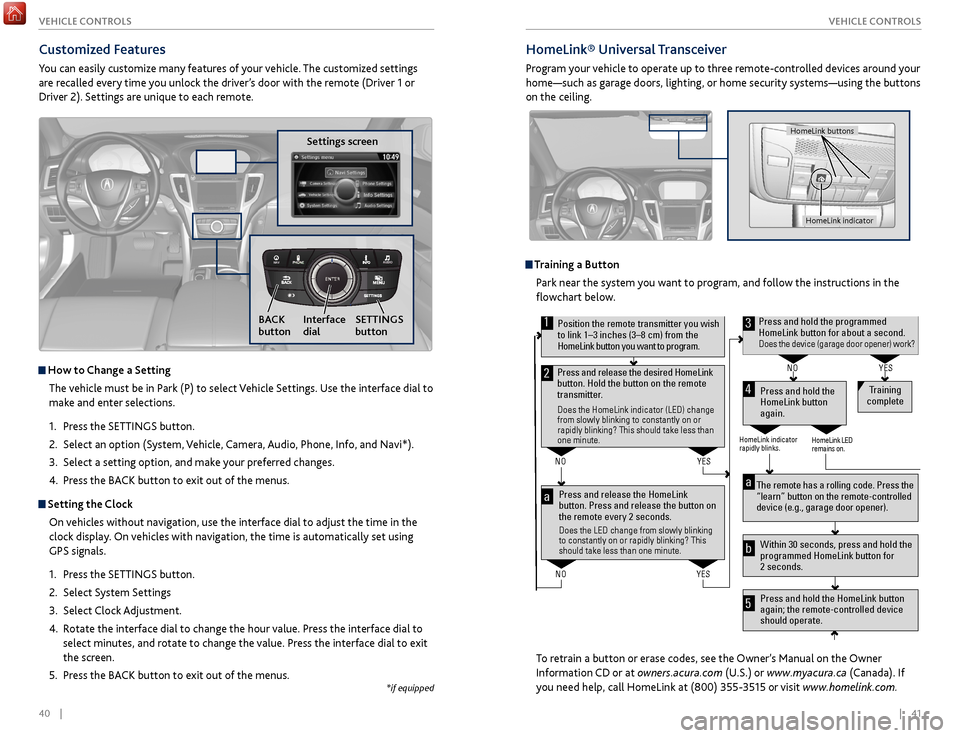
Customized Features
You can easily customize many features of your vehicle. The customized settings
are recalled every time you unlock the driver’s door with the remote (Driver 1 or
Driver 2). Settings are unique to each remote.
How to
Change a Setting
The vehicle must be in Park (P) to select Vehicle Settings. Use the interface dial to
make and enter selections.
1.
Pr
ess the SETTINGS button.
2.
Select an
option (System, Vehicle, Camera, Audio, Phone, Info, and Navi*).
3.
Select a setting
option, and make your preferred changes.
4.
Pr
ess the BACK button to exit out of the menus.
Setting the Clock
On vehicles without navigation, use the interface dial to adjust the time in the
clock display. On vehicles with navigation, the time is automatically set using
GPS signals.
1.
Pr
ess the SETTINGS button.
2.
Select S
ystem Settings
3.
Select
Clock Adjustment.
4.
R
otate the interface dial to change the hour value. Press the interface dial to
select minutes, and rotate to change the value. Press the interface dial to exit
the screen.
5.
Pr
ess the BACK button to exit out of the menus.
Settings screen
NAVAUDIOAUDIONAV
SETTINGS
button
BACK
button Interface
dial
HomeLink®
Universal Transceiver
Program your vehicle to operate up to three remote-controlled devices around your
home—such as garage doors, lighting, or home security systems—using the buttons
on the ceiling.
Training a Button
Park near the system you want to program, and follow the instructions in the
flowchart below.
To retrain a button or erase codes, see the Owner’s Manual on the Owner
Information CD or at owners.acura.com (U.S.) or www.myacura.ca (Canada). If
you need help, call HomeLink at (800) 355-3515 or visit www.homelink.com.
Press and release the HomeLink
button. Press and release the button on
the remote every 2 seconds.
Does the LED change from slowly blinking
to constantly on or rapidly blinking? This
should take less than one minute.
Press and hold the
HomeLink button
again. Training
complete
YES
NO
HomeLink indicator
rapidly blinks. HomeLink LED
remains on.
YES
NO
YES
NO
Position the remote transmitter you wish to link 1–3 inches (3–8 cm) from the
HomeLink button you want to program.1
Press and release the desired HomeLink
button. Hold the button on the remote
transmitter.
Does the HomeLink indicator (LED) change
from slowly blinking to constantly on or
rapidly blinking? This should take less than
one minute.
2
aThe remote has a rolling code. Press the
“learn” button on the remote-controlled
device (e.g., garage door opener) .
Press and hold the HomeLink button
again; the remote-controlled device
should operate. Within 30 seconds, press and hold the
programmed HomeLink button for
2 seconds.a
Press and hold the programmed HomeLink button for about a second.Does the device (garage door opener) work?
3
b
4
5
HomeLink indicator
HomeLink buttons
*if equipped
Page 47 of 75

86 || 87
DRIVING
DRIVING
When in Operation
If a vehicle detected ahead of you slows down
abruptly, or if another vehicle cuts in front of you,
a beep sounds and BRAKE appears on the multi-
information display to alert you.
When a vehicle detected ahead is within ACC with
low speed follow range and stops, your vehicle also
stops. The Stopped message appears on the multi-
information display.
When the vehicle ahead of you starts again, the vehicle icon on the multi-
information display blinks. Press RES/+/SET/– up or down, or press the
accelerator pedal to resume the prior set speed.
Canceling ACCYou can press either the CANCEL button or the
CRUISE button, or press the brake pedal. The ACC
indicator goes off.
Certain conditions may cause ACC
to cancel
automaticall
y. When this happens, a beep sounds
and a message appears on the multi-information
display.
After cruise control has been canceled, you can still resume the prior set speed by
pressing the RES/+ switch.
Press the MAIN button to turn the system off.
Improper use of ACC with LSF can lead to a crash.
Use ACC with LSF only when driving on expressways or freeways and in good
weather conditions.
WARNING
Exiting a vehicle that has been stopped while the ACC with LSF system is
operating can result in the vehicle moving without operator control. Always
make sure Park (P) is selected before exiting the vehicle.
A vehicle that moves without operator control can cause a crash, resulting in
serious injury or death.
Never exit a vehicle when the vehicle is stopped by ACC with LSF.
WARNING
ACC with LSF has limited braking capability and may not stop your vehicle in
time to avoid a collision with a vehicle that quickly stops in front of you.
Always be prepared to apply the brake pedal if the conditions require.
WARNING
Adaptive Cruise Control (ACC) with Low Speed Follow (LSF)*
Helps maintain a constant vehicle speed and a set following interval behind a
vehicle detected ahead of yours. When the vehicle ahead changes speed, ACC
senses the change and accelerates or decelerates to maintain a set interval.
Activating and Setting the Vehicle Speed
1. Press the MAIN button. The ACC indicator appears.
2.
A
ccelerate to the desired speed.
Above 25 mph (40 km/h): Take your foot off the
pedal and press RES/+/SET/- to set the speed.
Below 25 mph (40 km/h) (Low Speed Follow):
Press SET/- to set the speed at 25 mph (40 km/h).
Adjusting the Vehicle Speed
Press the RES/+ switch to increase speed, or the
SET/- switch to decrease speed.
Each time you press the switch up or down, the
vehicle speed is increased or decreased by about
1 mph (1 km/h). If you keep the switch pressed up
or down, the vehicle speed increases or decreases
by 5 mph or 5 km/h until you release it.
Adjusting the Following Interval Press the Interval button to change the following
interval. Each time you press the button, the
following interval setting cycles through short,
middle, long, and extra long following intervals.
Switching to Standard Cruise ControlPress and hold the Interval button.
Interval Short Middle LongExtra Long
Approx.
Gap
(seconds) 1 .1
1.5 2 .12.8
MAIN button
RES/+ switch
SET/- switch
CANCEL button
INTERVAL button
*if equipped
Page 55 of 75

102 || 103
HANDLING THE UNEXPECTED
HANDLING THE UNEXPECTED
Emergency Engine Stop
The ENGINE START/STOP button may be used to stop the engine due to an
emergency situation even while driving. If you must stop the engine, choose one of
the following operations:
•
Pr
ess and hold the ENGINE START/STOP button for
two seconds, or
•
Firml
y press the ENGINE START/STOP button two
times.
The steering wheel will not lock. The power mode changes to ACCESSORY, unless
the shift lever is in Park, in which case the power mode changes to VEHICLE OFF.
Because turning off the engine also disables the power assist the engine provides to
the steering and braking systems, it will require significantly more physical effort
and time to steer and slow the vehicle. Downshift gears and use both feet on the
brake pedal, if necessary, to slow the vehicle and stop immediately in a safe place.
Do not press the button while driving unless it is absolutely necessary for the
engine to be switched off.
Emergency Towing
Call a professional towing service if you need to tow your vehicle.
All models
Flat bed equipment: The operator loads your vehicle on the back of a truck. This is
the best way to transport your vehicle.
2WD models
Wheel lift equipment: The tow truck uses two pivoting arms that go under the front
tires and lift them off the ground. The rear tires remain on the ground. This is an
acceptable way to tow your vehicle.
NOTICE
Trying to lift or tow your vehicle by the bumpers will cause serious damage. The
bumpers are not designed to support the vehicle’s weight.
Improper towing such as towing behind a motorhome or other motor vehicle can
damage the transmission.
NOTICE
Overheating
Signs your engine is overheating: •
The
temperature gauge needle is at the H mark
•
The engine suddenl
y loses power
•
Steam
or spray comes out from under the hood
•
The message
Engine Temperature Too Hot appears on the display.
1.
Immediatel
y park the vehicle in a safe place. Turn
off all accessories and turn on the hazard warning
lights.
2.
If no steam
or spray is present: Keep the
engine running and open the hood (see page
118).
If steam or spray is present: Turn off the engine
and wait until it subsides. Then, open the hood
(see page 118).
3.
Check that the
cooling fan is operating and stop the engine once the
temperature gauge needle goes down. If the cooling fan is not operating,
immediately stop the engine.
4.
Once
the engine has cooled down, inspect the coolant level and check the
cooling system components for leaks. If the coolant level in the reserve tank
is low, add coolant until it reaches the MAX mark. If there is no coolant in the
reserve tank, make sure the radiator is cool, then cover the radiator cap with a
heavy cloth and open the cap. If necessary, add coolant up to the base of the
filler neck, and put the cap back on.
Once the engine has cooled sufficiently, restart it and check the temperature
gauge. If the temperature needle has gone down, resume driving. If it has not gone
down, contact a dealer for repairs.
Reserve tank MAX
MIN
Steam and spray from an overheated engine can seriously scald you.
Do not open the hood if steam is coming out.
WARNING
Removing the radiator cap while the engine is hot can cause the coolant to
spray out, seriously scalding you.
Always let the engine and radiator cool down before removing the radiator
cap.
WARNING
Continuing to drive with the temperature gauge needle at the H mark may
damage the engine.
NOTICE
Page 58 of 75

108 || 109
HANDLING THE UNEXPECTED
HANDLING THE UNEXPECTED
Replacing the Flat Tire
1.
R
emove the wheel nuts and flat tire.
2.
Mount the
compact spare tire. Replace the
wheel nuts, and lightly tighten them.
3.
Lower
the vehicle and remove the jack. Tighten
the wheel nuts in the order indicated in the
image. Go around, tightening the nuts, two to
three times in this order. Do not over tighten the
wheel nuts.
Storing the Flat Tire
1.
R
emove the center cap, and place the flat tire
face down in the spare tire well.
2.
R
emove the spacer cone from the wing bolt, flip
it over, and insert it back on to the bolt. Secure
the flat tire with the wing bolt.
3.
R
eturn the jack and wheel nut wrench to the
tool case. Store the case in the trunk, and close
the trunk.
Loose items can fly around the interior in a crash and can seriously injure the
occupants.
Store the wheel, jack, and tools securely before driving.
WARNING
Wing bolt
Spacer cone
Center cap
Setting Up the Jack
1.
Place
the jack under the jacking point closest to
the tire to be changed.
2.
Turn
the end bracket clockwise (as shown in
the image) until the top of the jack contacts
the jacking point. Make sure that the jacking
point tab is resting in the jack notch. Do not
overextend the jack.
3.
Raise
the vehicle, using the jack handle bar and
the jack handle, until the tire is off the ground.
The following instructions must be followed to use the jack safely:
•
Do not use
the jack with people or luggage in the vehicle.
•
Use
the jack provided in your vehicle. Other jacks may not support the weight
(“load”) or fit the jacking point.
•
Do not use
while the engine is running.
•
Use
only where the ground is firm and level.
•
Use
only at the jacking points.
•
Do not get in
the vehicle while using the jack.
•
Do
not put anything on top of or underneath the jack.
The vehicle can easily roll off the jack, seriously injuring anyone underneath.
Follow the directions for changing a tire exactly, and never get under the
vehicle when it is supported only by the jack.
WARNING
Do not use the jack if it doesn’t work properly. Call your dealer or a professional
towing service.
NOTICE
Jack
handle bar
Wheel nut wrench
as jack handle
Jacking points
Page 61 of 75
114 || 115
MAINTENANCE
MAINTENANCE
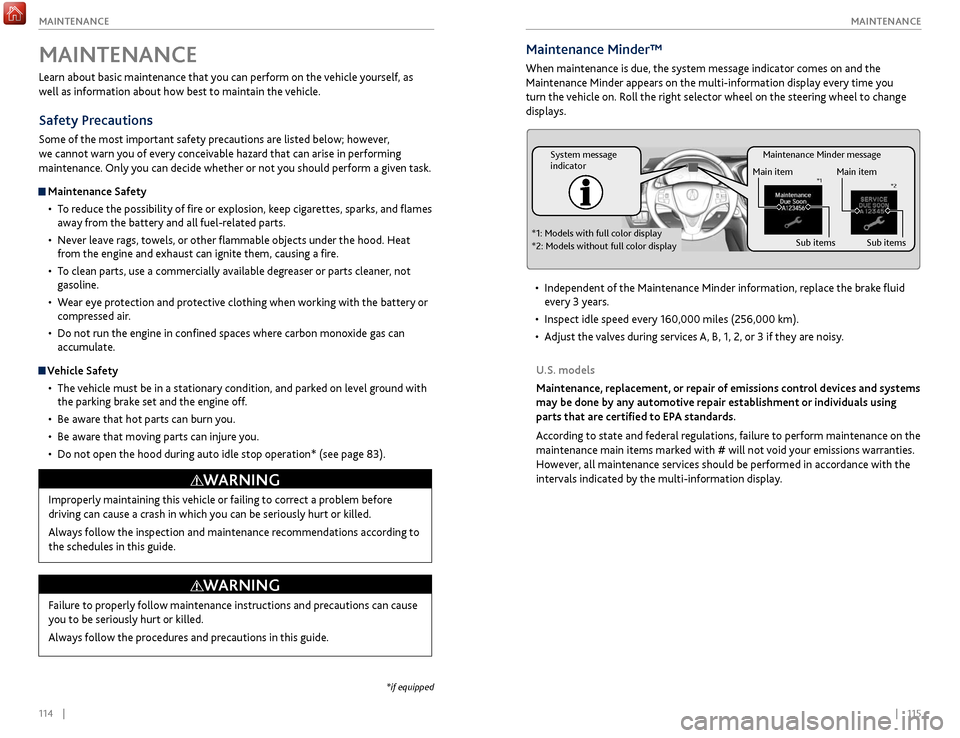
Maintenance Minder message
System message
indicator
Main item
Sub items
Main item
Sub item s*1
*2
*1: Models with full color display
*2: Models without full color display
Maintenance Minder™
When maintenance is due, the system message indicator comes on and the
Maintenance Minder appears on the multi-information display every time you
turn the vehicle on. Roll the right selector wheel on the steering wheel to change
displays.
•
Independent
of the Maintenance Minder information, replace the brake fluid
every 3 years.
•
Inspect idle speed ev
ery 160,000 miles (256,000 km).
•
A
djust the valves during services A, B, 1, 2, or 3 if they are noisy.
U.S. models
Maintenance, replacement, or repair of emissions control devices and systems
may be done by any automotive repair establishment or individuals using
parts that are certified to EPA standards.
According to state and federal regulations, failure to perform maintenance on the
maintenance main items marked with # will not void your emissions warranties.
However, all maintenance services should be performed in accordance with the
intervals indicated by the multi-information display.
Learn about basic maintenance that you can perform on the vehicle yourself, as
well as information about how best to maintain the vehicle.
Safety Precautions
Some of the most important safety precautions are listed below; however,
we cannot warn you of every conceivable hazard that can arise in performing
maintenance. Only you can decide whether or not you should perform a given task.
Maintenance Safety
•
T
o reduce the possibility of fire or explosion, keep cigarettes, sparks, and flames
away from the battery and all fuel-related parts.
•
Nev
er leave rags, towels, or other flammable objects under the hood. Heat
from the engine and exhaust can ignite them, causing a fire.
•
T
o clean parts, use a commercially available degreaser or parts cleaner, not
gasoline.
•
W
ear eye protection and protective clothing when working with the battery or
compressed air.
•
Do not run
the engine in confined spaces where carbon monoxide gas can
accumulate.
Vehicle Safety
•
The
vehicle must be in a stationary condition, and parked on level ground with
the parking brake set and the engine off.
•
Be awar
e that hot parts can burn you.
•
Be awar
e that moving parts can injure you.
•
Do not
open the hood during auto idle stop operation* (see page 83).
MAINTENANCE
Improperly maintaining this vehicle or failing to correct a problem before
driving can cause a crash in which you can be seriously hurt or killed.
Always follow the inspection and maintenance recommendations according to
the schedules in this guide.
WARNING
Failure to properly follow maintenance instructions and precautions can cause
you to be seriously hurt or killed.
Always follow the procedures and precautions in this guide.
WARNING
*if equipped
Page 66 of 75
124 || 125
MAINTENANCE
MAINTENANCE
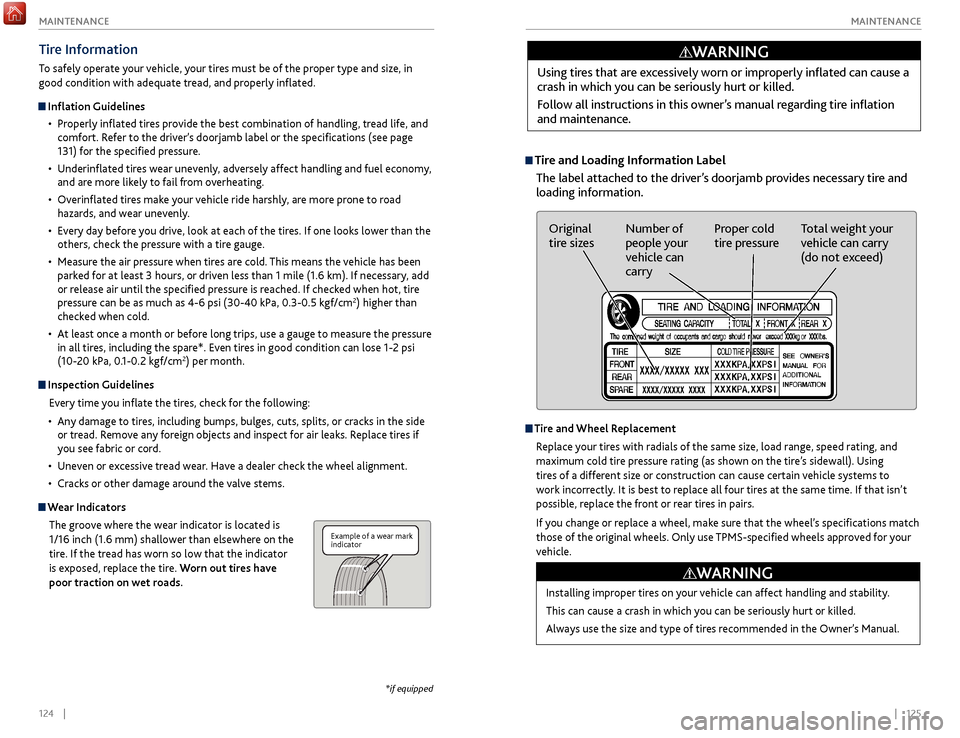
Tire and Loading Information Label
The label attached to the driver’s doorjamb provides necessary tire and
loading information.Using tires that are excessively worn or improperly inflated can cause a
crash in which you can be seriously hurt or killed.
Follow all instructions in this owner’s manual regarding tire inflation
and maintenance.
WARNING
Original
tire sizes
Number of
people your
vehicle can
carry Proper cold
tire pressure
Total weight your
vehicle can carry
(do not exceed)
Tire and Wheel Replacement
Replace your tires with radials of the same size, load range, speed rating, and
maximum cold tire pressure rating (as shown on the tire’s sidewall). Using
tires of a different size or construction can cause certain vehicle systems to
work incorrectly. It is best to replace all four tires at the same time. If that isn’t
possible, replace the front or rear tires in pairs.
If you change or replace a wheel, make sure that the wheel’s specifications match
those of the original wheels. Only use TPMS-specified wheels approved for your
vehicle.
Installing improper tires on your vehicle can affect handling and stability.
This can cause a crash in which you can be seriously hurt or killed.
Always use the size and type of tires recommended in the Owner’s Manual.
WARNING
Tire Information
To safely operate your vehicle, your tires must be of the proper type and size, in
good condition with adequate tread, and properly inflated.
Inflation Guidelines•
Pr
operly inflated tires provide the best combination of handling, tread life, and
comfort. Refer to the driver’s doorjamb label or the specifications (see page
131) for the specified pressure.
•
Underinflated
tires wear unevenly, adversely affect handling and fuel economy,
and are more likely to fail from overheating.
•
Ov
erinflated tires make your vehicle ride harshly, are more prone to road
hazards, and wear unevenly.
•
Ev
ery day before you drive, look at each of the tires. If one looks lower than the
others, check the pressure with a tire gauge.
•
Measur
e the air pressure when tires are cold. This means the vehicle has been
parked for at least 3 hours, or driven less than 1 mile (1.6 km). If necessary, add
or release air until the specified pressure is reached. If checked when hot, tire
pressure can be as much as 4-6 psi (30-40 kPa, 0.3-0.5 kgf/cm
2) higher than
checked when cold.
•
A
t least once a month or before long trips, use a gauge to measure the pressure
in all tires, including the spare*. Even tires in good condition can lose 1-2 psi
(10-20 kPa, 0.1-0.2 kgf/cm
2) per month.
Inspection Guidelines
Every time you inflate the tires, check for the following:
•
An
y damage to tires, including bumps, bulges, cuts, splits, or cracks in the side
or tread. Remove any foreign objects and inspect for air leaks. Replace tires if
you see fabric or cord.
•
Unev
en or excessive tread wear. Have a dealer check the wheel alignment.
•
Cracks or other damage
around the valve stems.
Wear IndicatorsThe groove where the wear indicator is located is
1/16 inch (1.6 mm) shallower than elsewhere on the
tire. If the tread has worn so low that the indicator
is exposed, replace the tire. Worn out tires have
poor traction on wet roads.
Example of a wear mark
indicator
*if equipped