tow Acura TLX 2017 Owner's Guide
[x] Cancel search | Manufacturer: ACURA, Model Year: 2017, Model line: TLX, Model: Acura TLX 2017Pages: 75, PDF Size: 10.99 MB
Page 3 of 75
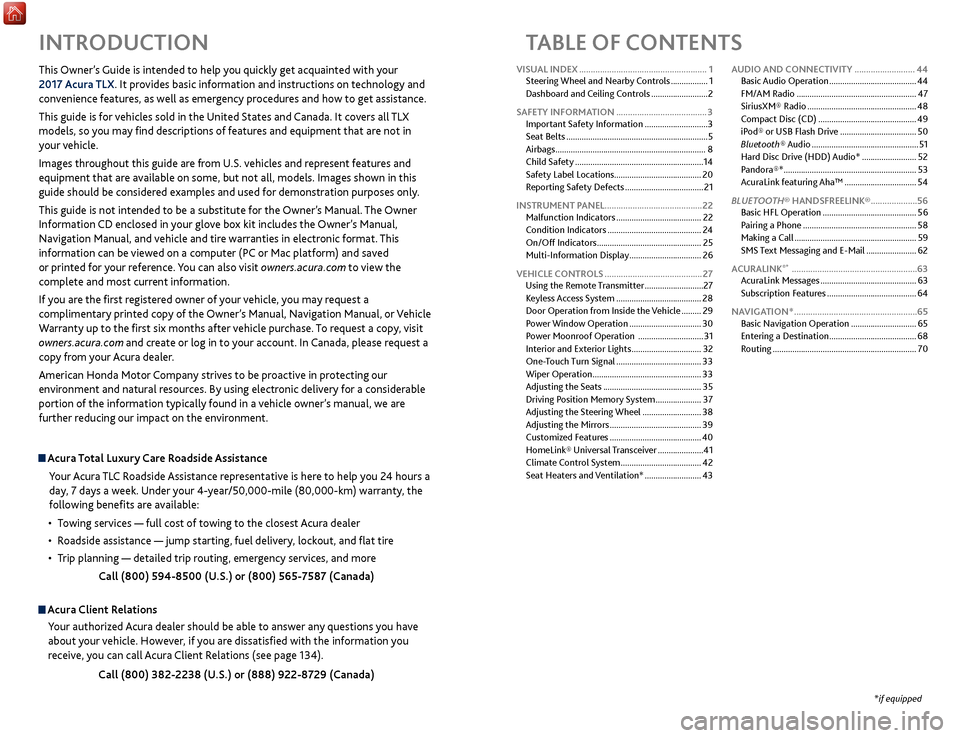
TABLE OF CONTENTS
Acura Total Luxury Care Roadside AssistanceYour Acura TLC Roadside Assistance representative is here to help you 24 hours a
day, 7 days a week. Under your 4-year/50,000-mile (80,000-km) warranty, the
following benefits are available:
•
T
owing services — full cost of towing to the closest Acura dealer
•
R
oadside assistance — jump starting, fuel delivery, lockout, and flat tire
•
T
rip planning — detailed trip routing, emergency services, and more Call (800) 594-8500 (U.S.) or (800) 565-7587 (Canada)
Acura Client RelationsYour authorized Acura dealer should be able to answer any questions you have
about your vehicle. However, if you are dissatisfied with the information you
receive, you can call Acura Client Relations (see page 134).
Call (800) 382-2238 (U.S.) or (888) 922-8729 (Canada)
INTRODUCTION
This Owner’s Guide is intended to help you quickly get acquainted with your
2017 Acura TLX. It provides basic information and instructions on technology and
convenience features, as well as emergency procedures and how to get assistance.
This guide is for vehicles sold in the United States and Canada. It covers all TLX
models, so you may find descriptions of features and equipment that are not in
your vehicle.
Images throughout this guide are from U.S. vehicles and represent features and
equipment that are available on some, but not all, models. Images shown in this
guide should be considered examples and used for demonstration purposes only.
This guide is not intended to be a substitute for the Owner’s Manual. The Owner
Information CD enclosed in your glove box kit includes the Owner’s Manual,
Navigation Manual, and vehicle and tire warranties in electronic format. This
information can be viewed on a computer (PC
or Mac platform) and sav
ed
or printed for your reference. You can also visit owners.acura.com to view the
complete and most current information.
If you are the first registered owner of your vehicle, you may request a
complimentary printed copy of the Owner’s Manual, Navigation Manual, or Vehicle
Warranty up to the first six months after vehicle purchase. To request a copy, visit
owners.acura.com and create or log in to your account. In Canada, please request a
copy from your Acura dealer.
American Honda Motor Company strives to be proactive in protecting our
environment and natural resources. By using electronic delivery for a considerable
portion of the information typically found in a vehicle owner’s manual, we are
further reducing our impact on the environment.
*if equipped
VISUAL INDEX
.......................................................
1
Steering Wheel and Nearby Controls
.................
1
Dashboard and Ceiling Controls
..........................
2
SAFETY INFORMATION
.......................................
3
Important Safety Information
.............................3
Seat Belts
.................................................................
5
Airbags
.....................................................................
8
Child Safety
...........................................................
14
Safety Label Locations........................................ 20
Reporting Safety Defects
....................................
21
INSTRUMENT PANEL..........................................22 Malfunction Indicators
.......................................
22
Condition Indicators
...........................................
24
On/Off Indicators
................................................
25
Multi-Information Display
.................................
26
VEHICLE CONTROLS
..........................................
27
Using the Remote Transmitter
...........................
27
Keyless Access System
.......................................
28
Door Operation from Inside the Vehicle
.........
29
Power Window Operation
.................................
30
Power Moonroof Operation
..............................
31
Interior and Exterior Lights
................................
32
One-Touch Turn Signal
.......................................
33
Wiper Operation
..................................................
33
Adjusting the Seats
.............................................
35
Driving Position Memory System
.....................
37
Adjusting the Steering Wheel
...........................
38
Adjusting the Mirrors
..........................................
39
Customized Features
..........................................
40
HomeLink® Universal Transceiver
.....................
41
Climate Control System
.....................................
42
Seat Heaters and Ventilation*
..........................
43AUDIO AND CONNECTIVITY
..........................
44
Basic Audio Operation
........................................
44
FM/AM Radio
.......................................................
47
SiriusXM® Radio
..................................................
48
Compact Disc (CD)
.............................................
49
iPod® or USB Flash Drive
...................................
50
Bluetooth® Audio
.................................................
51
Hard Disc Drive (HDD) Audio*
.........................
52
Pandora®*
.............................................................
53
AcuraLink featuring Aha™
.................................
54
BLUETOOTH® HANDSFREELINK®
....................
56
Basic
HFL Operation
...........................................
56
Pairing a Phone
....................................................
58
Making a Call
........................................................
59
SMS Text Messaging and E-Mail
.......................
62
ACURALINK
®* ......................................................63
A
curaLink Messages ............................................ 63
Subscription Features
......................................... 64
NAVIGATION*
..................................................... 65
Basic Navigation Operation
.............................. 65
Entering a Destination
........................................ 68
Routing
.................................................................. 70
Page 4 of 75
| 1
V
ISUAL
I
NDEX
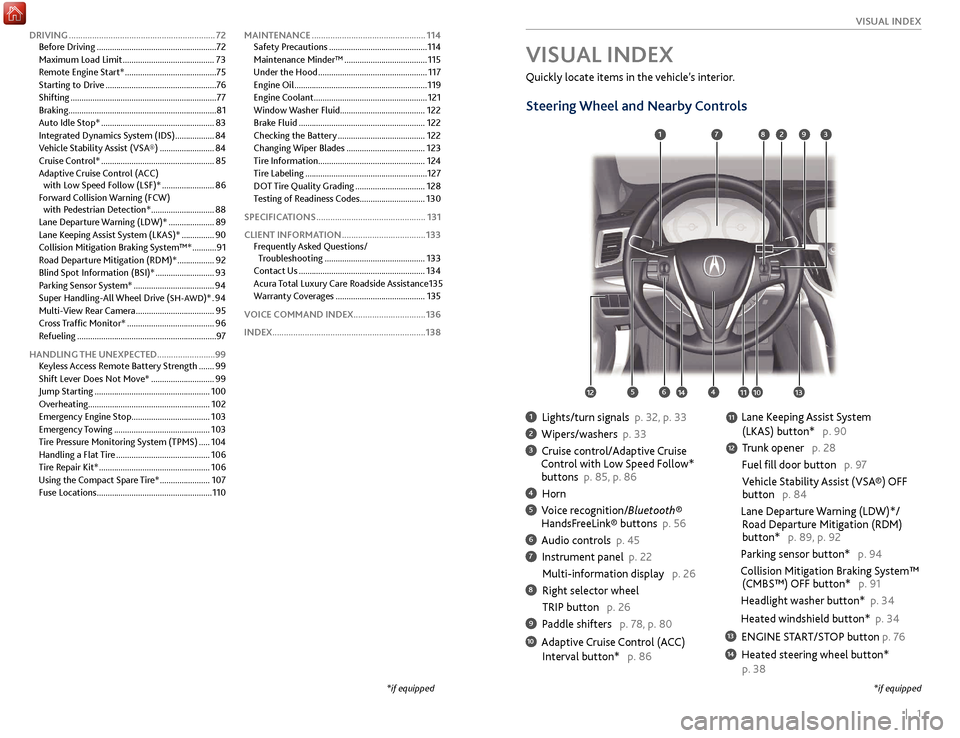
1 Lights/turn signals p. 32, p. 33
2 Wipers/washers p. 33
3 Cruise control/Adaptive Cruise
Control with Low Speed Follow*
buttons p. 85, p. 86
4 Horn
5 Voice recognition/Bluetooth® HandsF reeLink® buttons p. 56
6 Audio controls p. 45
7 Instrument panel p. 22
Multi-information
display p. 26
8 Right selector wheel
TRIP button
p. 26
9 Paddle shifters p. 78, p. 80
10 Adaptive Cruise Control (ACC)
Interval button*
p. 86
Quickly locate items in the vehicle’s interior.
Steering Wheel and Nearby Controls
Lane Keeping Assist System
(LKAS) button*
p. 90
T
runk opener p. 28
Fuel fill door button p. 97
Vehicle Stability Assist (VSA®) OFF
button
p. 84
Lane Departure Warning (LDW)*/
R
oad Departure Mitigation (RDM)
button*
p. 89, p. 92
Parking sensor button* p. 94
Collision Mitigation Braking System™
(CMBS™)
OFF button* p. 91
Headlight washer button* p. 34
Heated windshield button* p. 34
13 ENGINE START/STOP button p. 76
14 Heated steering wheel button*
p. 38
VISUAL INDEX
*if equipped
1
1011
27
4
8
13
12
1256
93
*if equipped
11
14
DRIVING ............................................................... 72
Befor e Driving ....................................................... 72
Maximum Load Limit
..........................................73
Remote Engine Start*
..........................................75
Starting to Drive
................................................... 76
Shifting
................................................................... 77
Braking
.................................................................... 81
Auto Idle Stop*
.................................................... 83
Integrated Dynamics System (IDS)
..................84
Vehicle Stability Assist (VSA®)
.........................84
Cruise Control*
.................................................... 85
Adaptive Cruise Control (ACC) with Low Speed Follow (LSF)*
........................86
Forward Collision Warning (FCW) with Pedestrian Detection*
.............................88
Lane Departure Warning (LDW)*
.....................89
Lane Keeping Assist System (LKAS)*
...............90
Collision Mitigation Braking System™*
...........91
Road Departure Mitigation (RDM)*
.................92
Blind Spot Information (BSI)*
...........................93
Parking Sensor System*
.....................................94
Super Handling-All Wheel Drive (
SH-AWD)* . 94
Multi-
View Rear Camera
.................................... 95
Cross Traffic Monitor*
........................................ 96
Refueling
................................................................ 97
HANDLING THE UNEXPECTED .........................99
Keyless Access Remote Battery Strength
....... 99
Shift Lever Does Not Move*
............................. 99
Jump Starting
..................................................... 100
Overheating........................................................ 102
Emergency Engine Stop
.................................... 103
Emergency Towing
............................................ 103
Tire Pressure Monitoring System (TPMS)
..... 104
Handling a Flat Tire
........................................... 106
Tire Repair Kit*
................................................... 106
Using the Compact Spare Tire*
....................... 107
Fuse Locations
..................................................... 110MAINTENANCE
.................................................
114
Safety Precautions .............................................
114
Maintenance Minder™ ......................................
115
Under the Hood ..................................................
117
Engine Oil .............................................................
119
Engine Coolant ....................................................
121
Window Washer Fluid ....................................... 122
Brake Fluid ..........................................................
122
Checking the Battery ........................................
122
Changing Wiper Blades ....................................
123
Tire Information .................................................
124
Tire Labeling ........................................................
127
DOT Tire Quality Grading ................................
128
Testing of Readiness Codes .............................. 130
SPECIFICATIONS ...............................................
131
CLIENT INFORMATION ....................................
133
Frequently Asked Questions/ Troubleshooting ..............................................
133
Contact Us ..........................................................
134
Acura Total Luxury Care Roadside Assistance 135
Warranty Coverages .........................................
135
VOICE COMMAND INDEX ...............................136
INDEX..................................................................138
Page 40 of 75
72 || 73
DRIVING
DRIVING
Maximum Load Limit
Carrying too much cargo or improperly storing it can affect your vehicle’s handling,
stability, stopping distance, and tires, and make it unsafe.
Your vehicle is not designed to tow a trailer. Attempting to do so can void your
vehicle warranties.
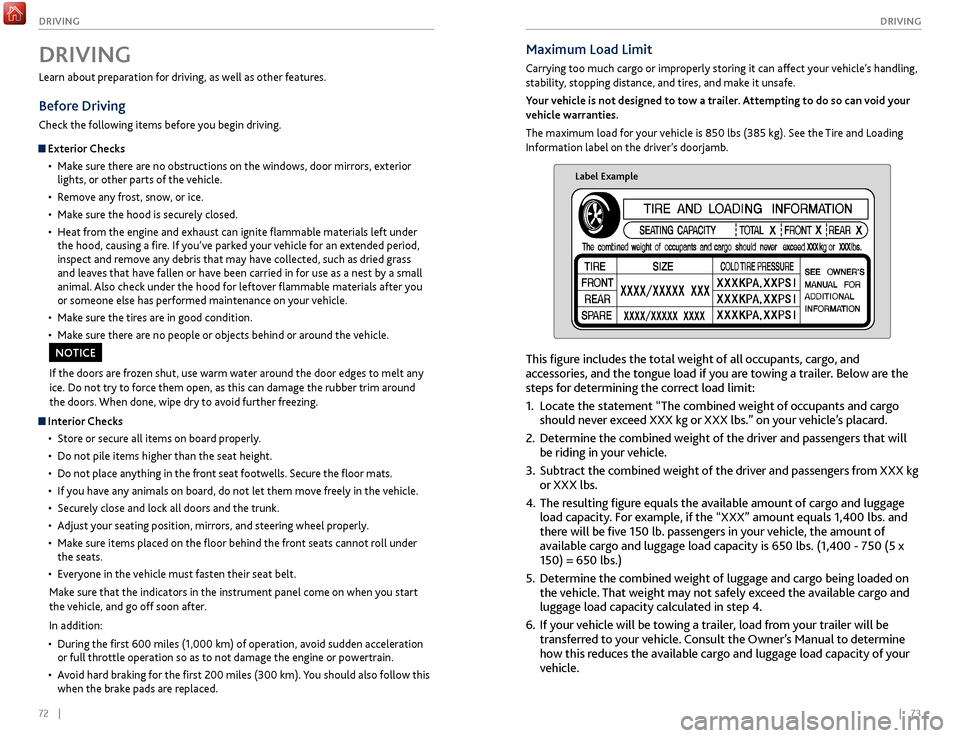
The maximum load for your vehicle is 850 lbs (385 kg). See the Tire and Loading
Information label on the driver’s doorjamb.
Label Example
This figure includes the total weight of all occupants, cargo, and
accessories, and the tongue load if you are towing a trailer. Below are the
steps for determining the correct load limit:
1.
Locate
the statement “The combined weight of occupants and cargo
should never exceed XXX kg or XXX lbs.” on your vehicle’s placard.
2.
Determine the
combined weight of the driver and passengers that will
be riding in your vehicle.
3.
Subtract the
combined weight of the driver and passengers from XXX kg
or XXX lbs.
4.
The r
esulting figure equals the available amount of cargo and luggage
load capacity. For example, if the “XXX” amount equals 1,400 lbs. and
there will be five 150 lb. passengers in your vehicle, the amount of
available cargo and luggage load capacity is 650 lbs. (1,400 - 750 (5 x
150) = 650 lbs.)
5.
Determine
the combined weight of luggage and cargo being loaded on
the vehicle. That weight may not safely exceed the available cargo and
luggage load capacity calculated in step 4.
6.
If y
our vehicle will be towing a trailer, load from your trailer will be
transferred to your vehicle. Consult the Owner’s Manual to determine
how this reduces the available cargo and luggage load capacity of your
vehicle.
Learn about preparation for driving, as well as other features.
Before Driving
Check the following items before you begin driving.
Exterior Checks
•
Mak
e sure there are no obstructions on the windows, door mirrors, exterior
lights, or other parts of the vehicle.
•
R
emove any frost, snow, or ice.
•
Mak
e sure the hood is securely closed.
•
Heat
from the engine and exhaust can ignite flammable materials left under
the hood, causing a fire. If you’ve parked your vehicle for an extended period,
inspect and remove any debris that may have collected, such as dried grass
and leaves that have fallen or have been carried in for use as a nest by a small
animal. Also check under the hood for leftover flammable materials after you
or someone else has performed maintenance on your vehicle.
•
Mak
e sure the tires are in good condition.
•
Mak
e sure there are no people or objects behind or around the vehicle.
DRIVING
If the doors are frozen shut, use warm water around the door edges to melt any
ice. Do not try to force them open, as this can damage the rubber trim around
the doors. When done, wipe dry to avoid further freezing.
NOTICE
Interior Checks•
Stor
e or secure all items on board properly.
•
Do not pile items higher
than the seat height.
•
Do not place an
ything in the front seat footwells. Secure the floor mats.
•
If
you have any animals on board, do not let them move freely in the vehicle.
•
Secur
ely close and lock all doors and the trunk.
•
A
djust your seating position, mirrors, and steering wheel properly.
•
Mak
e sure items placed on the floor behind the front seats cannot roll under
the seats.
•
Ev
eryone in the vehicle must fasten their seat belt.
Make sure that the indicators in the instrument panel come on when you start
the vehicle, and go off soon after.
In addition:
•
During
the first 600 miles (1,000 km) of operation, avoid sudden acceleration
or full throttle operation so as to not damage the engine or powertrain.
•
A
void hard braking for the first 200 miles (300 km). You should also follow this
when the brake pads are replaced.
Page 41 of 75
74 || 75
DRIVING
DRIVING
Remote Engine Start*
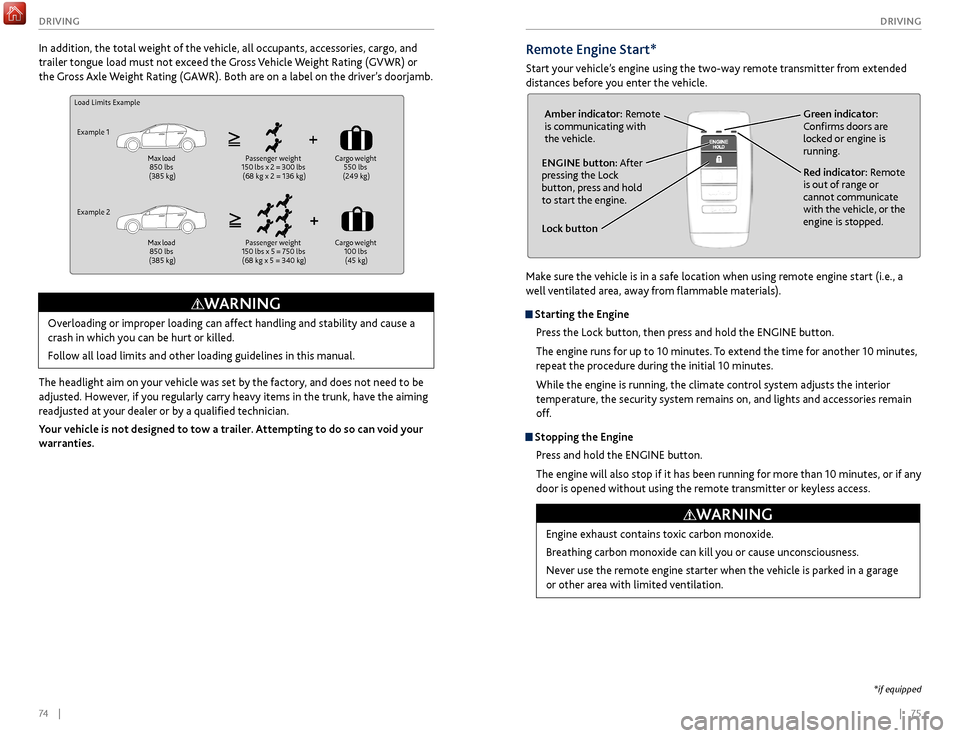
Start your vehicle’s engine using the two-way remote transmitter from extended
distances before you enter the vehicle.
Lock button
ENGINE button: After
pressing the Lock
button, press and hold
to start the engine.Red indicator: Remote
is out of range or
cannot communicate
with the vehicle, or the
engine is stopped.
Amber indicator: Remote
is communicating with
the vehicle.
Green indicator:
Confirms doors are
locked or engine is
running.
Engine exhaust contains toxic carbon monoxide.
Breathing carbon monoxide can kill you or cause unconsciousness.
Never use the remote engine starter when the vehicle is parked in a garage
or other area with limited ventilation.
WARNING
*if equipped
Make sure the vehicle is in a safe location when using remote engine start (i.e., a
well ventilated area, away from flammable materials).
Starting the Engine
Press the Lock button, then press and hold the ENGINE button.
The engine runs for up to 10 minutes. To extend the time for another 10 minutes,
repeat the procedure during the initial 10 minutes.
While the engine is running, the climate control system adjusts the interior
temperature, the security system remains on, and lights and accessories remain
off.
Stopping the EnginePress and hold the ENGINE button.
The engine will also stop if it has been running for more than 10 minutes, or if any
door is opened without using the remote transmitter or keyless access.
Load Limits Example
Example 1 Max load
850 lbs
(385 kg) Passenger weight
150 lbs x 2 = 300 lbs (68 kg x 2 = 136 kg) Cargo
weight
550 lbs
(249 kg)
Example 2 Max load
850 lbs
(385 kg) Passenger weight
150 lbs x 5 = 750 lbs (68 kg x 5 = 340 kg) Cargo
weight
100 lbs (45 kg)
Overloading or improper loading can affect handling and stability and cause a
crash in which you can be hurt or killed.
Follow all load limits and other loading guidelines in this manual.
WARNING
In addition, the total weight of the vehicle, all occupants, accessories, cargo, and
trailer tongue load must not exceed the Gross Vehicle Weight Rating (GVWR) or
the Gross Axle Weight Rating (GAWR). Both are on a label on the driver’s doorjamb.
The headlight aim on your vehicle was set by the factory, and does not need to be
adjusted. However, if you regularly carry heavy items in the trunk, have the aiming
readjusted at your dealer or by a qualified technician.
Your vehicle is not designed to tow a trailer. Attempting to do so can void your
warranties.
Page 54 of 75

100 || 101
HANDLING THE UNEXPECTED
HANDLING THE UNEXPECTED
WARNING: Battery posts, terminals, and related accessories contain lead and lead
compounds. Wash your hands after handling.
After the Engine Starts
Once your vehicle’s engine has started, remove the jumper cables in the following
order:
1.
Disconnect
the jumper cable from your vehicle’s ground.
2.
Disconnect
the other end of the jumper cable from the booster battery (-)
terminal.
3.
Disconnect
the jumper cable from your vehicle’s battery (+) terminal.
4.
Disconnect
the other end of the jumper cable from the booster battery (+)
terminal.
Have your vehicle inspected by a nearby service station or a dealer. A battery can explode if you do not follow the correct procedure, seriously
injuring anyone nearby.
Keep all sparks, open flames, and smoking materials away from the battery.
WARNING
Jump Starting
Turn off the power to electric devices, such as audio and lights. Turn off the engine,
then open the hood (see page 118).
1.
6-cylinder models:
Remove the engine
cover. Start on the passenger side, and lift the
outermost edge of the cover, removing it from
the pins. Move towards the driver side while
applying uniform upward pressure. Open the
battery terminal cover.
2.
All models:
Connect the first jumper cable to
your vehicle’s battery (+) terminal.
3.
C
onnect the other end of the first jumper
cable to the booster battery (+) terminal. Use
a 12-volt booster battery only (i.e., an assisting
vehicle or a rechargeable 12-volt battery pack).
4.
C
onnect the second jumper cable to the
booster battery (-) terminal.
5.
C
onnect the other end of the second jumper
cable to the mounting bolt or engine hanger
as shown. Do not connect this jumper cable to
any other part.
6.
If
your vehicle is connected to another vehicle,
start the assisting vehicle’s engine and increase
its rpm slightly.
7.
A
ttempt to start your vehicle’s engine. If it
turns over slowly, make sure the jumper cables
have good metal-to-metal contact.
6-cylinder models
Pin
Engine cover
6-cylinder models
Battery
terminal cover
4-cylinder models
Booster battery
6-cylinder models
Booster battery
4-cylinder models
6-cylinder models
Page 55 of 75

102 || 103
HANDLING THE UNEXPECTED
HANDLING THE UNEXPECTED
Emergency Engine Stop
The ENGINE START/STOP button may be used to stop the engine due to an
emergency situation even while driving. If you must stop the engine, choose one of
the following operations:
•
Pr
ess and hold the ENGINE START/STOP button for
two seconds, or
•
Firml
y press the ENGINE START/STOP button two
times.
The steering wheel will not lock. The power mode changes to ACCESSORY, unless
the shift lever is in Park, in which case the power mode changes to VEHICLE OFF.
Because turning off the engine also disables the power assist the engine provides to
the steering and braking systems, it will require significantly more physical effort
and time to steer and slow the vehicle. Downshift gears and use both feet on the
brake pedal, if necessary, to slow the vehicle and stop immediately in a safe place.
Do not press the button while driving unless it is absolutely necessary for the
engine to be switched off.
Emergency Towing
Call a professional towing service if you need to tow your vehicle.
All models
Flat bed equipment: The operator loads your vehicle on the back of a truck. This is
the best way to transport your vehicle.
2WD models
Wheel lift equipment: The tow truck uses two pivoting arms that go under the front
tires and lift them off the ground. The rear tires remain on the ground. This is an
acceptable way to tow your vehicle.
NOTICE
Trying to lift or tow your vehicle by the bumpers will cause serious damage. The
bumpers are not designed to support the vehicle’s weight.
Improper towing such as towing behind a motorhome or other motor vehicle can
damage the transmission.
NOTICE
Overheating
Signs your engine is overheating: •
The
temperature gauge needle is at the H mark
•
The engine suddenl
y loses power
•
Steam
or spray comes out from under the hood
•
The message
Engine Temperature Too Hot appears on the display.
1.
Immediatel
y park the vehicle in a safe place. Turn
off all accessories and turn on the hazard warning
lights.
2.
If no steam
or spray is present: Keep the
engine running and open the hood (see page
118).
If steam or spray is present: Turn off the engine
and wait until it subsides. Then, open the hood
(see page 118).
3.
Check that the
cooling fan is operating and stop the engine once the
temperature gauge needle goes down. If the cooling fan is not operating,
immediately stop the engine.
4.
Once
the engine has cooled down, inspect the coolant level and check the
cooling system components for leaks. If the coolant level in the reserve tank
is low, add coolant until it reaches the MAX mark. If there is no coolant in the
reserve tank, make sure the radiator is cool, then cover the radiator cap with a
heavy cloth and open the cap. If necessary, add coolant up to the base of the
filler neck, and put the cap back on.
Once the engine has cooled sufficiently, restart it and check the temperature
gauge. If the temperature needle has gone down, resume driving. If it has not gone
down, contact a dealer for repairs.
Reserve tank MAX
MIN
Steam and spray from an overheated engine can seriously scald you.
Do not open the hood if steam is coming out.
WARNING
Removing the radiator cap while the engine is hot can cause the coolant to
spray out, seriously scalding you.
Always let the engine and radiator cool down before removing the radiator
cap.
WARNING
Continuing to drive with the temperature gauge needle at the H mark may
damage the engine.
NOTICE
Page 58 of 75

108 || 109
HANDLING THE UNEXPECTED
HANDLING THE UNEXPECTED
Replacing the Flat Tire
1.
R
emove the wheel nuts and flat tire.
2.
Mount the
compact spare tire. Replace the
wheel nuts, and lightly tighten them.
3.
Lower
the vehicle and remove the jack. Tighten
the wheel nuts in the order indicated in the
image. Go around, tightening the nuts, two to
three times in this order. Do not over tighten the
wheel nuts.
Storing the Flat Tire
1.
R
emove the center cap, and place the flat tire
face down in the spare tire well.
2.
R
emove the spacer cone from the wing bolt, flip
it over, and insert it back on to the bolt. Secure
the flat tire with the wing bolt.
3.
R
eturn the jack and wheel nut wrench to the
tool case. Store the case in the trunk, and close
the trunk.
Loose items can fly around the interior in a crash and can seriously injure the
occupants.
Store the wheel, jack, and tools securely before driving.
WARNING
Wing bolt
Spacer cone
Center cap
Setting Up the Jack
1.
Place
the jack under the jacking point closest to
the tire to be changed.
2.
Turn
the end bracket clockwise (as shown in
the image) until the top of the jack contacts
the jacking point. Make sure that the jacking
point tab is resting in the jack notch. Do not
overextend the jack.
3.
Raise
the vehicle, using the jack handle bar and
the jack handle, until the tire is off the ground.
The following instructions must be followed to use the jack safely:
•
Do not use
the jack with people or luggage in the vehicle.
•
Use
the jack provided in your vehicle. Other jacks may not support the weight
(“load”) or fit the jacking point.
•
Do not use
while the engine is running.
•
Use
only where the ground is firm and level.
•
Use
only at the jacking points.
•
Do not get in
the vehicle while using the jack.
•
Do
not put anything on top of or underneath the jack.
The vehicle can easily roll off the jack, seriously injuring anyone underneath.
Follow the directions for changing a tire exactly, and never get under the
vehicle when it is supported only by the jack.
WARNING
Do not use the jack if it doesn’t work properly. Call your dealer or a professional
towing service.
NOTICE
Jack
handle bar
Wheel nut wrench
as jack handle
Jacking points
Page 61 of 75
114 || 115
MAINTENANCE
MAINTENANCE
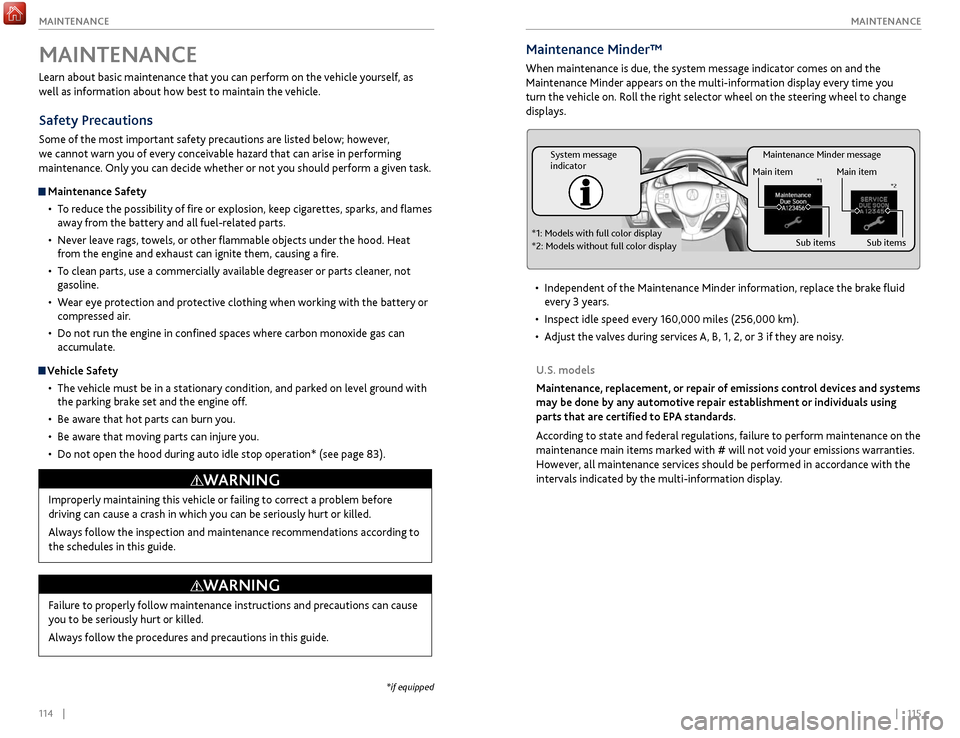
Maintenance Minder message
System message
indicator
Main item
Sub items
Main item
Sub item s*1
*2
*1: Models with full color display
*2: Models without full color display
Maintenance Minder™
When maintenance is due, the system message indicator comes on and the
Maintenance Minder appears on the multi-information display every time you
turn the vehicle on. Roll the right selector wheel on the steering wheel to change
displays.
•
Independent
of the Maintenance Minder information, replace the brake fluid
every 3 years.
•
Inspect idle speed ev
ery 160,000 miles (256,000 km).
•
A
djust the valves during services A, B, 1, 2, or 3 if they are noisy.
U.S. models
Maintenance, replacement, or repair of emissions control devices and systems
may be done by any automotive repair establishment or individuals using
parts that are certified to EPA standards.
According to state and federal regulations, failure to perform maintenance on the
maintenance main items marked with # will not void your emissions warranties.
However, all maintenance services should be performed in accordance with the
intervals indicated by the multi-information display.
Learn about basic maintenance that you can perform on the vehicle yourself, as
well as information about how best to maintain the vehicle.
Safety Precautions
Some of the most important safety precautions are listed below; however,
we cannot warn you of every conceivable hazard that can arise in performing
maintenance. Only you can decide whether or not you should perform a given task.
Maintenance Safety
•
T
o reduce the possibility of fire or explosion, keep cigarettes, sparks, and flames
away from the battery and all fuel-related parts.
•
Nev
er leave rags, towels, or other flammable objects under the hood. Heat
from the engine and exhaust can ignite them, causing a fire.
•
T
o clean parts, use a commercially available degreaser or parts cleaner, not
gasoline.
•
W
ear eye protection and protective clothing when working with the battery or
compressed air.
•
Do not run
the engine in confined spaces where carbon monoxide gas can
accumulate.
Vehicle Safety
•
The
vehicle must be in a stationary condition, and parked on level ground with
the parking brake set and the engine off.
•
Be awar
e that hot parts can burn you.
•
Be awar
e that moving parts can injure you.
•
Do not
open the hood during auto idle stop operation* (see page 83).
MAINTENANCE
Improperly maintaining this vehicle or failing to correct a problem before
driving can cause a crash in which you can be seriously hurt or killed.
Always follow the inspection and maintenance recommendations according to
the schedules in this guide.
WARNING
Failure to properly follow maintenance instructions and precautions can cause
you to be seriously hurt or killed.
Always follow the procedures and precautions in this guide.
WARNING
*if equipped
Page 63 of 75
118 || 119
MAINTENANCE
MAINTENANCE
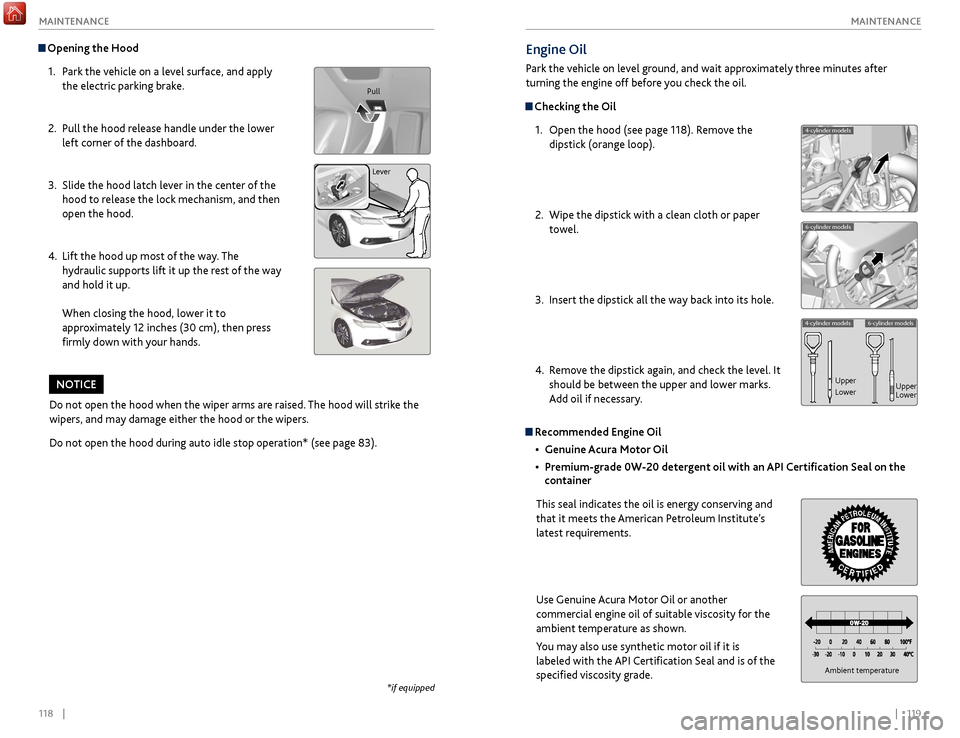
Engine Oil
Park the vehicle on level ground, and wait approximately three minutes after
turning the engine off before you check the oil.
Checking the Oil
1.
Open
the hood (see page 118). Remove the
dipstick (orange loop).
2.
Wipe
the dipstick with a clean cloth or paper
towel.
3.
Insert
the dipstick all the way back into its hole.
4.
R
emove the dipstick again, and check the level. It
should be between the upper and lower marks.
Add oil if necessary.
Recommended Engine Oil
•
Genuine A
cura Motor Oil
•
Pr
emium-grade 0W-20 detergent oil with an API Certification Seal on the
container
This seal indicates the oil is energy conserving and
that it meets the American Petroleum Institute’s
latest requirements.
Use Genuine Acura Motor Oil or another
commercial engine oil of suitable viscosity for the
ambient temperature as shown.
You may also use synthetic motor oil if it is
labeled with the API Certification Seal and is of the
specified viscosity grade.
4-cylinder models
6-cylinder models
4-cylinder models6-cylinder models
Upper
Lower Upper
Lower
Ambient temperature
Opening the Hood
1.
P
ark the vehicle on a level surface, and apply
the electric parking brake.
2.
Pull
the hood release handle under the lower
left corner of the dashboard.
3.
Slide
the hood latch lever in the center of the
hood to release the lock mechanism, and then
open the hood.
4.
Lift the
hood up most of the way. The
hydraulic supports lift it up the rest of the way
and hold it up.
When closing the hood, lower it to
approximately 12 inches (30 cm), then press
firmly down with your hands.
Do not open the hood when the wiper arms are raised. The hood will strike the
wipers, and may damage either the hood or the wipers.
Do not open the hood during auto idle stop operation* (see page 83).
NOTICE
Pull
Lever
*if equipped
Page 65 of 75

122 || 123
MAINTENANCE
MAINTENANCE
Changing Wiper Blades
If the wiper blades leave streaks across the windshield, try cleaning them first
with a paper towel or soft cloth and wiper fluid. If the wiper blade rubber has
deteriorated, you should change the wiper blades.
1.
Lift the driv
er side wiper arm first, then the
passenger side.
2.
Pr
ess and hold the tab, then slide the holder off
the wiper arm.
3.
Pull the
end of the wiper blade to the direction of
the arrow (shown in the image) until it unfastens
from the end cap.
4.
Pull the
wiper blade to the opposite direction to
slide it out from its holder.
5. Insert the flat side of the new wiper blade onto the
bottom part of the holder. Insert the blade all the way.
6. Install the end of the wiper blade into the end cap.
7. Slide the wiper holder onto the wiper arm until it locks.
8. Lower the passenger side wiper arm first, then the
driver side.
Avoid dropping the wiper arm, as it may damage the windshield.
NOTICE
Tab
Wiper
blade
End cap at
the bottom
Holder
Wiper
blade
Holder
Cap
Do not use engine antifreeze or a vinegar/water solution in the windshield
washer reservoir. Antifreeze can damage your vehicle’s paint. A vinegar/water
solution can damage the windshield washer pump.
NOTICE
Checking the Battery
The battery condition is monitored by the sensor on the negative terminal. If there
is a problem with the sensor, a message appears on multi-information display. Have
your vehicle checked by a dealer.
If your battery is labeled AGM, consult your dealer before you connect a battery
charger. AGM batteries require compatible chargers.
WARNING: Battery posts, terminals, and related accessories contain lead and lead
compounds. Wash your hands after handling.The battery gives off explosive hydrogen gas during normal operation.
A spark or flame can cause the battery to explode with enough force to kill or
seriously hurt you.
When conducting any battery maintenance, wear protective clothing and a
face shield, or have a skilled technician do it.
WARNING
Window Washer Fluid
Check the amount of window washer fluid by looking
at the reservoir. Fill if it is low. Pour the washer fluid
carefully. Do not overflow the reservoir
Canadian models
If the washer fluid is low, a message appears on the
multi-information display.
Brake fluid marked DOT 5 is not compatible with your vehicle’s braking system
and can cause extensive damage.
NOTICE
Brake Fluid
The fluid level should be between the MIN and MAX
marks on the side of the tank.
We recommend using
Acura Heavy Duty Brake Fluid DOT 3.
Pour the fluid carefully.
If the fluid level is at or below the MIN mark, have a
dealer inspect for leaks or worn brake pads as soon as
possible.Brake reserve tank
MAX
MIN