reset Acura TLX 2019 User Guide
[x] Cancel search | Manufacturer: ACURA, Model Year: 2019, Model line: TLX, Model: Acura TLX 2019Pages: 591, PDF Size: 34.5 MB
Page 131 of 591

129
uuGauges and Multi-Information Display uMulti-Information Display
Instrument Panel
4. Roll the right selector wheel until “Trip A”
Reset Timing appears on the display, then
push the right selector wheel.
u The display swit ches to the
customization setup screen, where you
can select When Refueled , IGN Off ,
Manually Reset , or Exit .
5. Roll the right selector wheel and select
When Refueled , then push the right
selector wheel.
u The When Refueled Setup screen
appears, then the di splay returns to the
customization menu screen.
6. Roll the right selector wheel until Exit
appears on the display, then push the right
selector wheel.
7. Repeat Step 6 until you return to the
normal screen.
19 ACURA TLX-31TZ36400.book 129 ページ 2018年2月16日 金曜日 午後12時22分
Page 176 of 591

174
uuOperating the Switches Around the Steering Wheel uDriving Position Memory System
Controls
Driving Position Memory System
You can store two driver’s seat (except for power lumbar and thigh support*) and
door mirror positions with the driving position memory system.
When you unlock and open the driver’s doo r with a remote transmitter, or keyless
access system, door mirrors adjust to one of the two preset positions and the seat
adjusts to retracted positions of one of the two preset positions automatically.
The seat will move to th e stored position when you set the power mode to
ACCESSORY.
When you enter the vehicle, the multi-in formation display briefly shows you which
remote transmitter you used to unlock the vehicle.
• DRIVER 1 transmitter is linked to memory button 1.
• DRIVER 2 transmitter is linked to memory button 2.
The driver’s seat moves rearward depending
on the set seating position once you
•Stop the vehicle.
• Put the transmission in
(P.
• Turn the engine off.
• Then open the driver’s door.
Once the power mode is in the ACCESSORY
position, the driver’s seat moves forward to
the DRIVER 1 or 2 preset position.
1 Driving Position Memory System
Using the information scr een or multi-information
display, you can disable th e automatic seat and door
mirror adjustment function. 2 Customized Features P. 120, 292
The driver’s seat easy exit feature can be turned ON/
OFF. 2 Customized Features P. 120, 292
System Operation
The system will not operate if:
•The vehicle speed is above 3 mph (5 km/h).
•Either memory position button is pressed while the
seat is in motion.
•The seat position is adju sted while in operation.
•The memory 1 or 2 position is set fully to the rear.DRIVER 1 DRIVER 2
* Not available on all models
19 ACURA TLX-31TZ36400.book 174 ページ 2018年2月16日 金曜日 午後12時22分
Page 219 of 591

217
uuAudio System uAudio Remote Controls
Continued
Features
Audio Remote Controls
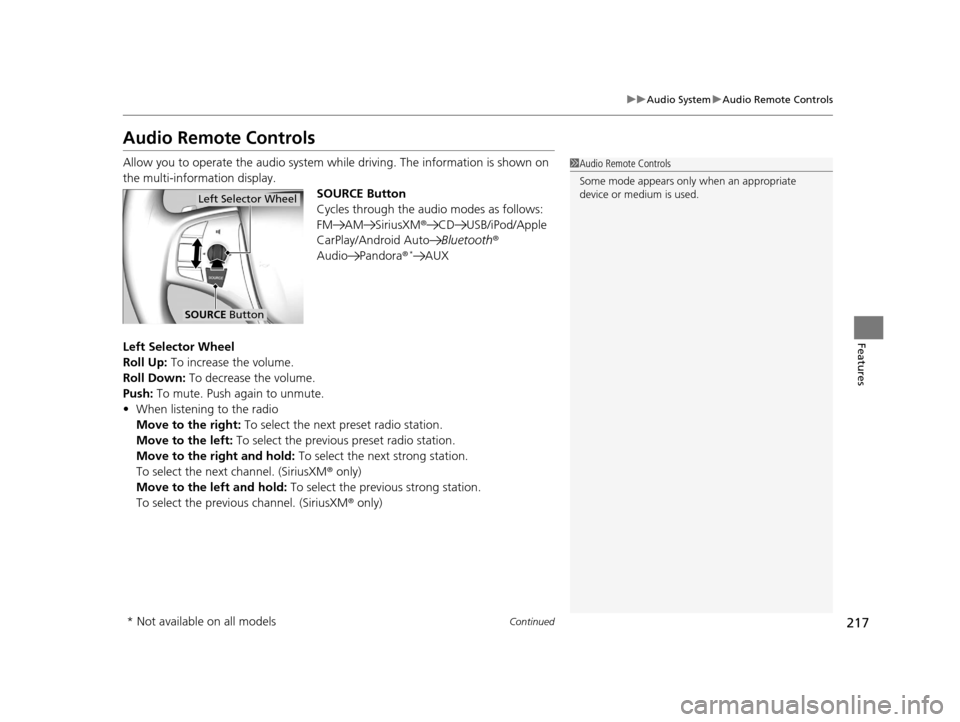
Allow you to operate the audio system whil e driving. The information is shown on
the multi-information display. SOURCE Button
Cycles through the audio modes as follows:
FM AM SiriusXM®CD USB/iPod/Apple
CarPlay/Android Auto Bluetooth®
Audio Pandora®
*AUX
Left Selector Wheel
Roll Up: To increase the volume.
Roll Down: To decrease the volume.
Push: To mute. Push again to unmute.
• When listening to the radio
Move to the right: To select the next preset radio station.
Move to the left: To select the previous preset radio station.
Move to the right and hold: To select the next strong station.
To select the next channel. (SiriusXM ® only)
Move to the left and hold: To select the previous strong station.
To select the previous channel. (SiriusXM ® only)
1Audio Remote Controls
Some mode appears only when an appropriate
device or medium is used.
Left Selector Wheel
SOURCE Button
* Not available on all models
19 ACURA TLX-31TZ36400.book 217 ページ 2018年2月16日 金曜日 午後12時22分
Page 221 of 591

219
Features
Audio System Basic Operation
To use the audio system, the power mode must be in ACCESSORY or ON.Use the interface dial or ENTER/MENU button
to access phone, info rmation or smartphone
functions.
Interface dial (E NTER/MENU button):
Rotate left or right to scroll through the
available choices. Press to set your selection.
Move right, left, up or down to select a
secondary menu.
Press to switch the display to the Information
Menu screen while the trip computer screen
or clock/wallpaper screen is displayed.
BACK button: Press to go back to the
previous display.
(Day/Night) button: Press to change
the information screen brightness.
Press once and make an adjustment
using the interface dial. u Each time you press , the mode
switches between the daytime mode,
nighttime mode and off mode.1Audio System Basic Operation
These indications are used to show how to operate
the interface dial.
Rotate to select.
Press to enter.
Move , , or to se lect a secondary menu.
Audio function items 2 Station List P. 231
2 Save Preset P. 231, 235
2 Radio Text P. 232
2 Music Search P. 245, 248, 253
2 Scan P. 232, 243, 246, 254
2 Random/Repeat P. 246, 249, 254
When you unlock the doors with your remote, the
driver’s ID (Driver 1 or Driver 2 ) is detected, and the
audio system settings and pr eset memory are turned
to the respective mode automatically when you set
the power mode to ON.
(Day/Night)
ButtonBACK Button
Interface Dial ( ENTER/
MENU Button)
19 ACURA TLX-31TZ36400.book 219 ページ 2018年2月16日 金曜日 午後12時22分
Page 226 of 591

224
uuAudio System Basic Operation uInformation Screen
Features
■Phone
Shows the HFL information.
2 Bluetooth® HandsFreeLink® P. 317
■Info
Shows the Trip Computer or Clock /Wallpaper . Press to display the
Information Menu screen.
Trip computer :
Current Drive
Shows the range and instant and average fuel economy of the current trip, as well
as the average fuel economy from your last trip.
History of Trip A
Shows the range, average fuel economy an d distances traveled for the current trip,
as well as the average fuel economy and distances traveled during the last three
driving cycles.
Each time you reset the trip meter A, th e information on the display updates. The
history of the previous th ree driving cycles is kept.
Deleting the history manually
1. Press on the History of Trip A screen to select Delete History.
2. A confirmation message appears on the screen. Rotate to select Yes, then
press .
Clock /Wallpaper :
Shows a clock screen or an image you import.
19 ACURA TLX-31TZ36400.book 224 ページ 2018年2月16日 金曜日 午後12時22分
Page 232 of 591

230
uuAudio System Basic Operation uPlaying AM/FM Radio
Features
Playing AM/FM Radio
On Demand Multi-Use DisplayTM
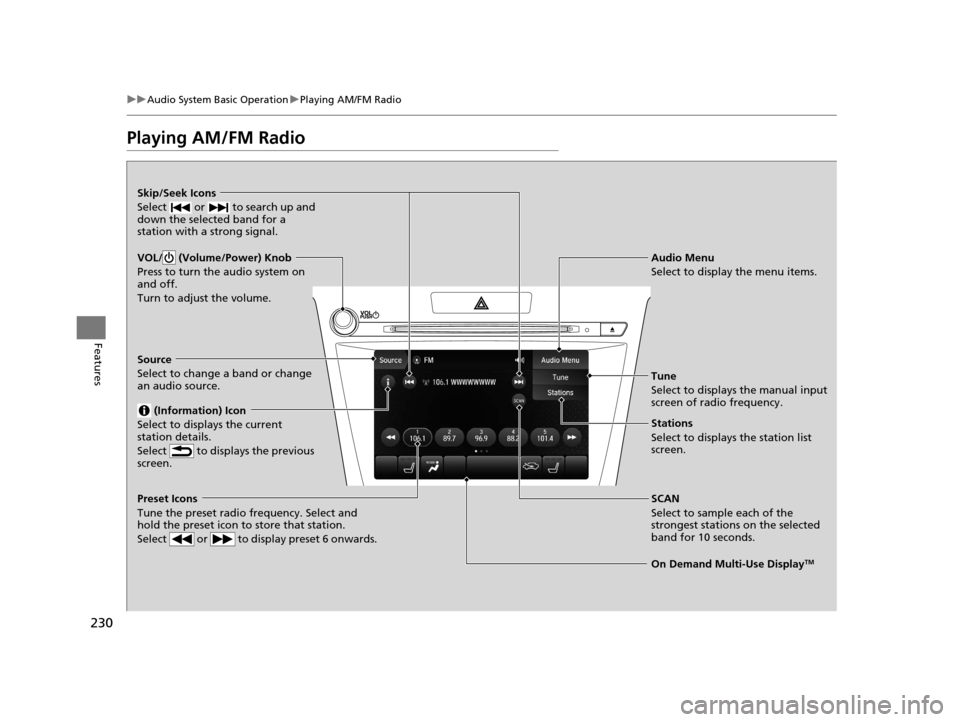
VOL/ (Volume/Power) Knob
Press to turn the audio system on
and off.
Turn to adjust the volume.
Skip/Seek Icons
Select or to search up and
down the selected band for a
station with a strong signal.
Audio Menu
Select to display the menu items.
Source
Select to change a band or change
an audio source. (Information) Icon
Select to displays the current
station details.
Select to displays the previous
screen.
Preset Icons
Tune the preset radio frequency. Select and
hold the preset icon to store that station.
Select or to display preset 6 onwards.
Tune
Select to displays the manual input
screen of radio frequency.
Stations
Select to displays the station list
screen.
SCAN
Select to sample each of the
strongest stations on the selected
band for 10 seconds.
19 ACURA TLX-31TZ36400.book 230 ページ 2018年2月16日 金曜日 午後12時22分
Page 233 of 591

Continued231
uuAudio System Basic Operation uPlaying AM/FM Radio
Features
To store a station:
1. Tune to the selected station.
2. Select and hold the preset number you want to store that station.
Provides text data information related to your selected RDS-capable FM station.
■To find an RDS station from Station List
1. Select Stations .
2. Select station on the list.
■Manual update
Updates your available st ation list at any time.
1. Select Stations .
2. Select Refresh on the list.
■Preset Memory
■Radio Data System (RDS)
1Playing AM/FM Radio
The ST indicator appears on the display indicating
stereo FM broadcasts.
Stereo reproduction in AM is not available.
Switching the Audio Mode
Press the SOURCE button on the steering wheel.
2 Audio Remote Controls P. 217
You can store 6 AM stations and 12 FM stations into
the preset memory.
19 ACURA TLX-31TZ36400.book 231 ページ 2018年2月16日 金曜日 午後12時22分
Page 235 of 591

233
uuAudio System Basic Operation uPlaying SiriusXM ® Radio
Continued
Features
Playing SiriusXM® Radio
On Demand Multi-Use DisplayTM
VOL/ (Volume/Power) Knob
Press to turn the audio system on
and off.
Turn to adjust the volume.
Category Up/Down Icons
Select or to display and select
a SiriusXM® Radio category.
Audio Menu
Select to display the menu items.
Source
Select to change an audio source. (Information) Icon
Select to displays the current
channel details.
Select to displays the previous
screen.
Preset Icons
Tune the preset channel. Select and hold the
preset icon to store that channel. Select or to display preset 4 onwards.
Tune
Select to displays the channel
number input screen.
Presets/Controls
Select to changes between the
Presets mode and Controls mode of
the Replay function.
Browse
Select to displays the channel list of
Categories , Channels or Featured
channels types.
Channel Up/Down Icons
Select or to the previous or
next channel.
Select and hold to rapidly skip 10
channels at a time.
19 ACURA TLX-31TZ36400.book 233 ページ 2018年2月16日 金曜日 午後12時22分
Page 236 of 591

uuAudio System Basic Operation uPlaying SiriusXM ® Radio
234
Features
1. Select the SiriusXM® mode.
2 Audio Remote Controls P. 217
2 On Demand Multi-Use DisplayTM P. 220
2.Select a channel using the , ic ons or the preset numbers (1-12 ) on the preset
mode screen.
■SiriusXM ® channel manual tune screen
1.Select Tune.
2. Enter the desired channel number using the
numeric keypad.
3. Select OK to tune into the channel.
You can also tune into the channel of your
choice following the procedures below
instead of inputting its channel number.
1. Touch the desired channel number on the
channel bar.
2. Select and hold the channel indicator, then
slide it to the desired channel number on
the channel bar.
■To Play SiriusXM ® Radio1 Playing SiriusXM ® Radio
In the channel mode, all available channels are
selectable. In the categor y mode, you can select a
channel within a ca tegory (Jazz, Rock, Classical, etc.).
There may be instances when SiriusXM ® Radio does
not broadcast all the data fi elds (artist name, title).
This does not indicate a problem with your audio
system.
SiriusXM ® Radio stations load in ascending order,
which can take about a minute. Once they have
loaded you will be able to scroll up or down to make
your selections.
Tune Start:
When you change a channel, a song being played on
that channel restarts from the beginning with this
function. This can be turned on or off from the Play
the Song from the Beginning setting.
2 Customized Features P. 292
1SiriusXM ® channel manual tune screen
Channel icons:
Select or to the prev ious or next channel.
Select and hold to rapidly sk ip 10 channels at a time.
Channel Indicator Channel Bar
Numeric Keypad
19 ACURA TLX-31TZ36400.book 234 ページ 2018年2月16日 金曜日 午後12時22分
Page 237 of 591

Continued235
uuAudio System Basic Operation uPlaying SiriusXM ® Radio
Features
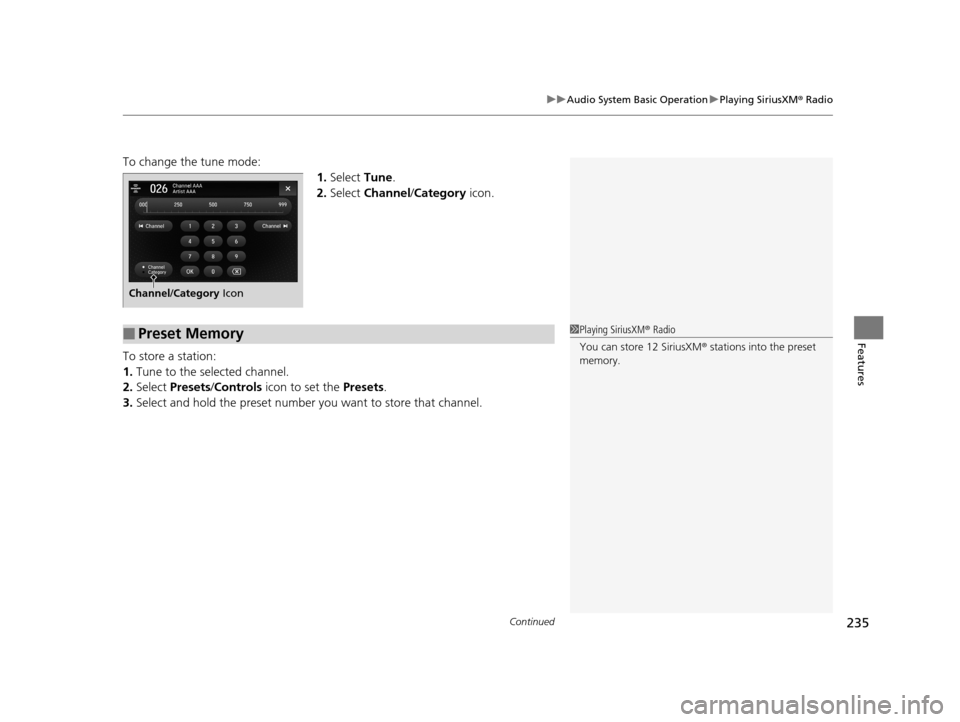
To change the tune mode:
1.Select Tune.
2. Select Channel /Category icon.
To store a station:
1. Tune to the selected channel.
2. Select Presets /Controls icon to set the Presets.
3. Select and hold the preset number you want to store that channel.
Channel/Category Icon
■Preset Memory1Playing SiriusXM ® Radio
You can store 12 SiriusXM ® stations into the preset
memory.
19 ACURA TLX-31TZ36400.book 235 ページ 2018年2月16日 金曜日 午後12時22分