Socket Acura TLX 2020 Owner's Manual
[x] Cancel search | Manufacturer: ACURA, Model Year: 2020, Model line: TLX, Model: Acura TLX 2020Pages: 589, PDF Size: 32.88 MB
Page 7 of 589
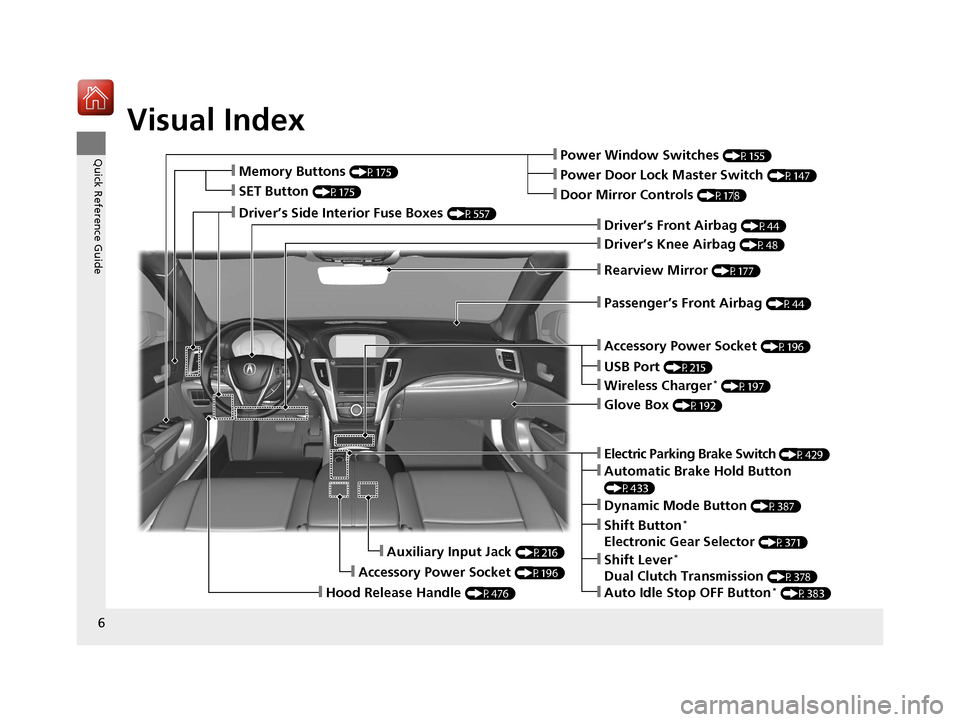
Visual Index
6
Quick Reference Guide❙Power Window Switches (P155)
❙Driver’s Front Airbag (P44)
❙Driver’s Knee Airbag (P48)
❙Door Mirror Controls (P178)
❙Power Door Lock Master Switch (P147)
❙Accessory Power Socket (P196)
❙Auxiliary Input Jack (P216)
❙Accessory Power Socket (P196)
❙Rearview Mirror (P177)
❙Hood Release Handle (P476)
❙Memory Buttons (P175)
❙SET Button (P175)
❙Glove Box (P192)
❙Passenger’s Front Airbag (P44)
❙Driver’s Side Interior Fuse Boxes (P557)
❙Electric Parking Brake Switch (P429)
❙Dynamic Mode Button (P387)
❙Shift Button*
Electronic Gear Selector (P371)
❙Automatic Brake Hold Button
(P433)
❙Shift Lever*
Dual Clutch Transmission (P378)
❙Auto Idle Stop OFF Button* (P383)
❙Wireless Charger* (P197)
❙USB Port (P215)
20 ACURA TLX-31TZ36500.book 6 ページ 2019年2月7日 木曜日 午後2時2分
Page 197 of 589
uuInterior Lights/Interior Convenience Items uInterior Convenience Items
196
Controls
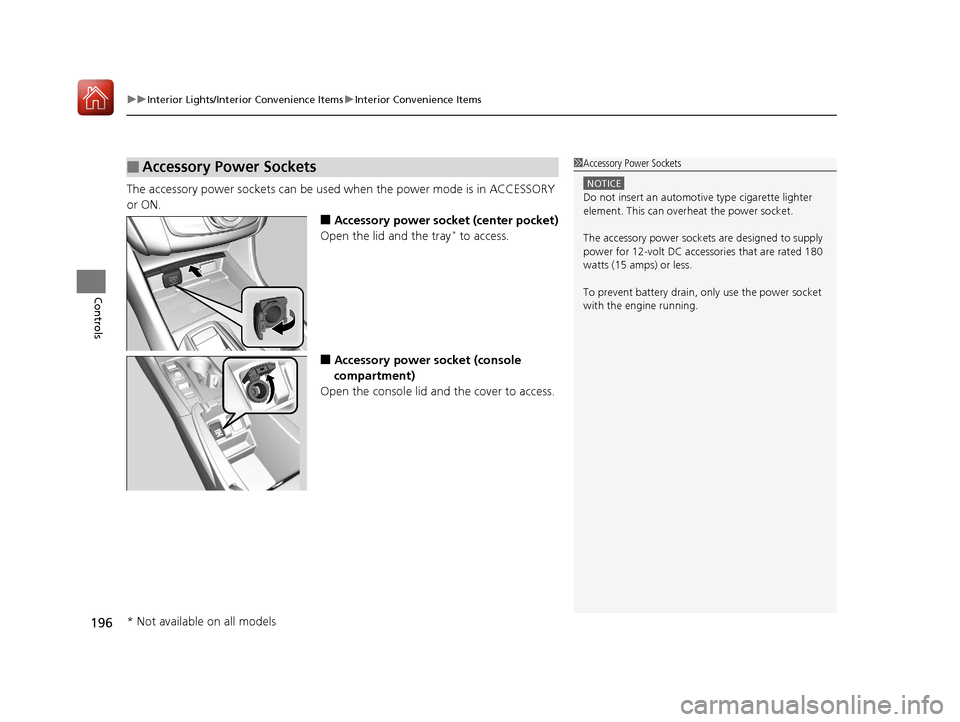
The accessory power sockets can be used when the power mode is in ACCESSORY
or ON.
■Accessory power socket (center pocket)
Open the lid and the tray* to access.
■Accessory power socket (console
compartment)
Open the console lid and the cover to access.
■Accessory Power Sockets1 Accessory Power Sockets
NOTICE
Do not insert an automotive type cigarette lighter
element. This can overheat the power socket.
The accessory power socket s are designed to supply
power for 12-volt DC accessories that are rated 180
watts (15 amps) or less.
To prevent battery drain, only use the power socket
with the engine running.
* Not available on all models
20 ACURA TLX-31TZ36500.book 196 ページ 2019年2月7日 木曜日 午後2時2分
Page 491 of 589

490
uuReplacing Light Bulbs uBrake and Taillight/Rear Side Marker Lights
Maintenance
4. Turn the socket counter-clockwise and
remove it. Remove the old bulb.
5. Insert a new bulb.
Brake and Taillight/Rea r Side Marker Lights
Brake and taillight/rear side marker lights are LED type. Have an authorized Acura
dealer inspect and replace the light assembly.
Brake Lights and Taillights
Brake lights and taillights are LED type. Have an authorized Acura dealer inspect and
replace the light assembly.
Bulb Socket
20 ACURA TLX-31TZ36500.book 490 ページ 2019年2月7日 木曜日 午後2時2分
Page 492 of 589

491
uuReplacing Light Bulbs uBack-Up Light Bulbs
Maintenance
Back-Up Light Bulbs
When replacing, use the following bulbs.
1.Remove the holding clip using a flat-tip
screwdriver, then pull the lining back.
2. Turn the socket counter-clockwise and
remove it, then remove the old bulb.
3. Insert a new bulb.
Back-Up Light: 21 W
Clip
Socket
Bulb
20 ACURA TLX-31TZ36500.book 491 ページ 2019年2月7日 木曜日 午後2時2分
Page 524 of 589
Continued523
uuIf a Tire Goes Flat uTemporarily Repairing a Flat Tire
Handling the Unexpected
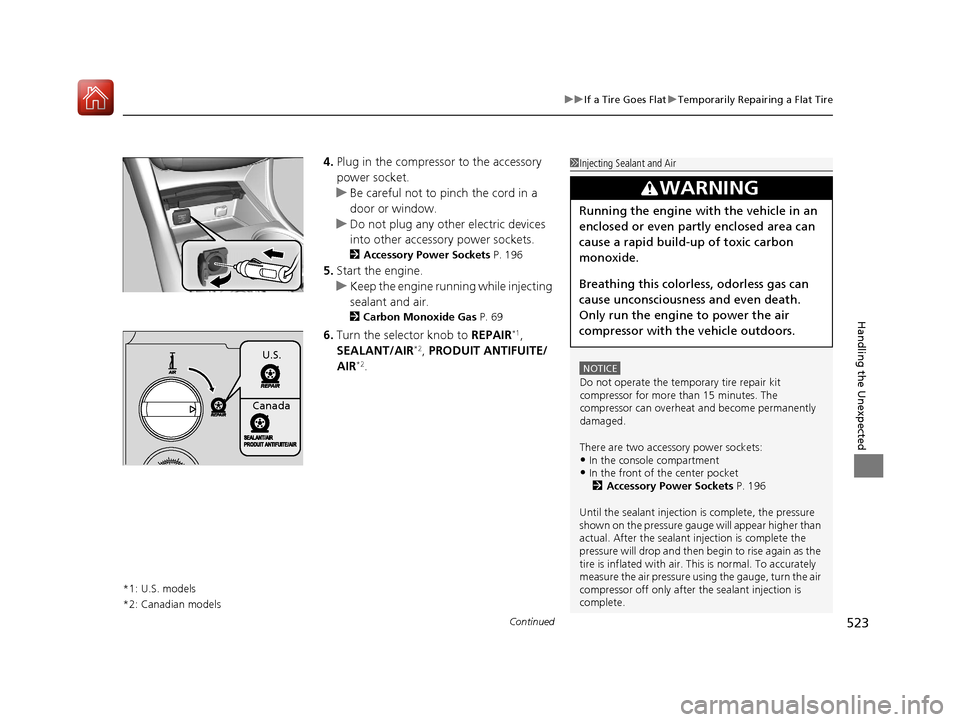
4. Plug in the compressor to the accessory
power socket.
u Be careful not to pinch the cord in a
door or window.
u Do not plug any other electric devices
into other accessory power sockets.
2 Accessory Power Sockets P. 196
5.Start the engine.
u Keep the engine running while injecting
sealant and air.
2 Carbon Monoxide Gas P. 69
6.Turn the selector knob to REPAIR*1,
SEALANT/AIR*2, PRODUIT ANTIFUITE/
AIR*2.
*1: U.S. models
*2: Canadian models
1 Injecting Sealant and Air
NOTICE
Do not operate the temporary tire repair kit
compressor for more than 15 minutes. The
compressor can overheat and become permanently
damaged.
There are two accessory power sockets:
•In the console compartment•In the front of the center pocket 2 Accessory Power Sockets P. 196
Until the sealant injection is complete, the pressure
shown on the pressure gauge will appear higher than
actual. After the sealant injection is complete the
pressure will drop and then begin to rise again as the
tire is inflated with air. This is normal. To accurately
measure the air pressure usi ng the gauge, turn the air
compressor off only after the sealant injection is
complete.
3WARNING
Running the engine with the vehicle in an
enclosed or even partly enclosed area can
cause a rapid build-up of toxic carbon
monoxide.
Breathing this colorless, odorless gas can
cause unconsciousness and even death.
Only run the engine to power the air
compressor with th e vehicle outdoors.
U.S.
Canada
20 ACURA TLX-31TZ36500.book 523 ページ 2019年2月7日 木曜日 午後2時2分
Page 525 of 589

uuIf a Tire Goes Flat uTemporarily Repairing a Flat Tire
524
Handling the Unexpected
7. Press the inflator switch to turn on the
compressor.
u The compressor starts injecting sealant
and air into the tire.
u When the sealant injection is complete,
continue to add air.
8. After the air pressure reaches 32 psi (220
kPa), turn off the kit.
u To check the pressure , occasionally turn
off the compressor and read the gauge.
9. Unplug the power plug from the accessory
power socket.
10. Unscrew the sealant/air hose from the tire
valve stem. Reinstall the valve cap.
11. Press the pressure relief button until the
gauge returns to 0 psi (0 kPa).Pressure Gauge
ON
OFF
1Injecting Sealant and Air
If the required air pressure is not reached within 10
minutes, the tire may be too severely damaged for
the kit to provide the necessa ry seal, and your vehicle
will need to be towed.
See an Acura dealer for a replacement sealant bottle
and proper disposal of an empty bottle.
Sealant/Air Hose
Valve Stem
Pressure Relief Button
20 ACURA TLX-31TZ36500.book 524 ページ 2019年2月7日 木曜日 午後2時2分
Page 529 of 589
uuIf a Tire Goes Flat uTemporarily Repairing a Flat Tire
528
Handling the Unexpected
• Greater than 25 psi (175 kPa), but less
than 32 psi (220 kPa):
Turn the air compressor on to inflate the
tire until the tire pressure reaches 32 psi
(220 kPa).
2 Inflating an Under-inflated Tire P. 529
Then drive carefully for 10 more minutes
or until you reach the nearest service
station, whichever is sooner. Do not
exceed 50 mph (80 km/h). If you have not
reached a service station, stop and check
the tire pressure.
u You should repeat this procedure as
long as the air pressure is within this
range.
7. Unplug the kit from the accessory power
socket.
8. Unscrew the sealant/air hose from the tire
valve stem. Reinstall the valve cap.
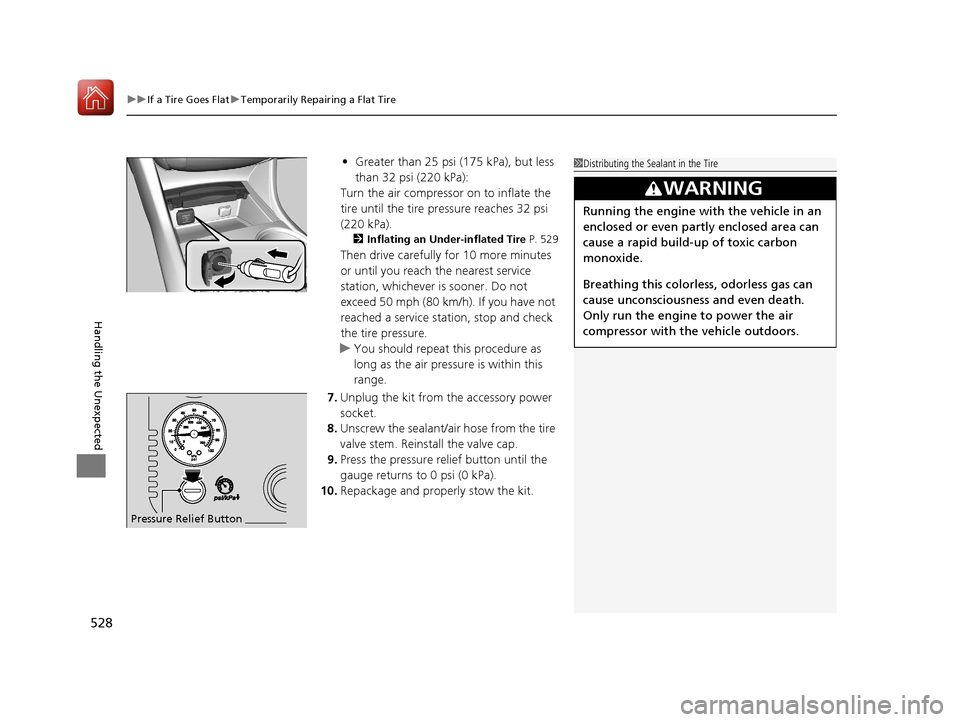
9. Press the pressure relief button until the
gauge returns to 0 psi (0 kPa).
10. Repackage and proper ly stow the kit.
Pressure Relief Button
1Distributing the Sealant in the Tire
3WARNING
Running the engine with the vehicle in an
enclosed or even partly enclosed area can
cause a rapid build-up of toxic carbon
monoxide.
Breathing this colorless, odorless gas can
cause unconsciousness and even death.
Only run the engine to power the air
compressor with th e vehicle outdoors.
20 ACURA TLX-31TZ36500.book 528 ページ 2019年2月7日 木曜日 午後2時2分
Page 531 of 589
530
uuIf a Tire Goes Flat uTemporarily Repairing a Flat Tire
Handling the Unexpected
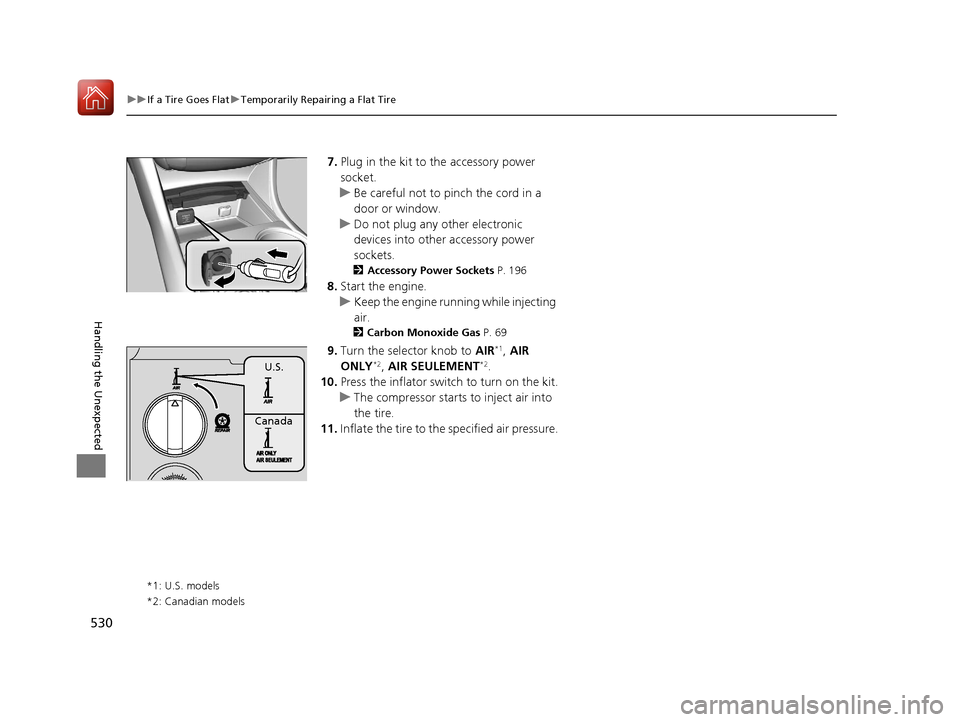
7. Plug in the kit to the accessory power
socket.
u Be careful not to pinch the cord in a
door or window.
u Do not plug any other electronic
devices into other accessory power
sockets.
2 Accessory Power Sockets P. 196
8.Start the engine.
u Keep the engine running while injecting
air.
2 Carbon Monoxide Gas P. 69
9.Turn the selector knob to AIR*1, AIR
ONLY*2, AIR SEULEMENT*2.
10. Press the inflator swit ch to turn on the kit.
u The compressor starts to inject air into
the tire.
11. Inflate the tire to the specified air pressure.
*1: U.S. models
*2: Canadian models
U.S.
Canada
20 ACURA TLX-31TZ36500.book 530 ページ 2019年2月7日 木曜日 午後2時2分
Page 532 of 589
531
uuIf a Tire Goes Flat uTemporarily Repairing a Flat Tire
Handling the Unexpected
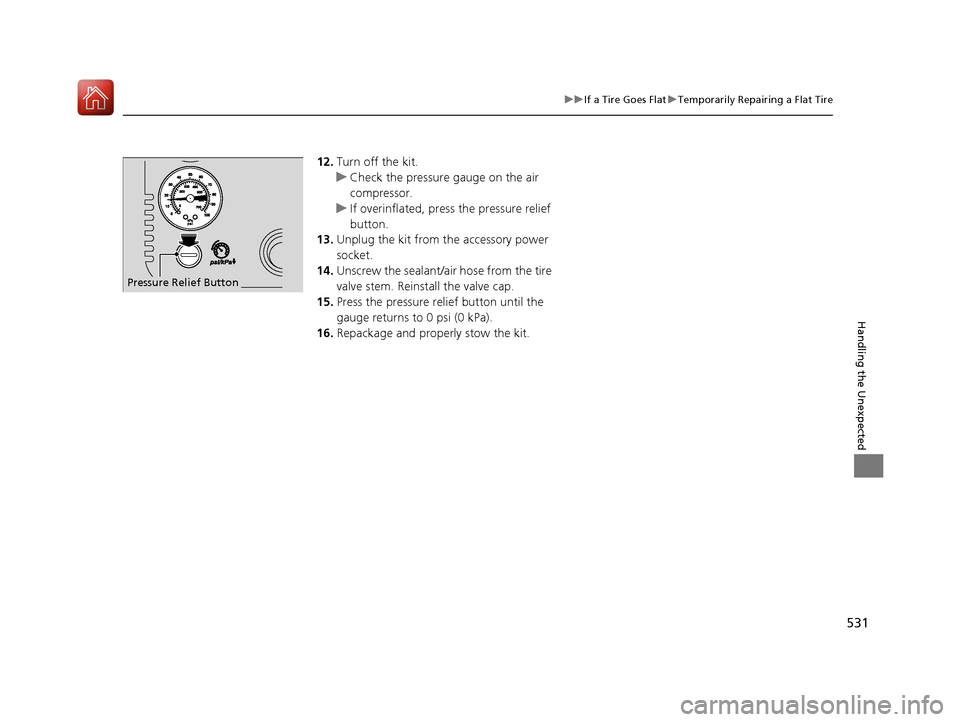
12. Turn off the kit.
u Check the pressure gauge on the air
compressor.
u If overinflated, press the pressure relief
button.
13. Unplug the kit from the accessory power
socket.
14. Unscrew the sealant/ai r hose from the tire
valve stem. Reinstall the valve cap.
15. Press the pressure relief button until the
gauge returns to 0 psi (0 kPa).
16. Repackage and properly stow the kit.
Pressure Relief Button
20 ACURA TLX-31TZ36500.book 531 ページ 2019年2月7日 木曜日 午後2時2分
Page 558 of 589
557
uuFuses uFuse Locations
Continued
Handling the Unexpected
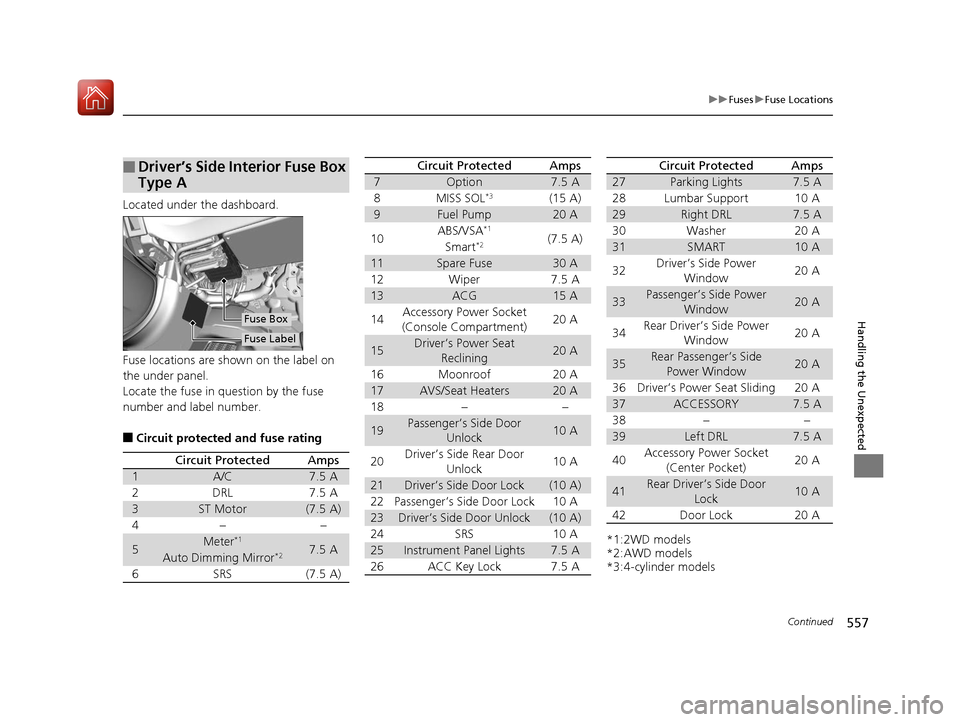
Located under the dashboard.
Fuse locations are shown on the label on
the under panel.
Locate the fuse in question by the fuse
number and label number.
■Circuit protected and fuse rating
■Driver’s Side Interior Fuse Box
Type A
Fuse Label
Fuse Box
Circuit ProtectedAmps
1A/C7.5 A
2DRL7.5 A
3ST Motor(7.5 A)
4−−
5Meter*17.5 AAuto Dimming Mirror*2
6SRS(7.5 A)
7Option7.5 A
8MISS SOL*3(15 A)
9Fuel Pump20 A
10ABS/VSA*1(7.5 A)Smart*2
11Spare Fuse30 A
12Wiper7.5 A
13ACG15 A
14Accessory Power Socket
(Console Compartment)20 A
15Driver’s Power Seat Reclining20 A
16Moonroof20 A
17AVS/Seat Heaters20 A
18−−
19Passenger’s Side Door Unlock10 A
20Driver’s Side Rear Door
Unlock10 A
21Driver’s Side Door Lock(10 A)
22Passenger’s Side Door Lock10 A
23Driver’s Side Door Unlock(10 A)
24SRS10 A
25Instrument Panel Lights7.5 A
26ACC Key Lock7.5 A
Circuit ProtectedAmps
*1:2WD models
*2:AWD models
*3:4-cylinder models
27Parking Lights7.5 A
28Lumbar Support10 A
29Right DRL7.5 A
30Washer20 A
31SMART10 A
32Driver’s Side Power Window20 A
33Passenger’s Side Power Window20 A
34Rear Driver’s Side Power Window20 A
35Rear Passenger’s Side
Power Window20 A
36Driver’s Power Seat Sliding20 A
37ACCESSORY7.5 A
38−−
39Left DRL7.5 A
40Accessory Power Socket (Center Pocket)20 A
41Rear Driver’s Side Door Lock10 A
42Door Lock20 A
Circuit ProtectedAmps
20 ACURA TLX-31TZ36500.book 557 ページ 2019年2月7日 木曜日 午後2時2分