clock Acura TSX 2004 Owner's Manual
[x] Cancel search | Manufacturer: ACURA, Model Year: 2004, Model line: TSX, Model: Acura TSX 2004Pages: 364, PDF Size: 5.35 MB
Page 5 of 364
Your Car at a Glance
2
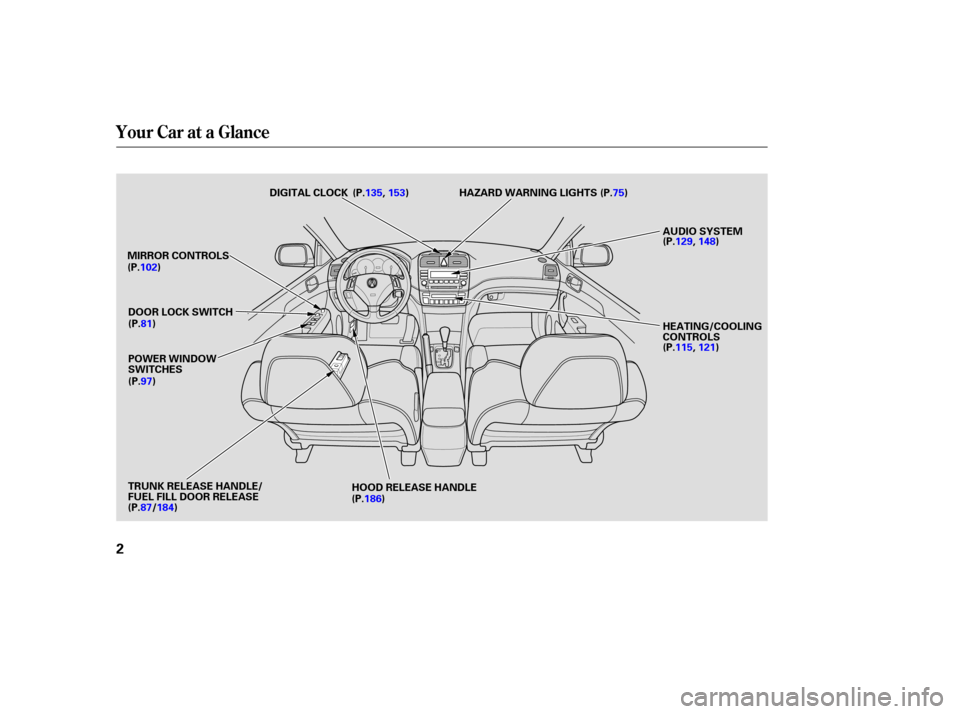
POWER WINDOW
SWITCHES
MIRROR CONTROLS
DOOR LOCK SWITCH HEATING/COOLING
CONTROLS
TRUNK RELEASE HANDLE/
FUEL FILL DOOR RELEASE HOOD RELEASE HANDLEHAZARD WARNING LIGHTS
DIGITAL CLOCK (P.135, 153) (P.75)
AUDIO SYSTEM
(P.129,148)
(P.115, 121)
(P.186)
(P.87/ 184)
(P.97) (P.81)
(P.102)
Page 61 of 364
Inst rument s and Cont rols
Control L ocations
58
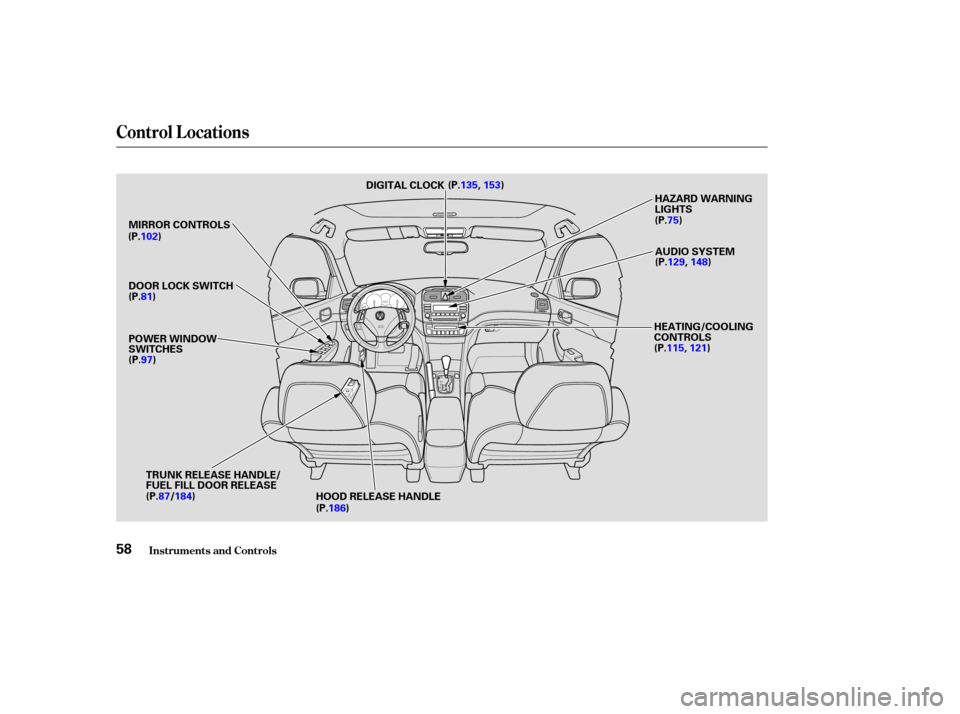
MIRROR CONTROLS
DOOR LOCK SWITCH
POWER WINDOW
SWITCHESAUDIO SYSTEM
HEATING/COOLING
CONTROLS
TRUNK RELEASE HANDLE/
FUEL FILL DOOR RELEASE HAZARD WARNING
LIGHTS
HOOD RELEASE HANDLE DIGITAL CLOCK
(P.102)
(P.81)
(P.97)
(P.186) (P.115,
121)
(P.129,
148)
(P.
75)
(P.135,
153)
(P.87/ 184)
Page 97 of 364
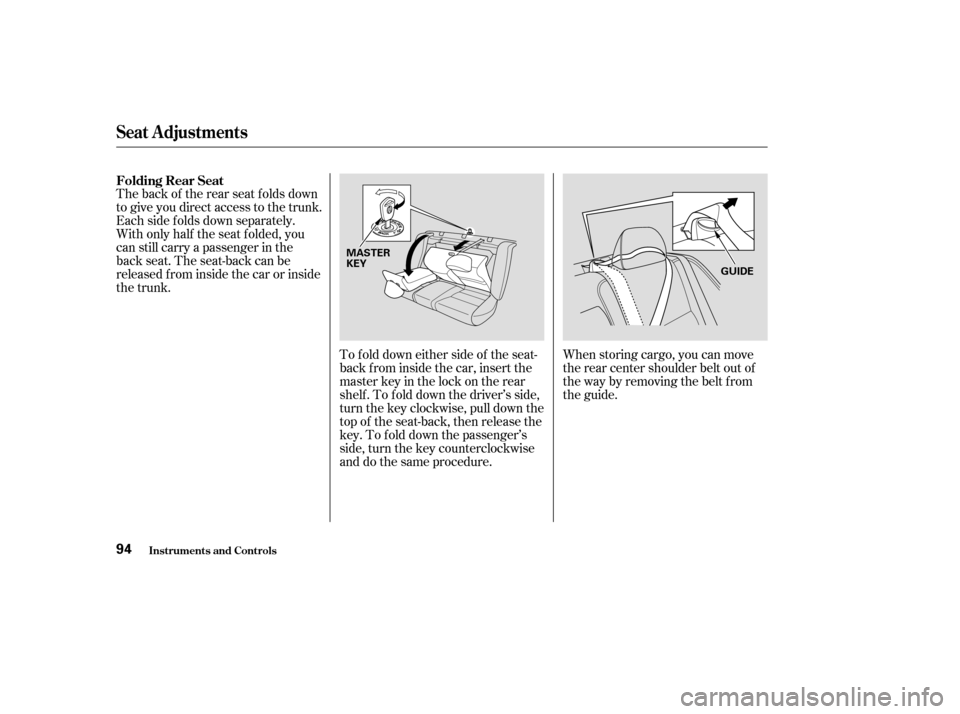
The back of the rear seat folds down
to give you direct access to the trunk.
Each side f olds down separately.
With only half the seat f olded, you
can still carry a passenger in the
back seat. The seat-back can be
released f rom inside the car or inside
the trunk.When storing cargo, you can move
therearcentershoulderbeltoutof
the way by removing the belt f rom
the guide.
To f old down either side of the seat-
back f rom inside the car, insert the
master key in the lock on the rear
shelf. To fold down the driver’s side,
turn the key clockwise, pull down the
top of the seat-back, then release the
key. To f old down the passenger’s
side, turn the key counterclockwise
and do the same procedure.
Folding Rear Seat
Seat A djustments
Inst rument s and Cont rols94
GUIDE
MASTER
KEY
Page 103 of 364

Turnthekeyclockwiseagain,and
hold it. All f our windows start to
open. To stop the windows,
release the key.
You can open all of the windows
from the outside with the remote
transmitter.
Press the UNLOCK button once
to unlock the driver’s door.
Press the UNLOCK button a
second time, and hold it. The
passenger’s doors unlock, and all
f our windows start to open. To
stop the windows, release the
button.
To open the windows f urther,
press the button again.
You cannot close the windows with
the remote transmitter. You can open and close the windows
with the key in the driver’s door lock.
To open:
Insert the key in the driver’s door
lock.
Turn the key clockwise, then
release it. To open the windows f urther, turn
andholdthekeyagain(within
10 seconds).
To close: Insert the key in the driver’s door
lock.
Turn the key counterclockwise,
then release it.
Turn the key counterclockwise
again, and hold it. All four
windowsstarttoclose.Tostopthe
windows, release the key.
To close the windows f urther, turn
andholdthekeyagain(within
10 seconds).
NOTE: If the windows stop bef ore
the desired position, repeat steps 2
and 3.
1.
2.
3.
1.
2.
3.
4.
1.
2. 3.
4.
Power Windows
Inst rument s and Cont rols
Opening the Windows with the
Remote Transmitter
Opening/Closing the Windows
with the Key
100
UNLOCK BUTTON
Close Open
Page 116 of 364
...............
Climate Control System . 114
.......
Fully-automatic Operation . 115
.......
Semi-automatic Operation . 116
.......
Fully-automatic Operation . 121
.......
Semi-automatic Operation . 122
Sunlight Sensor/ ............
Temperature Sensor . 128
................................
Audio System .129
.................
Operating the Radio . 130
.................
Adjusting the Sound . 134
..............................
Digital Clock .135
.....
Operating the CD Changer . 136
.......
Protecting Compact Discs . 142
CD Changer Error .............................
Indications .143
Operating the Cassette ....................................
Player .144
...........
Tape Search Functions . 146
Caring f or the Cassette ....................................
Player .147
................................
Audio System .148
.................
Operating the Radio . 149................
Adjusting the Sound . 152
.............................
Digital Clock .153
...................
Radio Frequencies . 154
.......................
Radio Reception .154
.....
Operating the CD Changer . 156
CD Changer Error .............................
Indications .164
......
Protecting Compact Discs . 165
Operating the Cassette ....................................
Player .166
...........
Tape Search Functions . 168
Caring f or the Cassette ....................................
Player .170
...........
Remote Audio Controls . 171
.......................
Thef t Protection .172
............................
Security System .173
...............................
Cruise Control .174
HomeLink Wireless Control ........................................
System .177
Without Navigation System
With Navigation System
Without Navigation System
With Navigation System
Comf ort and Convenience Features
Comf ort and Convenience Feat ures113
Page 138 of 364
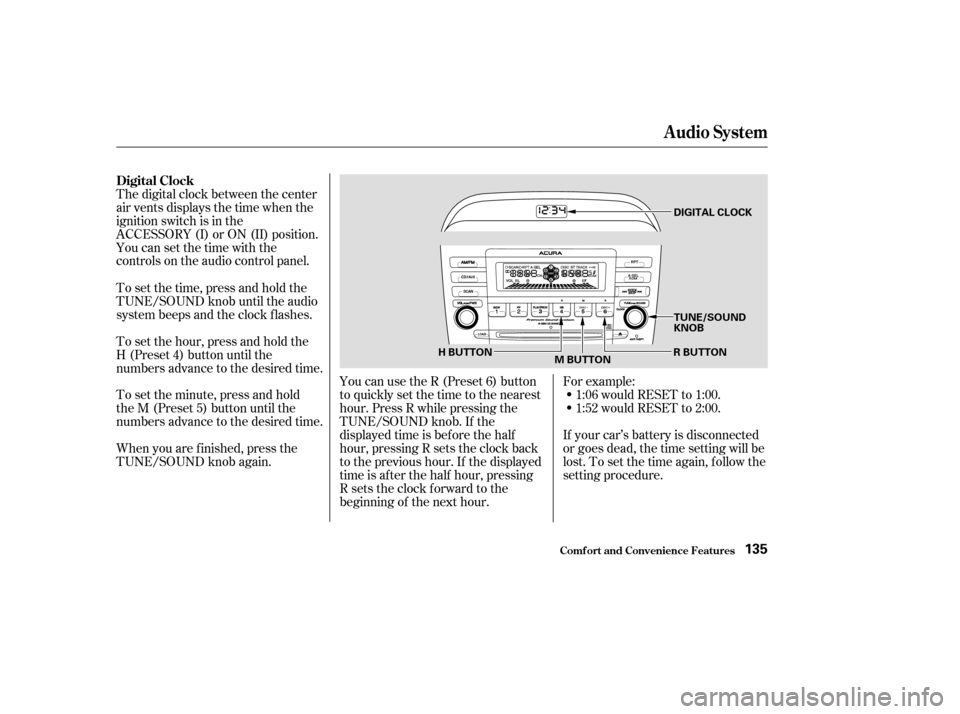
For example:1:06 would RESET to 1:00.
1:52 would RESET to 2:00.
If your car’s battery is disconnected
or goes dead, the time setting will be
lost. To set the time again, f ollow the
setting procedure.
The digital clock between the center
air vents displays the time when the
ignition switch is in the
ACCESSORY (I) or ON (II) position.
You can set the time with the
controls on the audio control panel.
You can use the R (Preset 6) button
to quickly set the time to the nearest
hour. Press R while pressing the
TUNE/SOUND knob. If the
displayed time is bef ore the half
hour, pressing R sets the clock back
to the previous hour. If the displayed
time is af ter the half hour, pressing
R sets the clock f orward to the
beginning of the next hour.
To set the time, press and hold the
TUNE/SOUND knob until the audio
system beeps and the clock f lashes.
To set the hour, press and hold the
H (Preset 4) button until the
numbers advance to the desired time.
To set the minute, press and hold
the M (Preset 5) button until the
numbers advance to the desired time.
When you are f inished, press the
TUNE/SOUND knob again. Digital Clock
Audio System
Comf ort and Convenience Feat ures135
R BUTTON
TUNE/SOUND
KNOB
H BUTTON M BUTTON DIGITAL CLOCK
Page 156 of 364

If you want to adjust the sound while
the radio/CD is playing, push the
AUDIO DISPLAY button, then touch
the SOUND icon in the display.
To return to the previous display,
push the AUDIO DISPLAY button
again.
To adjust the balance, touch the left
or right icon on the sound grid.
When you touch an icon, the yellow
bars on the grid turn orange and
move toward the icon, changing the
balance lef t or right. To equalize the
balance, touch the lef t or right icon
until each side has an orange bar at
the center of the sound grid.
To adjust the fader, touch the front
or rear icon on the sound grid. When
you touch an icon, the white bars on
thegridturnorangeandmove
toward the icon, changing the f ader
to the f ront or rear. To equalize the
f ader, touch the f ront or rear icon
until each side has an orange bar at
the center of the sound grid. The upper display shows the time
when the ignition switch is in the
ACCESSORY (I) or ON (II) position.
The Navigation System receives
signals f rom the Global Positioning
System (GPS), and the displayed
time is updated automatically by the
GPS. Ref er to the Navigation System
Owner’s Manual to set up the time.
To see the audio screen when you
are f inished adjusting the sound,
touch the RETURN icon or wait five
seconds. Digital Clock
Audio System
Comf ort and Convenience Feat ures153
Page 253 of 364
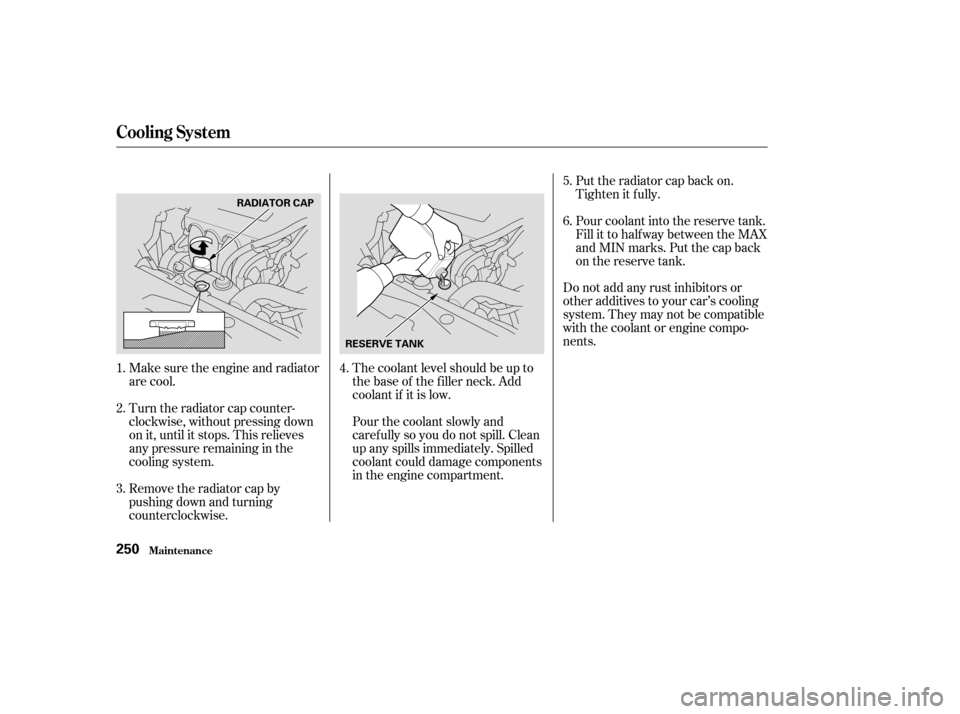
Turn the radiator cap counter-
clockwise, without pressing down
on it, until it stops. This relieves
any pressure remaining in the
cooling system. Make sure the engine and radiator
are cool.The coolant level should be up to
the base of the f iller neck. Add
coolant if it is low.
Remove the radiator cap by
pushing down and turning
counterclockwise. Put the radiator cap back on.
Tighten it f ully.
Pour coolant into the reserve tank.
Fill it to half way between the MAX
and MIN marks. Put the cap back
on the reserve tank.
Do not add any rust inhibitors or
other additives to your car’s cooling
system. They may not be compatible
with the coolant or engine compo-
nents.
Pourthecoolantslowlyand
caref ully so you do not spill. Clean
up any spills immediately. Spilled
coolant could damage components
in the engine compartment.
3. 4.5.
6.
2. 1.
Cooling Syst em
Maint enance250
RADIATOR CAP RESERVE TANK
Page 287 of 364
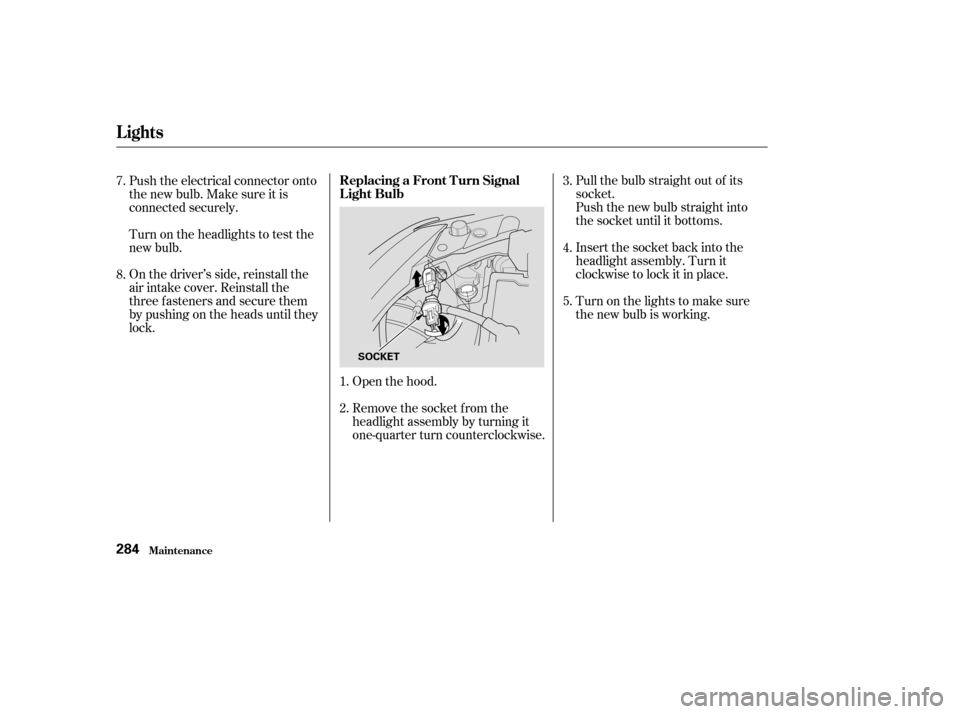
Pull the bulb straight out of its
socket.
Push the new bulb straight into
the socket until it bottoms.
Insert the socket back into the
headlight assembly. Turn it
clockwise to lock it in place.
Turn on the lights to make sure
the new bulb is working.
Open the hood.
Remove the socket from the
headlight assembly by turning it
one-quarter turn counterclockwise.
Push the electrical connector onto
the new bulb. Make sure it is
connected securely.
Turn on the headlights to test the
new bulb.
On the driver’s side, reinstall the
air intake cover. Reinstall the
three fasteners and secure them
by pushing on the heads until they
lock.
3.
4.
5.
2. 1.
7.
8.
Lights
Maint enance
Replacing a Front T urn Signal
Light Bulb
284
SOCKET
Page 288 of 364
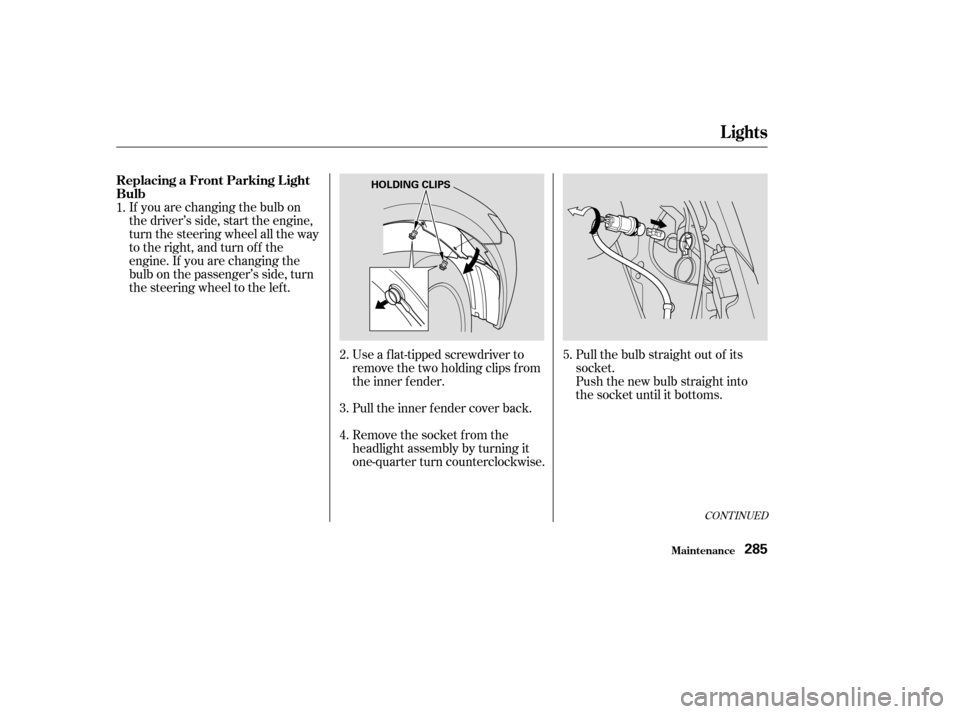
Pull the inner f ender cover back.Pull the bulb straight out of its
socket.
Push the new bulb straight into
the socket until it bottoms.
Use a f lat-tipped screwdriver to
remove the two holding clips f rom
the inner f ender.
If you are changing the bulb on
the driver’s side, start the engine,
turn the steering wheel all the way
to the right, and turn off the
engine. If you are changing the
bulb on the passenger’s side, turn
the steering wheel to the left.
Remove the socket from the
headlight assembly by turning it
one-quarter turn counterclockwise.
4. 5.
2.
1.
3.
CONT INUED
Lights
Maint enance
Replacing a Front Parking L ight
Bulb
285
HOLDING CLIPS