trunk Acura TSX 2007 Owner's Guide
[x] Cancel search | Manufacturer: ACURA, Model Year: 2007, Model line: TSX, Model: Acura TSX 2007Pages: 379, PDF Size: 5.45 MB
Page 245 of 379

Make sure all windows, mirrors,
and outside lights are clean and
unobstructed. Remove frost, snow,
or ice.
Make sure the doors are securely
closed and locked.
Fasten your seat belt. Check that
your passengers have fastened
their seat belts (see page ).
Check
the steering wheel
adjustment (see page ).
Check that the hood is fully closed.
Check that the trunk is fully
closed.
Check that any items you may be
carrying are stored properly or
fastened down securely. Check
the adjustment of the
inside and outside mirrors (see
pages and ).
Youshoulddothesechecksand
adjustments
before you drive your
vehicle:
Visually check the tires. If a tire
looks low, use a gauge to check its
pressure (see page ). Check
the seat adjustment (see
page ). When
you start the engine, check
the gauges and indicato rs in the
instrument panel, and the
messages on the multi-inform ation
display (see pages , and ).
11.
61
76
3. 2. 1.
4.
5. 6.
7.
8.
9.
10. 145
15
146
138
125
310 68
Preparing to Drive
242
Page 256 of 379

Always use the parking brake when
you park your vehicle. Make sure
the parking brake is set f irmly, or
your vehicle may roll if it is parked
on an incline.
If your vehicle has an automatic
transmission, set the parking brake
bef ore you put the transmission in
Park. This keeps the vehicle f rom
moving and putting pressure on the
parking mechanism in the
transmission.
If your vehicle has a manual
transmission, put it in f irst gear.Make sure the parking brake is
f ully released bef ore driving away.
Driving with the parking brake
partially set can overheat or
damage the rear brakes. If the vehicle is f acing uphill, turn
the front wheels away from the
curb. If your vehicle has a manual
transmission, put it in f irst gear.
If the vehicle is f acing downhill,
turn the front wheels toward the
curb. If your vehicle has a manual
transmission, put it in reverse gear.
Make sure the moonroof and the
windows are closed.
Turn of f the lights.
Place any packages, valuables, etc.,
in the trunk or take them with you.
Lockthedoorswiththekeyorthe
remote transmitter.
Check the indicator on the
instrument panel to verif y that the
security system is set.
Never park over dry leaves, tall
grass, or other f lammable
materials. The hot three way
catalytic converter could cause
these materials to catch on fire.
Parking T ips
Parking
Driving
253
Page 301 of 379

Theheadlightswereproperlyaimed
when your vehicle was new. If you
regularly carry heavy items in the
trunk or pull a trailer, readjustment
may be required. Adjustments
should be done by your dealer or
other qualif ied mechanic.Your vehicle has halogen headlight
bulbs, one on each side. When
replacing a bulb, handle it by its steel
base and protect the glass from
contactwithyourskinorhard
objects. If you touch the glass, clean
it with denatured alcohol and a clean
cloth.
The low beam headlight bulbs are a
type of high voltage discharge tube.
High voltage can remain in the
circuit even with the light switch of f
and the key removed. Because of
this, you should not attempt to
examine or change a low beam
headlight bulb yourself . If a low
beam headlight bulb fails, take the
vehicle to your dealer to have it
replaced.
Headlight A iming
Replacing a High Beam Headlight
Bulb
L ow Beam Headlight Bulb
Replacement
Lights
298
Halogen headlight bulbs get very hot
when lit. Oil, perspiration, or a scratch
on the glass can cause the bulb to
overheat and shatter.
Page 305 of 379

Insert the socket back into the
headlight assembly. Turn it
clockwise to lock it in place.
Turn on the lights to test the new
bulb.
Put the inner f ender cover in place.
Install and lock each holding clip
bypushingonthecenter.Open the trunk.
Remove the light assembly cover
by pulling its outside edge.
Remove the socket by turning it
one-quarter turn counterclockwise,
and pull the bulb straight out of its
socket.Push a new bulb straight into the
socket until it bottoms, and
reinstall the socket into the light
assembly by turning it clockwise
until it locks.
Test the new bulb to make sure it
works.
Reinstall the light assembly cover.
1.
3. 2.
6.
7.
8.
4.
5.
6.
Replacing Rear Bulbs
(In Fenders)
Lights
302
COVER
Page 306 of 379

Open the trunk.
Pull the lining back caref ully.Determine which of the two bulbs
is burned out: taillight or back-up
light.
To replace a bulb on the right side,
remove the trim clip. For the lef t
side, remove the two trim clips. Remove the socket by turning it
one-quarter turn counterclockwise.
Pull the bulb straight out of its
socket. Push the new bulb straight
into the socket until it bottoms.Insert the socket back into the
light assembly. Turn it clockwise
to lock it in place.
Turn on the lights to test the new
bulb.
Reinstall the trunk lid trim. Make
sure it is installed under the edge
of the trunk lid seal.
Press the trim clips back into their
holes.
1.
2. 5.
6. 4.
3. 7.
8.
9.
10.
Replacing Rear Bulbs
(in T runk L id)
Lights
Maint enance
303
SOCKETS BULBS
TRIM CLIPS
Page 307 of 379

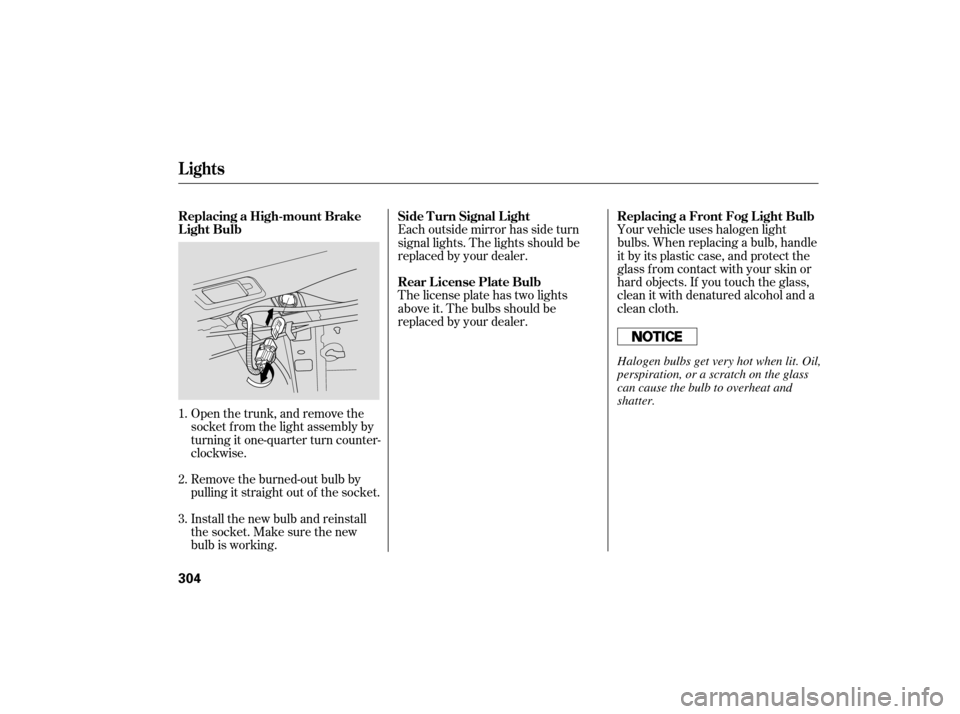
Open the trunk, and remove the
socket f rom the light assembly by
turning it one-quarter turn counter-
clockwise.
Remove the burned-out bulb by
pulling it straight out of the socket.
Install the new bulb and reinstall
the socket. Make sure the new
bulb is working.Your vehicle uses halogen light
bulbs. When replacing a bulb, handle
it by its plastic case, and protect the
glass from contact with your skin or
hard objects. If you touch the glass,
clean it with denatured alcohol and a
clean cloth.
Each outside mirror has side turn
signal lights. The lights should be
replaced by your dealer.
The license plate has two lights
above it. The bulbs should be
replaced by your dealer.
1.
2.
3. Replacing a High-mount Brake
Light Bulb Side T urn Signal L ight
Rear L icense Plate BulbReplacing a Front Fog L ight Bulb
Lights
304
Halogen bulbs get very hot when lit. Oil,
perspiration, or a scratch on the glass
can cause the bulb to overheat and
shatter.
Page 320 of 379

Block the rear wheels.
If the vehicle is to be stored f or a
longer period, it should be
supported on jackstands so the
tires are of f the ground.
Leave one window open slightly (if
the vehicle is being stored
indoors).
Disconnect the battery.
Support the f ront wiper blade
arms with a f olded towel or rag so
they do not touch the windshield.
To minimize sticking, apply a
silicone spray lubricant to all door
and trunk seals. Also, apply a
vehiclebodywaxtothepainted
surfaces that mate with the door
and trunk seals.
If you need to park your vehicle f or
an extended period (more than 1
month), there are several things you
should do to prepare it f or storage.
Proper preparation helps prevent
deterioration and makes it easier to
get your vehicle back on the road. If
possible, store your vehicle indoors.
Fill the f uel tank.
Change the engine oil and f ilter.
Wash and dry the exterior
completely.
Cleantheinterior.Makesurethe
carpeting, floor mats, etc., are
completely dry. Leave the parking brake off. Put
the transmission in reverse
(manual) or Park (automatic).
Cover the vehicle with a
‘‘breathable’’ cover, one made
f rom a porous material such as
cotton. Non-porous materials, such
as plastic sheeting, trap moisture,
which can damage the paint.
If possible, periodically run the
engine until it reaches f ull
operating temperature (the
cooling f ans cycle on and of f
twice). Pref erably, do this once a
month.
Vehicle Storage
Maint enance
317
Page 324 of 379

CONT INUED
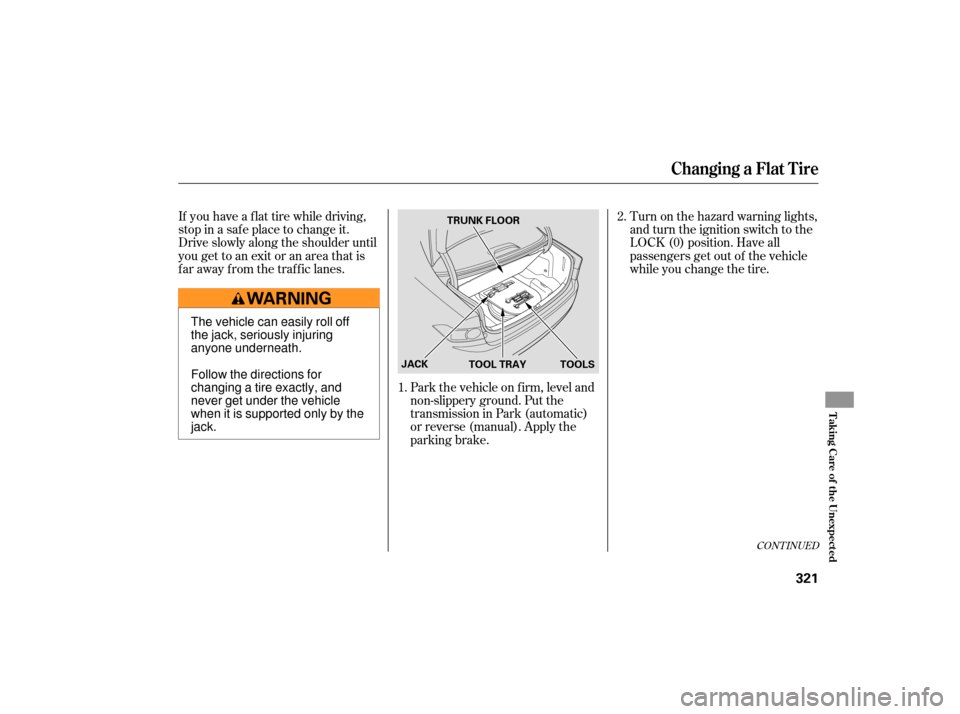
Park the vehicle on f irm, level and
non-slippery ground. Put the
transmission in Park (automatic)
or reverse (manual). Apply the
parking brake.
If you have a f lat tire while driving,
stop in a saf e place to change it.
Drive slowly along the shoulder until
you get to an exit or an area that is
far away from the traffic lanes.
Turn on the hazard warning lights,
and turn the ignition switch to the
LOCK (0) position. Have all
passengers get out of the vehicle
while you change the tire.
2.
1.
Changing a Flat Tire
T aking Care of t he Unexpect ed
321
TRUNK FLOOR
JACK TOOLS
TOOL TRAY
The vehicle can easily roll off
the jack, seriously injuring
anyone underneath.
Follow the directions for
changing a tire exactly, and
never get under the vehicle
when it is supported only by the
jack.
Page 325 of 379

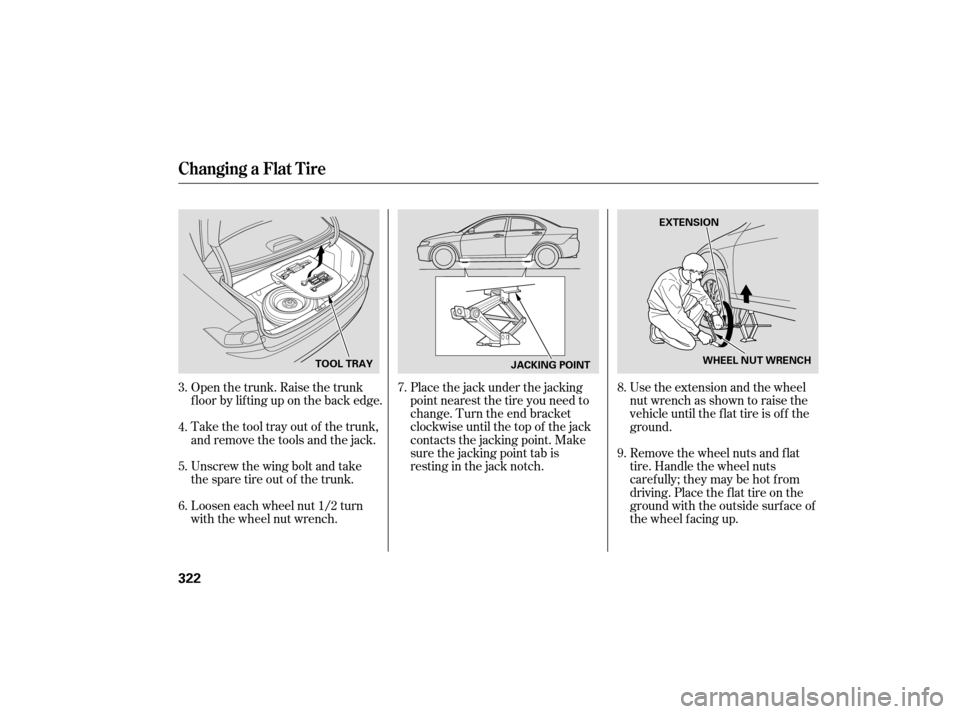
Open the trunk. Raise the trunk
f loor by lif ting up on the back edge.
Take the tool tray out of the trunk,
and remove the tools and the jack.
Unscrew the wing bolt and take
the spare tire out of the trunk.
Loosen each wheel nut 1/2 turn
with the wheel nut wrench.Place the jack under the jacking
point nearest the tire you need to
change. Turn the end bracket
clockwise until the top of the jack
contacts the jacking point. Make
sure the jacking point tab is
restinginthejacknotch.
Use the extension and the wheel
nut wrench as shown to raise the
vehicle until the f lat tire is of f the
ground.
Remove the wheel nuts and f lat
tire. Handle the wheel nuts
caref ully; they may be hot f rom
driving. Place the f lat tire on the
ground with the outside surf ace of
the wheel f acing up.
7.
3.
4.
5.
6. 8.
9.
Changing a Flat Tire
322
JACKING POINT
TOOL TRAY WHEEL NUT WRENCH
EXTENSION
Page 327 of 379

Securetheflattirebyscrewing
the wing bolt back into its hole.
Store the jack and tools in the tool
tray, and place the tool tray back
in the trunk. Store
the wheel cover or center
cap in the trunk. Make sure it does
not get scratched or damaged.
Lower the trunk floor, then close
the trunk lid.
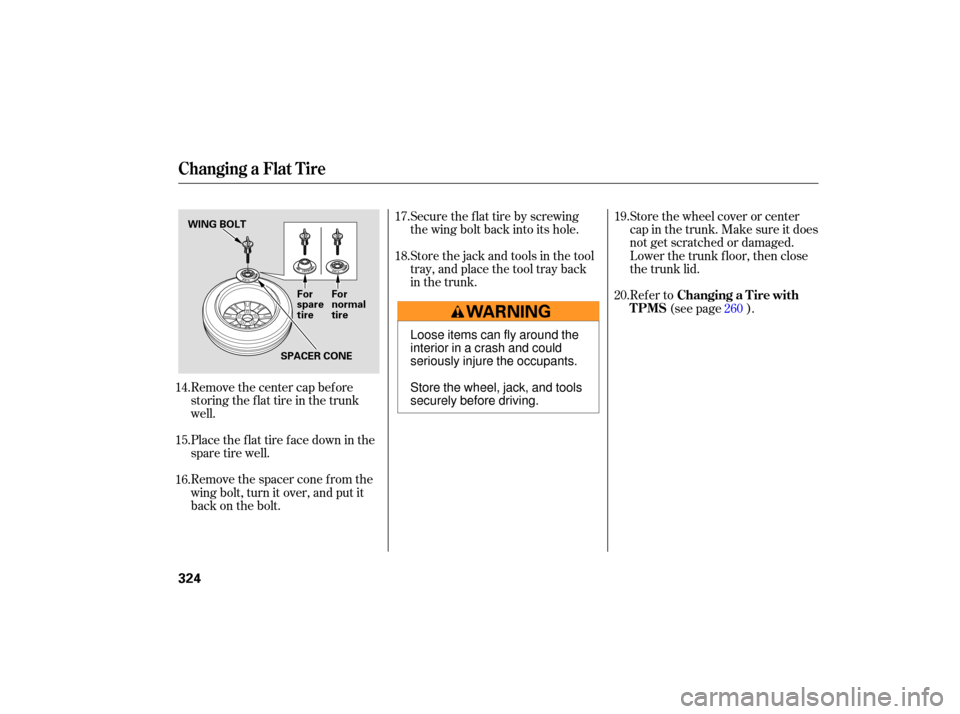
Remove the center cap before
storing the flat tire in the trunk
well.
Place the flat tire face down in the
spare tire well.
Remove the spacer cone from the
wing bolt, turn it over, and put it
back on the bolt. Refer to
(see page ).
19.
20.
17.
18.
14.
15.
16. 260
Changing a Flat Tire
Changing a T ire with
TPMS
324
WING BOLT
For
spare
tireFor
normal
tire
SPACER CONE
Loose items can fly around the
interior in a crash and could
seriously injure the occupants.
Store the wheel, jack, and tools
securely before driving.