Trunk Acura TSX 2012 Owner's Guide
[x] Cancel search | Manufacturer: ACURA, Model Year: 2012, Model line: TSX, Model: Acura TSX 2012Pages: 324, PDF Size: 9.45 MB
Page 124 of 324
123
uuAdjusting the SeatsuRear Seats
Controls
Rear Seats
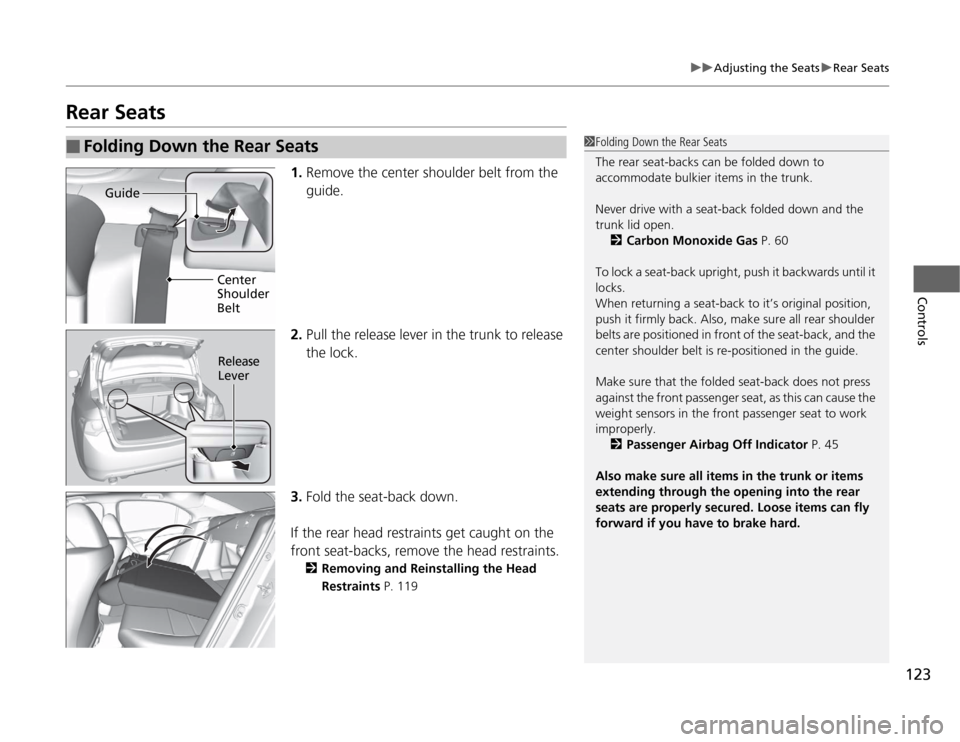
1.Remove the center shoulder belt from the
guide.
2.Pull the release lever in the trunk to release
the lock.
3.Fold the seat-back down.
If the rear head restraints get caught on the
front seat-backs, remove the head restraints.
2Removing and Reinstalling the Head
Restraints P. 119
■
Folding Down the Rear Seats
1Folding Down the Rear Seats
The rear seat-backs can be folded down to
accommodate bulkier items in the trunk.
Never drive with a seat-back folded down and the
trunk lid open.
2Carbon Monoxide Gas P. 60
To lock a seat-back upright, push it backwards until it
locks.
When returning a seat-back to it’s original position,
push it firmly back. Also, make sure all rear shoulder
belts are positioned in front of the seat-back, and the
center shoulder belt is re-positioned in the guide.
Make sure that the folded seat-back does not press
against the front passenger seat, as this can cause the
weight sensors in the front passenger seat to work
improperly.
2Passenger Airbag Off Indicator P. 45
Also make sure all items in the trunk or items
extending through the opening into the rear
seats are properly secured. Loose items can fly
forward if you have to brake hard.
Guide
Center
Shoulder
Belt
Release
Lever
Page 131 of 324

uuInterior Lights/Interior Convenience ItemsuInterior Convenience Items
130Controls
There are coat hooks on the rear left and right
grab handles. Pull them down to use them.
The cargo hooks in the trunk can be used to
install a net for securing items.
■
Coat Hooks
1Coat Hooks
The coat hooks are not designed for large or heavy
items.
■
Cargo Hooks
1Cargo Hooks
Distribute cargo evenly on the floor of the trunk,
placing the heaviest items on the bottom and as far
forward as possible.
2Maximum Load Limit P. 185
Hooks
Page 184 of 324
Continued
183
uuBefore DrivinguDriving Preparation
Driving
•Store or secure all items on board properly.
uCarrying too much cargo, or improperly storing it, can affect your vehicle’s
handling, stability, stopping distance, and tires, and make it unsafe.
2Maximum Load Limit P. 185
•Do not pile items higher than the seat height.
uThey can block your view and may be thrown forward in the event of sudden
braking.
•Do not place anything in the front seat footwells. Make sure to secure the floor
mat.
uAn object or unsecured floor mat can interfere with your brake and accelerator
pedal operation while driving.
•If you have any animals on board, do not let them move around in the vehicle.
uThey may interfere with driving and a crash could occur.
•Securely close and lock all doors and the trunk.
2Locking/Unlocking the Doors from the Inside P. 93
•Adjust your seating position properly.
uAdjust the head restraint, too.
2Adjusting the Seats P. 116
2Adjusting the Head Restraints P. 118
•Adjust the mirrors and steering wheel properly for your driving.
uAdjust them while sitting in the proper driving position.
2Adjusting the Mirror P. 114
2Adjusting the Steering Wheel P. 113
■
Interior Checks
1Interior Checks
The headlight aim is set by the factory, and does not
need to be adjusted. However, if you regularly carry
heavy items in the trunk or tow a trailer, have the
aiming readjusted at a dealer or by a qualified
technician.
Page 248 of 324
247
Continued
Maintenance
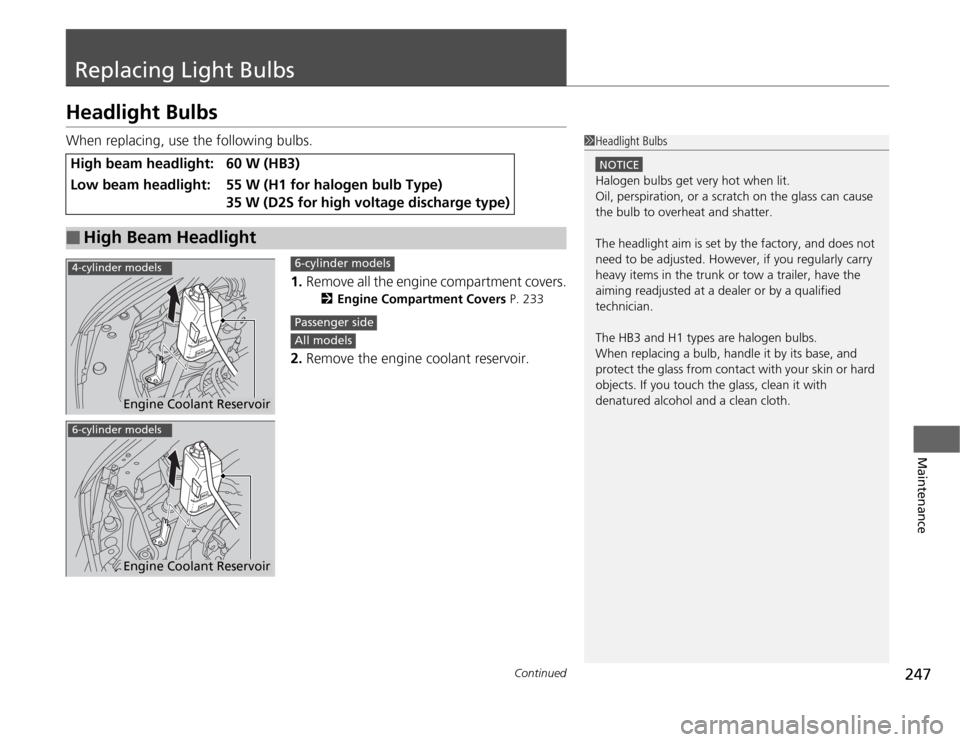
Replacing Light BulbsHeadlight BulbsWhen replacing, use the following bulbs.
1.Remove all the engine compartment covers.
2Engine Compartment Covers P. 233
2.Remove the engine coolant reservoir.
High beam headlight:
60 W (HB3)
Low beam headlight:
55 W (H1 for halogen bulb Type)
35 W (D2S for high voltage discharge type)
■
High Beam Headlight
1Headlight Bulbs
NOTICEHalogen bulbs get very hot when lit.
Oil, perspiration, or a scratch on the glass can cause
the bulb to overheat and shatter.
The headlight aim is set by the factory, and does not
need to be adjusted. However, if you regularly carry
heavy items in the trunk or tow a trailer, have the
aiming readjusted at a dealer or by a qualified
technician.
The HB3 and H1 types are halogen bulbs.
When replacing a bulb, handle it by its base, and
protect the glass from contact with your skin or hard
objects. If you touch the glass, clean it with
denatured alcohol and a clean cloth.
Engine Coolant Reservoir
4-cylinder models
6-cylinder modelsPassenger sideAll models
6-cylinder models
Engine Coolant Reservoir
Page 255 of 324
254
uuReplacing Light BulbsuBack-Up Light Bulbs
Maintenance
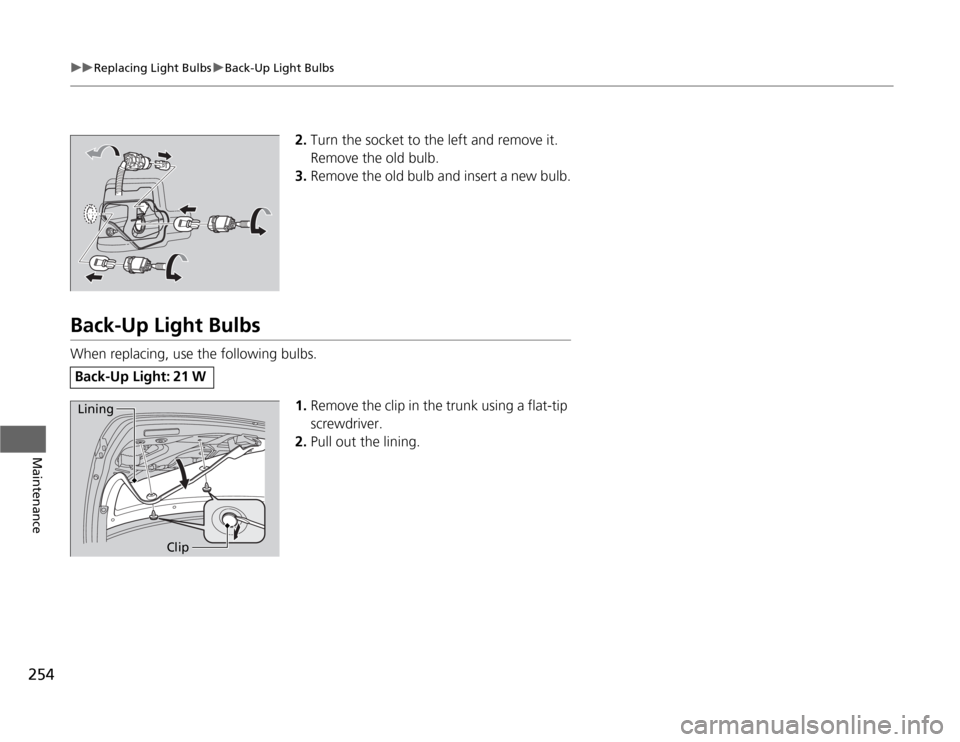
2.Turn the socket to the left and remove it.
Remove the old bulb.
3.Remove the old bulb and insert a new bulb.
Back-Up Light BulbsWhen replacing, use the following bulbs.
1.Remove the clip in the trunk using a flat-tip
screwdriver.
2.Pull out the lining.Back-Up Light: 21 W Lining
Clip
Page 257 of 324
256
uuReplacing Light BulbsuHigh-Mount Brake Light Bulbs
Maintenance
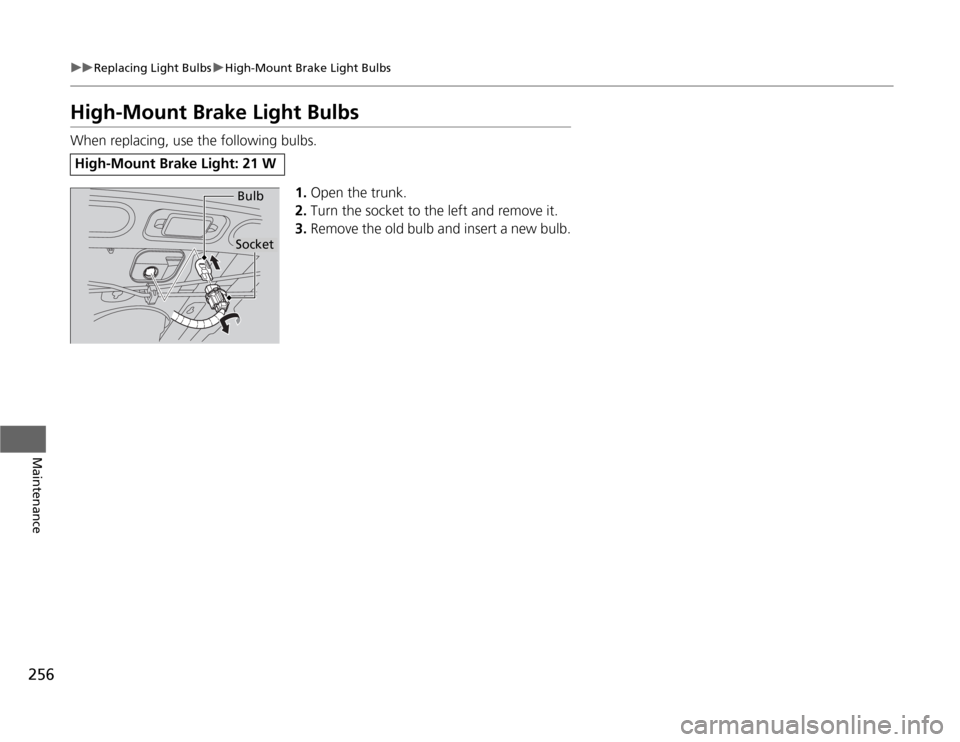
High-Mount Brake Light BulbsWhen replacing, use the following bulbs.
1.Open the trunk.
2.Turn the socket to the left and remove it.
3.Remove the old bulb and insert a new bulb.High-Mount Brake Light: 21 W
BulbSocket
Page 276 of 324
275
Handling the Unexpected
This chapter explains how to handle unexpected troubles.
Tools.................................................. 276
Types of Tools .................................. 276
If a Tire Goes Flat.............................. 277
Changing a Flat Tire ......................... 277
Engine Does Not Start
Checking the Engine ........................ 283
Jump Starting.................................... 284
Shift Lever Does Not Move.............. 287
Overheating...................................... 288
How to Handle Overheating ............. 288Indicator, Coming On/Blinking
If the Low Oil Pressure Indicator Comes
On.................................................. 290If the Charging System Indicator Comes
On ................................................. 290
If the Malfunction Indicator Lamp Comes
On or Blinks ................................... 291If the Brake System Indicator Comes On .. 292If the EPS Indicator Comes On.......... 292
If the Low Tire Pressure/TPMS Indicator
Comes On or Blinks........................ 293Fuses
Fuse Locations ................................. 294
Circuit Protected and Amps for Each
Fuse............................................ 296Inspecting and Changing Fuses ........ 298
Emergency Towing........................... 299
When You Cannot Unlock the Fuel Fill
Door................................................. 300
When You Cannot Open the Trunk.. 301
Page 279 of 324
278
uuIf a Tire Goes FlatuChanging a Flat Tire
Handling the Unexpected
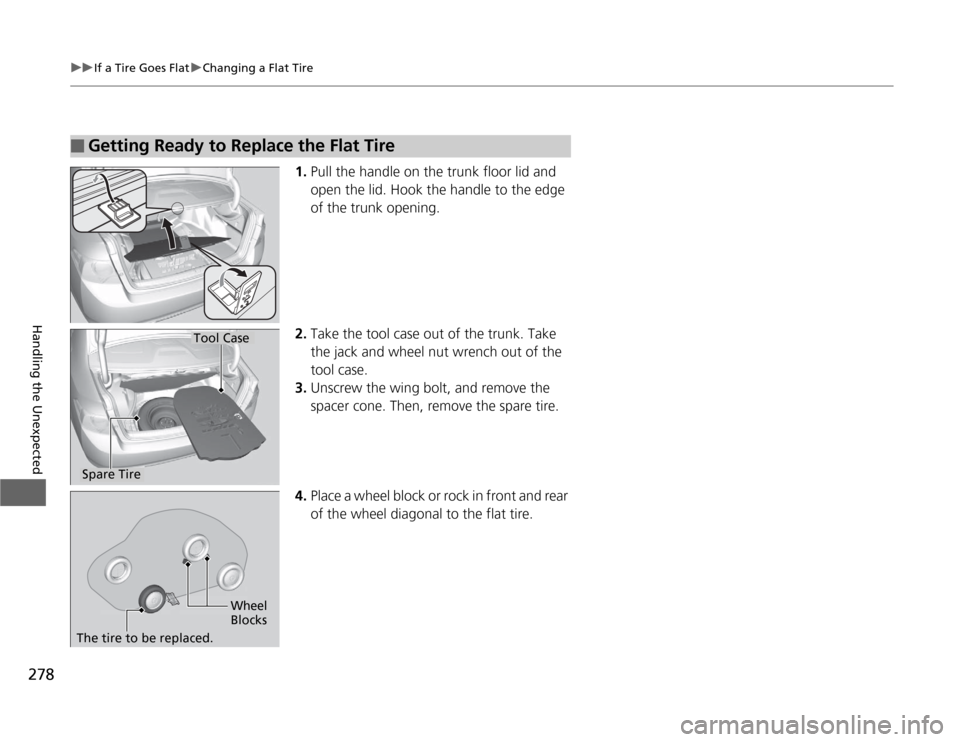
1.Pull the handle on the trunk floor lid and
open the lid. Hook the handle to the edge
of the trunk opening.
2.Take the tool case out of the trunk. Take
the jack and wheel nut wrench out of the
tool case.
3.Unscrew the wing bolt, and remove the
spacer cone. Then, remove the spare tire.
4.Place a wheel block or rock in front and rear
of the wheel diagonal to the flat tire.
■
Getting Ready to Replace the Flat Tire
Tool Case
Spare Tire
Wheel
Blocks
The tire to be replaced.
Page 283 of 324
uuIf a Tire Goes FlatuChanging a Flat Tire
282Handling the Unexpected
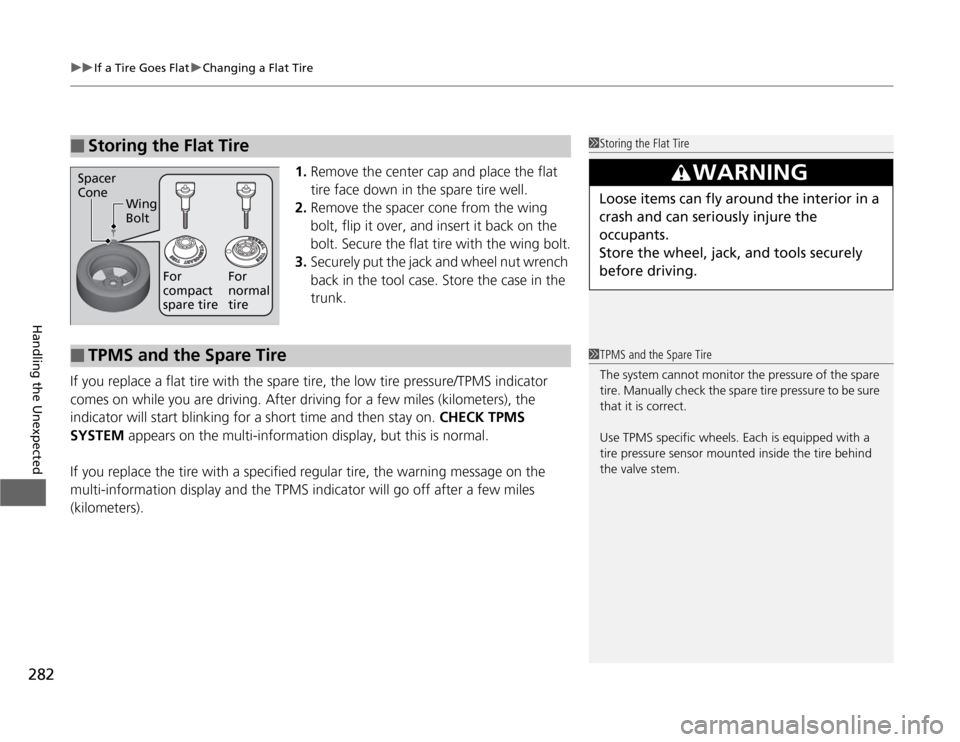
1.Remove the center cap and place the flat
tire face down in the spare tire well.
2.Remove the spacer cone from the wing
bolt, flip it over, and insert it back on the
bolt. Secure the flat tire with the wing bolt.
3.Securely put the jack and wheel nut wrench
back in the tool case. Store the case in the
trunk.
If you replace a flat tire with the spare tire, the low tire pressure/TPMS indicator
comes on while you are driving. After driving for a few miles (kilometers), the
indicator will start blinking for a short time and then stay on. CHECK TPMS
SYSTEM appears on the multi-information display, but this is normal.
If you replace the tire with a specified regular tire, the warning message on the
multi-information display and the TPMS indicator will go off after a few miles
(kilometers).
■
Storing the Flat Tire
1Storing the Flat Tire
3
WARNING
Loose items can fly around the interior in a
crash and can seriously injure the
occupants.
Store the wheel, jack, and tools securely
before driving.
Spacer
Cone
Wing
Bolt
For
compact
spare tireFor
normal
tire■
TPMS and the Spare Tire
1TPMS and the Spare Tire
The system cannot monitor the pressure of the spare
tire. Manually check the spare tire pressure to be sure
that it is correct.
Use TPMS specific wheels. Each is equipped with a
tire pressure sensor mounted inside the tire behind
the valve stem.
Page 301 of 324
300Handling the Unexpected
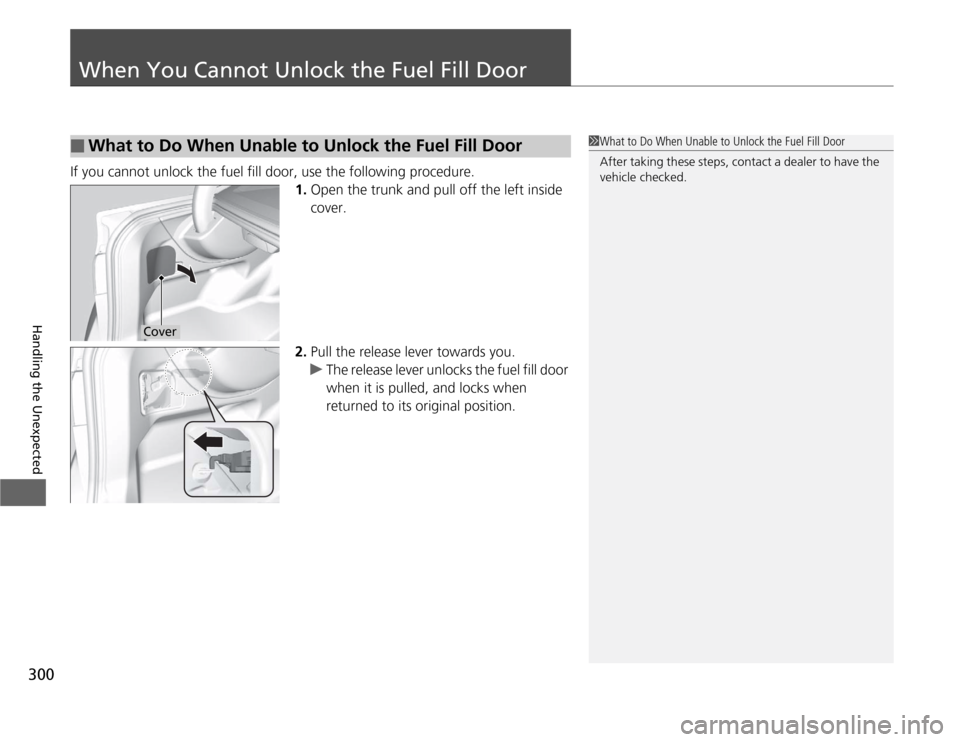
When You Cannot Unlock the Fuel Fill DoorIf you cannot unlock the fuel fill door, use the following procedure.
1.Open the trunk and pull off the left inside
cover.
2.Pull the release lever towards you.
uThe release lever unlocks the fuel fill door
when it is pulled, and locks when
returned to its original position.■
What to Do When Unable to Unlock the Fuel Fill Door
1What to Do When Unable to Unlock the Fuel Fill Door
After taking these steps, contact a dealer to have the
vehicle checked.
Cover