automatic transmission Acura TSX 2012 Owner's Manual
[x] Cancel search | Manufacturer: ACURA, Model Year: 2012, Model line: TSX, Model: Acura TSX 2012Pages: 324, PDF Size: 9.45 MB
Page 5 of 324
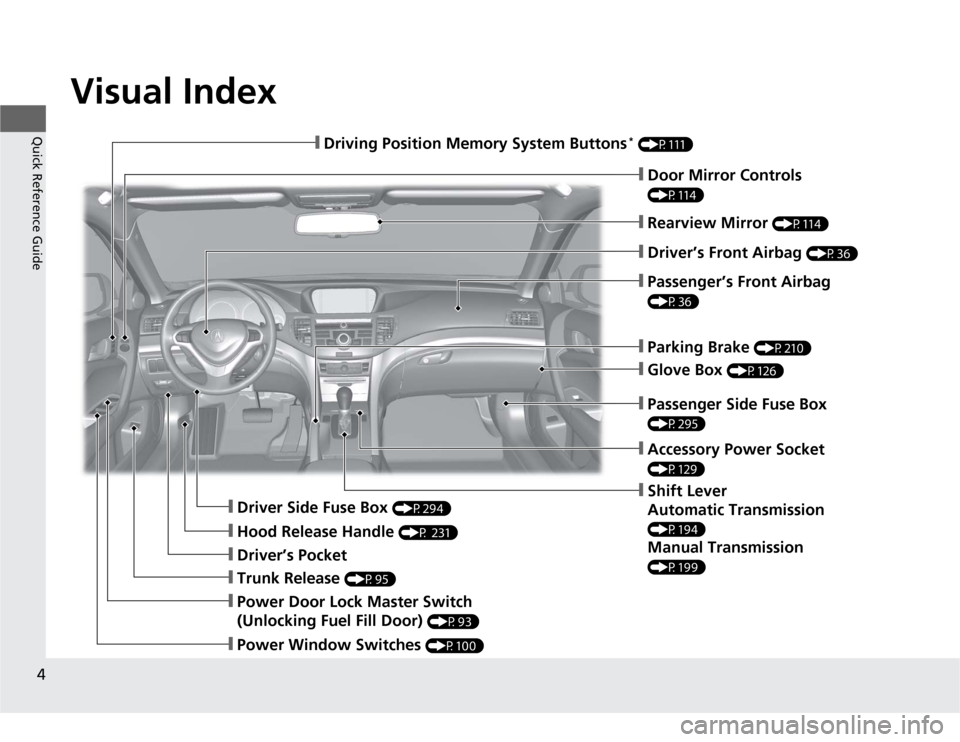
Visual Index
4Quick Reference Guide
❙Door Mirror Controls (P114)❙Parking Brake
(P210)
❙Glove Box
(P126)
❙Rearview Mirror
(P114)
❙Shift Lever
Automatic Transmission (P194)Manual Transmission (P199)
❙Driver Side Fuse Box
(P294)
❙Passenger Side Fuse Box (P295)
❙Driver’s Pocket❙Trunk Release
(P95)
❙Power Window Switches
(P100)
❙Driving Position Memory System Buttons
* (P111)❙Driver’s Front Airbag
(P36)
❙Hood Release Handle
(P 231)
❙Passenger’s Front Airbag (P36)❙Accessory Power Socket (P129)
❙Power Door Lock Master Switch
(Unlocking Fuel Fill Door)
(P93)
Page 14 of 324
13Quick Reference Guide
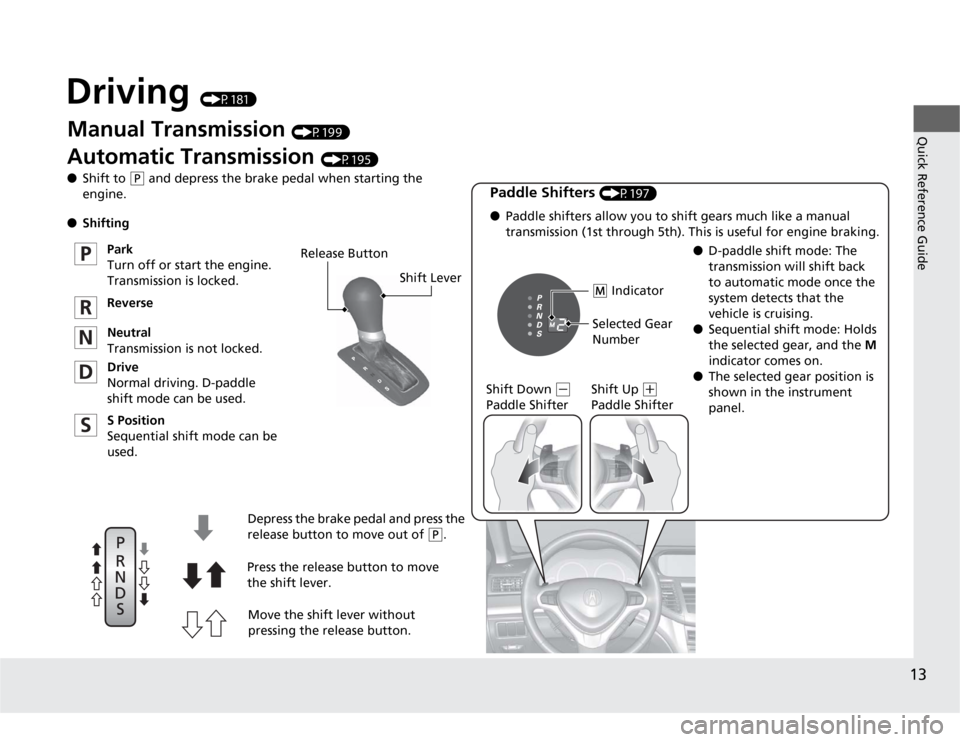
Driving
(P181)
Release Button
Shift Lever
Depress the brake pedal and press the
release button to move out of
(P
.
Move the shift lever without
pressing the release button. Press the release button to move
the shift lever.
Manua
l Transm
iss
ion
(P199)
Automatic Transmission
(P195)
●Shift to
(P
and depress the brake pedal when starting the
engine.
●Shifting
Park
Turn off or start the engine.
Transmission is locked.
Reverse
Neutral
Transmission is not locked.
Drive
Normal driving. D-paddle
shift mode can be used.
S Position
Sequential shift mode can be
used.
Paddle Shifters
(P197)
●Paddle shifters allow you to shift gears much like a manual
transmission (1st through 5th). This is useful for engine braking.
●D-paddle shift mode: The
transmission will shift back
to automatic mode once the
system detects that the
vehicle is cruising.
●Sequential shift mode: Holds
the selected gear, and the M
indicator comes on.
●The selected gear position is
shown in the instrument
panel. Shift Down
(-
Paddle ShifterShift Up
(+
Paddle ShifterSelected Gear
Number
(M
Indicator
Page 81 of 324
uuGauges and Multi-Information DisplayuMulti-Information Display
80Instrument Panel
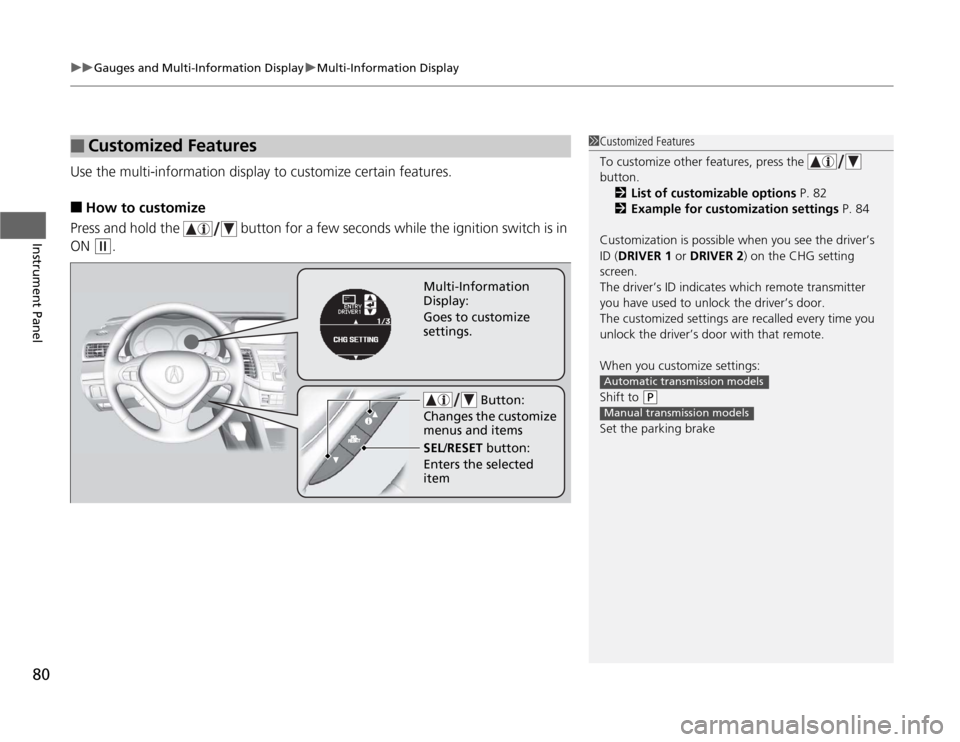
Use the multi-information display to customize certain features.■
How to customize
Press and hold the button for a few seconds while the ignition switch is in
ON (w
.
■
Customized Features
1Customized Features
To customize other features, press the
button.
2List of customizable options P. 82
2Example for customization settings P. 84
Customization is possible when you see the driver’s
ID (DRIVER 1 or DRIVER 2) on the CHG setting
screen.
The driver’s ID indicates which remote transmitter
you have used to unlock the driver’s door.
The customized settings are recalled every time you
unlock the driver’s door with that remote.
When you customize settings:
Shift to
(P
Set the parking brakeAutomatic transmission modelsManual transmission models
Button:
Changes the customize
menus and items
Multi-Information
Display:
Goes to customize
settings.
SEL/RESET button:
Enters the selected
item
Page 84 of 324
83
uuGauges and Multi-Information DisplayuMulti-Information Display
Continued
Instrument Panel
*1: Default Setting
*2: Default Setting for automatic transmission
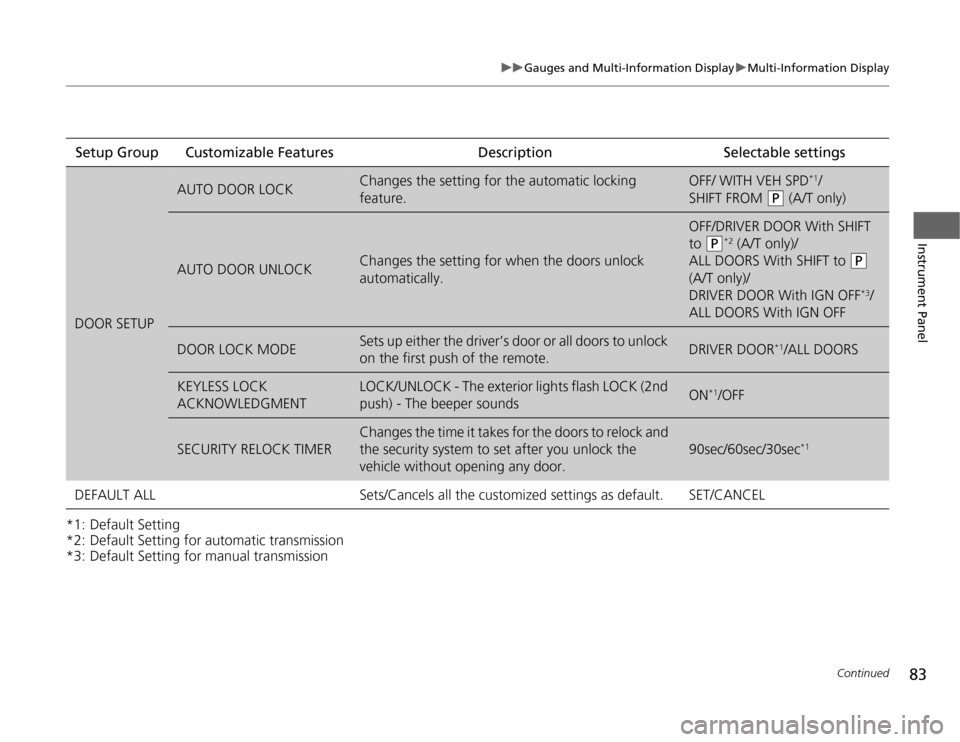
*3: Default Setting for manual transmissionSetup Group Customizable Features Description Selectable settingsDOOR SETUP
AUTO DOOR LOCK
Changes the setting for the automatic locking
feature.
OFF/ WITH VEH SPD
*1/
SHIFT FROM
(P
(A/T only)
AUTO DOOR UNLOCK
Changes the setting for when the doors unlock
automatically.
OFF/DRIVER DOOR With SHIFT
to
(P
*2 (A/T only)/
ALL DOORS With SHIFT to
(P
(A/T only)/
DRIVER DOOR With IGN OFF*3/
ALL DOORS With IGN OFF
DOOR LOCK MODE
Sets up either the driver’s door or all doors to unlock
on the first push of the remote.
DRIVER DOOR
*1/ALL DOORS
KEYLESS LOCK
ACKNOWLEDGMENT
LOCK/UNLOCK - The exterior lights flash LOCK (2nd
push) - The beeper sounds
ON
*1/OFF
SECURITY RELOCK TIMER
Changes the time it takes for the doors to relock and
the security system to set after you unlock the
vehicle without opening any door.
90sec/60sec/30sec
*1
DEFAULT ALL
Sets/Cancels all the customized settings as default.
SET/CANCEL
Page 95 of 324
94
uuLocking and Unlocking the DoorsuChildproof Door Locks
Controls
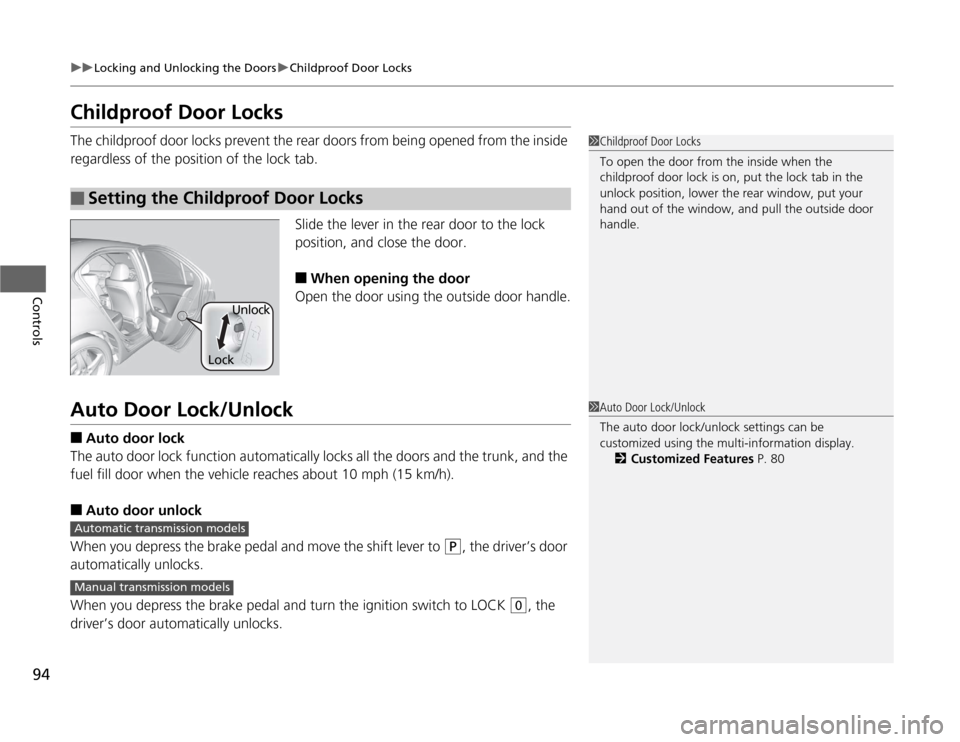
Childproof Door LocksThe childproof door locks prevent the rear doors from being opened from the inside
regardless of the position of the lock tab.
Slide the lever in the rear door to the lock
position, and close the door.
■
When opening the door
Open the door using the outside door handle.
Auto Door Lock/Unlock■
Auto door lock
The auto door lock function automatically locks all the doors and the trunk, and the
fuel fill door when the vehicle reaches about 10 mph (15 km/h).
■
Auto door unlock
When you depress the brake pedal and move the shift lever to
(P
, the driver’s door
automatically unlocks.
When you depress the brake pedal and turn the ignition switch to LOCK
(0
, the
driver’s door automatically unlocks.
■
Setting the Childproof Door Locks
1Childproof Door Locks
To open the door from the inside when the
childproof door lock is on, put the lock tab in the
unlock position, lower the rear window, put your
hand out of the window, and pull the outside door
handle.
LockUnlock
1Auto Door Lock/Unlock
The auto door lock/unlock settings can be
customized using the multi-information display.
2Customized Features P. 80
Automatic transmission modelsManual transmission models
Page 105 of 324
104Controls
Operating the Switches Around the Steering WheelIgnition Switch
1Ignition Switch
You cannot take the key out unless the shift lever is
in
(P
.
If you open the driver’s door when the key is in LOCK
(0
or ACCESSORY
(q
, a warning buzzer will sound
to remind you to take the key out.
When this happens, the following messages appear
on the multi-information display:
•In LOCK
(0
: REMOVE KEY.
•In ACCESSORY
(q
: REMOVE KEY. The buzzer will
stop when you take the key out.
If the key won’t turn from LOCK
(0
to ACCESSORY
(q
, turn the key while moving the steering wheel left
and right. The steering wheel will unlock, allowing
the key to turn.
3
WARNING
Removing the key from the ignition switch
while driving locks the steering. This can
cause you to lose control of the vehicle.
Remove the key from the ignition switch
only when parked.Manual transmission modelsAutomatic transmission modelsAll models
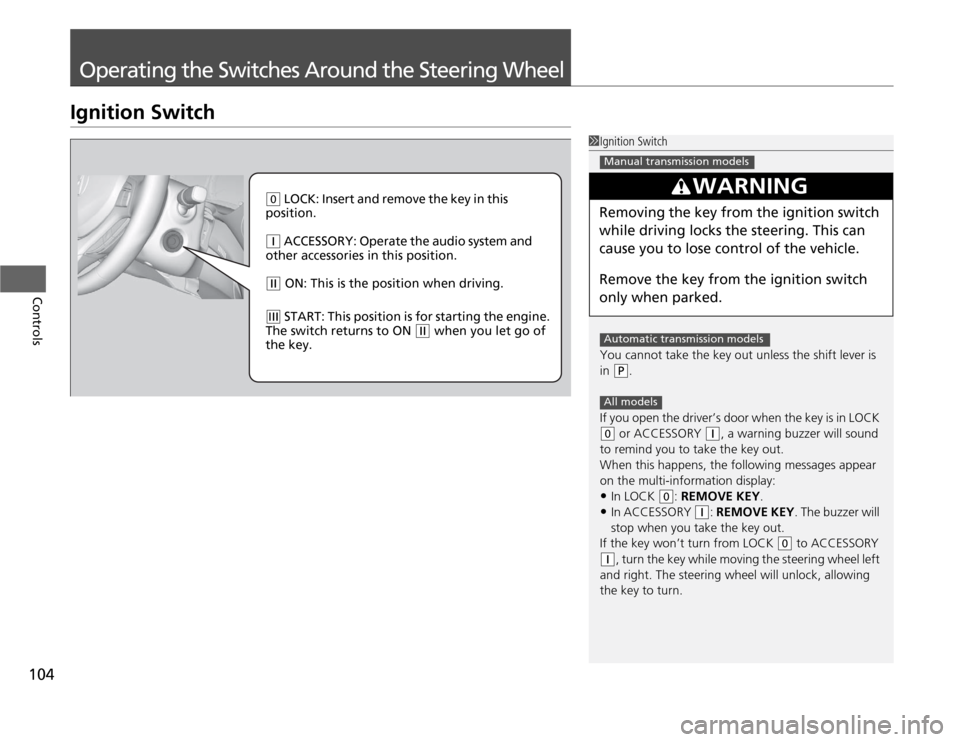
(0
LOCK: Insert and remove the key in this
position.
(q
ACCESSORY: Operate the audio system and
other accessories in this position.
(w
ON: This is the position when driving.
(e
START: This position is for starting the engine.
The switch returns to ON
(w
when you let go of
the key.
Page 113 of 324
uuOperating the Switches Around the Steering WheeluDriving Position Memory System
*
112Controls
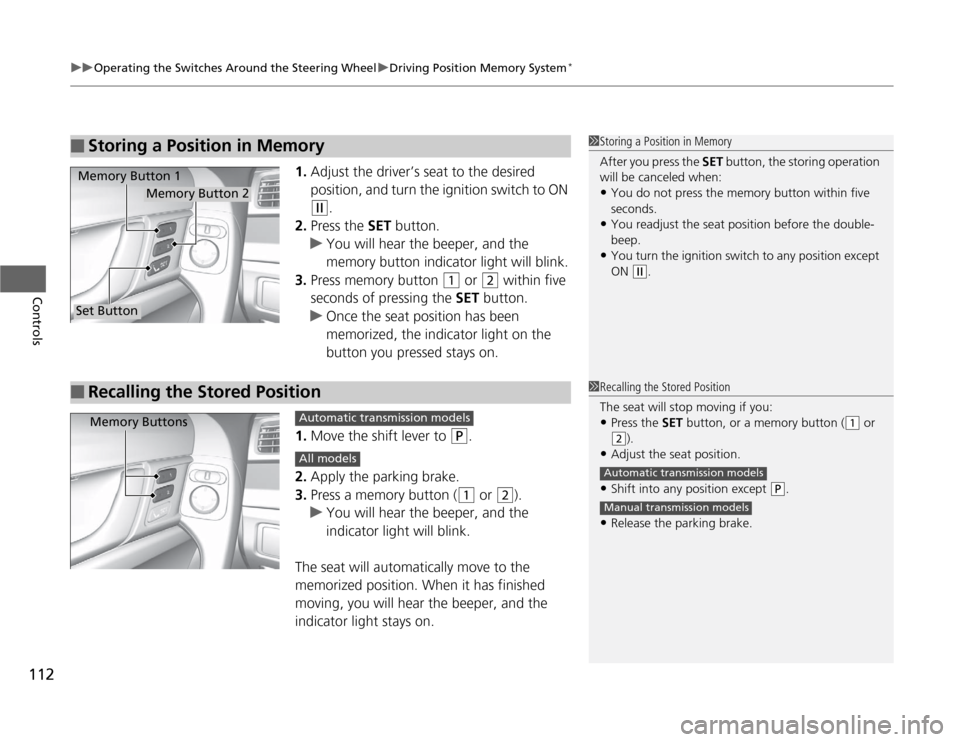
1.Adjust the driver’s seat to the desired
position, and turn the ignition switch to ON
(w
.
2.Press the SET button.
uYou will hear the beeper, and the
memory button indicator light will blink.
3.Press memory button
(1
or
(2
within five
seconds of pressing the SET button.
uOnce the seat position has been
memorized, the indicator light on the
button you pressed stays on.
1.Move the shift lever to
(P
.
2.Apply the parking brake.
3.Press a memory button ((1
or
(2
).
uYou will hear the beeper, and the
indicator light will blink.
The seat will automatically move to the
memorized position. When it has finished
moving, you will hear the beeper, and the
indicator light stays on.
■
Storing a Position in Memory
1Storing a Position in Memory
After you press the SET button, the storing operation
will be canceled when:•You do not press the memory button within five
seconds.•You readjust the seat position before the double-
beep.•You turn the ignition switch to any position except
ON
(w
.
Memory Button 1
Memory Button 2
Set Button■
Recalling the Stored Position
1Recalling the Stored Position
The seat will stop moving if you:•Press the SET button, or a memory button (
(1
or
(2
).
•Adjust the seat position.•Shift into any position except
(P
.
•Release the parking brake.Automatic transmission modelsManual transmission models
Memory Buttons
Automatic transmission modelsAll models
Page 182 of 324
181
Driving
This chapter discusses driving, refueling, and information on items such as accessories.
Before Driving
Driving Preparation .......................... 182
Maximum Load Limit........................ 185
Towing a Trailer
Towing Preparation .......................... 187
Driving Safely with a Trailer .............. 189
Towing Your Vehicle ........................ 190
When Driving
Starting the Engine .......................... 191
Precautions While Driving................. 193
Automatic Transmission ................... 194Shifting ............................................ 195
Shifting ............................................ 199
Cruise Control ................................. 201
VSA
® (Vehicle Stability Assist), aka ESC
(Electronic Stability Control), System ...... 204
TPMS (Tire Pressure Monitoring System) ... 206
Tire Pressure Monitoring System (TPMS) -
Required Federal Explanation ........... 208
Braking
Brake System ................................... 210
ABS (Anti-lock Brake System) ........... 212Automatic transmissionManual transmission
Brake Assist System ......................... 213
Parking Your Vehicle
When Stopped ................................ 214
Parking ............................................ 214
Refueling
Fuel Information .............................. 215
How to Refuel ................................. 216
Fuel Economy.................................... 218
Improving Fuel Economy .................. 218
Accessories and Modifications
Accessories ...................................... 219
Modifications................................... 219
Page 190 of 324
189
uuTowing a TraileruDriving Safely with a Trailer
Continued
Driving
Driving Safely with a Trailer•Have the trailer properly serviced and keep it in good condition.
•Make sure that all the weights and load in the vehicle and trailer are within limits.
2Towing Load Limits P. 187
•Securely attach the hitch, safety chains, and other necessary parts to the trailer.
•Securely store all the items in and on the trailer so that they do not shift while
driving.
•Check if the lights and brakes on the trailer are working properly.
•Check the pressures of the trailer tires, including the spare.
•Drive slower than normal.
•Obey posted speed limits for vehicles with trailers.
•Use the
(D
position when towing a trailer on level roads.
•Turn more slowly and with a wider turning arc than normal.
•Allow more time and distance for braking.
•Do not brake or turn suddenly.
■
Things You Need To Know Before Towing a Trailer
■
Towing Speeds and Gears
■
Turning and Braking
1Driving Safely with a Trailer
Parking
In addition to the normal precautions, place wheel
chocks at each of the trailer’s tires.
Automatic transmission models
Page 191 of 324
uuTowing a TraileruTowing Your Vehicle
190Driving
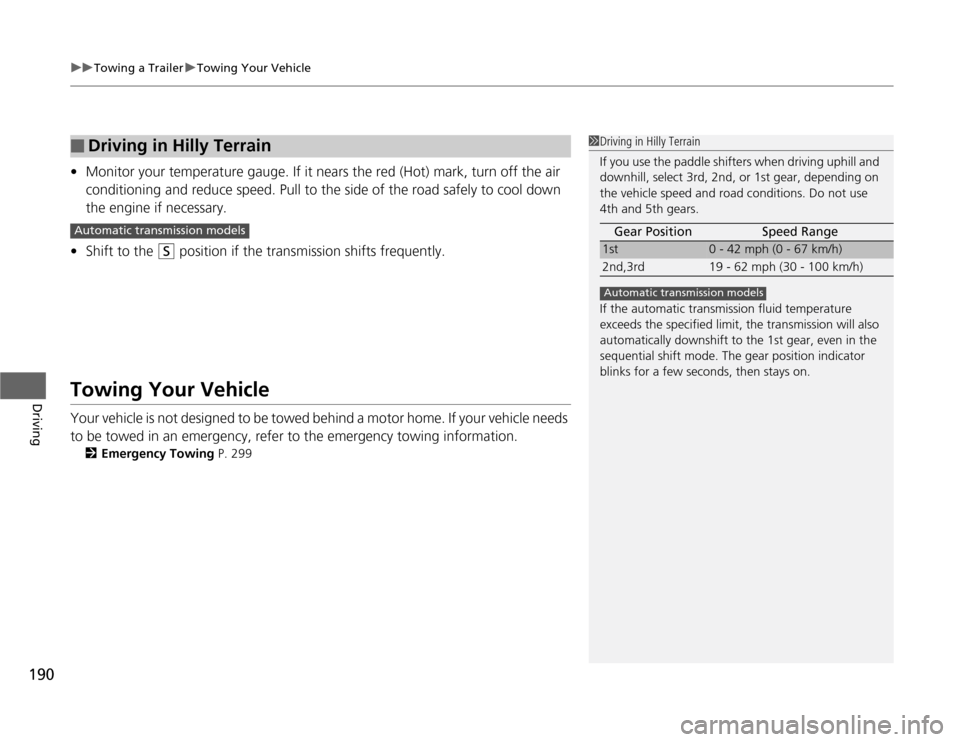
•Monitor your temperature gauge. If it nears the red (Hot) mark, turn off the air
conditioning and reduce speed. Pull to the side of the road safely to cool down
the engine if necessary.
•Shift to the
(S
position if the transmission shifts frequently.
Towing Your VehicleYour vehicle is not designed to be towed behind a motor home. If your vehicle needs
to be towed in an emergency, refer to the emergency towing information.
2Emergency Towing P. 299
■
Driving in Hilly Terrain
1Driving in Hilly Terrain
If you use the paddle shifters when driving uphill and
downhill, select 3rd, 2nd, or 1st gear, depending on
the vehicle speed and road conditions. Do not use
4th and 5th gears.
If the automatic transmission fluid temperature
exceeds the specified limit, the transmission will also
automatically downshift to the 1st gear, even in the
sequential shift mode. The gear position indicator
blinks for a few seconds, then stays on.Gear Position Speed Range
1st
0 - 42 mph (0 - 67 km/h)
2nd,3rd 19 - 62 mph (30 - 100 km/h)
Automatic transmission models
Automatic transmission models