AUX Acura TSX 2013 Navigation Manual
[x] Cancel search | Manufacturer: ACURA, Model Year: 2013, Model line: TSX, Model: Acura TSX 2013Pages: 252, PDF Size: 9.44 MB
Page 5 of 252
4
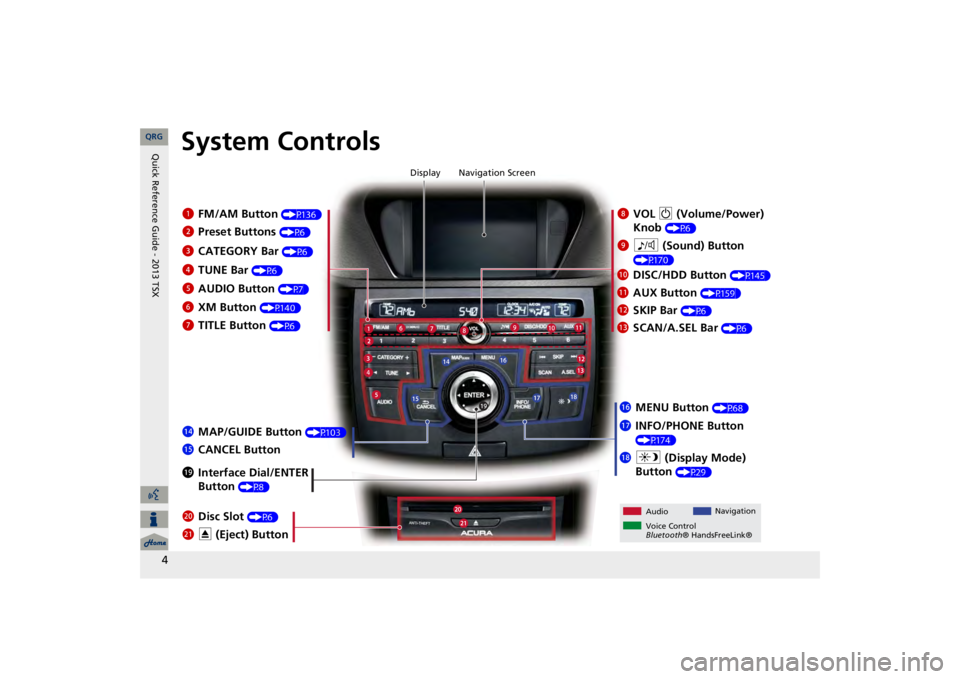
System Controls
8
VOL
9
(Volume/Power)
Knob
(P6)
Display
9
8
(Sound) Button
(P170)
la
DISC/HDD Button
(P145)
3
CATEGORY Bar
(P6)
1
FM/AM Button
(P136)
2
Preset Buttons
(P6)
4
TUNE Bar
(P6)
5
AUDIO Button
(P7)
6
XM Button
(P140)
7
TITLE Button
(P6)
le
MAP/GUIDE Button
(P103)
lf
CANCEL Button
lj
Interface Dial/ENTER Button
(P8)
ma
Disc Slot
(P6)
mb
E
(Eject) Button
Navigation Screen
Audio
Navigation
Voice Control Bluetooth
® HandsFreeLink®
lb
AUX Button
(P159)
lc
SKIP Bar
(P6)
ld
SCAN/A.SEL Bar
(P6)
lg
MENU Button
(P68)
lh
INFO/PHONE Button (P174)
li
a
(Display Mode)
Button
(P29)
QRG
Quick Reference Guide - 2013 TSX
Page 134 of 252
133
Audio
This section describes how to operate the audio system. You can play
music from a wide array of media s
ources, and control the audio system
using the audio buttons, the Interface Dial, or voice control.
Audio System
.................................................. 134
About Your Audio System ..............................
134
Auxiliary Input Jack .........
..........
................
.....
135
Audio System Theft Protection .......................
135
Playing FM/AM Radio
..................................... 136
Selecting FM/AM Mode..................................
136
Audio Screen Control .....................................
136
Audio Menu ..................................................
137
Radio Data System (RDS) ................................
138
Playing XM® Radio
......................................... 140
Selecting XM Mode........................................
140
Audio Screen Control .....................................
140
Audio Menu ..................................................
141
Note Function ................................................
142
XM® Radio Service ........................................
144
Playing a Disc
................................................... 145
Selecting Disc Mode .......................................
145
Audio Screen Control .....................................
145
Audio Menu ...................................................
146
Playing MP3/WMA/AAC Discs ........................
147
Recommended Discs ......................................
148
Playing Hard Disc Drive (HDD) Audio
............ 149
Selecting HDD Mode ......................................
149
Audio Screen Control .....................................
150
Audio Menu ...................................................
150
Recording a Music CD to HDD........................
152
Searching for Music........................................
154
Adding a Track to a User Playlist .....................
155
Editing a Playlist .............................................
155
Displaying Music Information .........................
157
Updating Gracenote® Album Info ..................
158
Playing an iPod®
............................................. 159
Selecting iPod® Mode ....................................
160
Audio Screen Control .....................................
160
Audio Menu ...................................................
161
Searching for Music........................................
162
Searching for Music Using Song By Voice™ (SBV)
............................................................... 163
Playing a USB Flash Drive
............................... 164
Selecting USB Mode.......................................
165
Audio Screen Control.....................................
165
Audio Menu ..................................................
166
Playing Tracks in Folders.................................
167
Playing Bluetooth® Audio
............................. 168
Selecting Bluetooth® Audio Mode .................
168
Switching to HFL Mode ..................................
169
Audio Screen Control.....................................
169
Adjusting the Sound
....................................... 170
Audio Remote Controls
.................................. 171
Steering Wheel Controls ................................
171
QRG2013 TSX
Page 136 of 252
135
Audio System
Auxiliary Input Jack
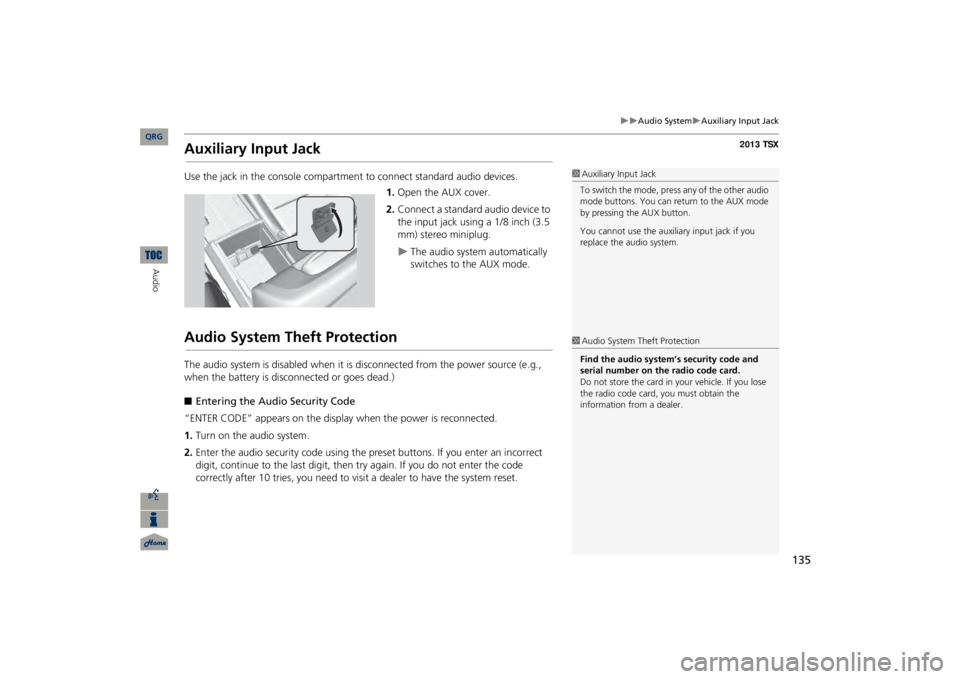
Auxiliary Input JackUse the jack in the console compartment
to connect standa
rd audio devices.
1.Open the AUX cover.2.Connect a standard audio device to the input jack using a 1/8 inch (3.5 mm) stereo miniplug.
The audio system automatically switches to the AUX mode.
Audio System Theft ProtectionThe audio system is disabled when it is
disconnected from the power source (e.g.,
when the battery is disc
onnected or goes dead.)
■Entering the Audio Security Code“ENTER CODE” appears on the displa
y when the power is reconnected.
1.Turn on the audio system.2.Enter the audio security code using the pr
eset buttons. If you enter an incorrect
digit, continue to the last digit, then
try again. If you do not enter the code
correctly after 10 tries, you need to vi
sit a dealer to have the system reset.
1Auxiliary Input JackTo switch the mode, press any of the other audio mode buttons. You can return to the AUX mode by pressing the AUX button. You cannot use the auxili
ary input jack if you
replace the audio system. 1Audio System Theft ProtectionFind the audio system’s security code and serial number on the radio code card.Do not store the card in your vehicle. If you lose the radio code card, you must obtain the information from a dealer.
QRG
Audio
Page 161 of 252
160
Playing an iPod®
Selecting iPod® Mode
Audio
Selecting iPod® Mode1.Connect the iPod® to the USB adapter cable in the console compartment.2.Press the AUX button until you get to iPod® mode.3.Select a track using the iPod® menu on the screen.
The current track number and total number of tracks are displayed on
the
display.
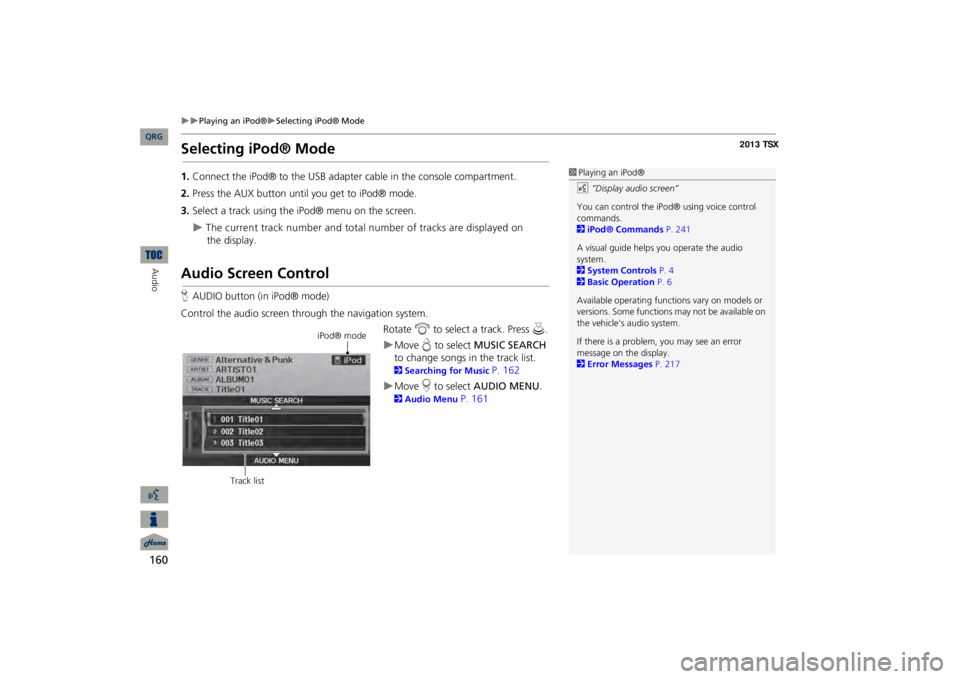
Audio Screen ControlHAUDIO button (in iPod® mode)Control the audio screen through the navigation system.
Rotate
i
to select a track. Press
u
.
Move
e to select
MUSIC SEARCH
to change songs in
the track list.
2Searching for Music
P. 162
Move
r to select
AUDIO MENU
.
2Audio Menu
P. 161
1Playing an iPod®d
“Display audio screen”
You can control the iPod® using voice control commands. 2iPod® Commands
P. 241
A visual guide helps
you operate the audio
system.2System Controls
P. 4
2Basic Operation
P. 6
Available operating functi
ons vary on models or
versions. Some functions
may not be available on
the vehicle’s audio system. If there is a problem, you may see an error message on the display. 2Error Messages
P. 217
iPod® mode
Track list
QRG
Page 166 of 252
165
Playing a USB Flash Drive
Selecting USB Mode
Selecting USB Mode1.Connect the USB flash drive to the
USB adapter cable in the console
compartment.2.Press the AUX button until you get to USB mode.3.Select a track using skip, scan,
folder list, or track list.
The current track number and folder number are displayed on the display.
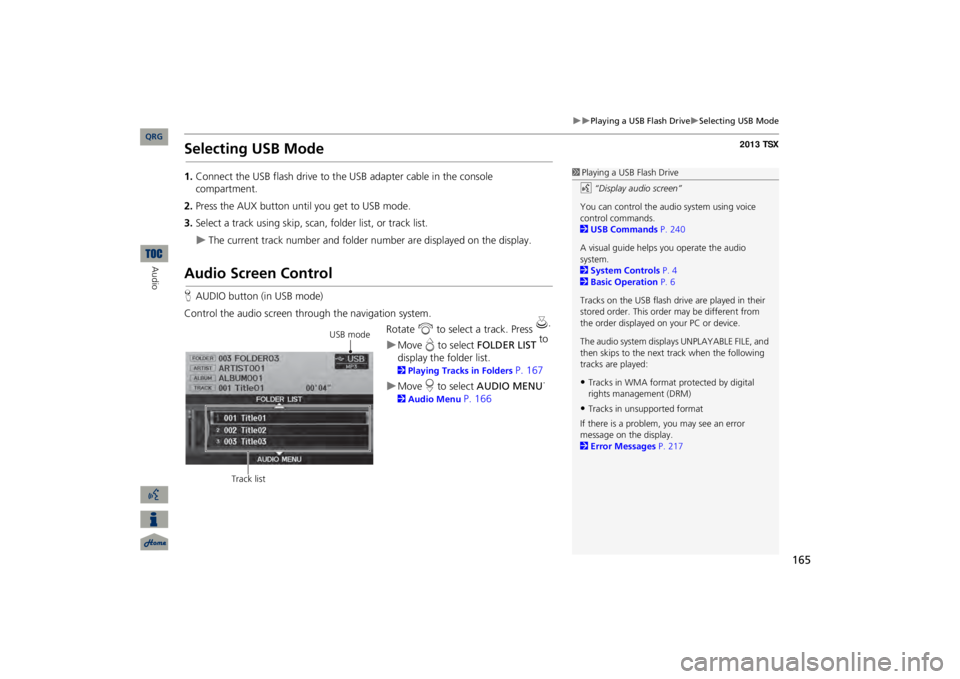
Audio Screen ControlHAUDIO button (in USB mode)Control the audio screen through the navigation system.
Rotate
i
to select a track. Press
u
.
Move
e to select
FOLDER LIST
to
display the folder list. 2Playing Tracks in Folders
P. 167
Move
r to select
AUDIO MENU
.
2Audio Menu
P. 166
1Playing a USB Flash Drived
“Display audio screen”
You can control the audio system using voice control commands. 2USB Commands
P. 240
A visual guide helps
you operate the audio
system.2System Controls
P. 4
2Basic Operation
P. 6
Tracks on the USB flash drive are played in their stored order. This orde
r may be different from
the order displayed on
your PC or device.
The audio system displa
ys UNPLAYABLE FILE, and
then skips to the next track when the following tracks are played:•Tracks in WMA format protected by digital rights management (DRM)•Tracks in unsupported formatIf there is a problem, you may see an error message on the display. 2Error Messages
P. 217
USB mode
Track list
QRG
Audio
Page 169 of 252
168Audio
Playing
Bluetooth
® Audio
Your audio system allows you to listen to music tracks stored on your
Bluetooth
-
compatible phone. This function is available when the phone is linked to the vehicle’s
Bluetooth
®
HandsFreeLink® (HFL) system. 2Bluetooth® HandsFreeLink®
P. 173
Selecting
Bluetooth
® Audio Mode
1.Make sure that your
phone is on, paired,
and linked to HFL.
2Pairing a Phone
P. 176
2.Press the AUX button to select
Bluetooth
® Audio mode.
A Bluetooth
® message and icon are displaye
d on the display and screen.
3.If necessary, follow the cell phone operating instructions for playing audio tracks.Check the following if the phone is not recognized: •Another HFL-compatible phone, which is not compatible for
Bluetooth
® Audio, is
already connected.
1Playing
Bluetooth
® Audio
d
“Display audio screen”
You can control the audio system using voice control commands. 2Bluetooth® Audio Commands
P. 241
Not all
Bluetooth
-enabled phones with
streaming audio capabilities are compatible. To check if your phone is compatible:•Call HandsFreeLink
customer support at
(888) 528-7876.•U.S.: Visit
www.acura.com/handsfreelink
.
•Canada: Visit
www.handsfreelink.ca
.
In some states, it may be illegal to perform some data device functions while driving. Only one phone can be used with HFL at a time. When there are more than two paired phones in the vehicle, a first paired phone the system finds will be automatically linked. Pressing the TITLE button
switches the center
display between the
Bluetooth
® Audio message
and the device name. If more than one phone is paired to the HFL system, there may be a delay before the system begins to play. A “NO CONNECT” message may be displayed if:•The phone is not linked to HFL.•The phone is not turned on.•The phone is not in the vehicle.•An incompatible phone is connected.
QRG
Page 171 of 252
170Audio
Adjusting the SoundHAUDIO button
AUDIO MENU
Sound Setup
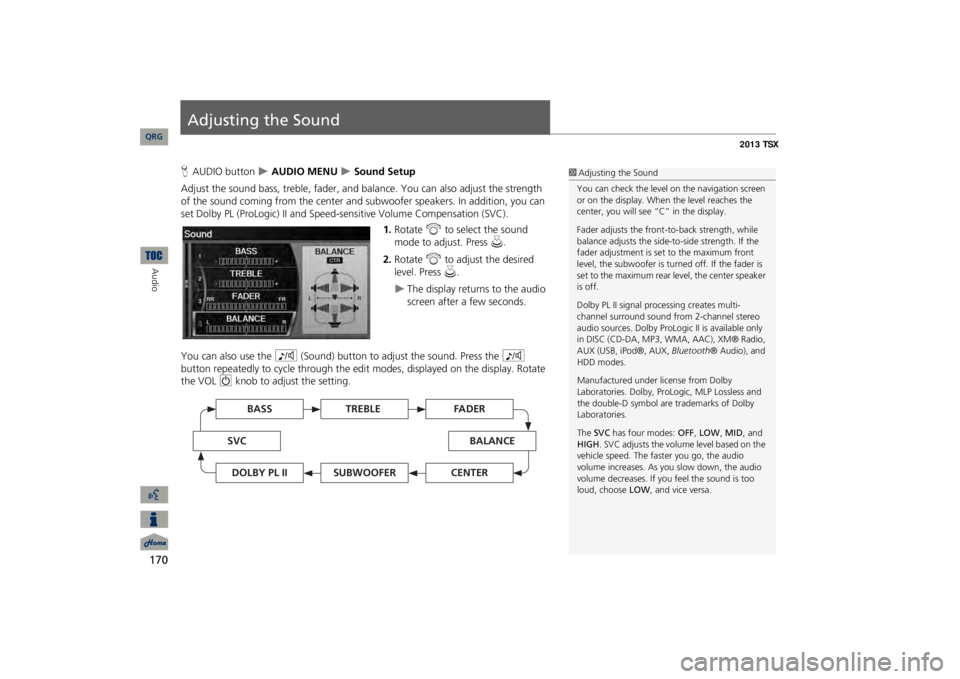
Adjust the sound bass, treble, fader, and ba
lance. You can also adjust the strength
of the sound coming from the center and
subwoofer speakers. In
addition, you can
set Dolby PL (ProLogic) II and Speed-s
ensitive Volume Compensation (SVC).
1.Rotate
i
to select the sound
mode to adjust. Press
u
.
2.Rotate
i
to adjust the desired
level. Press
u
.
The display returns to the audio screen after a few seconds.
You can also use the
8
(Sound) button to adjust the sound. Press the
8
button repeatedly to cycle through the edit
modes, displayed on the display. Rotate
the VOL
9
knob to adjust the setting.
1Adjusting the SoundYou can check the level on the navigation screen or on the display. When the level reaches the center, you will see “C” in the display. Fader adjusts the front-t
o-back strength, while
balance adjusts the side-to-side strength. If the fader adjustment is set to the maximum front level, the subwoofer is turned off. If the fader is set to the maximum rear level, the center speaker is off. Dolby PL II signal proc
essing creates multi-
channel surround sound fro
m 2-channel stereo
audio sources. Dolby ProL
ogic II is available only
in DISC (CD-DA, MP3, WMA, AAC), XM® Radio, AUX (USB, iPod®, AUX,
Bluetooth
® Audio), and
HDD modes. Manufactured under license from Dolby Laboratories. Dolby, ProL
ogic, MLP Lossless and
the double-D symbol are trademarks of Dolby Laboratories. The
SVC
has four modes:
OFF
, LOW
, MID
, and
HIGH
. SVC adjusts the volume level based on the
vehicle speed. The faster you go, the audio volume increases. As you slow down, the audio volume decreases. If you feel the sound is too loud, choose
LOW
, and vice versa.
TREBLE
BASS
SVC
BALANCE
FADER
SUBWOOFER
DOLBY PL II
CENTER
QRG
Page 172 of 252
171
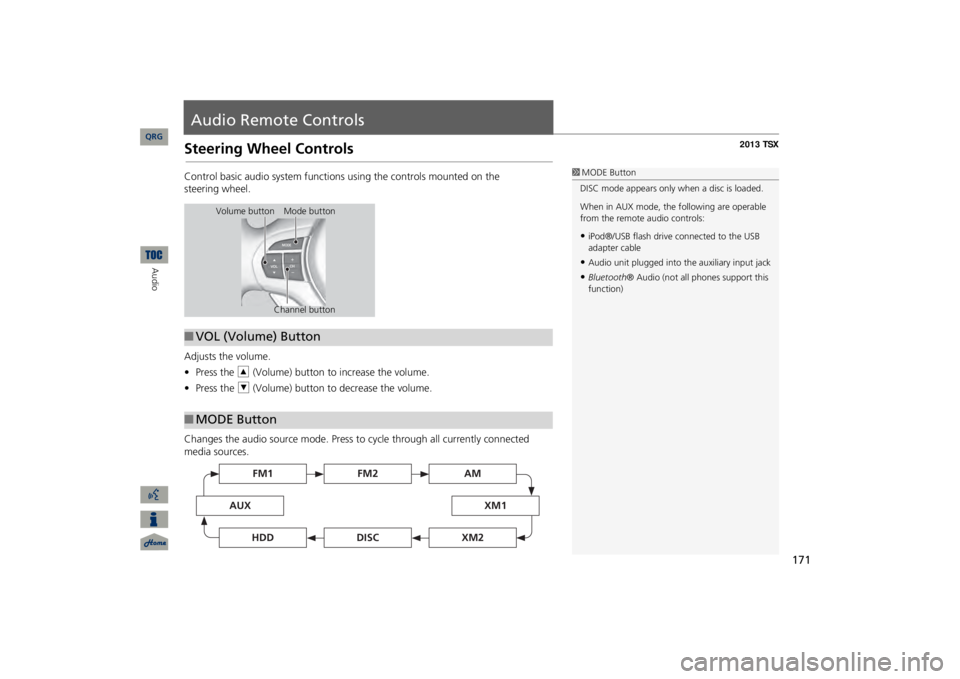
Audio Remote ControlsSteering Wheel ControlsControl basic audio system functions using the controls mounted on the
steering
wheel. Adjusts the volume. •Press the
R
(Volume) button to increase the volume.
•Press the
U
(Volume) button to decrease the volume.
Changes the audio source mode. Press to
cycle through all currently connected
media sources.
1MODE ButtonDISC mode appears only when a disc is loaded. When in AUX mode, the
following are operable
from the remote audio controls:•iPod®/USB flash drive
connected to the USB
adapter cable•Audio unit plugged into th
e auxiliary input jack
•Bluetooth
® Audio (not all phones support this
function)
Volume button Mode button
Channel button
■VOL (Volume) Button■MODE Button
FM2
FM1
AUX
XM1
AM
DISC
HDD
XM2
QRG
Audio
Page 242 of 252
241
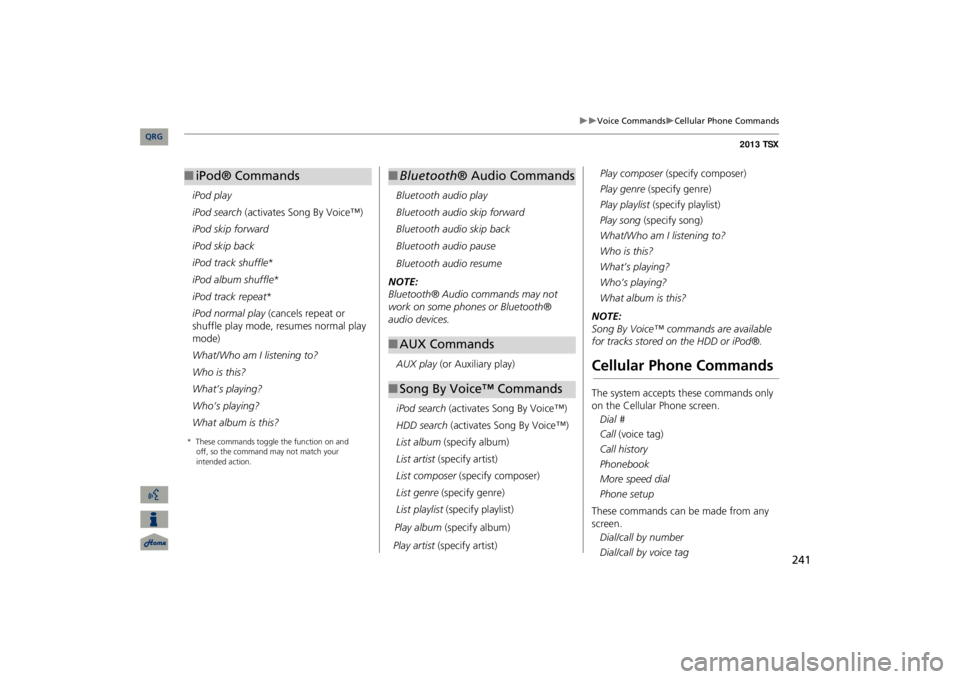
Voice Commands
Cellular Phone Commands
iPod play iPod search
(activates Song By Voice™)
iPod skip forwardiPod skip backiPod track shuffle
*
iPod album shuffle
*
iPod track repeat
*
iPod normal play
(cancels repeat or
shuffle play mode, resumes normal play mode) What/Who am I listening to?Who is this?What’s playing?Who’s playing?What album is this? ■iPod® Commands
Bluetooth
audio play
Bluetooth
audio skip forward
Bluetooth
audio skip back
Bluetooth
audio pause
Bluetooth
audio resume
NOTE: Bluetooth® Audio commands may not work on some phones or Bluetooth® audio devices.AUX play
(or Auxiliary play)
iPod search
(activates Song By Voice™)
HDD search
(activates Song By Voice™)
List album
(specify album)
List artist
(specify artist)
List composer
(specify composer)
List genre
(specify genre)
List playlist
(specify playlist)
Play album
(specify album)
Play artist
(specify artist)
Play composer
(specify composer)
Play genre
(specify genre)
Play playlist
(specify playlist)
■Bluetooth
® Audio Commands
■AUX Commands■Song By Voice™ Commands
Play song
(specify song)
What/Who am I listening to?Who is this?What’s playing?Who’s playing?What album is this?NOTE: Song By Voice™ commands are available for tracks stored on the HDD or iPod®.Cellular Phone CommandsThe system accepts these commands only on the Cellular Phone screen.Dial # Call
(voice tag)
Call historyPhonebookMore speed dialPhone setupThese commands can be made from any screen.Dial/call by number Dial/call by voice tag
QRG
* These commands toggle the function on and
off, so the command may not
match your
intended action.
Page 248 of 252
247
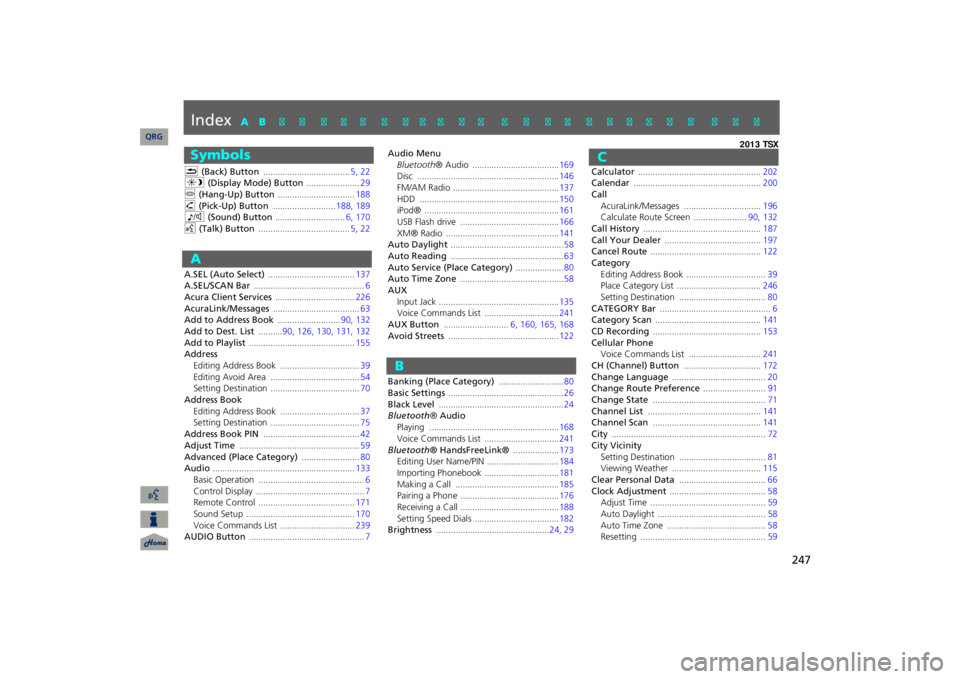
Index
SymbolsK
(Back) Button
....................................
5, 22
a
(Display Mode) Button
......................
29
j
(Hang-Up) Button
................................
188
h
(Pick-Up) Button
..........................
188
, 189
8
(Sound) Button
.............................
6, 170
d
(Talk) Button
......................................
5, 22
AA.SEL (Auto Select)
....................................
137
A.SEL/SCAN Bar
..............................................
6
Acura Client Services
.................................
226
AcuraLink/Messages
....................................
63
Add to Address Book
..........................
90, 132
Add to Dest. List
..........
90, 126
, 130
, 131
, 132
Add to Playlist
............................................
155
AddressEditing Address Book
.................................
39
Editing Avoid Area
.....................................
54
Setting Destination
.....................................
70
Address BookEditing Address Book
.................................
37
Setting Destination
.....................................
75
Address Book PIN
........................................
42
Adjust Time
..................................................
59
Advanced (Place Category)
........................
80
Audio
...........................................................
133
Basic Operation
............................................
6
Control Display
.............................................
7
Remote Control
........................................
171
Sound Setup
.............................................
170
Voice Commands List
...............................
239
AUDIO Button
................................................
7
Audio MenuBluetooth
® Audio
....................................
169
Disc
...........................................................
146
FM/AM Radio
............................................
137
HDD
..........................................................
150
iPod®
........................................................
161
USB Flash drive
.........................................
166
XM® Radio
...............................................
141
Auto Daylight
..............................................
.58
Auto Reading
...............................................
63
Auto Service (Place Category)
...................
.80
Auto Time Zone
...........................................
58
AUXInput Jack
..................................................
135
Voice Commands List
...............................
241
AUX Button
...........................
6, 160
, 165
, 168
Avoid Streets
..............................................
122
Banking (Place Category)
...........................
80
Basic Settings
................................................
26
Black Level
....................................................
24
Bluetooth
® Audio
Playing
......................................................
168
Voice Commands List
...............................
241
Bluetooth
® HandsFreeLink®
...................
173
Editing User Name/PIN
..............................
184
Importing Phonebook
...............................
181
Making a Call
..........................................
.185
Pairing a Phone
.........................................
176
Receiving a Call
.........................................
188
Setting Speed Dials
...................................
182
Brightness
...............................................
24, 29
Calculator
...................................................
202
Calendar
.....................................................
200
CallAcuraLink/Messages
................................
196
Calculate Route Screen
......................
90, 132
Call History
.................................................
187
Call Your Dealer
........................................
197
Cancel Route
..............................................
122
CategoryEditing Address Book
.................................
39
Place Category List
...................................
246
Setting Destination
....................................
80
CATEGORY Bar
..............................................
6
Category Scan
............................................
141
CD Recording
.............................................
153
Cellular PhoneVoice Commands List
..............................
241
CH (Channel) Button
................................
172
Change Language
.......................................
20
Change Route Preference
..........................
91
Change State
...............................................
71
Channel List
...............................................
141
Channel Scan
.............................................
141
City
................................................................
72
City VicinitySetting Destination
....................................
81
Viewing Weather
.....................................
115
Clear Personal Data
....................................
66
Clock Adjustment
........................................
58
Adjust Time
................................................
59
Auto Daylight
.............................................
58
Auto Time Zone
.........................................
58
Resetting
....................................................
59
QRG
A B C D E F G H I J K L M N O P Q R S T U V W X Y Z
BC