Code Acura TSX 2013 Owner's Manual
[x] Cancel search | Manufacturer: ACURA, Model Year: 2013, Model line: TSX, Model: Acura TSX 2013Pages: 325, PDF Size: 8.61 MB
Page 66 of 325
65
uuIndicators u
Continued
Instrument Panel
Indicator
Name
On/Blinking
Explanation
Message
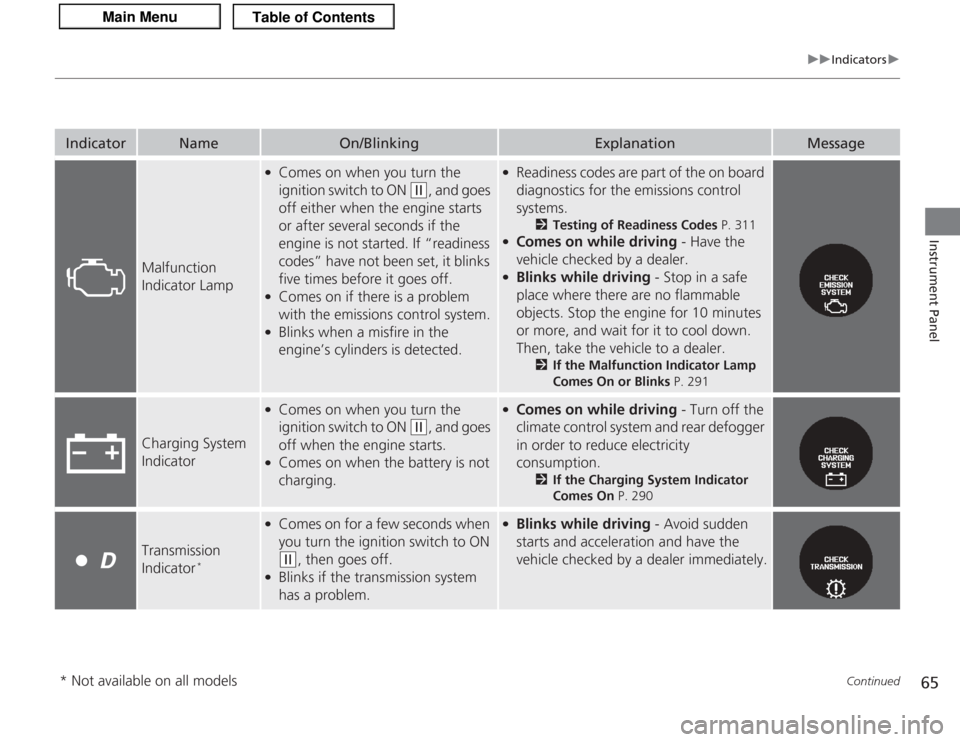
Malfunction
Indicator Lamp
●
Comes on when you turn the
ignition switch to ON
(w
, and goes
off either when the engine starts
or after several seconds if the
engine is not started. If “readiness
codes” have not been set, it blinks
five times before it goes off.
●
Comes on if there is a problem
with the emissions control system.
●
Blinks when a misfire in the
engine’s cylinders is detected.
●
Readiness codes are part of the on board
diagnostics for the emissions control
systems.
2 Testing of Readiness Codes P. 311
●
Comes on while driving - Have the
vehicle checked by a dealer.
●
Blinks while driving - Stop in a safe
place where there are no flammable
objects. Stop the engine for 10 minutes
or more, and wait for it to cool down.
Then, take the vehicle to a dealer.
2 If the Malfunction Indicator Lamp
Comes On or Blinks P. 291
Charging System
Indicator
●
Comes on when you turn the
ignition switch to ON
(w
, and goes
off when the engine starts.
●
Comes on when the battery is not
charging.
●
Comes on while driving - Turn off the
climate control system and rear defogger
in order to reduce electricity
consumption.
2 If the Charging System Indicator
Comes On P. 290
Transmission
Indicator
*
●
Comes on for a few seconds when
you turn the ignition switch to ON (w
, then goes off.
●
Blinks if the transmission system
has a problem.
●
Blinks while driving - Avoid sudden
starts and acceleration and have the
vehicle checked by a dealer immediately.
* Not available on all models
Page 141 of 325
140
uuAudio System uAuxiliary Input Jack
Features
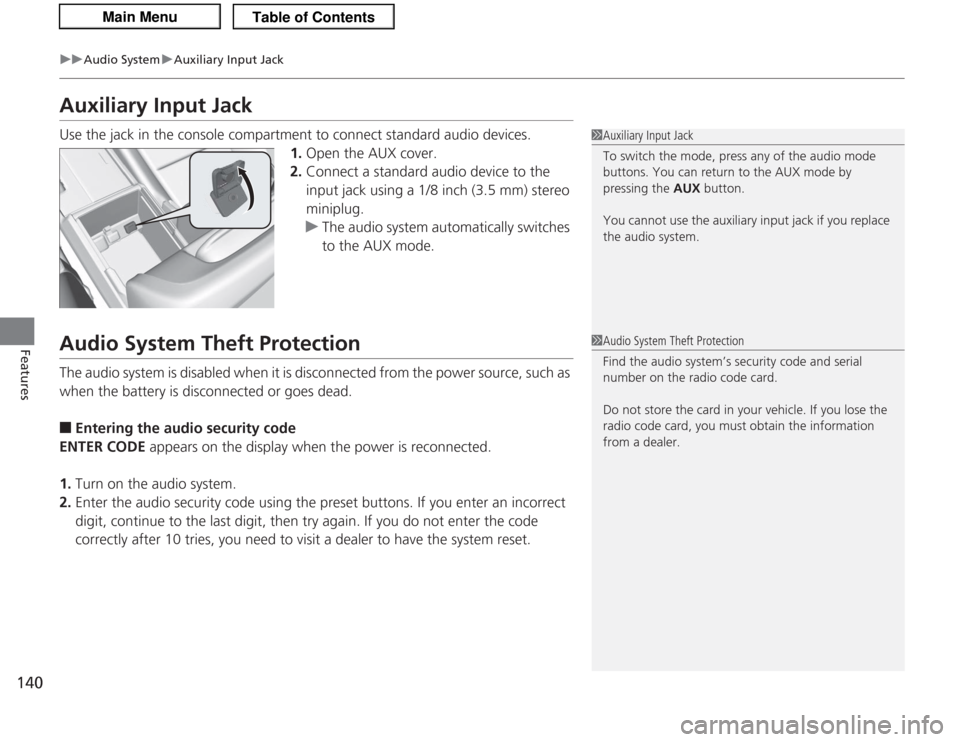
Auxiliary Input JackUse the jack in the console compartment to connect standard audio devices.
1.Open the AUX cover.
2. Connect a standard audio device to the
input jack using a 1/8 inch (3.5 mm) stereo
miniplug.
u The audio system automatically switches
to the AUX mode.Audio System Theft ProtectionThe audio system is disabled when it is disconnected from the power source, such as
when the battery is disconnected or goes dead.■
Entering the audio security code
ENTER CODE appears on the display when the power is reconnected.
1. Turn on the audio system.
2. Enter the audio security code using the preset buttons. If you enter an incorrect
digit, continue to the last digit, then try again. If you do not enter the code
correctly after 10 tries, you need to visit a dealer to have the system reset.
1Auxiliary Input Jack
To switch the mode, press any of the audio mode
buttons. You can return to the AUX mode by
pressing the AUX button.
You cannot use the auxiliary input jack if you replace
the audio system.1 Audio System Theft Protection
Find the audio system’s security code and serial
number on the radio code card.
Do not store the card in your vehicle. If you lose the
radio code card, you must obtain the information
from a dealer.
Page 162 of 325
161
Features
General Information on the Audio SystemXM® Radio Service1. You need your radio ID ready before registering for subscription.
To see the ID in the display: Turn the selector knob until 0 appears.
2. Have your radio ID and credit card number ready, and either call or visit the XM ®
website to subscribe.
Press the (XM ®) button and stay in this mode for about 30 minutes until the
service is activated. Make sure your vehicle is in an open area with good reception.
LOADING: XM® is loading the audio or program information.
OFF AIR: The channel is not currently broadcasting.
UPDATING: The encryption code is being updated. Channels 0 and 1 still work
normally.
NO SIGNAL: The signal is too weak in the current location.
--------: No such channel exists, the channel is not part of your subscription, or the
artist or title information is unavailable.
ANTENNA: There is a problem with the XM ® antenna. Contact a dealer.■
Subscribing to XM® Radio
■
Receiving XM ® Radio
■
XM ® Radio Display Messages
1 Subscribing to XM ® Radio
Contact Information for XM ® Radio:
US: XM ® Radio at www.siriusxm.com or (800) 852-
9696
Canada: XM ® Canada at www.xmradio.ca , or (877)
209-00791 Receiving XM ® Radio
The XM ® satellites are in orbit over the equator;
therefore, objects south of the vehicle may cause
satellite reception interruptions. Satellite signals are
more likely to be blocked by tall buildings and
mountains the farther north you travel from the
equator.
You may experience reception problems under the
following circumstances:•In a location with an obstruction to the south of
your vehicle.•In tunnels•On the lower level of a multi-tiered road•Large items carried on the roof rack
Page 166 of 325
165
Continued
Features
HomeLink® Universal TransceiverThe HomeLink ® Universal Transceiver can be programmed to operate up to three
remote controlled devices around your home, such as garage doors, lighting, or
home security systems.
Refer to the safety information that comes with your garage door opener to test that
the safety features are functioning properly. If you do not have the safety
information, contact the manufacturer.
Before programming HomeLink, make sure that people and objects are out of the
way of the garage or gate to prevent potential injury or damage.
When programming a garage door opener, park just outside the garage door’s
path.Training HomeLink
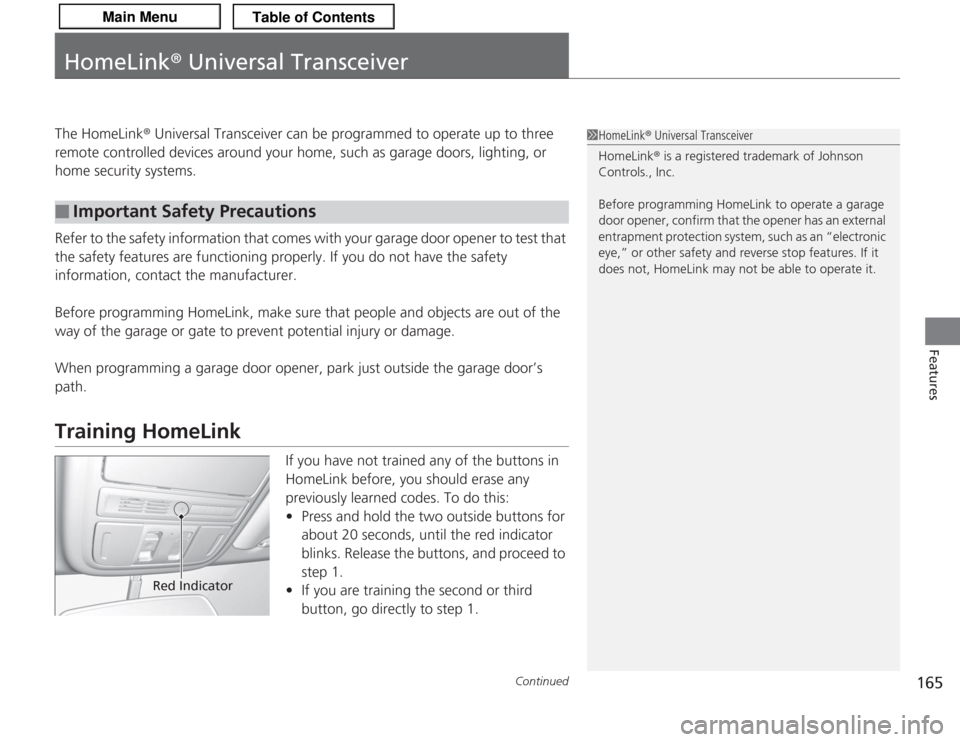
If you have not trained any of the buttons in
HomeLink before, you should erase any
previously learned codes. To do this:
• Press and hold the two outside buttons for
about 20 seconds, until the red indicator
blinks. Release the buttons, and proceed to
step 1.
• If you are training the second or third
button, go directly to step 1.
■
Important Safety Precautions
1HomeLink ® Universal Transceiver
HomeLink® is a registered trademark of Johnson
Controls., Inc.
Before programming HomeLink to operate a garage
door opener, confirm that the opener has an external
entrapment protection system, such as an “electronic
eye,” or other safety and reverse stop features. If it
does not, HomeLink may not be able to operate it.
Red Indicator
Page 167 of 325
uuHomeLink ® Universal Transceiver uTraining HomeLink
166Features
■
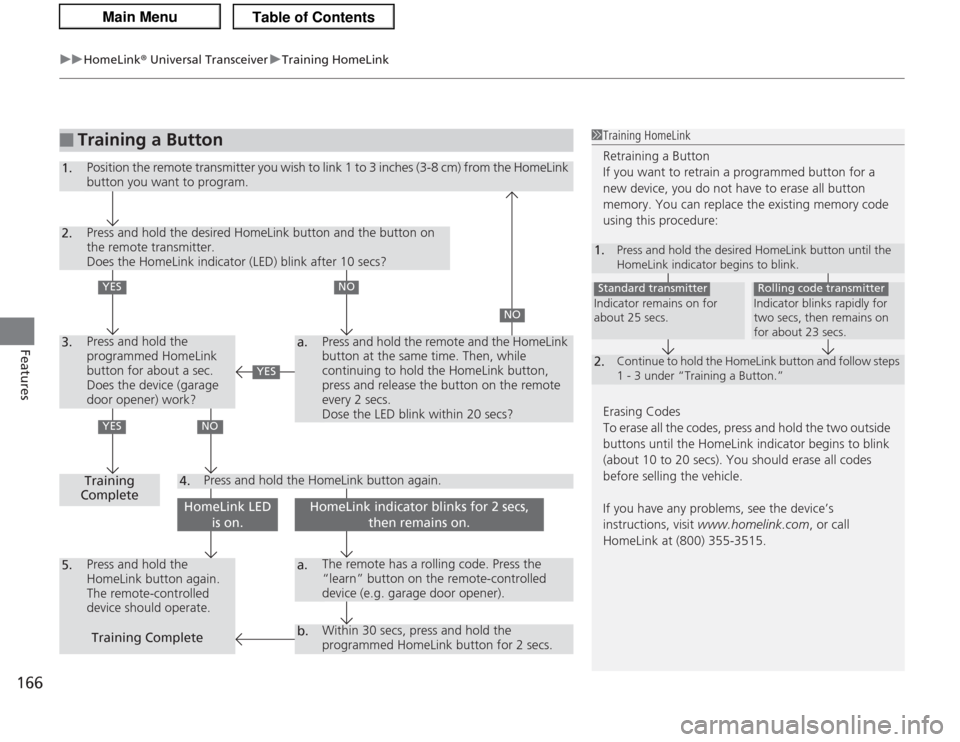
Training a Button
1Training HomeLink
Retraining a Button
If you want to retrain a programmed button for a
new device, you do not have to erase all button
memory. You can replace the existing memory code
using this procedure:
Erasing Codes
To erase all the codes, press and hold the two outside
buttons until the HomeLink indicator begins to blink
(about 10 to 20 secs). You should erase all codes
before selling the vehicle.
If you have any problems, see the device’s
instructions, visit www.homelink.com , or call
HomeLink at (800) 355-3515.1.
Press and hold the desired HomeLink button until the
HomeLink indicator begins to blink.
2.
Continue to hold the HomeLink button and follow steps
1 - 3 under “Training a Button.”
Indicator remains on for
about 25 secs.Standard transmitter
Indicator blinks rapidly for
two secs, then remains on
for about 23 secs.Rolling code transmitter
1.
Position the remote transmitter you wish to link 1 to 3 inches (3-8 cm) from the HomeLink
button you want to program.
2.3.
Press and hold the desired HomeLink button and the button on
the remote transmitter.
Does the HomeLink indicator (LED) blink after 10 secs?Press and hold the
programmed HomeLink
button for about a sec.
Does the device (garage
door opener) work?
a.
4.
5.
a.b.
Training
CompletePress and hold the
HomeLink button again.
The remote-controlled
device should operate.
The remote has a rolling code. Press the
“learn” button on the remote-controlled
device (e.g. garage door opener).Within 30 secs, press and hold the
programmed HomeLink button for 2 secs.
Press and hold the HomeLink button again.
Training Complete
NO
Press and hold the remote and the HomeLink
button at the same time. Then, while
continuing to hold the HomeLink button,
press and release the button on the remote
every 2 secs.
Dose the LED blink within 20 secs?
NO
YESYES
NO
HomeLink LED is on.
HomeLink indicator blinks for 2 secs, then remains on.
YES
Page 170 of 325
169
uuBluetooth ® HandsFreeLink ®u HFL Menus
Continued
Features
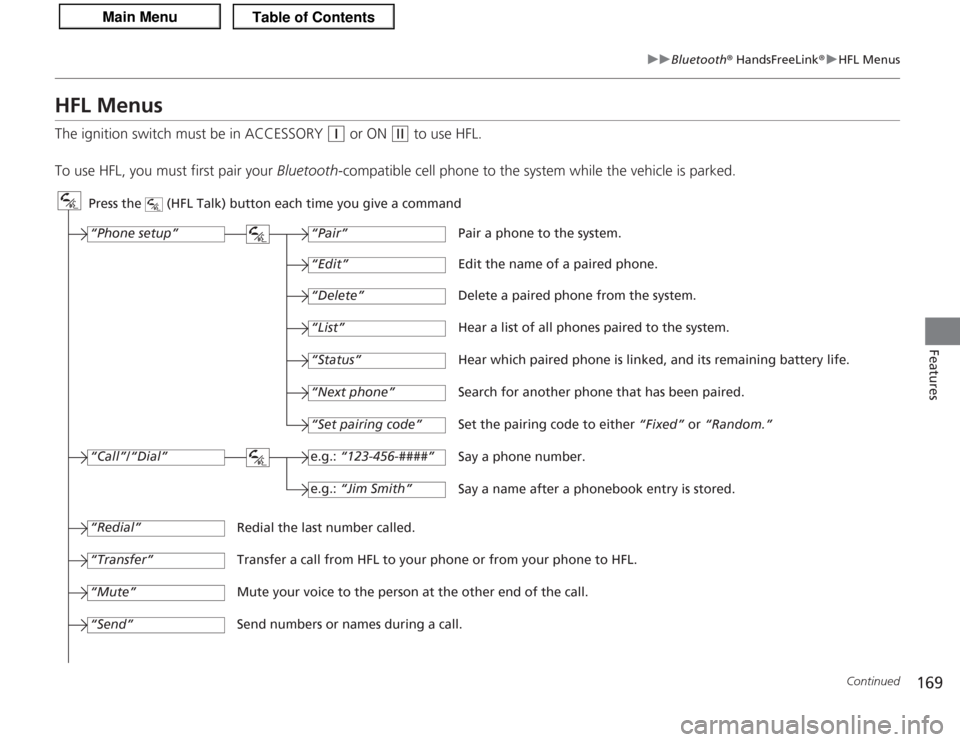
HFL MenusThe ignition switch must be in ACCESSORY
(q
or ON
(w
to use HFL.
To use HFL, you must first pair your Bluetooth-compatible cell phone to the system while the vehicle is parked.
Press the (HFL Talk) button each time you give a command
“Set pairing code”
Pair a phone to the system.
Edit the name of a paired phone.
Delete a paired phone from the system.
Hear a list of all phones paired to the system.
Hear which paired phone is linked, and its remaining battery life.
Search for another phone that has been paired.
Set the pairing code to either “Fixed” or “Random.”
Say a phone number.
Say a name after a phonebook entry is stored.
Redial the last number called.
Transfer a call from HFL to your phone or from your phone to HFL.
Mute your voice to the person at the other end of the call.
Send numbers or names during a call. “Pair”
“Edit”“Delete”“List”“Status”“Next phone”e.g.: “123-456-####”e.g.: “Jim Smith”
“Phone setup”“Call”/“Dial”“Transfer”“Mute”“Send”“Redial”
Page 171 of 325
170
uuBluetooth ® HandsFreeLink ®u HFL Menus
Features
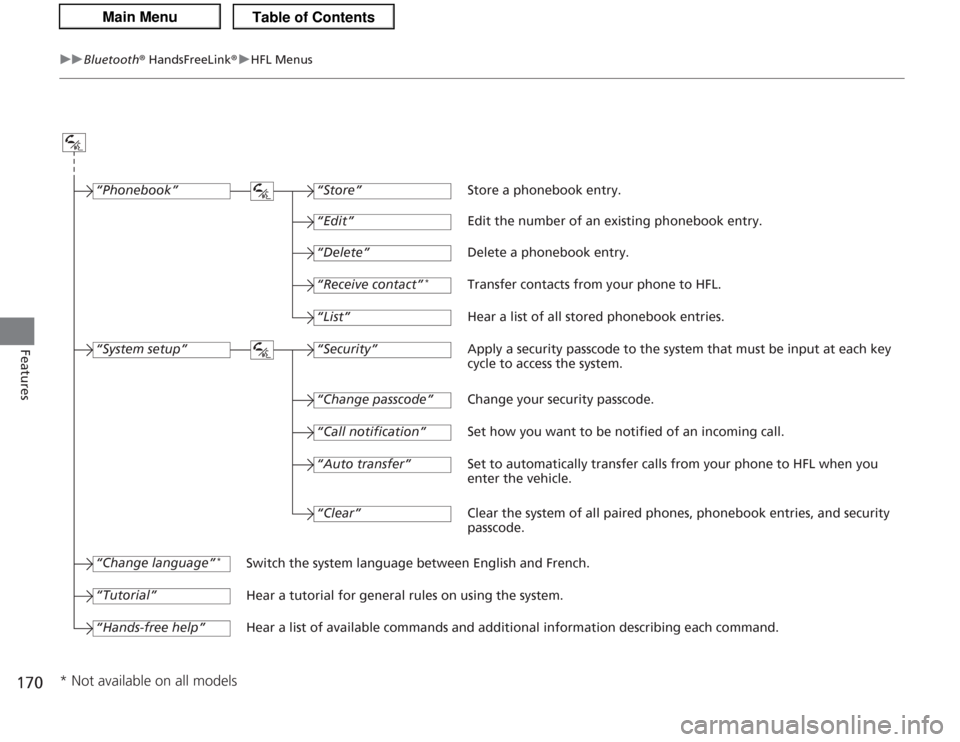
“Change passcode”
Store a phonebook entry.
Edit the number of an existing phonebook entry.
Delete a phonebook entry.
Transfer contacts from your phone to HFL.
Hear a list of all stored phonebook entries.
Apply a security passcode to the system that must be input at each key
cycle to access the system.
Change your security passcode.
Set how you want to be notified of an incoming call.
Set to automatically transfer calls from your phone to HFL when you
enter the vehicle.
Switch the system language between English and French.
Hear a tutorial for general rules on using the system.
Hear a list of available commands and additional information describing each command. “Store”
“Edit”“Delete”“Receive contact”
*
“List”“Security”“Call notification”“Auto transfer”
“Phonebook”“System setup”“Change language”
*
“Tutorial”“Hands-free help”
Clear the system of all paired phones, phonebook entries, and security
passcode.
“Clear”
* Not available on all models
Page 172 of 325
Continued
171
uuBluetooth ® HandsFreeLink ®u HFL Menus
Features
■
To pair a cell phone
1. If no phone has been paired to the system before, HFL gives you information
about how to pair the first phone.
If a phone has already been paired: say “Phone Setup” and “Pair” after the HFL
prompts.
2. Follow the HFL prompts and put your phone in discovery or search mode.
u HFL gives you a four-digit code and begins searching for your phone.
3. When your phone finds a Bluetooth ® device, select HFL from the options and
enter the four-digit code.
4. Follow the HFL prompts and name the newly paired phone.
■
To rename a paired phone
1. Say “Phone Setup.”
2. Say “Edit” after the prompts.
3. Follow the HFL prompts and rename the phone.
u If there is more than one phone paired to the system, HFL will ask you which
phone’s name you want to change.
■
To delete a paired phone
1. Say “Phone Setup.”
2. Say “Delete” after the prompts.
3. Follow the HFL prompts.
u HFL will ask you which phone you want to delete.
■
Phone Setup
1Phone Setup
Press the button and wait for a beep before
giving a command.
Your Bluetooth -compatible phone must be paired to
HFL before you can make and receive hands-free
calls.
Phone Pairing Tips:•You cannot pair your phone while the vehicle is
moving.•Your phone must be in the discovery or search
mode when pairing the phone. Refer to your
phone’s manual.•Up to six phones can be paired.•Your phone’s battery may drain faster when it is
paired to HFL.•If your phone is not ready for pairing or not found
by the system within three minutes, the system will
time out and returns to idle.
Page 173 of 325
uuBluetooth ® HandsFreeLink ®u HFL Menus
172Features
■
To hear the name of all paired phones
1. Say “Phone Setup.”
2. Say “List” after the prompts.
3. HFL reads out all the paired phones’ names.
■
To hear which paired phone is currently linked
1. Say “Phone Setup.”
2. Say “Status” after the prompts.
3. HFL will tell you which phone is linked with the system.
■
To change the currently linked phone
1. Say “Phone Setup.”
2. Say “Next Phone” after the prompts.
3. HFL disconnects the current phone, and searches for another paired phone.
4. Once another phone is found, it is connected to the system. HFL will inform you
which phone is now linked.
■
To change the pairing code setting
1. Say “Phone Setup.”
2. Say “Set Pairing Code” after the prompts.
3. If you want HFL to create a random code each time you pair a phone, say
“Random.” If you want to create your own four-digit code, say “Fixed.”
4. Follow the HFL prompts.
1Phone Setup
If no other phones are found or paired when trying to
switch to another phone, HFL will inform you that the
original phone is linked again.
“Status” and “Next Phone” commands:
Only one paired phone at a time can be linked to HFL.
When there are two or more paired phones in the
vehicle, the first paired phone that the system finds is
linked.
Page 178 of 325
Continued
177
uuBluetooth ® HandsFreeLink ®u HFL Menus
Features
This command group allows you to change or customize HFL basic settings.■
To set a four-digit passcode to lock the HFL system for security
1. Say “System Setup.”
2. Say “Security.”
3. Follow the HFL prompts and say the four-digit number of your choice.
4. Follow the HFL prompts and confirm the number.
■
To change the security passcode
1. Say “System Setup.”
2. Say “Change Passcode” after the prompts.
3. Say the new four-digit passcode after the HFL prompts.
4. Follow the HFL prompts.
■
To select a ring tone or a prompt as the incoming call notification
1. Say “System Setup.”
2. Say “Call Notification” after the prompts.
3. Say “Ring Tone” or “Prompt” after the prompts. For no audible notification, say
“Off.”
■
System Setup
1 System Setup
Press the button before a command.
Once a passcode is set, you are required to enter the
passcode with every new key cycle to use HFL.
If you forget the code, go to your dealer to have the
passcode reset. You can also cancel the passcode by
clearing all the data stored in the HFL system.
2 To clear the system P. 178
The default setting of the incoming notification is a
ring tone.