tow Acura ZDX 2012 Owner's Guide
[x] Cancel search | Manufacturer: ACURA, Model Year: 2012, Model line: ZDX, Model: Acura ZDX 2012Pages: 645, PDF Size: 16.36 MB
Page 559 of 645
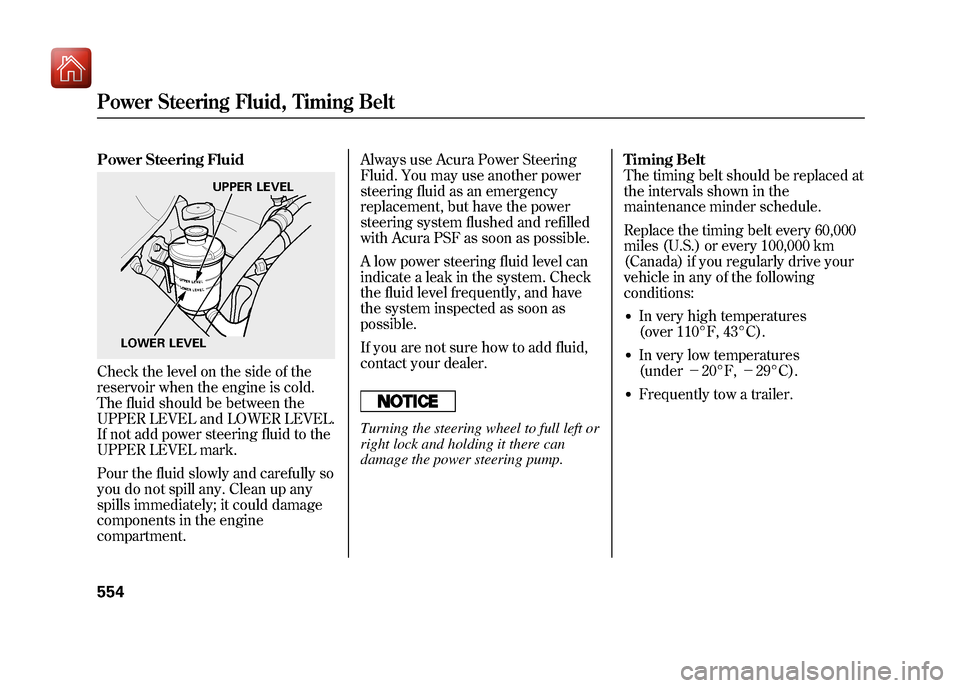
Power Steering FluidCheck the level on the side of the
reservoir when the engine is cold.
The fluid should be between the
UPPER LEVEL and LOWER LEVEL.
If not add power steering fluid to the
UPPER LEVEL mark.
Pour the fluid slowly and carefully so
you do not spill any. Clean up any
spills immediately; it could damage
components in the engine
compartment.Always use Acura Power Steering
Fluid. You may use another power
steering fluid as an emergency
replacement, but have the power
steering system flushed and refilled
with Acura PSF as soon as possible.
A low power steering fluid level can
indicate a leak in the system. Check
the fluid level frequently, and have
the system inspected as soon as
possible.
If you are not sure how to add fluid,
contact your dealer.
Turning the steering wheel to full left or
right lock and holding it there can
damage the power steering pump.
Timing Belt
The timing belt should be replaced at
the intervals shown in the
maintenance minder schedule.
Replace the timing belt every 60,000
miles (U.S.) or every 100,000 km
(Canada) if you regularly drive your
vehicle in any of the following
conditions:
●In very high temperatures
(over 110°F, 43°C).●In very low temperatures
(under
-20°F, -29°C).●Frequently tow a trailer.
LOWER LEVEL UPPER LEVEL
Power Steering Fluid, Timing Belt55409/10/28 17:15:37 10 ACURA ZDX KA KC New North America Own 50 31SZN600 enu
Page 569 of 645
Check the condition of the wiper
blades at least every 6 months.
Replace them if you find signs of
cracking in the rubber, and areas
that are getting hard or if they leave
streaks and unwiped areas when
used.
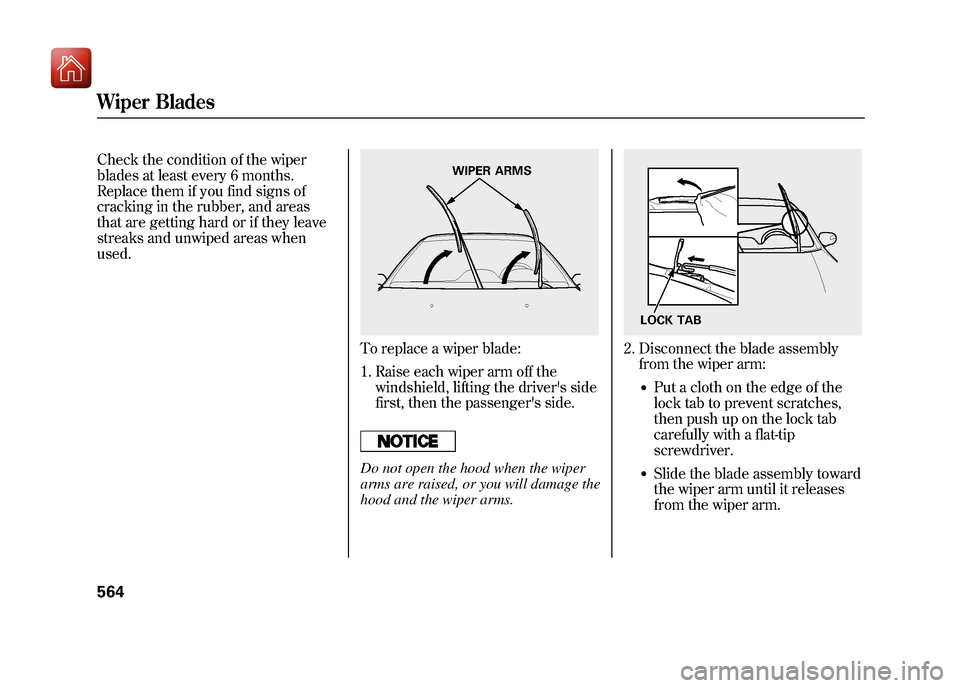
To replace a wiper blade:
1. Raise each wiper arm off thewindshield, lifting the driver's side
first, then the passenger's side.Do not open the hood when the wiper
arms are raised, or you will damage the
hood and the wiper arms.
2. Disconnect the blade assemblyfrom the wiper arm:
●Put a cloth on the edge of the
lock tab to prevent scratches,
then push up on the lock tab
carefully with a flat-tip
screwdriver.●Slide the blade assembly toward
the wiper arm until it releases
from the wiper arm.
WIPER ARMS
LOCK TAB
Wiper Blades56409/10/28 17:15:37 10 ACURA ZDX KA KC New North America Own 50 31SZN600 enu
Page 571 of 645
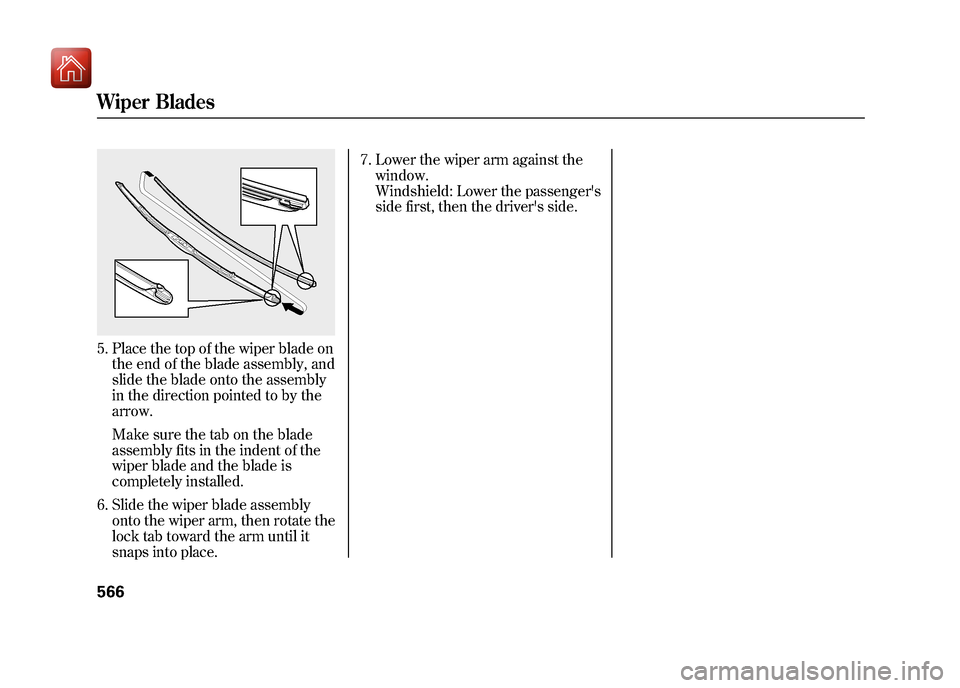
5. Place the top of the wiper blade onthe end of the blade assembly, and
slide the blade onto the assembly
in the direction pointed to by the
arrow.
Make sure the tab on the blade
assembly fits in the indent of the
wiper blade and the blade is
completely installed.
6. Slide the wiper blade assembly onto the wiper arm, then rotate the
lock tab toward the arm until it
snaps into place. 7. Lower the wiper arm against the
window.
Windshield: Lower the passenger's
side first, then the driver's side.Wiper Blades56609/10/28 17:15:37 10 ACURA ZDX KA KC New North America Own 50 31SZN600 enu
Page 578 of 645
The sensor on the negative terminal
monitors your vehicle's battery
condition.
If there is a problem with the sensor,
you will see a‘‘CHECK BATTERY
SENSOR’’ message on the multi-
information display. Have the vehicle
checked by your dealer.
Check the terminals for corrosion (a
white or yellowish powder). To
remove it, cover the terminals with a
solution of baking soda and water. It
will bubble up and turn brown. When
this stops, wash it off with plain
water. Dry off the battery with a cloth
or paper towel. Coat the terminals
with grease to help prevent further
corrosion.
If additional battery maintenance is
needed, see your dealer or a
qualified technician. WARNING:
Battery posts,
terminals, and related accessories
contain lead and lead compounds.
Wash your hands after handling.
If you need to connect the battery to
a charger, disconnect both cables to
prevent damaging your vehicle's
electrical system. Always disconnect
the negative (- ) cable first, and
reconnect it last.
The battery gives off explosive
hydrogen gas during normal
operation.
A spark or flame can cause the
battery to explode with enough
force to kill or seriously hurt
you.
Wear protective clothing and a
face shield, or have a skilled
technician do the battery
maintenance.
If your vehicle's battery is
disconnected or goes dead, the audio
system may disable itself. The next
time you turn on the radio, you will
see ‘‘ENTER CODE ’’in the
frequency display. Use the preset
buttons to enter the code (see page
374).
CONTINUED
Checking the Battery
573
Maintenance
09/10/28 17:15:37 10 ACURA ZDX KA KC New North America Own 50 31SZN600 enu
Page 580 of 645
If you need to park your vehicle for
an extended period (more than 1
month), there are several things you
should do to prepare it for storage.
Proper preparation helps prevent
deterioration and makes it easier to
get your vehicle back on the road. If
possible, store your vehicle indoors.●Fill the fuel tank.●Wash and dry the exterior
completely.●Clean the interior. Make sure the
carpeting, floor mats, etc., are
completely dry.●Leave the parking brake off. Put
the transmission in Park.
●Block the rear wheels.●If the vehicle is to be stored for a
longer period, it should be
supported on jackstands so the
tires are off the ground.●Leave one window open slightly (if
the vehicle is being stored
indoors).●Disconnect the battery.●Support the front and rear wiper
blade arms with a folded towel or
rag so they do not touch the
windshield.●To minimize sticking, apply a
silicone spray lubricant to all door
and tailgate seals. Also, apply a
vehicle body wax to the painted
surfaces that mate with the door
and tailgate seals.
●Cover the vehicle with a
‘‘breathable’’ cover, one made from
a porous material such as cotton.
Non-porous materials, such as
plastic sheeting, trap moisture,
which can damage the paint.●If possible, periodically run the
engine until it reaches full
operating temperature (the cooling
fans cycle on and off twice).
Preferably, do this once a month.
Vehicle Storage
575
Maintenance
09/10/28 17:15:37 10 ACURA ZDX KA KC New North America Own 50 31SZN600 enu
Page 582 of 645
This section covers the more
common problems that motorists
experience with their vehicles. It
gives you information about how to
safely evaluate the problem and what
to do to correct it. If the problem has
stranded you on the side of the road,
you may be able to get going again. If
not, you will also find instructions on
getting your vehicle towed.Compact Spare Tire
....................
578
Changing a Flat Tire
...................
579
If the Engine Won't Start
.............
585
Jump Starting
..............................
587
If the Engine Overheats
..............
589
Low Oil Pressure Indicator
.........
591
Charging System Indicator
.........
592
Malfunction Indicator Lamp
........
593
Brake System Indicator
...............
594
Fuses
..........................................
595
Fuse Locations
............................
599
Opening the Fuel Fill Door Manually
.................................
602
Emergency Towing
.....................
602
If Your Vehicle Gets Stuck
..........
603
Taking Care of the Unexpected
577
Taking Care of the Unexpected
09/10/28 17:15:37 10 ACURA ZDX KA KC New North America Own 50 31SZN600 enu
Page 589 of 645
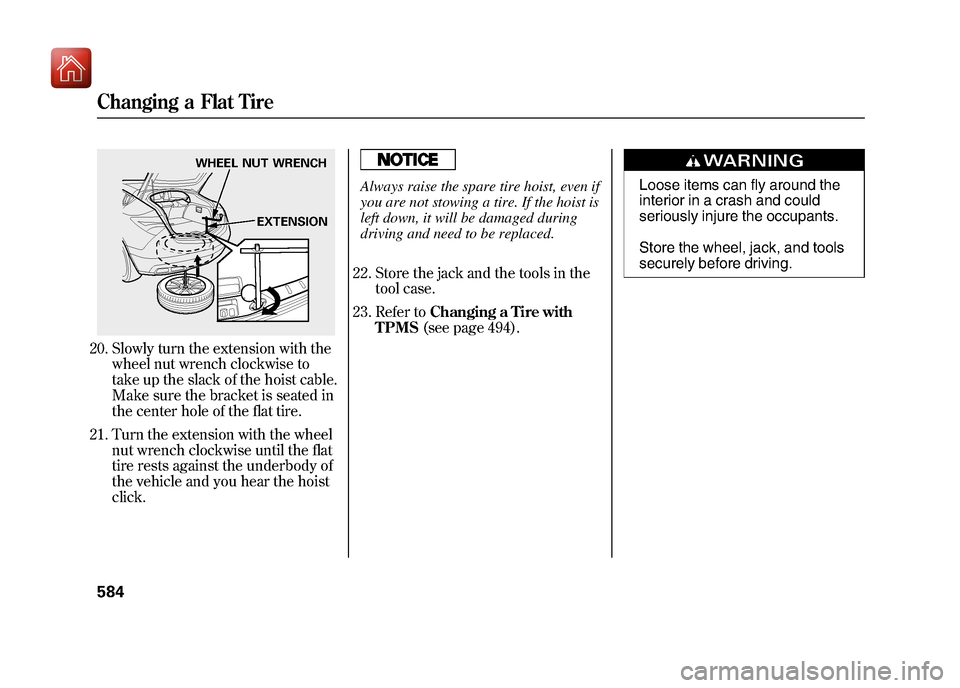
20. Slowly turn the extension with thewheel nut wrench clockwise to
take up the slack of the hoist cable.
Make sure the bracket is seated in
the center hole of the flat tire.
21. Turn the extension with the wheel nut wrench clockwise until the flat
tire rests against the underbody of
the vehicle and you hear the hoist
click.
Always raise the spare tire hoist, even if
you are not stowing a tire. If the hoist is
left down, it will be damaged during
driving and need to be replaced.
22. Store the jack and the tools in the tool case.
23. Refer to Changing a Tire with
TPMS (see page 494).
Loose items can fly around the
interior in a crash and could
seriously injure the occupants.
Store the wheel, jack, and tools
securely before driving.
WHEEL NUT WRENCH
EXTENSION
Changing a Flat Tire58409/10/28 17:15:37 10 ACURA ZDX KA KC New North America Own 50 31SZN600 enu
Page 590 of 645
Diagnosing why the engine won't
start falls into two areas, depending
on what you hear when you turn the
ignition switch to the START (III)
position or on models with keyless
access system, press the engine
start/stop button to set START mode
(see page 194):●You hear nothing, or almost
nothing. The engine's starter
motor does not operate at all, or
operates very slowly.●You can hear the starter motor
operating normally, or the starter
motor sounds like it is spinning
faster than normal, but the engine
does not start up and run.Nothing Happens or the Starter
Motor Operates Very Slowly
When you turn the ignition switch to
the START (III) position or on
models with keyless access system,
press the engine start/stop button to
set START mode (see page 194), you
do not hear the normal noise of the
engine trying to start. You may hear
a clicking sound, a series of clicks, or
nothing at all.
Check these things:
●Check the transmission interlock.
The transmission must be in Park
or neutral or the starter will not
operate.
●Turn the ignition switch to the ON
(II) position or on models with
keyless access system, press the
engine start/stop button to set ON
mode (see page 194). Turn on the
headlights, and check their
brightness. If the headlights are
very dim or do not come on at all,
the battery is discharged. See
Jump Starting
on page 587.●Turn the ignition switch to the
START (III) position or on models
with keyless access system, press
the engine start/stop button to set
START mode (see page 194). If the
headlights do not dim, check the
condition of the fuses. If the fuses
are OK, there is probably
something wrong with the
electrical circuit for the ignition
switch or starter motor. You will
need a qualified technician to
determine the problem. See
Emergency Towing on page 602.
CONTINUED
If the Engine Won't Start
585
Taking Care of the Unexpected
09/10/28 17:15:37 10 ACURA ZDX KA KC New North America Own 50 31SZN600 enu
Page 591 of 645
If the headlights dim noticeably or
go out when you try to start the
engine, either the battery is
discharged or the connections are
corroded. Check the condition of
the battery and terminal
connections (see page 573). You
can then try jump starting the
vehicle from a booster battery (see
page 587).
The Starter Operates Normally
In this case, the starter motor's speed
sounds normal, or even faster than
normal, when you turn the ignition
switch to the START (III) position or
on models with keyless access
system, press the engine start/stop
button to set START mode (see page
194), but the engine does not run.●Are you using a properly coded
key? An improperly coded key will
cause the immobilizer system
indicator in the instrument panel
to blink rapidly (see page 70).
On models with keyless access system●Do you have your keyless access
system remote with you? The
vehicle will not start without the
remote within operating range.
The vehicle will not start without
the remote within operating range
and with the keyless access main
switch in the glove box turned on.●Are you using the proper starting
procedure? Refer to Starting the
Engine on page 475.●Do you have fuel? Check the fuel
gauge; the warning indicator may
not be working.●There may be an electrical
problem, such as no power to the
fuel pump. Check all the fuses (see
page 596). If you find nothing wrong, you will
need a qualified technician to find the
problem. See
Emergency Towing on
page 602.
NOTE: If you are unable to stop the
engine normally while in the Park
position, see Emergency Engine
Stop on page 200.
If the Engine Won't Start58609/10/28 17:15:37 10 ACURA ZDX KA KC New North America Own 50 31SZN600 enu
Page 595 of 645
4. If the temperature gauge stays atthe red mark, turn off the engine.
5. Look for any obvious coolant leaks, such as a split radiator hose.
Everything is still extremely hot,
so use caution. If you find a leak, it
must be repaired before you
continue driving (see Emergency
Towing on page 602).
6. If you do not find an obvious leak, check the coolant level in the
radiator reserve tank. Add coolant
if the level is below the MIN mark.
7. If there was no coolant in the reserve tank, you may need to add
coolant to the radiator. Let the
engine cool down until the pointer
reaches the middle of the
temperature gauge, or lower,
before checking the radiator.
Removing the radiator cap
while the engine is hot can
cause the coolant to spray out,
seriously scalding you.
Always let the engine and
radiator cool down before
removing the radiator cap.
8. Using gloves or a large heavy cloth, turn the radiator cap
counterclockwise, without pushing
down, to the first stop. After the
pressure releases, push down on
the cap, and turn it until it comes
off. 9. Start the engine and set the
climate control to AUTO at ‘‘Hi. ’’
Add coolant to the radiator up to
the base of the filler neck. If you
do not have the proper coolant
mixture available, you can add
plain water. Remember to have the
cooling system drained and refilled
with the proper mixture as soon as
you can.
10. Put the radiator cap back on tightly. Run the engine, and check
the temperature gauge. If it goes
back to the red mark, the engine
needs repair (see Emergency
Towing on page 602).
11. If the temperature stays normal, check the coolant level in the
radiator reserve tank. If it has gone
down, add coolant to the MAX
mark. Put the cap back on tightly.
If the Engine Overheats59009/10/28 17:15:37 10 ACURA ZDX KA KC New North America Own 50 31SZN600 enu